🧍♀️ How To Sketch A Body Step By Step

& Painting
No rigid rules or pretension. Just practical guides, medium comparisons, and encouraging tips to help you enjoy the drawing & painting process.
Learning to sketch the human body can feel intimidating at first. Many aspiring artists struggle with proportions and capturing movement. I remember my own early attempts, filled with stiff figures and mismatched limbs.
This guide comes from years of practice and breaking down complex forms into simple, manageable actions. You’ll discover how to approach body sketching with confidence, transforming initial struggles into satisfying progress.
Quick Overview
You’re about to embark on a foundational journey in figure drawing. This guide will walk you through the essential steps to construct a human form from scratch, focusing on basic shapes and proportions.
- Time needed: 45-90 minutes per sketch (depending on detail)
- Difficulty: Beginner
- What you’ll need: Pencil (HB or 2B recommended), paper, eraser, optional reference images
Step-by-Step Instructions
Step 1: Understand the Gesture and Flow
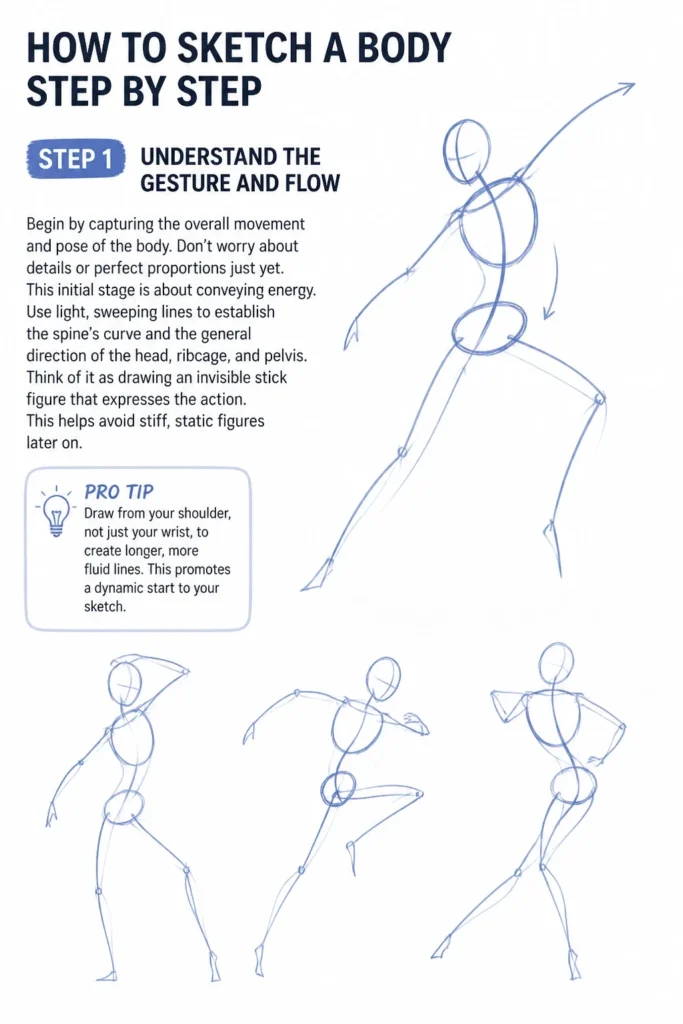
Begin by capturing the overall movement and pose of the body. Don’t worry about details or perfect proportions just yet. This initial stage is about conveying energy.
Use light, sweeping lines to establish the spine’s curve and the general direction of the head, ribcage, and pelvis. Think of it as drawing an invisible stick figure that expresses the action. This helps avoid stiff, static figures later on.
Pro Tip: Draw from your shoulder, not just your wrist, to create longer, more fluid lines. This promotes a dynamic start to your sketch.
Step 2: Establish Basic Proportions and Head Placement
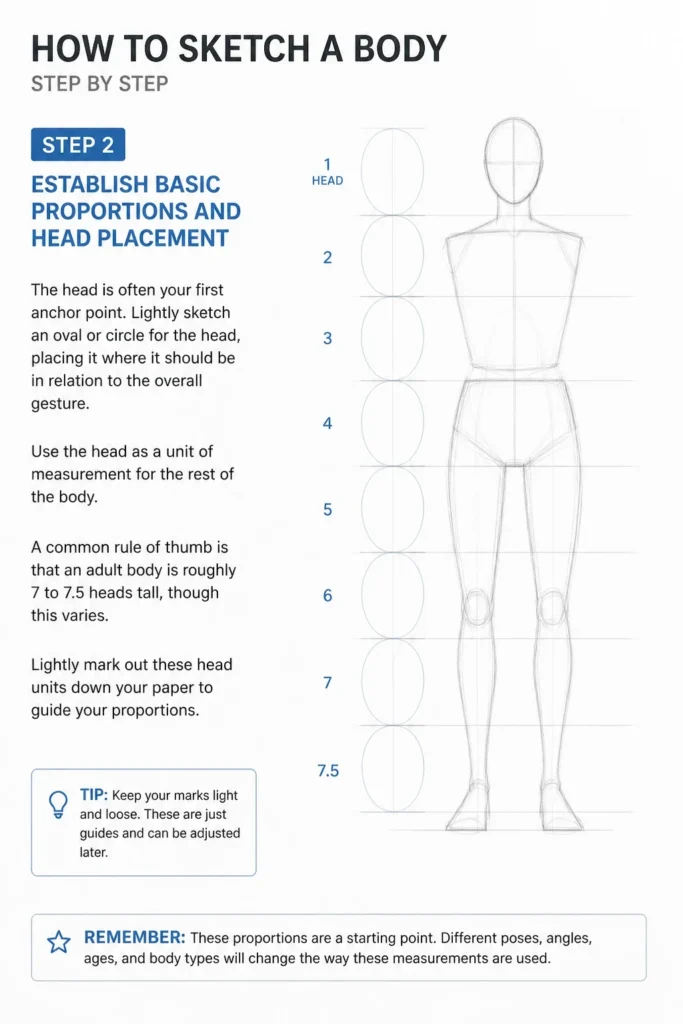
The head is often your first anchor point. Lightly sketch an oval or circle for the head, placing it where it should be in relation to the overall gesture.
Use the head as a unit of measurement for the rest of the body. A common rule of thumb is that an adult body is roughly 7 to 7.5 heads tall, though this varies. Lightly mark out these head units down your paper to guide your proportions.
Step 3: Block in the Torso with Simple Shapes
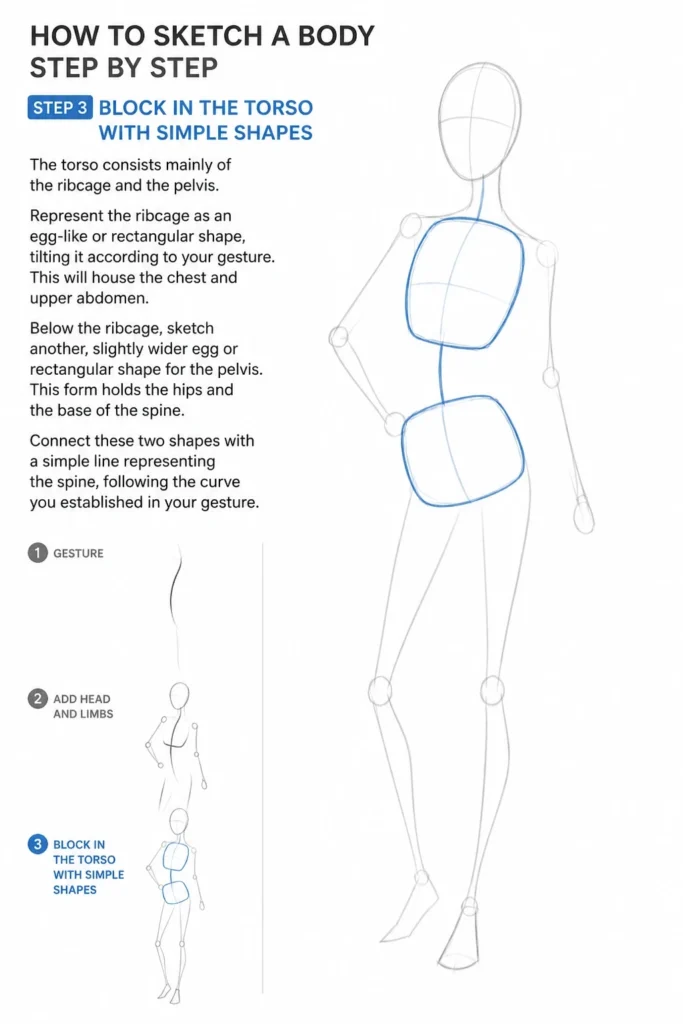
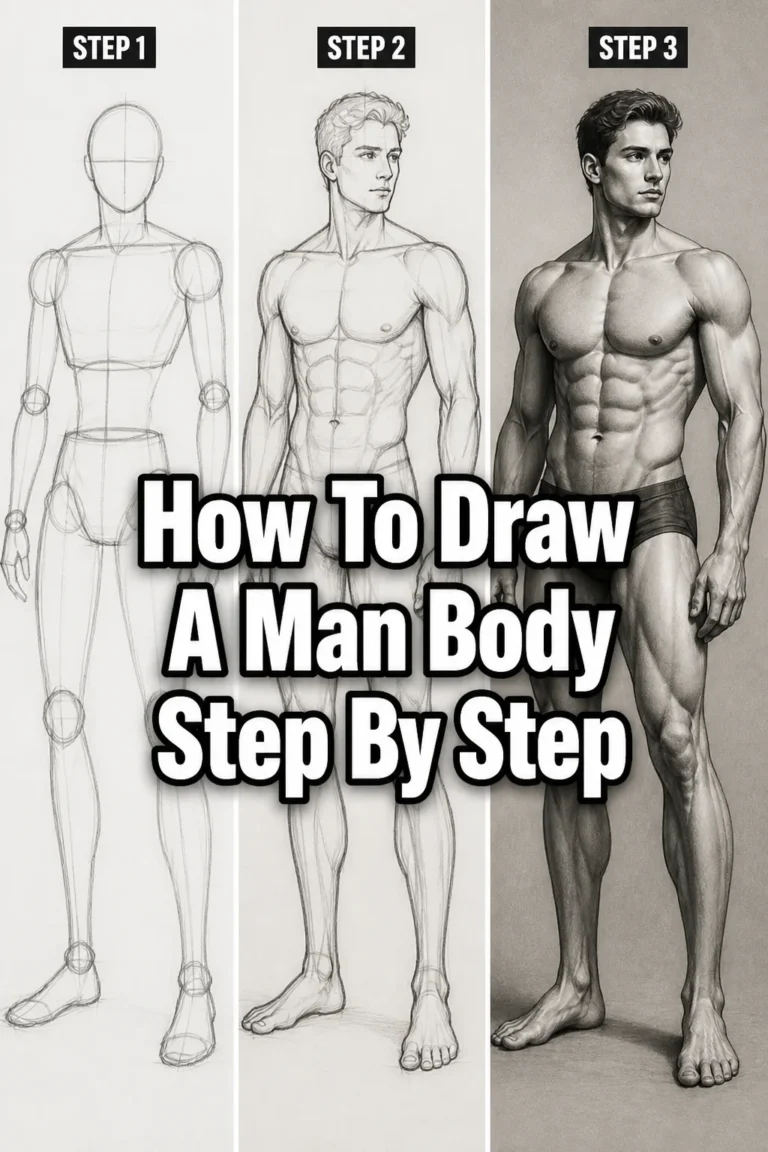
The torso consists mainly of the ribcage and the pelvis. Represent the ribcage as an egg-like or rectangular shape, tilting it according to your gesture. This will house the chest and upper abdomen.
Below the ribcage, sketch another, slightly wider egg or rectangular shape for the pelvis. This form holds the hips and the base of the spine. Connect these two shapes with a simple line representing the spine, following the curve you established in your gesture.
Step 4: Connect the Core Forms and Define the Centerline
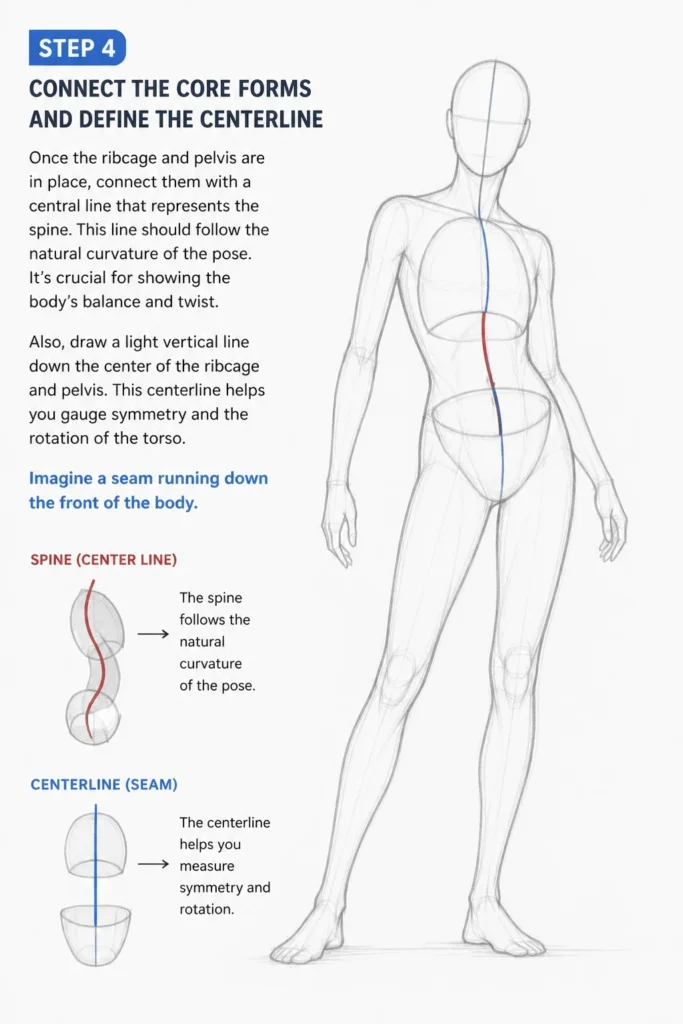
Once the ribcage and pelvis are in place, connect them with a central line that represents the spine. This line should follow the natural curvature of the pose. It’s crucial for showing the body’s balance and twist.
Also, draw a light vertical line down the center of the ribcage and pelvis. This centerline helps you gauge symmetry and the rotation of the torso. Imagine a seam running down the front of the body.
Step 5: Lay Out the Limbs Using Cylinders or Simple Forms
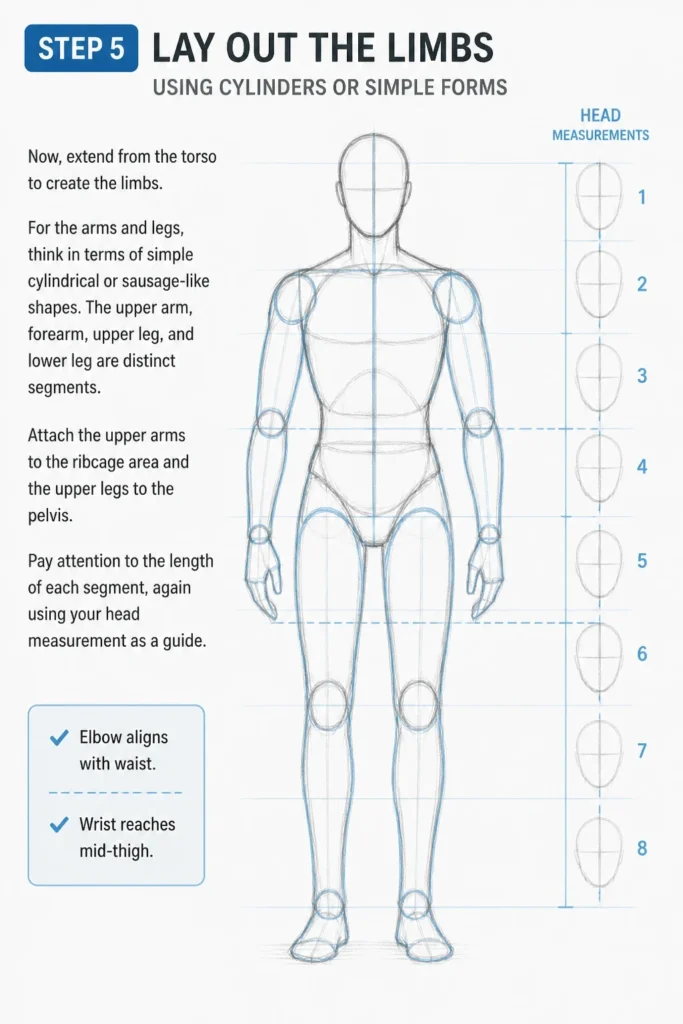
Now, extend from the torso to create the limbs. For the arms and legs, think in terms of simple cylindrical or sausage-like shapes. The upper arm, forearm, upper leg, and lower leg are distinct segments.
Attach the upper arms to the ribcage area and the upper legs to the pelvis. Pay attention to the length of each segment, again using your head measurement as a guide. The elbow usually aligns with the waist, and the wrist often reaches the mid-thigh.
Step 6: Add Joints as Spheres
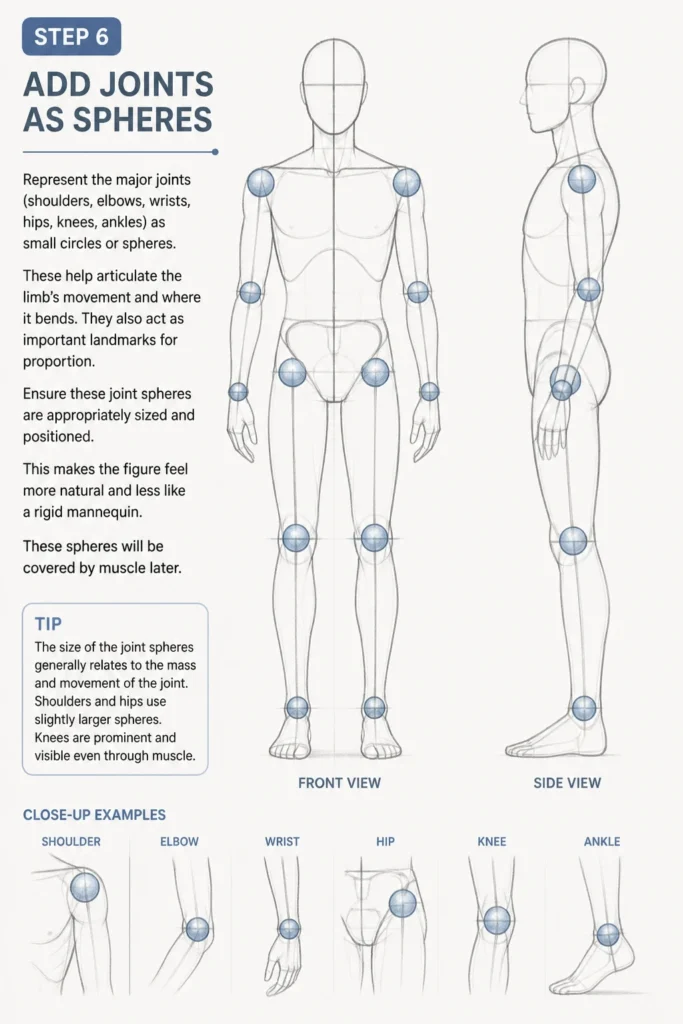
Represent the major joints (shoulders, elbows, wrists, hips, knees, ankles) as small circles or spheres. These help articulate the limb’s movement and where it bends. They also act as important landmarks for proportion.
Ensure these joint spheres are appropriately sized and positioned. This makes the figure feel more natural and less like a rigid mannequin. These spheres will be covered by muscle later.
Step 7: Refine the Silhouette and Add Muscle Mass
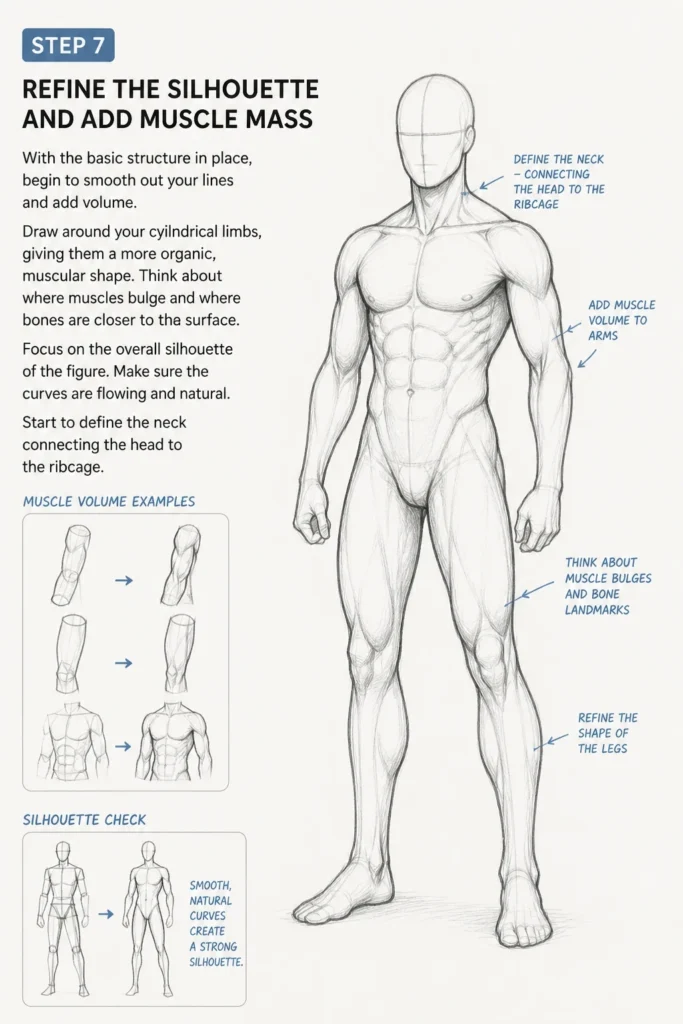
With the basic structure in place, begin to smooth out your lines and add volume. Draw around your cylindrical limbs, giving them a more organic, muscular shape. Think about where muscles bulge and where bones are closer to the surface.
Focus on the overall silhouette of the figure. Make sure the curves are flowing and natural. Start to define the neck connecting the head to the ribcage.
Step 8: Define Details and Facial Features (Optional)
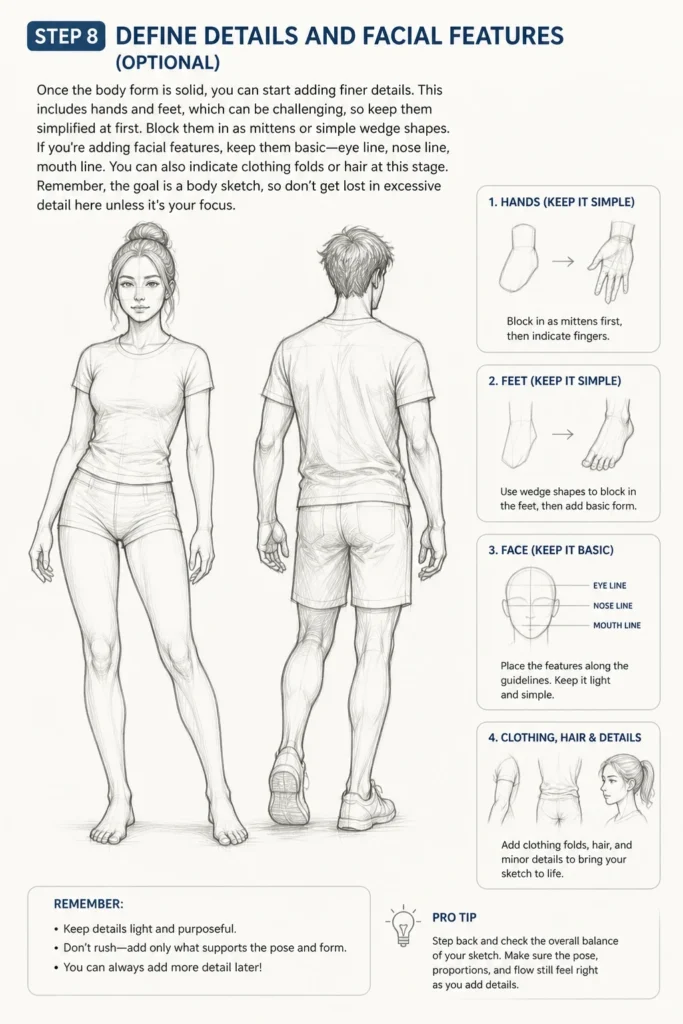
Once the body form is solid, you can start adding finer details. This includes hands and feet, which can be challenging, so keep them simplified at first. Block them in as mittens or simple wedge shapes.
If you’re adding facial features, keep them basic: eye line, nose line, mouth line. You can also indicate clothing folds or hair at this stage. Remember, the goal is a body sketch, so don’t get lost in excessive detail here unless it’s your focus.
Step 9: Clean Up and Refine Your Lines
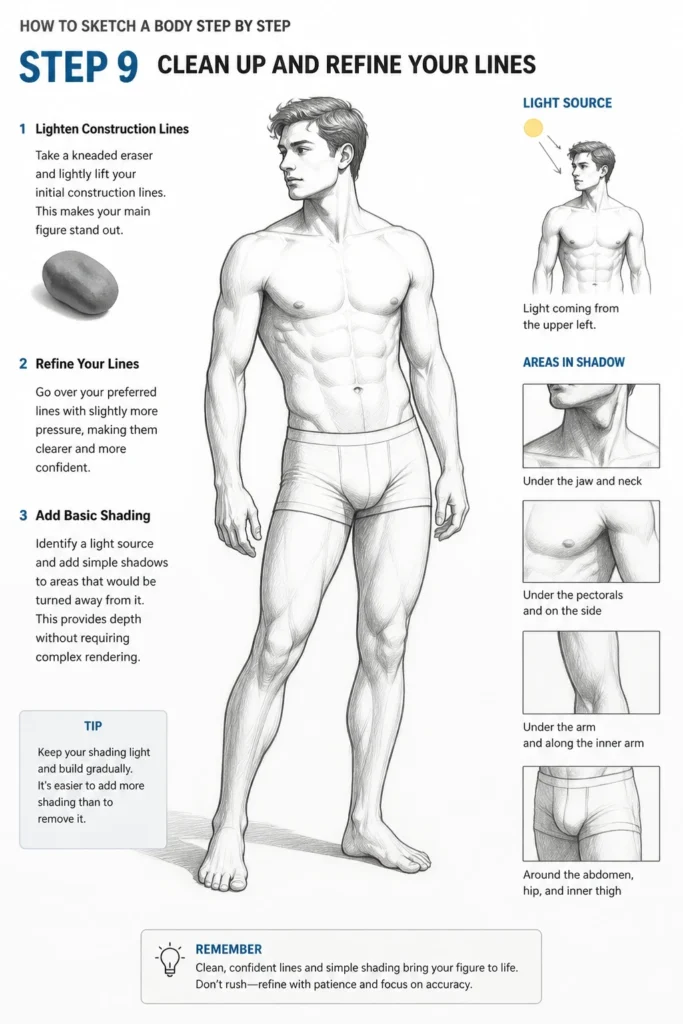
Take a kneaded eraser and lightly lift your initial construction lines. This makes your main figure stand out. Then, go over your preferred lines with slightly more pressure, making them clearer and more confident.
You can add some basic shading at this point to give the figure more dimension. Identify a light source and add simple shadows to areas that would be turned away from it. This provides depth without requiring complex rendering.
Common Mistakes to Avoid
Stiff, Static Poses
Many beginners draw figures that look rigid, as if frozen in place. This often happens by starting with straight lines and focusing too much on individual body parts rather than the whole.
Instead, always begin with a gesture sketch. Capture the flow and movement of the pose with light, sweeping lines before adding any structure. Think about the “line of action” that runs through the figure.
Incorrect Proportions
Figures can look distorted if the head, torso, and limbs are not sized correctly relative to each other. This makes the body appear unnatural or disproportionate.
Use the head as a consistent unit of measurement. Lightly mark out head lengths down your paper to guide the placement of the shoulders, waist, hips, knees, and feet. Regularly compare your drawing to a reference or your mental model.
Rushing Details Too Early
It’s tempting to jump straight to drawing eyes, fingers, or toes. However, focusing on small details before the overall form is established can lead to an unbalanced or incorrectly proportioned figure.
Always work from general to specific. Establish the gesture, then the major forms, then the limbs, and finally the smaller details. Build your figure like a sculptor, adding clay in layers.
Not Using Reference Material
Relying solely on imagination, especially as a beginner, can lead to generic or anatomically incorrect figures. The human body is complex, and memory can be unreliable.
Actively seek out and use reference photos or even a mirror. Observe how muscles flex, how skin folds, and how light falls on the form. Reference material is a tool for learning, not cheating.
Troubleshooting
My Figures Look Flat and Lack Volume
If your sketches appear two-dimensional, you might be focusing too much on outlines. The body has depth and form.
Think of the body as a collection of three-dimensional shapes: cylinders for limbs, eggs for the ribcage and pelvis, and spheres for joints. Draw through these forms, imagining their back sides even if you can’t see them. Adding subtle shading also helps create the illusion of depth.
Limbs Look Disconnected or “Stuck On”
When arms and legs seem to float or are poorly integrated with the torso, it’s often due to a weak connection at the joints.
Ensure you’re clearly defining the connection points at the shoulders and hips. These are areas where the limbs pivot. Use those sphere-like joints to show where the limb attaches and how it moves in relation to the main body mass.
I Struggle with Hands and Feet
Hands and feet are notoriously difficult due to their complex structure and numerous small bones. It’s common for beginners to avoid them or simplify them excessively.
Start by treating hands and feet as simple block shapes or mittens. Break them down into their largest components first (palm/sole, thumb mass, finger mass). Practice drawing them separately from the body to understand their structure before integrating them into a full figure.
Key Takeaways
- Always begin with a light gesture sketch to capture movement and flow.
- Use simple 3D shapes like eggs, boxes, and cylinders to construct the body.
- The head is an excellent unit of measurement for establishing correct proportions.
- Work from general forms to specific details, never rushing the process.
- Reference images are invaluable tools for learning and improving accuracy.
- Practice regularly to develop your eye and hand coordination.
Frequently Asked Questions
How long does it take to get good at sketching bodies?
Learning to sketch bodies effectively is a journey, not a destination. Consistent practice is key. With daily practice, you might see noticeable improvement in a few months, but mastery takes years. Focus on enjoying the process and celebrating small victories.
Should I focus on anatomy right away?
While a basic understanding of anatomy is helpful, don’t get bogged down by memorizing every muscle name when you’re just starting. Begin by understanding major bone landmarks and muscle groups. As you progress, gradually delve deeper into anatomical details to enhance realism.
What if my sketches don’t look like the reference?
It’s perfectly normal for initial sketches not to perfectly match your reference. The goal isn’t to create a photocopy, but to understand and interpret the form. Focus on capturing the essence, proportions, and gesture. Accuracy will improve with practice and observation.
Is it better to draw from photos or live models?
Both have their benefits. Photos offer convenience and allow you to study a pose for an extended period. Live models, however, provide a better understanding of three-dimensional form, lighting, and subtle movements. Incorporate both into your practice for a well-rounded approach.
Our Top Recommended Finds
- Sketch Pencils Set: A good set with varying lead hardness (HB, 2B, 4B, 6B) allows for diverse line weights and shading.
- Sketchbook with Quality Paper: Look for paper that can handle multiple erasures without tearing or pilling, typically 60-80lb (90-120 gsm).
- Kneaded Eraser: This soft, pliable eraser lifts graphite without damaging the paper and is excellent for subtle corrections.
Your Sketching Journey Begins Now
You now have a clear, actionable path to start sketching the human body. This isn’t about perfection on your first try; it’s about building a solid foundation. Each line you draw is a step forward in your artistic development.
Embrace the process, be patient with yourself, and most importantly, have fun creating. Consider exploring different poses or even starting to draw figures in motion to challenge yourself further. Pick up your pencil and start sketching today!
& Painting
No rigid rules or pretension. Just practical guides, medium comparisons, and encouraging tips to help you enjoy the drawing & painting process.