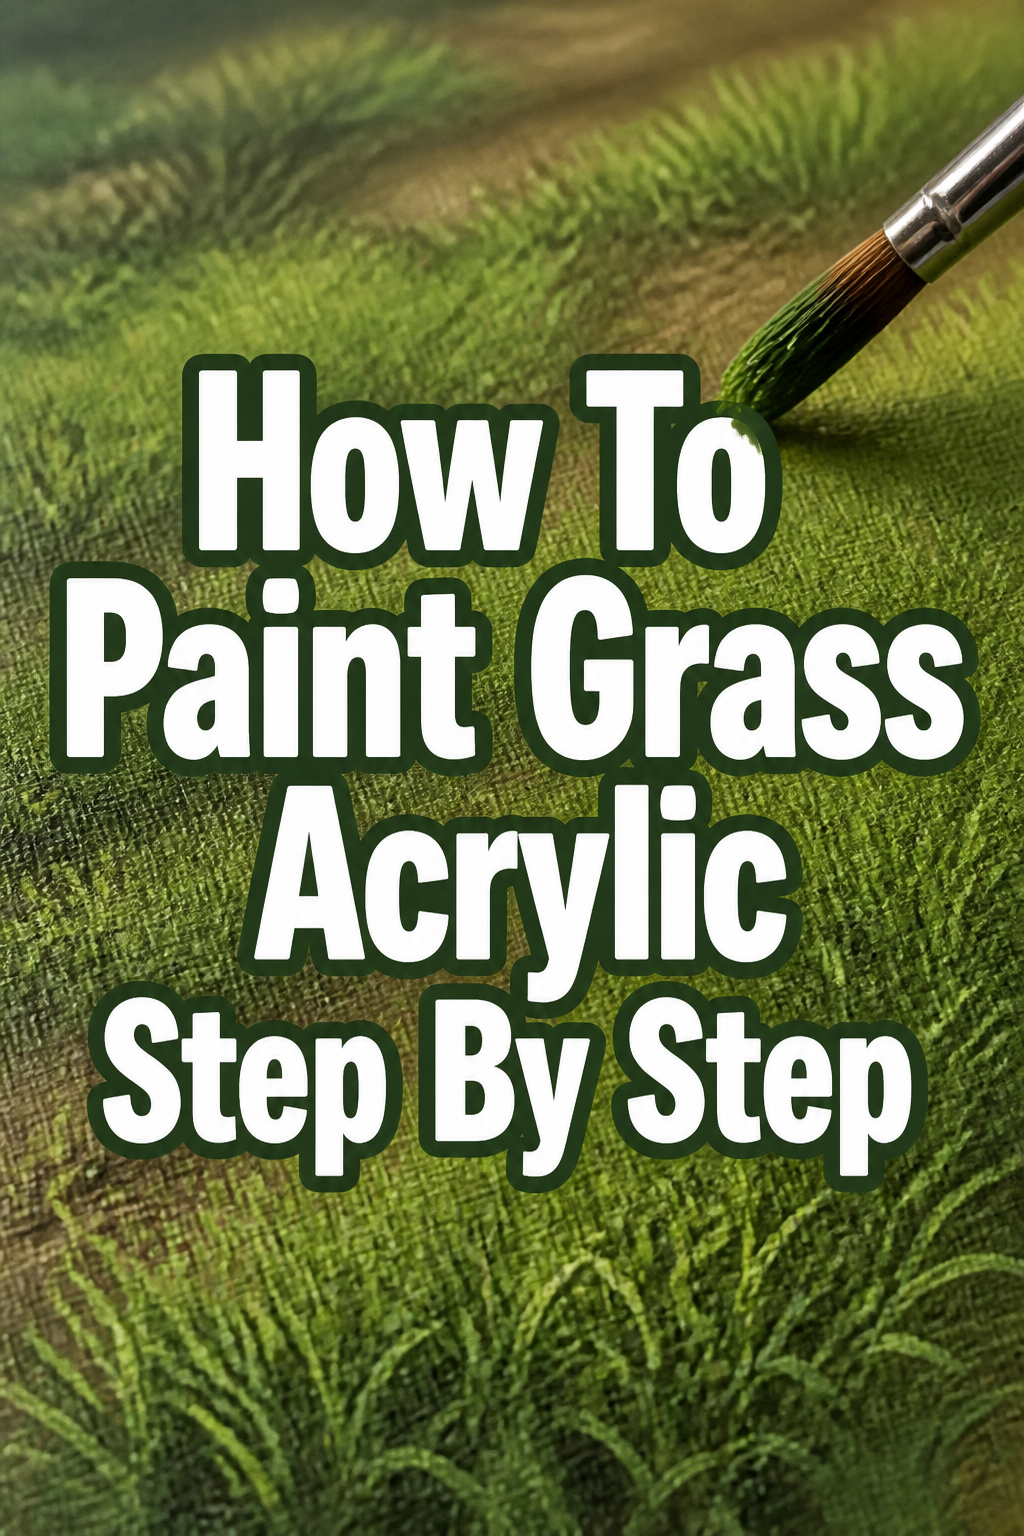
🌱 How To Paint Grass Acrylic Step By Step

& Painting
No rigid rules or pretension. Just practical guides, medium comparisons, and encouraging tips to help you enjoy the drawing & painting process.
Painting grass with acrylics can transform your landscapes from flat to vibrant. It adds life and depth to any outdoor scene, bringing your canvas to reality.
I remember my first attempts at grass were just green blobs, frustratingly unrealistic. This guide distills years of practice into clear steps, helping you avoid those early pitfalls and create convincing, textured grass.
You’ll discover techniques to build layers, add varied tones, and achieve a natural flow that makes your grass truly stand out.
Quick Overview
This guide will teach you how to paint realistic, layered grass using acrylic paints. You’ll learn to create depth, texture, and natural color variations.
- Time needed: 1-3 hours (depending on detail and drying time)
- Difficulty: Beginner to Intermediate
- What you’ll need: Acrylic paints (various greens, yellows, browns, white), brushes (flat, round, fan), palette, water, paper towel, canvas/surface.
Step-by-Step Instructions
Step 1: Prepare Your Workspace and Gather Materials
Set up your easel or painting surface in a well-lit area. Lay down newspaper or a protective sheet to catch any spills.
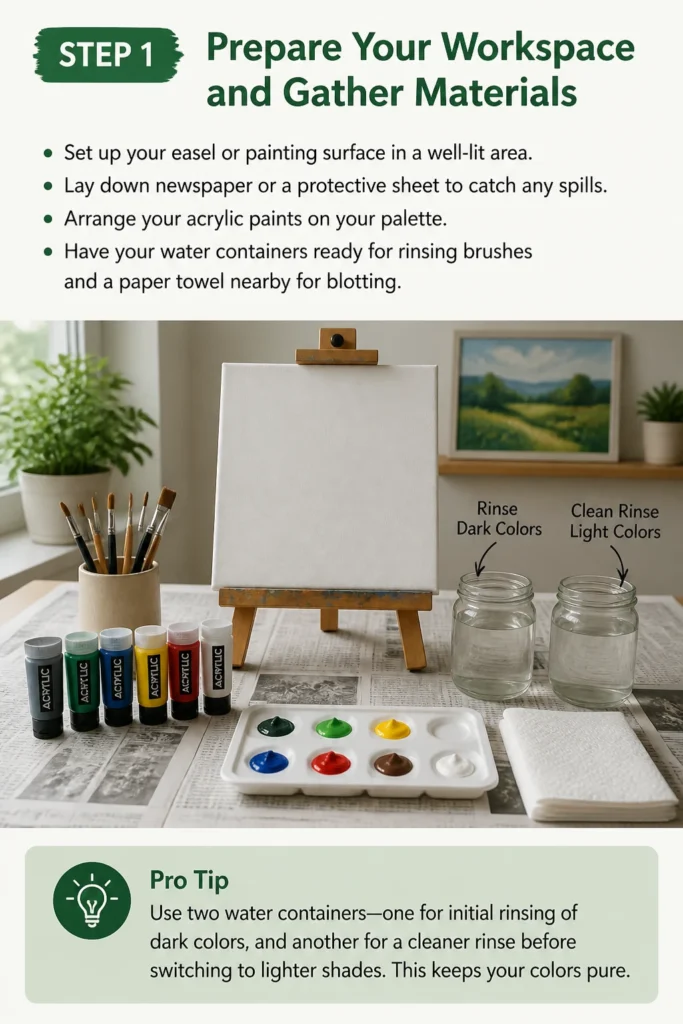
Arrange your acrylic paints on your palette. Have your water containers ready for rinsing brushes and a paper towel nearby for blotting.
Pro Tip: Use two water containers: one for initial rinsing of dark colors, and another for a cleaner rinse before switching to lighter shades. This keeps your colors pure.
Step 2: Lay Down Your Base Layer
Mix a mid-tone green for your base layer. This color should represent the general hue of the grass in shadow or the underlying tone.
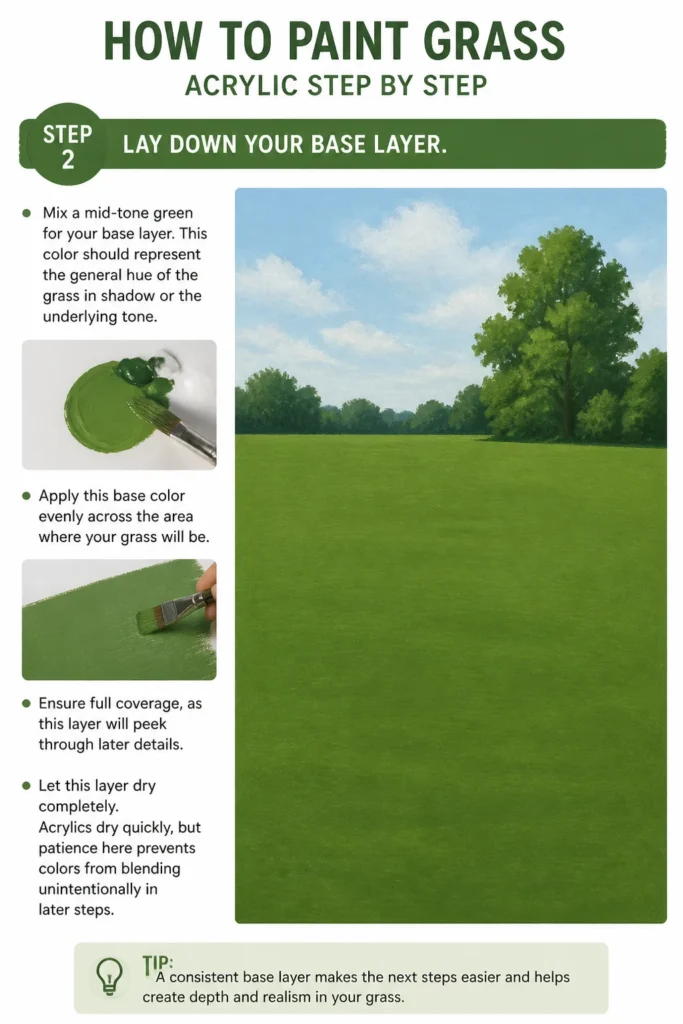
Apply this base color evenly across the area where your grass will be. Ensure full coverage, as this layer will peek through later details.
Let this layer dry completely. Acrylics dry quickly, but patience here prevents colors from blending unintentionally in later steps.
Step 3: Establish Darker Tones for Depth
Create a darker green by adding a touch of black, dark blue, or dark brown to your base green. This will be your shadow color.
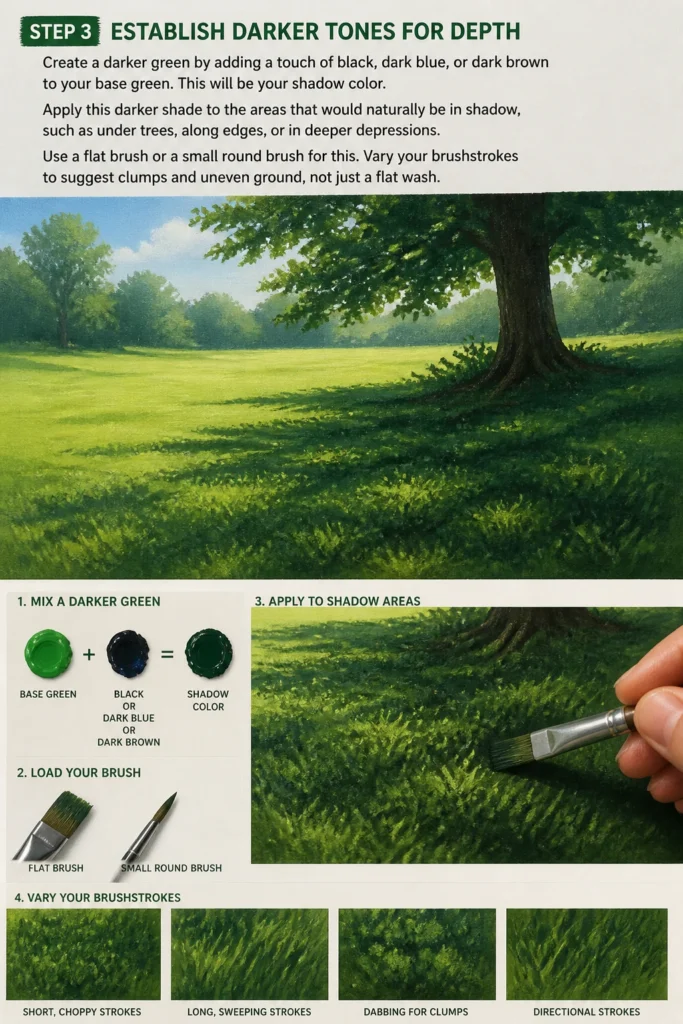
Apply this darker shade to the areas that would naturally be in shadow, such as under trees, along edges, or in deeper depressions.
Use a flat brush or a small round brush for this. Vary your brushstrokes to suggest clumps and uneven ground, not just a flat wash.
Step 4: Introduce Mid-Tones and Texture
Return to your original mid-tone green or mix a slightly lighter version. Begin adding short, upward strokes over the darker areas and across the base.
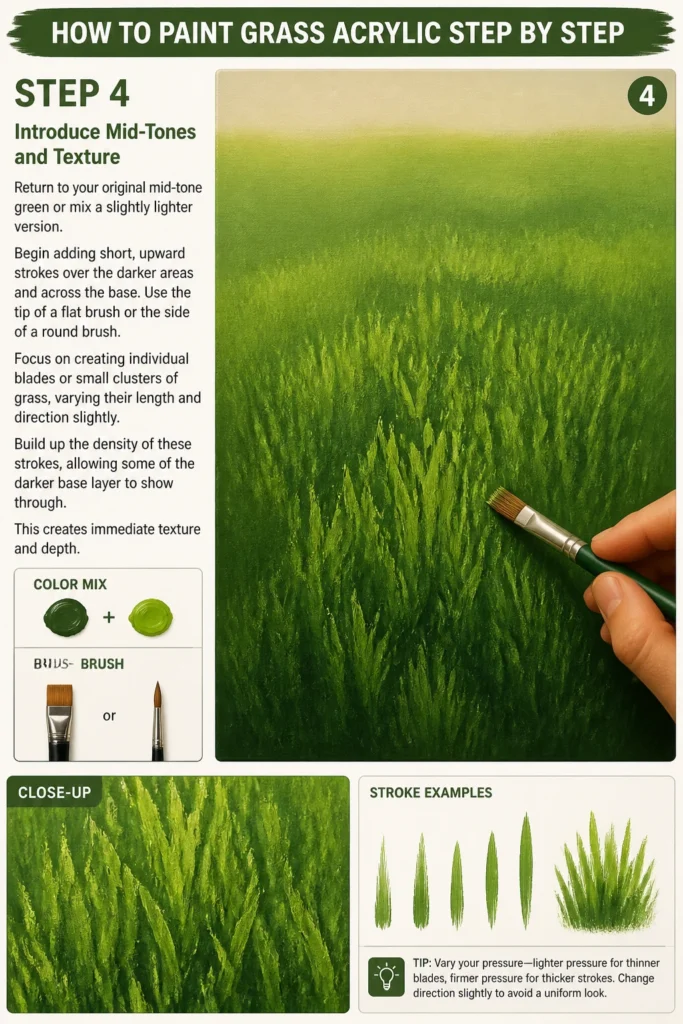
Use the tip of a flat brush or the side of a round brush. Focus on creating individual blades or small clusters of grass, varying their length and direction slightly.
Build up the density of these strokes, allowing some of the darker base layer to show through. This creates immediate texture and depth.
Step 5: Add Lighter Greens for Highlights
Mix a lighter green by adding a small amount of yellow or white to your mid-tone green. This color will represent grass hit by direct light.
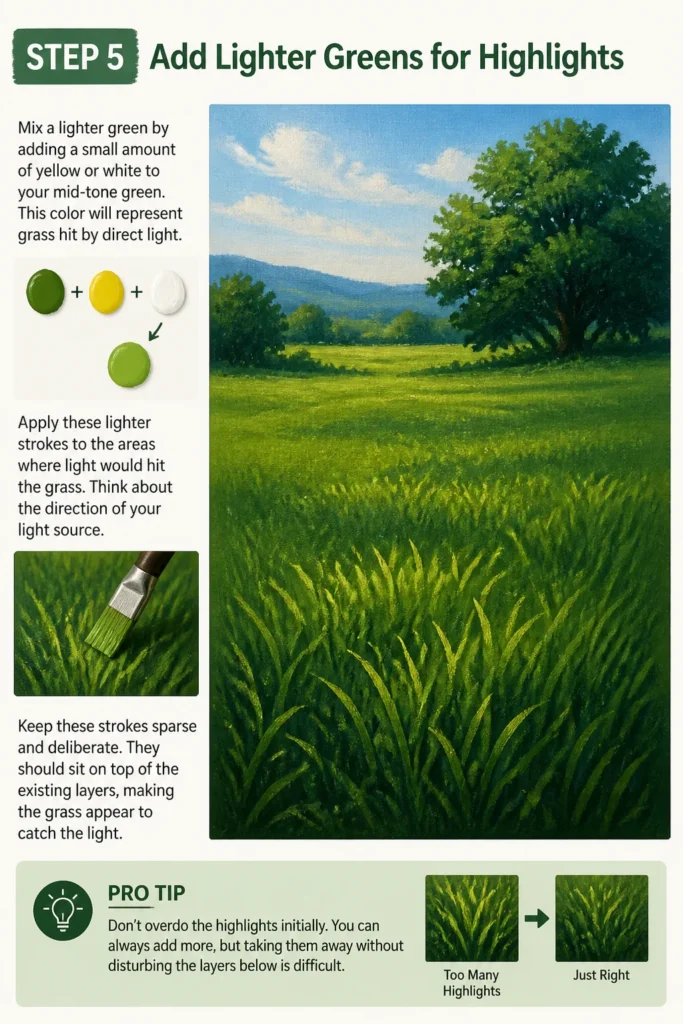
Apply these lighter strokes to the areas where light would hit the grass. Think about the direction of your light source.
Keep these strokes sparse and deliberate. They should sit on top of the existing layers, making the grass appear to catch the light.
Pro Tip: Don’t overdo the highlights initially. You can always add more, but taking them away without disturbing the layers below is difficult.
Step 6: Incorporate Warm and Cool Variations
Introduce subtle shifts in color to make the grass more natural. Mix a tiny bit of yellow ochre or a warm brown into a green for dry, sun-baked patches.
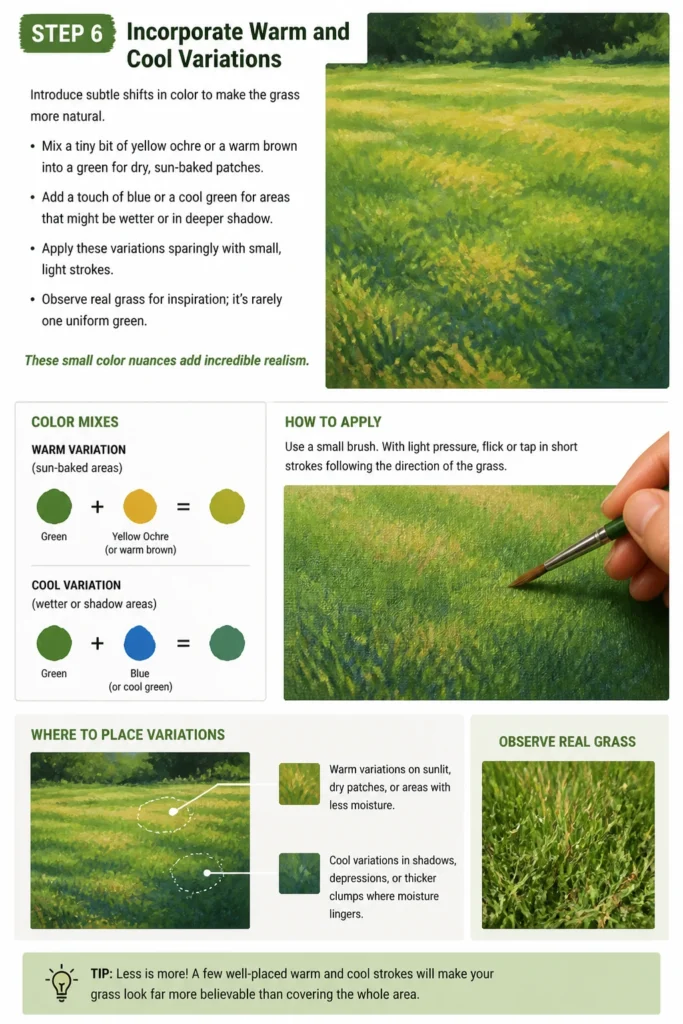
Add a touch of blue or a cool green for areas that might be wetter or in deeper shadow. Apply these variations sparingly with small, light strokes.
Observe real grass for inspiration; it’s rarely one uniform green. These small color nuances add incredible realism.
Step 7: Create Fine Details with a Fan Brush or Liner Brush
Load a fan brush with a light green or yellow-green paint. Lightly flick the brush upward from the base of the grass area.
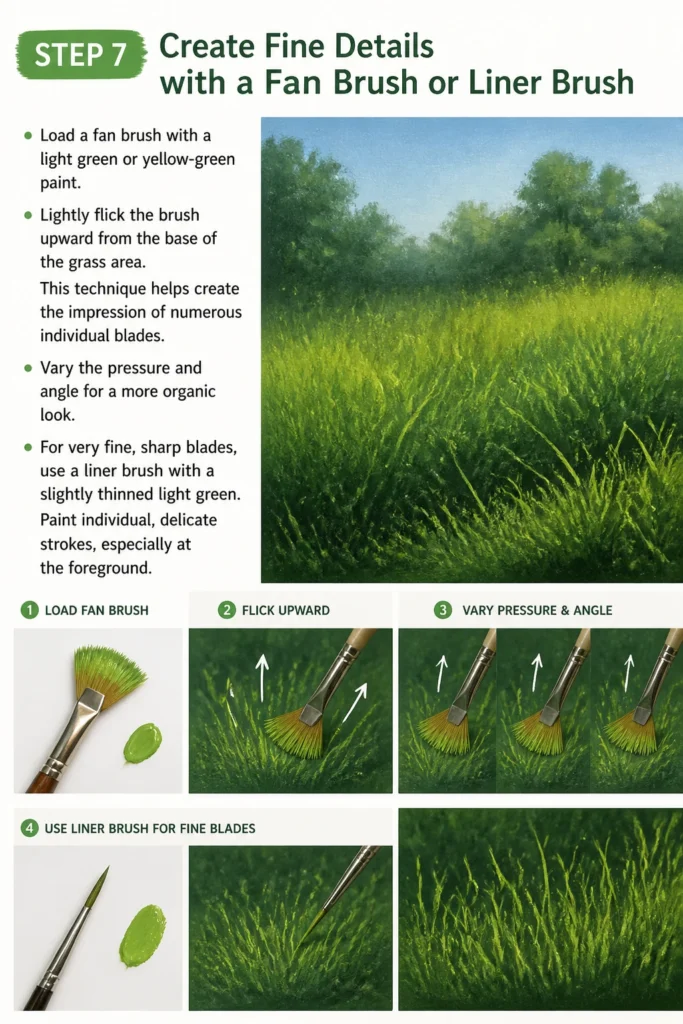
This technique helps create the impression of numerous individual blades. Vary the pressure and angle for a more organic look.
For very fine, sharp blades, use a liner brush with a slightly thinned light green. Paint individual, delicate strokes, especially at the foreground.
Step 8: Add Final Touches and Texture
Step back from your painting to assess the overall effect. Identify any areas that need more texture or definition.
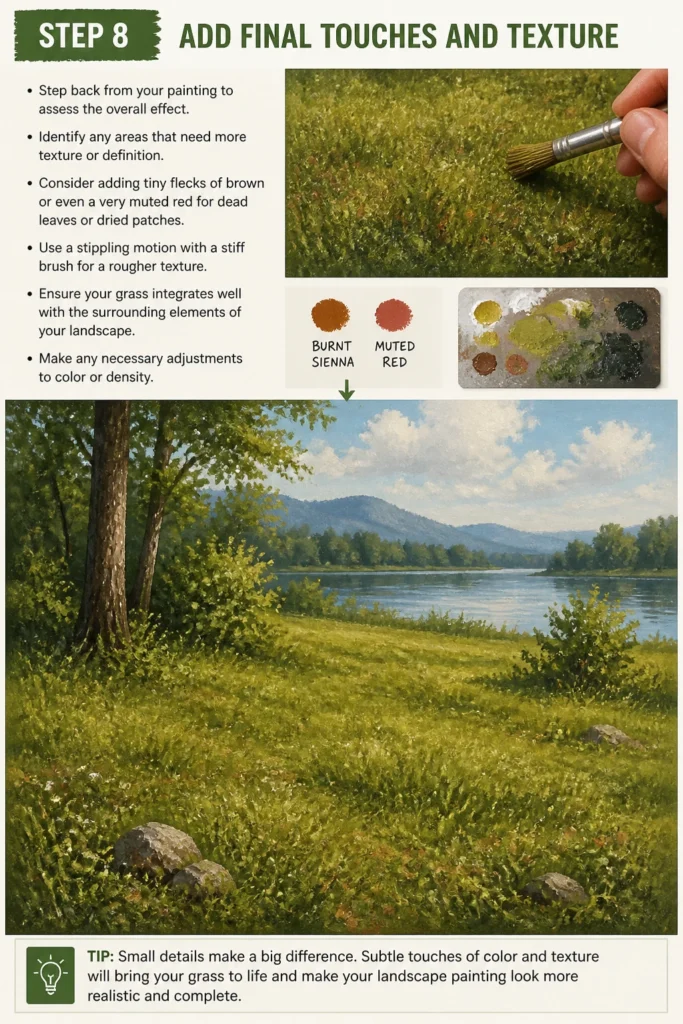
Consider adding tiny flecks of brown or even a very muted red for dead leaves or dried patches. Use a stippling motion with a stiff brush for a rougher texture.
Ensure your grass integrates well with the surrounding elements of your landscape. Make any necessary adjustments to color or density.
Common Mistakes to Avoid
Painting Flat, Uniform Green
Many beginners use just one shade of green for all their grass. This results in a lifeless, artificial look that lacks depth and realism.
Instead, layer different greens, from dark to light, and introduce subtle variations. Think about shadows, highlights, and even hints of yellow or brown for natural diversity.
Overworking the Details
It’s easy to get caught up trying to paint every single blade of grass. This can make the grass look stiff and unnatural, overwhelming the viewer.
Focus on creating the impression of grass through varied strokes and layers. Suggest individual blades, especially in the foreground, but allow background areas to be more generalized.
Ignoring Light and Shadow
Painting grass without considering how light interacts with it makes it appear flat. Without shadows and highlights, the grass loses its three-dimensional quality.
Always establish your light source first. Use darker greens for shadowed areas and lighter, brighter greens for areas catching the sun. This contrast brings the grass to life.
Using a Single Brush Type
Relying on just one brush, like a flat brush, limits the textures you can create. Different brushes offer unique effects for grass.
Experiment with various brushes: a flat brush for broad strokes, a round brush for individual blades, a fan brush for flicking textures, and a liner brush for fine details. Each has its purpose.
Troubleshooting
My Grass Looks Too Flat
If your grass appears two-dimensional, you likely need more contrast. Go back and reinforce your darkest shadows, especially at the base of clumps or in recessed areas.
Then, add brighter highlights with a lighter green or yellow, focusing on the topmost blades that would catch the most light. The interplay of dark and light creates depth.
The Colors Look Unnatural or Too Bright
This often happens when using colors straight from the tube without mixing. Pure, vibrant greens can sometimes look artificial in a natural setting.
Try dulling your greens slightly by mixing in a tiny bit of its complementary color (red) or a touch of brown. Also, ensure you have enough cool and warm variations to mimic nature’s complexity.
I Can’t Get Individual Blades to Show
Achieving distinct blades requires a light touch and the right brush. Make sure your paint isn’t too thick, which can clump, or too thin, which might disappear.
Use a fine liner brush or the very tip of a round brush. Practice quick, flicking strokes, lifting the brush at the end of each stroke to create a tapered effect. Don’t press too hard.
Key Takeaways
- Layering is Key: Build your grass from dark base tones to lighter highlights for realistic depth.
- Vary Your Greens: Incorporate different shades, including warm yellows and cool blues, to create natural complexity.
- Use Diverse Brushstrokes: Employ various brush types and techniques to achieve a range of textures, from broad sweeps to individual blades.
- Consider Light Source: Always paint with a clear understanding of where your light is coming from to accurately place shadows and highlights.
- Less is More for Details: Suggest details rather than painting every blade, especially in background areas.
- Practice Patience: Allow layers to dry and step back frequently to assess your work and make thoughtful adjustments.
Frequently Asked Questions
What colors do I need for realistic grass?
You’ll need a range of greens, from deep forest green to lighter sap green. Also, include yellow (like lemon yellow or cadmium yellow), a warm brown (burnt sienna), and white. A touch of blue or black can help for darkening shadows.
How do I make grass look like it’s moving in the wind?
To suggest movement, vary the direction and curve of your grass strokes. Instead of all vertical, paint some blades gently leaning or curving in a consistent direction, as if pushed by a breeze. Use slightly blurred edges or softer strokes for distant, wind-swept areas.
Should I paint wet-on-wet or wait for layers to dry?
For distinct layers and crisp textures, it’s generally best to wait for each layer to dry before applying the next. This prevents colors from blending into mud. However, for softer, blended effects, especially in background grass, you can work wet-on-wet with caution.
How do I make grass look further away?
Distant grass should be less detailed and have softer edges. Use cooler, slightly desaturated colors (add a touch of blue or gray) to mimic atmospheric perspective. Reduce contrast and keep strokes more generalized, avoiding sharp individual blades.
Our Top Recommended Finds
- Acrylic Paint Set: A good starter set with a variety of greens, yellows, blues, and browns will provide a solid foundation for mixing.
- Artist’s Brush Set: Look for a set that includes flat, round, fan, and liner brushes. These different shapes are essential for varied grass textures.
- Stay-Wet Palette: This keeps your acrylics workable for longer, reducing paint waste and allowing you more time to mix custom greens.
Bring Your Landscapes to Life
You now have the tools and knowledge to transform your acrylic landscapes with convincing, vibrant grass. Every stroke you apply builds upon the last, creating depth and realism.
Take these techniques and apply them to your next painting project. Experiment with different light sources, seasons, and grass types.
The beauty of acrylics is their versatility and quick drying time, inviting you to explore and refine your vision. Start painting your own lush, textured fields today.
& Painting
No rigid rules or pretension. Just practical guides, medium comparisons, and encouraging tips to help you enjoy the drawing & painting process.