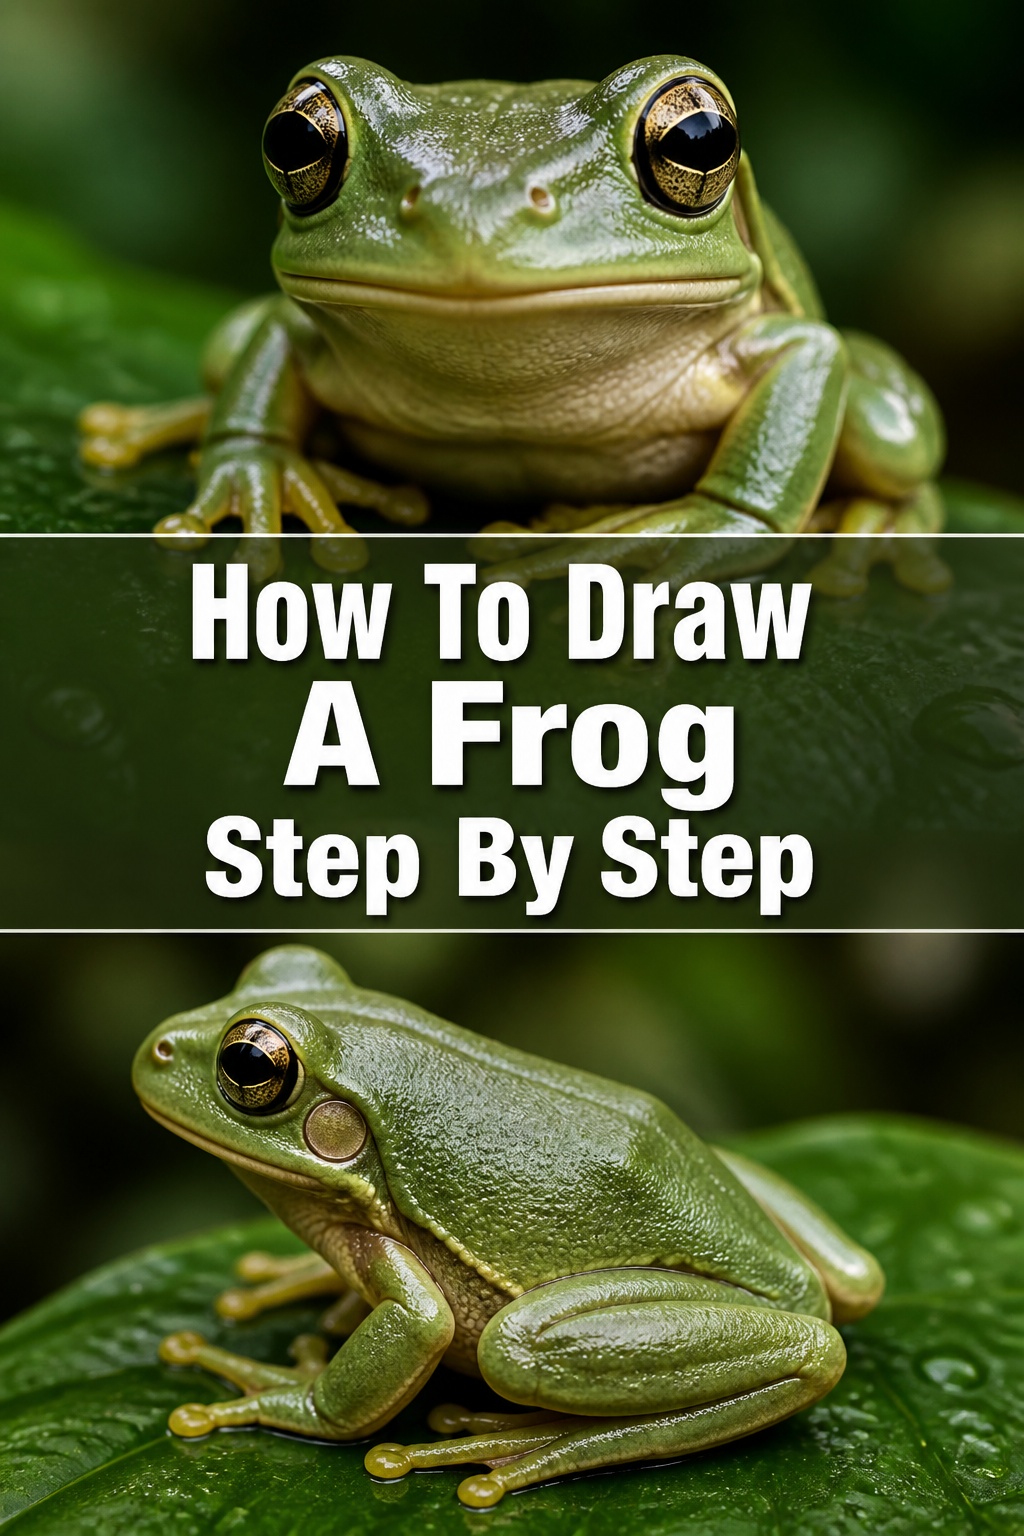
🐸 How To Draw A Frog Step By Step

& Painting
No rigid rules or pretension. Just practical guides, medium comparisons, and encouraging tips to help you enjoy the drawing & painting process.
I have spent countless hours sitting by local ponds with a sketchbook in my lap.
Frogs are some of my favorite subjects because they are built from simple, satisfying shapes.
This guide comes from years of trial and error, helping you capture that classic amphibian look without the frustration.
Quick Overview
In this tutorial, we will build a charming frog from the ground up using basic geometry.
You will learn how to transition from rough circles to a polished, textured illustration.
- Time needed: 25 to 35 minutes
- Difficulty: Beginner
- What you’ll need: Drawing paper, a range of graphite pencils (HB and 2B), a soft eraser, and a fine-liner pen.
Step-by-Step Instructions
Step 1: Sketch the Primary Body Oval
Start by drawing a large, horizontal oval in the center of your paper.
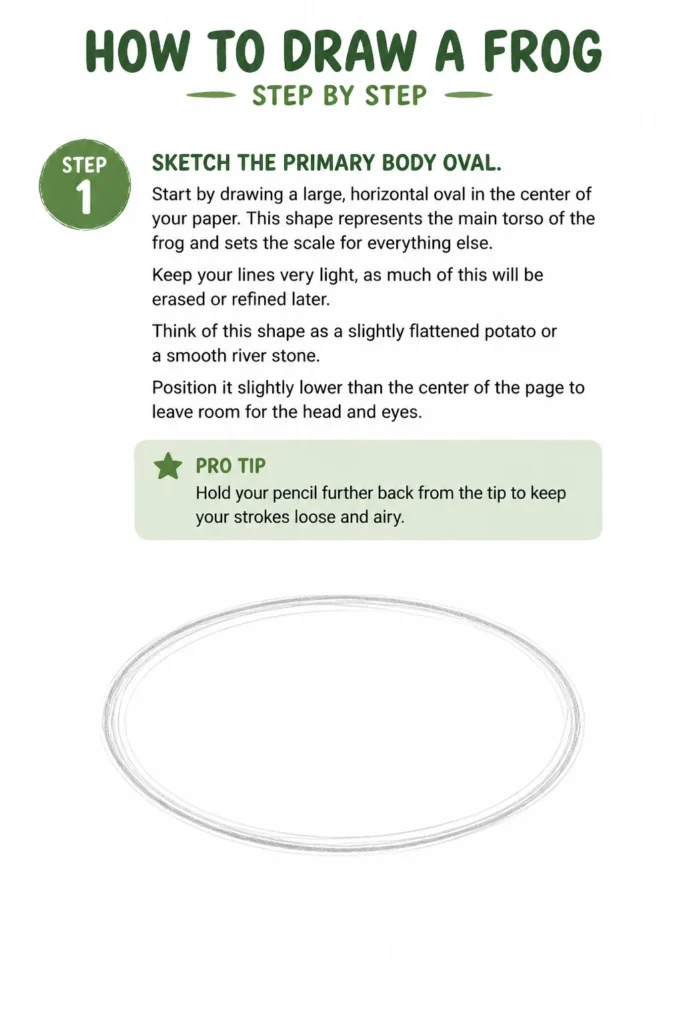
This shape represents the main torso of the frog and sets the scale for everything else.
Keep your lines very light, as much of this will be erased or refined later.
Think of this shape as a slightly flattened potato or a smooth river stone.
Position it slightly lower than the center of the page to leave room for the head and eyes.
Pro Tip: Hold your pencil further back from the tip to keep your strokes loose and airy.
Step 2: Add the Head and Neck Connection
Overlap a smaller, slightly more rounded oval on the upper left or right side of your main body shape.
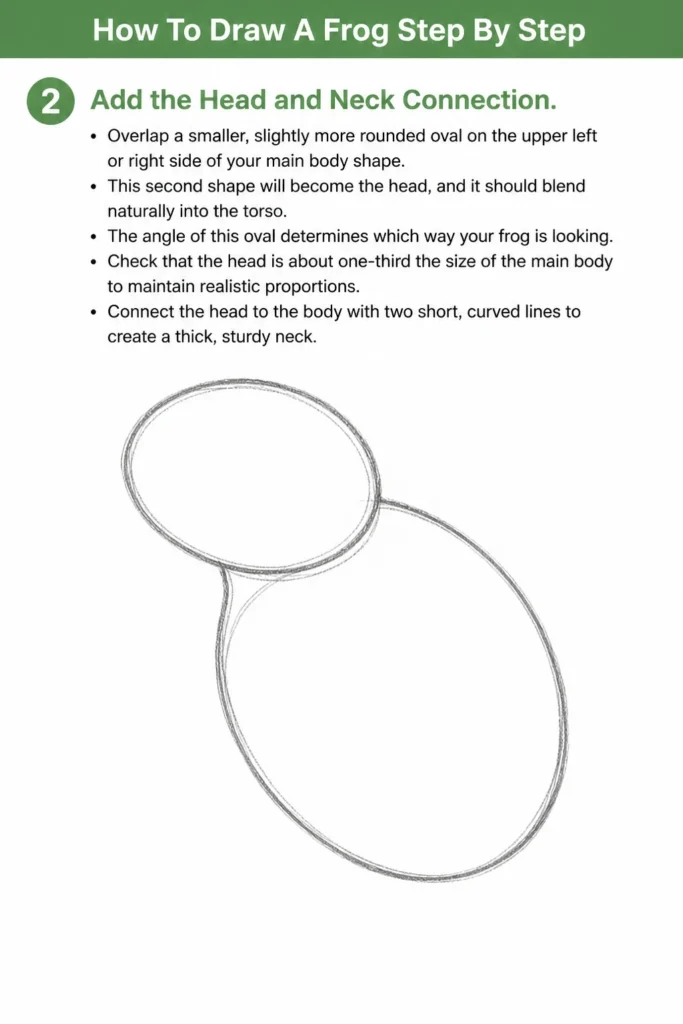
This second shape will become the head, and it should blend naturally into the torso.
The angle of this oval determines which way your frog is looking.
Check that the head is about one-third the size of the main body to maintain realistic proportions.
Connect the head to the body with two short, curved lines to create a thick, sturdy neck.
Step 3: Place the Iconic Eye Bulges
Draw two small circles sitting right on top of the head oval.
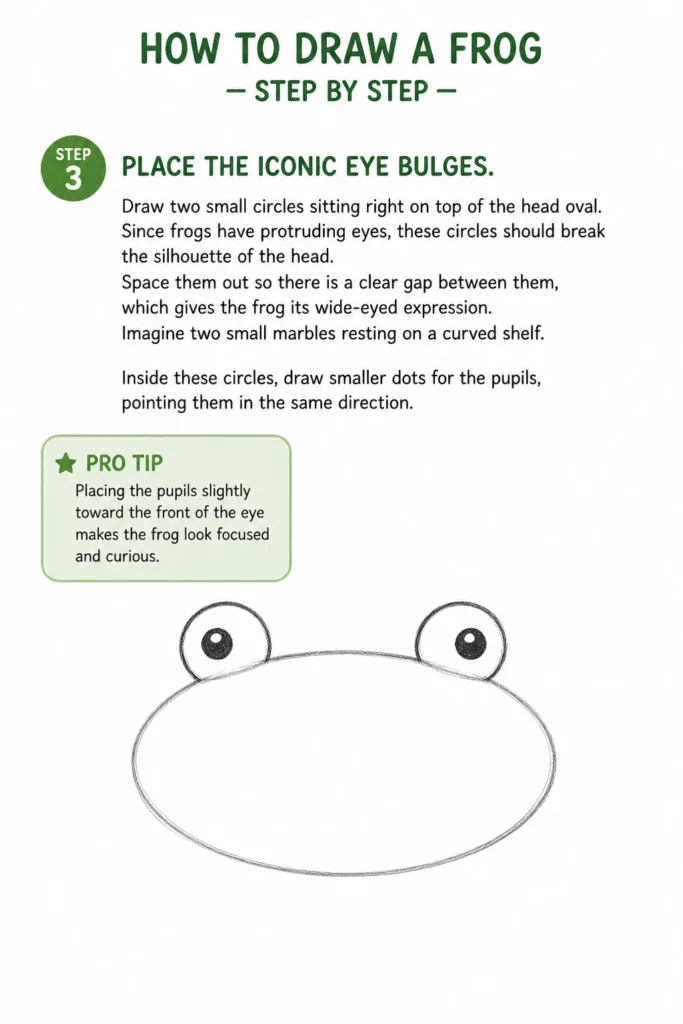
Since frogs have protruding eyes, these circles should break the silhouette of the head.
Space them out so there is a clear gap between them, which gives the frog its wide-eyed expression.
Imagine two small marbles resting on a curved shelf.
Inside these circles, draw smaller dots for the pupils, pointing them in the same direction.
Pro Tip: Placing the pupils slightly toward the front of the eye makes the frog look focused and curious.
Step 4: Map Out the Back Legs
Create a large, “C” shaped curve on the side of the body furthest from the head.
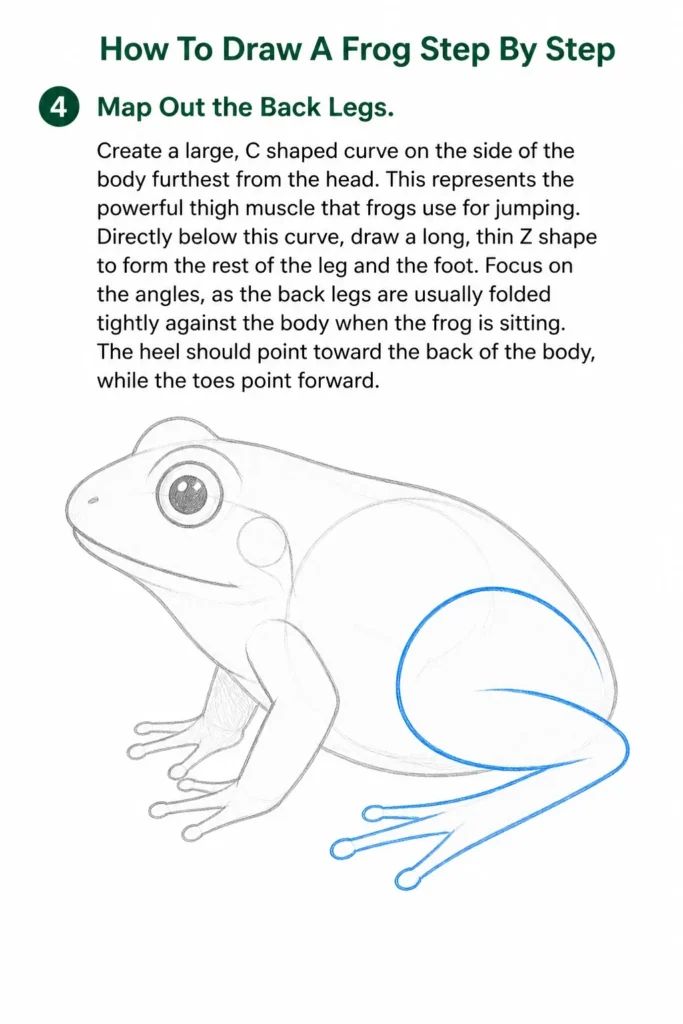
This represents the powerful thigh muscle that frogs use for jumping.
Directly below this curve, draw a long, thin “Z” shape to form the rest of the leg and the foot.
Focus on the angles, as the back legs are usually folded tightly against the body when the frog is sitting.
The heel should point toward the back of the body, while the toes point forward.
Step 5: Sketch the Slender Front Legs
Drop two straight lines down from the front of the chest area.
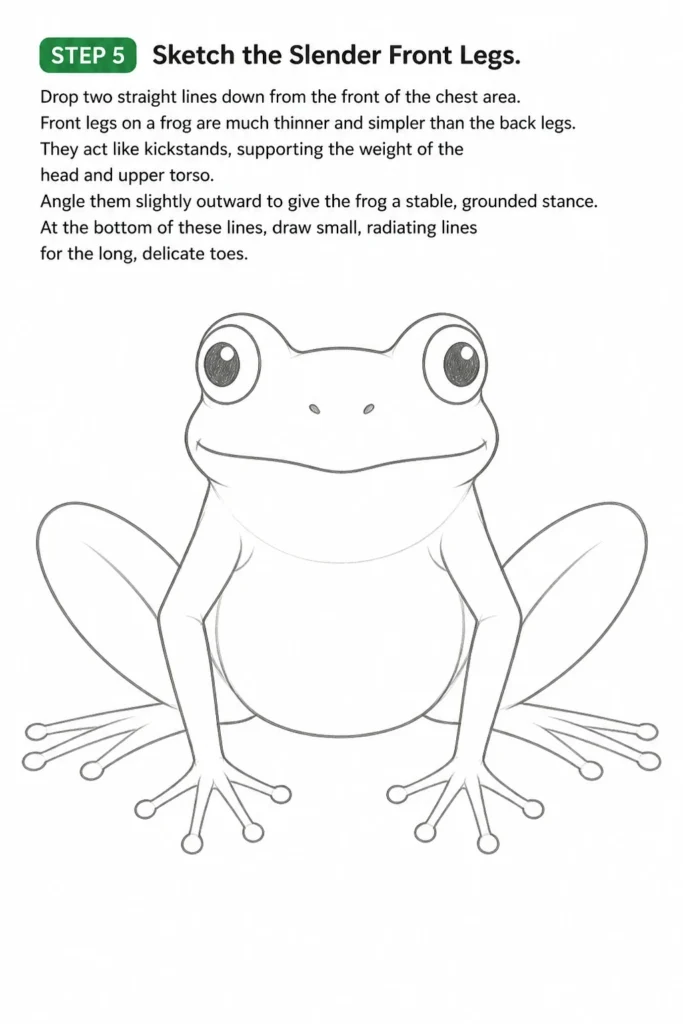
Front legs on a frog are much thinner and simpler than the back legs.
They act like kickstands, supporting the weight of the head and upper torso.
Angle them slightly outward to give the frog a stable, grounded stance.
At the bottom of these lines, draw small, radiating lines for the long, delicate toes.
Step 6: Define the Mouth and Nostrils
Draw a long, wide curve across the lower half of the head oval.
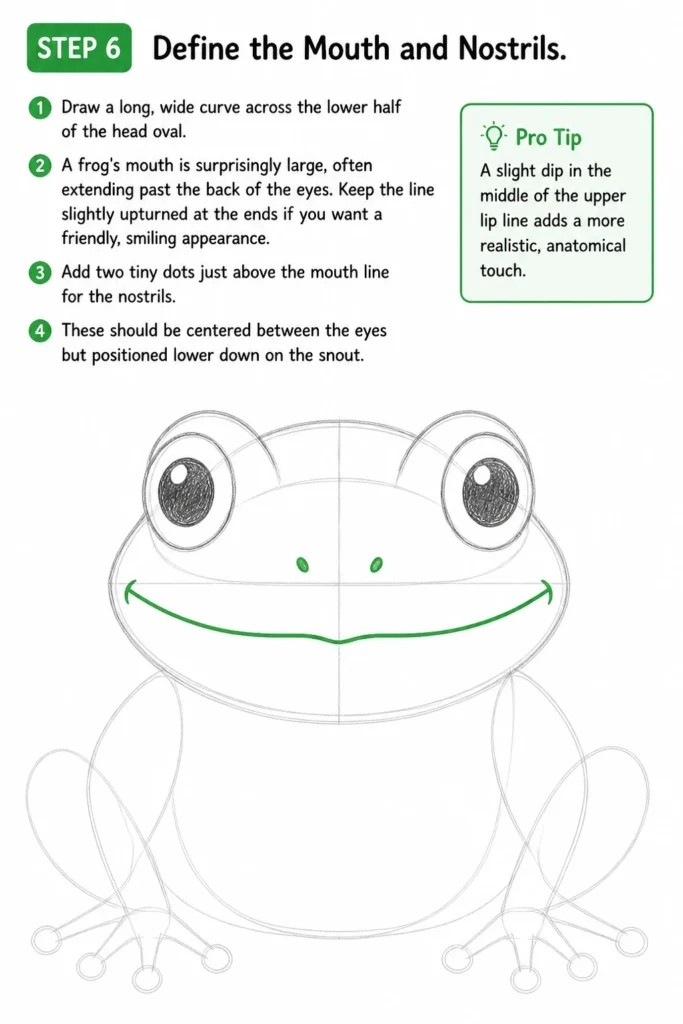
A frog’s mouth is surprisingly large, often extending past the back of the eyes.
Keep the line slightly upturned at the ends if you want a friendly, “smiling” appearance.
Add two tiny dots just above the mouth line for the nostrils.
These should be centered between the eyes but positioned lower down on the snout.
Pro Tip: A slight dip in the middle of the upper lip line adds a more realistic, anatomical touch.
Step 7: Add Webbing and Toe Pads
Refine the ends of the legs by adding small circles to the tips of each toe.
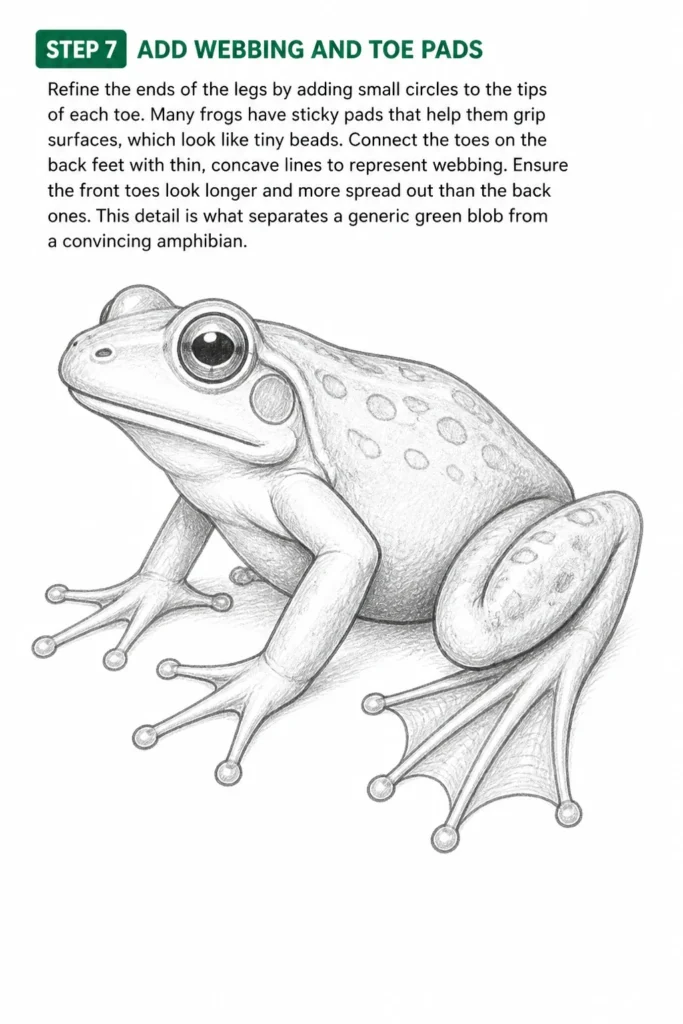
Many frogs have “sticky” pads that help them grip surfaces, which look like tiny beads.
Connect the toes on the back feet with thin, concave lines to represent webbing.
Ensure the front toes look longer and more spread out than the back ones.
This detail is what separates a generic green blob from a convincing amphibian.
Step 8: Texture the Skin and Add Patterns
Scatter small, irregular circles and dots across the back and thighs.
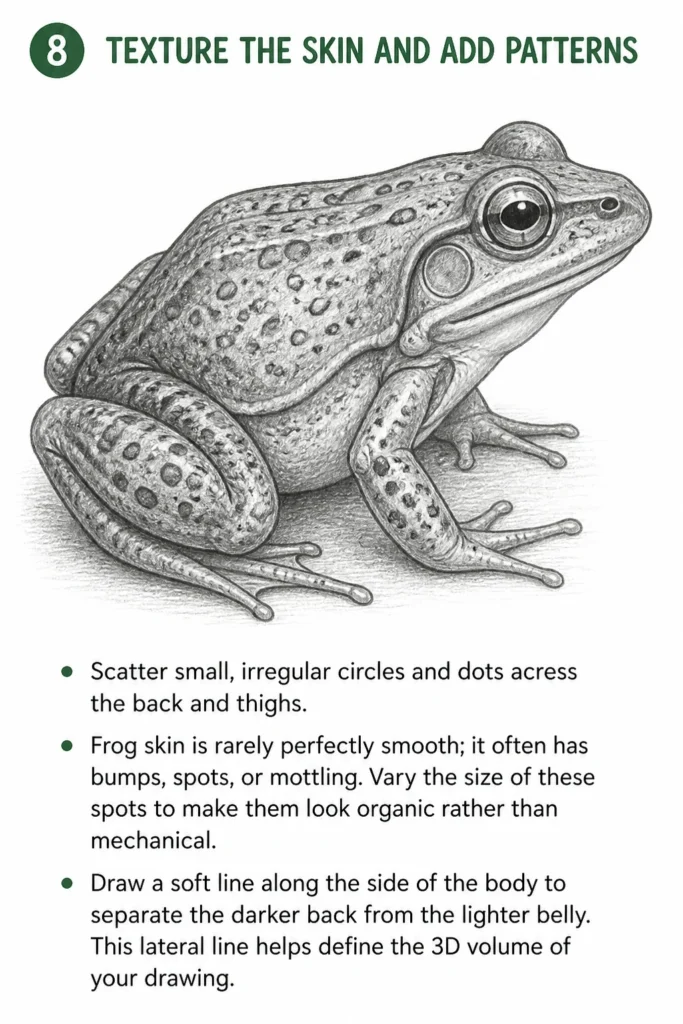
Frog skin is rarely perfectly smooth; it often has bumps, spots, or mottling.
Vary the size of these spots to make them look organic rather than mechanical.
Draw a soft line along the side of the body to separate the darker back from the lighter belly.
This “lateral line” helps define the 3D volume of your drawing.
Step 9: Finalize Outlines and Erase Guides
Trace over your final lines with a darker pencil or a fine-liner pen.
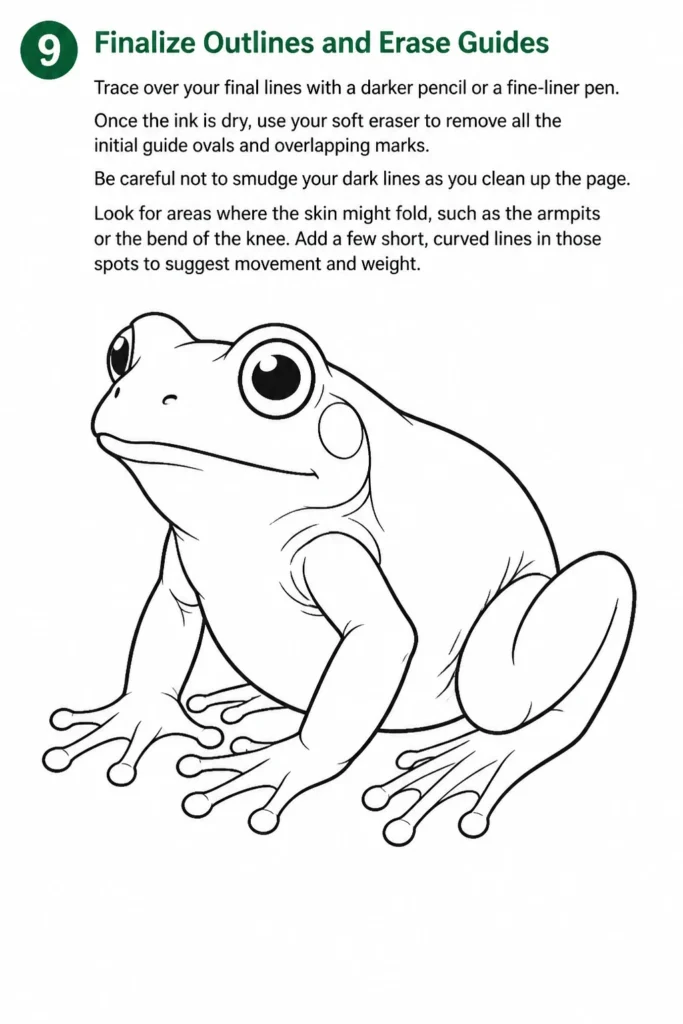
Once the ink is dry, use your soft eraser to remove all the initial guide ovals and overlapping marks.
Be careful not to smudge your dark lines as you clean up the page.
Look for areas where the skin might fold, such as the armpits or the bend of the knee.
Add a few short, curved lines in those spots to suggest movement and weight.
Common Mistakes to Avoid
Making the Body Too Round
While frogs are often plump, drawing them as a perfect circle can make them look like a ball.
In nature, frogs have a distinct structure with a flatter belly and a slightly humped back.
Always try to keep your main body oval elongated rather than perfectly circular.
Misplacing the Eye Bulges
New artists often place the eyes inside the head, like a human’s eyes.
Frogs have eyes that sit on top of their skull to help them see while submerged in water.
If the eyes don’t break the top outline of the head, the frog will look more like a lizard.
Drawing Straight Back Legs
A sitting frog never has straight back legs because they are always “loaded” for a jump.
If you draw the back legs as straight lines, the anatomy will look broken and stiff.
Always use a folded, angular shape to represent the power tucked away in those limbs.
Troubleshooting
The Frog Looks Like It Is Floating
This usually happens when there is no shadow beneath the body.
To fix this, add a small, dark patch of shading directly under the belly and the feet.
This “grounds” the character and makes it feel like it has actual weight on the surface.
The Legs Look Too Thin or Weak
If the legs look like noodles, you likely haven’t defined the thigh muscle.
Go back and thicken the upper part of the back leg where it attaches to the body.
Adding a bit of bulk here makes the frog look healthy and capable of hopping.
The Drawing Lacks Depth
If your frog looks flat, your lines might all be the same thickness.
Try making the lines on the bottom of the body thicker and the lines on the top thinner.
This simple trick mimics the way light hits an object and creates an instant 3D effect.
Key Takeaways
- Start with simple ovals to establish the scale and posture before adding any detail.
- Ensure the eyes protrude from the head to capture the classic amphibian silhouette.
- Use an angular “Z” shape for the back legs to show the frog is ready to jump.
- Add small circles at the tips of the toes to represent sticky pads.
- Vary your line weight and add irregular spots to create a realistic skin texture.
- Always ground your drawing with a small shadow to give it a sense of place.
Frequently Asked Questions
What kind of pencil is best for the initial sketch?
An HB pencil is ideal because it is hard enough to leave light marks but soft enough to erase easily.
Avoid using heavy pressure, as deep grooves in the paper are impossible to remove later.
Save your darker 2B or 4B pencils for the final shading and texture phases.
How do I make the frog look like it is underwater?
Draw a few wavy horizontal lines across the middle of the frog’s body to represent the water’s surface.
Keep the details above the line sharp and make the details below the line slightly blurred or distorted.
Adding a few small bubbles rising from the nostrils will complete the aquatic effect.
Can I use this method to draw a toad?
Yes, the basic structure is very similar, but you will need to make a few adjustments.
Toads generally have shorter back legs, wider bodies, and much bumpier, drier-looking skin.
Swap the smooth spots for larger, more raised “warts” to get that specific toad appearance.
How do I choose where to put the spots?
Look at photos of real frogs for inspiration, as every species has a different pattern.
Generally, spots are more concentrated on the back and become smaller or disappear near the belly.
Avoid making the pattern perfectly symmetrical, as nature is full of beautiful imperfections.
Our Top Recommended Finds
- Kneaded Eraser: This tool is essential for lifting graphite without damaging the paper surface or leaving crumbs.
- Bristol Board Paper: The smooth surface of this paper is perfect for fine-liner pens and detailed frog skin textures.
- Blending Stumps: These help you create smooth transitions on the frog’s belly and soft shadows underneath the body.
Expanding Your Pond Life Collection
Now that you have mastered the basic frog, you can try drawing it from different angles.
Try sketching a frog in mid-jump with its legs fully extended to practice capturing motion.
You could also add a lily pad or some cattails to create a full environment for your new friend.
Grab your sketchbook and head to a local park today to see if you can find a real-life model to study.
The more you observe these creatures in the wild, the more natural your drawings will become.
& Painting
No rigid rules or pretension. Just practical guides, medium comparisons, and encouraging tips to help you enjoy the drawing & painting process.