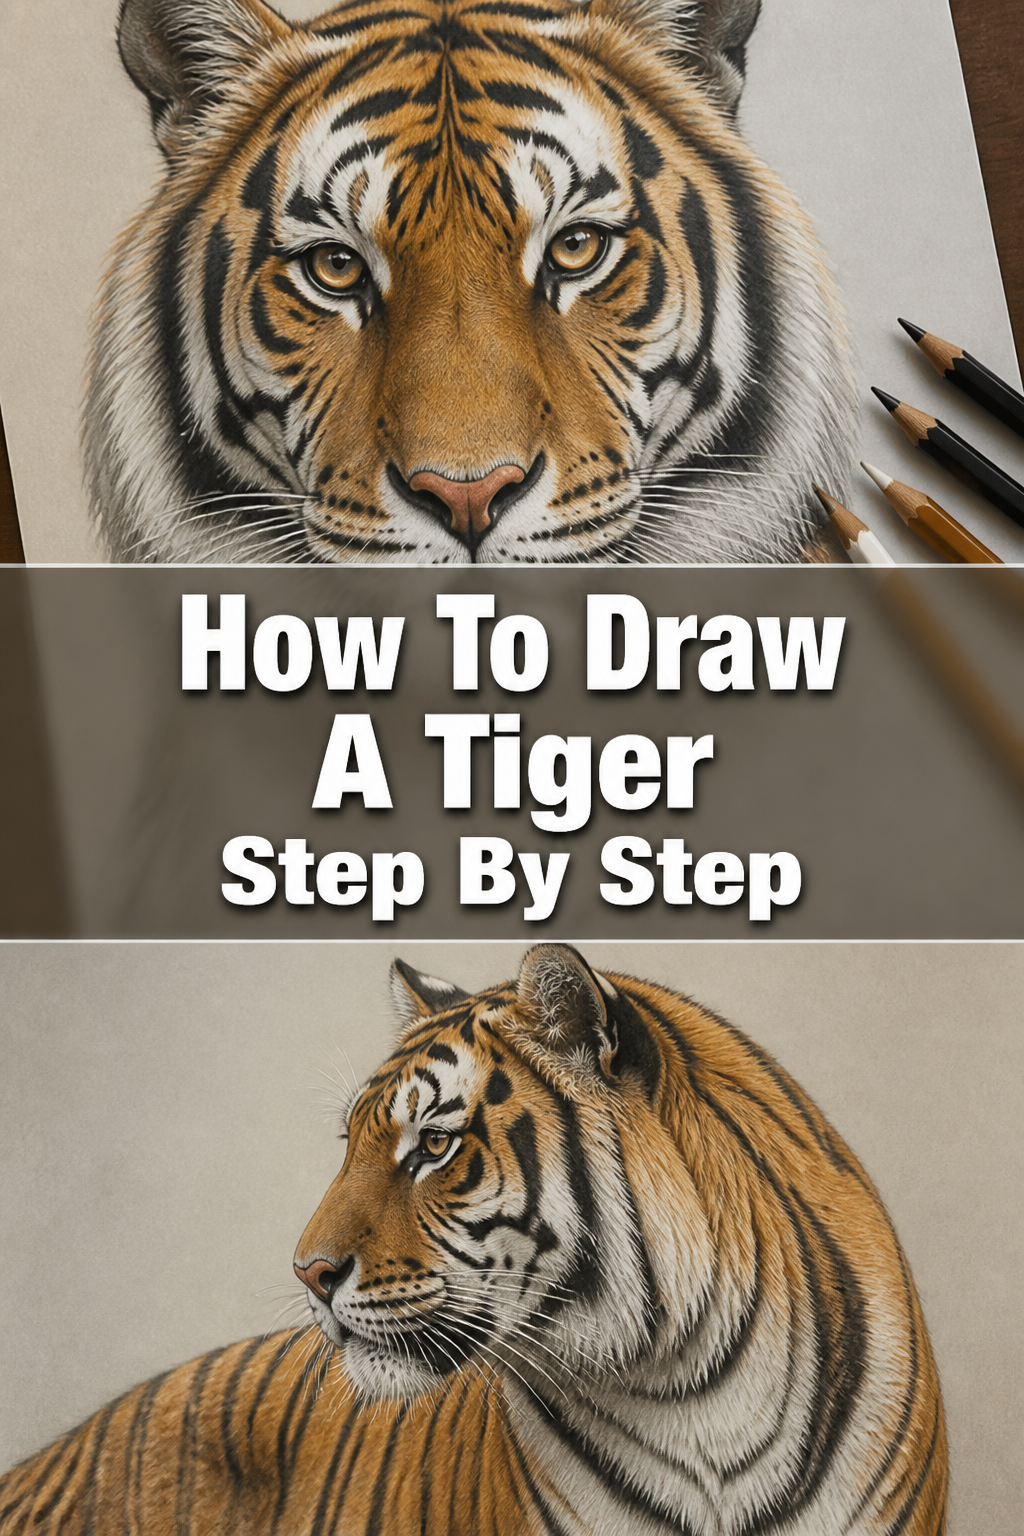
🐅 How To Draw A Tiger Step By Step

& Painting
No rigid rules or pretension. Just practical guides, medium comparisons, and encouraging tips to help you enjoy the drawing & painting process.
Learning to draw a majestic tiger can feel like a big challenge at first.
I remember my own early attempts, struggling with the stripes and the fierce yet graceful expression.
Through years of practice and teaching, I’ve honed a method that breaks down this beautiful creature into manageable, enjoyable steps, which I’m excited to share with you today.
Quick Overview
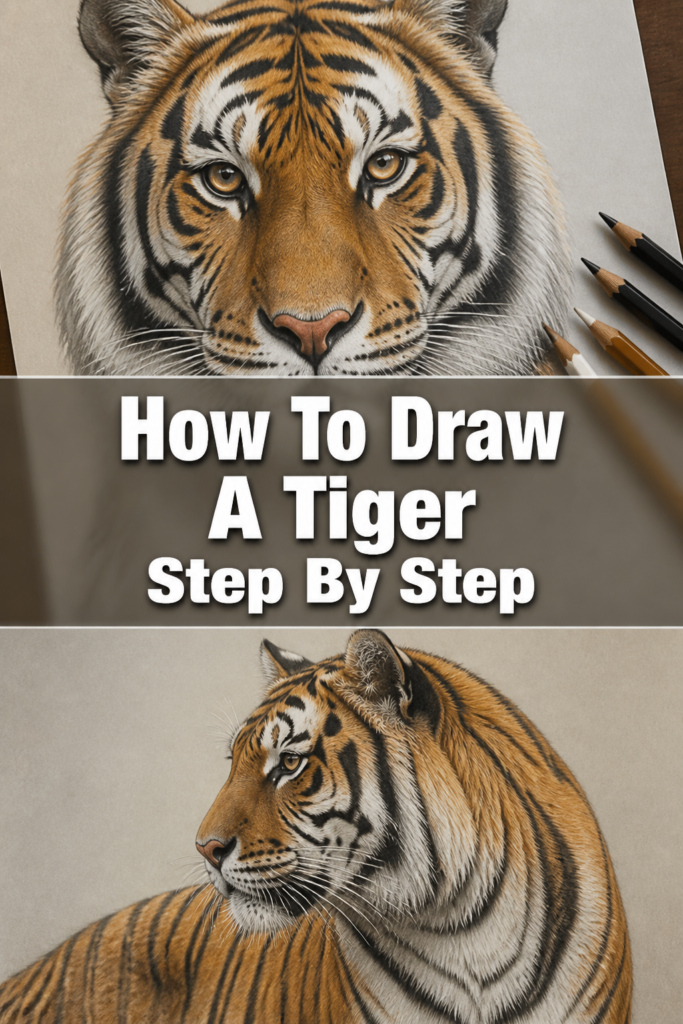
This guide will walk you through creating a stunning tiger drawing, from initial sketches to adding intricate details.
You’ll learn to capture its powerful form and distinctive markings with confidence.
- Time needed: 1-3 hours (depending on detail and experience)
- Difficulty: Intermediate
- What you’ll need: Pencil (HB, 2B, 4B), eraser, paper, reference images (optional)
Step-by-Step Instructions
Step 1: Sketch the Basic Shapes and Proportions
Begin by lightly sketching the fundamental geometric shapes that form the tiger’s body.
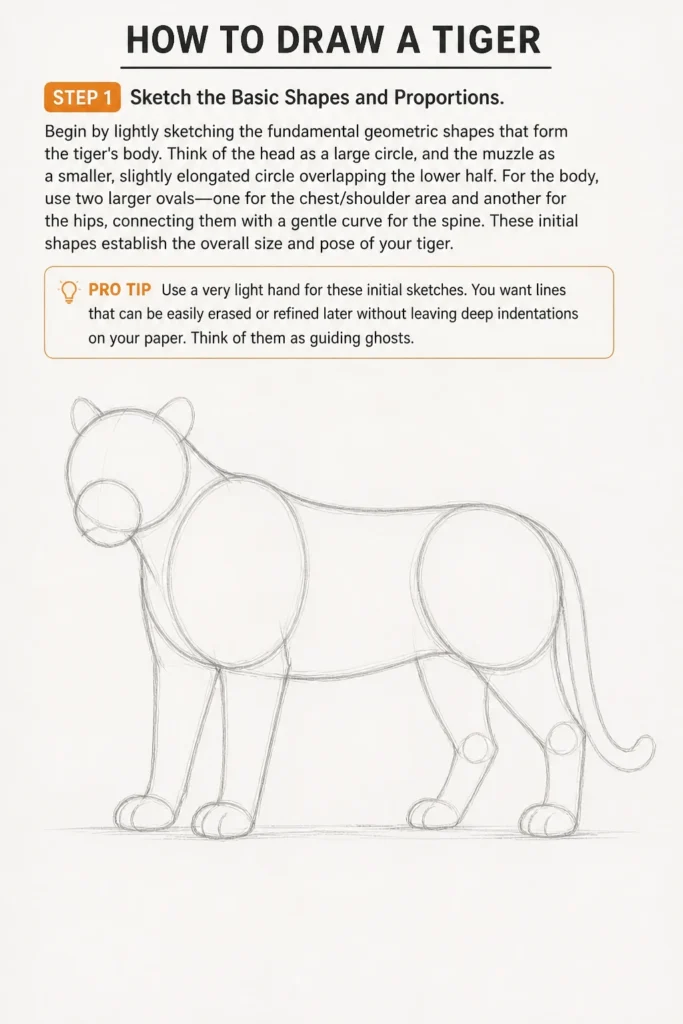
Think of the head as a large circle, and the muzzle as a smaller, slightly elongated circle overlapping the lower half.
For the body, use two larger ovals: one for the chest/shoulder area and another for the hips, connecting them with a gentle curve for the spine.
These initial shapes establish the overall size and pose of your tiger.
Pro Tip: Use a very light hand for these initial sketches. You want lines that can be easily erased or refined later without leaving deep indentations on your paper. Think of them as guiding ghosts.
Step 2: Define the Head and Facial Features
Now, refine the head circle to create the tiger’s distinctive skull shape.
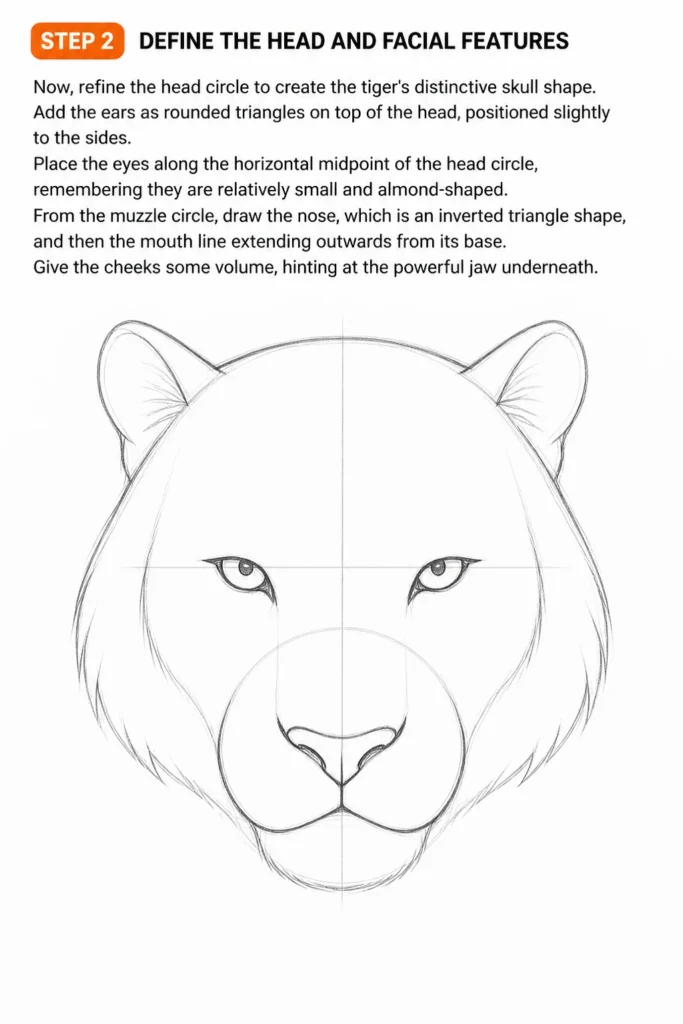
Add the ears as rounded triangles on top of the head, positioned slightly to the sides.
Place the eyes along the horizontal midpoint of the head circle, remembering they are relatively small and almond-shaped.
From the muzzle circle, draw the nose, which is an inverted triangle shape, and then the mouth line extending outwards from its base.
Give the cheeks some volume, hinting at the powerful jaw underneath.
Step 3: Develop the Body and Limb Structure
Connect the two body ovals with graceful, flowing lines to form the tiger’s torso.
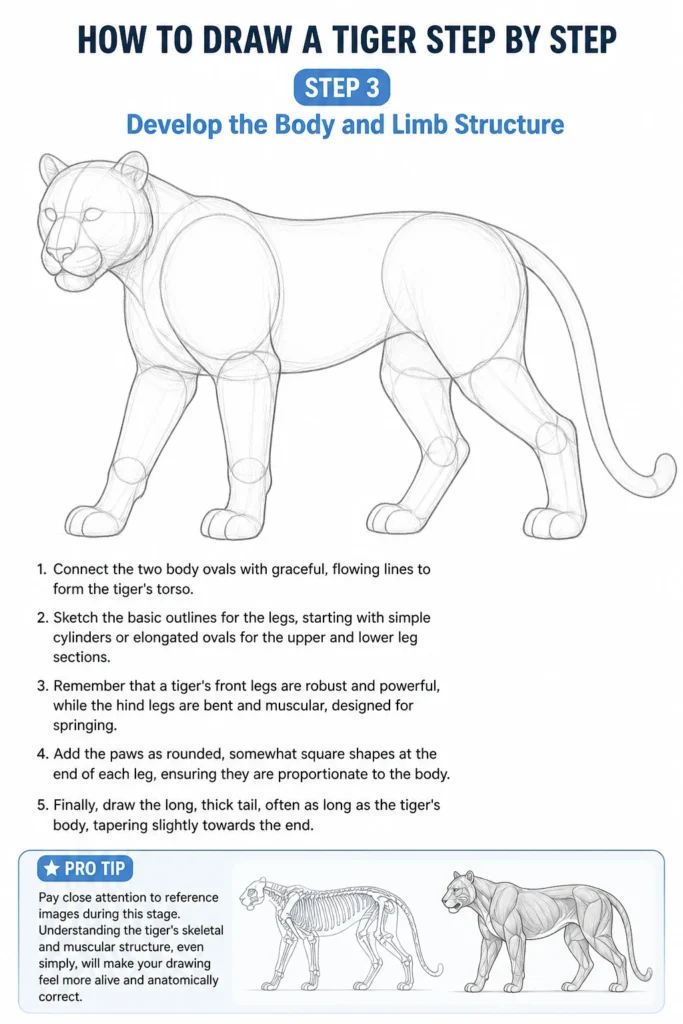
Sketch the basic outlines for the legs, starting with simple cylinders or elongated ovals for the upper and lower leg sections.
Remember that a tiger’s front legs are robust and powerful, while the hind legs are bent and muscular, designed for springing.
Add the paws as rounded, somewhat square shapes at the end of each leg, ensuring they are proportionate to the body.
Finally, draw the long, thick tail, often as long as the tiger’s body, tapering slightly towards the end.
Pro Tip: Pay close attention to reference images during this stage. Understanding the tiger’s skeletal and muscular structure, even simply, will make your drawing feel more alive and anatomically correct.
Step 4: Refine the Anatomy and Add Fur Flow
Erase your initial construction lines, leaving only the refined outlines.
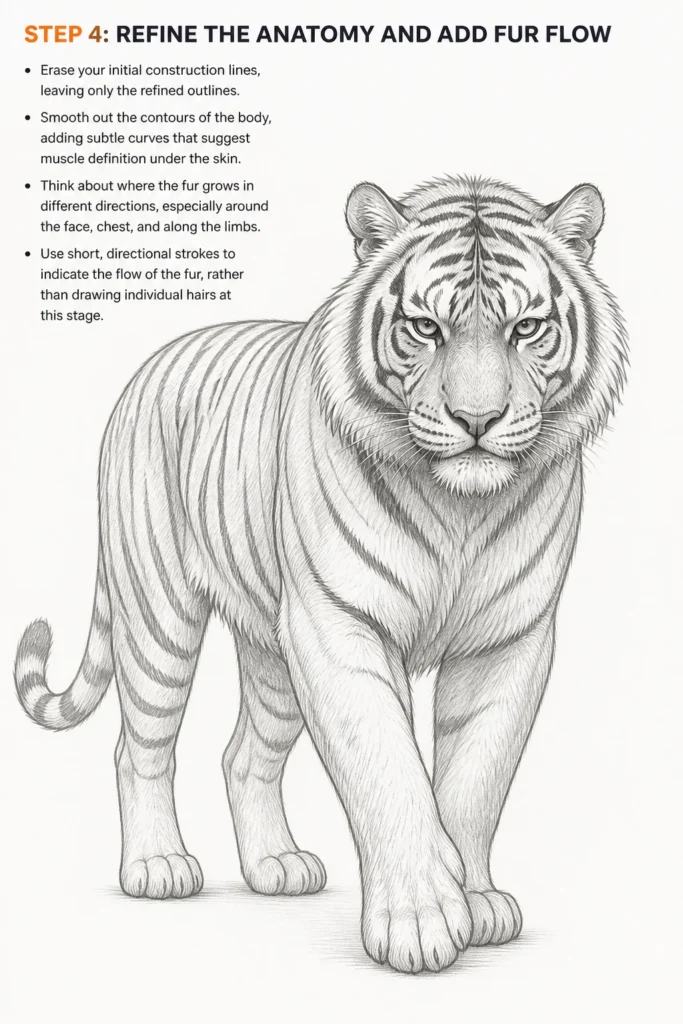
Begin to smooth out the contours of the body, adding subtle curves that suggest muscle definition under the skin.
Think about where the fur grows in different directions, especially around the face, chest, and along the limbs.
Use short, directional strokes to indicate the flow of the fur, rather than drawing individual hairs at this stage.
This helps give your tiger a sense of volume and texture.
Step 5: Introduce the Distinctive Stripes
This is where the tiger truly comes to life.
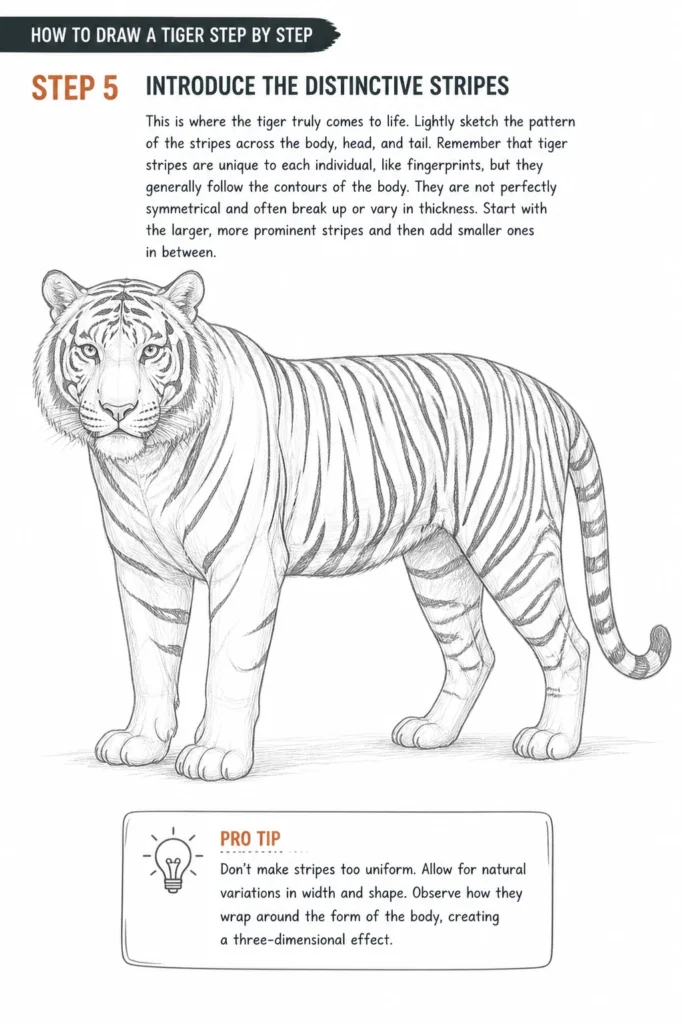
Lightly sketch the pattern of the stripes across the body, head, and tail.
Remember that tiger stripes are unique to each individual, like fingerprints, but they generally follow the contours of the body.
They are not perfectly symmetrical and often break up or vary in thickness.
Start with the larger, more prominent stripes and then add smaller ones in between.
Pro Tip: Don’t make stripes too uniform. Allow for natural variations in width and shape. Observe how they wrap around the form of the body, creating a three-dimensional effect.
Step 6: Begin Shading and Adding Depth
Using a softer pencil (like 2B or 4B), start filling in the stripes.
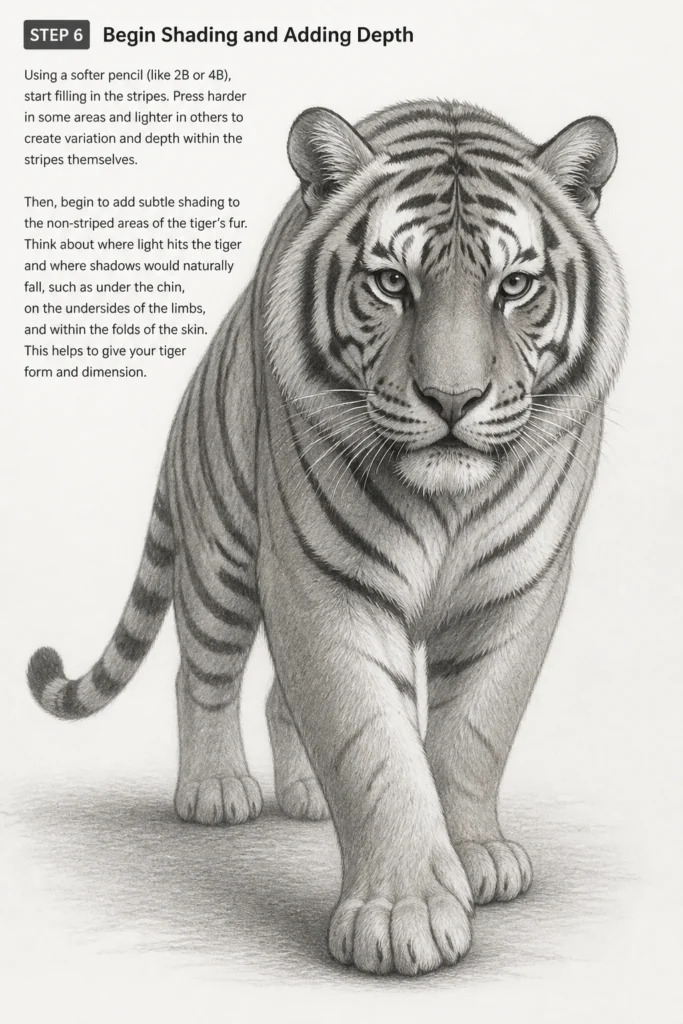
Press harder in some areas and lighter in others to create variation and depth within the stripes themselves.
Then, begin to add subtle shading to the non-striped areas of the tiger’s fur.
Think about where light hits the tiger and where shadows would naturally fall, such as under the chin, on the undersides of the limbs, and within the folds of the skin.
This helps to give your tiger form and dimension.
Step 7: Detail the Fur Texture and Facial Expression
With a sharper pencil, go back over the fur and add finer textural details.
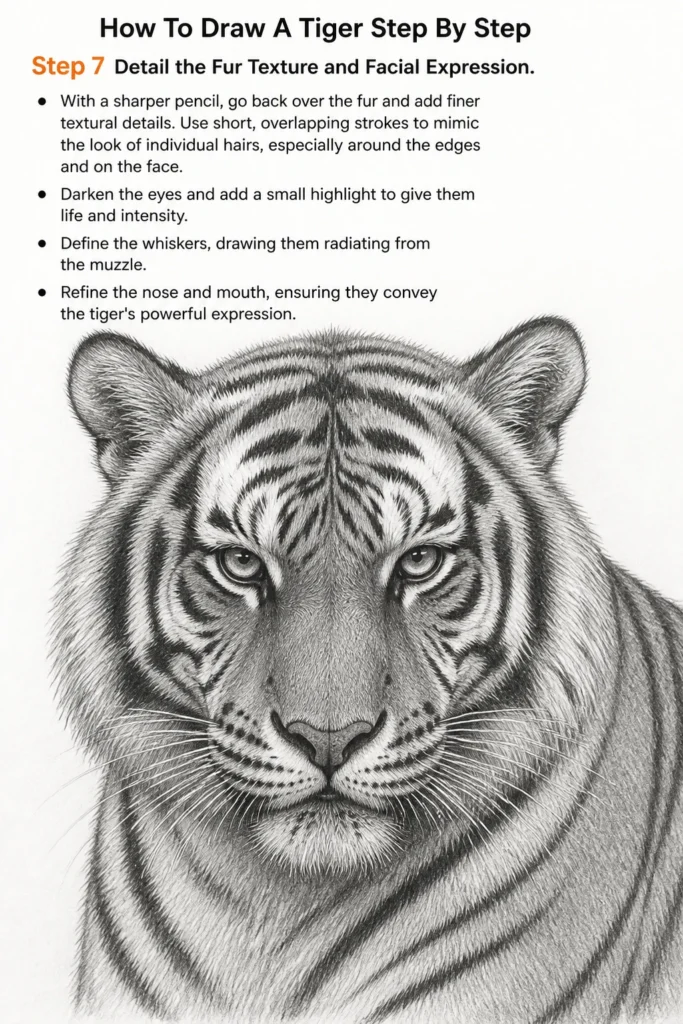
Use short, overlapping strokes to mimic the look of individual hairs, especially around the edges and on the face.
Darken the eyes and add a small highlight to give them life and intensity.
Define the whiskers, drawing them radiating from the muzzle.
Refine the nose and mouth, ensuring they convey the tiger’s powerful expression.
Step 8: Final Touches and Refinement
Step back from your drawing and assess it as a whole.
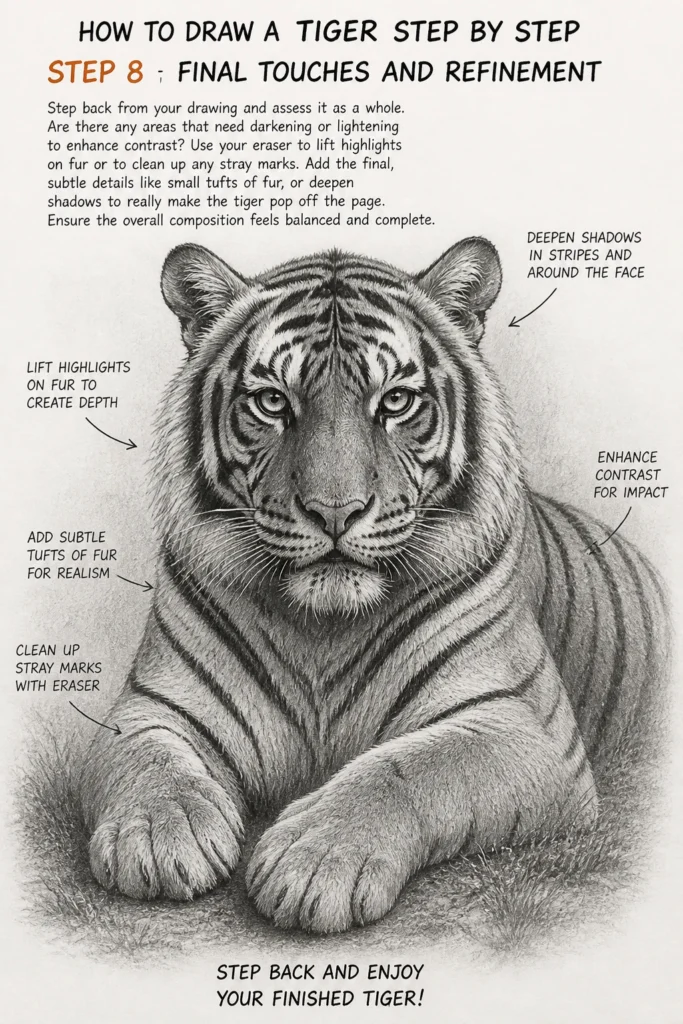
Are there any areas that need darkening or lightening to enhance contrast?
Use your eraser to lift highlights on fur or to clean up any stray marks.
Add the final, subtle details like small tufts of fur, or deepen shadows to really make the tiger pop off the page.
Ensure the overall composition feels balanced and complete.
Common Mistakes to Avoid
Ignoring Basic Anatomy
Many beginners jump straight into details without establishing a solid foundation of shapes and proportions.
This often results in a tiger that looks stiff or disproportionate.
Always start with simple forms to build your animal’s structure correctly before adding fur and stripes.
Making Stripes Too Uniform
Drawing stripes as perfectly even, parallel lines will make your tiger look flat and unnatural.
Tiger stripes vary in width, length, and direction, curving around the body’s contours.
Allow for irregularity and observe how they flow with the musculature to create a more dynamic and realistic pattern.
Lack of Contrast
A common pitfall is drawing everything with the same pencil pressure, leading to a flat image.
Tigers have stark contrasts between their dark stripes and lighter fur, as well as areas of shadow and light.
Push your darks darker and preserve your lights to give your drawing depth and visual impact.
Rushing the Details
It’s tempting to jump to drawing individual hairs and whiskers early on.
However, focusing on details before the overall form and shading are established can lead to a messy or underdeveloped drawing.
Build your drawing in layers, from general shapes to specific textures, for a more polished result.
Troubleshooting
My Tiger Looks Stiff and Lifeless
Often, this is due to relying too heavily on straight lines or symmetrical shapes in the initial stages.
Try re-evaluating your initial sketch, emphasizing curves and dynamic angles that suggest movement and muscle.
Use more organic, flowing lines when connecting the main body parts to convey natural posture.
The Stripes Don’t Look Natural
If your stripes appear pasted on rather than integrated, you might be drawing them too flatly.
Think about the three-dimensional form of the tiger’s body and how the stripes would wrap around it.
Vary their thickness and allow them to subtly curve and break up, following the underlying muscle structure.
My Drawing Lacks Depth
This usually indicates insufficient contrast between light and shadow areas.
Go back with a softer pencil (like 4B or 6B) and deepen the darkest shadows, such as under the belly, in the folds of the legs, and inside the ears.
Conversely, use your eraser to carefully lift highlights on the areas directly hit by light, enhancing the sense of volume.
Key Takeaways
- Start with basic shapes to establish accurate proportions and pose.
- Refine the head and body contours before adding intricate details.
- Observe the flow of fur and the unique pattern of tiger stripes.
- Use varying pencil pressure to create depth through shading and contrast.
- Build your drawing in layers, from general forms to specific textures.
- Practice regularly and use reference images to improve your observational skills.
Frequently Asked Questions
What pencil hardness should I use?
Begin with an HB pencil for light construction lines that are easy to erase. As you add detail and shading, switch to softer pencils like 2B, 4B, and even 6B for darker tones and richer contrast, giving your tiger more depth.
How do I make the fur look realistic?
Avoid drawing every single hair. Instead, use short, directional strokes that follow the tiger’s form and fur growth patterns. Layer these strokes and vary their length and pressure to create texture, especially around edges and highlights.
Should I use a reference image?
Absolutely! Using high-quality reference images is crucial for understanding tiger anatomy, muscle structure, stripe patterns, and expressions. It helps you capture the essence of the animal more accurately and realistically.
How can I capture the tiger’s fierce expression?
Focus on the eyes and brow. Tigers often have a slightly narrowed eye shape and a prominent brow ridge, which can be emphasized with subtle shading. The muzzle and whiskers also contribute significantly to the overall expression, so pay attention to their positioning and angle.
Our Top Recommended Finds
- Good Quality Sketch Pencils: A set with a range from 2H to 6B allows for versatility in line work and shading.
- Kneaded Eraser: Perfect for lifting graphite gently, creating subtle highlights, and cleaning up without damaging the paper.
- Smooth Drawing Paper: Paper with a slight tooth holds graphite well, allowing for smooth blending and detailed texture work.
Your Masterpiece Awaits
Drawing a tiger is a rewarding journey, combining foundational art skills with the challenge of capturing a powerful creature.
Each stroke you make brings it closer to life on your paper.
Don’t be afraid to experiment, make mistakes, and learn from every attempt.
Now, grab your pencils and start sketching your magnificent tiger today!
& Painting
No rigid rules or pretension. Just practical guides, medium comparisons, and encouraging tips to help you enjoy the drawing & painting process.