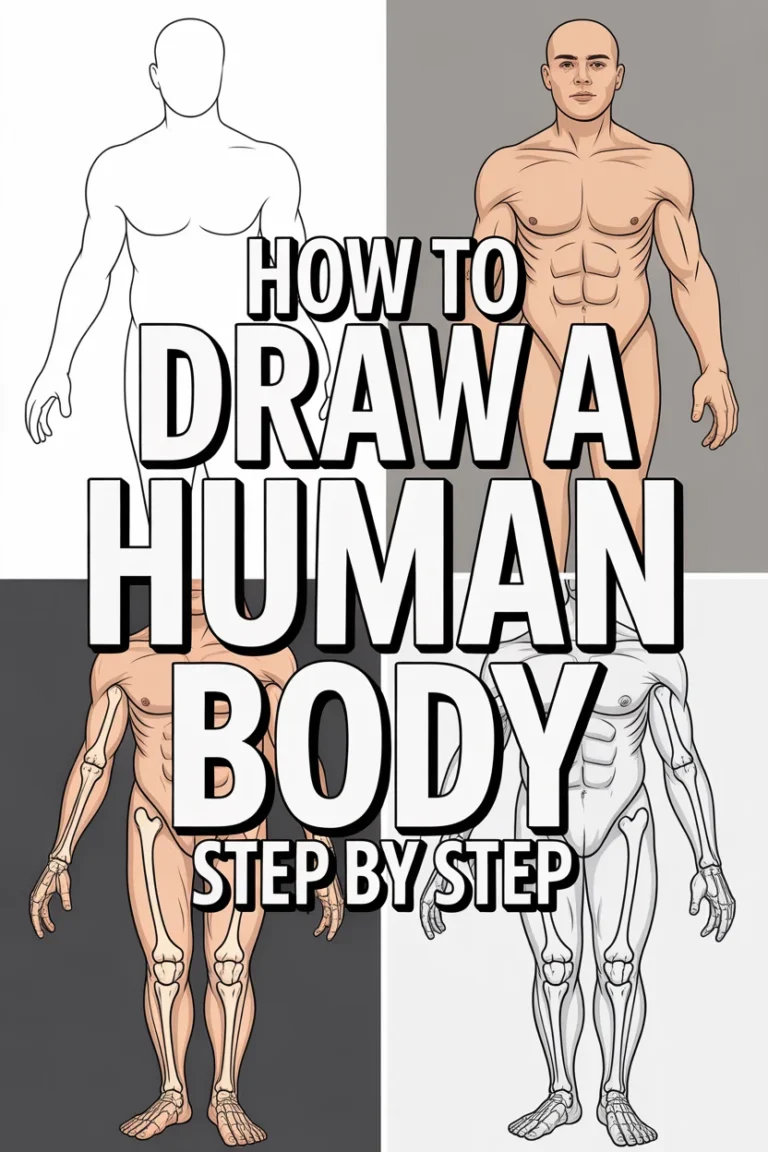
🎨 How To Draw A Body Easy Step By Step
Learning to draw the human body can feel like a daunting task.
When I first started, I often felt overwhelmed by anatomy and proportions.
But with the right approach, breaking it down into simple shapes makes all the difference, and this guide will show you exactly how.
Quick Overview
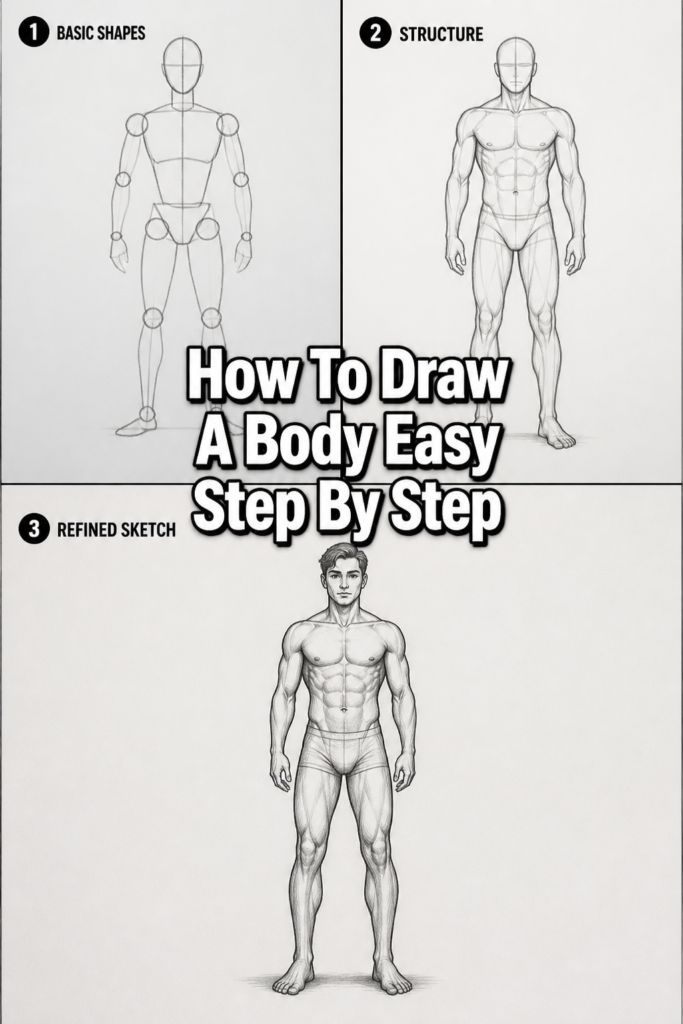
This guide will help you build a foundational understanding of drawing the human form, starting with basic shapes and progressing to more refined figures.
- Time needed: 1-2 hours for your first complete drawing, with ongoing practice recommended.
- Difficulty: Beginner
- What you’ll need: Pencil (HB or 2B recommended), paper, eraser, and optional reference photos.
Step-by-Step Instructions
Step 1: Sketch the Basic Head Shape and Line of Action
Start by drawing a simple oval for the head. This doesn’t need to be perfect.
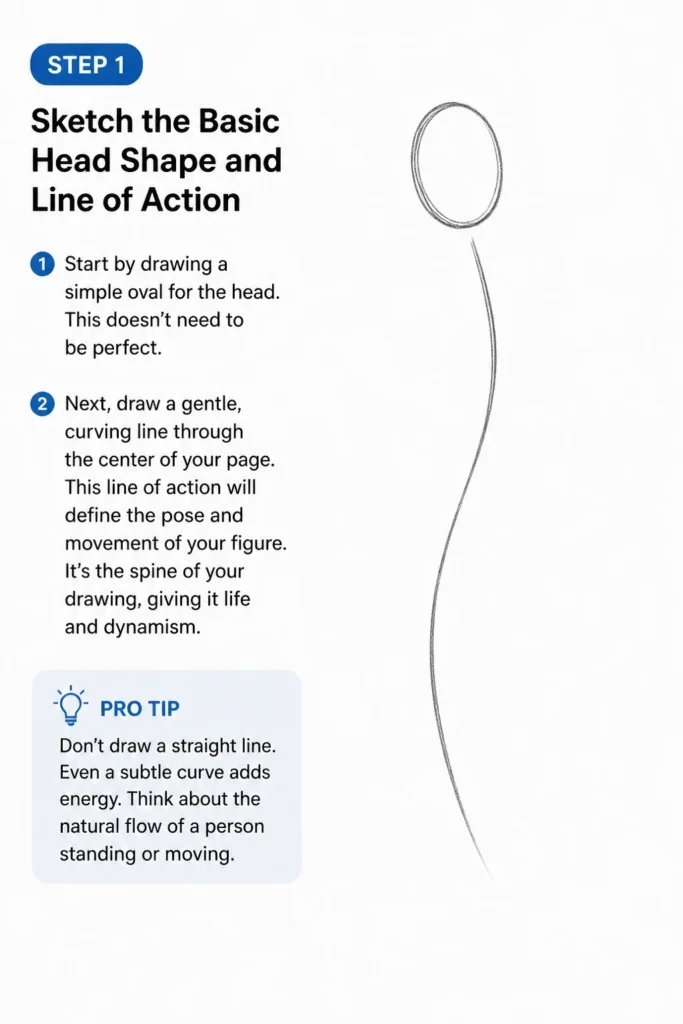
Next, draw a gentle, curving line through the center of your page. This “line of action” will define the pose and movement of your figure.
It’s the spine of your drawing, giving it life and dynamism.
Pro Tip: Don’t draw a straight line. Even a subtle curve adds energy. Think about the natural flow of a person standing or moving.
Step 2: Establish the Torso and Pelvis
Below the head, draw a simple box or an inverted trapezoid for the ribcage. This represents the upper torso.
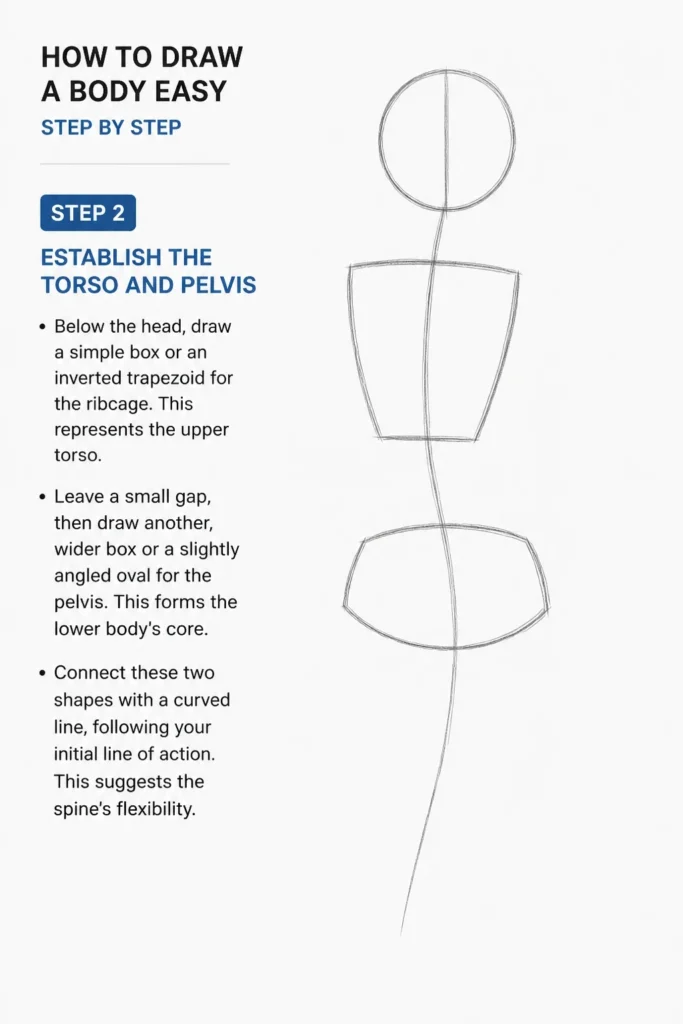
Leave a small gap, then draw another, wider box or a slightly angled oval for the pelvis. This forms the lower body’s core.
Connect these two shapes with a curved line, following your initial line of action. This suggests the spine’s flexibility.
Step 3: Connect the Forms with the Shoulder and Hip Lines
Draw a horizontal line across the top of the ribcage box for the shoulders. This line can tilt to express pose.
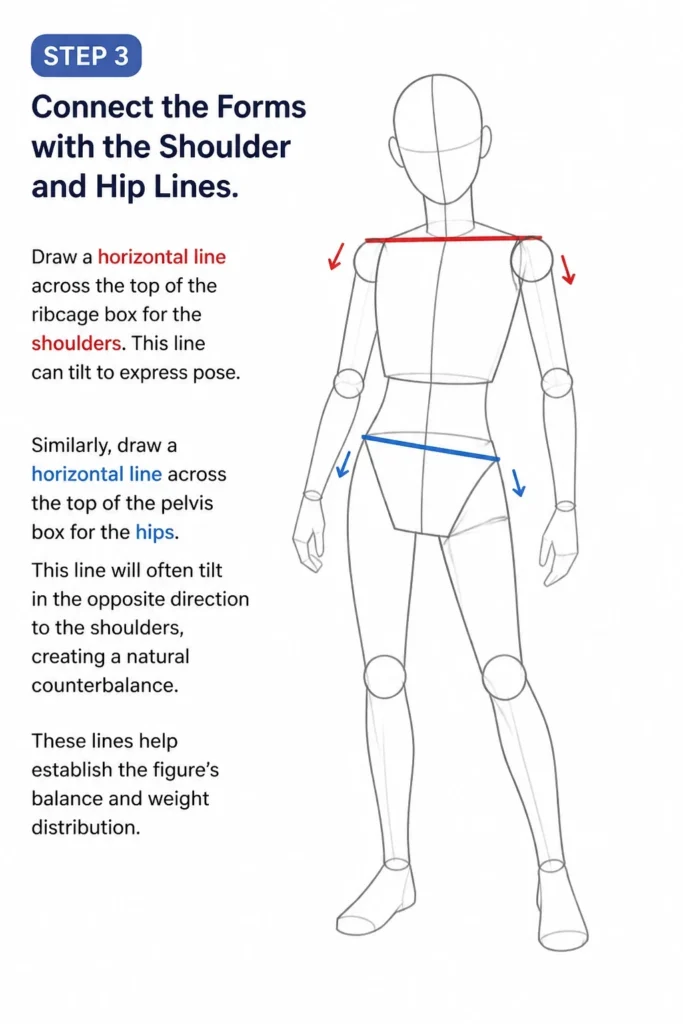
Similarly, draw a horizontal line across the top of the pelvis box for the hips. This line will often tilt in the opposite direction to the shoulders, creating a natural counterbalance.
These lines help establish the figure’s balance and weight distribution.
Step 4: Map Out the Limbs with Simple Cylinders
From the shoulder line, draw two simple lines extending downwards for the arms. Use small circles for the elbows and wrists.
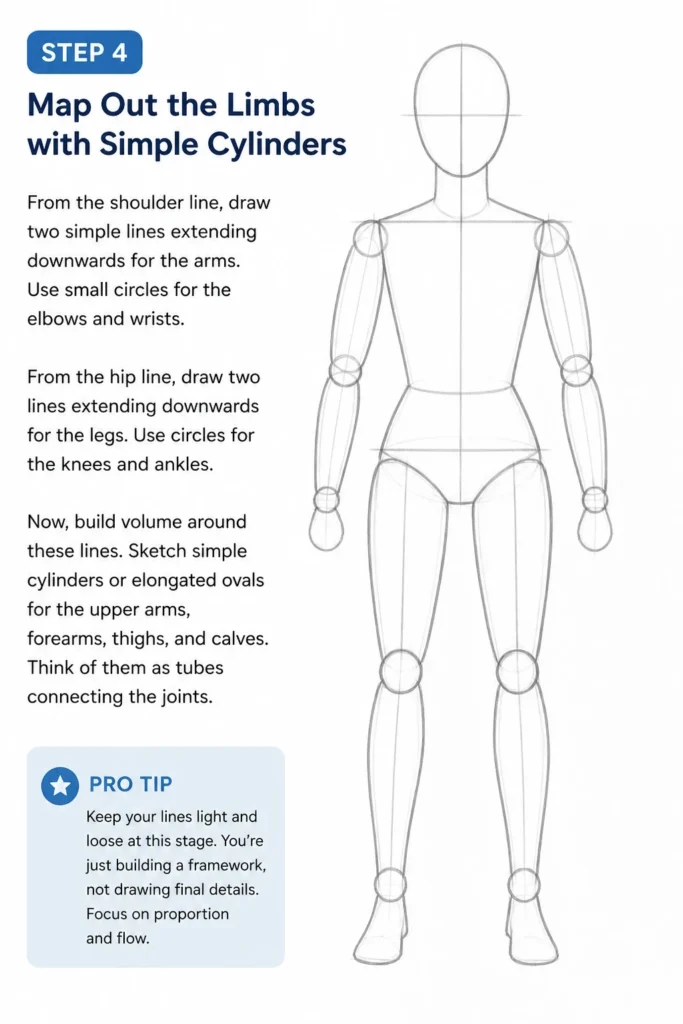
From the hip line, draw two lines extending downwards for the legs. Use circles for the knees and ankles.
Now, build volume around these lines. Sketch simple cylinders or elongated ovals for the upper arms, forearms, thighs, and calves.
Think of them as tubes connecting the joints.
Pro Tip: Keep your lines light and loose at this stage. You’re just building a framework, not drawing final details. Focus on proportion and flow.
Step 5: Add Hands and Feet as Basic Shapes
At the end of the arm cylinders, draw simple blocks or mitt shapes for the hands. Don’t worry about individual fingers yet.
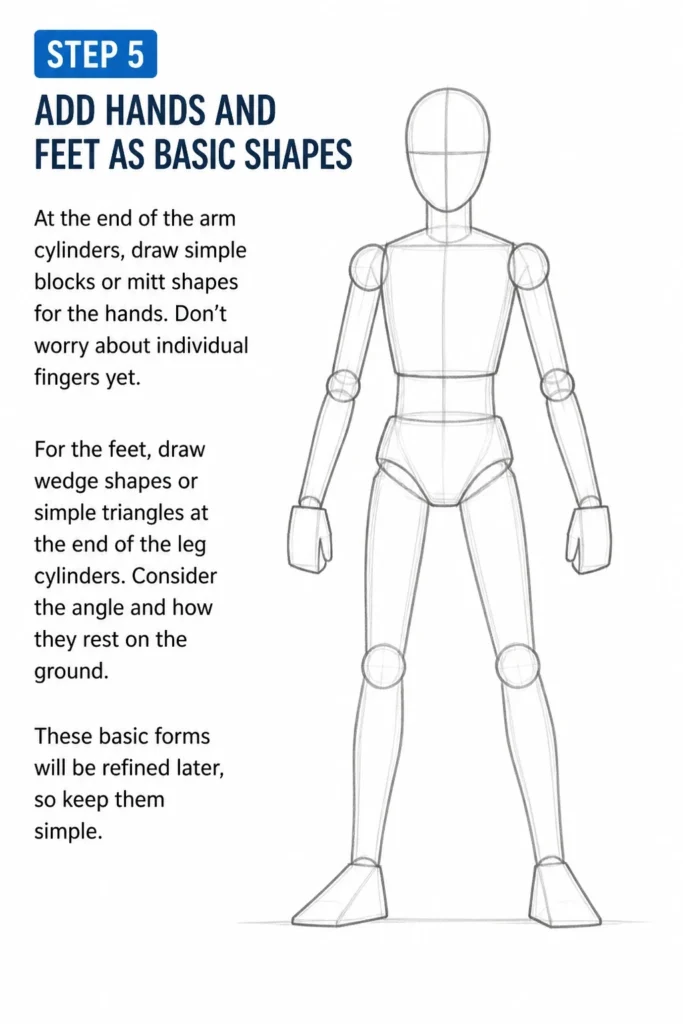
For the feet, draw wedge shapes or simple triangles at the end of the leg cylinders. Consider the angle and how they rest on the ground.
These basic forms will be refined later, so keep them simple.
Step 6: Refine the Form and Connect the Shapes
Now, begin to smooth out the connections between your basic shapes. Gently curve the lines to create a more organic silhouette.
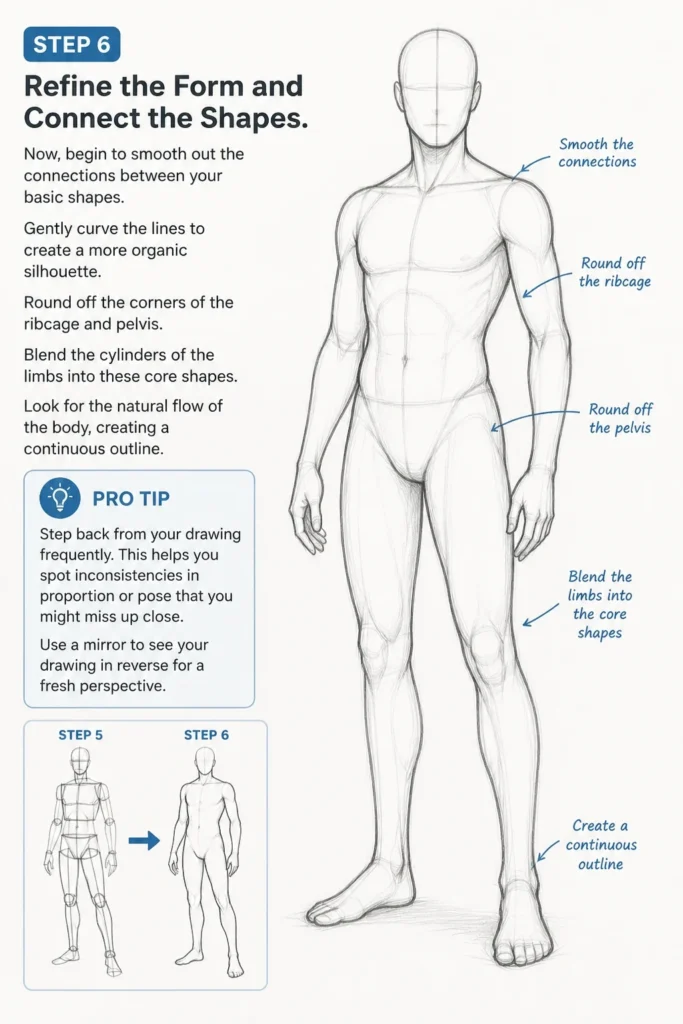
Round off the corners of the ribcage and pelvis. Blend the cylinders of the limbs into these core shapes.
Look for the natural flow of the body, creating a continuous outline.
Pro Tip: Step back from your drawing frequently. This helps you spot inconsistencies in proportion or pose that you might miss up close. Use a mirror to see your drawing in reverse for a fresh perspective.
Step 7: Erase Construction Lines and Add Basic Anatomy
Carefully erase the underlying construction lines you no longer need. Leave only the refined outline of your figure.
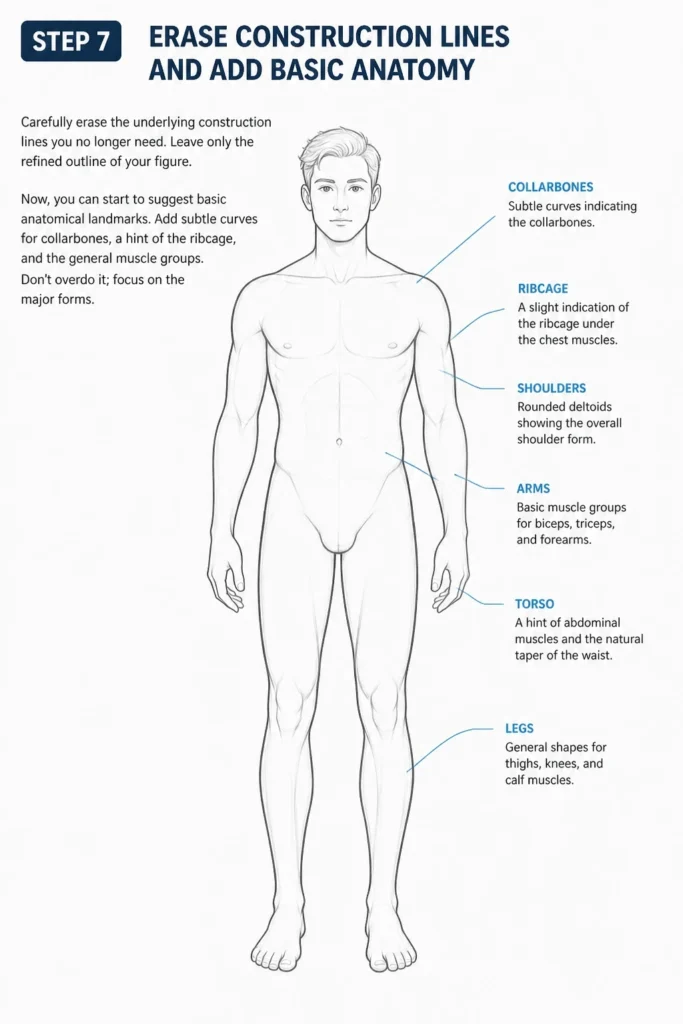
Now, you can start to suggest basic anatomical landmarks. Add subtle curves for collarbones, a hint of the ribcage, and the general muscle groups.
Don’t overdo it; focus on the major forms.
Step 8: Detail the Features and Add Definition
Once the body’s structure is solid, you can add details to the hands and feet. Sketch in fingers and toes, focusing on their overall shape and placement.
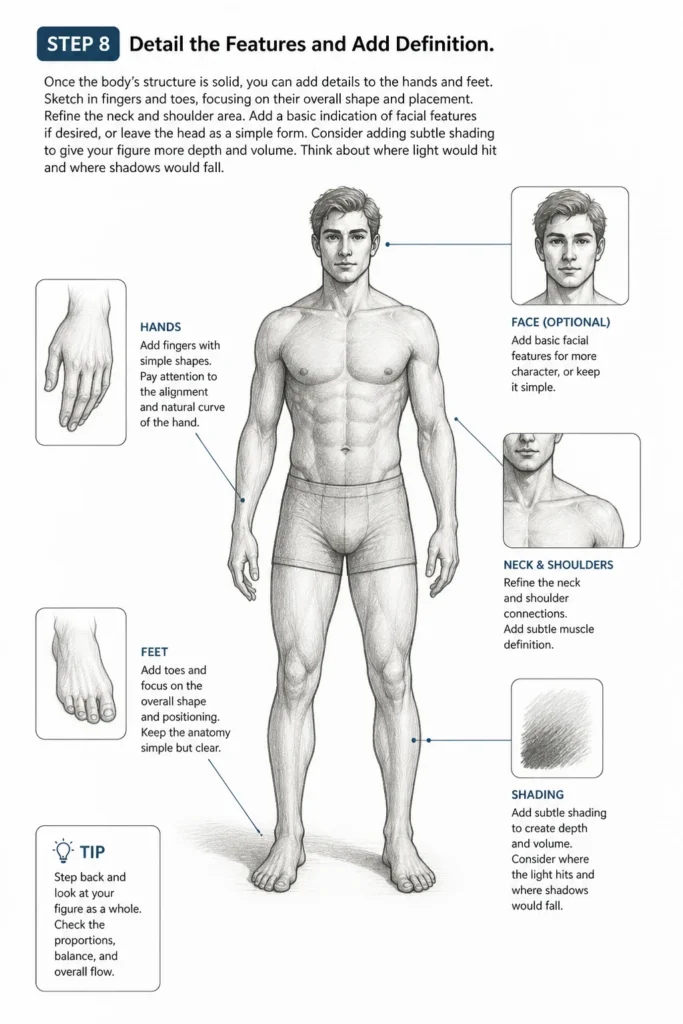
Refine the neck and shoulder area. Add a basic indication of facial features if desired, or leave the head as a simple form.
Consider adding subtle shading to give your figure more depth and volume. Think about where light would hit and where shadows would fall.
Common Mistakes to Avoid
Stiff Poses and Lack of Dynamism
A common pitfall is drawing figures that look rigid or unnatural, often because artists start with straight lines.
The human body is full of curves and twists, even when standing still. Always begin with a line of action to inject natural movement into your drawing.
Embrace opposing curves in the shoulders and hips to create a sense of balance and life.
Disproportionate Limbs and Body Parts
One arm might be too long, or a head might be too small, throwing off the entire figure. This often happens when artists don’t use a consistent measuring system.
Use the head as a unit of measurement. An average adult figure is about 7-8 heads tall.
Constantly compare the lengths and sizes of different body parts to each other as you draw.
Ignoring Basic Forms and Jumping to Details
Many beginners try to draw muscles and intricate details before establishing the underlying structure.
This leads to drawings that lack solidity and depth. Always build your figure from simple, geometric shapes first.
Think of it like building a house: you need a strong frame before you add the walls and decorations.
Rushing the Sketching Phase
It’s tempting to want to get to the “finished” drawing quickly, but the initial rough sketch is the most crucial part.
Spending adequate time on your construction lines and basic shapes ensures a strong foundation. Don’t be afraid to make many light lines and adjust.
A solid blueprint prevents major structural errors later on.
Troubleshooting
My Drawing Looks Flat and Lifeless
If your figure lacks depth, you might be drawing too much on a single plane. Try to think in three dimensions.
Use overlapping shapes to suggest depth (e.g., one arm slightly in front of the torso). Also, ensure your line of action has a strong curve.
Practicing gesture drawing, which focuses on capturing movement and energy quickly, can greatly improve dynamism.
My Body Parts Don’t Connect Smoothly
Often, this means you’re not blending your basic shapes into each other. Think of the body as a series of connected, flowing forms, not separate pieces.
When connecting cylinders (limbs) to boxes (torso/pelvis), use gentle, continuous curves. Pay attention to how muscles flow over joints.
Use your eraser to refine the transitional lines until they feel natural and organic.
I Can’t Get the Proportions Right Consistently
Proportion is a skill that improves significantly with practice and observation. Don’t get discouraged if it’s not perfect immediately.
Use measuring techniques, like holding your pencil up to compare lengths on your reference photo and then transferring those relative measurements to your paper.
Continuously check the relationships between body parts: “Is this arm the same length as the torso?” “Is the head one-eighth of the total height?”
Key Takeaways
- Always start with a dynamic line of action to give your figure life and movement.
- Break down the complex human form into simple, manageable geometric shapes like ovals, boxes, and cylinders.
- Use the head as a basic unit of measurement to maintain consistent proportions throughout your drawing.
- Work from general shapes to specific details, refining your drawing in layers.
- Don’t be afraid to use light, loose lines in the initial stages and erase as you refine your forms.
- Practice regularly and use reference photos to observe real human anatomy and poses.
Frequently Asked Questions
How long will it take to draw a body well?
Mastering body drawing is a journey, not a single destination. You’ll see improvement with each practice session, but consistent effort over weeks and months will yield significant results. Focus on understanding the process, not just the outcome.
Should I use reference photos when drawing a body?
Absolutely, yes! Reference photos are invaluable learning tools. They help you observe real anatomy, understand different poses, and grasp how light interacts with the form. Even experienced artists use references regularly to ensure accuracy and inspire new ideas.
What if my drawing still looks stiff or unnatural?
This is a very common challenge. Revisit your line of action and try to exaggerate its curve. Focus on the “contrapposto” principle where the shoulders and hips tilt in opposite directions. Also, try quick gesture drawings to loosen up your hand and capture the essence of movement.
Can these steps be used to draw different body types?
Yes, the foundational principles remain the same regardless of body type. The basic structure of the head, torso, pelvis, and limbs applies to everyone. You’ll simply adjust the proportions, width, and volume of the shapes to reflect the specific body type you’re aiming for.
Our Top Recommended Finds
- Good Quality Sketchbook: A sketchbook with slightly thicker paper (70-100gsm) can withstand erasing and allows for smoother blending.
- Drawing Pencil Set: A set including pencils of varying hardness (e.g., 2H, HB, 2B, 4B) gives you a range of line weights and shading options.
- Kneaded Eraser: Unlike standard erasers, a kneaded eraser lifts graphite without damaging the paper and can be molded for precise erasing of construction lines.
Embark on Your Artistic Journey
You now have a clear, step-by-step roadmap to drawing the human body with confidence.
Remember, every artist starts somewhere, and practice is your most powerful tool.
Don’t be afraid to experiment, make mistakes, and most importantly, enjoy the process of bringing your figures to life on paper.