🎨 How To Sketch A Face Step By Step

& Painting
No rigid rules or pretension. Just practical guides, medium comparisons, and encouraging tips to help you enjoy the drawing & painting process.
Learning to sketch a face can feel intimidating at first. Many aspiring artists struggle with capturing likeness or getting proportions right. This guide draws on years of personal practice and observation to simplify the process. You can absolutely learn to draw a recognizable face, even if you’ve never tried before.
Quick Overview
This guide will walk you through the fundamental steps to sketch a basic face. You will learn how to establish correct proportions and place features accurately. By the end, you’ll have a solid foundation for more complex portrait work.
- Time needed: 60-90 minutes for a first attempt
- Difficulty: Beginner
- What you’ll need: Pencil (HB or 2B recommended), paper, eraser (kneaded or vinyl)
Step-by-Step Instructions
Step 1: Map Out the Basic Head Shape
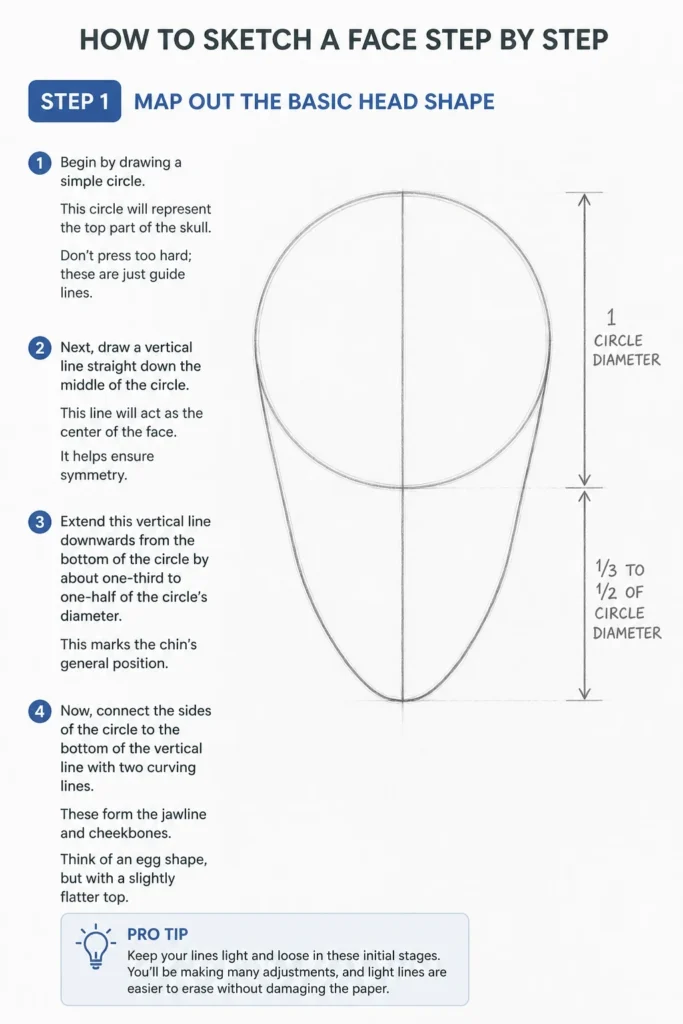
Begin by drawing a simple circle. This circle will represent the top part of the skull. Don’t press too hard; these are just guide lines.
Next, draw a vertical line straight down the middle of the circle. This line will act as the center of the face. It helps ensure symmetry.
Extend this vertical line downwards from the bottom of the circle by about one-third to one-half of the circle’s diameter. This marks the chin’s general position.
Now, connect the sides of the circle to the bottom of the vertical line with two curving lines. These form the jawline and cheekbones. Think of an egg shape, but with a slightly flatter top.
Pro Tip: Keep your lines light and loose in these initial stages. You’ll be making many adjustments, and light lines are easier to erase without damaging the paper.
Step 2: Establish the Center and Eye Lines
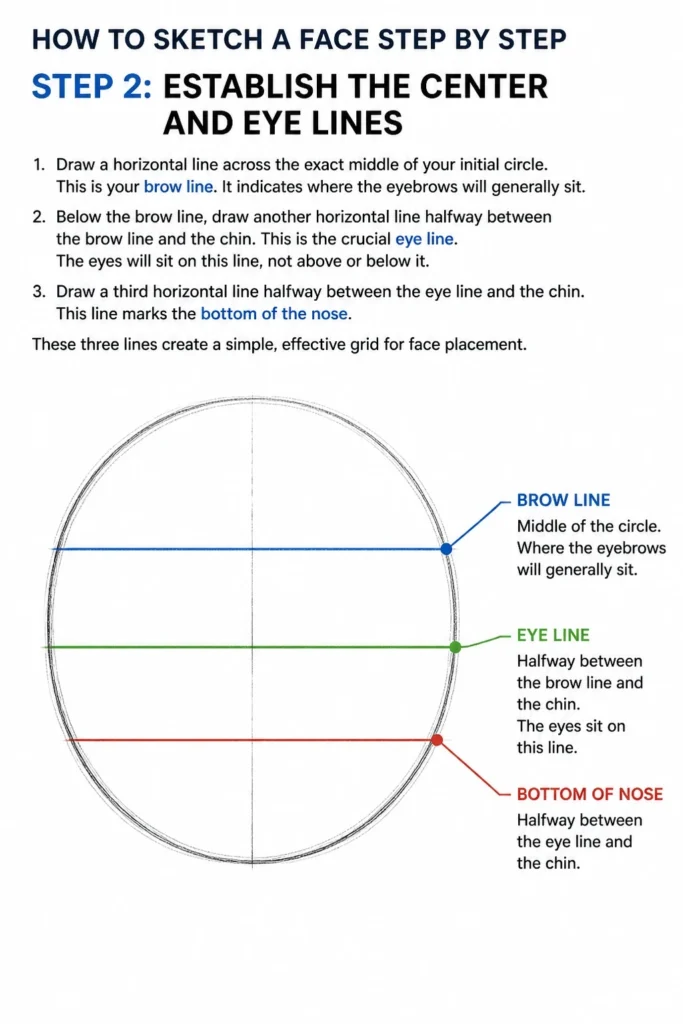
Draw a horizontal line across the exact middle of your initial circle. This is your brow line. It indicates where the eyebrows will generally sit.
Below the brow line, draw another horizontal line halfway between the brow line and the chin. This is the crucial eye line. The eyes will sit on this line, not above or below it.
Now, draw a third horizontal line halfway between the eye line and the chin. This line marks the bottom of the nose. These three lines create a simple, effective grid for face placement.
Step 3: Place and Shape the Eyes
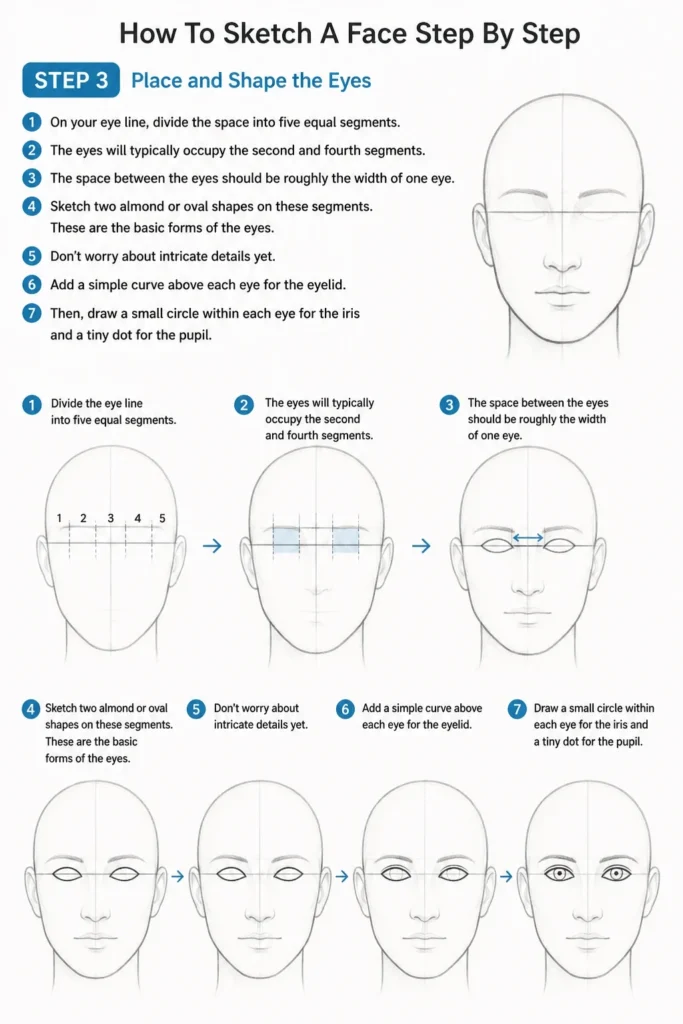
On your eye line, divide the space into five equal segments. The eyes will typically occupy the second and fourth segments. The space between the eyes should be roughly the width of one eye.
Sketch two almond or oval shapes on these segments. These are the basic forms of the eyes. Don’t worry about intricate details yet.
Add a simple curve above each eye for the eyelid. Then, draw a small circle within each eye for the iris and a tiny dot for the pupil.
Step 4: Structure the Nose
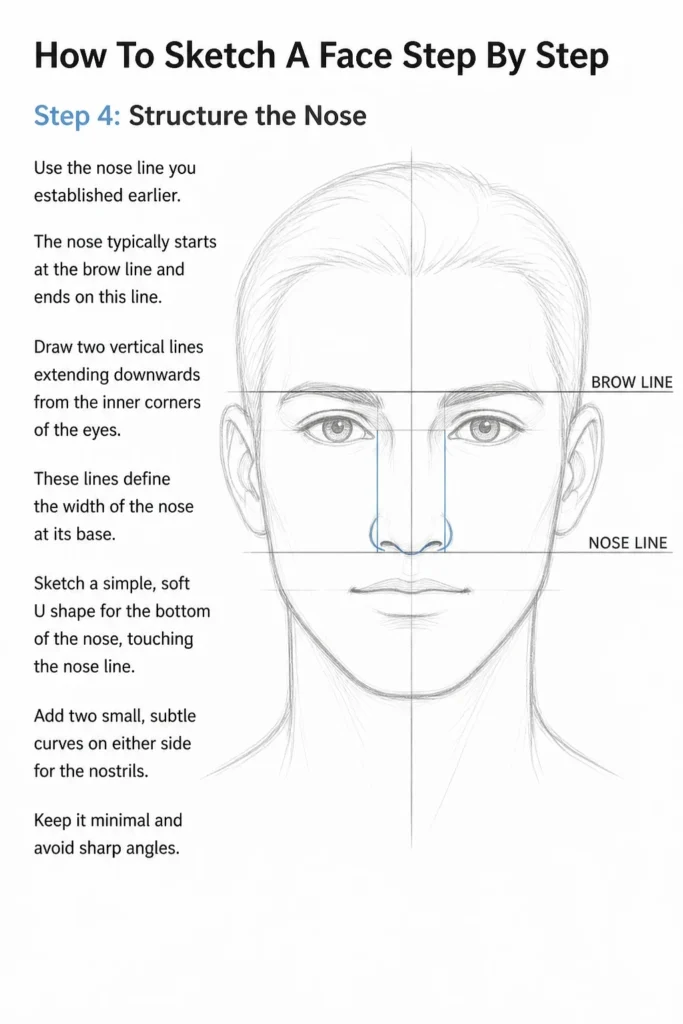
Use the nose line you established earlier. The nose typically starts at the brow line and ends on this line.
Draw two vertical lines extending downwards from the inner corners of the eyes. These lines define the width of the nose at its base.
Sketch a simple, soft “U” shape for the bottom of the nose, touching the nose line. Add two small, subtle curves on either side for the nostrils. Keep it minimal and avoid sharp angles.
Step 5: Position and Form the Mouth
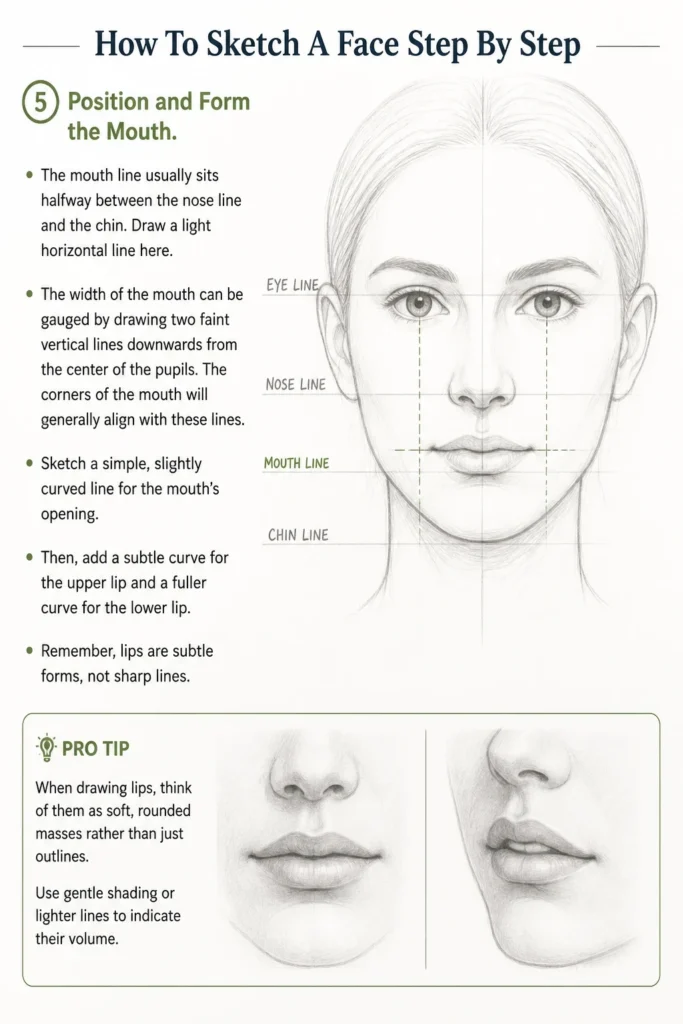
The mouth line usually sits halfway between the nose line and the chin. Draw a light horizontal line here.
The width of the mouth can be gauged by drawing two faint vertical lines downwards from the center of the pupils. The corners of the mouth will generally align with these lines.
Sketch a simple, slightly curved line for the mouth’s opening. Then, add a subtle curve for the upper lip and a fuller curve for the lower lip. Remember, lips are subtle forms, not sharp lines.
Pro Tip: When drawing lips, think of them as soft, rounded masses rather than just outlines. Use gentle shading or lighter lines to indicate their volume.
Step 6: Place the Ears
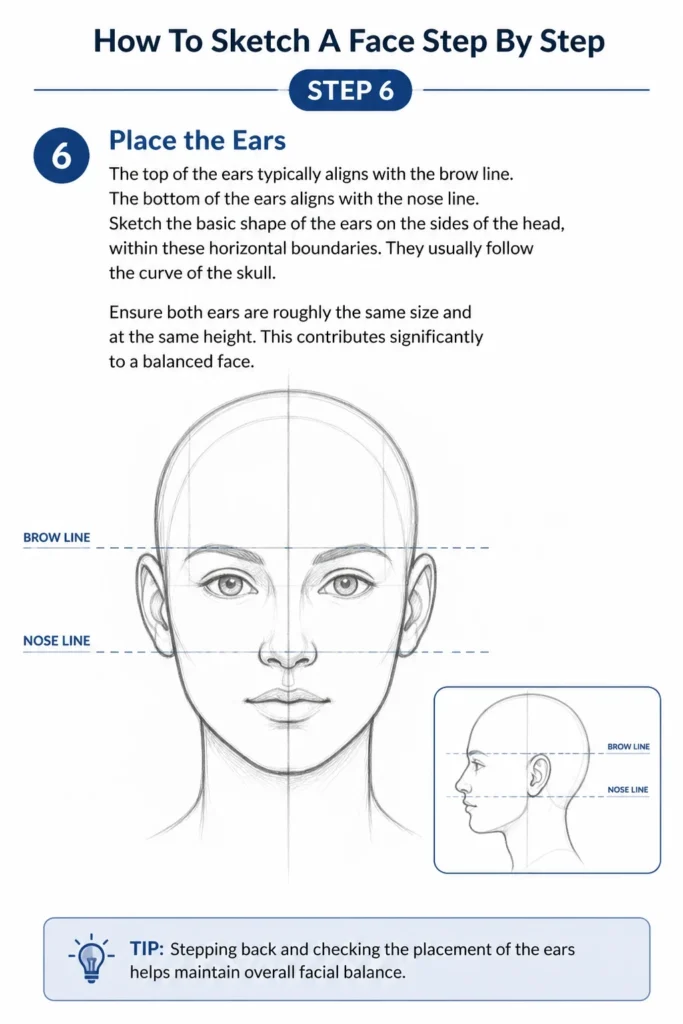
The top of the ears typically aligns with the brow line. The bottom of the ears aligns with the nose line.
Sketch the basic shape of the ears on the sides of the head, within these horizontal boundaries. They usually follow the curve of the skull.
Ensure both ears are roughly the same size and at the same height. This contributes significantly to a balanced face.
Step 7: Define the Hairline and Neck
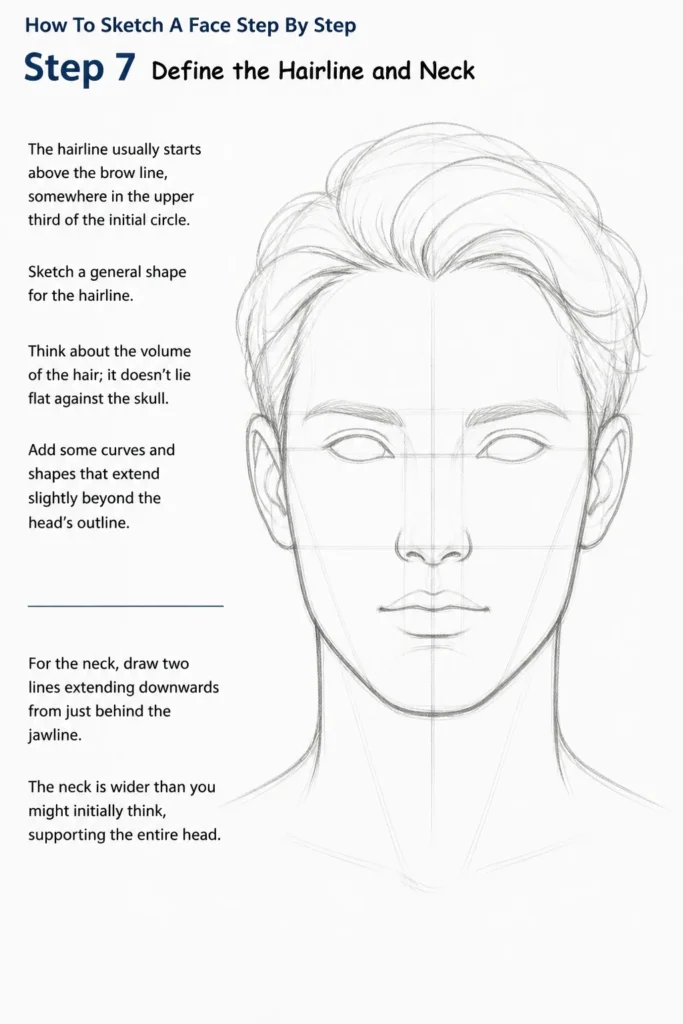
The hairline usually starts above the brow line, somewhere in the upper third of the initial circle. Sketch a general shape for the hairline.
Think about the volume of the hair; it doesn’t lie flat against the skull. Add some curves and shapes that extend slightly beyond the head’s outline.
For the neck, draw two lines extending downwards from just behind the jawline. The neck is wider than you might initially think, supporting the entire head.
Step 8: Refine Features and Erase Guides
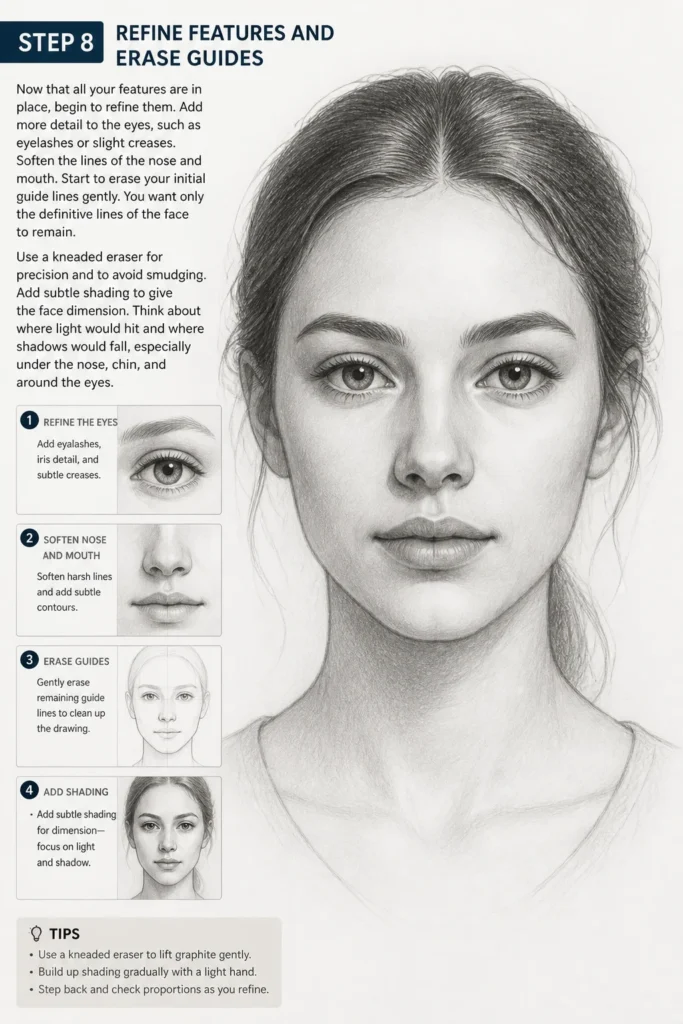
Now that all your features are in place, begin to refine them. Add more detail to the eyes, such as eyelashes or slight creases. Soften the lines of the nose and mouth.
Start to erase your initial guide lines gently. You want only the definitive lines of the face to remain. Use a kneaded eraser for precision and to avoid smudging.
Add subtle shading to give the face dimension. Think about where light would hit and where shadows would fall, especially under the nose, chin, and around the eyes.
Common Mistakes to Avoid
Symmetry Issues
A common pitfall is drawing one side of the face differently from the other. This can make the face look lopsided or unnatural. Always use your center vertical line as a guide. Frequently flip your drawing upside down or look at it in a mirror to spot imbalances.
Placing Features Too High or Low
Incorrect placement of eyes, nose, or mouth is a frequent error. This often happens when artists don’t use guide lines. Relying on the horizontal guide lines (brow, eye, nose, mouth) is crucial for accurate proportions.
Drawing Features in Isolation
Focusing too much on drawing a “perfect eye” or “perfect mouth” without considering its relationship to other features. Each feature must fit within the overall structure of the face. Always sketch the basic head shape and guide lines first, then place features in relation to each other.
Over-Reliance on Hard Lines
Using heavy, dark lines for every feature can make a sketch look stiff and flat. Faces are full of subtle curves and soft transitions. Use lighter lines for initial sketches and build up darker lines only where shadows or definitive edges exist.
Troubleshooting
Face Looks Flat or Lifeless
If your sketch lacks depth, you might be relying too much on outlines. Try introducing subtle shading. Think about the roundness of the skull and features. Add shadows under the brow, nose, and chin to create dimension.
Features Don’t Look Right Together
This usually points to a proportion or placement issue. Go back to your guide lines. Are the eyes centered? Is the space between them correct? Is the nose length accurate? Sometimes, even a slight adjustment to a guide line can dramatically improve the overall look.
Struggling with Angles or Perspective
When drawing faces from angles other than straight on, the rules of perspective apply. Foreshortening will make some features appear shorter or wider. Practice drawing the basic head shape as a 3D sphere or egg in different orientations before adding features.
Key Takeaways
- Always start with basic shapes and guide lines for accurate proportions.
- Light, loose lines are essential in the initial stages for easy correction.
- The eyes sit on the halfway line of the head, not higher.
- Use the width of one eye to space the eyes correctly.
- The ears typically align with the brow and nose lines.
- Practice observing faces around you to understand variations and nuances.
Frequently Asked Questions
How long does it take to get good at sketching faces?
Learning to sketch faces effectively is a journey, not a race. Consistent practice, even just 15-30 minutes daily, will show significant improvement over months. Patience and persistence are key.
Should I use references?
Absolutely, yes. Using photo references is highly recommended, especially when you’re starting. It helps you observe real proportions, lighting, and expressions. Avoid copying directly; instead, use them to understand structure.
What’s the best pencil for sketching?
For general sketching, an HB or 2B pencil is a great starting point. HB offers a good balance of hardness and darkness, while 2B provides a slightly darker line and is excellent for shading. A range of pencils (2H to 6B) offers more versatility as you advance.
Can I sketch digitally?
Yes, the principles of sketching a face remain the same whether you use traditional paper and pencil or a digital tablet and stylus. Digital tools offer the advantage of easy undo and layers, which can be helpful for beginners.
Our Top Recommended Finds
- Sketchbook with Smooth Paper: A good quality sketchbook provides a clean surface that allows for smooth pencil strokes and easy erasing without tearing.
- Drawing Pencil Set (HB, 2B, 4B, 6B): A small set gives you a range of hardness for light guidelines, mid-tones, and darker shadows, adding depth to your sketches.
- Kneaded Eraser: Unlike traditional erasers, a kneaded eraser can be molded into various shapes for precise erasing and lifting graphite without smudging or damaging the paper.
Embrace Your Artistic Journey
You’ve now taken the crucial first steps in sketching a face. This guide provides a foundational roadmap, but true mastery comes through consistent practice and observation. Don’t be afraid to make mistakes; they are invaluable learning opportunities.
Pick up your pencil and paper today. Experiment with different faces, expressions, and angles. The more you draw, the more intuitive the process will become. Every line you draw brings you closer to becoming the artist you aspire to be.
& Painting
No rigid rules or pretension. Just practical guides, medium comparisons, and encouraging tips to help you enjoy the drawing & painting process.