👁️ How To Draw Eyes Step By Step Easy

& Painting
No rigid rules or pretension. Just practical guides, medium comparisons, and encouraging tips to help you enjoy the drawing & painting process.
I remember sitting at my kitchen table for hours, frustrated that my portraits looked like aliens because I couldn’t get the eyes right.
It took me years of trial and error to realize that drawing a realistic eye isn’t about being born with a gift, but about following a specific sequence of shapes.
This guide uses the same foundational techniques I now use in my professional sketches to help you create eyes that look like they are actually looking back at you.
Quick Overview
Before you pick up your pencil, here is a quick look at what this tutorial covers and what you will need to succeed.
- Time needed: 20 to 30 minutes
- Difficulty: Beginner
- What you’ll need: Drawing paper, HB pencil, 2B or 4B pencil, a kneaded eraser, and a blending stump or tissue.
Step-by-Step Instructions
Step 1: Sketch the Foundation Circle
Begin by drawing a very light circle in the center of your paper using your HB pencil.
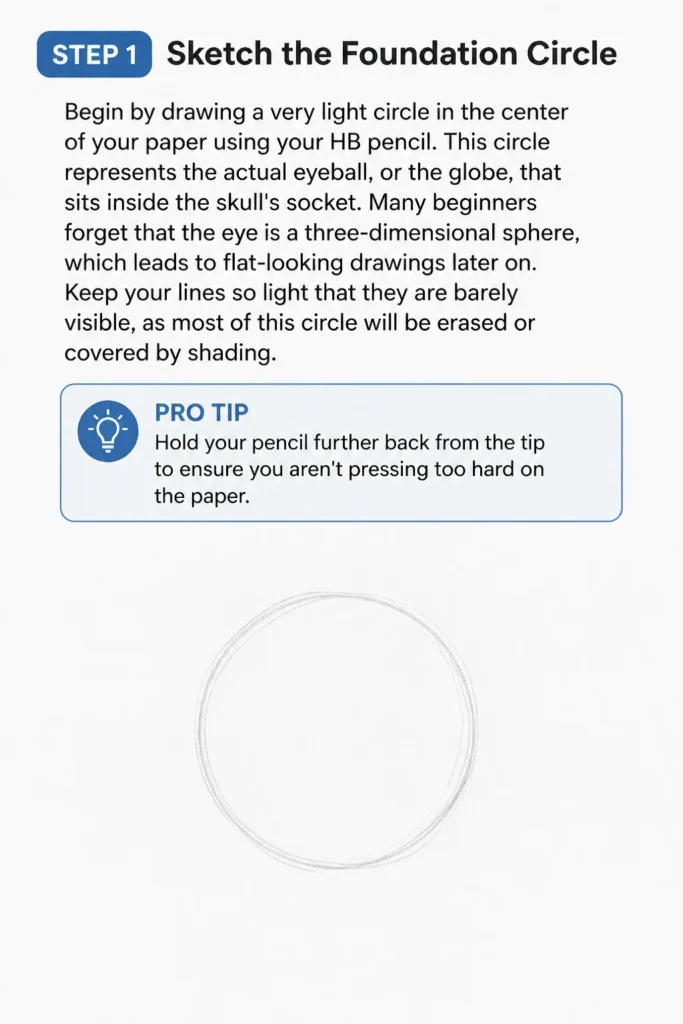
This circle represents the actual eyeball, or the globe, that sits inside the skull’s socket.
Many beginners forget that the eye is a three-dimensional sphere, which leads to flat-looking drawings later on.
Keep your lines so light that they are barely visible, as most of this circle will be erased or covered by shading.
Pro Tip: Hold your pencil further back from the tip to ensure you aren’t pressing too hard on the paper.
Step 2: Map the Eye Opening
Draw two curved lines across the circle to create the opening where the eye is visible between the lids.
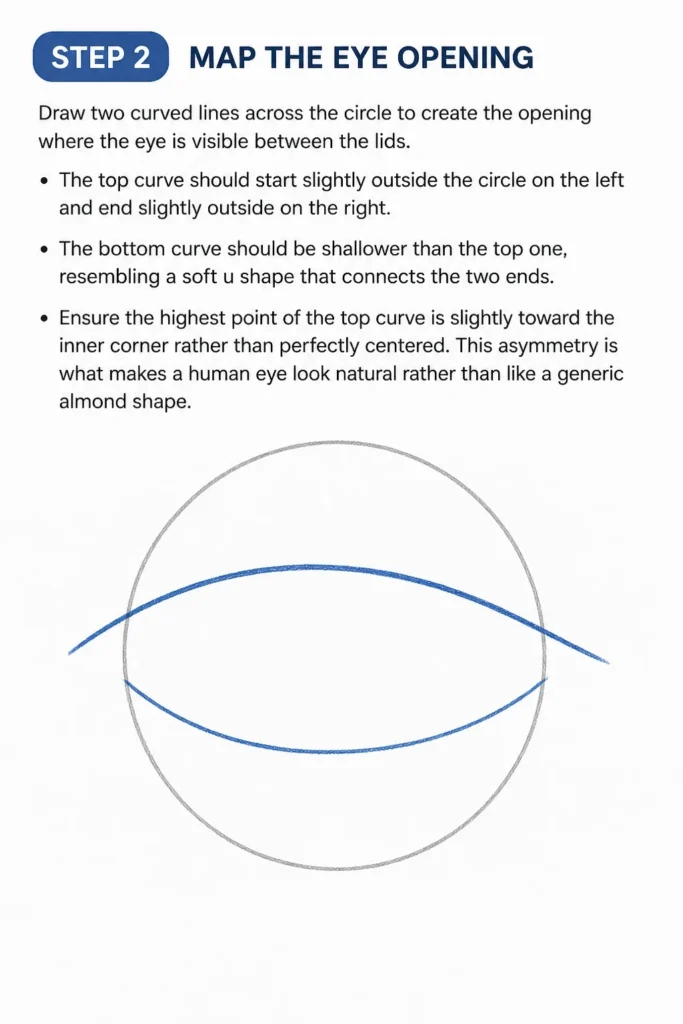
The top curve should start slightly outside the circle on the left and end slightly outside on the right.
The bottom curve should be shallower than the top one, resembling a soft “u” shape that connects the two ends.
Ensure the highest point of the top curve is slightly toward the inner corner rather than perfectly centered.
This asymmetry is what makes a human eye look natural rather than like a generic almond shape.
Step 3: Define the Tear Duct
Add a small, sideways “v” shape at the inner corner of the eye, pointing toward the bridge of the nose.
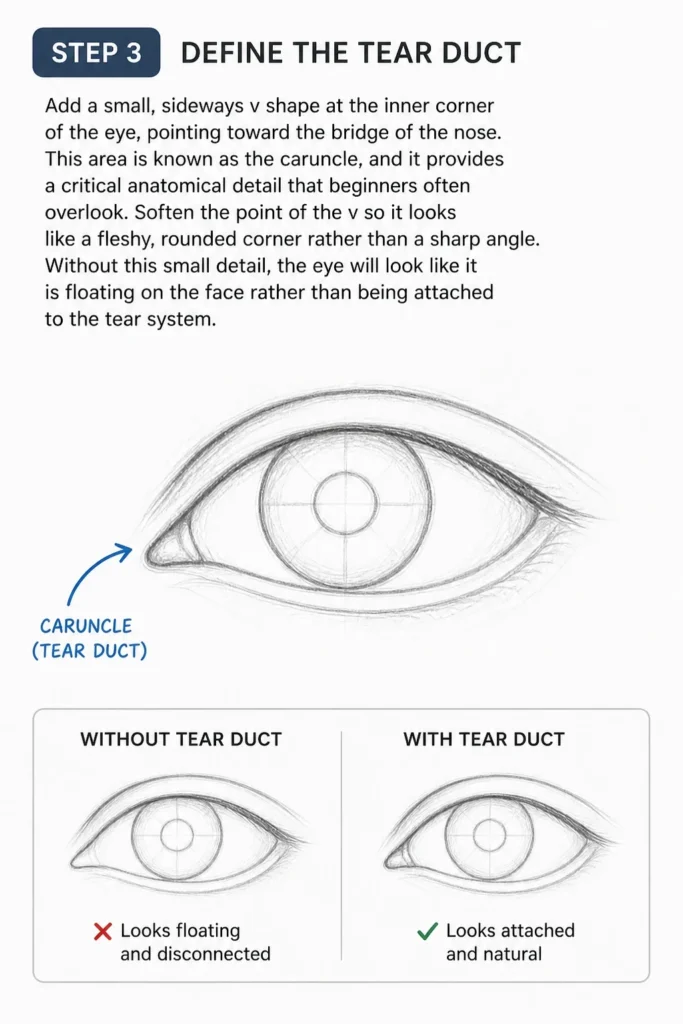
This area is known as the caruncle, and it provides a critical anatomical detail that beginners often overlook.
Soften the point of the “v” so it looks like a fleshy, rounded corner rather than a sharp angle.
Without this small detail, the eye will look like it is floating on the face rather than being attached to the tear system.
Step 4: Place the Iris and Pupil
Outline a large circle for the iris, making sure the top of the circle is slightly tucked under the upper eyelid.
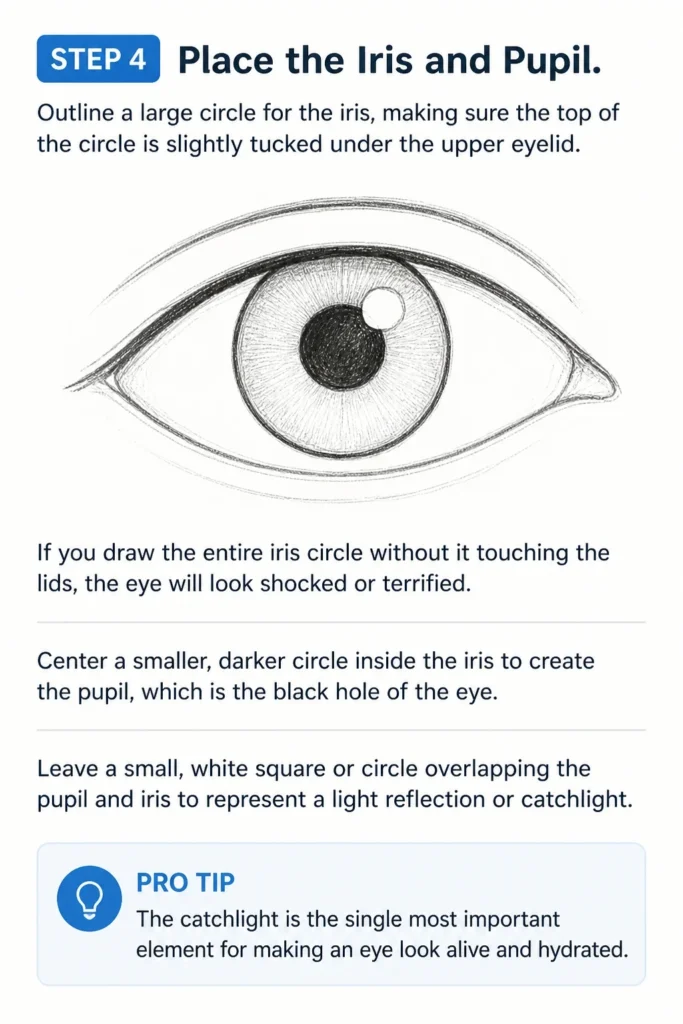
If you draw the entire iris circle without it touching the lids, the eye will look shocked or terrified.
Center a smaller, darker circle inside the iris to create the pupil, which is the “black hole” of the eye.
Leave a small, white square or circle overlapping the pupil and iris to represent a light reflection or “catchlight.”
Pro Tip: The catchlight is the single most important element for making an eye look “alive” and hydrated.
Step 5: Sketch the Eyelid Crease
Follow the curve of the upper eyelid and draw a parallel line just a few millimeters above it.
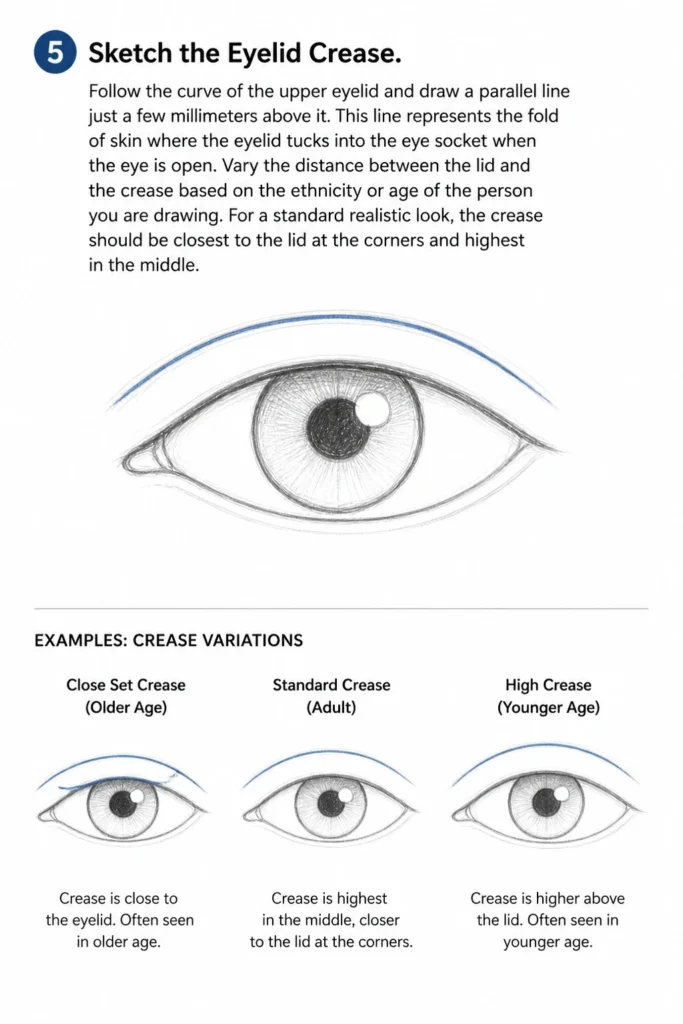
This line represents the fold of skin where the eyelid tucks into the eye socket when the eye is open.
Vary the distance between the lid and the crease based on the ethnicity or age of the person you are drawing.
For a standard realistic look, the crease should be closest to the lid at the corners and highest in the middle.
Step 6: Shade the Sclera
Apply very light shading to the corners of the “white” part of the eye, also known as the sclera.
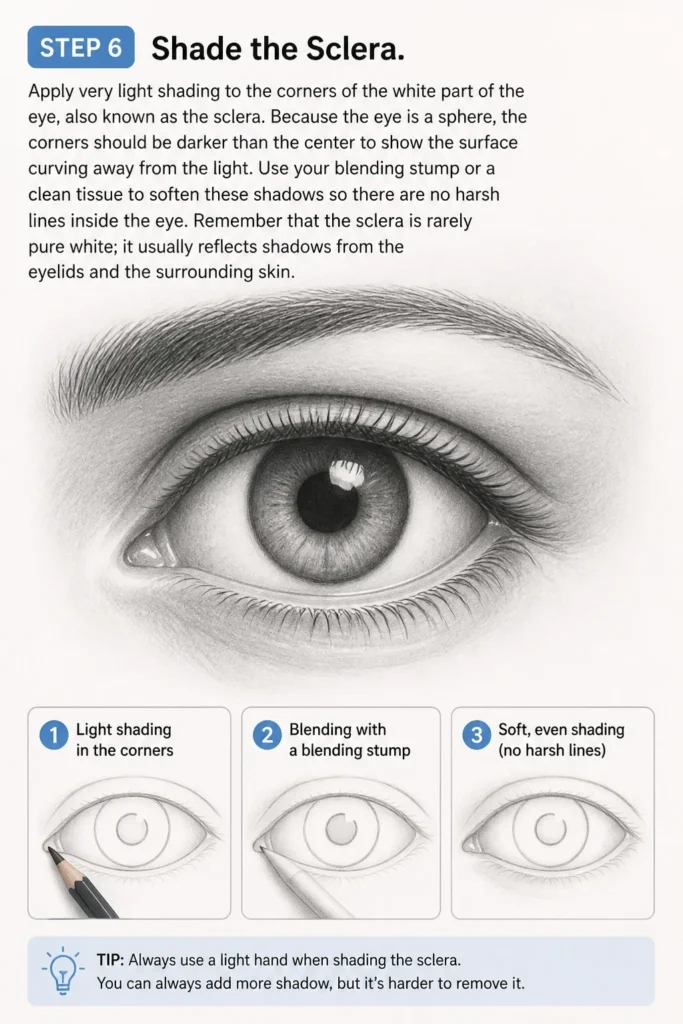
Because the eye is a sphere, the corners should be darker than the center to show the surface curving away from the light.
Use your blending stump or a clean tissue to soften these shadows so there are no harsh lines inside the eye.
Remember that the sclera is rarely pure white; it usually reflects shadows from the eyelids and the surrounding skin.
Step 7: Detail the Iris
Draw small, radiating lines from the pupil outward toward the edge of the iris using your 2B pencil.
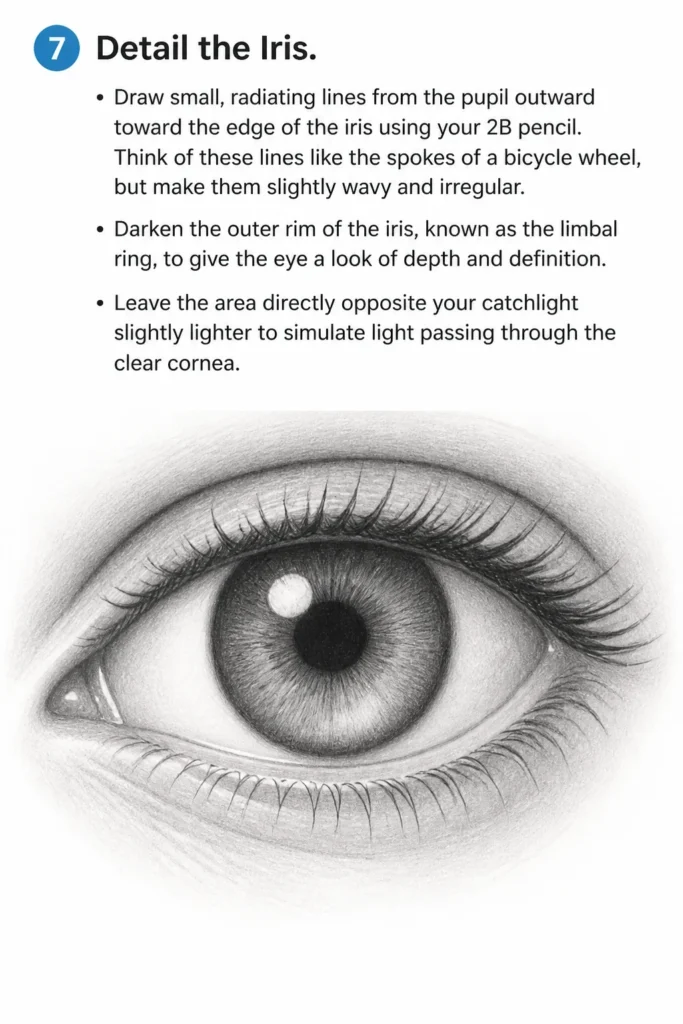
Think of these lines like the spokes of a bicycle wheel, but make them slightly wavy and irregular.
Darken the outer rim of the iris, known as the limbal ring, to give the eye a look of depth and definition.
Leave the area directly opposite your catchlight slightly lighter to simulate light passing through the clear cornea.
Step 8: Form the Eyelashes
Create the eyelashes by using quick, flicking motions starting from the eyelid and moving outward.
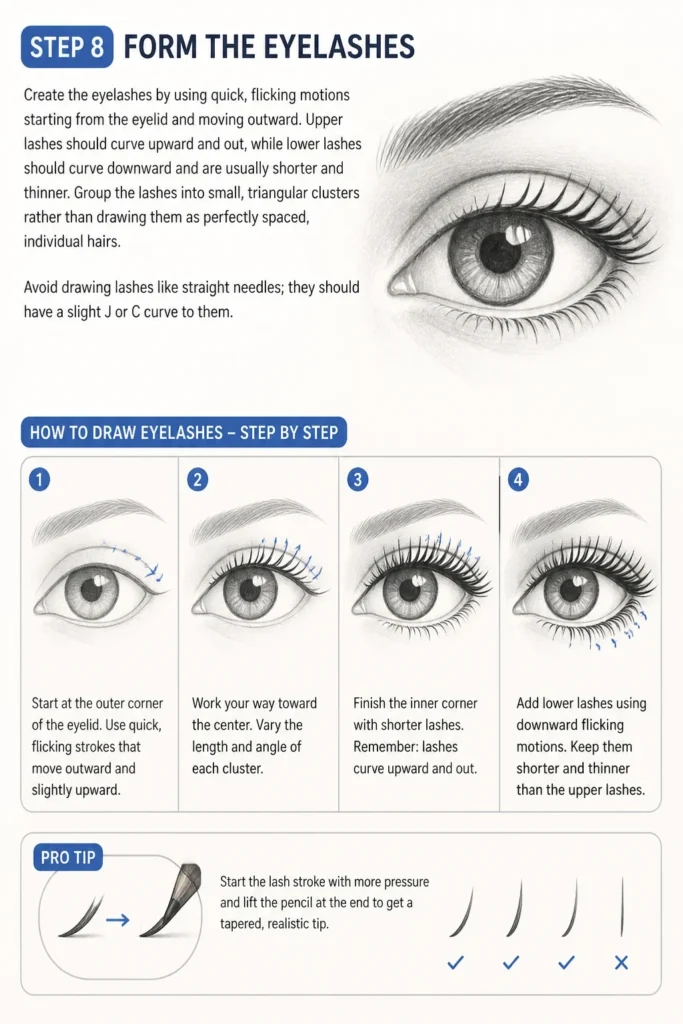
Upper lashes should curve upward and out, while lower lashes should curve downward and are usually shorter and thinner.
Group the lashes into small, triangular clusters rather than drawing them as perfectly spaced, individual hairs.
Avoid drawing lashes like straight needles; they should have a slight “J” or “C” curve to them.
Pro Tip: Start the lash stroke with more pressure and lift the pencil at the end to get a tapered, realistic tip.
Step 9: Add Depth to the Lids
Darken the line of the upper eyelid to indicate the shadow cast by the lashes onto the eyeball.
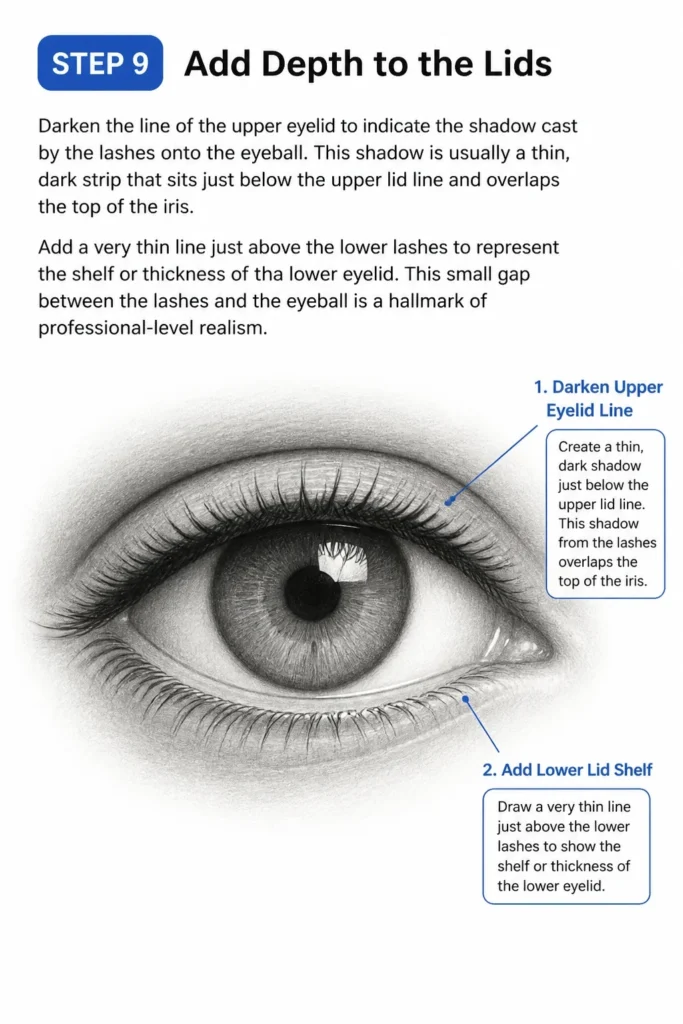
This shadow is usually a thin, dark strip that sits just below the upper lid line and overlaps the top of the iris.
Add a very thin line just above the lower lashes to represent the “shelf” or thickness of the lower eyelid.
This small gap between the lashes and the eyeball is a hallmark of professional-level realism.
Step 10: Final Highlights and Cleanup
Use your kneaded eraser to tap away any excess graphite and brighten the catchlight in the pupil.
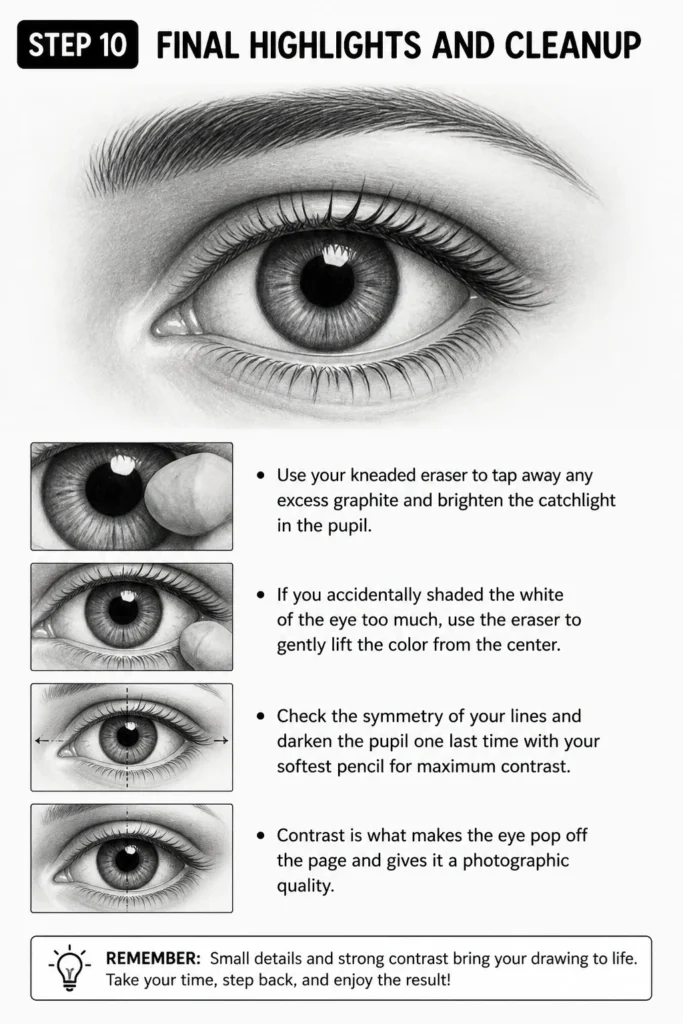
If you accidentally shaded the white of the eye too much, use the eraser to gently lift the color from the center.
Check the symmetry of your lines and darken the pupil one last time with your softest pencil for maximum contrast.
Contrast is what makes the eye “pop” off the page and gives it a photographic quality.
Common Mistakes to Avoid
The Football Shape Trap
Many people draw eyes as a perfect, symmetrical oval that looks like a football. In reality, the inner corner of the eye is usually lower than the outer corner, and the curves of the lids are different. If you make the eye perfectly symmetrical, it will look like a cartoon or a symbol rather than a human feature.
Ignoring the Eyelid Thickness
Beginners often draw the eyelashes directly coming out of the eyeball itself. Eyelids have a physical thickness, and the lashes grow from the outer edge of that skin. If you don’t leave a tiny space for the “wet line” of the lower lid, the eye will look flat and unnatural.
Making the Whites Too White
Leaving the sclera completely unshaded makes the eye look like it is made of paper. Because the eye is a ball, it must have shadows on the sides to look round. Always add a soft gradient of grey to the corners to give the eye its necessary volume.
Over-Drawing Individual Eyelashes
Drawing every single eyelash with the same thickness and spacing creates a “comb” effect. Real lashes are messy, they overlap, and they vary in length. Focus on the overall shape and “clumps” of the lashes rather than counting every hair.
Troubleshooting
The Eye Looks Staring or Scared
This usually happens when the iris is a full circle and doesn’t touch the eyelids. To fix this, ensure the top of the iris is partially covered by the upper lid. Most people’s upper lids cover about the top 1/4th of the iris in a relaxed state.
The Eye Looks Flat and 2D
If your drawing lacks depth, you likely haven’t used enough contrast between your darkest and lightest areas. Darken the pupil and the shadow under the upper lid significantly. Use a bright white eraser to create a sharp highlight in the iris to provide that “wet” look.
The Eyelashes Look Like Spider Legs
This occurs when the lashes are drawn too thick, too straight, or too long. Use a very sharp pencil and practice your “flicking” motion on a separate piece of paper. Remember that lashes should be thinner at the tips than they are at the base.
Key Takeaways
- Start with a circle to remember the eye is a 3D sphere inside the head.
- The upper lid usually covers the top portion of the iris to avoid a “startled” look.
- The catchlight or reflection is essential for making the eye look wet and alive.
- Eyelids have thickness; always leave a small gap for the lower lid shelf.
- Shade the corners of the white part of the eye to create a sense of roundness.
- Use quick, tapered strokes for eyelashes rather than slow, heavy lines.
Frequently Asked Questions
What is the best pencil for drawing eyes?
I recommend using a combination of an HB pencil for the initial sketch and a 4B pencil for the dark areas like the pupil and shadows. The HB allows you to make mistakes and erase easily, while the 4B provides the deep blacks needed for realism. A mechanical pencil is also great for fine details like individual eyelashes or iris textures.
How do I make both eyes look the same?
The best way to achieve symmetry is to draw both eyes at the same time rather than finishing one and then starting the other. Move back and forth between the two, drawing the basic shapes for both, then the iris for both, and so on. Use a ruler or your pencil to measure the distance between them, which is typically the width of one eye.
Why does my eye drawing look like a cartoon?
Cartoonish eyes usually result from heavy outlines and a lack of soft shading. In real life, there are very few hard lines on a face; most “lines” are actually just transitions between light and shadow. Try to blend your lines and focus on creating gradients rather than sharp borders around every shape.
How long does it take to master drawing eyes?
You can see a massive improvement in just one afternoon of focused practice using this step-by-step method. However, mastering the subtle nuances of different eye shapes and lighting conditions can take months of consistent sketching. Don’t be discouraged if your first few attempts don’t look perfect; every drawing is a step toward improvement.
Our Top Recommended Finds
- Staedtler Mars Lumograph Pencil Set: These pencils offer a wide range of lead hardness, which is perfect for achieving the deep blacks and light greys needed for a realistic eye.
- Prismacolor Kneaded Eraser: This tool is essential because you can mold it into a fine point to “draw” highlights back into the iris or clean up tiny areas without smudging.
- Strathmore 400 Series Drawing Paper: The smooth surface of this paper allows for excellent blending and fine detail work that cheaper printer paper simply can’t handle.
Bringing Your Portraits To Life
Now that you have mastered the basic structure of a realistic eye, you have the most important tool for creating compelling portraits.
The eyes are the first thing people look at in a drawing, and getting them right sets the tone for the entire piece.
Practice drawing eyes from different angles, such as a profile view or looking upward, to see how these shapes change with perspective.
Take your sketchbook out today and try to draw the eyes of a friend or even your own eyes in a mirror using these steps.
Consistent practice is the only way to turn these steps into muscle memory, so keep your pencils sharp and keep drawing.
& Painting
No rigid rules or pretension. Just practical guides, medium comparisons, and encouraging tips to help you enjoy the drawing & painting process.