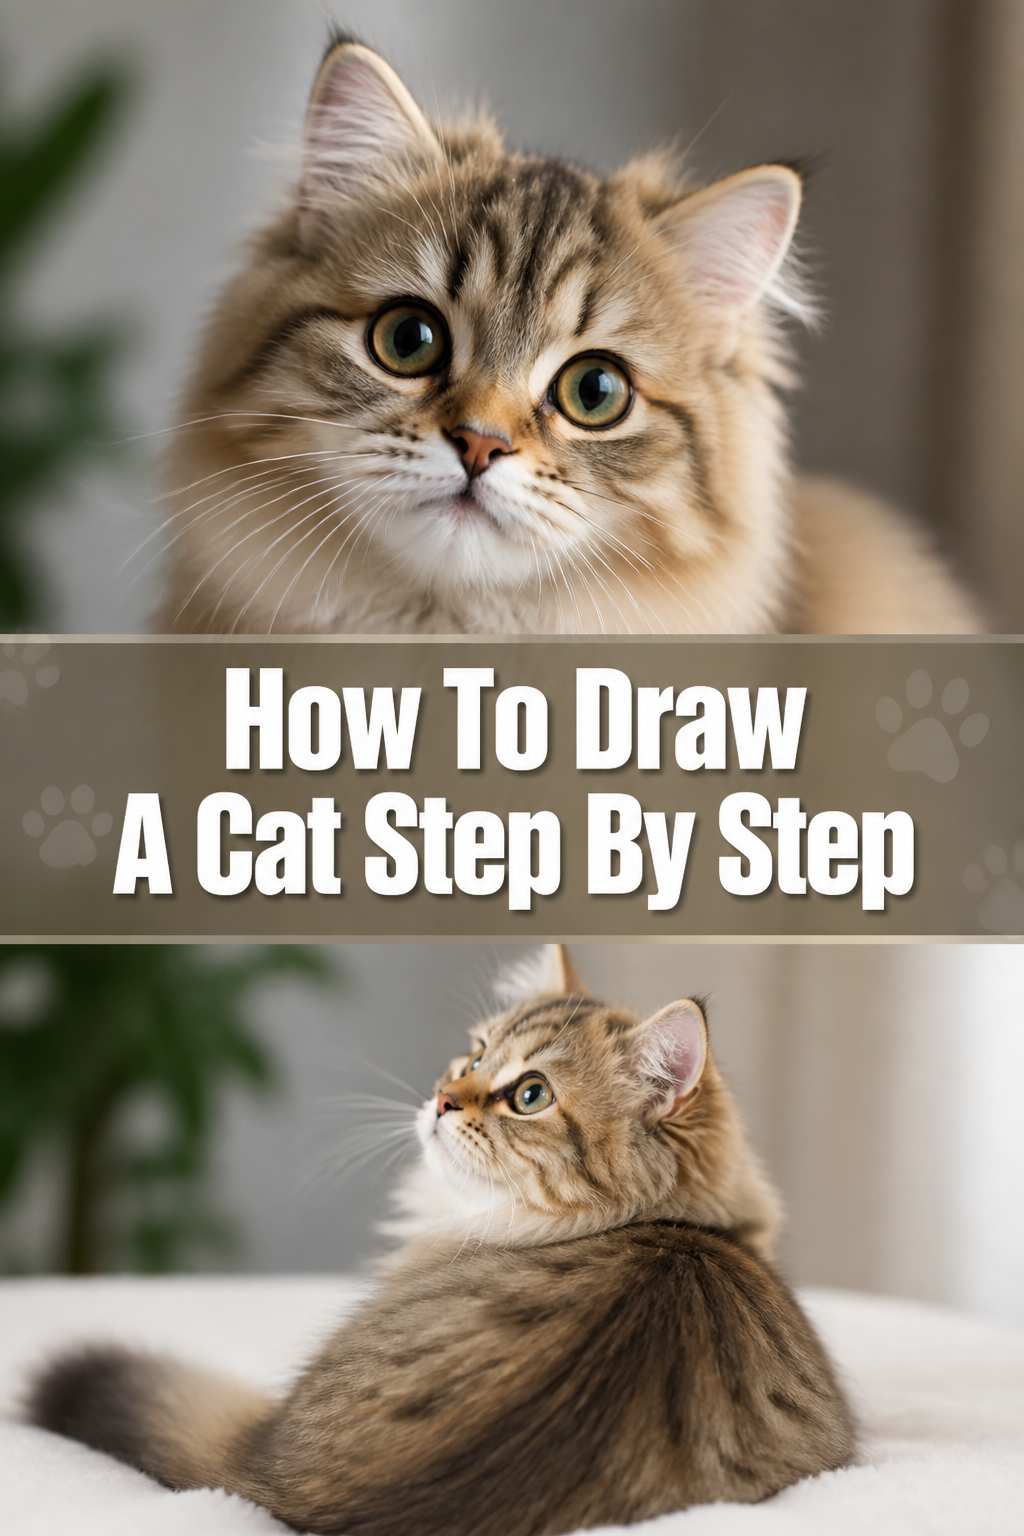
🐱 How To Draw A Cat Step By Step

& Painting
No rigid rules or pretension. Just practical guides, medium comparisons, and encouraging tips to help you enjoy the drawing & painting process.
Drawing a cat can seem tricky at first glance, with all their graceful curves and unique expressions.
I remember my own early attempts, often ending up with something that looked more like a lumpy potato than a feline friend.
This guide will simplify the process, helping you create charming cat drawings with confidence and ease.
Quick Overview
This guide will walk you through creating a full cat drawing, from basic shapes to final details.
By the end, you will have a complete understanding of how to construct a cat, ready to personalize your own feline artwork.
- Time needed: 45-75 minutes
- Difficulty: Beginner
- What you’ll need: Pencil (HB or 2B), paper, eraser, optional: blending stump or tissue
Step-by-Step Instructions
Step 1: Start with Basic Shapes for the Head and Body
Begin by lightly sketching two overlapping ovals or circles on your paper.
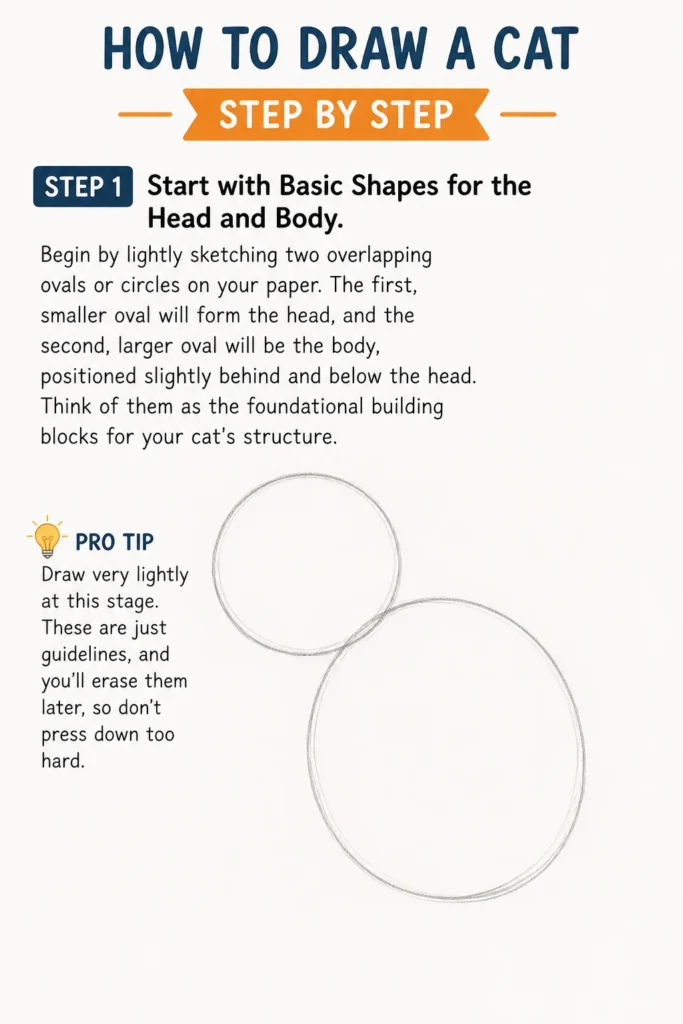
The first, smaller oval will form the head, and the second, larger oval will be the body, positioned slightly behind and below the head.
Think of them as the foundational building blocks for your cat’s structure.
Pro Tip: Draw very lightly at this stage. These are just guidelines, and you’ll erase them later, so don’t press down too hard.
Step 2: Add Guidelines and Facial Placement
Draw a vertical line down the center of the head oval and a horizontal line across its middle.
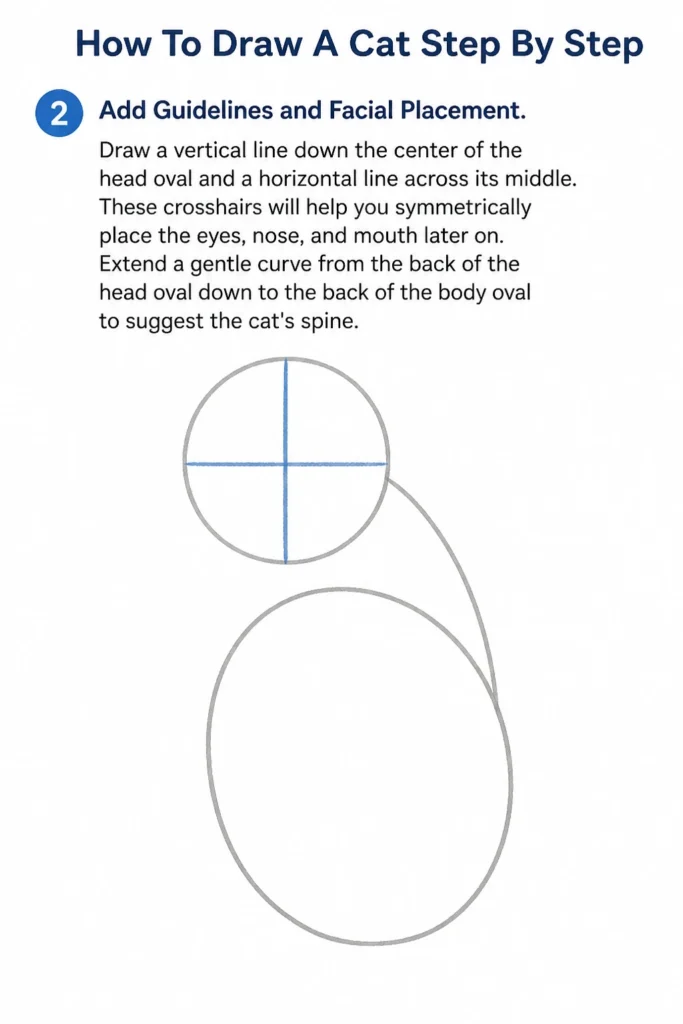
These crosshairs will help you symmetrically place the eyes, nose, and mouth later on.
Extend a gentle curve from the back of the head oval down to the back of the body oval to suggest the cat’s spine.
Step 3: Refine the Head Shape and Ears
Connect the head oval to the body oval with a gentle curve for the neck.
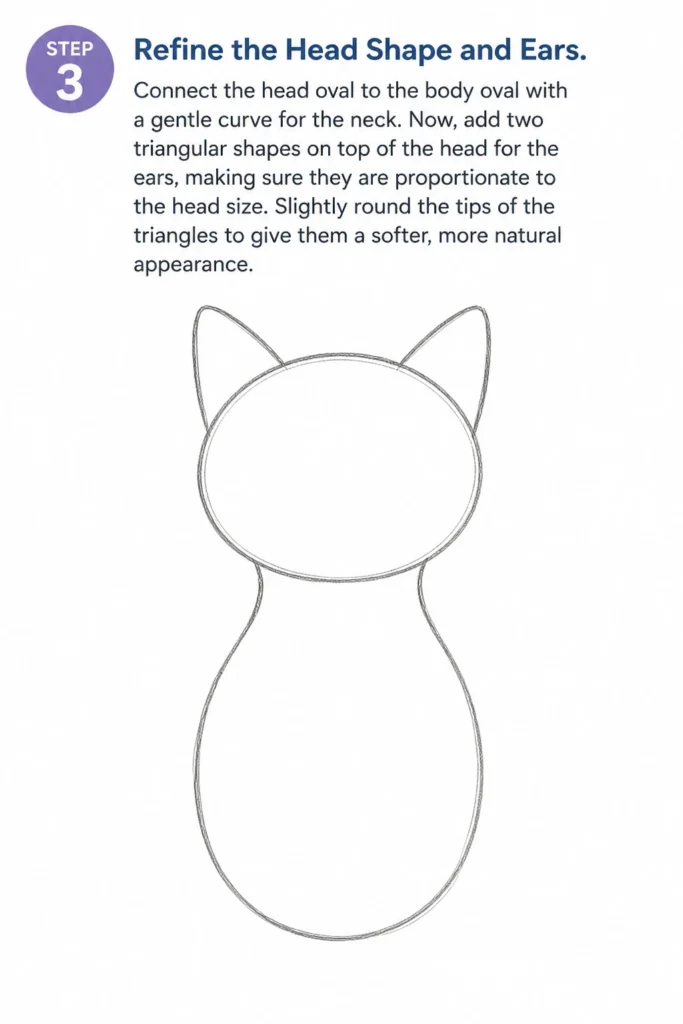
Now, add two triangular shapes on top of the head for the ears, making sure they are proportionate to the head size.
Slightly round the tips of the triangles to give them a softer, more natural appearance.
Step 4: Sketch the Body and Legs
Outline the full body shape, smoothing out the initial ovals into a more natural feline form.
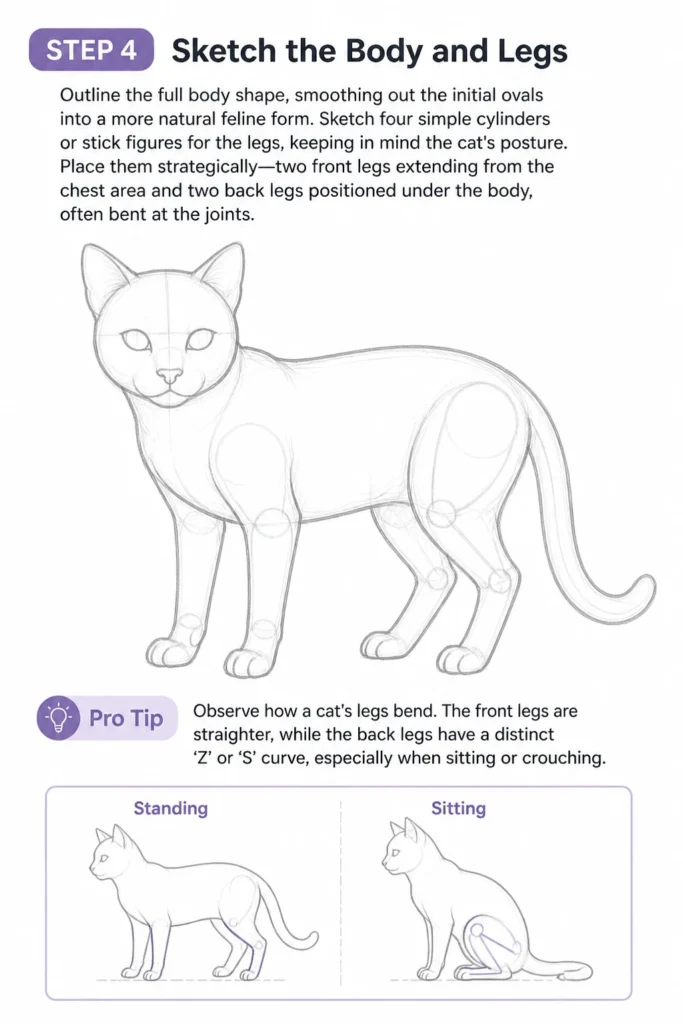
Sketch four simple cylinders or stick figures for the legs, keeping in mind the cat’s posture.
Place them strategically: two front legs extending from the chest area and two back legs positioned under the body, often bent at the joints.
Pro Tip: Observe how a cat’s legs bend. The front legs are straighter, while the back legs have a distinct ‘Z’ or ‘S’ curve, especially when sitting or crouching.
Step 5: Draw the Tail
Add a graceful, curved shape for the tail, extending from the back of the body.
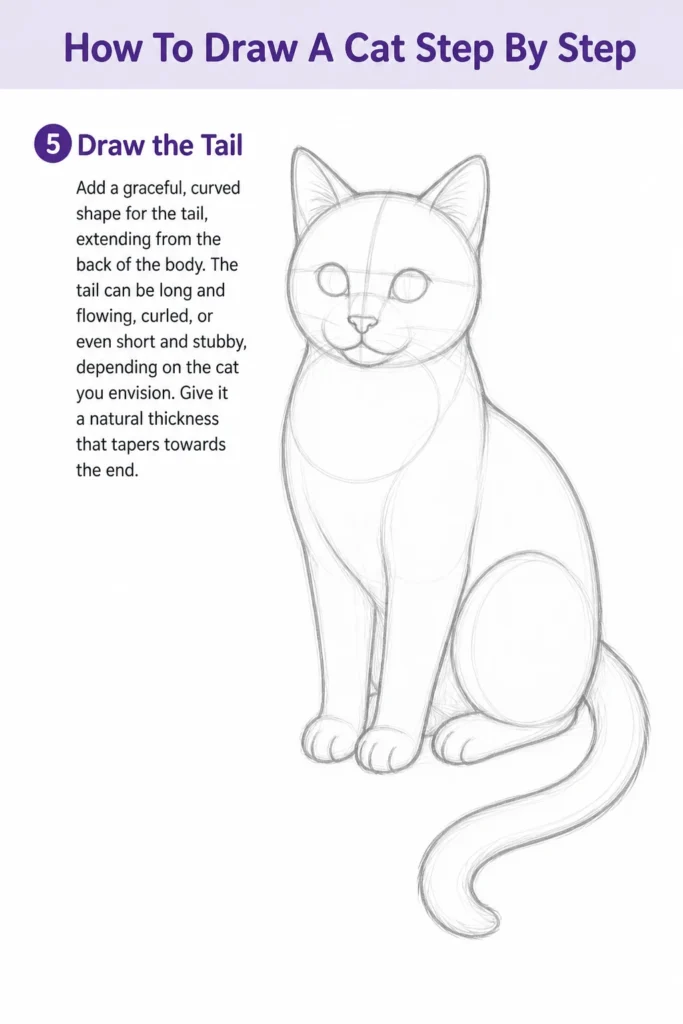
The tail can be long and flowing, curled, or even short and stubby, depending on the cat you envision.
Give it a natural thickness that tapers towards the end.
Step 6: Place Facial Features – Eyes, Nose, and Mouth
Position the eyes along the horizontal guideline, keeping them symmetrical to the vertical line.
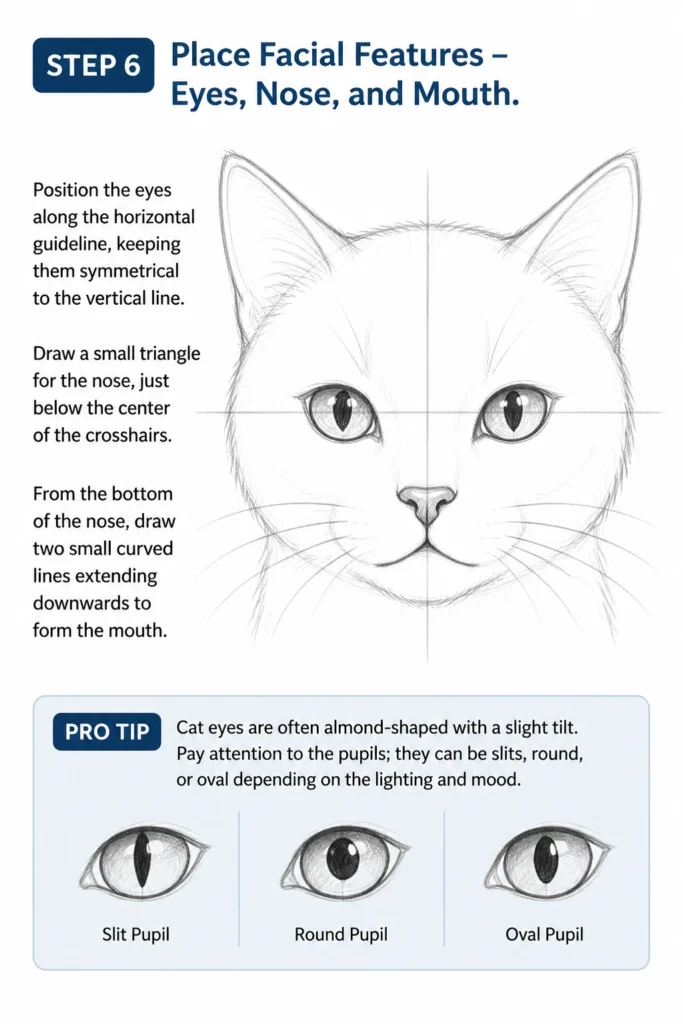
Draw a small triangle for the nose, just below the center of the crosshairs.
From the bottom of the nose, draw two small curved lines extending downwards to form the mouth.
Pro Tip: Cat eyes are often almond-shaped with a slight tilt. Pay attention to the pupils; they can be slits, round, or oval depending on the lighting and mood.
Step 7: Add Fur Details and Whiskers
Introduce texture by adding short, feathery strokes along the edges of your cat’s outline to suggest fur.
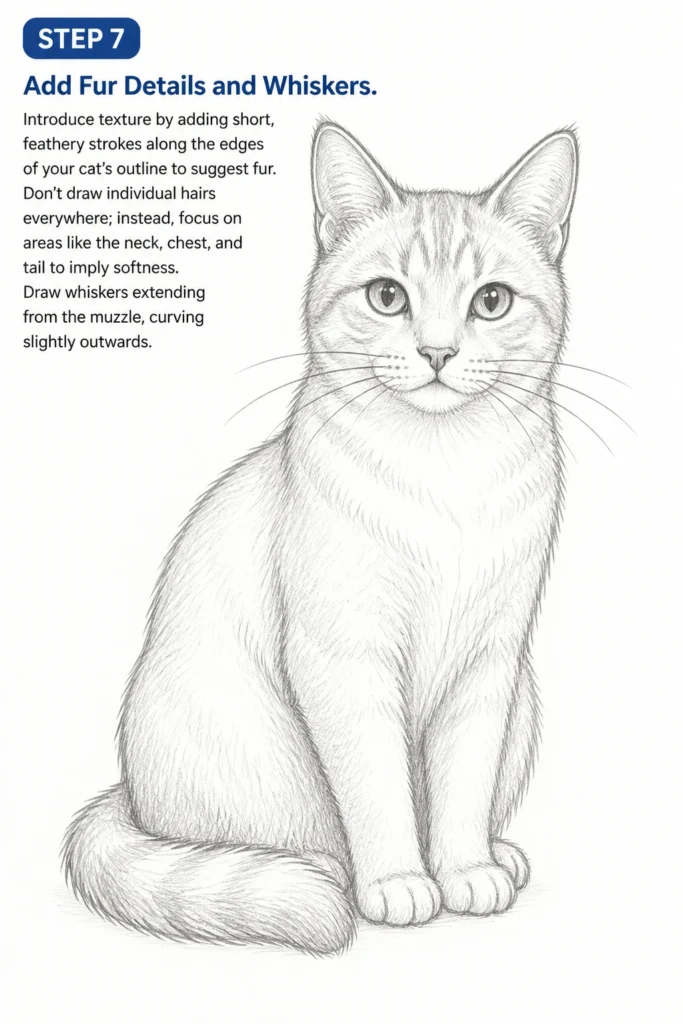
Don’t draw individual hairs everywhere; instead, focus on areas like the neck, chest, and tail to imply softness.
Draw whiskers extending from the muzzle, curving slightly outwards.
Step 8: Clean Up and Erase Guidelines
Carefully erase all the initial light guidelines you drew in the first few steps.
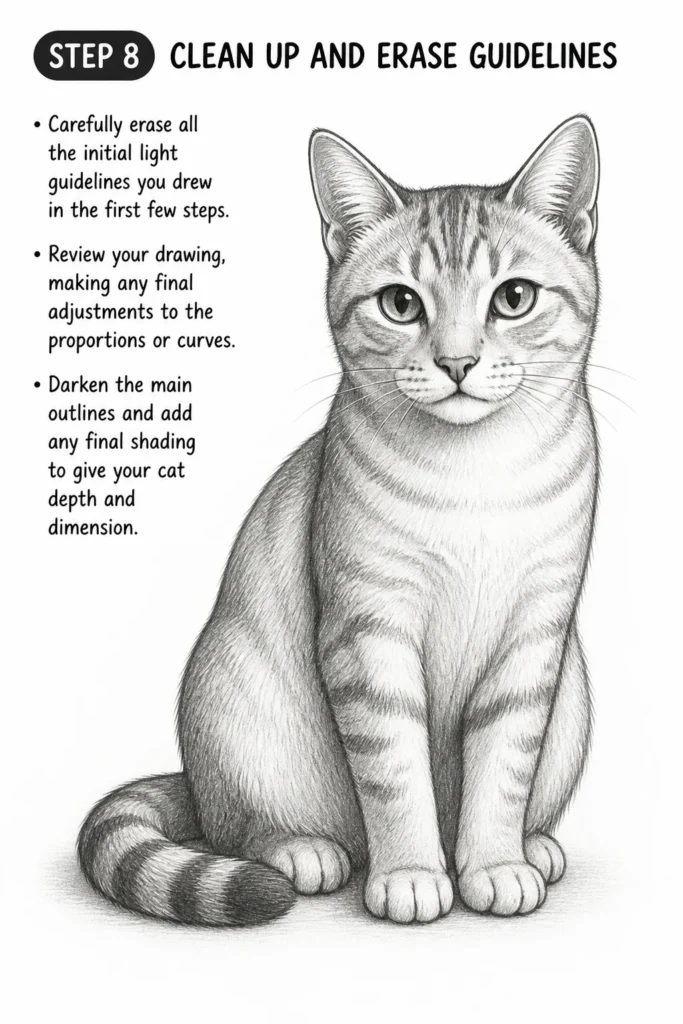
Review your drawing, making any final adjustments to the proportions or curves.
Darken the main outlines and add any final shading to give your cat depth and dimension.
Common Mistakes to Avoid
Disproportionate Features
A common pitfall is drawing a head that is too large or too small for the body, or ears that look out of place.
This can make your cat look unnatural and throw off the entire drawing.
Always start with basic shapes and continually compare the sizes of different parts as you draw to maintain a harmonious balance.
Stiff, Unrealistic Poses
Many beginners draw cats with rigid, straight lines, making them appear lifeless.
Cats are known for their fluidity and grace, so avoid making limbs too straight or bodies too boxy.
Focus on gentle curves and natural angles to convey their characteristic flexibility.
Over-detailing Too Early
Jumping straight to drawing individual hairs or intricate eye details before establishing the basic form can lead to frustration and a messy drawing.
Build your cat drawing in layers, starting with simple shapes and gradually adding complexity.
This approach ensures a solid foundation before you get lost in the finer points.
Ignoring Reference Images
Relying solely on memory can result in generic or inaccurate cat drawings.
Even if you’re aiming for a stylized look, having a reference photo of a real cat helps you understand anatomy and posture.
Observe different cat breeds and their unique features to inspire more varied and believable artwork.
Troubleshooting
My Cat Looks Flat/2D
If your drawing lacks depth, it might be due to a lack of overlapping shapes and varied line weight.
To fix this, ensure that parts of the cat’s body overlap slightly, creating a sense of dimension.
Use thicker or darker lines for elements closer to the viewer and lighter lines for those further away, which helps create an illusion of form.
I Can’t Get the Eyes Right
Cat eyes are crucial for conveying emotion and personality, making them challenging to master.
Try focusing on their almond shape and the slight tilt, rather than drawing perfect circles.
Adding a tiny white highlight in the pupil can instantly bring the eyes to life and give them a sparkling quality.
The Fur Looks Messy
If your fur texture appears chaotic, you might be adding too many individual hair strokes.
Instead, use short, directional strokes that follow the contours of the cat’s body, indicating where the fur would naturally lie.
Vary the length and pressure of your strokes to create different textures, focusing on patches of fur rather than individual strands.
Key Takeaways
- Always start with light, basic geometric shapes to build a strong foundation.
- Use guidelines to ensure symmetry and proper placement of features.
- Focus on curves and natural forms to capture a cat’s inherent grace and fluidity.
- Build your drawing in layers, moving from general shapes to specific details.
- Observe real cats or use reference images to understand anatomy and varied poses.
- Practice light sketching and erasing to refine your lines and correct mistakes easily.
Frequently Asked Questions
Can I use a pen instead of a pencil?
While you can certainly draw with a pen, it’s generally recommended for beginners to start with a pencil.
Pencils allow for easy erasing and adjustments, which is invaluable when learning new techniques.
Once you’re confident with your forms, feel free to experiment with ink.
How do I make my cat look unique?
To give your cat a unique personality, experiment with different ear shapes, tail positions, and facial expressions.
Consider adding specific markings, fur patterns, or even accessories like collars.
Observing real cats and their individual quirks can provide endless inspiration for unique characteristics.
What if my first attempt isn’t perfect?
It’s completely normal for your first attempts to not be perfect, or even your tenth!
Drawing is a skill that improves with practice and patience.
View each drawing as a learning experience, focusing on what you learned rather than striving for immediate perfection.
Our Top Recommended Finds
- Sketching Pencils Set: A good set with varying lead hardness (HB, 2B, 4B, 6B) allows for different line weights and shading.
- Kneaded Eraser: This type of eraser is excellent for lifting graphite gently without damaging the paper, perfect for subtle corrections.
- Quality Sketchbook: A sketchbook with slightly thicker, smooth paper (around 70-100 gsm) will hold graphite well and withstand erasing without pilling.
Your Next Feline Adventure Awaits
You now have the fundamental steps to draw a cat, transforming simple shapes into a charming feline friend.
Don’t stop here; the world of animal drawing is vast and rewarding.
Why not try drawing your cat in different poses, or exploring other animals like dogs or birds?
Grab your pencil today and let your creativity purr!
& Painting
No rigid rules or pretension. Just practical guides, medium comparisons, and encouraging tips to help you enjoy the drawing & painting process.