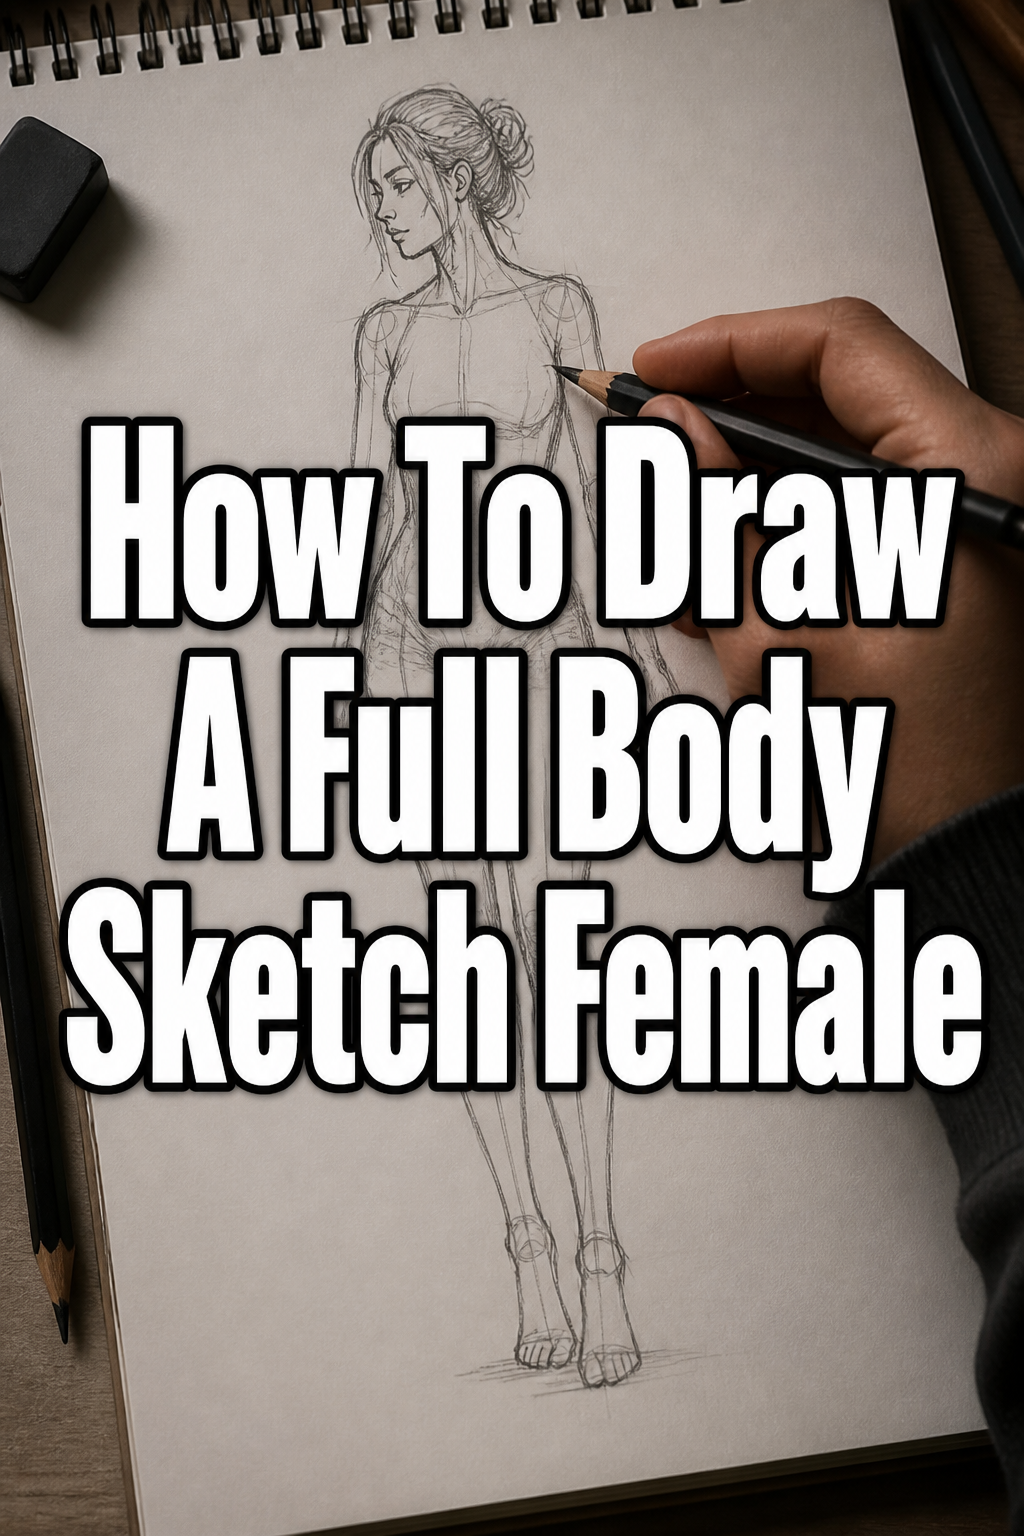
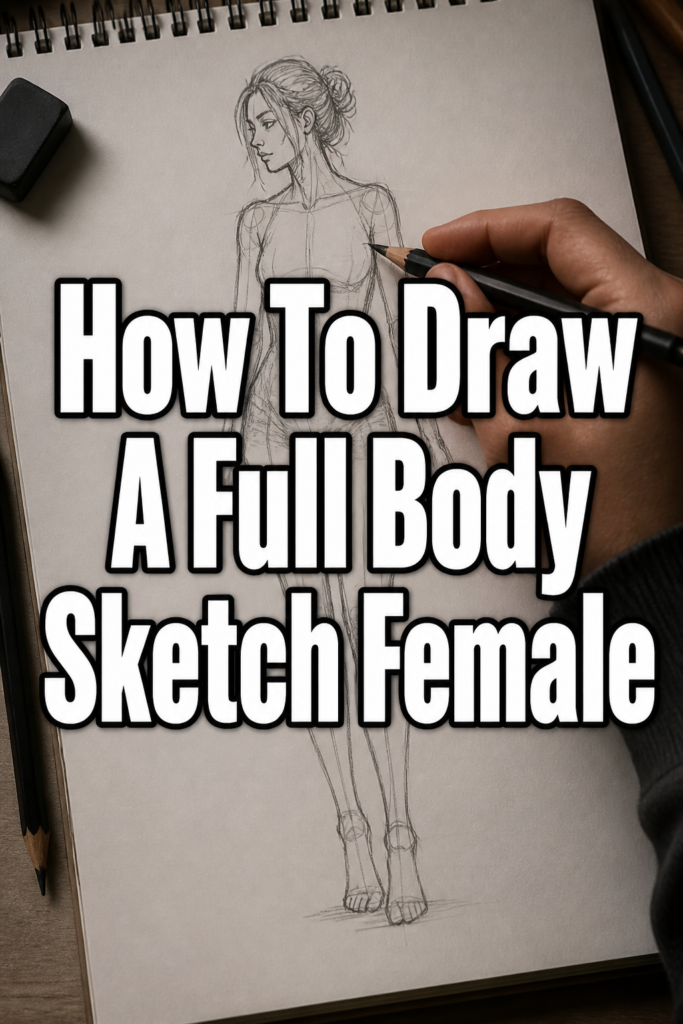
✏️ How To Draw A Full Body Sketch Female

& Painting
No rigid rules or pretension. Just practical guides, medium comparisons, and encouraging tips to help you enjoy the drawing & painting process.
Learning to draw a full body can feel like a big challenge when you’re starting out.
I remember my early attempts, grappling with proportions and making figures look stiff, but consistent practice and understanding basic principles completely transformed my approach.
This guide will break down the process into manageable steps, helping you build confidence and create dynamic female figures.
Quick Overview
You’re about to learn a foundational method for sketching the female form, focusing on essential proportions and gesture.
By the end, you’ll have a solid understanding of how to construct a balanced and natural-looking full body sketch.
- Time needed: 45-90 minutes (depending on detail and practice)
- Difficulty: Beginner to Intermediate
- What you’ll need: Pencil (HB, 2B), Eraser (kneaded, plastic), Sketchbook or paper
Step-by-Step Instructions
Step 1: Establish Your Canvas and Initial Gesture
Begin by lightly sketching a vertical line down the center of your paper. This acts as a guide for your figure’s height and overall balance.
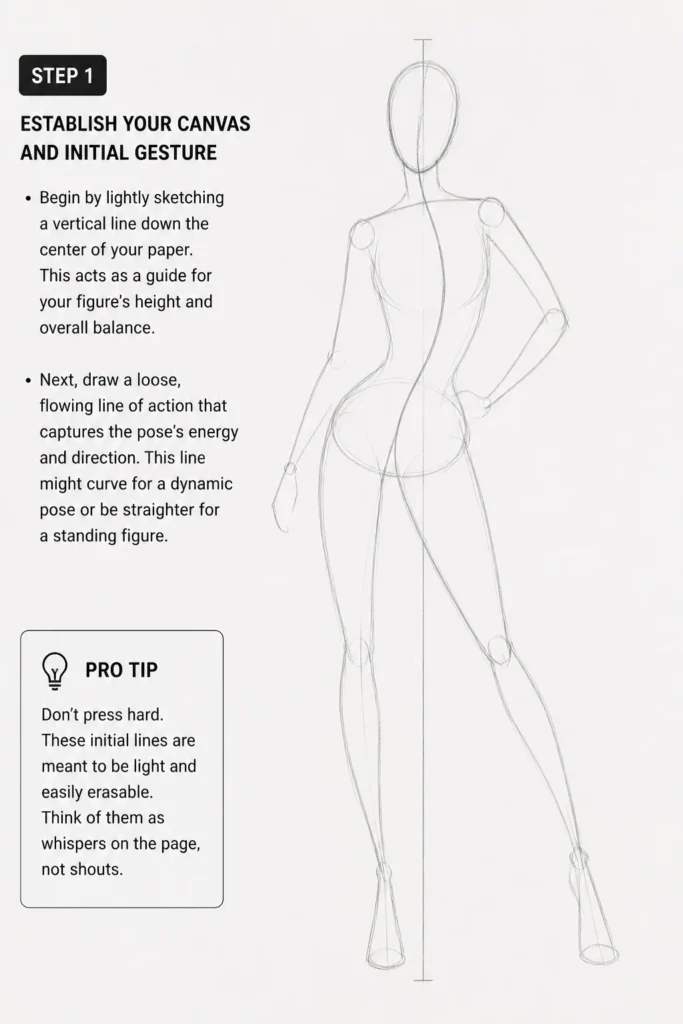
Next, draw a loose, flowing “line of action” that captures the pose’s energy and direction. This line might curve for a dynamic pose or be straighter for a standing figure.
Pro Tip: Don’t press hard. These initial lines are meant to be light and easily erasable. Think of them as whispers on the page, not shouts.
Step 2: Map Out the Head and Key Proportions
Place an oval for the head at the top of your line of action. This head will be your primary unit of measurement.
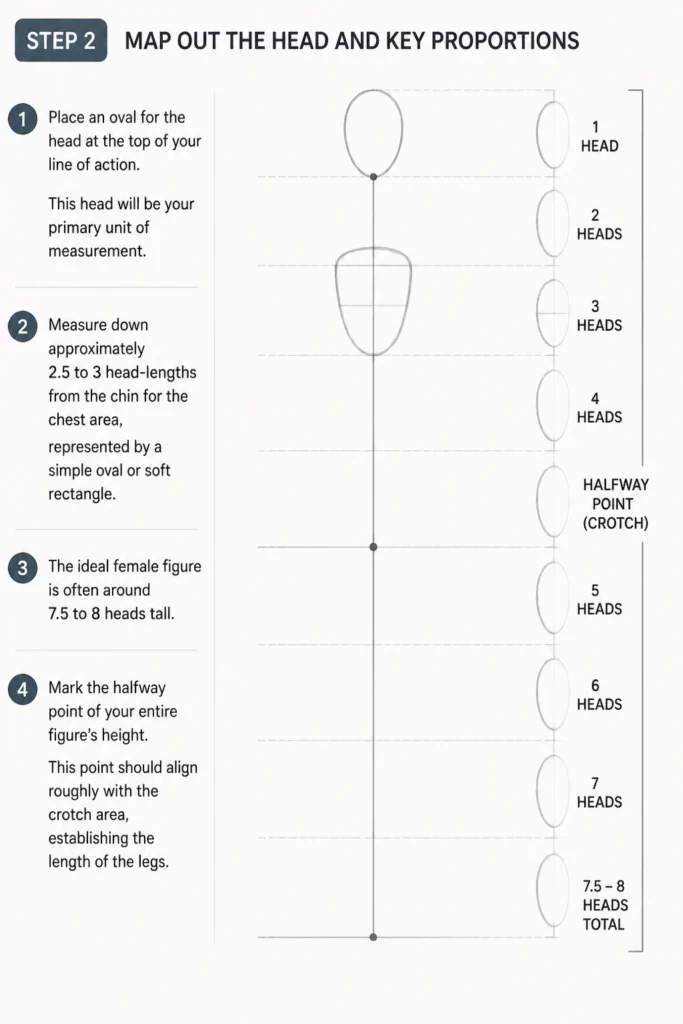
Measure down approximately 2.5 to 3 head-lengths from the chin for the chest area, represented by a simple oval or soft rectangle. The ideal female figure is often around 7.5 to 8 heads tall.
Mark the halfway point of your entire figure’s height. This point should align roughly with the crotch area, establishing the length of the legs.
Step 3: Define the Torso and Pelvis
Sketch a second, larger oval or inverted trapezoid below the chest shape to represent the pelvis. This form should be wider than the chest for a typical female figure.
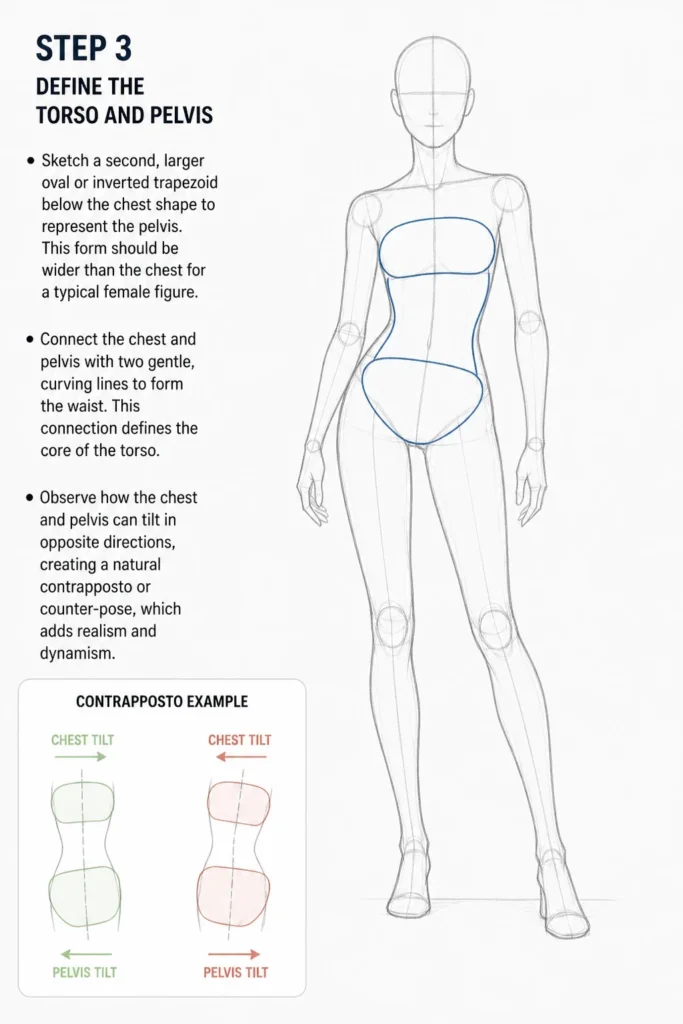
Connect the chest and pelvis with two gentle, curving lines to form the waist. This connection defines the core of the torso.
Observe how the chest and pelvis can tilt in opposite directions, creating a natural “contrapposto” or counter-pose, which adds realism and dynamism.
Step 4: Construct the Limbs with Simple Shapes
Draw simple cylinder or oval shapes for the upper arms, extending from the sides of the chest. The elbow usually aligns with the bottom of the ribcage.
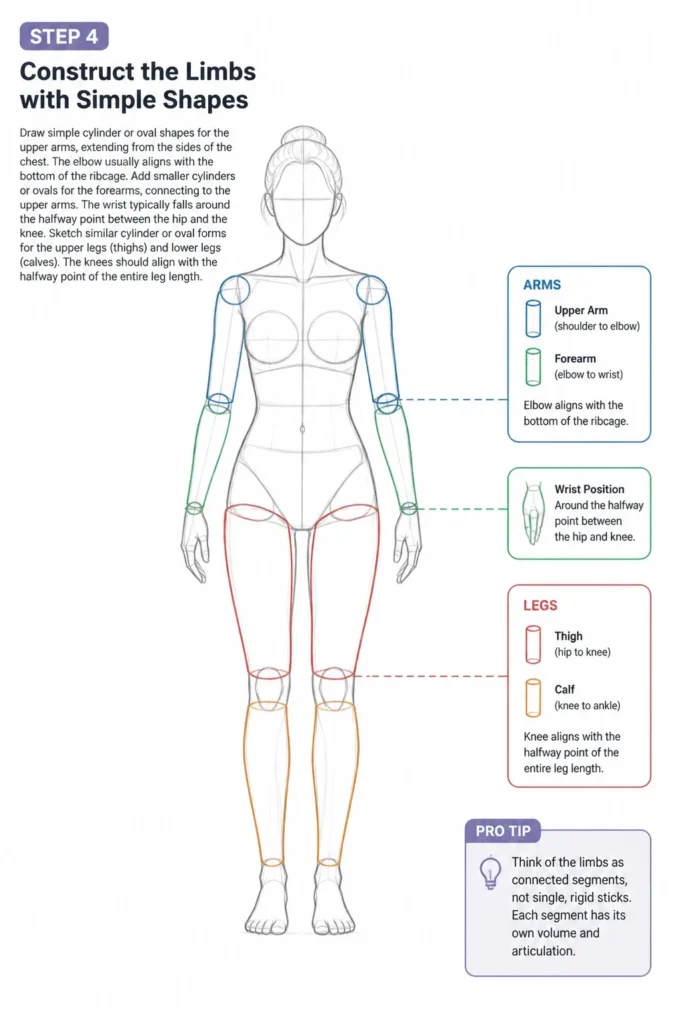
Add smaller cylinders or ovals for the forearms, connecting to the upper arms. The wrist typically falls around the halfway point between the hip and the knee.
Sketch similar cylinder or oval forms for the upper legs (thighs) and lower legs (calves). The knees should align with the halfway point of the entire leg length.
Pro Tip: Think of the limbs as connected segments, not single, rigid sticks. Each segment has its own volume and articulation.
Step 5: Indicate Joints and Hands/Feet
Mark the major joints—shoulders, elbows, wrists, hips, knees, and ankles—with small circles. These help articulate the figure’s movement.
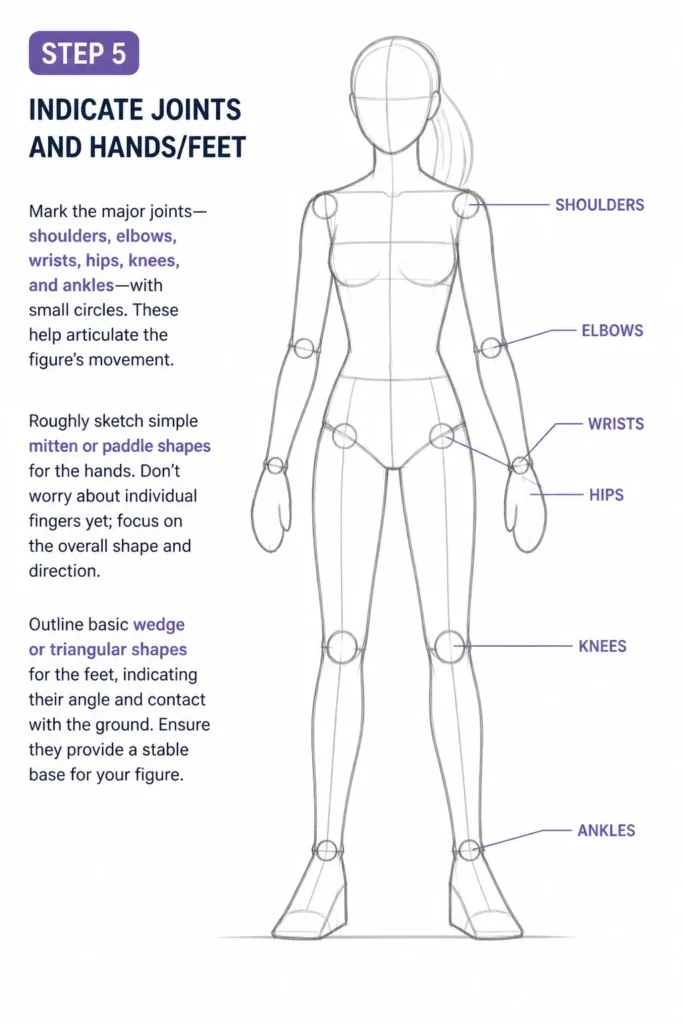
Roughly sketch simple mitten or paddle shapes for the hands. Don’t worry about individual fingers yet; focus on the overall shape and direction.
Outline basic wedge or triangular shapes for the feet, indicating their angle and contact with the ground. Ensure they provide a stable base for your figure.
Step 6: Refine the Form with Contours and Curves
Connect all your simple shapes with smoother, more organic lines. Add curves to suggest muscles and natural body contours.
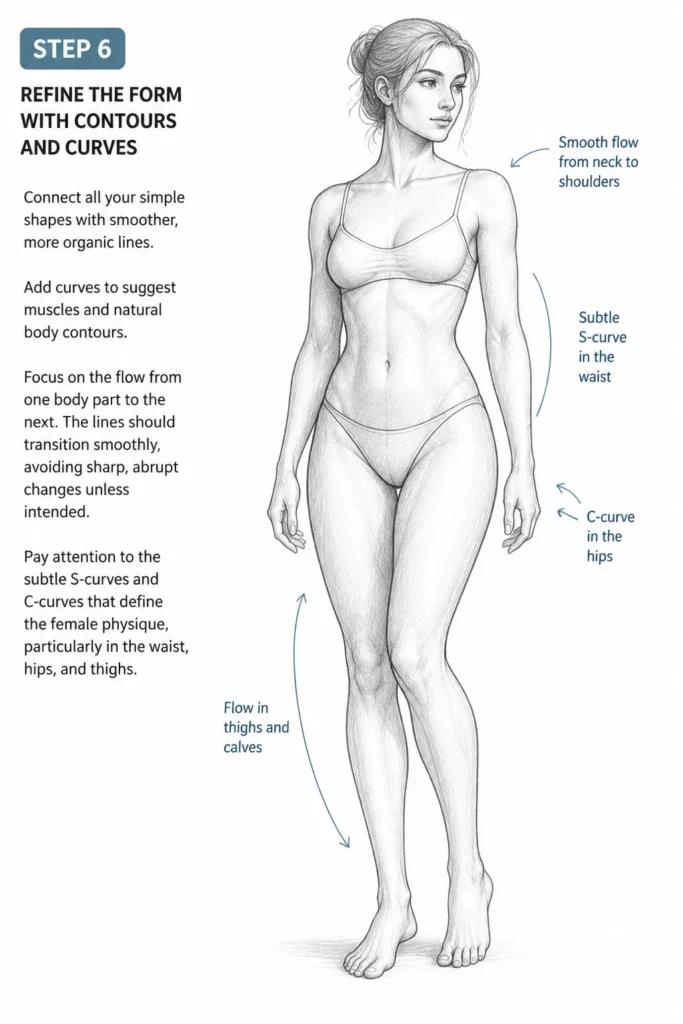
Focus on the flow from one body part to the next. The lines should transition smoothly, avoiding sharp, abrupt changes unless intended.
Pay attention to the subtle S-curves and C-curves that define the female physique, particularly in the waist, hips, and thighs.
Step 7: Detail the Head and Facial Features
Refine the head shape, adding guidelines for eyes, nose, and mouth. The eyes typically sit halfway down the head, with the nose halfway between the eyes and chin.
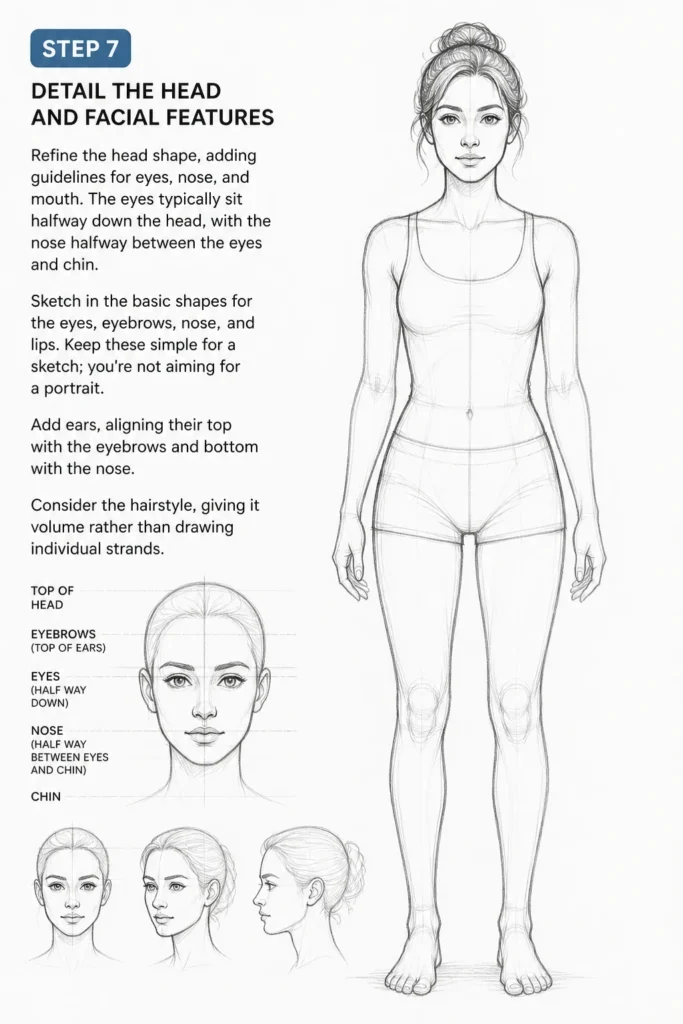
Sketch in the basic shapes for the eyes, eyebrows, nose, and lips. Keep these simple for a sketch; you’re not aiming for a portrait.
Add ears, aligning their top with the eyebrows and bottom with the nose. Consider the hairstyle, giving it volume rather than drawing individual strands.
Step 8: Add Basic Clothing and Hair (Optional)
If desired, drape simple clothing forms over your figure. Remember that fabric follows the body’s contours but also has its own weight and folds.
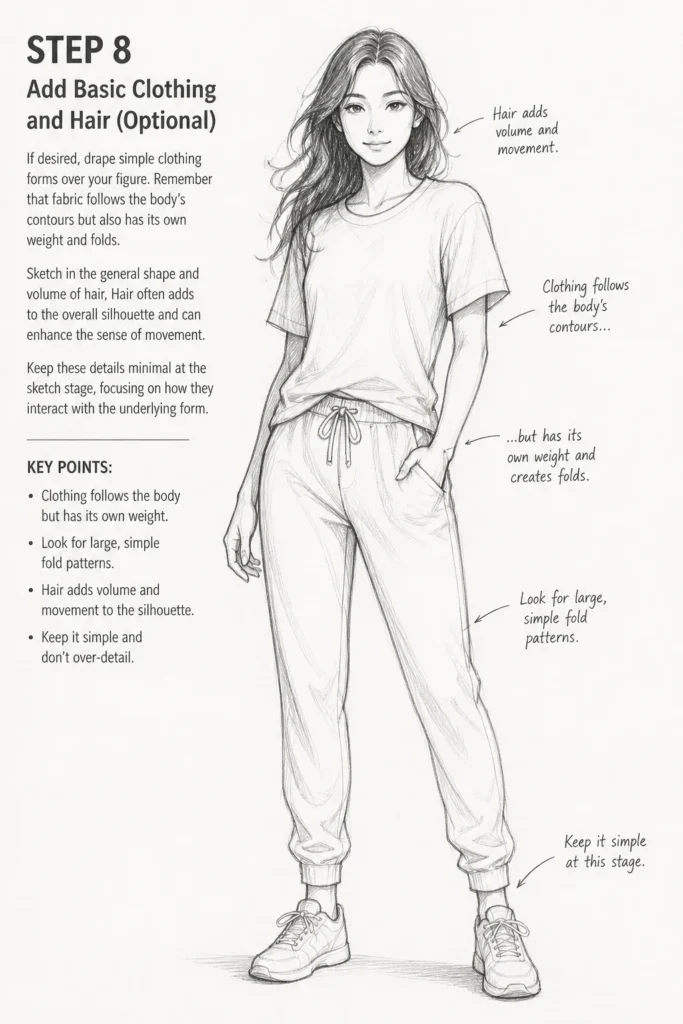
Sketch in the general shape and volume of hair. Hair often adds to the overall silhouette and can enhance the sense of movement.
Keep these details minimal at the sketch stage, focusing on how they interact with the underlying form.
Step 9: Clean Up and Define
Use your kneaded eraser to lighten all your construction lines. You want the underlying structure to fade into the background.
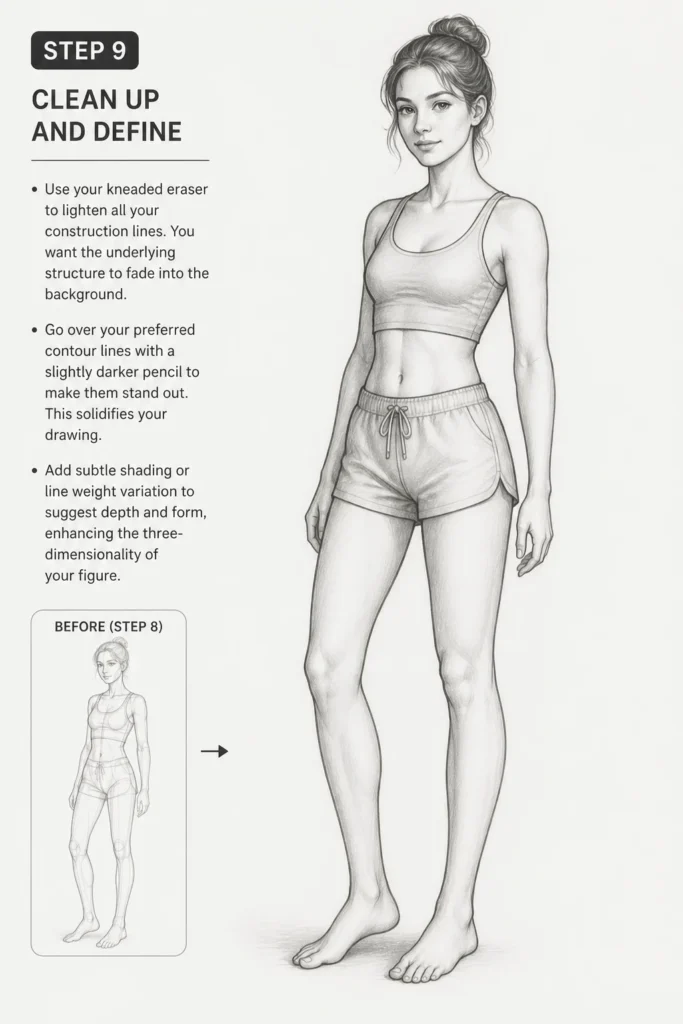
Go over your preferred contour lines with a slightly darker pencil to make them stand out. This solidifies your drawing.
Add subtle shading or line weight variation to suggest depth and form, enhancing the three-dimensionality of your figure.
Step 10: Review and Refine
Step back from your drawing and look at it with fresh eyes. Does anything look out of proportion? Is the pose balanced?
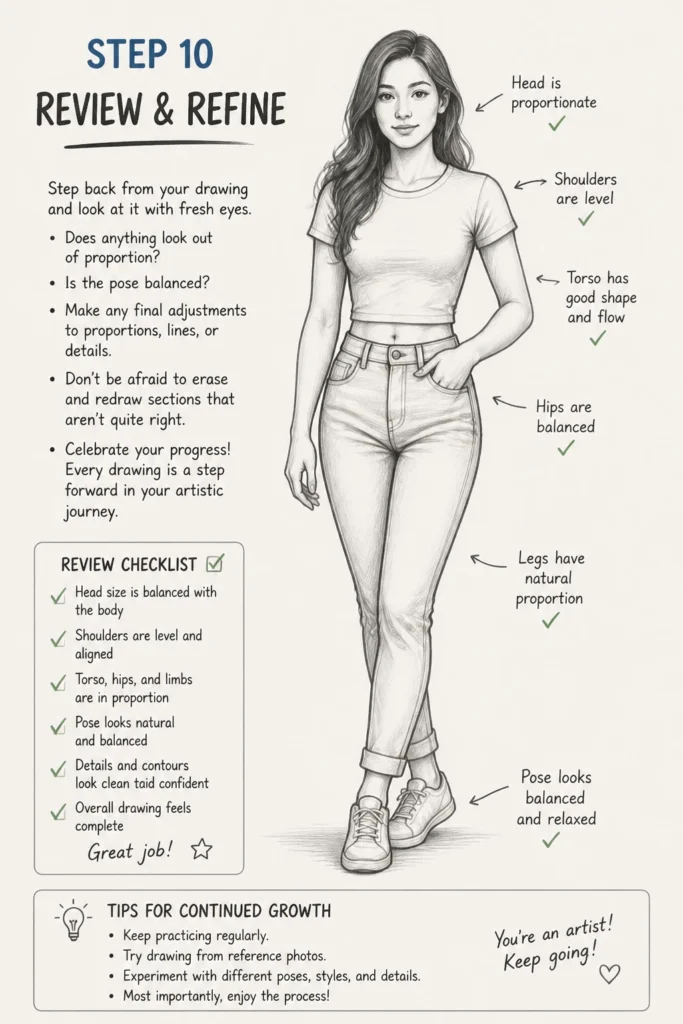
Make any final adjustments to proportions, lines, or details. Don’t be afraid to erase and redraw sections that aren’t quite right.
Celebrate your progress! Every drawing is a step forward in your artistic journey.
Common Mistakes to Avoid
Ignoring the Line of Action
Many beginners jump straight into drawing body parts without establishing an initial gesture or line of action. This often results in stiff, lifeless figures that lack movement and natural flow.
Always start with a loose, dynamic line that captures the pose’s energy. This foundational line dictates the rhythm of your entire drawing and makes your figure feel alive.
Inaccurate Proportions
One of the most common pitfalls is getting body proportions wrong, leading to figures with unusually long limbs or tiny heads. This can make your drawing look amateurish and unconvincing.
Consistently use the head as a unit of measurement and adhere to general anatomical guidelines (e.g., 7.5-8 heads tall). Practice measuring distances with your pencil to train your eye.
Drawing Symmetrically
Our bodies are rarely perfectly symmetrical, especially in dynamic poses. Drawing both sides of a figure identically can make it appear rigid and unnatural.
Embrace asymmetry and contrapposto. Allow the shoulders and hips to tilt in opposing directions, creating a natural weight shift and a more believable, relaxed stance.
Focusing on Details Too Early
Getting bogged down in drawing individual fingers, facial features, or clothing wrinkles at the beginning can distract you from the overall form and proportions. This often leads to a figure that looks detailed but fundamentally flawed.
Always work from general to specific. Establish the large shapes and overall gesture first, then refine the forms, and only then add smaller details. Build your figure from the ground up.
Troubleshooting
My Figure Looks Stiff and Robotic
If your sketch lacks fluidity, it’s likely you skipped or didn’t fully commit to the initial gesture line. Stiff figures often result from drawing rigid, straight lines for limbs and torso.
Go back to Step 1 and really emphasize the “line of action.” Practice drawing flowing S-curves and C-curves for the spine and limbs. Think of the body as a series of flexible, connected forms, not rigid blocks.
Proportions Are Off, Despite Measuring
Sometimes, even with measurements, proportions can seem skewed. This might be due to incorrect initial placement of the head or an inconsistent head unit size throughout the drawing.
Double-check your initial head size and ensure you’re consistently using it as your measurement guide. Try flipping your drawing upside down or viewing it in a mirror; this can reveal hidden proportional errors.
The Pose Doesn’t Feel Balanced
A figure that looks like it’s about to fall over or has an unnatural weight distribution is a common issue. This often stems from an unstable line of action or misaligned weight-bearing limbs.
Draw a plumb line (a vertical line) from the figure’s neck down through the feet. For a stable pose, the majority of the body’s mass should fall within this vertical axis. Adjust the feet and hips to re-establish balance.
Key Takeaways
- Always start with a light line of action to establish pose and energy.
- Use the head as a proportional unit to maintain consistent body measurements.
- Build the figure from simple shapes like ovals and cylinders before refining contours.
- Embrace asymmetry and contrapposto for natural, dynamic poses.
- Work from general forms to specific details, never getting lost in small features too early.
- Practice regularly and review your work to identify and correct mistakes.
Frequently Asked Questions
How do I make my female figures look distinct from male figures?
Focus on key anatomical differences. Female figures generally have wider hips, a narrower ribcage, a more defined waist, and softer, more rounded muscle forms. The shoulders are typically narrower relative to the hips compared to male figures.
Should I use reference photos?
Absolutely, yes! Using reference photos is incredibly helpful, especially when learning. They provide accurate anatomical information, diverse poses, and can inspire new ideas. Just be sure to understand the underlying structure rather than simply copying lines.
What if my lines are too shaky or uncertain?
Shaky lines often indicate hesitation. Try drawing with your whole arm, not just your wrist, to create longer, more confident strokes. Practice drawing continuous, flowing lines and ellipses repeatedly to improve your muscle memory and control.
How can I make my sketches more dynamic?
Exaggerate the line of action, push the contrapposto, and consider foreshortening. Think about the energy and emotion of the pose. Even slight tilts and twists can add significant dynamism. Don’t be afraid to experiment with more dramatic angles.
Your Artistic Journey Awaits
Drawing a full body sketch is a fundamental skill that opens up countless creative possibilities.
Each line you draw, each proportion you measure, builds your understanding and refines your artistic eye.
Keep practicing these steps, experiment with different poses, and watch your confidence grow with every sketch.
Our Top Recommended Finds
- Strathmore 400 Series Sketch Pad: A reliable, acid-free paper that holds up well to erasing and allows for smooth pencil work.
- Faber-Castell Art & Graphic Pencils (HB, 2B, 4B): A versatile set for construction lines, general sketching, and adding darker values.
- Kneaded Eraser: Essential for lifting graphite without damaging the paper, allowing you to lighten guidelines effectively.
& Painting
No rigid rules or pretension. Just practical guides, medium comparisons, and encouraging tips to help you enjoy the drawing & painting process.