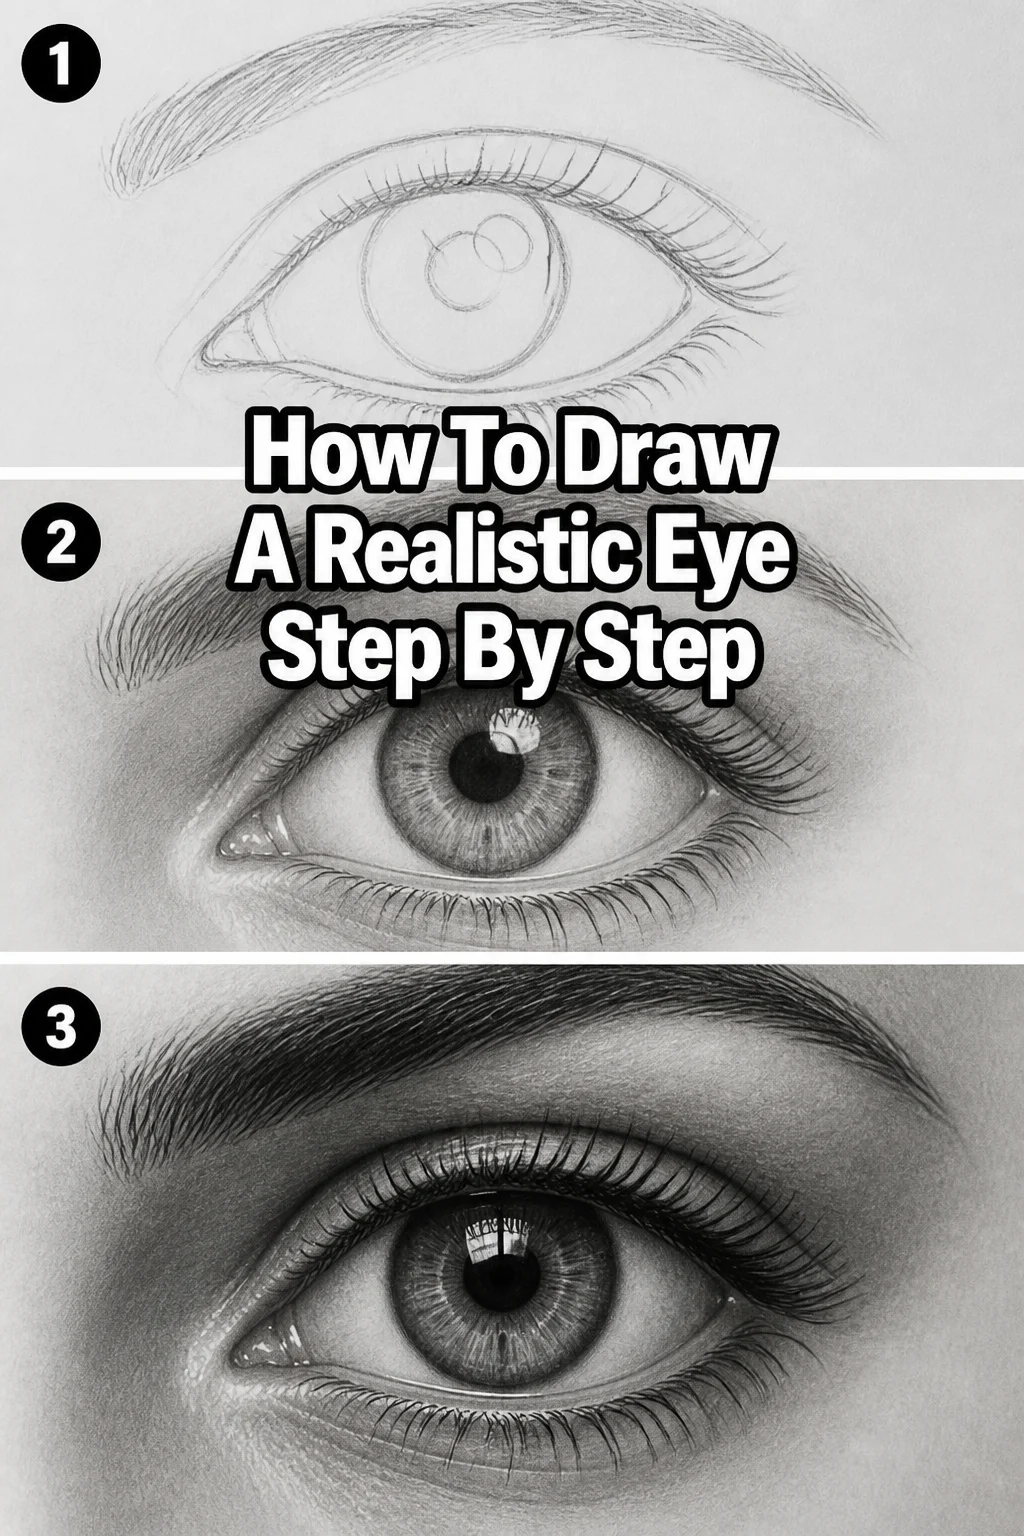
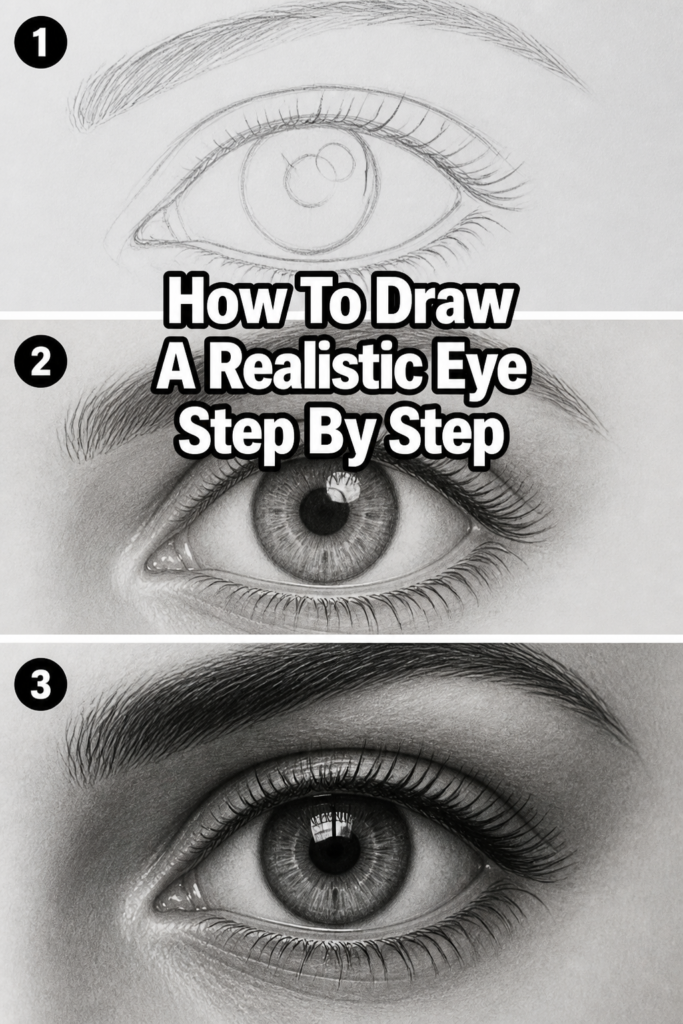
How To Draw A Realistic Eye Step By Step
👁️ How To Draw A Realistic Eye Step By Step
Drawing a realistic eye can seem daunting at first glance. I remember my own early attempts, often ending in flat, lifeless results that missed the mark.
Over years of practice and countless sketches, I discovered the specific techniques that truly bring an eye to life on paper. This guide distills those methods into clear, actionable steps for you. You can absolutely achieve stunning realism with the right approach.
Quick Overview
This guide will walk you through the precise steps to render a realistic eye, from initial sketch to final detailed shading. You’ll learn to capture depth, texture, and light, transforming your drawing skills.
Time needed: 1-2 hours (can vary based on detail)
Difficulty: Intermediate
What you’ll need: Drawing pencils (HB, 2B, 4B, 6B), smooth drawing paper, kneaded eraser, blending stump or cotton swab.
Step-by-Step Instructions
Step 1: Establish the Basic Shape and Placement
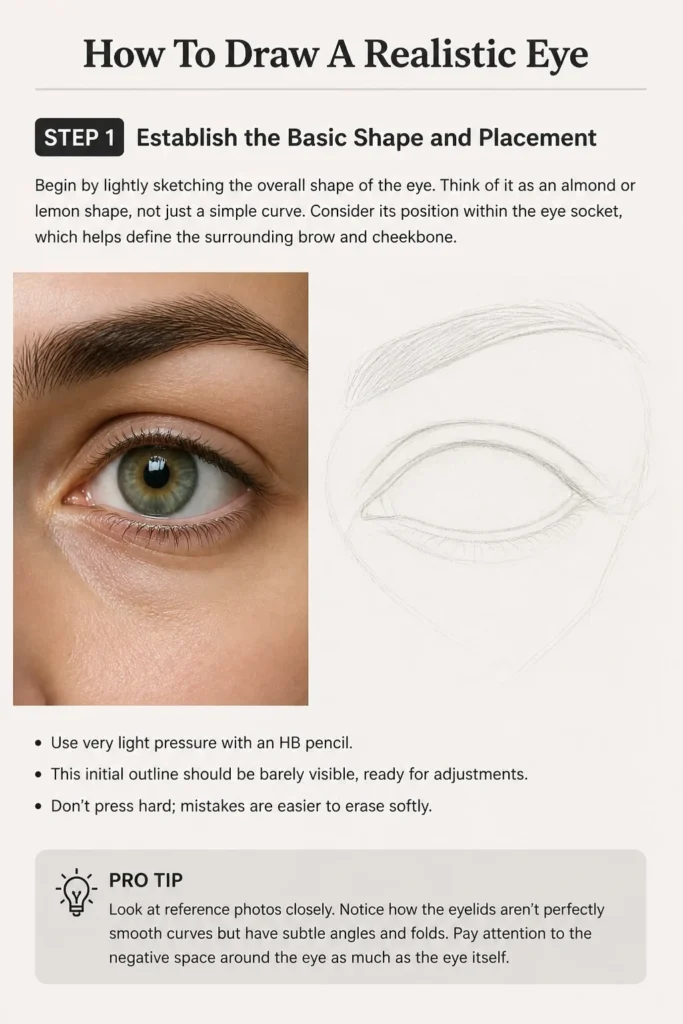
Begin by lightly sketching the overall shape of the eye. Think of it as an almond or lemon shape, not just a simple curve.
Consider its position within the eye socket, which helps define the surrounding brow and cheekbone. Use very light pressure with an HB pencil.
This initial outline should be barely visible, ready for adjustments. Don’t press hard; mistakes are easier to erase softly.
Pro Tip: Look at reference photos closely. Notice how the eyelids aren’t perfectly smooth curves but have subtle angles and folds. Pay attention to the negative space around the eye as much as the eye itself.
Step 2: Define the Iris and Pupil
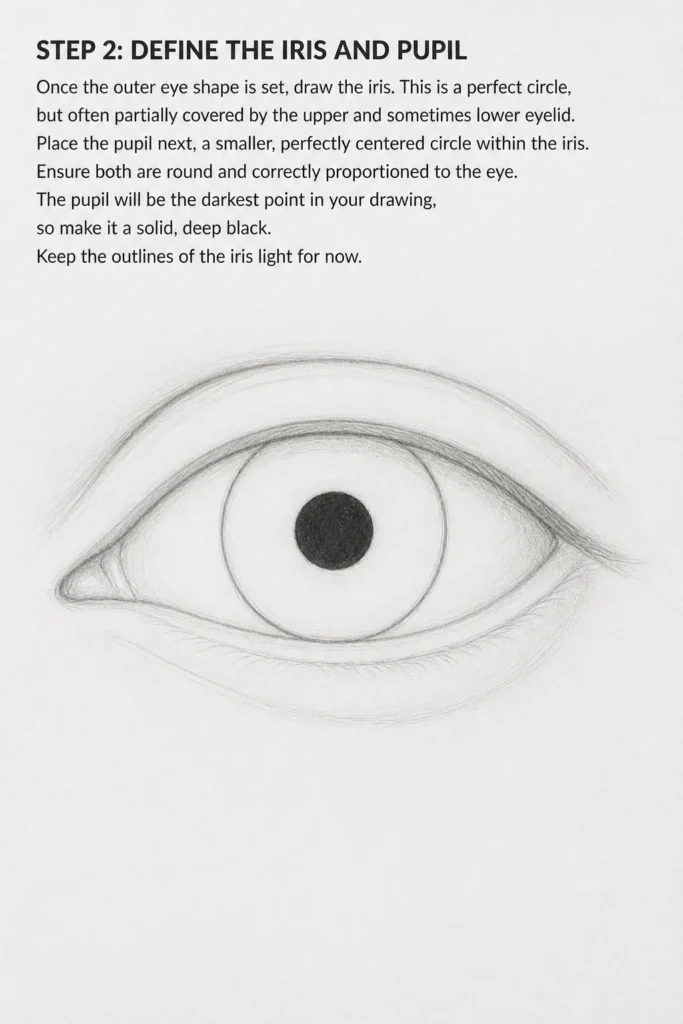
Once the outer eye shape is set, draw the iris. This is a perfect circle, but often partially covered by the upper and sometimes lower eyelid.
Place the pupil next, a smaller, perfectly centered circle within the iris. Ensure both are round and correctly proportioned to the eye.
The pupil will be the darkest point in your drawing, so make it a solid, deep black. Keep the outlines of the iris light for now.
Step 3: Sketch the Eyelids and Tear Duct
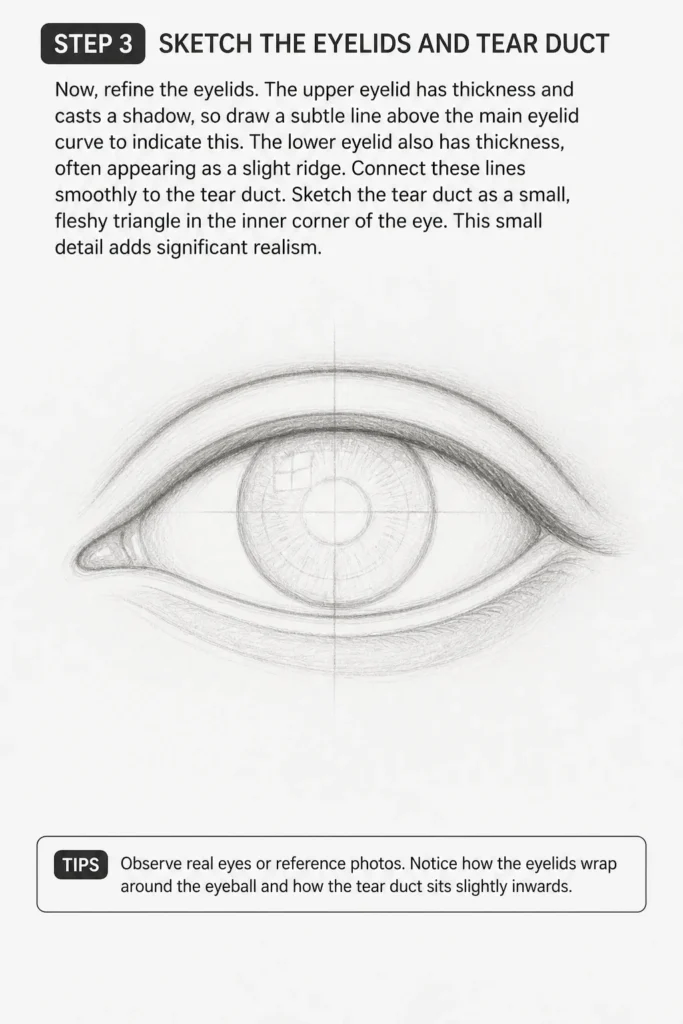
Now, refine the eyelids. The upper eyelid has thickness and casts a shadow, so draw a subtle line above the main eyelid curve to indicate this.
The lower eyelid also has thickness, often appearing as a slight ridge. Connect these lines smoothly to the tear duct.
Sketch the tear duct as a small, fleshy triangle in the inner corner of the eye. This small detail adds significant realism.
Step 4: Begin Basic Shading and Form
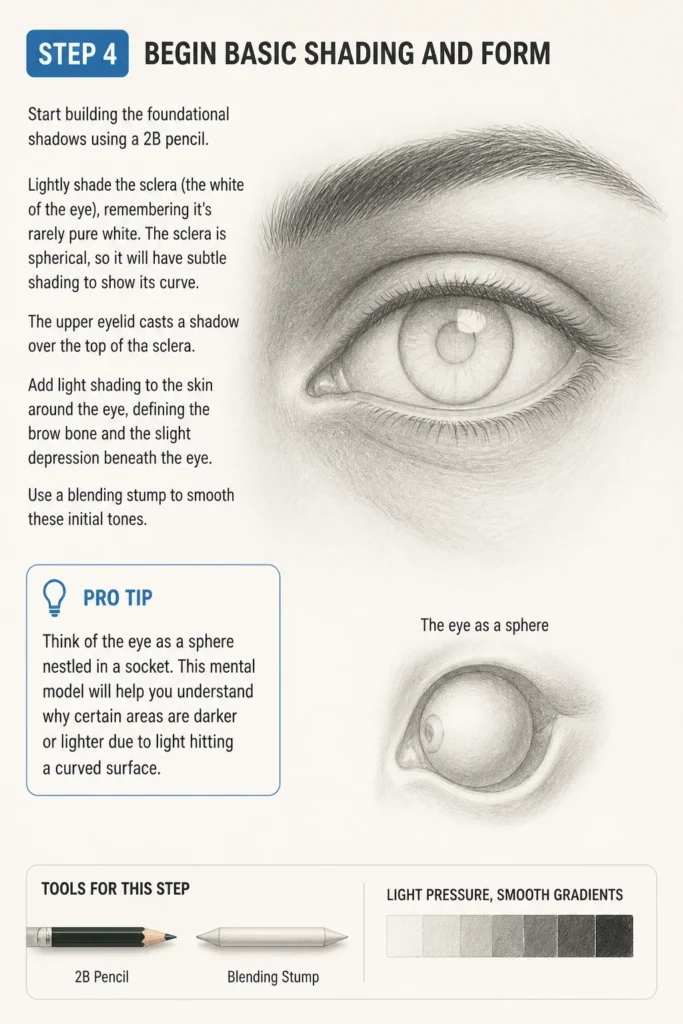
Start building the foundational shadows using a 2B pencil. Lightly shade the sclera (the white of the eye), remembering it’s rarely pure white.
The sclera is spherical, so it will have subtle shading to show its curve. The upper eyelid casts a shadow over the top of the sclera.
Add light shading to the skin around the eye, defining the brow bone and the slight depression beneath the eye. Use a blending stump to smooth these initial tones.
Pro Tip: Think of the eye as a sphere nestled in a socket. This mental model will help you understand why certain areas are darker or lighter due to light hitting a curved surface.
Step 5: Detail the Iris and Reflections
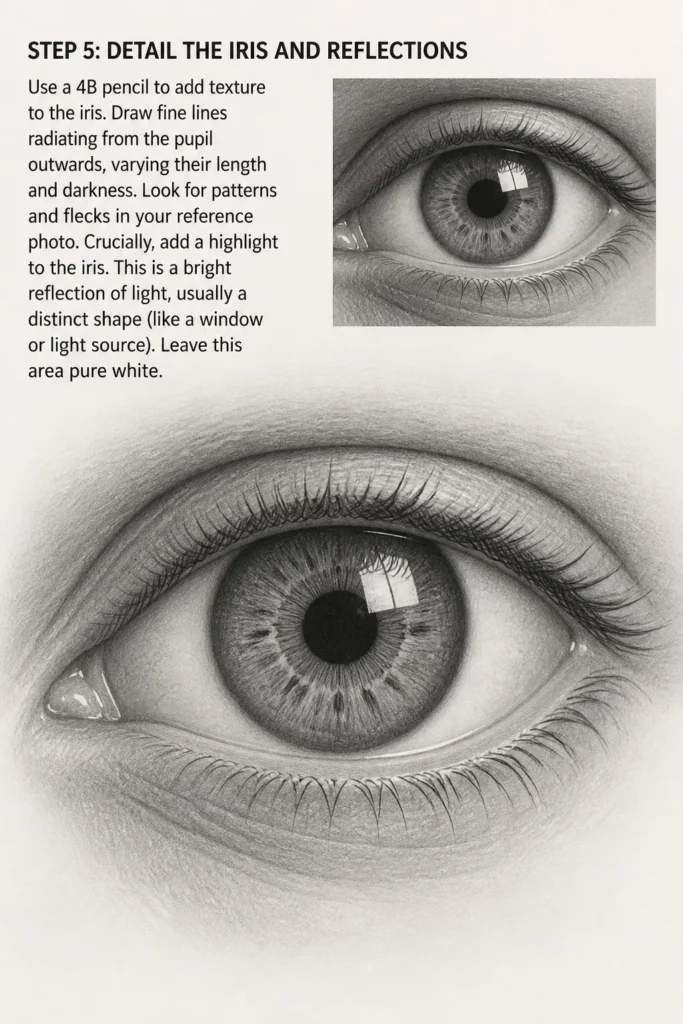
This is where the eye truly starts to come alive. Use a 4B pencil to add texture to the iris.
Draw fine lines radiating from the pupil outwards, varying their length and darkness. Look for patterns and flecks in your reference photo.
Crucially, add a highlight to the iris. This is a bright reflection of light, usually a distinct shape (like a window or light source). Leave this area pure white.
Step 6: Render Eyelashes and Eyebrows
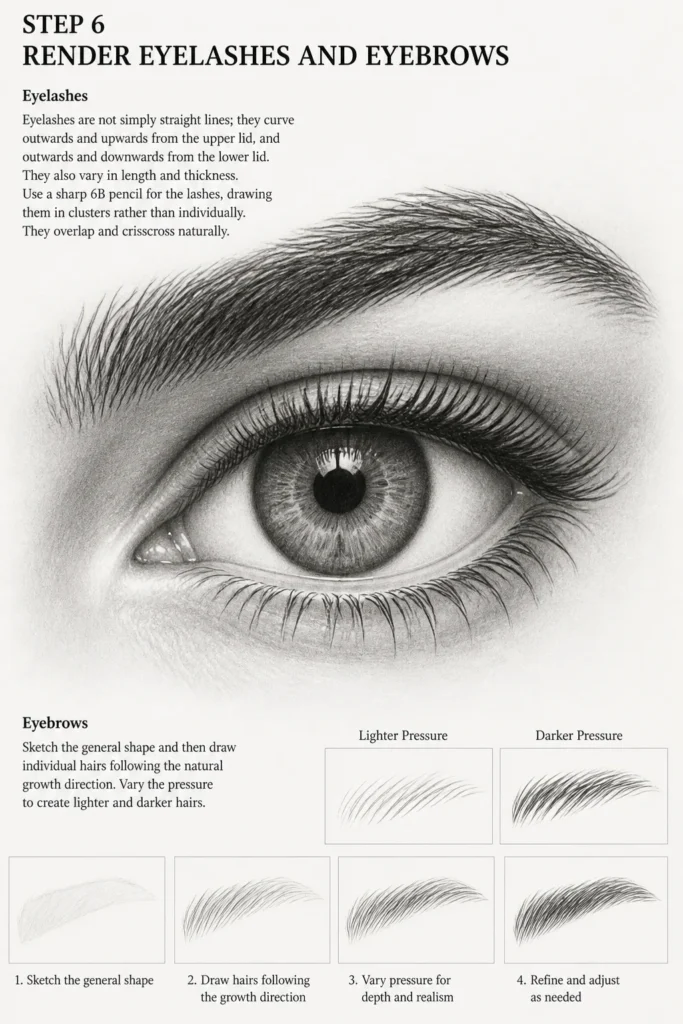
Eyelashes are not simply straight lines; they curve outwards and upwards from the upper lid, and outwards and downwards from the lower lid. They also vary in length and thickness.
Use a sharp 6B pencil for the lashes, drawing them in clusters rather than individually. They overlap and crisscross naturally.
For eyebrows, sketch the general shape and then draw individual hairs following the natural growth direction. Vary the pressure to create lighter and darker hairs.
Step 7: Refine Skin Texture and Mid-Tones
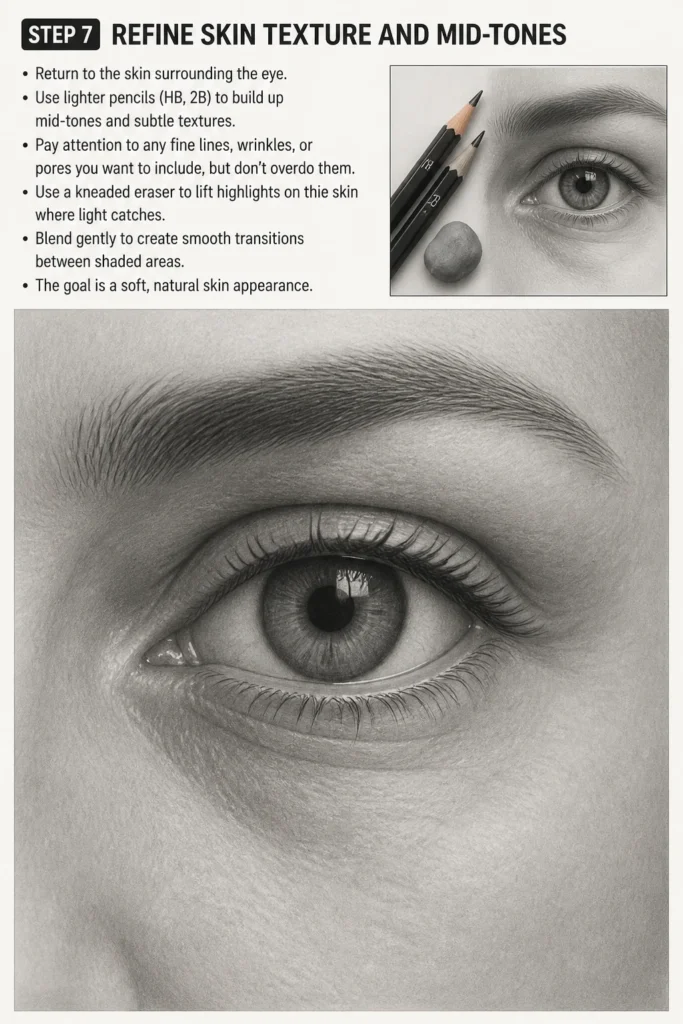
Return to the skin surrounding the eye. Use lighter pencils (HB, 2B) to build up mid-tones and subtle textures.
Pay attention to any fine lines, wrinkles, or pores you want to include, but don’t overdo them. Use a kneaded eraser to lift highlights on the skin where light catches.
Blend gently to create smooth transitions between shaded areas. The goal is a soft, natural skin appearance.
Step 8: Add Final Touches and Enhance Contrast
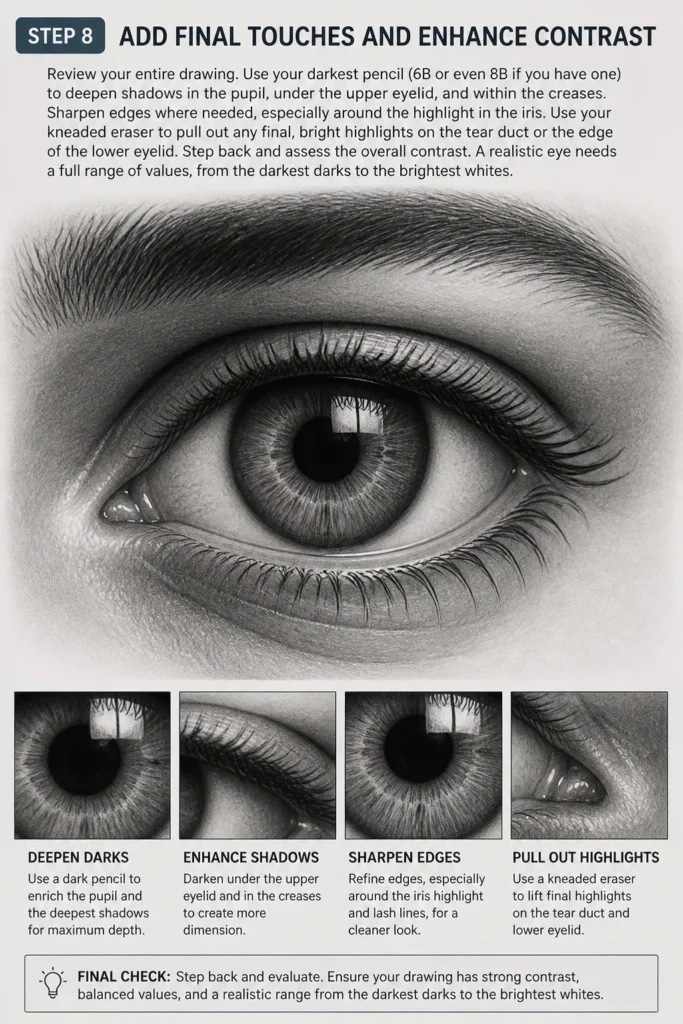
Review your entire drawing. Use your darkest pencil (6B or even 8B if you have one) to deepen shadows in the pupil, under the upper eyelid, and within the creases.
Sharpen edges where needed, especially around the highlight in the iris. Use your kneaded eraser to pull out any final, bright highlights on the tear duct or the edge of the lower eyelid.
Step back and assess the overall contrast. A realistic eye needs a full range of values, from the darkest darks to the brightest whites.
Common Mistakes to Avoid
Making the Sclera Too White
A common error is leaving the sclera (the “white” of the eye) pure white. In reality, it’s a curved surface, often shaded by the eyelids and affected by ambient light. Leaving it pure white makes the eye look flat and unrealistic, like a cartoon. Always add subtle shading, especially beneath the upper eyelid and towards the corners, to show its spherical form.
Drawing Eyelashes as Straight Lines
Many beginners draw eyelashes as uniform, straight lines radiating outwards. This creates a stiff, unnatural look. Eyelashes grow in clusters, curve outward, and vary in length and thickness. They also overlap and crisscross. Observe how they emerge from the eyelid itself, not just float above it.
Ignoring the Thickness of Eyelids
The eyelids are not just thin lines; they have depth and thickness. Failing to show this dimension makes the eye appear flat. Always indicate the slight ridge or curve of the upper and lower eyelids. This small detail adds significant three-dimensionality and realism.
Placing the Highlight Incorrectly
The highlight in the eye is crucial for realism and sparkle. A common mistake is placing it randomly or making it too small. The highlight should reflect a light source and often has a distinct shape. It sits on the iris and pupil, indicating the wet, reflective surface of the eye. Ensure it’s crisp and bright.
Troubleshooting
My Eye Looks Flat and Lifeless
If your eye drawing lacks depth, it’s likely due to insufficient contrast and shading. Go back and deepen your shadows, especially in the pupil, under the upper eyelid, and where the sclera curves away. Make sure your lightest lights (highlights) are truly bright. A full range of values from darkest darks to brightest whites is essential for three-dimensionality.
The Iris Looks Like a Plain Circle
A flat iris indicates a lack of texture and detail. The iris has complex patterns of fibers, lines, and flecks. Use a sharp pencil to draw fine lines radiating from the pupil outwards. Vary their length and intensity. Don’t forget the highlight, which gives the iris its wet, reflective quality. Practice observing these details in reference photos.
Eyelashes Look Unnatural or Spiky
If your eyelashes appear stiff, you might be drawing them too individually or too straight. Remember they grow in groups and have a natural curve. Try drawing them with quick, flicking motions, letting your pencil lift off at the end of each stroke to create a tapered effect. Study how they overlap and where they originate from the eyelid.
Key Takeaways
Start Light, Build Dark: Always begin with light sketches and gradually increase pressure and darkness.
Observe Anatomy: Understand the spherical nature of the eyeball and the thickness of the eyelids.
Layer Your Shading: Build up tones gradually, from lighter pencils to darker ones, for smooth transitions.
Detail the Iris: Focus on the intricate patterns and the crucial highlight for realism.
Natural Eyelashes: Draw lashes in clusters with varied lengths and natural curves.
Full Value Range: Ensure a complete spectrum of light and dark tones for depth and dimension.
Frequently Asked Questions
What pencil hardness should I use for different parts of the eye?
Generally, start with an HB or 2H for initial light sketches. Use 2B and 4B for mid-tones and building up form. Reserve 6B or darker pencils for the pupil, deep shadows, and crisp eyelashes. Having a range allows for greater control over values.
How do I make the eye look wet and reflective?
The key to a wet, reflective look is the highlight. Ensure it’s a clean, bright white area in the iris. The tear duct also needs a subtle highlight. Additionally, subtle, smooth blending on the sclera and skin around the eye helps create a soft, lifelike sheen.
Should I draw the entire face or just the eye?
For practice, focusing solely on the eye is excellent. However, understanding how the eye sits within the face (the eye socket, brow bone, cheekbone) is crucial for realism. Even when drawing just the eye, lightly sketch some of the surrounding facial structure to inform your shading and proportions.
How important is a reference photo?
Extremely important. Even experienced artists use reference photos. They help you observe subtle details, light sources, and proportions you might otherwise miss. Choose a high-quality photo with clear lighting for the best results.
Our Top Recommended Finds
Derwent Graphic Pencils (Medium Set): Offers a great range of graphite pencils from 2H to 6B, perfect for all stages of drawing.
Strathmore 400 Series Smooth Bristol Paper: Its smooth surface is ideal for detailed graphite work and blending, helping you achieve realistic textures.
Kneaded Eraser: Essential for lifting graphite, creating soft highlights, and cleaning up without damaging your paper.
Ignite Your Artistic Journey
You now have the tools and knowledge to draw a truly realistic eye. This guide provides a solid foundation, but the true magic happens with practice.
Pick up your pencils today and begin your first realistic eye drawing. Don’t be afraid to experiment and take your time with each step. As you gain confidence, consider exploring other facial features or even complete portraits. The journey of artistic growth is continuous and rewarding.