✏️ How To Draw Side Face Step By Step

& Painting
No rigid rules or pretension. Just practical guides, medium comparisons, and encouraging tips to help you enjoy the drawing & painting process.
Learning to draw a compelling side profile can feel like a daunting task at first.
I remember struggling for ages, making faces look flat or disproportionate.
This guide shares the method I finally adopted, breaking down the process into simple, manageable steps for anyone to follow.
Quick Overview
In this guide, you will learn to construct a well-proportioned and expressive side profile from scratch, moving from basic shapes to refined details.
- Time needed: 45-90 minutes (can vary based on detail and practice)
- Difficulty: Beginner
- What you’ll need: Pencil (HB, 2B), paper, eraser, ruler (optional, for guidelines)
Step-by-Step Instructions
Step 1: Establish the Basic Head Shape
Begin by lightly sketching a perfect circle on your paper. This circle will represent the cranium, the largest part of the head.
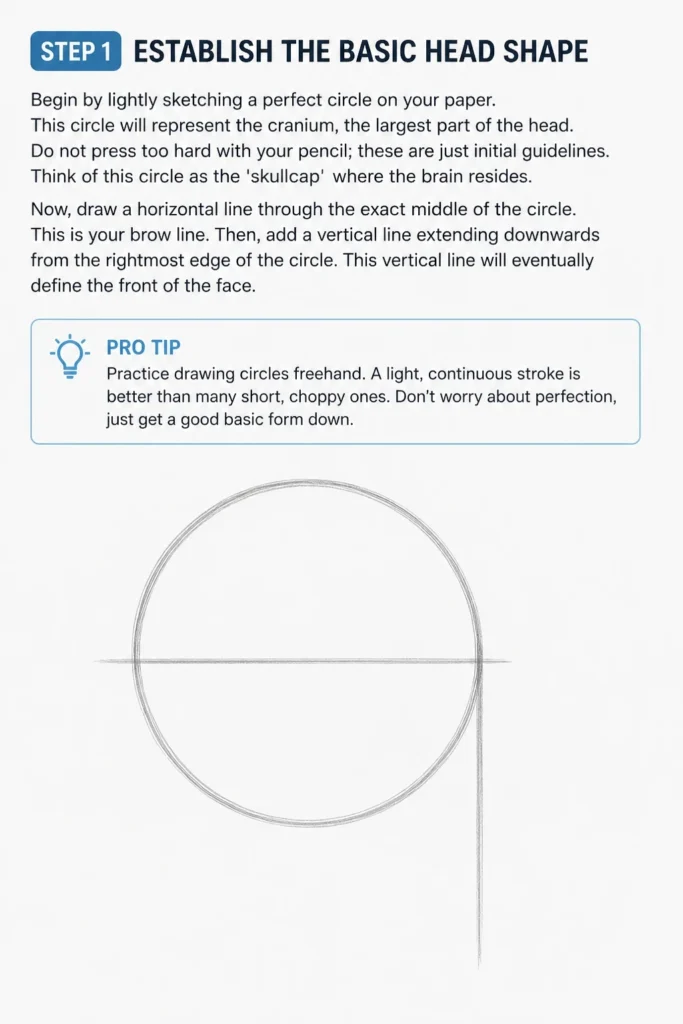
Do not press too hard with your pencil; these are just initial guidelines.
Think of this circle as the ‘skullcap’ where the brain resides.
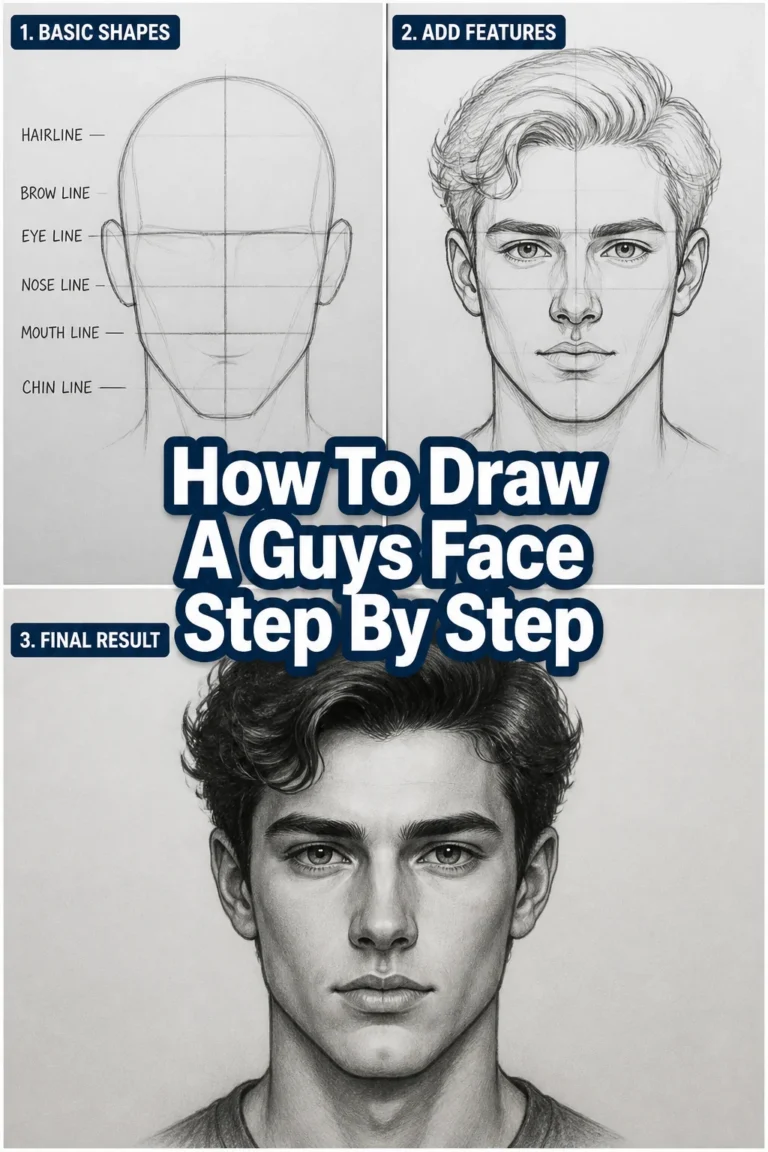
Now, draw a horizontal line through the exact middle of the circle. This is your brow line.
Then, add a vertical line extending downwards from the rightmost edge of the circle. This vertical line will eventually define the front of the face.
Pro Tip: Practice drawing circles freehand. A light, continuous stroke is better than many short, choppy ones. Don’t worry about perfection, just get a good basic form down.
Step 2: Define the Jawline and Chin
From the bottom of your initial circle, measure a distance roughly equal to half the circle’s radius downwards along your vertical line.
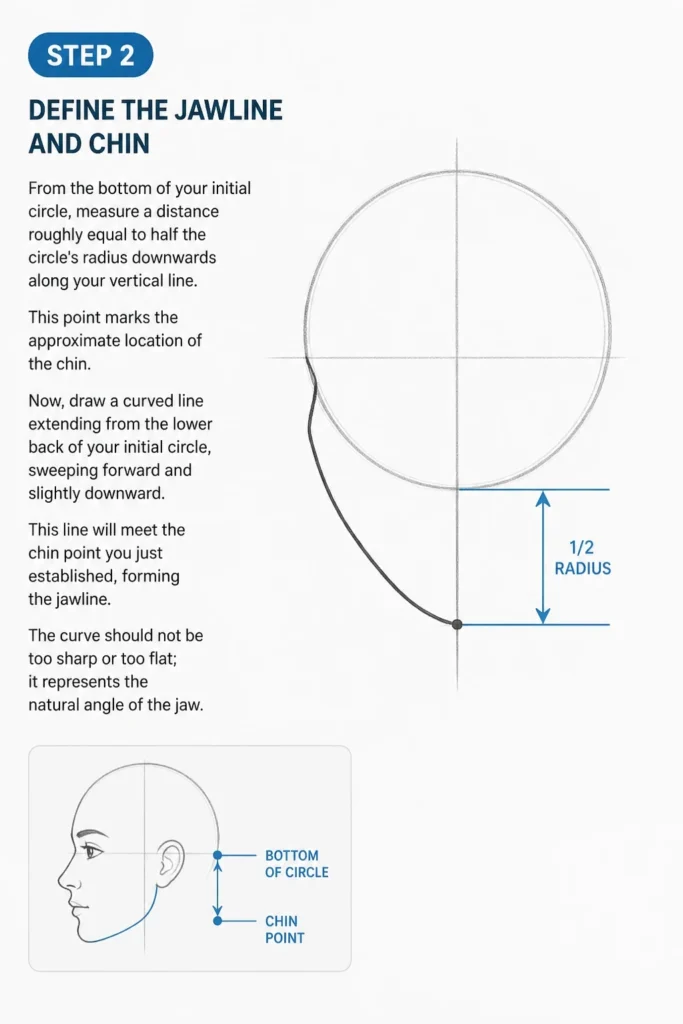
This point marks the approximate location of the chin.
Now, draw a curved line extending from the lower back of your initial circle, sweeping forward and slightly downward.
This line will meet the chin point you just established, forming the jawline.
The curve should not be too sharp or too flat; it represents the natural angle of the jaw.
Step 3: Place the Essential Guidelines
You already have the brow line. Now, let’s add the remaining crucial horizontal guidelines.
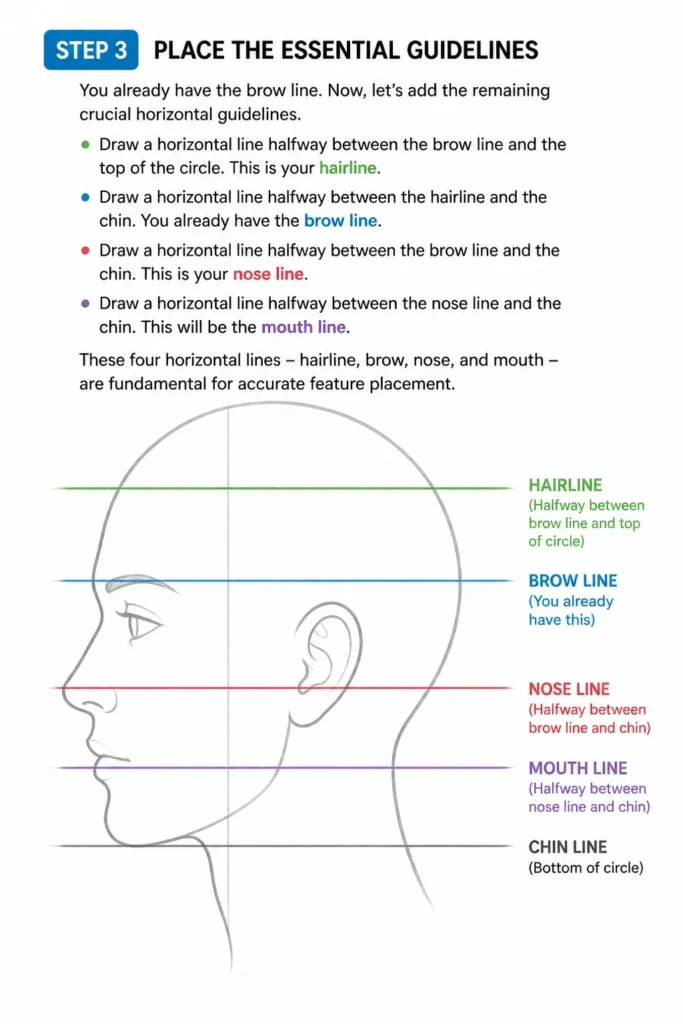
Draw a horizontal line halfway between the brow line and the chin. This is your nose line.
Next, add another horizontal line halfway between the nose line and the chin. This will be the mouth line.
Finally, draw a horizontal line halfway between the brow line and the top of the initial circle. This is the hairline.
These four horizontal lines – hairline, brow, nose, and mouth – are fundamental for accurate feature placement.
Step 4: Sketch the Nose and Mouth
Let’s start with the nose. From the vertical line marking the front of the face, draw a gentle curve upwards from the nose line, then a sharper angle down to form the bridge.
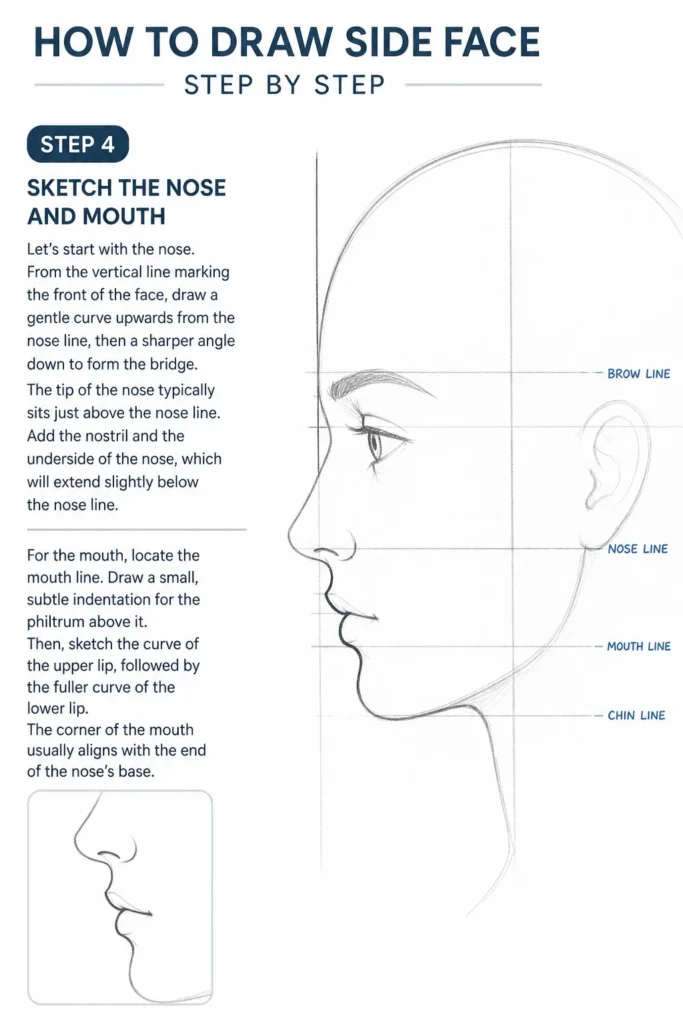
The tip of the nose typically sits just above the nose line.
Add the nostril and the underside of the nose, which will extend slightly below the nose line.
For the mouth, locate the mouth line. Draw a small, subtle indentation for the philtrum above it.
Then, sketch the curve of the upper lip, followed by the fuller curve of the lower lip.
The corner of the mouth usually aligns with the end of the nose’s base.
Step 5: Position the Eye and Ear
The eye in a side profile is often drawn as a simple triangle or a sharp almond shape.
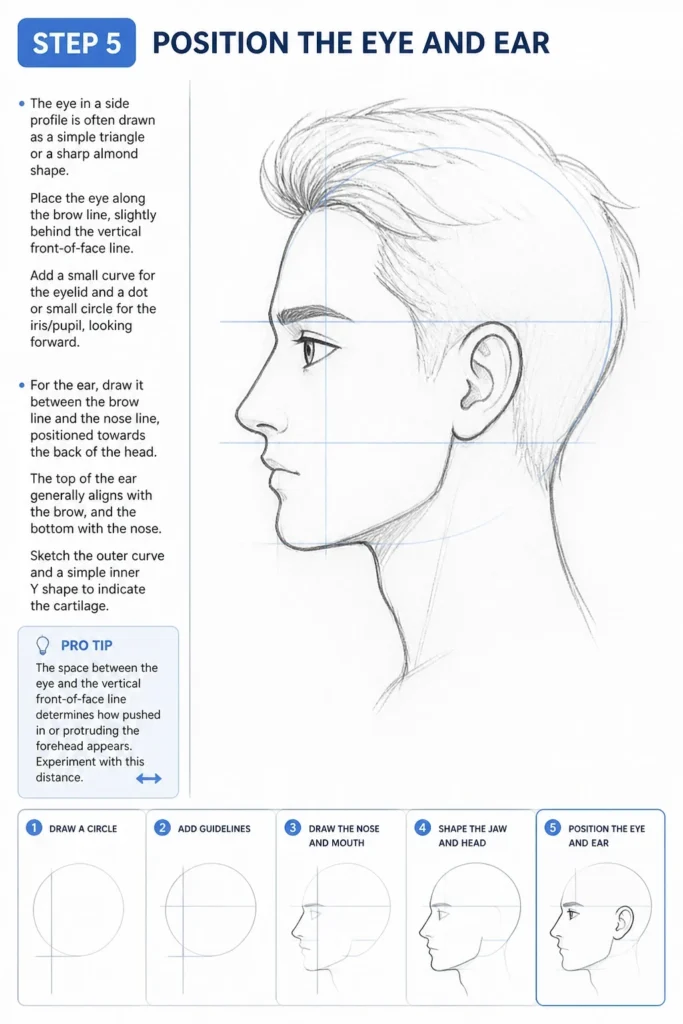
Place the eye along the brow line, slightly behind the vertical front-of-face line.
Add a small curve for the eyelid and a dot or small circle for the iris/pupil, looking forward.
For the ear, draw it between the brow line and the nose line, positioned towards the back of the head.
The top of the ear generally aligns with the brow, and the bottom with the nose.
Sketch the outer curve and a simple inner “Y” shape to indicate the cartilage.
Pro Tip: The space between the eye and the vertical front-of-face line determines how “pushed in” or “protruding” the forehead appears. Experiment with this distance.
Step 6: Define the Neck and Hairline
The neck is crucial for anchoring the head.
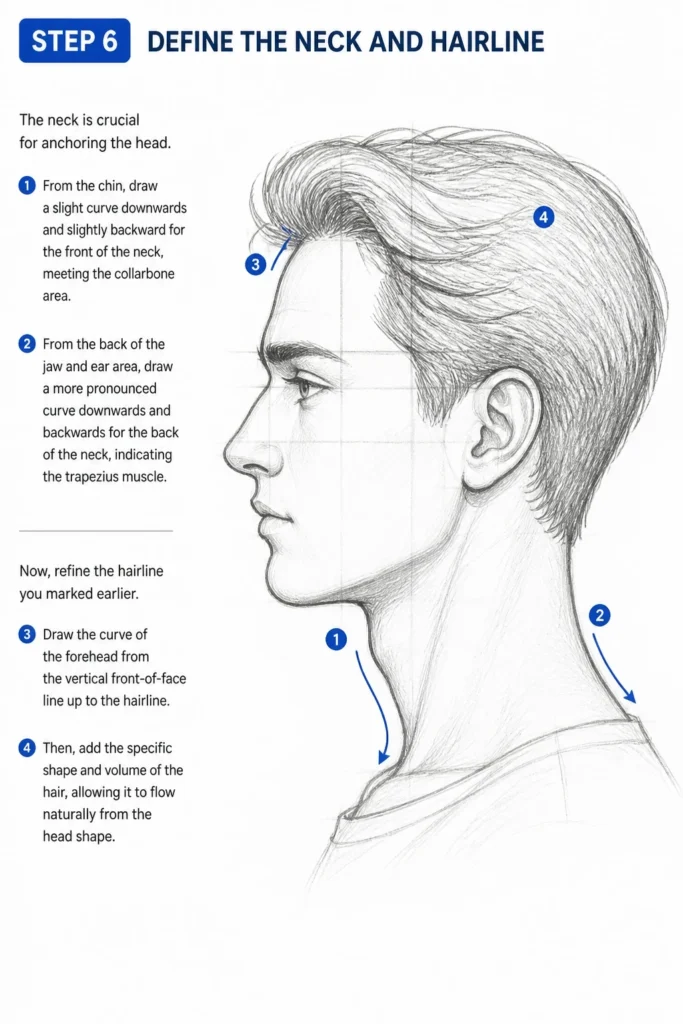
From the chin, draw a slight curve downwards and slightly backward for the front of the neck, meeting the collarbone area.
From the back of the jaw and ear area, draw a more pronounced curve downwards and backwards for the back of the neck, indicating the trapezius muscle.
Now, refine the hairline you marked earlier. Draw the curve of the forehead from the vertical front-of-face line up to the hairline.
Then, add the specific shape and volume of the hair, allowing it to flow naturally from the head shape.
Step 7: Refine and Add Details
This is where your drawing truly comes to life. Erase all the initial construction lines and guidelines.
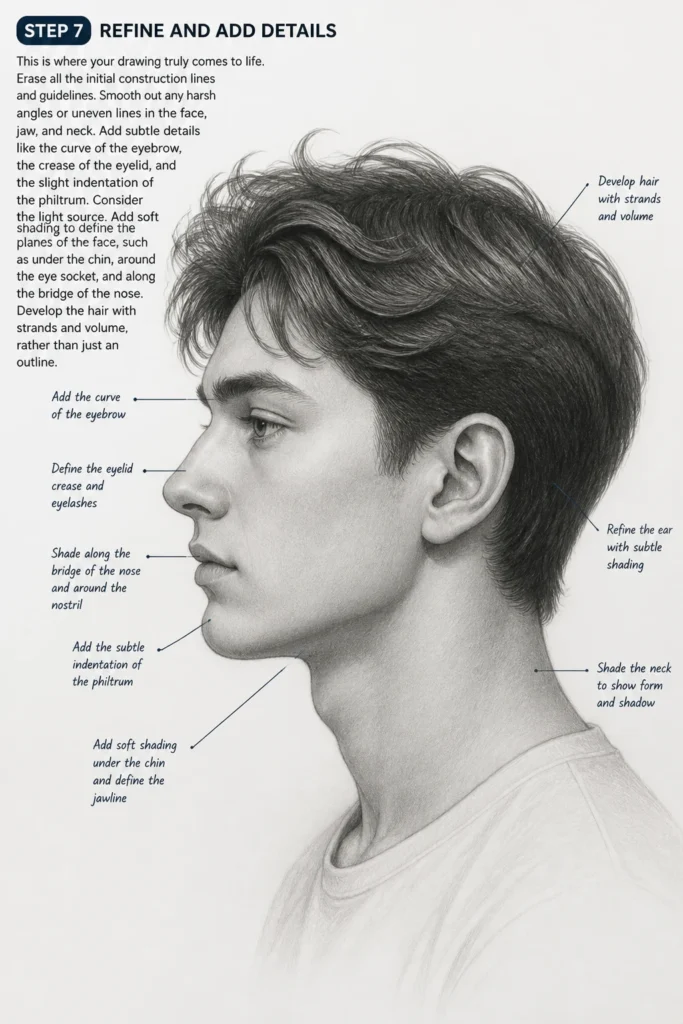
Smooth out any harsh angles or uneven lines in the face, jaw, and neck.
Add subtle details like the curve of the eyebrow, the crease of the eyelid, and the slight indentation of the philtrum.
Consider the light source. Add soft shading to define the planes of the face, such as under the chin, around the eye socket, and along the bridge of the nose.
Develop the hair with strands and volume, rather than just an outline.
Step 8: Final Touches and Erasing
Step back and examine your drawing from a distance. This helps you spot any remaining inconsistencies or areas that need adjustment.
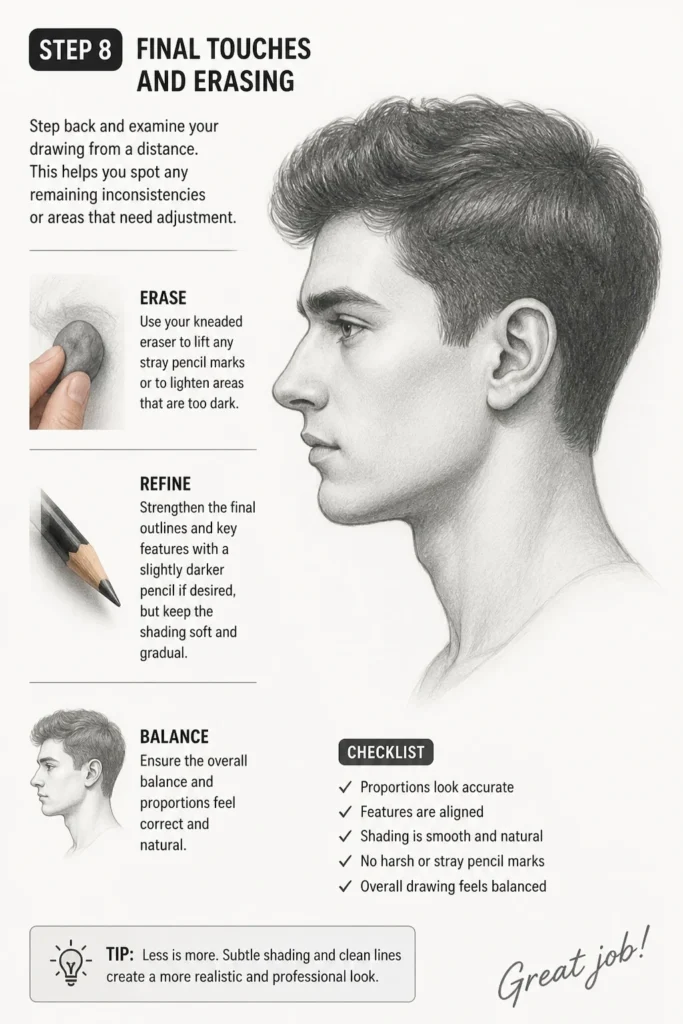
Use your kneaded eraser to lift any stray pencil marks or to lighten areas that are too dark.
Strengthen the final outlines and key features with a slightly darker pencil if desired, but keep the shading soft and gradual.
Ensure the overall balance and proportions feel correct and natural.
Common Mistakes to Avoid
Making the Face Too Flat
A common error is drawing the features directly onto the initial circle, making the face appear flat and two-dimensional.
Remember that the human head has depth. The forehead curves forward, the eye recedes slightly, and the nose protrudes.
Use the vertical front-of-face line as a guide for how much the nose and mouth should extend beyond the main head mass.
Incorrect Feature Placement
Placing the eye too far back, the ear too high, or the mouth too close to the chin can drastically alter the profile.
Always rely on your horizontal guidelines for accurate placement of the brow, nose, mouth, and hairline.
The ear’s position between the brow and nose lines is particularly important for anatomical correctness.
Drawing a Disconnected Neck
A neck that appears to be merely tacked onto the head can make the figure look unnatural or stiff.
The neck flows organically from the skull and jawline, connecting seamlessly to the shoulders and upper torso.
Pay attention to the natural curves and musculature of the neck to integrate it properly with the head.
Over-Reliance on Hard Lines
Using only dark, heavy outlines throughout the drawing can make it look rigid and less lifelike.
Start with very light construction lines and gradually build up your drawing with softer, varied line weights.
Reserve darker lines for defining key features and areas of shadow, allowing other parts to blend more softly.
Troubleshooting
My Face Looks Too Long/Short
This usually indicates an issue with the initial circle or the distance you extended down for the chin.
Re-evaluate the initial circle’s size and ensure the chin point is roughly half the circle’s radius below the bottom of the circle.
Check the spacing of your horizontal guidelines; they should be relatively evenly distributed to maintain proper proportions.
The Features Don’t Align Correctly
Misaligned features are often a result of not strictly adhering to the guidelines.
Go back to your brow, nose, and mouth lines. Verify that the eye sits on the brow line, the nose’s base is on the nose line, and the mouth is centered on the mouth line.
Ensure the ear is correctly placed between the brow and nose lines, towards the back of the head.
My Drawing Looks Flat and Lacks Depth
A flat appearance typically means you haven’t fully embraced the three-dimensionality of the head.
Focus on the curves and angles of the forehead, nose, and chin as they move away from the flat plane of the paper.
Introduce subtle shading, especially in areas like the eye socket, under the chin, and along the temple, to create the illusion of depth.
Key Takeaways
- Always start with a light circle and vertical/horizontal guidelines to establish foundational proportions.
- Use the brow, nose, and mouth lines as critical anchors for placing facial features accurately.
- The jawline and neck should flow naturally, connecting the head to the body seamlessly.
- Refine your drawing by gradually adding details and smoothing out construction lines.
- Practice observing real faces and reference images to understand subtle variations in profiles.
- Don’t be afraid to erase and adjust; drawing is an iterative process of refinement.
Frequently Asked Questions
How do I make my side profiles look less generic?
Once you master the basic proportions, start experimenting with variations. Adjust the angle of the nose, the fullness of the lips, the curve of the jaw, and the shape of the forehead. Every person has unique features; try to capture those individual differences.
What if my initial circle isn’t perfect?
Don’t worry about a perfect circle. These are just initial guidelines. The important part is that it gives you a starting point for the cranium. You will refine and erase it later, so light, loose lines are key.
Should I draw hair first or last?
It’s generally best to draw the basic head shape and facial features first. This ensures the hair sits correctly on the skull. Once the head is established, you can then add the hair, giving it volume and flow that matches the underlying structure.
How can I practice effectively?
Consistency is key. Dedicate a short amount of time each day, even just 15-20 minutes, to drawing profiles. Use reference photos of people with diverse facial structures. Focus on one aspect at a time, like getting the nose right, before moving on.
Our Top Recommended Finds
- Sketchbook: A good quality sketchbook with smooth paper can make a big difference in your drawing experience.
- Pencil Set (HB, 2B, 4B): Having a range of graphite hardness allows for light guidelines, medium tones, and darker accents.
- Kneaded Eraser: This type of eraser is excellent for lifting pencil marks without damaging the paper, perfect for refining and cleaning up.
Embrace Your Artistic Journey
You now have a clear roadmap to drawing compelling side profiles. This skill is a fundamental building block for capturing character and expression.
Each line you draw is a step forward in your artistic journey, building confidence and precision.
Pick up your pencil right now and put these steps into practice; your next masterpiece awaits.
& Painting
No rigid rules or pretension. Just practical guides, medium comparisons, and encouraging tips to help you enjoy the drawing & painting process.