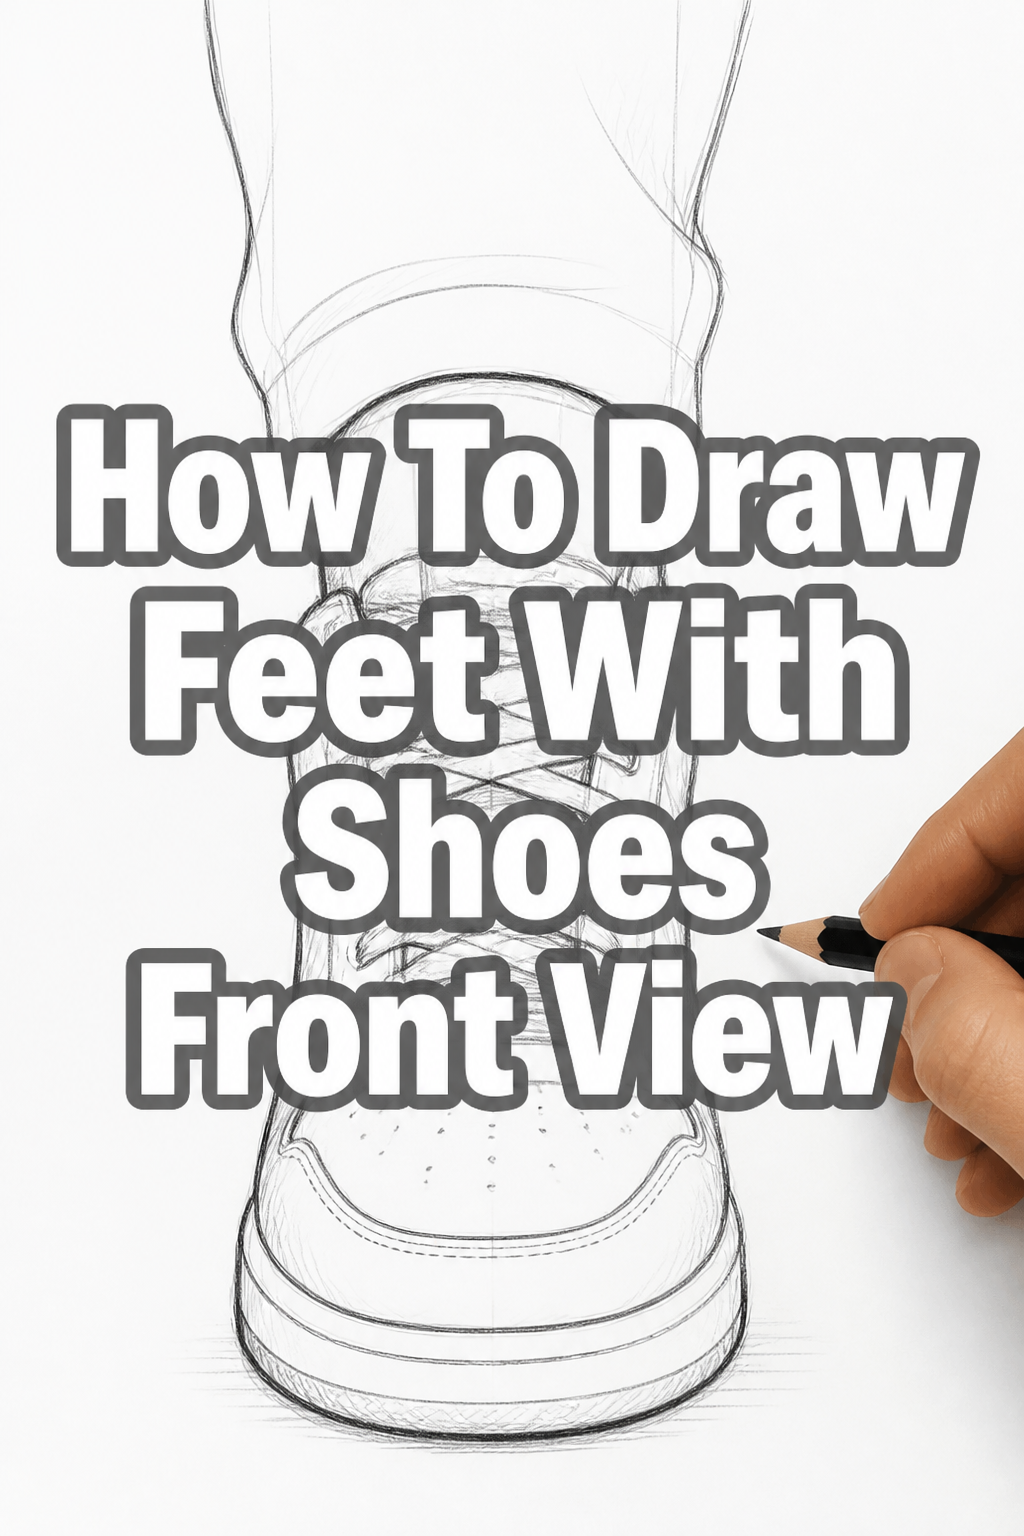
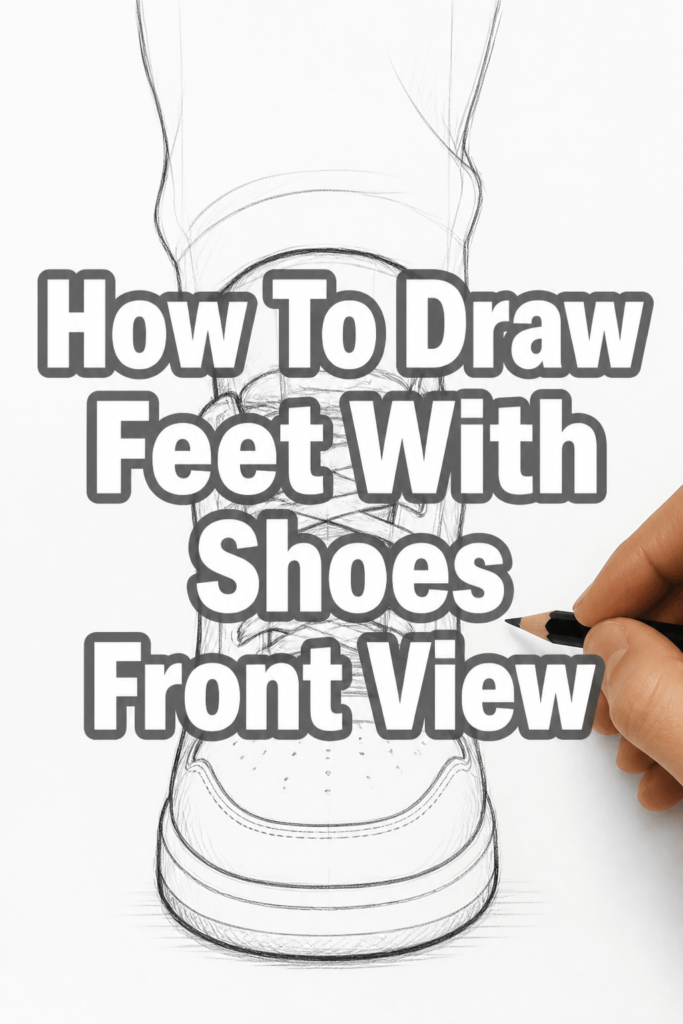
🦶 How To Draw Feet With Shoes Front View

& Painting
No rigid rules or pretension. Just practical guides, medium comparisons, and encouraging tips to help you enjoy the drawing & painting process.
Learning to draw feet, especially with shoes, can feel intimidating.
Many artists struggle with proportions and perspective.
I remember my early attempts resulted in awkward, blocky shapes, far from the dynamic forms I envisioned.
This guide distills years of practice into clear, actionable steps, so you can confidently create convincing footwear from a front view.
Quick Overview
This guide will equip you with a reliable method for drawing feet in shoes from a straight-on perspective.
You’ll learn to break down complex forms into simple shapes, ensuring accurate proportions and a natural appearance.
By the end, you’ll have a solid understanding of how to approach various shoe types.
- Time needed: 45-90 minutes (depending on practice)
- Difficulty: Intermediate
- What you’ll need: Pencil, paper, eraser, optional reference images
Step-by-Step Instructions
Step 1: Establish Your Foundation Shapes
Every successful drawing begins with a strong structural foundation.
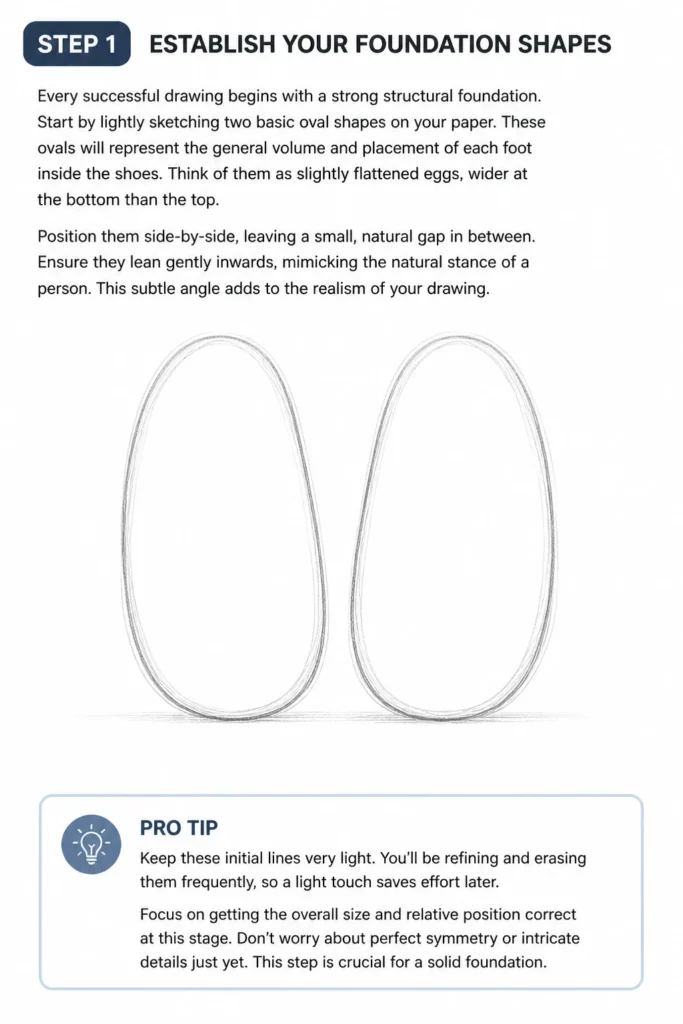
Start by lightly sketching two basic oval shapes on your paper.
These ovals will represent the general volume and placement of each foot inside the shoes.
Think of them as slightly flattened eggs, wider at the bottom than the top.
Position them side-by-side, leaving a small, natural gap in between.
Ensure they lean gently inwards, mimicking the natural stance of a person.
This subtle angle adds to the realism of your drawing.
Pro Tip: Keep these initial lines very light. You’ll be refining and erasing them frequently, so a light touch saves effort later.
Focus on getting the overall size and relative position correct at this stage.
Don’t worry about perfect symmetry or intricate details just yet.
This step is crucial for establishing accurate proportions for the rest of your drawing.
Step 2: Define the Shoe Outlines
Now, we’ll begin to give these foundation shapes the form of actual shoes.
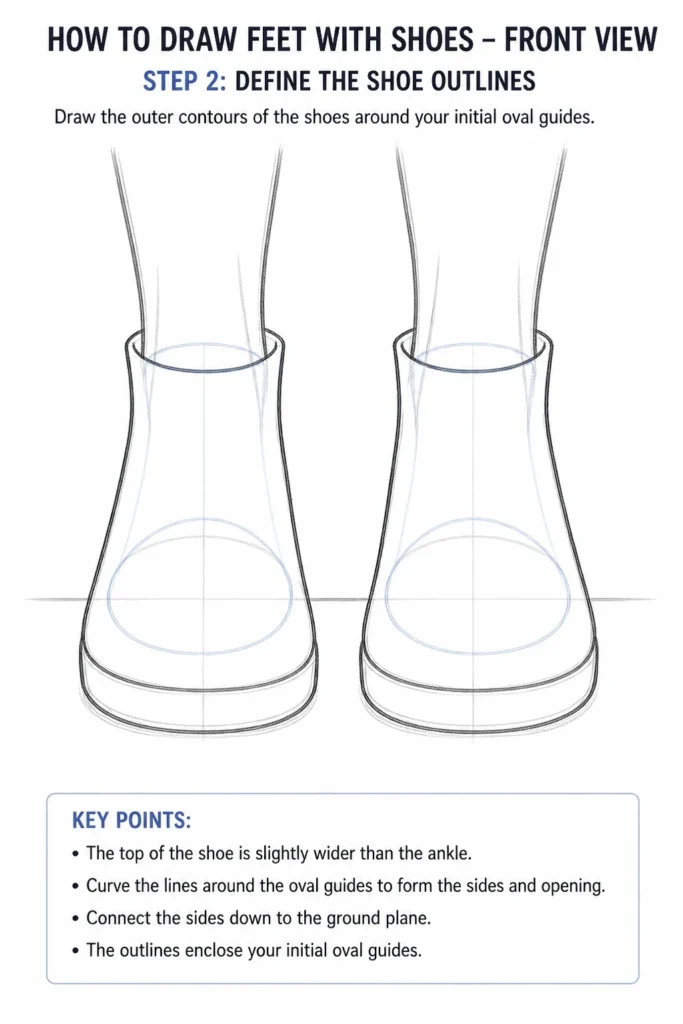
Draw the outer contours of the shoes around your initial oval guides.
Imagine a simple pair of sneakers or boots for now.
The top of the shoe will be slightly wider than the ankle area.
Curve the lines gently around the ovals, indicating the sides and top edge of the shoe opening.
Consider the type of shoe you want to draw.
For sneakers, the lines will be softer and more rounded.
For boots, they might be straighter and more rigid.
Connect the sides down towards the ground plane, forming the basic silhouette.
These lines should enclose your initial oval guides.
This step transitions from abstract forms to recognizable footwear shapes.
Step 3: Add the Soles and Ground Plane
The soles are essential for grounding your shoes and giving them weight.
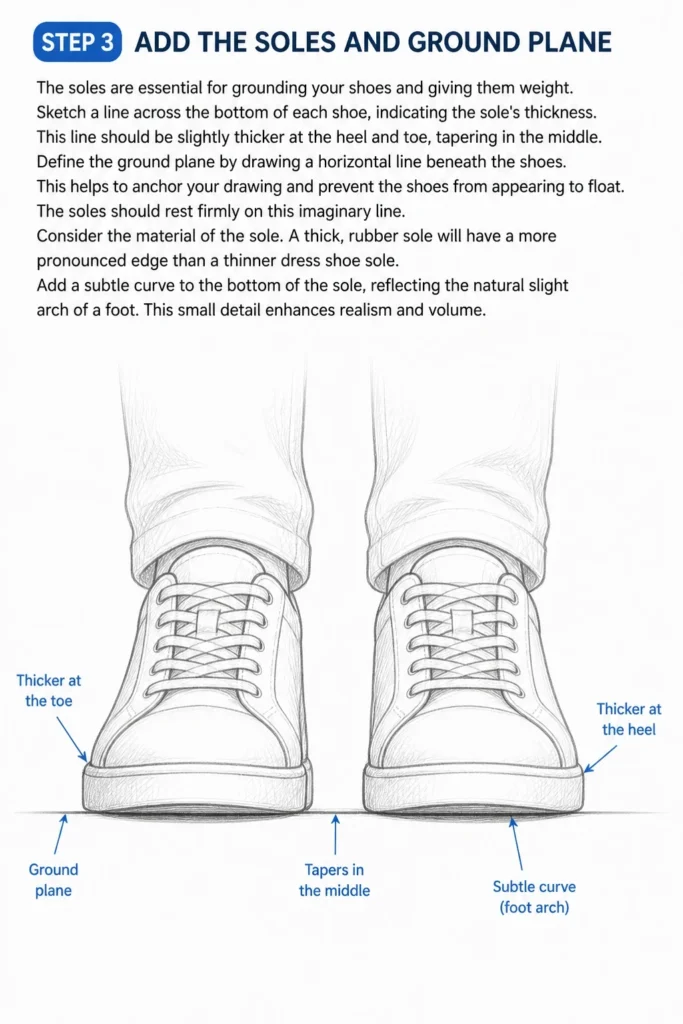
Sketch a line across the bottom of each shoe, indicating the sole’s thickness.
This line should be slightly thicker at the heel and toe, tapering in the middle.
Define the ground plane by drawing a horizontal line beneath the shoes.
This helps to anchor your drawing and prevent the shoes from appearing to float.
The soles should rest firmly on this imaginary line.
Consider the material of the sole.
A thick, rubber sole will have a more pronounced edge than a thinner dress shoe sole.
Add a subtle curve to the bottom of the sole, reflecting the natural slight arch of a foot.
This small detail enhances realism and volume.
Step 4: Indicate the Toes and Ankle Opening
These details bring more human-like qualities to your shoe drawing.
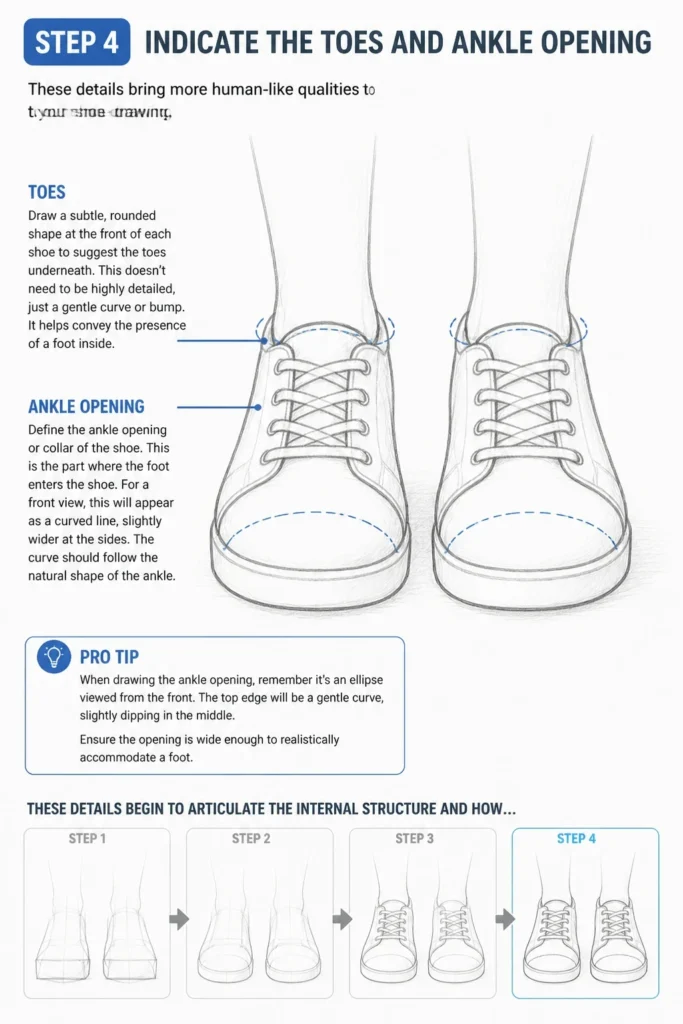
Draw a subtle, rounded shape at the front of each shoe to suggest the toes underneath.
This doesn’t need to be highly detailed, just a gentle curve or bump.
It helps convey the presence of a foot inside.
Define the ankle opening or collar of the shoe.
This is the part where the foot enters the shoe.
For a front view, this will appear as a curved line, slightly wider at the sides.
The curve should follow the natural shape of the ankle.
Pro Tip: When drawing the ankle opening, remember it’s an ellipse viewed from the front. The top edge will be a gentle curve, slightly dipping in the middle.
Ensure the opening is wide enough to realistically accommodate a foot.
These details begin to articulate the internal structure and how the foot interacts with the shoe.
Step 5: Incorporate Shoe Details
Now is the time to add specific features that define the shoe type.
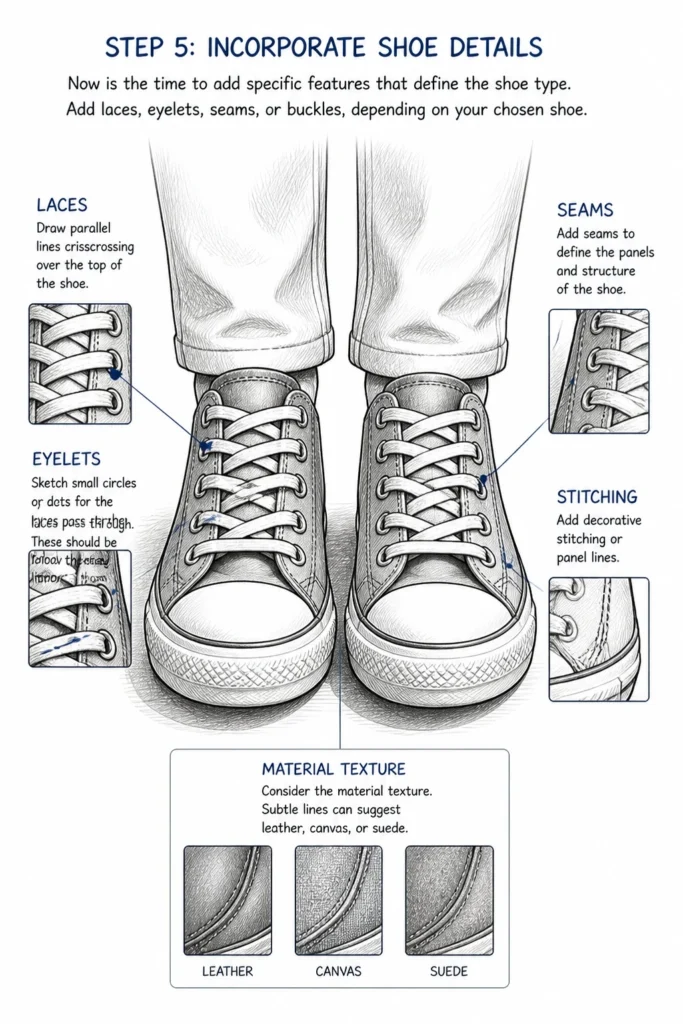
Add laces, eyelets, seams, or buckles, depending on your chosen shoe.
For laces, draw parallel lines crisscrossing over the top of the shoe.
Make sure the laces appear to follow the curve of the shoe’s surface.
Sketch small circles or dots for the eyelets where the laces pass through.
These should be evenly spaced and follow the general line of the shoe’s upper.
If drawing a boot, add any decorative stitching or panel lines.
These details contribute significantly to the shoe’s character and realism.
Consider the material texture.
Subtle lines can suggest leather, canvas, or suede.
Step 6: Refine Lines and Add Shading
This step brings your drawing to life by adding depth and form.
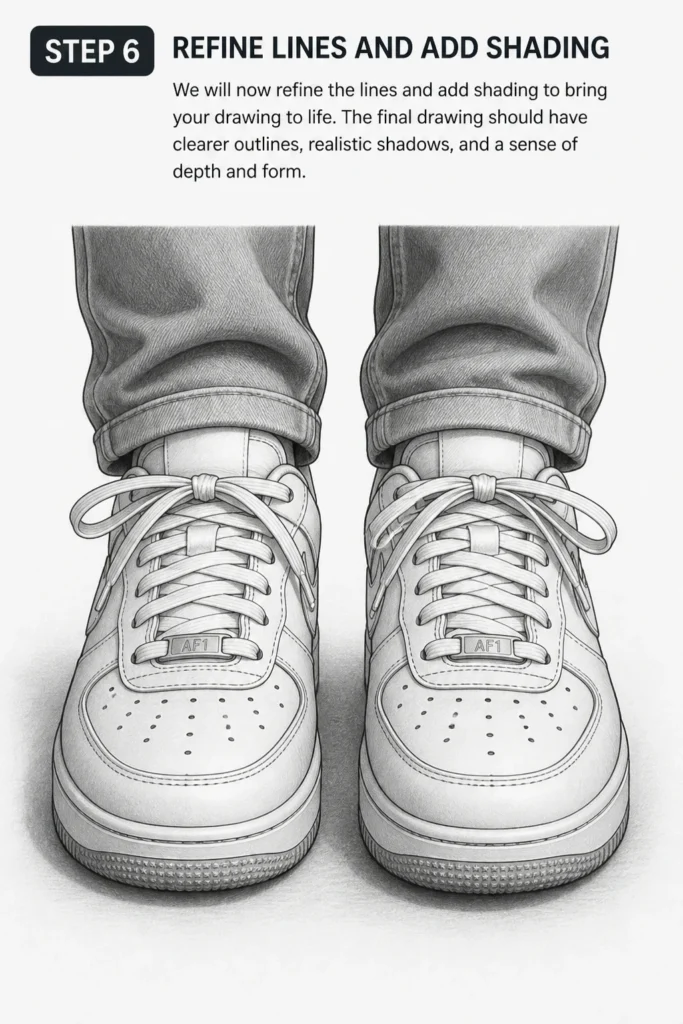
Go over your preferred lines with a slightly darker pressure, making them stand out.
Erase any unnecessary construction lines from your initial sketches.
Introduce shading to give your shoes a three-dimensional quality.
Imagine a light source and apply darker tones to areas that would be in shadow.
Typically, the undersides of the soles, creases, and recessed areas will be darker.
Use lighter shading for areas facing the light.
This contrast creates volume and makes the shoes feel real.
Blend your shading smoothly for a professional finish.
Small reflections on shiny surfaces can also enhance realism.
This stage transforms a flat outline into a dynamic object.
Step 7: Final Touches and Material Textures
The last step involves adding those subtle elements that truly complete the drawing.
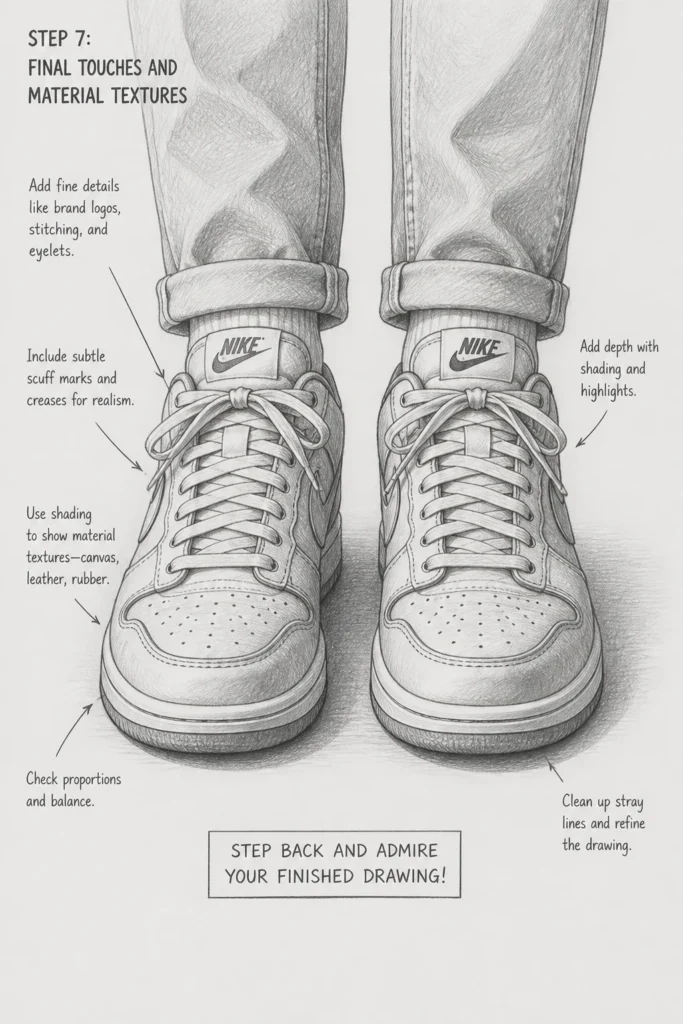
Add any last details like brand logos, subtle scuff marks, or intricate stitching patterns.
These small additions personalize your footwear.
Focus on conveying material textures through your lines and shading.
A canvas shoe might have a slightly rougher, cross-hatched texture.
Leather could be indicated with smoother, more reflective surfaces and subtle creases.
Check your proportions one last time.
Do the shoes look balanced and natural on the ground plane?
A final pass with your eraser can clean up any smudges or stray marks.
Step back and admire your finished footwear drawing.
Common Mistakes to Avoid
Flat Soles
Many beginners draw soles as perfectly flat, straight lines.
This makes the shoes look rigid and unnatural, as if they are floating or cut off.
Instead, remember that shoe soles, especially under the toes and heel, have a subtle curve.
Even a slight upward curve at the toe and heel, or a gentle dip in the middle, adds organic realism.
Lack of Volume
Drawing shoes as mere outlines makes them appear two-dimensional and lifeless.
This common error neglects the three-dimensional form of the foot and shoe.
Always think of the shoe as a solid object with depth and width.
Use your initial oval guides and then shading to convey this volume, making the shoes feel substantial.
Incorrect Proportions of the Ankle Opening
The ankle opening can often be drawn too wide, too narrow, or as a perfect circle.
This distorts the perspective and makes the shoe look awkward or ill-fitting.
From a front view, the ankle opening is an ellipse, slightly wider at the sides and gently curved.
Ensure it’s proportionate to the rest of the shoe and suggests a foot could comfortably fit inside.
Neglecting the Ground Plane
Drawing shoes without indicating a ground plane makes them appear to hover in space.
This disconnects the drawing from reality and lacks a sense of weight.
Always establish a subtle ground line or shadow beneath the soles.
This simple addition anchors the shoes and provides context for their placement.
Troubleshooting
Shoes Look Too Flat or Boxy
If your shoes lack dimension, you might be relying too much on straight lines.
Remember that shoes, even rigid ones, have subtle curves and roundness.
Revisit your initial oval guides and ensure you are building the shoe’s form around these organic shapes.
Add more varied line weights and subtle shading to create depth, especially in curved areas and around the sole.
Difficulty with Symmetry
Achieving perfect symmetry for both shoes can be challenging, leading to one shoe looking off.
Instead of trying to draw both perfectly at once, focus on one shoe’s proportions first.
Then, use light measuring lines or a simple grid to transfer key points (like the height of the ankle opening or the width of the sole) to the second shoe.
Remember that slight imperfections can actually add to the natural look of a hand-drawn piece.
Details Look Unnatural or Stiff
If your laces, seams, or other details appear rigid or don’t conform to the shoe’s surface, you might be drawing them too independently.
Always consider the underlying form of the shoe when adding details.
Laces, for example, should curve over the shoe’s instep, not lie flat.
Practice drawing these details on simple curved forms before applying them to your shoes.
Key Takeaways
- Always start with basic, light geometric shapes to establish overall volume and proportion.
- Think of the shoe as a three-dimensional object, not just an outline, and use shading to convey depth.
- Pay close attention to the sole’s subtle curves and the ground plane to anchor your drawing.
- The ankle opening is an ellipse from the front view, crucial for realistic perspective.
- Details like laces and seams should follow the contours of the shoe, not appear flat.
- Practice regularly and use reference images to observe different shoe types and their unique characteristics.
Frequently Asked Questions
What’s the best way to make the shoes look like they’re actually on feet?
The key is to hint at the foot’s presence without drawing it explicitly. This is achieved by the subtle bumps for the toes, the natural curve of the ankle opening, and slight creases or bulges in the shoe material where the foot would flex. Shading can also emphasize these forms, suggesting a foot inside.
How do I make different shoe types (sneakers, boots, heels) look distinct?
Focus on their defining characteristics. Sneakers have soft, rounded shapes, prominent laces, and often thick soles. Boots feature taller shafts, fewer laces, and sometimes buckles. Heels have a distinct elevated sole and a more elegant, tapered shape. Pay attention to the overall silhouette and specific details like sole thickness and material texture.
Should I draw the feet first and then the shoes?
For a front view, it’s often more practical to start with the shoe’s basic volume, as the shoe largely dictates the visible form. However, always keep the underlying foot anatomy in mind. Imagine the foot within the shoe as you draw, ensuring the shoe’s shape can realistically accommodate it. Some artists prefer a quick, light sketch of the foot first to ensure proportions.
How do I add wrinkles or creases to make shoes look worn?
Wrinkles and creases naturally form where the shoe material bends, such as over the toes or around the ankle. Use subtle, soft lines that follow the shoe’s contour. For worn shoes, add more pronounced, slightly irregular creases and perhaps some scuff marks on the soles or sides. Observe real shoes to see how these details appear.
Our Top Recommended Finds
- Graphite Sketch Pencils Set: Offers a range of hardness for light initial sketches and darker, defined lines.
- Kneaded Eraser: Excellent for lifting graphite without damaging the paper, perfect for subtle corrections and highlights.
- Drawing Paper Pad: A good quality, smooth paper surface allows for clean lines and smooth blending of shadows.
Embark on Your Artistic Journey
Drawing feet with shoes might seem daunting at first, but with a structured approach, it becomes an enjoyable challenge.
You now have the foundational steps to create convincing and dynamic footwear from a front perspective.
Don’t stop here; practice is your most powerful tool.
Try drawing different shoe styles, experiment with various poses, and explore how light interacts with different materials.
Your artistic skills will grow with every line you draw, so pick up your pencil and start creating today!
& Painting
No rigid rules or pretension. Just practical guides, medium comparisons, and encouraging tips to help you enjoy the drawing & painting process.