🦢 How To Draw A Swan Step By Step

& Painting
No rigid rules or pretension. Just practical guides, medium comparisons, and encouraging tips to help you enjoy the drawing & painting process.
There’s a special kind of magic in bringing a graceful swan to life on paper.
I remember the first time I truly captured its elegance; it felt incredibly rewarding.
This guide will walk you through each stroke, making the process enjoyable and straightforward.
Quick Overview
You’re about to create a beautiful, elegant swan drawing, step by step.
By following these instructions, you’ll gain confidence in sketching organic forms and delicate details.
- Time needed: 45-75 minutes
- Difficulty: Beginner to Intermediate
- What you’ll need: Pencil (HB, 2B), paper, eraser (kneaded and regular)
Step-by-Step Instructions
Step 1: Establish the Basic Shapes
Begin by lightly sketching two ovals on your paper. These will form the main body of your swan.
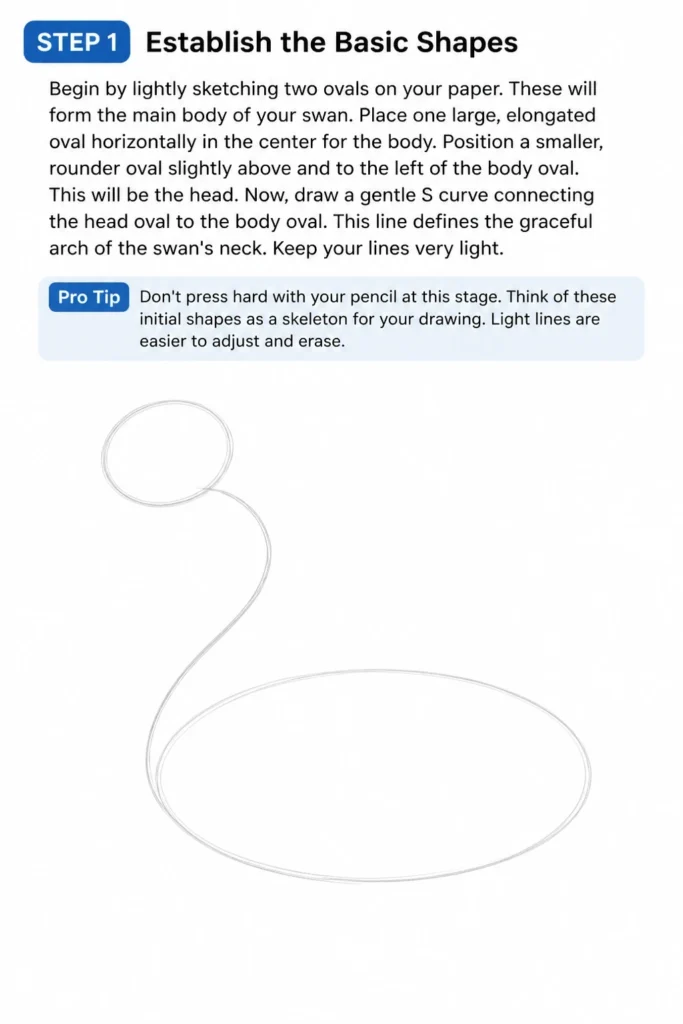
Place one large, elongated oval horizontally in the center for the body.
Position a smaller, rounder oval slightly above and to the left of the body oval. This will be the head.
Now, draw a gentle “S” curve connecting the head oval to the body oval. This line defines the graceful arch of the swan’s neck.
Keep your lines very light. These are just guidelines you will erase later.
Pro Tip: Don’t press hard with your pencil at this stage. Think of these initial shapes as a skeleton for your drawing. Light lines are easier to adjust and erase.
Step 2: Connect and Refine the Neck and Body
Using the “S” curve as your guide, draw two parallel lines around it to give the neck thickness.
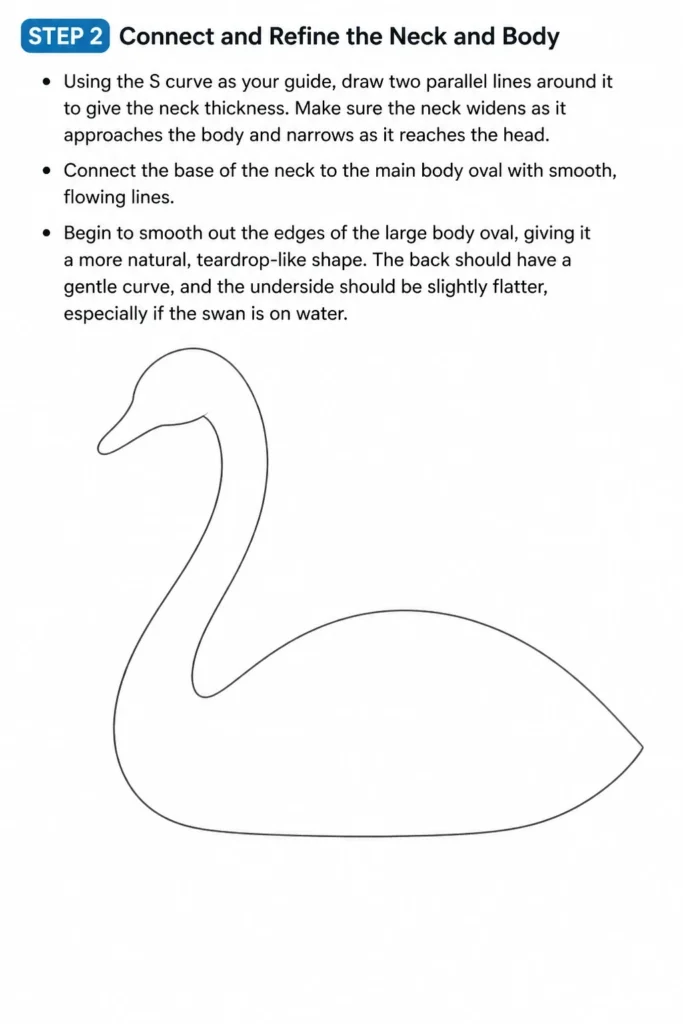
Make sure the neck widens as it approaches the body and narrows as it reaches the head.
Connect the base of the neck to the main body oval with smooth, flowing lines.
Begin to smooth out the edges of the large body oval, giving it a more natural, teardrop-like shape.
The back should have a gentle curve, and the underside should be slightly flatter, especially if the swan is on water.
Step 3: Define the Head and Beak
Focus on the smaller head oval. Begin to shape it into a more distinct head.
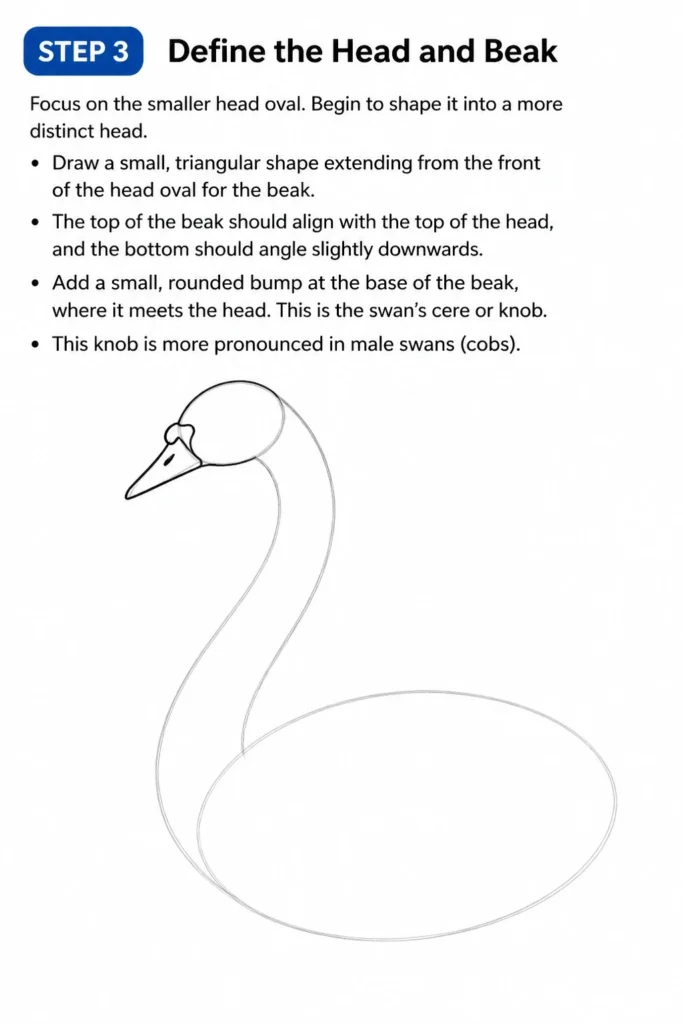
Draw a small, triangular shape extending from the front of the head oval for the beak.
The top of the beak should align with the top of the head, and the bottom should angle slightly downwards.
Add a small, rounded bump at the base of the beak, where it meets the head. This is the swan’s cere or knob.
This knob is more pronounced in male swans (cobs).
Step 4: Add the Eye and Facial Details
Place a small, almond-shaped eye on the side of the head, slightly above and behind the beak.
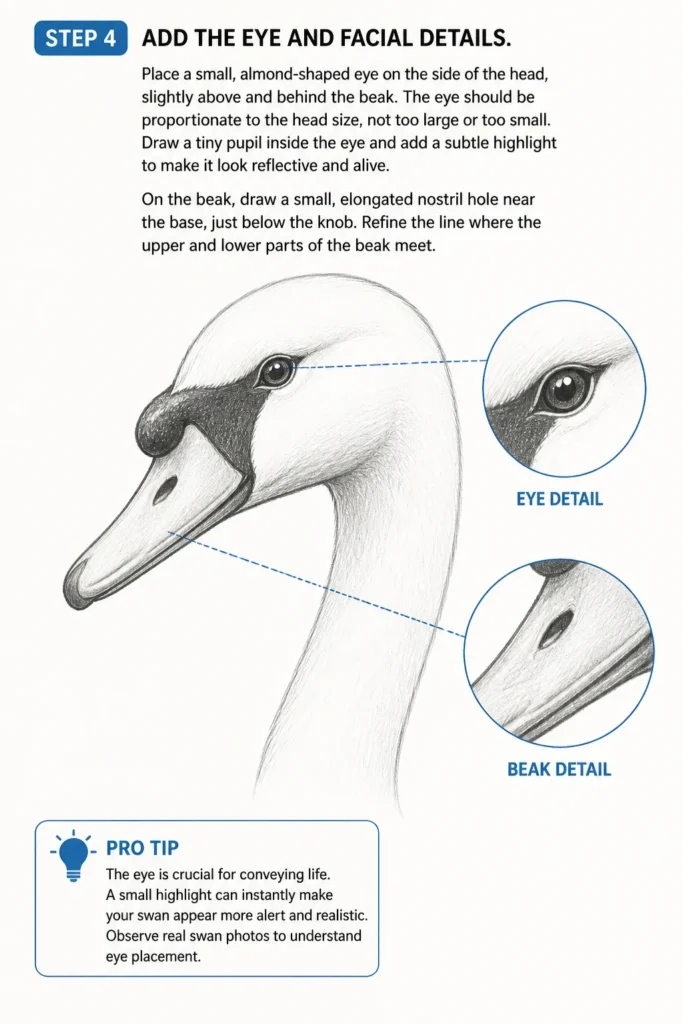
The eye should be proportionate to the head size, not too large or too small.
Draw a tiny pupil inside the eye and add a subtle highlight to make it look reflective and alive.
On the beak, draw a small, elongated nostril hole near the base, just below the knob.
Refine the line where the upper and lower parts of the beak meet.
Pro Tip: The eye is crucial for conveying life. A small highlight can instantly make your swan appear more alert and realistic. Observe real swan photos to understand eye placement.
Step 5: Sketch the Wings
Swans often have their wings tucked gracefully. Start by drawing a large, curved line extending from the upper back of the body.
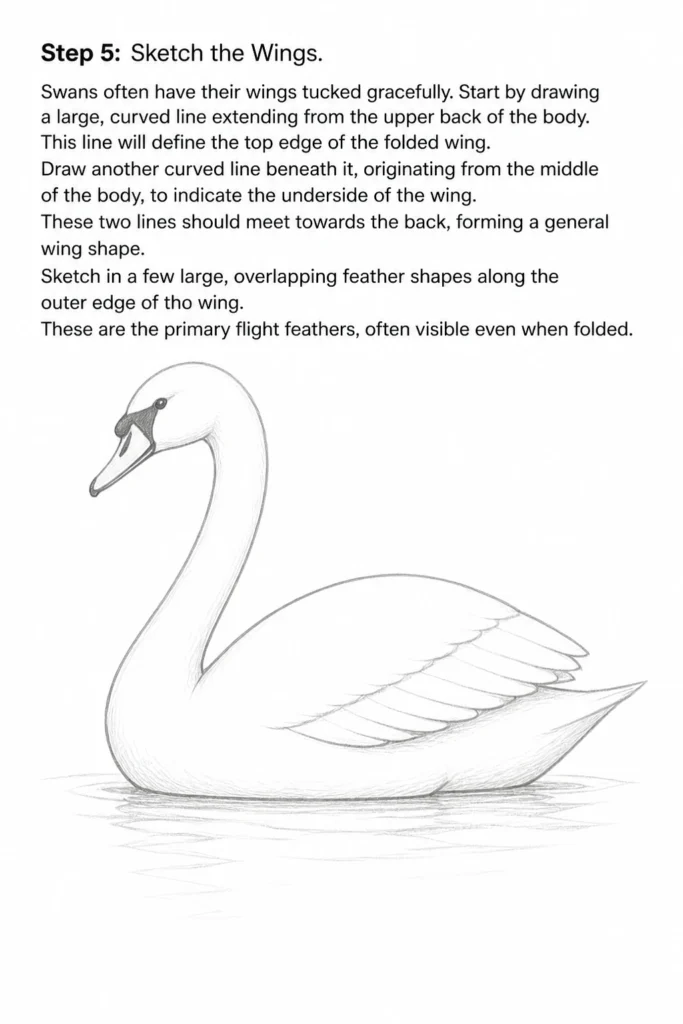
This line will define the top edge of the folded wing.
Draw another curved line beneath it, originating from the middle of the body, to indicate the underside of the wing.
These two lines should meet towards the back, forming a general wing shape.
Sketch in a few large, overlapping feather shapes along the outer edge of the wing.
These are the primary flight feathers, often visible even when folded.
Step 6: Refine Feathers and Tail
Add more detail to the wings by drawing layers of smaller, overlapping feather shapes.
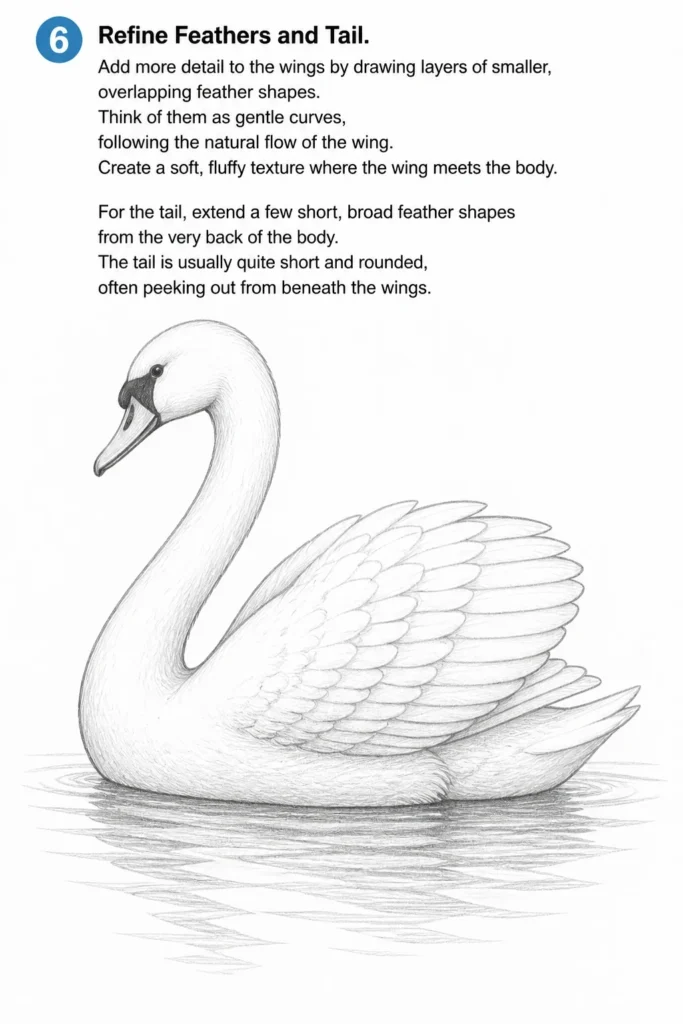
Think of them as gentle curves, following the natural flow of the wing.
Create a soft, fluffy texture where the wing meets the body.
For the tail, extend a few short, broad feather shapes from the very back of the body.
The tail is usually quite short and rounded, often peeking out from beneath the wings.
Step 7: Draw the Legs and Feet (Optional, if on land) or Waterline
If your swan is on land, draw two relatively short, thick legs emerging from the lower body.
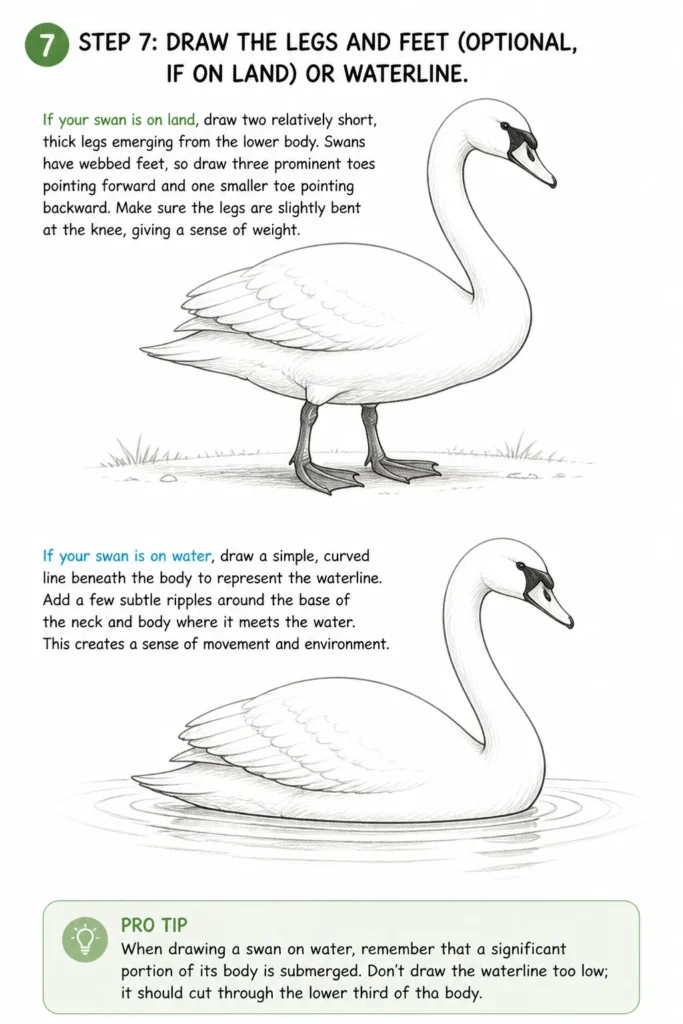
Swans have webbed feet, so draw three prominent toes pointing forward and one smaller toe pointing backward.
Make sure the legs are slightly bent at the knee, giving a sense of weight.
If your swan is on water, draw a simple, curved line beneath the body to represent the waterline.
Add a few subtle ripples around the base of the neck and body where it meets the water.
This creates a sense of movement and environment.
Pro Tip: When drawing a swan on water, remember that a significant portion of its body is submerged. Don’t draw the waterline too low; it should cut through the lower third of the body.
Step 8: Erase Guidelines and Add Shading
Carefully erase all the initial light guidelines you made in Step 1.
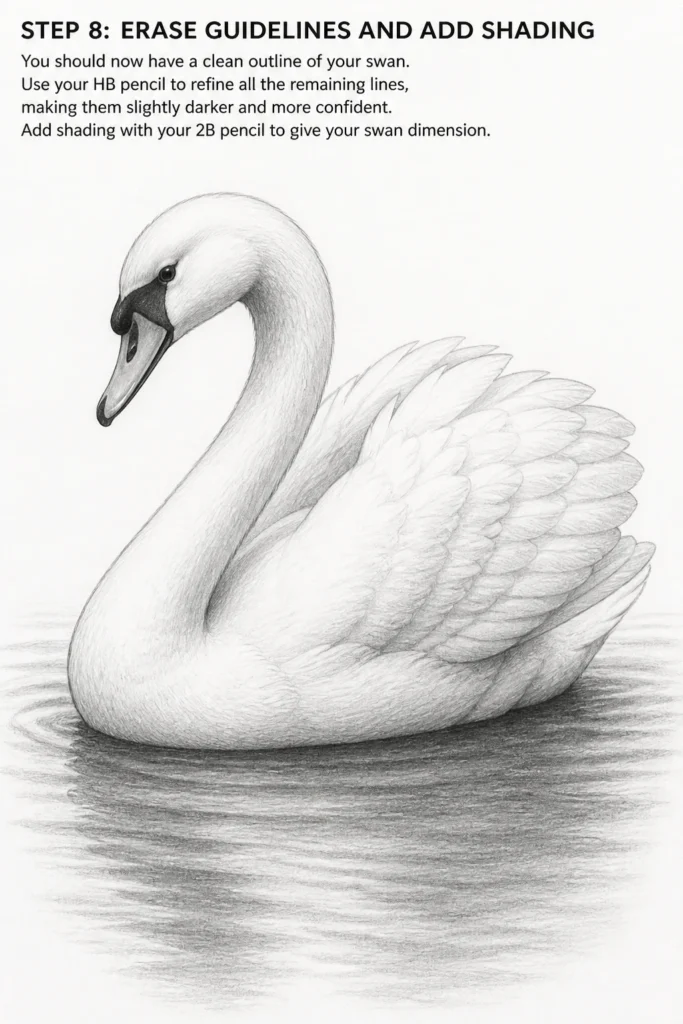
You should now have a clean outline of your swan.
Use your HB pencil to refine all the remaining lines, making them slightly darker and more confident.
Now, begin to add subtle shading to give your swan dimension.
Swans are mostly white, so shading will focus on creating form rather than color.
Use your 2B pencil for darker areas, like under the wings, along the underside of the neck, and around the eye.
Lightly shade the curves of the feathers to show their overlapping nature.
A very light touch can indicate the softness of the plumage.
Add a cast shadow beneath the swan if it’s on land, or darken the water slightly beneath it if on water.
This grounding element makes the drawing feel complete.
Common Mistakes to Avoid
Stiff or Unnatural Neck
Many beginners draw the swan’s neck too straight or with an abrupt bend.
A swan’s neck is an elegant “S” curve, fluid and graceful.
Always start with a light, flowing “S” guideline and build the thickness around it, ensuring it tapers smoothly from body to head.
Disproportionate Head and Beak
Sometimes the head can appear too small or too large relative to the body, or the beak might be out of proportion.
Before adding details, step back and check the overall balance.
The head should be distinct but not overpowering, and the beak should be a natural extension of the head’s form.
Flat or Lifeless Wings
Simply drawing a generic oval for the wing can make it look flat.
Remember that wings have structure and layers of feathers.
Focus on overlapping feather shapes and subtle curves to create depth and a sense of volume, even when the wings are folded.
Ignoring the Environment
Drawing a swan floating in mid-air can make the drawing feel incomplete.
Even a simple waterline or a light ground line can ground your swan.
A little context helps the viewer understand the swan’s setting and adds to the overall realism.
Troubleshooting
My Swan Looks Too Stiff
If your swan lacks fluidity, revisit the initial “S” curve for the neck and the main body oval.
Often, stiffness comes from drawing straight lines or sharp angles where curves should be.
Try drawing the initial shapes even lighter and with more sweeping, continuous motions.
Practice drawing “S” curves repeatedly until they feel natural and effortless.
The Feathers Don’t Look Natural
Natural feathers have a soft, overlapping quality, not harsh individual lines.
Avoid drawing each feather with a heavy outline.
Instead, use lighter, shorter strokes that follow the contour of the wing, suggesting layers rather than strictly defining each one.
Subtle shading can also help separate the feather groups without sharp lines.
I Can’t Get the Beak Right
The beak’s shape, especially the distinctive knob, can be tricky.
Look at reference photos of swans to understand the specific angle and size of the beak and knob.
It’s often a slightly curved triangle with a distinct upward curve at the top where it meets the head.
Practice drawing just the head and beak until you feel confident with its unique profile.
Key Takeaways
- Always start with light, basic geometric shapes to establish proportion.
- Embrace the “S” curve for the swan’s elegant neck, making it fluid and graceful.
- Pay close attention to subtle details like the eye and beak knob for realism.
- Layer your feather strokes to create texture and depth on the wings.
- Use soft shading to define form and volume, even on a white bird.
- Ground your drawing with a simple waterline or environmental element.
Frequently Asked Questions
What kind of pencil should I use for drawing swans?
An HB pencil is excellent for initial sketching and lighter lines, providing good control.
A 2B or 4B pencil works well for darker shading, adding depth and contrast to your drawing.
Having both allows you to create a range of tones, from soft highlights to deeper shadows.
How can I make my swan look more graceful?
Grace comes from fluid lines and gentle curves. Avoid any harsh or straight lines, particularly in the neck and body.
Emphasize the long, elegant curve of the neck and the smooth transitions between body parts.
Subtle shading that follows the contours also enhances the feeling of softness and elegance.
Can I draw a swan in different poses?
Absolutely! Once you master the basic standing or floating pose, try different actions.
Observe swans preening, stretching their wings, or even flying.
The core principles of starting with basic shapes and building details will still apply, just with different initial forms.
How do I make the water look realistic?
For realistic water, use horizontal lines and subtle ripples around the swan’s body.
Vary the pressure of your pencil to create different depths of shadow and reflection.
Adding a few reflections of the swan’s body or neck in the water can also enhance the illusion of movement and depth.
Our Top Recommended Finds
- Staedtler Mars Lumograph Pencils: A fantastic set of graphite pencils offering a wide range of hardness for all your sketching and shading needs.
- Strathmore 400 Series Sketch Pad: High-quality, acid-free paper that holds graphite beautifully, providing a smooth surface for your detailed drawings.
- Kneaded Eraser: Essential for lifting graphite gently without smudging, perfect for creating highlights and correcting light mistakes.
Embrace Your Artistic Flow
You’ve just completed a beautiful swan drawing, a testament to your patience and skill.
Each stroke you made built confidence and refined your artistic eye.
Don’t stop here. Try drawing your swan from a different angle, or experiment with adding a full background scene.
Perhaps you’d like to try adding color with pencils or watercolors next.
Keep practicing, keep observing, and let your creativity take flight.
& Painting
No rigid rules or pretension. Just practical guides, medium comparisons, and encouraging tips to help you enjoy the drawing & painting process.