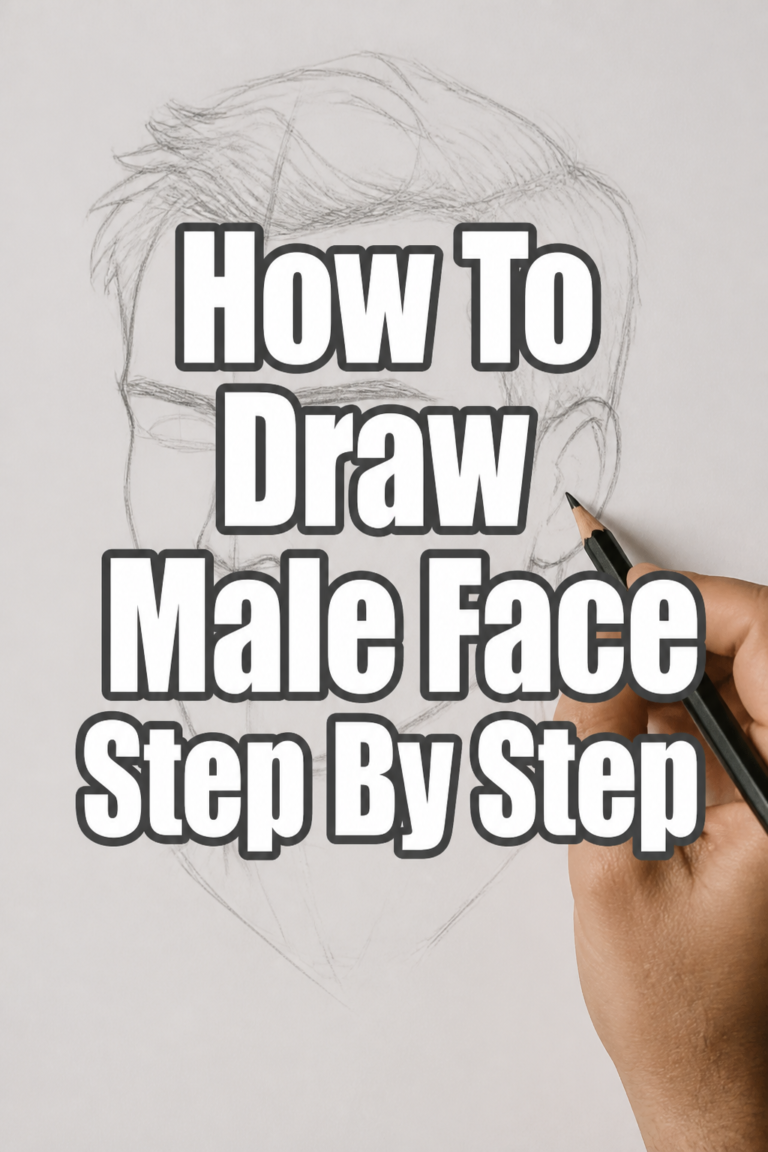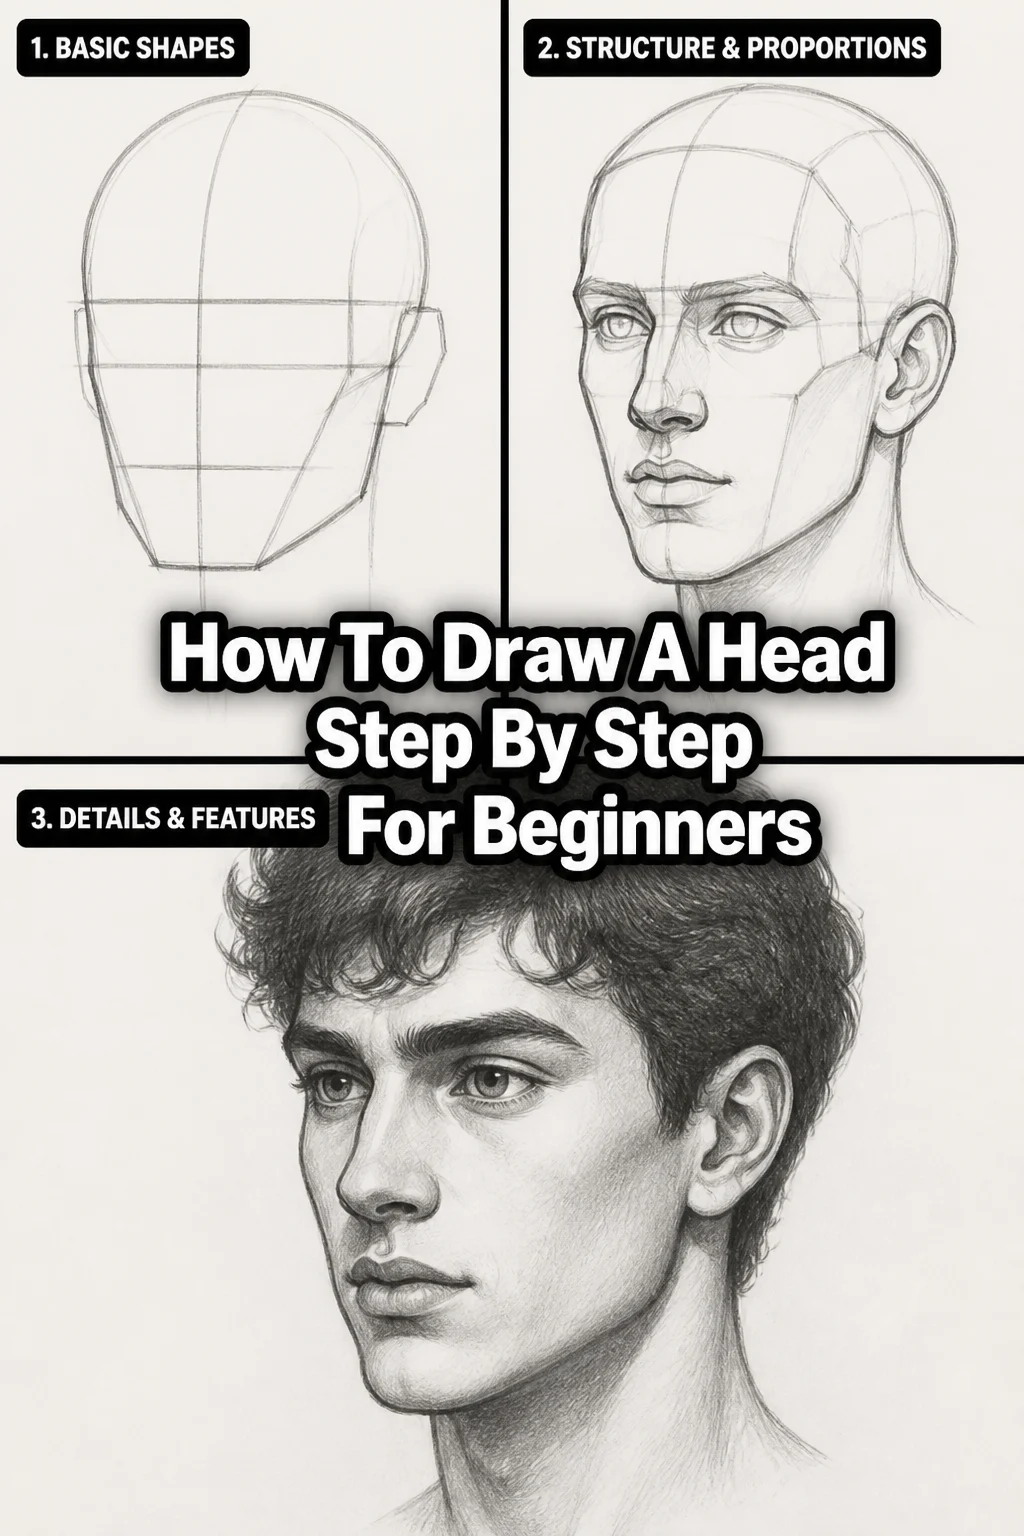
✏️ How To Draw A Head Step By Step For Beginners
Learning to draw a human head can feel like a big challenge at first.
I remember struggling with proportions and making heads look flat when I started.
But with a structured approach and a bit of patience, you’ll be amazed at your progress and how quickly you can grasp the basics.
Quick Overview
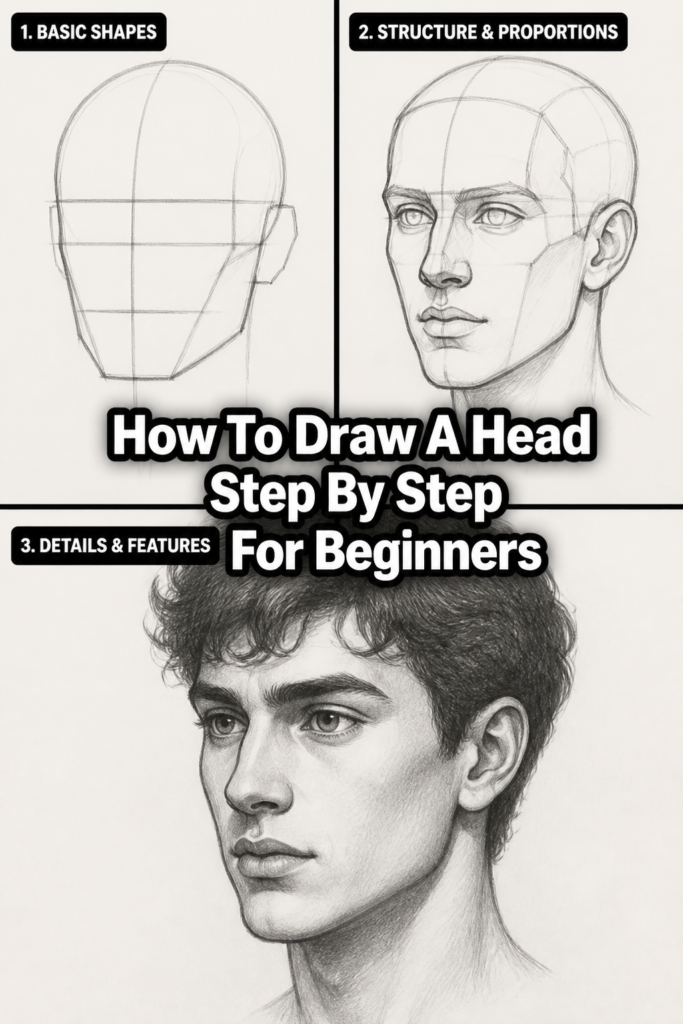
This guide will break down the complex task of drawing a head into manageable, easy-to-follow steps. You’ll learn the fundamental shapes and guidelines that professional artists use.
By the end, you’ll have a solid foundation to draw heads from various angles and with different features.
- Time needed: 45-90 minutes (including practice)
- Difficulty: Beginner
- What you’ll need: Pencils (HB, 2B recommended), eraser, paper, optional: a ruler and reference images.
Step-by-Step Instructions
Step 1: Sketch the Basic Head Shape
Every great head drawing begins with simple, foundational shapes. We start with a circle to represent the cranium, the upper part of the skull.
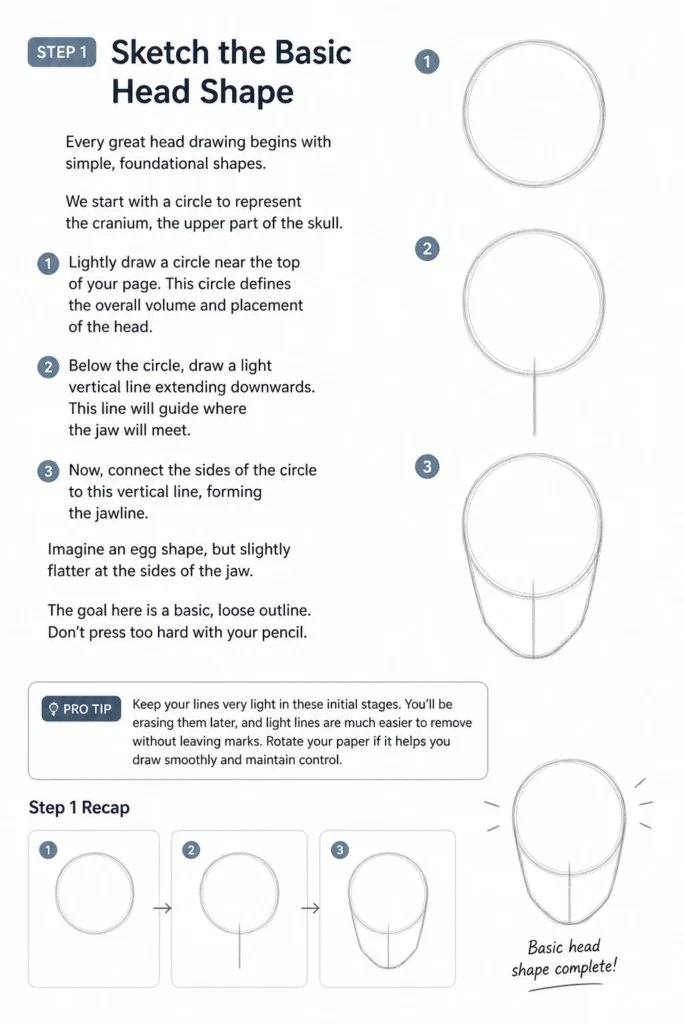
Lightly draw a circle near the top of your page. This circle defines the overall volume and placement of the head.
Below the circle, draw a light vertical line extending downwards. This line will guide where the jaw will meet.
Now, connect the sides of the circle to this vertical line, forming the jawline. Imagine an egg shape, but slightly flatter at the sides of the jaw.
The goal here is a basic, loose outline. Don’t press too hard with your pencil.
Pro Tip: Keep your lines very light in these initial stages. You’ll be erasing them later, and light lines are much easier to remove without leaving marks. Rotate your paper if it helps you draw smoother curves.
Step 2: Establish the Centerline and Eyeline
Guidelines are essential for achieving symmetry and correct placement of features. First, draw a vertical line straight down the middle of your head shape.
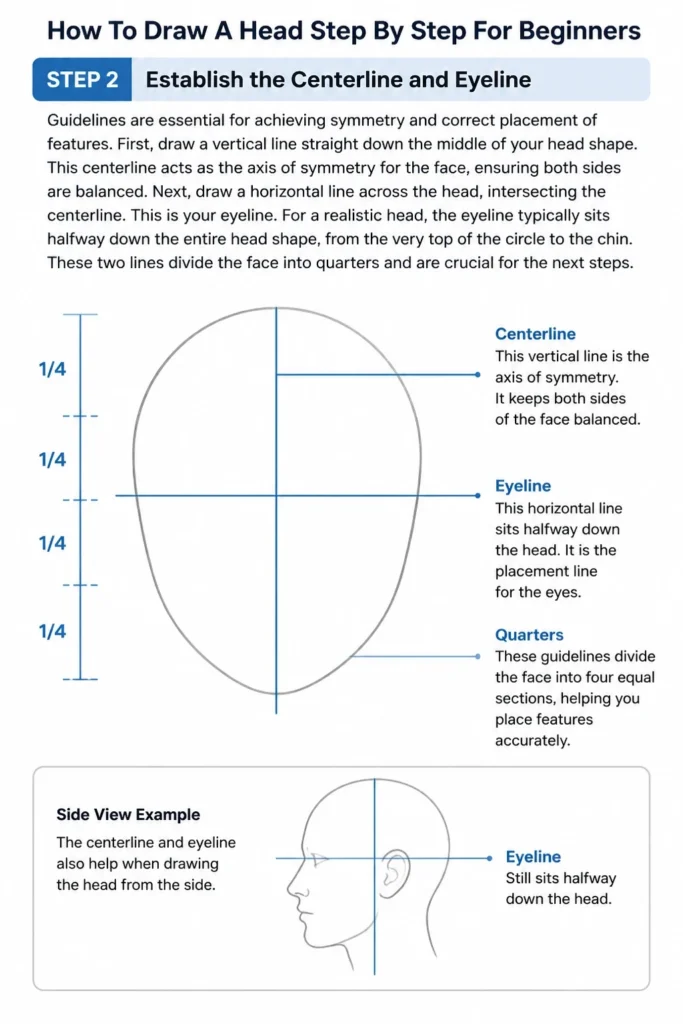
This centerline acts as the axis of symmetry for the face, ensuring both sides are balanced.
Next, draw a horizontal line across the head, intersecting the centerline. This is your eyeline.
For a realistic head, the eyeline typically sits halfway down the entire head shape, from the very top of the circle to the chin.
These two lines divide the face into quarters and are crucial for the next steps.
Step 3: Mark the Key Facial Feature Lines
Now we’ll add more horizontal guidelines to place the nose, mouth, and hairline accurately. Divide the lower half of the head (from the eyeline to the chin) into two equal sections.
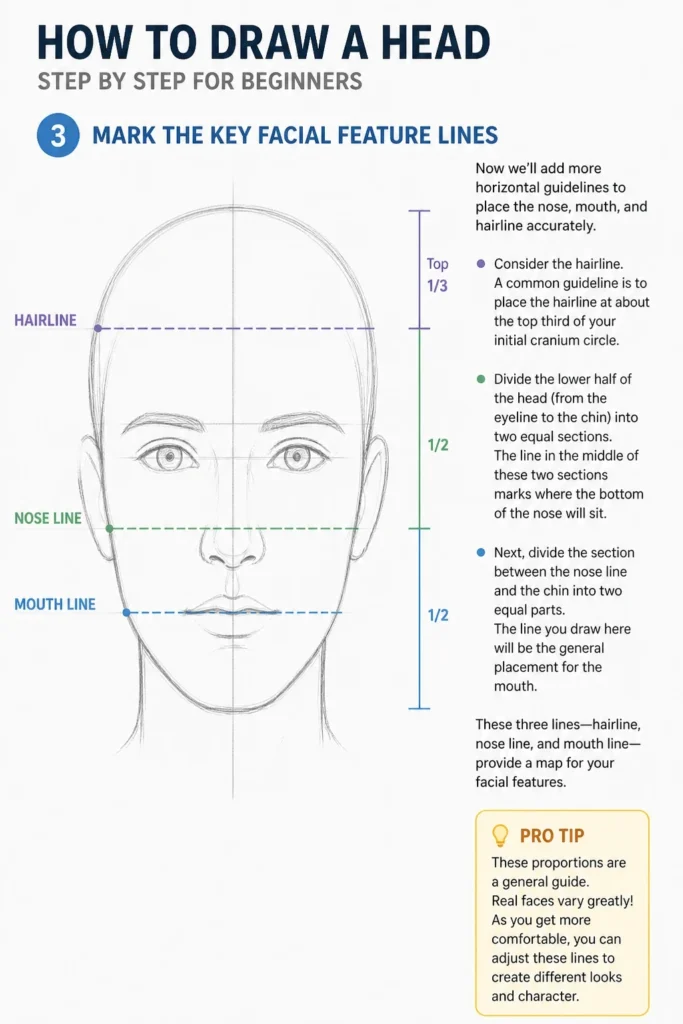
The line in the middle of these two sections marks where the bottom of the nose will sit.
Next, divide the section between the nose line and the chin into two equal parts. The line you draw here will be the general placement for the mouth.
Finally, consider the hairline. A common guideline is to place the hairline at about the top third of your initial cranium circle.
These three lines—hairline, nose line, and mouth line—provide a map for your facial features.
Pro Tip: These proportions are a general guide. Real faces vary greatly! As you get more comfortable, you can adjust these lines to create different character types or to match specific references.
Step 4: Place the Eyes and Eyebrows
The eyes are often considered the most expressive part of the face. They sit directly on your eyeline.
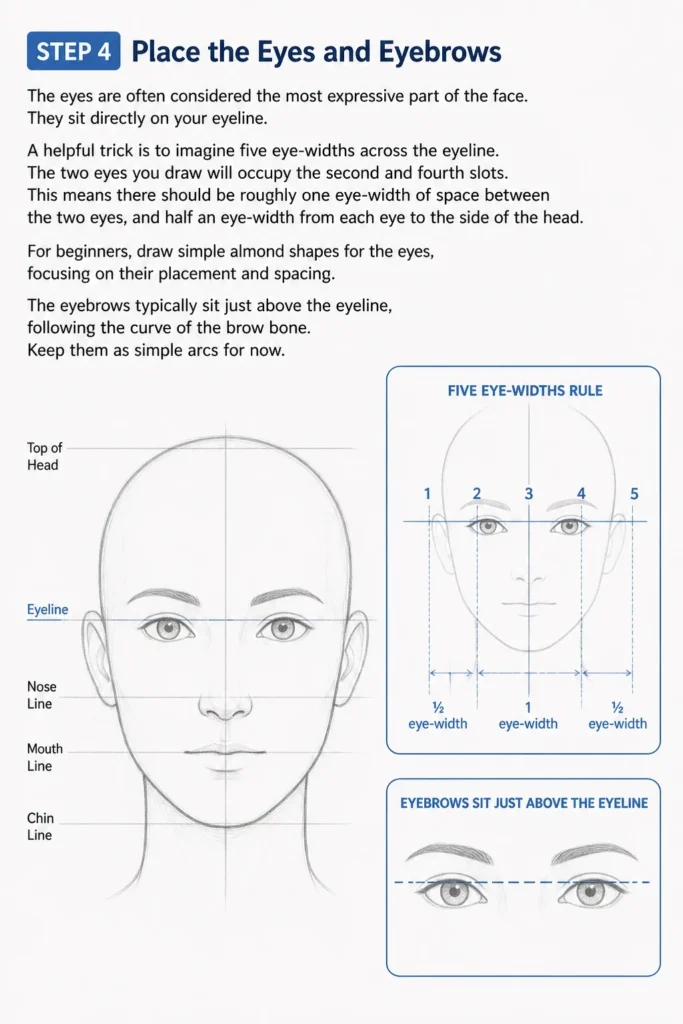
A helpful trick is to imagine five eye-widths across the eyeline. The two eyes you draw will occupy the second and fourth “slots.”
This means there should be roughly one eye-width of space between the two eyes, and half an eye-width from each eye to the side of the head.
For beginners, draw simple almond shapes for the eyes, focusing on their placement and spacing.
The eyebrows typically sit just above the eyeline, following the curve of the brow bone. Keep them as simple arcs for now.
Step 5: Draw the Nose
The nose can be simplified into basic geometric forms. Start by drawing a small circle on the nose line, centered on your vertical guideline.
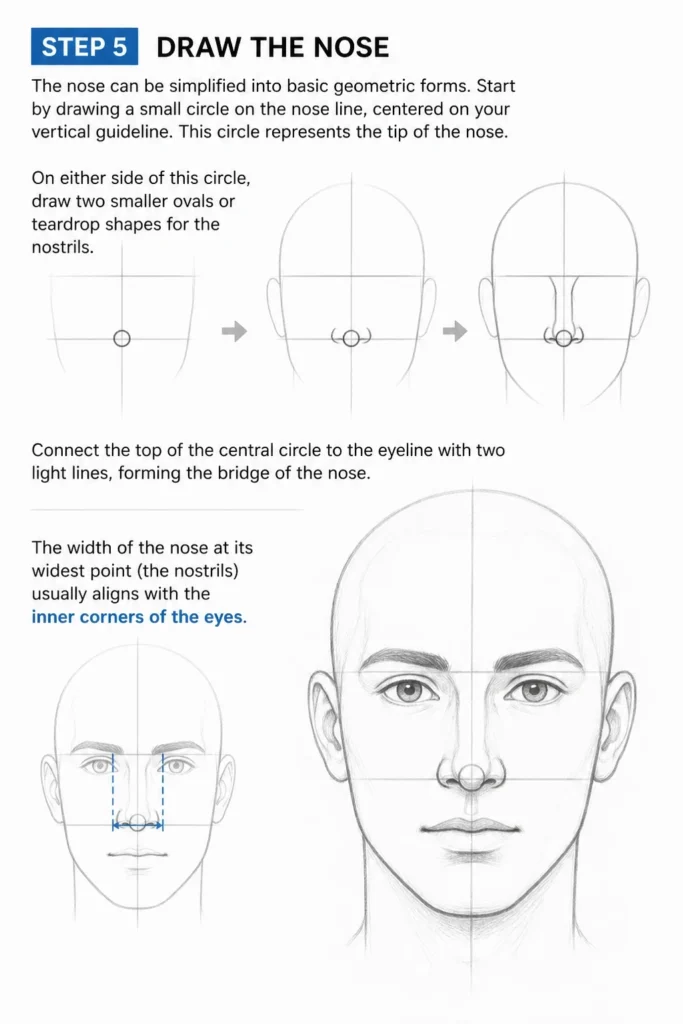
This circle represents the tip of the nose. On either side of this circle, draw two smaller ovals or teardrop shapes for the nostrils.
Connect the top of the central circle to the eyeline with two light lines, forming the bridge of the nose.
The width of the nose at its widest point (the nostrils) usually aligns with the inner corners of the eyes.
This simple structure helps you build the nose without getting lost in complex anatomy.
Step 6: Add the Mouth and Lips
The mouth sits on the mouth line you established earlier. Start by drawing a horizontal line for the mouth opening, centered on your vertical guideline.
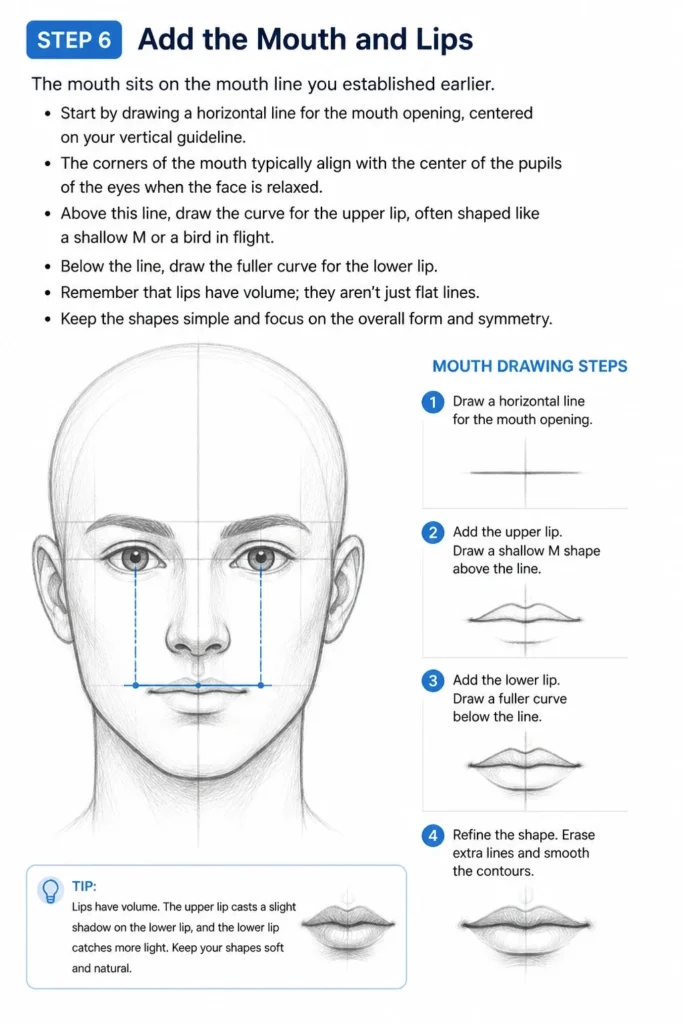
The corners of the mouth typically align with the center of the pupils of the eyes when the face is relaxed.
Above this line, draw the curve for the upper lip, often shaped like a shallow “M” or a bird in flight.
Below the line, draw the fuller curve for the lower lip. Remember that lips have volume; they aren’t just flat lines.
Keep the shapes simple and focus on the overall form and symmetry.
Step 7: Define the Ears
Ears are often placed incorrectly by beginners, but their position is quite consistent. The top of the ear generally aligns with the eyeline.
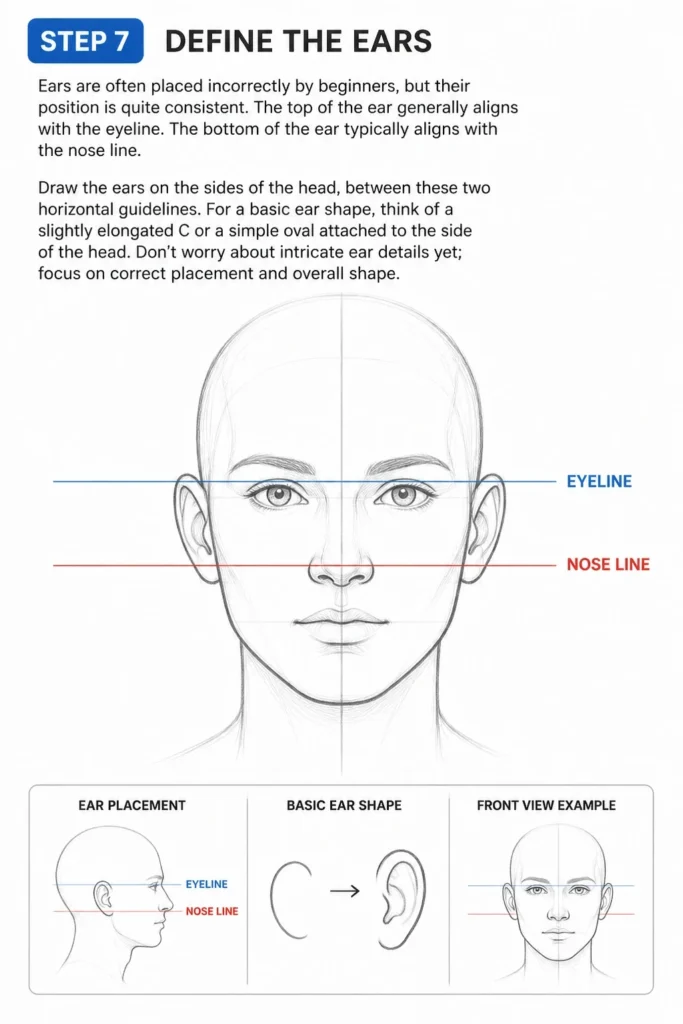
The bottom of the ear typically aligns with the nose line. Draw the ears on the sides of the head, between these two horizontal guidelines.
For a basic ear shape, think of a slightly elongated “C” or a simple oval attached to the side of the head.
Don’t worry about intricate ear details yet; focus on correct placement and overall shape.
Step 8: Refine the Hairline and Hair
The hairline was established in Step 3. Now, you can start to draw the hair, remembering that hair has volume and doesn’t sit flat against the skull.
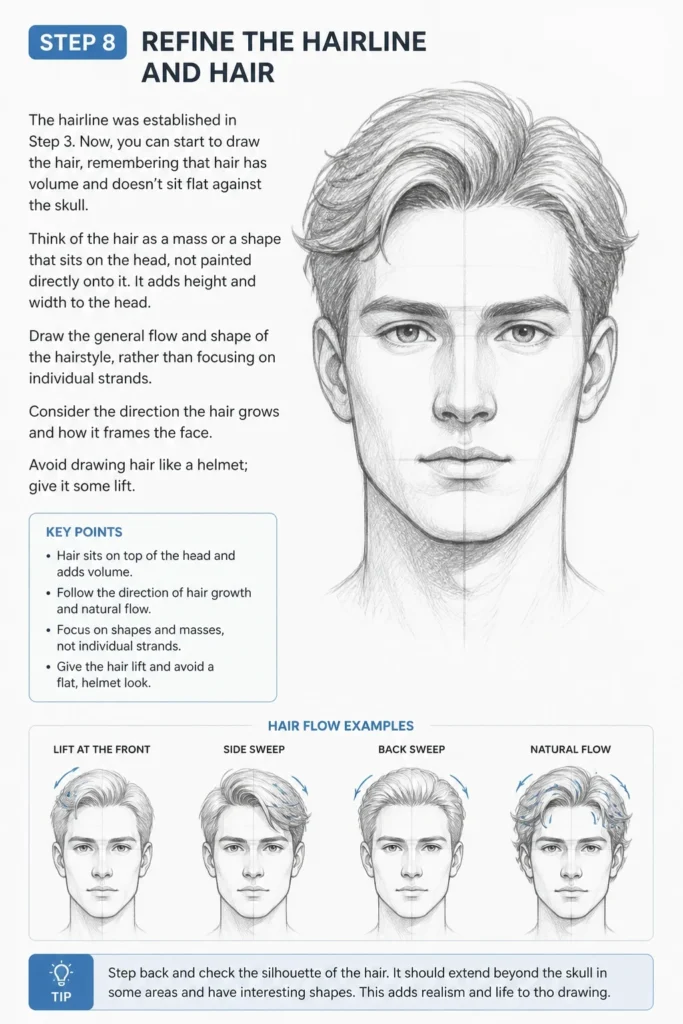
Think of the hair as a mass or a shape that sits on the head, not painted directly onto it. It adds height and width to the head.
Draw the general flow and shape of the hairstyle, rather than focusing on individual strands.
Consider the direction the hair grows and how it frames the face. Avoid drawing hair like a helmet; give it some lift.
Step 9: Clean Up and Add Shading
Once all your features are in place, take your eraser and very gently lighten or remove all the construction lines.
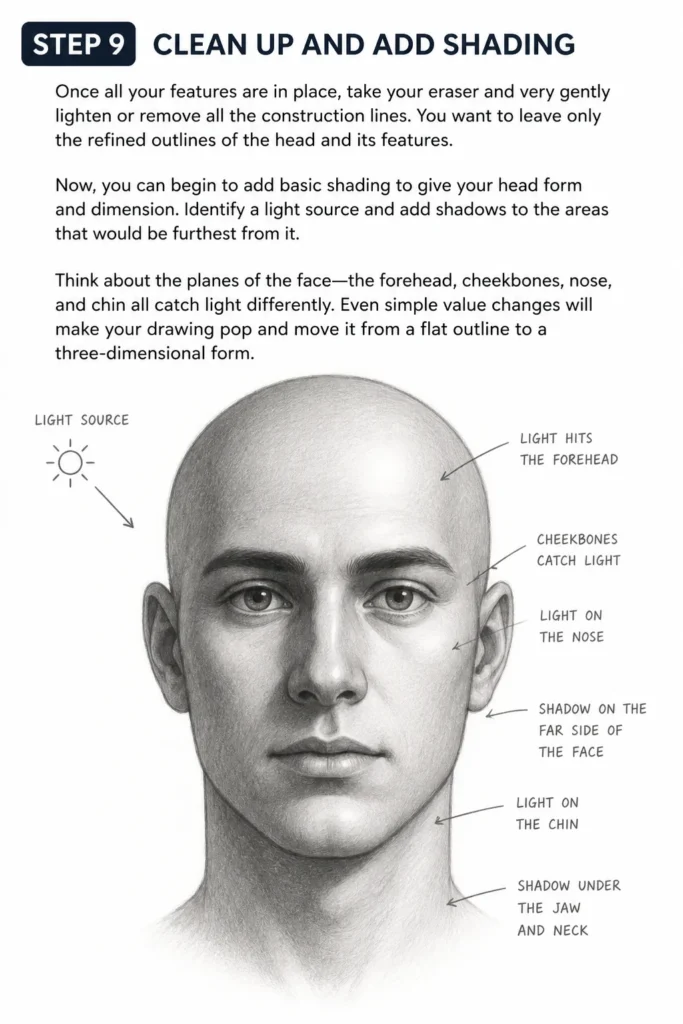
You want to leave only the refined outlines of the head and its features.
Now, you can begin to add basic shading to give your head form and dimension. Identify a light source and add shadows to the areas that would be furthest from it.
Think about the planes of the face: the forehead, cheekbones, nose, and chin all catch light differently.
Even simple value changes will make your drawing pop and move it from a flat outline to a three-dimensional form.
Common Mistakes to Avoid
Drawing Eyes Too High
A very common beginner mistake is placing the eyes too high on the head. This results in a disproportionately large forehead and a cramped lower face.
Always remember that the eyeline typically sits at the halfway point of the entire head, from the crown to the chin, not just the face.
Making the Head Too Flat
When starting with a circle, it’s easy to forget that the head is a three-dimensional object. Drawing features directly onto a flat circle makes the head look like a cutout.
Always visualize the sphere and the planes of the face. Even in a two-dimensional drawing, thinking in 3D will give your head more volume and realism.
Symmetry Issues
It’s challenging to make both sides of the face perfectly symmetrical, but significant asymmetry can make a drawing look off. One eye might be larger, or one side of the jaw might be wider.
Regularly check your vertical centerline and measure distances from it to ensure features are balanced. Flipping your drawing upside down or viewing it in a mirror can also reveal imbalances.
Drawing Hair as a Helmet
Many beginners draw hair as if it’s painted directly onto the scalp, lacking volume and life. This makes the head look like it’s wearing a tight, unstyled wig.
Remember that hair has thickness and grows out from the head. Give it space and volume, thinking of it as a separate mass rather than just lines on the skull.
Troubleshooting
My Head Looks Lopsided/Asymmetrical
This is a very common issue, even for experienced artists. First, go back to your initial vertical centerline and ensure it’s straight and truly in the middle.
Then, use your pencil to measure distances from this centerline to features like the eyes, nostrils, and corners of the mouth on both sides. Adjust as needed.
A classic trick is to hold your drawing up to a mirror or flip it upside down. Your brain processes the image differently, often revealing imbalances you missed.
Features Don’t Look Right (e.g., Eyes too big/small, Nose too long)
When features seem off, it’s almost always a proportion problem. Revisit your horizontal guidelines for the eyeline, nose line, and mouth line.
Confirm their placement relative to each other and to the overall head shape. For eyes, double-check the “five-eye” rule for spacing.
Don’t be afraid to lightly erase and redraw. The beauty of pencils is their forgiving nature.
The Head Looks Flat/2D
If your head drawing lacks depth, you might be thinking too much in terms of outlines. Start by reinforcing the initial sphere you drew.
Imagine the head as a solid object in space. Even without heavy shading, varying line weight can help: thicker lines for closer elements, lighter for those receding.
Introducing even minimal shading in step 9, focusing on the shadow side of the head, will immediately add dimension.
Key Takeaways
- Start with simple, foundational shapes like circles and ovals to build your head structure.
- Utilize guidelines consistently; they are your most powerful tools for accurate proportions and symmetry.
- Understand that the eyeline typically sits halfway down the entire head, not just the face.
- Think of the head as a three-dimensional form, not a flat shape, even when drawing on a 2D surface.
- Don’t be afraid to erase and refine your lines; the initial sketches are meant to be light and adjustable.
- Practice regularly and observe real faces to internalize proportions and variations.
Frequently Asked Questions
How do I make the head look less stiff?
To add dynamism, try introducing slight tilts to the head or subtle curves to the centerline. Not every head needs to be perfectly straight on. Experiment with different angles and expressions once you’re comfortable with the basic structure.
Should I use reference photos?
Absolutely! Reference photos are invaluable. They help you understand how features look from different angles, how light falls on the face, and the incredible diversity of human anatomy. Don’t copy directly, but use them to learn and inform your drawing.
What’s the best pencil for beginners?
An HB pencil is an excellent all-rounder for sketching and light lines. A 2B pencil is also very useful for slightly darker lines and beginning to add light shading. Having both allows for versatility without overwhelming you with choices.
How often should I practice?
Consistency is more important than duration. Short, regular practice sessions (e.g., 15-30 minutes daily) are often more effective than infrequent, long sessions. This builds muscle memory and keeps your skills sharp.
Our Top Recommended Finds
- Sketchbook with Smooth Paper: A good quality paper minimizes pencil drag and allows for clean erasing, making the learning process much more enjoyable.
- Set of Drawing Pencils (HB, 2B, 4B, 6B): A small set provides a range of hardness for light sketching (HB) to darker shading (4B/6B), expanding your expressive capabilities.
- Kneaded Eraser: Unlike traditional erasers, a kneaded eraser lifts graphite without abrading the paper. It’s also moldable, allowing for precise erasing of small areas or lightening lines.
Your Artistic Journey Starts Now
You’ve taken the first crucial steps in understanding how to draw a human head. This foundational knowledge will serve you well as you continue your artistic journey.
Don’t stop here. Try drawing heads from different angles, experimenting with various hairstyles, or even attempting to capture different expressions.
The key to improvement is consistent practice and patient observation. Pick up your pencil today and keep drawing!