🎨 How To Draw A Womans Face Step By Step Easy
Learning to draw a woman’s face might seem daunting at first. Many aspiring artists feel overwhelmed by the subtle curves and unique features. I remember struggling with proportions myself when I first started.
But with a structured approach, anyone can achieve beautiful results. This guide breaks down the process into simple, manageable steps, giving you the confidence to draw stunning portraits.
Quick Overview
You’re about to embark on a rewarding journey into portrait drawing. By the end of this guide, you’ll have a solid foundation for sketching a woman’s face with accurate proportions and developing your unique artistic style.
Time needed: 45-90 minutes (can be longer if you take your time)
Difficulty: Beginner
What you’ll need: Pencil (HB or 2B recommended), paper, eraser (kneaded eraser is great), and a ruler (optional, for initial guidelines).
Step-by-Step Instructions
Drawing a face is all about building from simple shapes. We’ll start with the basics and gradually add detail, making the process enjoyable and achievable. Remember, patience is your best tool.
Step 1: Sketch the Basic Head Shape
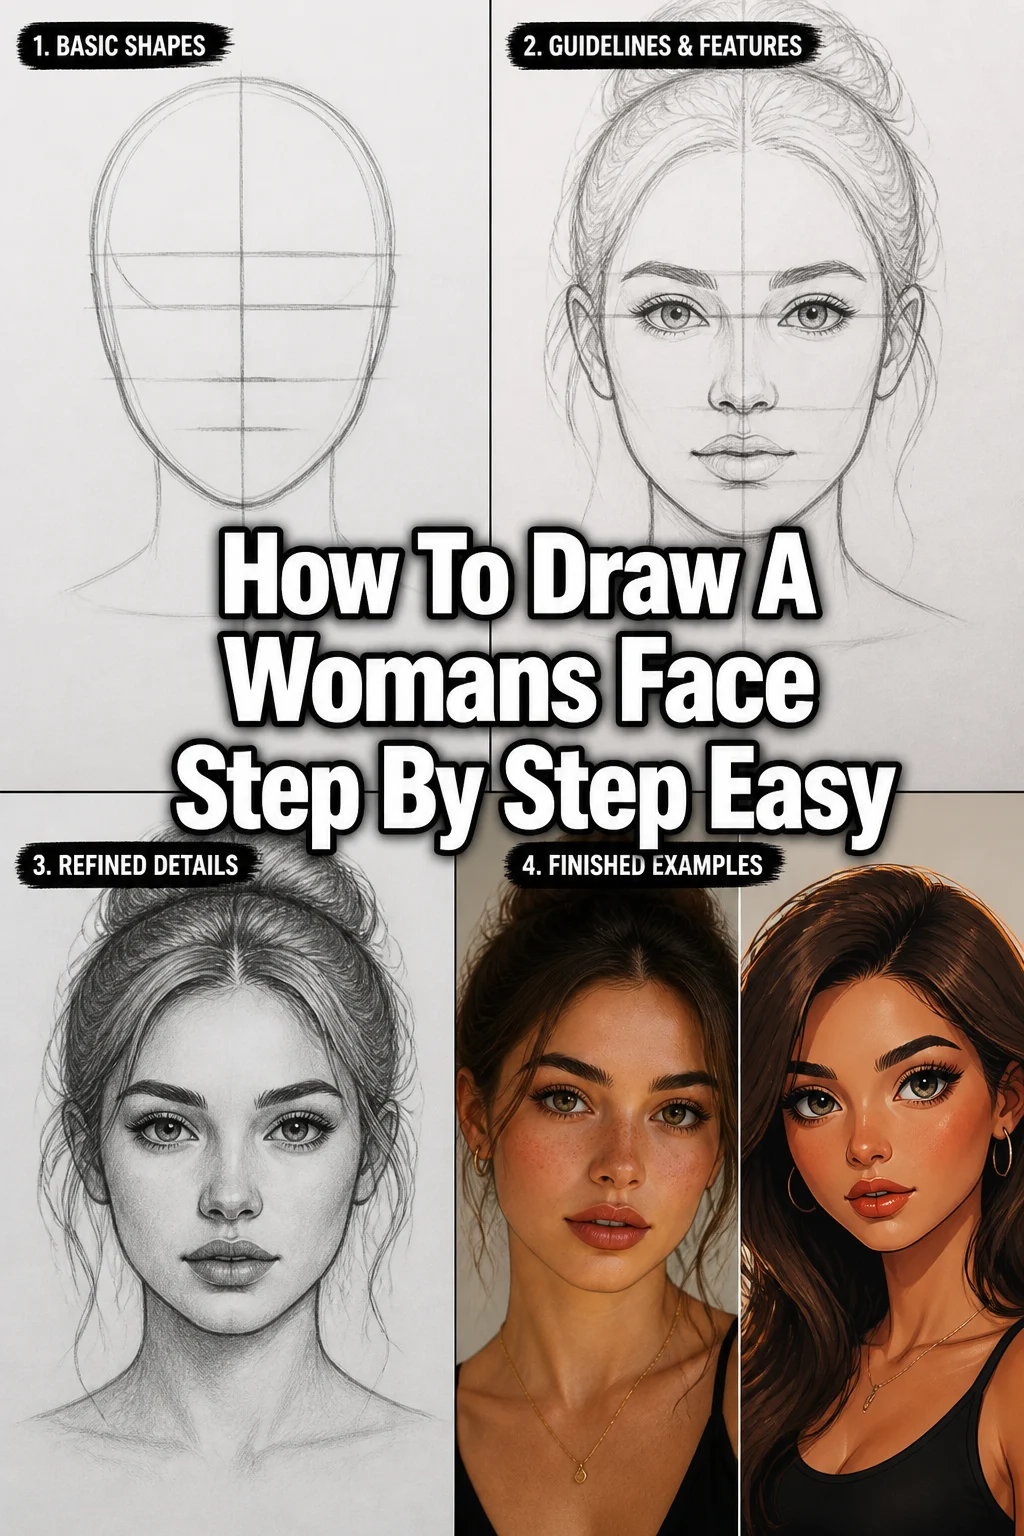
Begin by drawing a simple oval shape on your paper. This will represent the general form of the head. Think of it like an egg, slightly wider at the top.
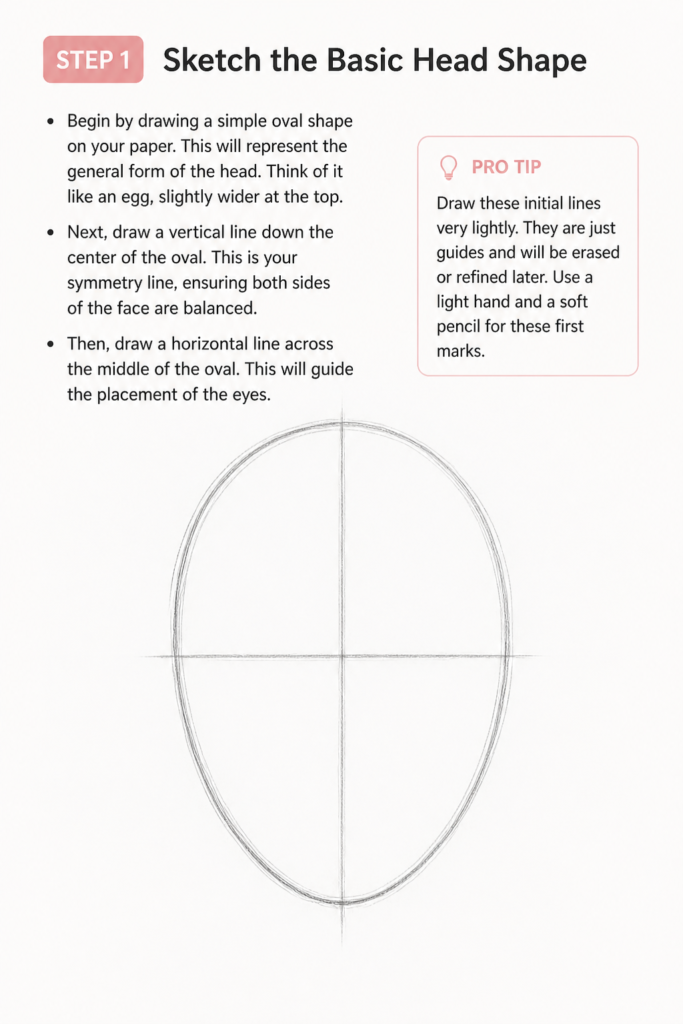
Next, draw a vertical line down the center of the oval. This is your symmetry line, ensuring both sides of the face are balanced. Then, draw a horizontal line across the middle of the oval. This will guide the placement of the eyes.
Pro Tip: Draw these initial lines very lightly. They are just guides and will be erased or refined later. Use a light hand and a soft pencil for these first marks.
Step 2: Define Facial Guidelines
Now, let’s add more specific guidelines for the facial features. Divide the lower half of the head (below the eye line) into three roughly equal sections using two more horizontal lines. The top line will be for the bottom of the nose, and the bottom line will be for the mouth.
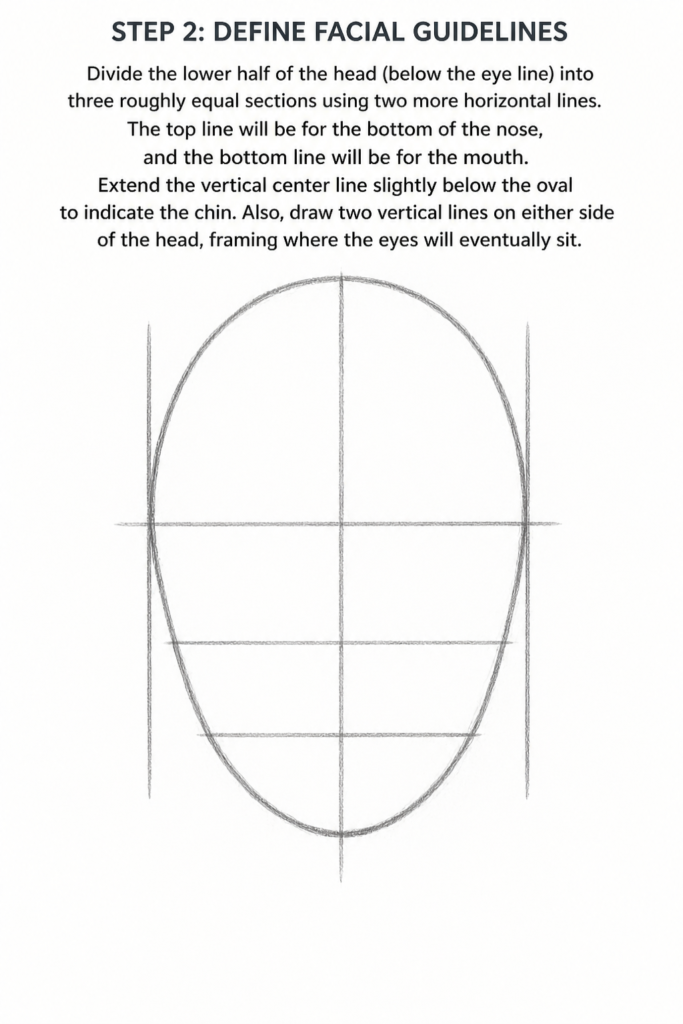
Extend the vertical center line slightly below the oval to indicate the chin. Also, draw two vertical lines on either side of the head, framing where the eyes will eventually sit. These help define the width of the face.
Step 3: Sketch the Eyes
Locate the horizontal eye line you drew in Step 1. Draw two almond-shaped forms on this line, centered on either side of the vertical symmetry line. Leave a space between them that is roughly the width of one eye.
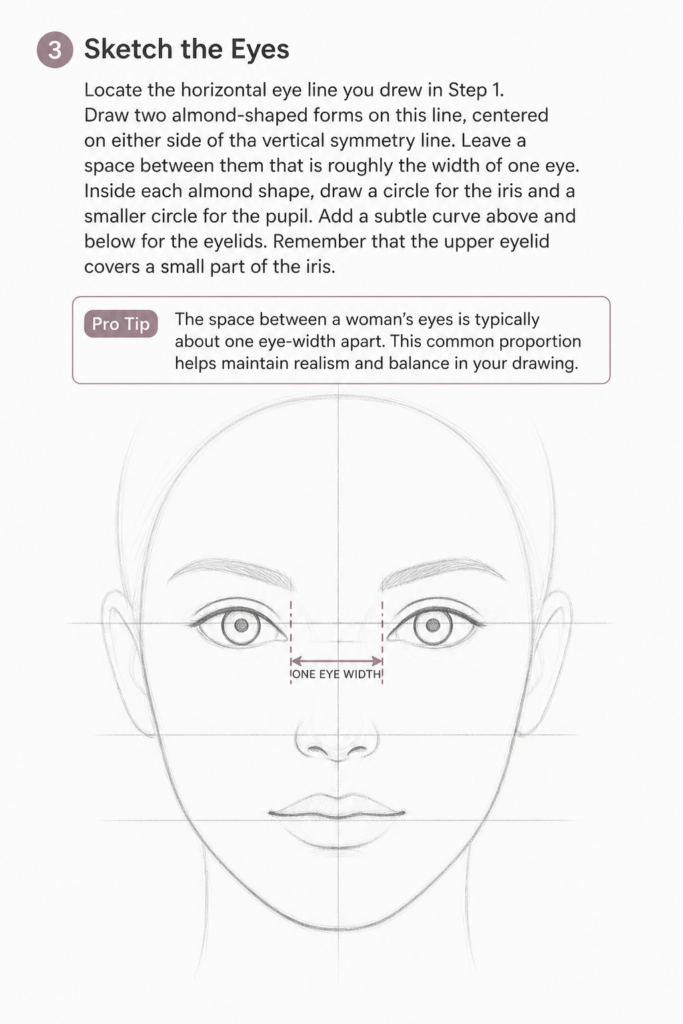
Inside each almond shape, draw a circle for the iris and a smaller circle for the pupil. Add a subtle curve above and below for the eyelids. Remember that the upper eyelid covers a small part of the iris.
Pro Tip: The space between a woman’s eyes is typically about one eye-width apart. This common proportion helps maintain realism and balance in your drawing.
Step 4: Form the Nose
Move down to the nose guideline. Lightly sketch the bridge of the nose, starting from between the eyes and narrowing as it descends. At the nose guideline, draw a gentle curve for the bottom of the nose.
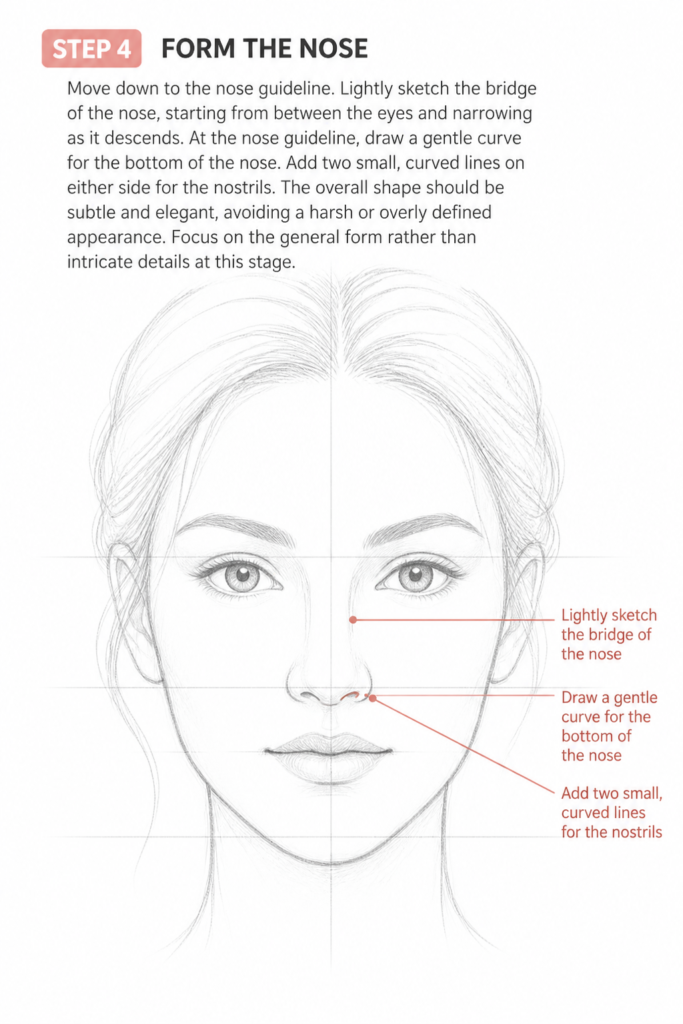
Add two small, curved lines on either side for the nostrils. The overall shape should be subtle and elegant, avoiding a harsh or overly defined appearance. Focus on the general form rather than intricate details at this stage.
Step 5: Outline the Lips
Find your mouth guideline. The corners of the mouth typically align with the center of the pupils of the eyes. Draw a horizontal line between these points for the mouth’s opening.
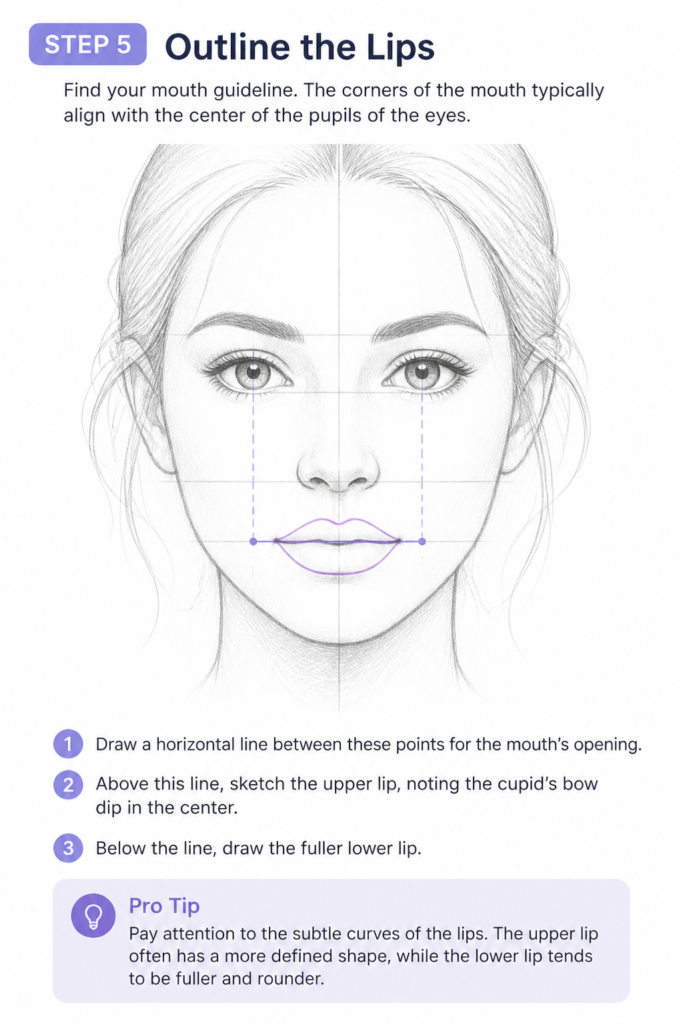
Above this line, sketch the upper lip, noting the “cupid’s bow” dip in the center. Below the line, draw the fuller lower lip. Keep the shapes soft and natural, avoiding sharp angles.
Pro Tip: Pay attention to the subtle curves of the lips. The upper lip often has a more defined shape, while the lower lip tends to be fuller and rounder.
Step 6: Shape the Ears
The ears are often overlooked but crucial for realism. They usually align with the eye line at the top and the nose line at the bottom. Sketch the general shape of the ears on either side of the head.
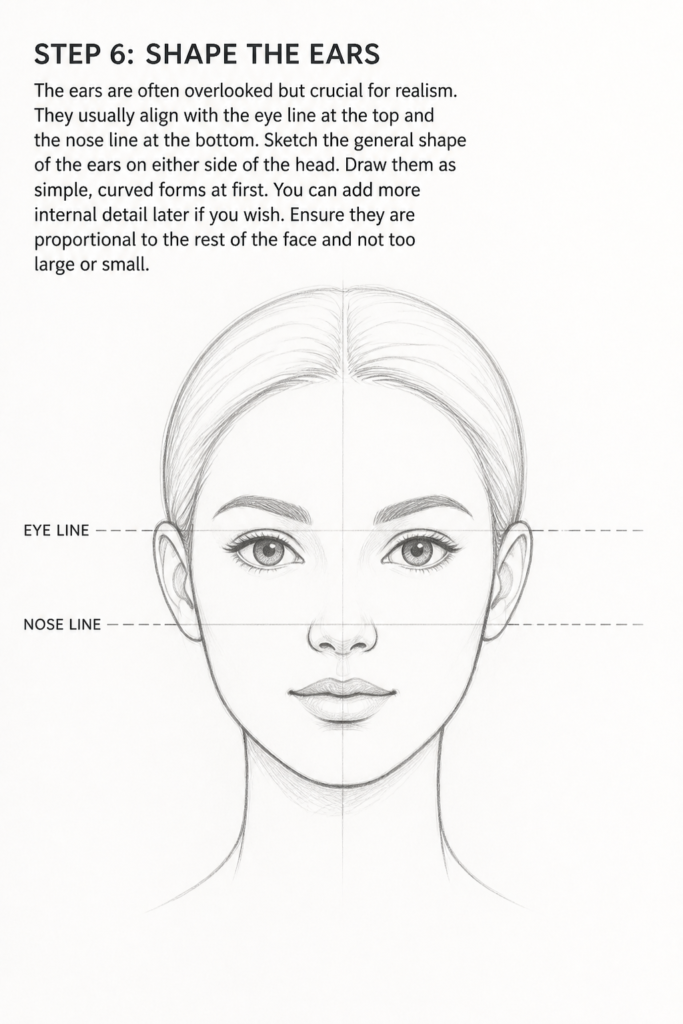
Draw them as simple, curved forms at first. You can add more internal detail later if you wish. Ensure they are proportional to the rest of the face and not too large or small.
Step 7: Draw the Hairline and Hair
The hairline usually begins about halfway between the top of the head and the eye line. Sketch a soft curve for the hairline. Then, begin to draw the hair, giving it volume and flow.
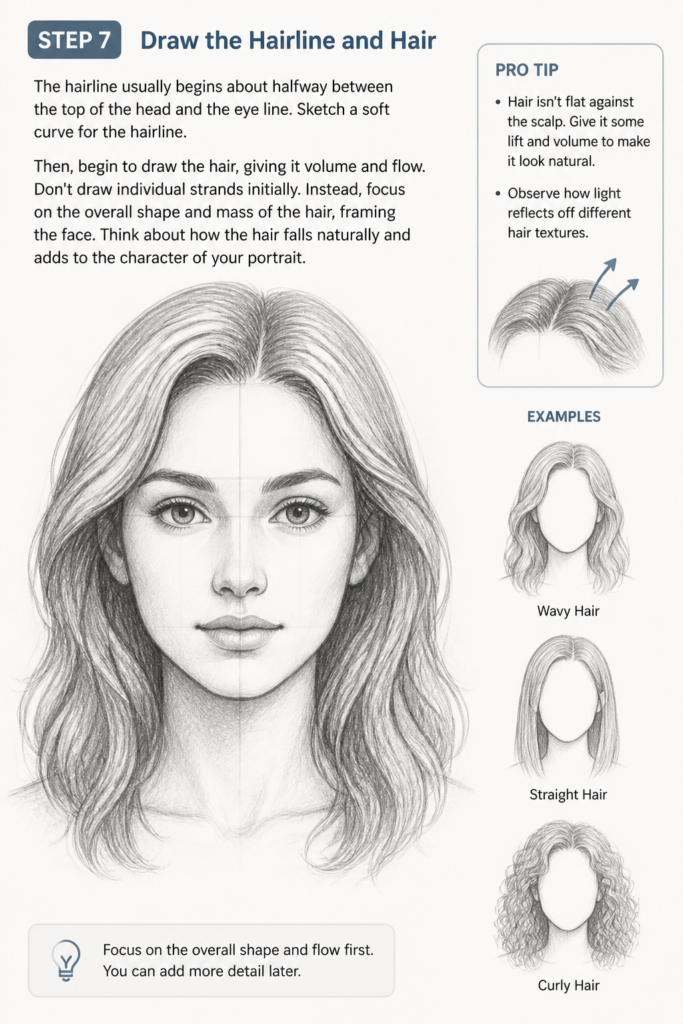
Don’t draw individual strands initially. Instead, focus on the overall shape and mass of the hair, framing the face. Think about how the hair falls naturally and adds to the character of your portrait.
Pro Tip: Hair isn’t flat against the scalp. Give it some lift and volume to make it look natural. Observe how light reflects off different hair textures.
Step 8: Refine and Erase
Now it’s time to clean up your drawing. Gently erase all the initial guidelines you drew. You should be left with a clear outline of the face and its features.
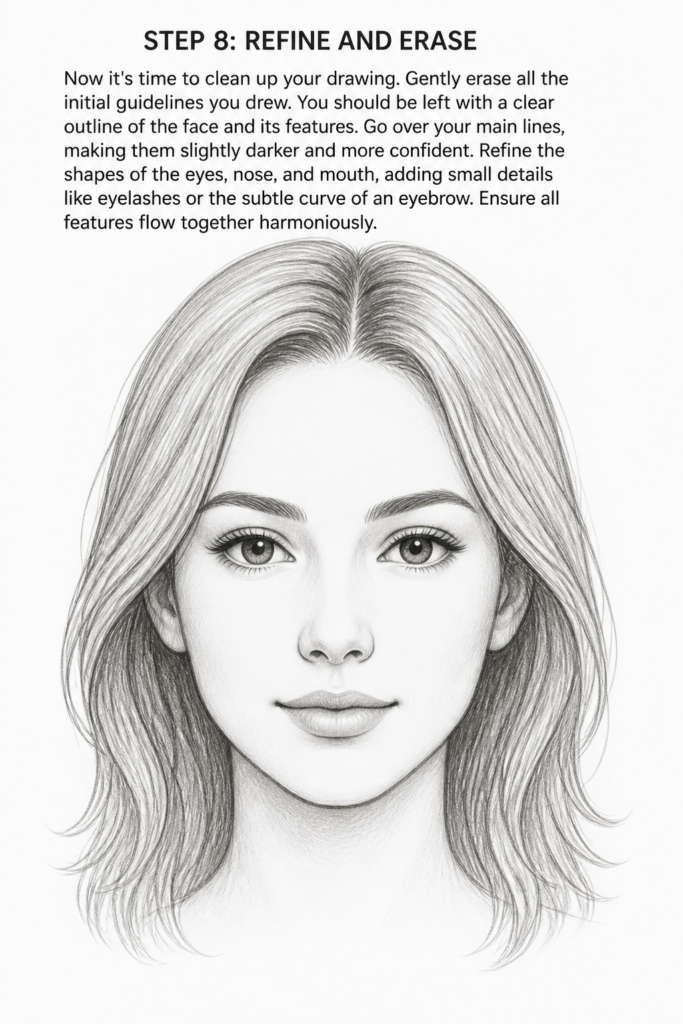
Go over your main lines, making them slightly darker and more confident. Refine the shapes of the eyes, nose, and mouth, adding small details like eyelashes or the subtle curve of an eyebrow. Ensure all features flow together harmoniously.
Step 9: Add Subtle Shading and Highlights
Shading brings your drawing to life. Identify where your light source is coming from. Add soft shadows under the chin, beneath the nose, and in the creases of the eyelids.
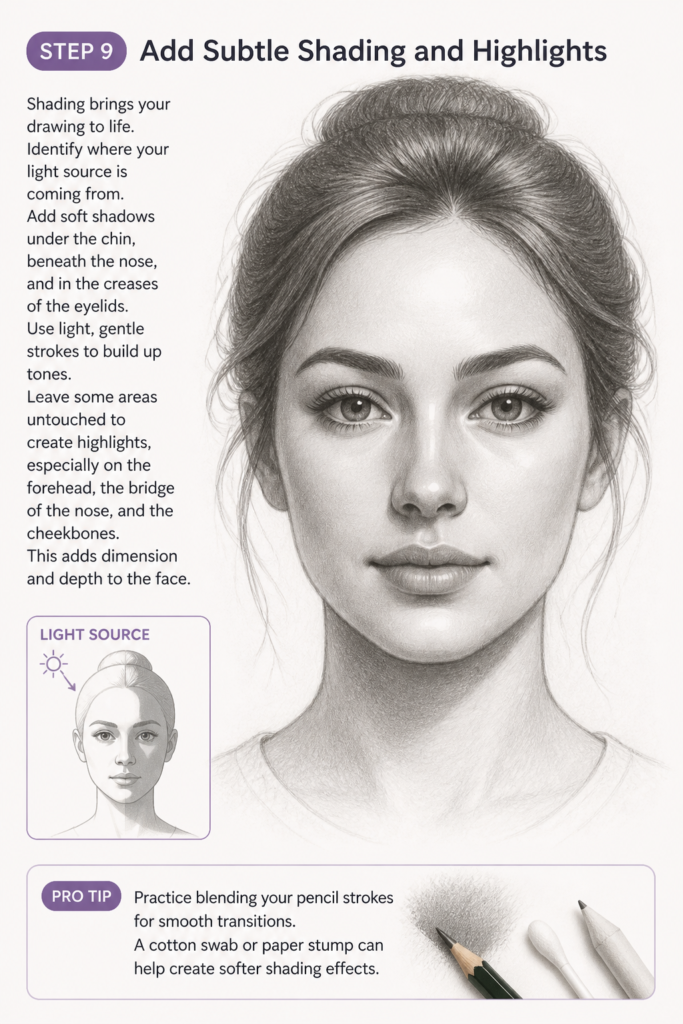
Use light, gentle strokes to build up tones. Leave some areas untouched to create highlights, especially on the forehead, the bridge of the nose, and the cheekbones. This adds dimension and depth to the face.
Pro Tip: Practice blending your pencil strokes for smooth transitions. A cotton swab or paper stump can help create softer shading effects.
Common Mistakes to Avoid
Even experienced artists encounter challenges. Being aware of common pitfalls can help you improve faster and avoid frustration. Let’s look at some frequent errors.
Symmetry Issues
One of the most common problems is drawing a face where one side doesn’t quite match the other. This can make the face look lopsided or unnatural. Often, this happens when artists don’t rely enough on their initial guidelines.
To correct this, always start with a strong vertical symmetry line. Regularly flip your drawing upside down or hold it up to a mirror. This fresh perspective helps reveal imbalances you might not notice otherwise.
Exaggerated Features
Beginners sometimes draw features that are too big or too small for the face. Eyes might be too large, or the nose might be too wide, distorting the overall harmony of the portrait. This can make the face look cartoonish rather than realistic.
Always refer back to your initial proportion guidelines. Remember the ‘rule of thirds’ for the lower face and the ‘one eye width’ for spacing. Practice observing real faces to internalize these proportions.
Flatness and Lack of Dimension
A drawing can sometimes look flat, as if it’s a cutout rather than a three-dimensional form. This usually occurs when there’s insufficient shading or when lines are all of the same weight. The face loses its sense of depth and form.
Vary your line pressure; use lighter lines for softer areas and darker lines for definition. Critically, introduce subtle shadows and highlights to create the illusion of roundness and form. Think of the face as a series of planes.
Rushing the Process
It’s tempting to jump straight into details like eyelashes or individual strands of hair. However, skipping the foundational steps of proportion and basic shapes often leads to a drawing that feels “off” despite detailed features.
Patience is key. Take your time with each step, especially the initial guidelines and basic forms. Build your drawing layer by layer, refining as you go, before adding any intricate details.
Troubleshooting
Even with a guide, you might encounter specific issues. Here are some common problems and how to address them. Don’t be discouraged; every challenge is an opportunity to learn.
Face Looks Stiff or Unnatural
If your drawing feels rigid, it might lack a sense of life or natural flow. This can happen when you focus too much on perfect lines and not enough on the overall gesture. The face appears frozen or doll-like.
Try to loosen up your wrist when drawing. Use lighter, flowing strokes in the initial stages. Practice drawing quick, gestural sketches of faces from photos or life to capture movement and expression.
Features Are Misaligned
You might find that the eyes aren’t level, or the mouth is slightly off-center. Even small misalignments can drastically affect the realism of your portrait. This is a common issue, especially when drawing freehand.
Go back to your horizontal and vertical guidelines. Use a ruler if necessary to check if your features are truly aligned. Don’t be afraid to erase and redraw. Flipping your drawing is also very effective for spotting these errors.
Drawing Lacks Personality
Sometimes, a technically correct drawing can still feel generic or lifeless. It might have all the right proportions but lacks a unique character or expression. This can be frustrating after all your hard work.
Study different reference photos, paying attention to unique expressions and subtle feature variations. Experiment with slight changes in eye shape, eyebrow arch, or lip fullness. A small tilt of the head or a hint of a smile can add immense personality.
Key Takeaways
Always begin with light, basic shapes and guidelines to establish correct proportions.
Patience is crucial; build your drawing in layers from general forms to specific details.
Use a vertical symmetry line and horizontal guides for eyes, nose, and mouth to ensure alignment.
Observe how features relate to each other, especially the spacing of eyes and the alignment of the mouth.
Shading and highlights are essential for creating depth, dimension, and a sense of realism.
Practice regularly and don’t be afraid to make mistakes; they are part of the learning process.
Frequently Asked Questions
Drawing faces often brings up specific questions, especially for beginners. Here are some common inquiries.
What pencil hardness should I use for drawing faces?
For initial sketches and guidelines, an HB pencil is ideal because it’s light and easy to erase. For darker lines, shading, and details, a 2B or 4B pencil works well, providing richer tones and smoother blending.
How do I make the face look unique and not generic?
To add uniqueness, study different reference photos and observe the subtle variations in people’s features. Focus on specific characteristics like the shape of the jawline, the curve of the eyebrows, or the slight asymmetry found in real faces. Experiment with expressions.
Should I use reference photos when drawing a woman’s face?
Absolutely, using reference photos is highly recommended, especially when you’re learning. They provide accurate information about proportions, light, and shadow. Over time, you’ll develop a stronger visual library to draw from memory.
How can I improve my shading techniques?
Practice value scales, creating a smooth gradient from light to dark with your pencil. Observe how light falls on objects and creates shadows in real life. Experiment with different blending tools like cotton swabs or paper stumps to achieve smooth transitions.
Our Top Recommended Finds
Having the right tools can make a significant difference in your drawing experience. Here are a few reliable basics.
- Strathmore 400 Series Sketch Pad: This paper offers a good tooth for pencil work and is durable enough for erasing, perfect for practice.
- Staedtler Mars Lumograph Pencil Set: A set with various lead hardness (HB, 2B, 4B, 6B) gives you versatility for sketching, shading, and detailing.
- Faber-Castell Kneaded Eraser: Unlike traditional erasers, a kneaded eraser lifts graphite without damaging the paper and can be molded for precise corrections.
Your Artistic Journey Continues
You’ve taken a fantastic first step in learning to draw a woman’s face. This guide provides a solid foundation, but the real magic happens with consistent practice. Don’t just read these steps; try them out.
Pick up your pencil right now and draw another face. Each attempt will teach you something new, refining your eye and your hand. Once you feel comfortable, explore different angles, expressions, and even try drawing from life. The world is full of inspiration, and your artistic potential is limitless.