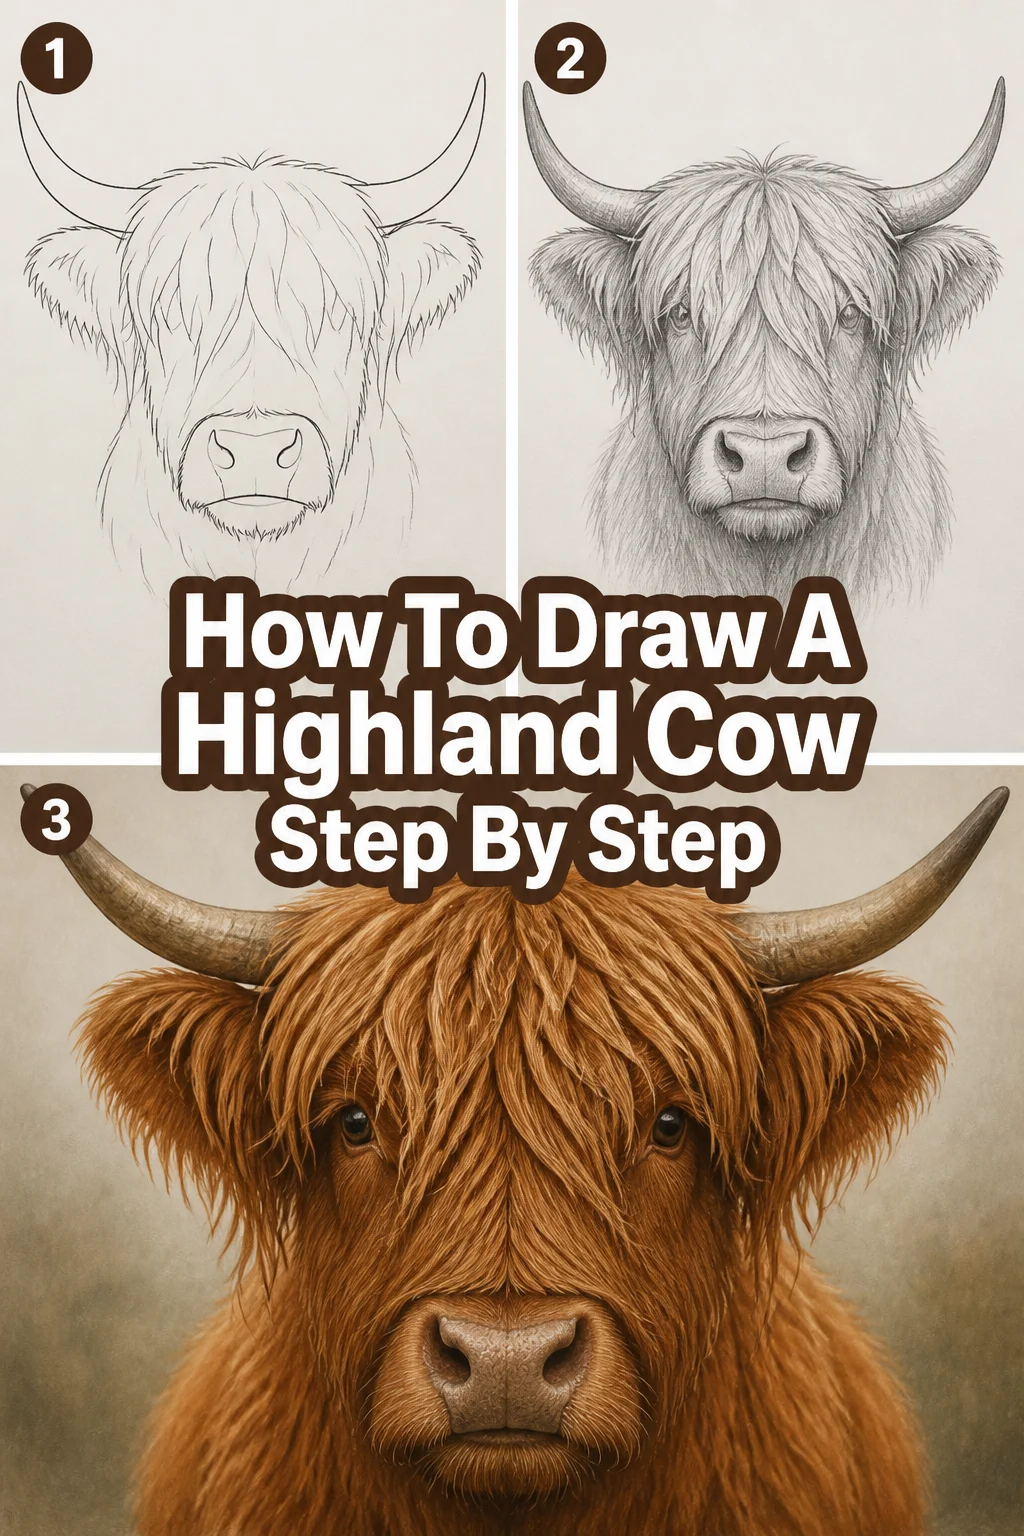
How To Draw A Highland Cow Step By Step
There’s a unique charm to Highland Cows, with their long shaggy coats and majestic horns.
I’ve spent countless hours sketching these magnificent creatures, captivated by their gentle eyes and distinctive silhouette.
This guide will walk you through each stroke, helping you capture their endearing character on paper, even if you’re just starting out.
Quick Overview
In this guide, you’ll learn to draw a realistic Highland Cow, focusing on its iconic features, from the shaggy hair to the powerful horns.
You’ll gain confidence in building up complex textures and understanding animal anatomy.
- Time needed: 1.5 – 2.5 hours
- Difficulty: Intermediate
- What you’ll need: Graphite pencils (HB, 2B, 4B, 6B), drawing paper, eraser (kneaded and stick), blending stump or cotton swab.
Step-by-Step Instructions
Step 1: Lay Down Basic Shapes and Proportions
Start by lightly sketching the fundamental forms that make up the cow’s body.
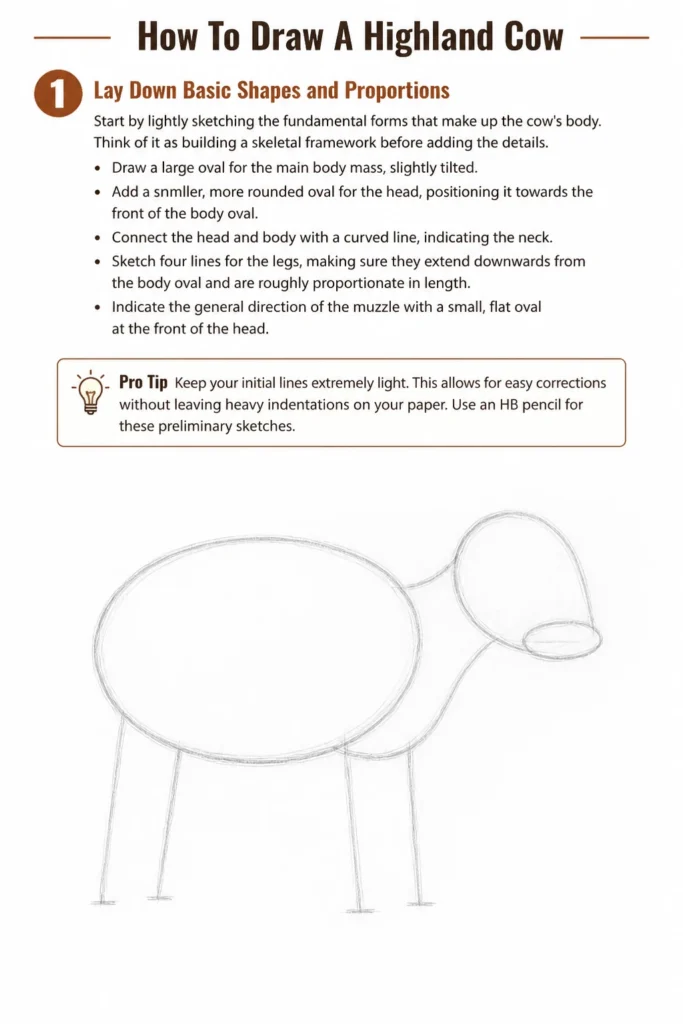
Think of it as building a skeletal framework before adding the details.
- Draw a large oval for the main body mass, slightly tilted.
- Add a smaller, more rounded oval for the head, positioning it towards the front of the body oval.
- Connect the head and body with a curved line, indicating the neck.
- Sketch four lines for the legs, making sure they extend downwards from the body oval and are roughly proportionate in length.
- Indicate the general direction of the muzzle with a small, flat oval at the front of the head.
Pro Tip: Keep your initial lines extremely light. This allows for easy corrections without leaving heavy indentations on your paper. Use an HB pencil for these preliminary sketches.
Step 2: Refine the Head and Facial Structure
Now, we’ll start to give our Highland Cow its distinctive face, focusing on the eye and muzzle placement.
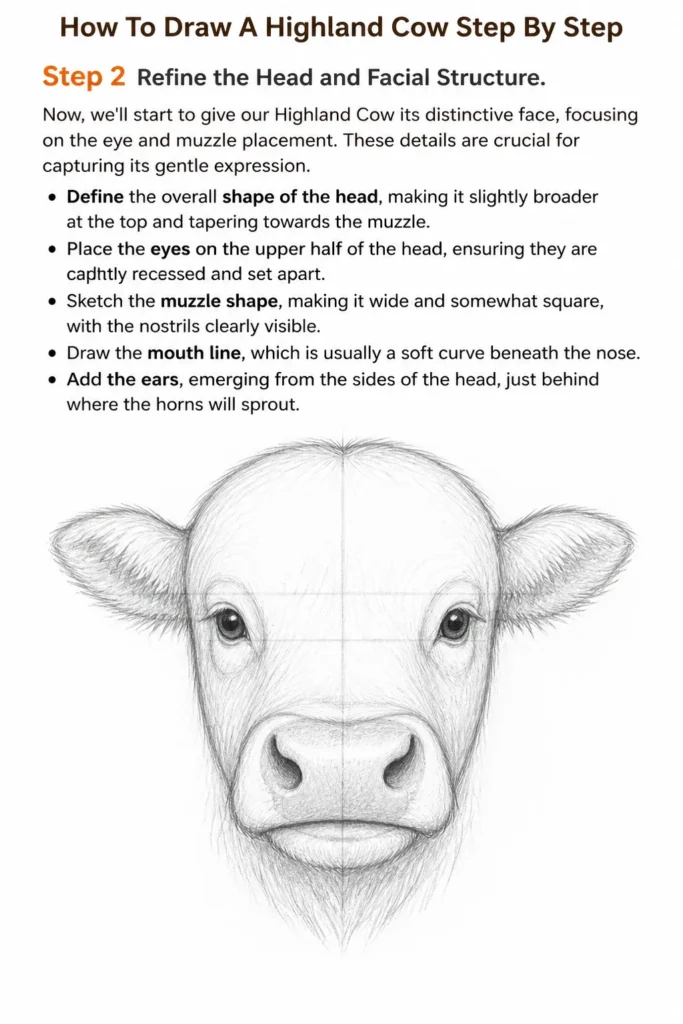
These details are crucial for capturing its gentle expression.
- Define the overall shape of the head, making it slightly broader at the top and tapering towards the muzzle.
- Place the eyes on the upper half of the head, ensuring they are slightly recessed and set apart.
- Sketch the muzzle shape, making it wide and somewhat square, with the nostrils clearly visible.
- Draw the mouth line, which is usually a soft curve beneath the nose.
- Add the ears, emerging from the sides of the head, just behind where the horns will sprout.
Step 3: Sketch the Horns and Forelock
The horns and the shaggy forelock (or “dossan”) are signature features of a Highland Cow.
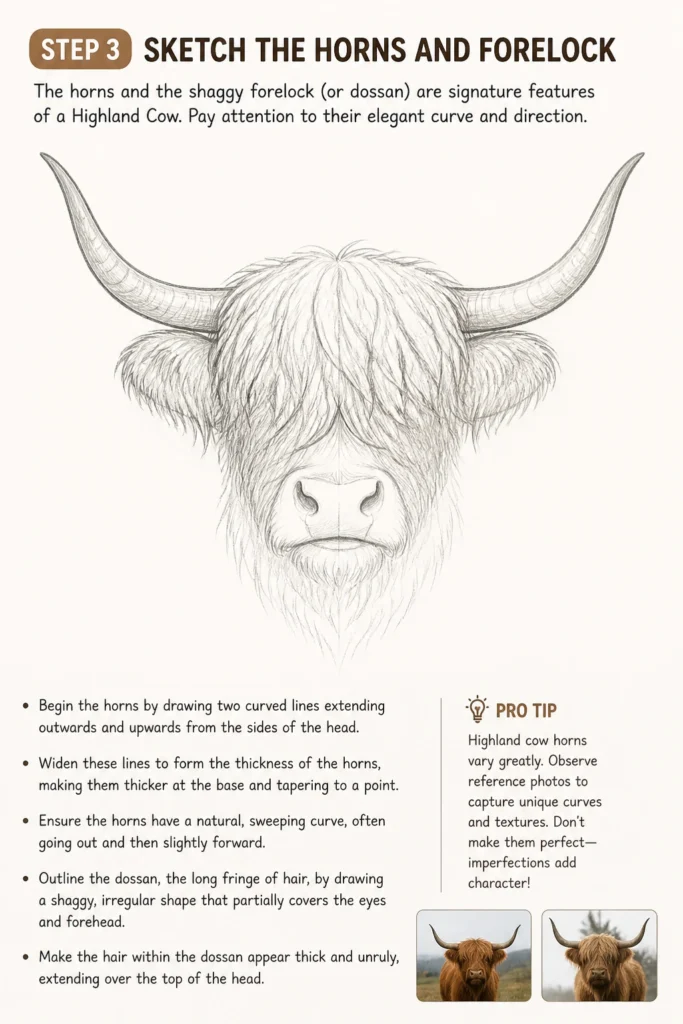
Pay attention to their elegant curve and direction.
- Begin the horns by drawing two curved lines extending outwards and upwards from the sides of the head.
- Widen these lines to form the thickness of the horns, making them thicker at the base and tapering to a point.
- Ensure the horns have a natural, sweeping curve, often going out and then slightly forward.
- Outline the “dossan,” the long fringe of hair, by drawing a shaggy, irregular shape that partially covers the eyes and forehead.
- Make the hair within the dossan appear thick and unruly, extending over the top of the head.
Pro Tip: Highland cow horns vary greatly. Observe reference photos to capture unique curves and textures. Don’t make them perfectly symmetrical; natural variation adds realism.
Step 4: Develop the Body and Leg Contours
With the head established, let’s give the body more form and volume, keeping the shaggy coat in mind.
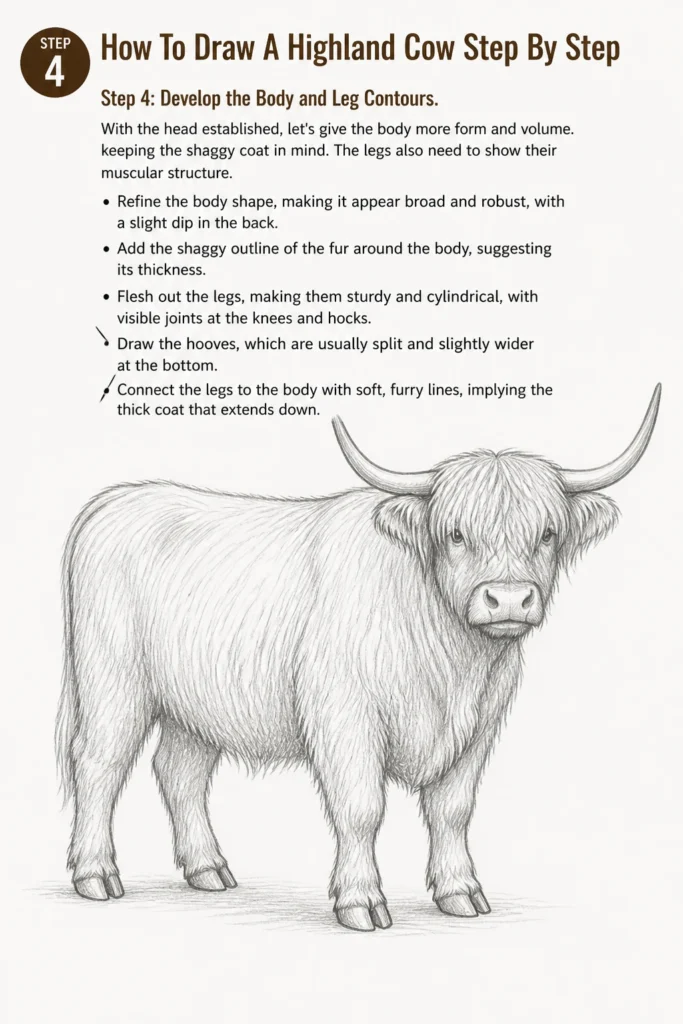
The legs also need to show their muscular structure.
- Refine the body shape, making it appear broad and robust, with a slight dip in the back.
- Add the shaggy outline of the fur around the body, suggesting its thickness.
- Flesh out the legs, making them sturdy and cylindrical, with visible joints at the knees and hocks.
- Draw the hooves, which are usually split and slightly wider at the bottom.
- Connect the legs to the body with soft, furry lines, implying the thick coat that extends down.
Step 5: Begin Texturing the Fur
This is where the Highland Cow truly starts to come to life, as we add its iconic shaggy coat.
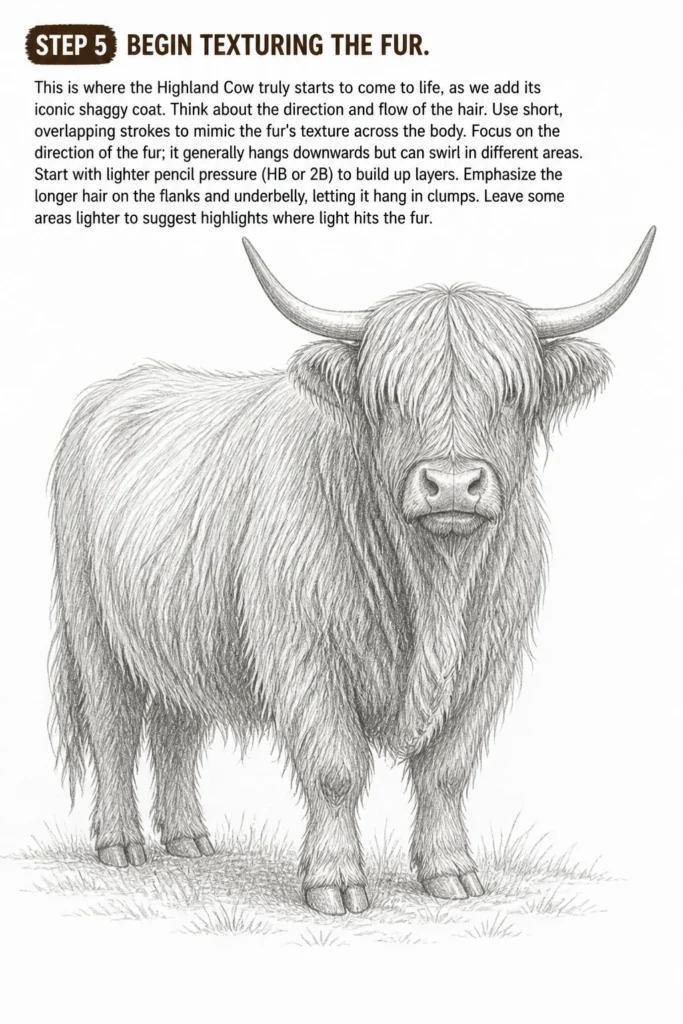
Think about the direction and flow of the hair.
- Use short, overlapping strokes to mimic the fur’s texture across the body.
- Focus on the direction of the fur; it generally hangs downwards but can swirl in different areas.
- Start with lighter pencil pressure (HB or 2B) to build up layers.
- Emphasize the longer hair on the flanks and underbelly, letting it hang in clumps.
- Leave some areas lighter to suggest highlights where light hits the fur.
Step 6: Add Shading and Depth
Shading gives your drawing three-dimensionality and makes it appear grounded.
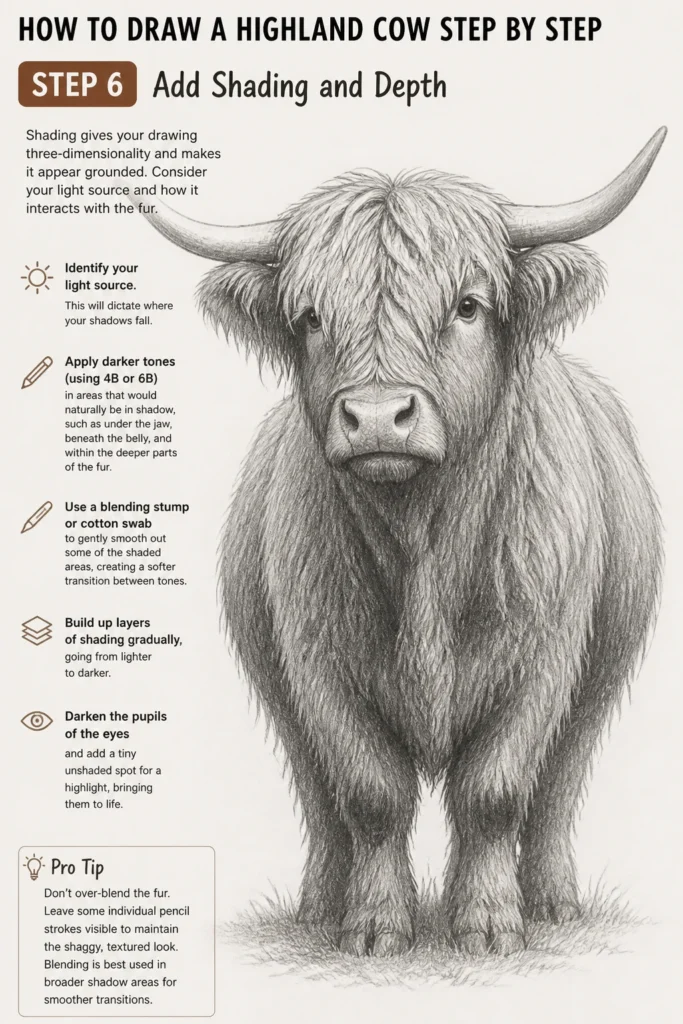
Consider your light source and how it interacts with the fur.
- Identify your light source. This will dictate where your shadows fall.
- Apply darker tones (using 4B or 6B) in areas that would naturally be in shadow, such as under the jaw, beneath the belly, and within the deeper parts of the fur.
- Use a blending stump or cotton swab to gently smooth out some of the shaded areas, creating a softer transition between tones.
- Build up layers of shading gradually, going from lighter to darker.
- Darken the pupils of the eyes and add a tiny unshaded spot for a highlight, bringing them to life.
Pro Tip: Don’t over-blend the fur. Leave some individual pencil strokes visible to maintain the shaggy, textured look. Blending is best for underlying shadows, not the top layer of fur.
Step 7: Detail the Fur and Horns
Now, it’s time to refine the textures, adding the fine details that make your drawing truly stand out.
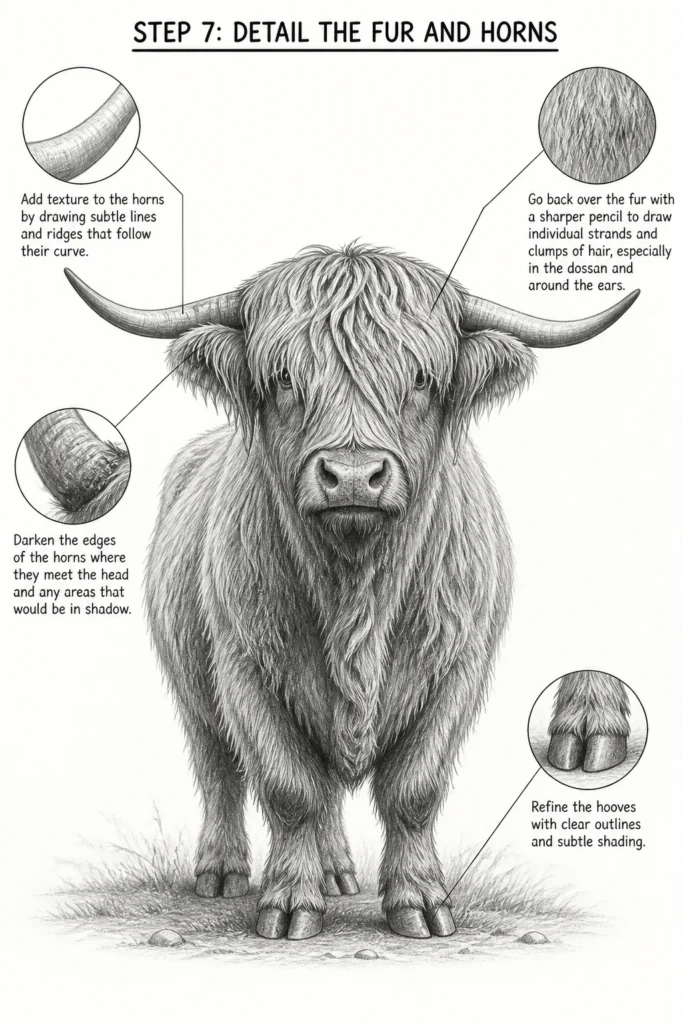
This stage requires patience and observation.
- Go back over the fur with a sharper pencil (2B or 4B) to draw individual strands and clumps of hair, especially in the dossan and around the ears.
- Use varied pressure to create different lengths and thicknesses of hair.
- Add texture to the horns by drawing subtle lines and ridges that follow their curve.
- Darken the edges of the horns where they meet the head and any areas that would be in shadow.
- Refine the hooves with clear outlines and subtle shading.
Step 8: Final Touches and Contrast
The final stage involves stepping back and making any necessary adjustments to enhance realism and visual impact.
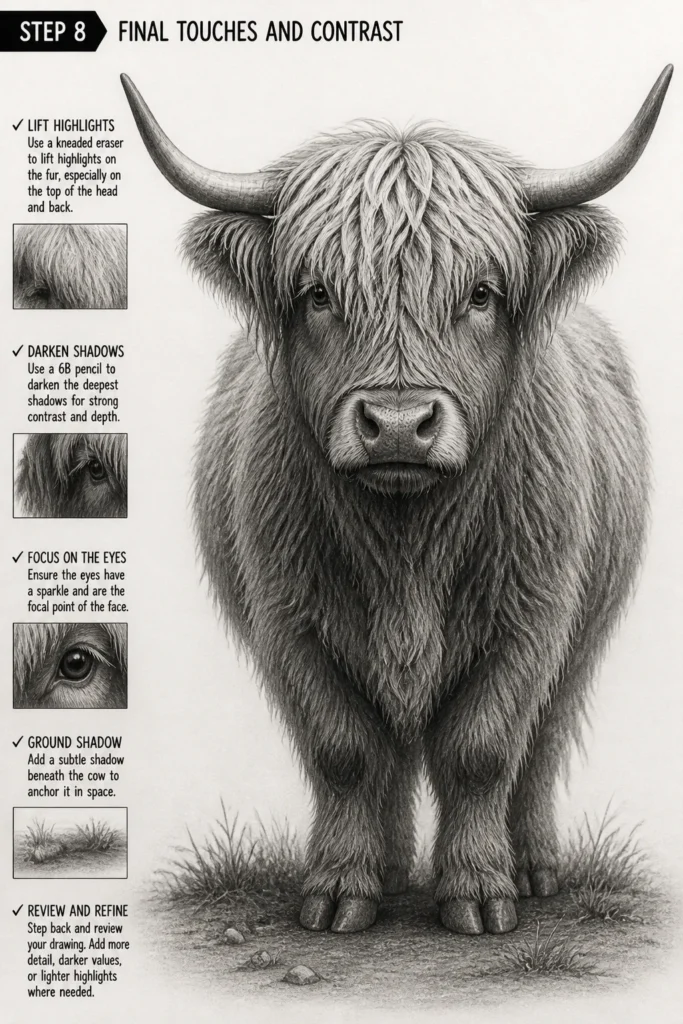
Contrast is key for making your drawing pop.
- Use your kneaded eraser to lift highlights on the fur, especially on the top of the head and back.
- Darken the deepest shadows (using a 6B pencil) to create strong contrast, making your cow appear more three-dimensional.
- Ensure the eyes have a sparkle and are truly the focal point of the face.
- Add a subtle ground shadow beneath the cow to anchor it in space.
- Review your entire drawing for any areas that need more detail, darker values, or lighter highlights.
Common Mistakes to Avoid
Ignoring Basic Proportions
A common pitfall is jumping straight into details without establishing the correct underlying shapes. This can lead to a drawing where the head is too big for the body or the legs are too short. Always start with light construction lines to map out the overall form and relationships between parts before adding fur or horns.
Making Fur Too Uniform
Highland cows are known for their wild, shaggy coats. Drawing every strand of hair in the same direction or with the same pressure will make the fur look stiff and unnatural. Vary your stroke length, direction, and pressure to create a dynamic, textured appearance, allowing some clumps to be darker and others to catch the light.
Flat Shading
Without proper shading, your drawing will appear two-dimensional and lack depth. Failing to identify a light source and consistently apply shadows and highlights will result in a flat image. Always think about where the light is coming from and how it would interact with the cow’s form, creating areas of dark shadow and bright highlight.
Neglecting the Forelock (Dossan)
The shaggy forelock is perhaps the most iconic feature of a Highland Cow. Some artists might make it too neat, too small, or forget its distinctive unruly quality. Ensure the dossan is prominent, covers part of the eyes, and shows plenty of individual, wild strands of hair to truly capture the breed’s character.
Troubleshooting
My Fur Looks Stiff and Unrealistic
If your fur lacks natural flow, you might be drawing individual strands too carefully or in too straight a line. Instead, focus on drawing clumps of fur with varying lengths and directions. Use a flicking motion with your pencil, letting your hand move freely to create organic, overlapping textures. Remember that fur isn’t perfectly straight; it has waves and curls.
I Can’t Get the Horns to Look Right
Horns can be tricky due to their three-dimensional curve. Often, they appear flat if you only draw the outline. Focus on their perspective: the horn closer to the viewer will appear larger and more detailed. Use construction lines to establish the overall curve and then add thickness. Introduce subtle lines and ridges along their length to give them a natural, textured appearance, and shade them to show their roundness.
My Drawing Lacks Depth and Dimension
This usually indicates a lack of contrast. You might be using too narrow a range of pencil values. To fix this, identify your darkest darks and lightest lights. Use a softer pencil (like a 6B or 8B) to deepen the shadows, such as under the chin, beneath the belly, and within the densest parts of the fur. Simultaneously, use a kneaded eraser to lift graphite and create brighter highlights on the most prominent areas. Strong contrast makes objects pop off the page.
Key Takeaways
- Always start with light, basic shapes to establish correct proportions and placement.
- Observe reference images closely to understand the unique characteristics of Highland Cows, especially their fur and horns.
- Build up fur texture using varied, overlapping strokes that follow the hair’s natural direction.
- Layer your shading from light to dark to create depth and a three-dimensional effect.
- Emphasize contrast by pushing your darkest darks and lifting your brightest highlights.
- The forelock (dossan) is a defining feature; ensure it is shaggy and prominent.
Frequently Asked Questions
What’s the best way to make the fur look really shaggy?
The key to shaggy fur is to use a variety of strokes. Don’t draw every hair; instead, draw clumps of hair. Use short, quick, overlapping strokes in different directions, letting some strands extend beyond the main outline. Vary your pencil pressure—lighter for wispy hairs, heavier for denser clumps. A kneaded eraser can also be used to lift out fine, wispy highlights on the fur.
How do I make the eyes look soulful?
Soulful eyes come from careful placement and contrast. Ensure the eyes are correctly positioned within the head, often slightly obscured by the dossan. Make the pupil very dark and add a tiny, bright highlight to one side, reflecting a light source. This tiny sparkle brings life to the eye. Also, shade the area around the eyes to give them depth and a slightly recessed look.
Can I draw a Highland Cow in different poses?
Absolutely! Once you understand the basic anatomy and proportions, you can adapt it to various poses. Start each new pose by sketching the basic shapes (ovals for body and head) in the desired orientation. Pay attention to how the limbs bend and how the fur would hang in that specific stance. Reference photos of Highland Cows in different positions will be invaluable.
Our Top Recommended Finds
- Sketchbook with Quality Paper: A good heavyweight paper (at least 80lb/120gsm) holds graphite well and withstands erasing, preventing tears or excessive smudging.
- Graphite Pencil Set (HB-8B): Having a range of hardness allows you to achieve everything from light construction lines to the deepest, darkest shadows, crucial for realistic fur and depth.
- Blending Stumps and Tortillions: These paper tools are essential for smoothing out graphite, creating soft transitions, and reaching small areas without using your fingers, which can transfer oils.
Unleash Your Inner Artist
You’ve now walked through the steps to draw one of nature’s most endearing creatures.
The joy of creating art comes from practice and patience, so don’t hesitate to try it again, perhaps experimenting with different angles or expressions.
Why not explore drawing other shaggy animals next, or even try adding a scenic background to your Highland Cow portrait?
Grab your pencils and start sketching your own magnificent coo today!