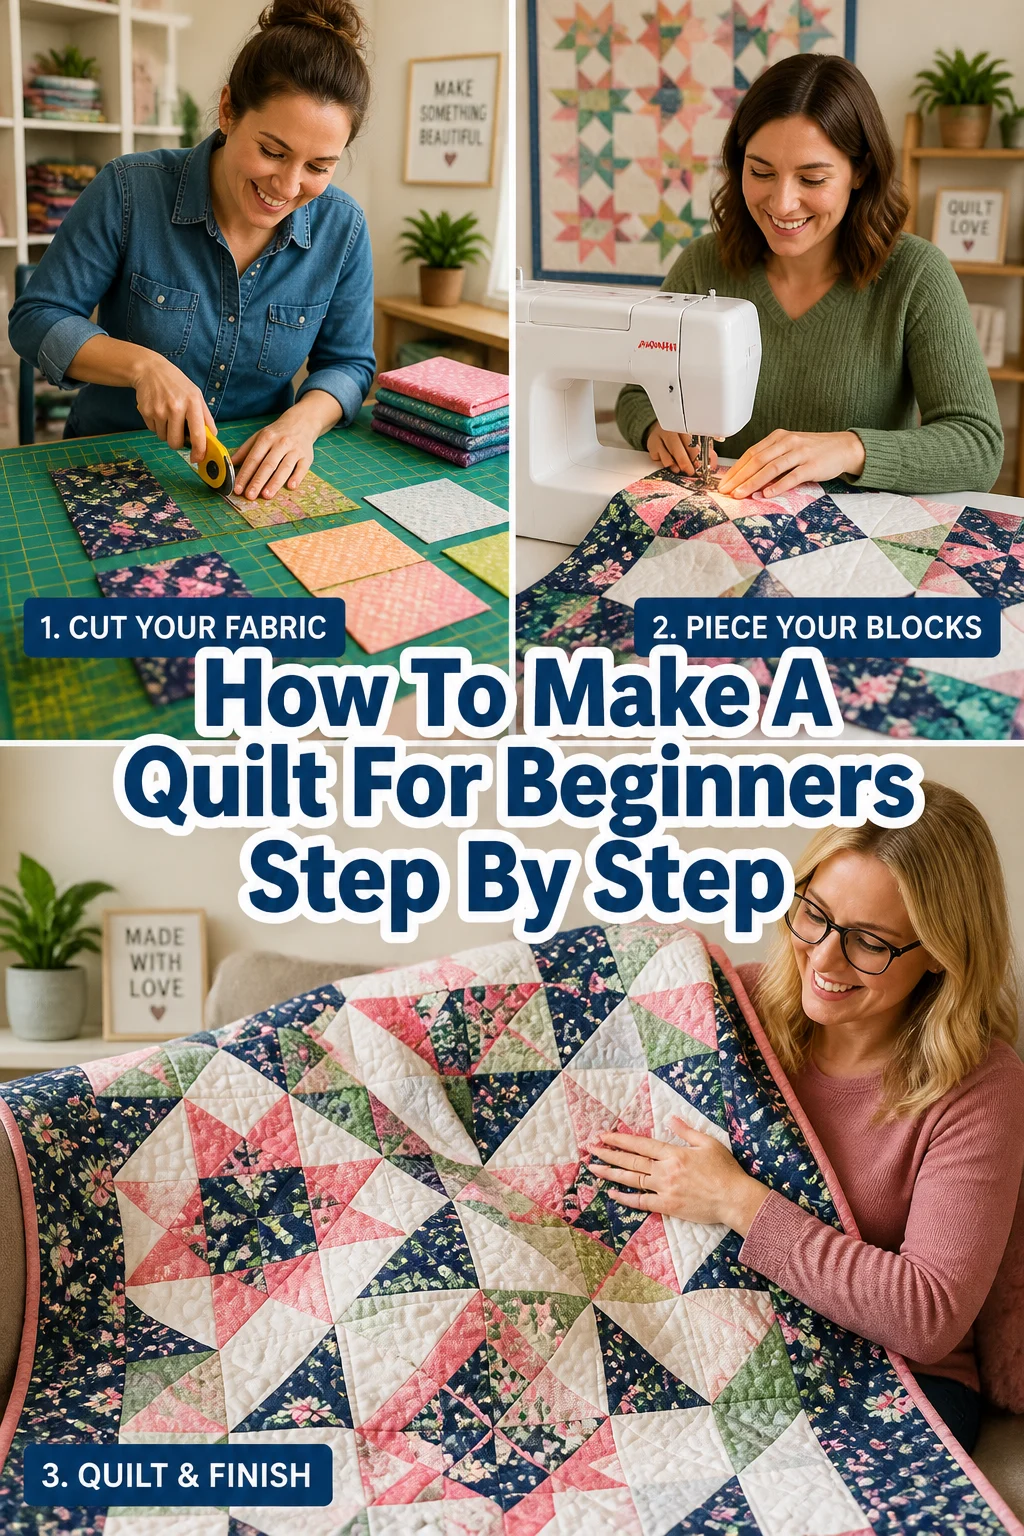
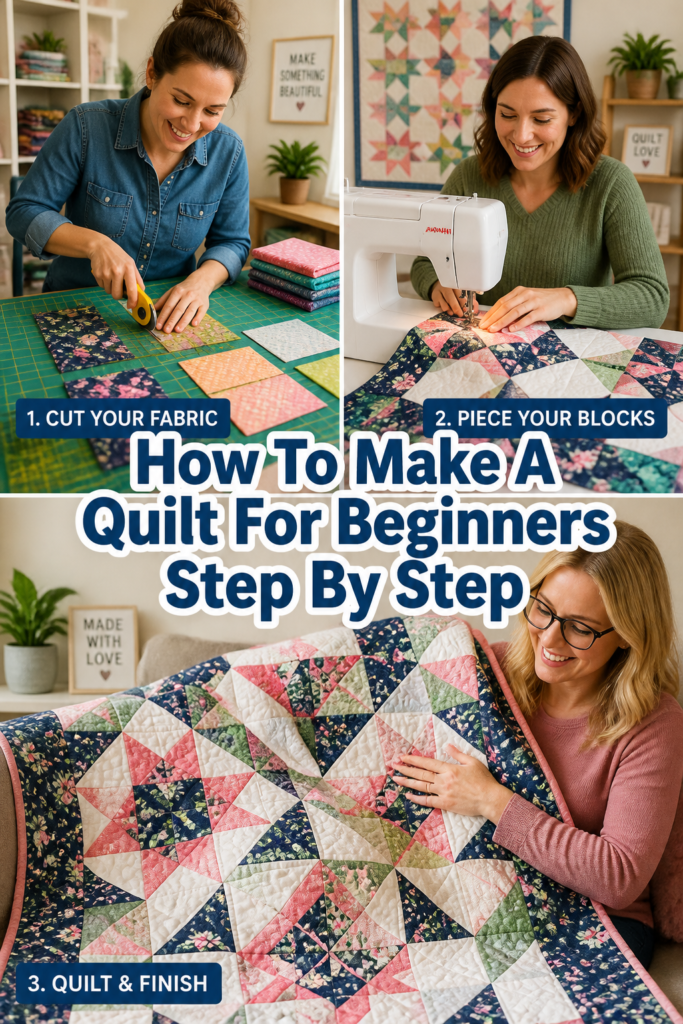
🧵 How To Make A Quilt For Beginners Step By Step
Embarking on your first quilting project is an incredibly rewarding journey.
I remember the joy and slight apprehension of cutting my first fabric squares, wondering if they would ever come together into something beautiful.
This guide distills years of personal experience into easy-to-follow steps, ensuring your first quilt is a success.
Quick Overview
This comprehensive guide will walk you through creating a simple, yet stunning, beginner-friendly quilt. You’ll learn essential techniques from fabric selection to the final binding, building a solid foundation for future quilting adventures.
- Time needed: 20-30 hours (spread over several days/weeks)
- Difficulty: Beginner
- What you’ll need: Fabric, batting, backing, thread, rotary cutter, cutting mat, quilting ruler, sewing machine, iron, pins, scissors.
Step-by-Step Instructions
Step 1: Gather Your Supplies
Before any stitches are made, having the right tools and materials is crucial.
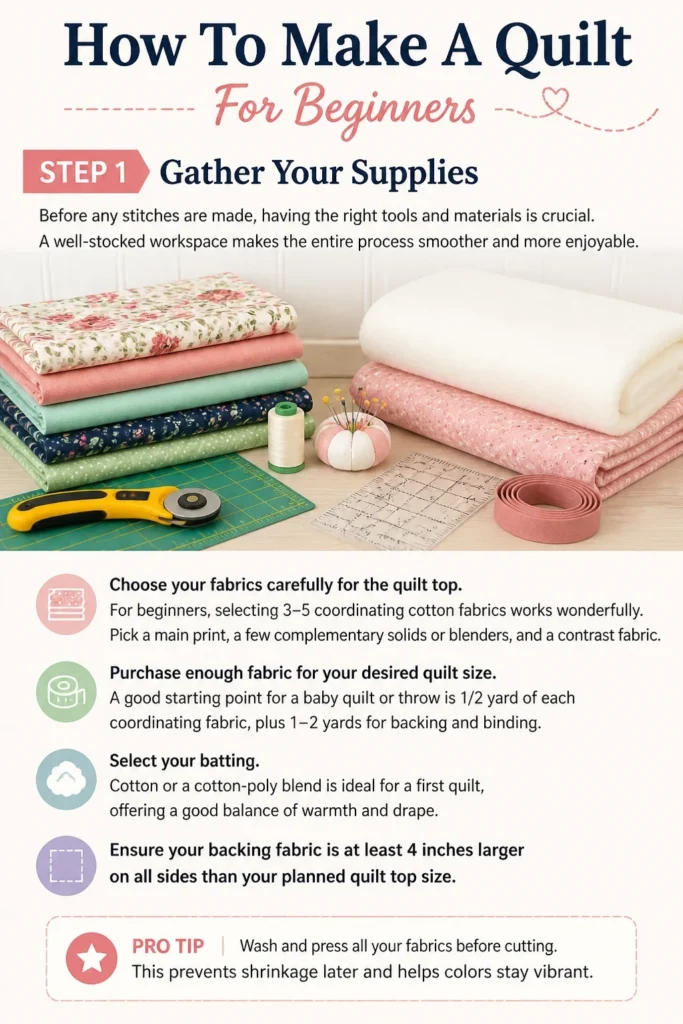
A well-stocked workspace makes the entire process smoother and more enjoyable.
Choose your fabrics carefully for the quilt top. For beginners, selecting 3-5 coordinating cotton fabrics works wonderfully.
Pick a main print, a few complementary solids or blenders, and a contrast fabric.
Purchase enough fabric for your desired quilt size. A good starting point for a baby quilt or throw is 1/2 yard of each coordinating fabric, plus 1-2 yards for backing and binding.
Select your batting. Cotton or a cotton-poly blend is ideal for a first quilt, offering a good balance of warmth and drape.
Ensure your backing fabric is at least 4 inches larger on all sides than your planned quilt top size.
Pro Tip: Wash and press all your fabrics before cutting. This pre-shrinks them and removes any sizing, preventing puckering after your quilt is finished.
Step 2: Prepare Your Fabric
Accurate cutting is the cornerstone of a successful quilt.
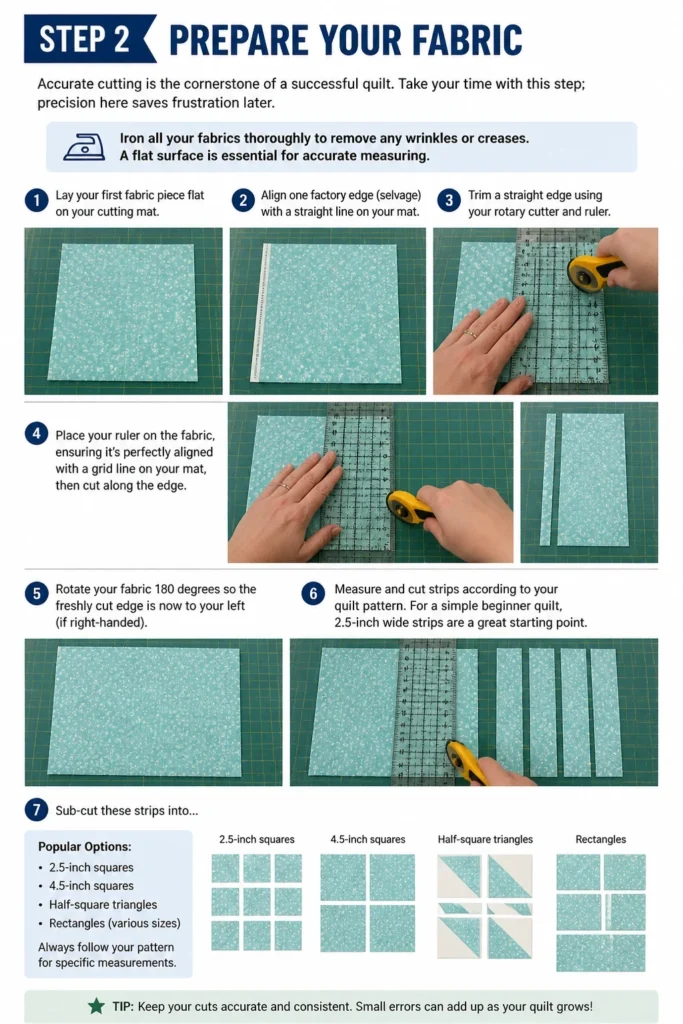
Take your time with this step; precision here saves frustration later.
Iron all your fabrics thoroughly to remove any wrinkles or creases. A flat surface is essential for accurate measuring.
Lay your first fabric piece flat on your cutting mat. Align one factory edge (selvage) with a straight line on your mat.
Trim a straight edge using your rotary cutter and ruler. Place your ruler on the fabric, ensuring it’s perfectly aligned with a grid line on your mat, then cut along the edge.
Rotate your fabric 180 degrees so the freshly cut edge is now to your left (if right-handed).
Measure and cut strips according to your quilt pattern. For a simple beginner quilt, 2.5-inch wide strips are a great starting point.
Sub-cut these strips into squares. For example, cut 2.5-inch strips into 2.5-inch squares.
Pro Tip: Always use a sharp rotary blade. A dull blade can snag fabric and lead to inaccurate cuts, which will affect how your pieces fit together.
Step 3: Design Your Quilt Top Layout
This is where your quilt starts to take shape and your creativity shines.
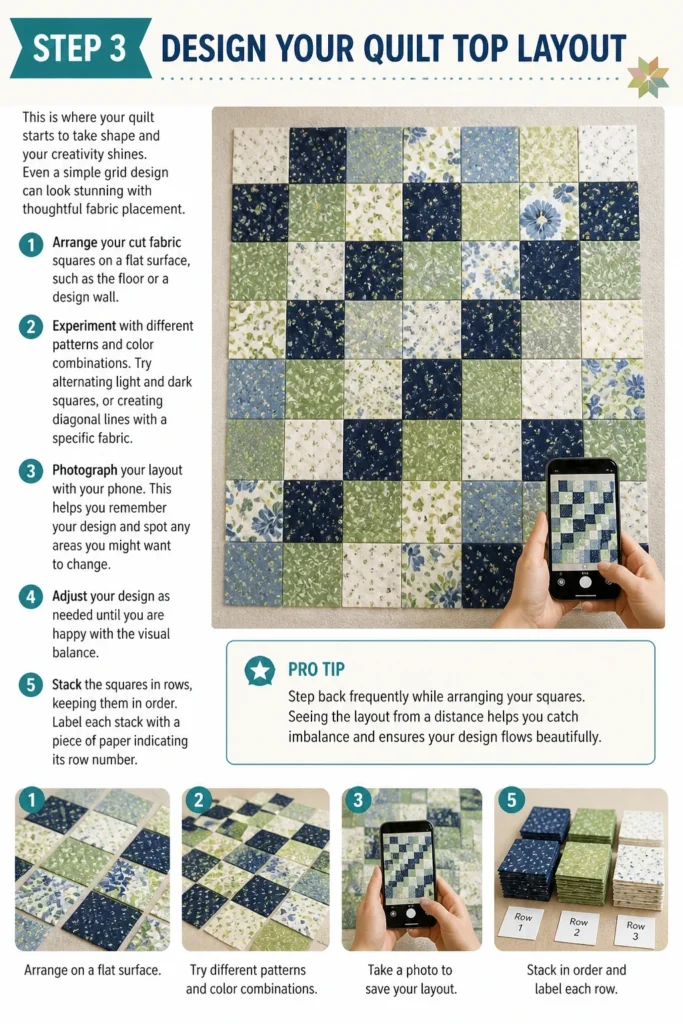
Even a simple grid design can look stunning with thoughtful fabric placement.
Arrange your cut fabric squares on a flat surface, such as the floor or a design wall.
Experiment with different patterns and color combinations. Try alternating light and dark squares, or creating diagonal lines with a specific fabric.
Photograph your layout with your phone. This helps you remember your design and spot any areas you might want to change.
Adjust your design as needed until you are happy with the visual balance.
Stack the squares in rows, keeping them in order. Label each stack with a piece of paper indicating its row number.
Pro Tip: Step back frequently while arranging your squares. Seeing the layout from a distance helps you evaluate the overall flow and balance of colors.
Step 4: Piece Your Quilt Rows
Now the sewing begins! This step involves joining your individual squares into longer rows.
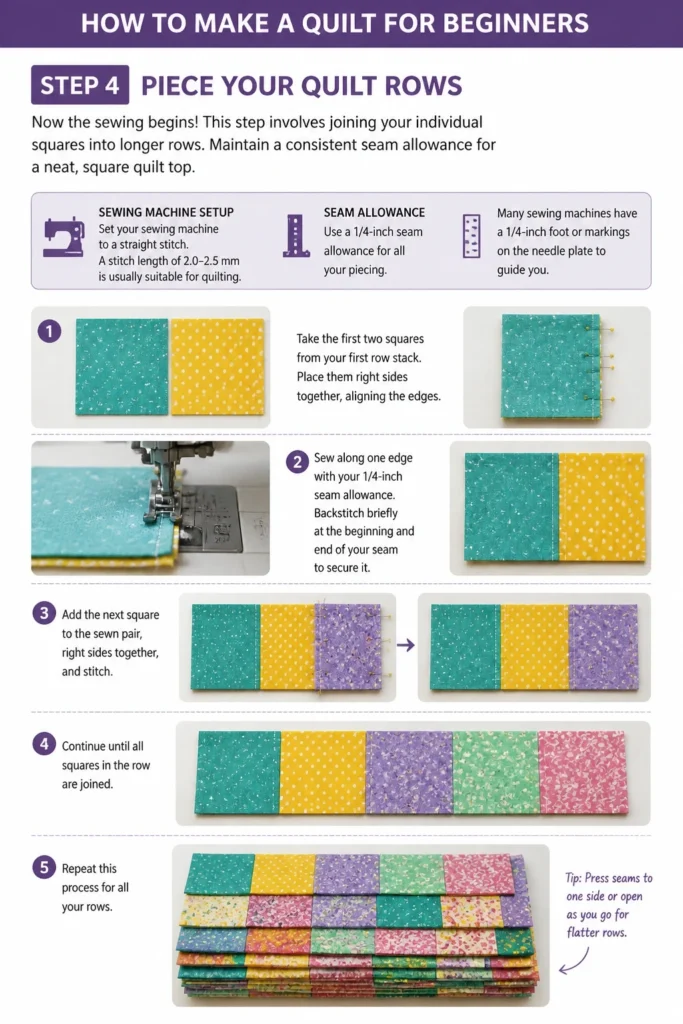
Maintain a consistent seam allowance for a neat, square quilt top.
Set your sewing machine to a straight stitch. A stitch length of 2.0-2.5 mm is usually suitable for quilting.
Use a 1/4-inch seam allowance for all your piecing. Many sewing machines have a 1/4-inch foot or markings on the needle plate to guide you.
Take the first two squares from your first row stack. Place them right sides together, aligning the edges.
Sew along one edge with your 1/4-inch seam allowance. Backstitch briefly at the beginning and end of your seam to secure it.
Add the next square to the sewn pair, right sides together, and stitch. Continue until all squares in the row are joined.
Repeat this process for all your rows.
Pro Tip: Chain piecing can save time. Instead of cutting threads after each seam, feed the next two squares directly under the needle, creating a “chain” of sewn pairs. You can snip them apart later.
Step 5: Press Your Seams
Pressing is just as important as sewing for a flat, professional-looking quilt.
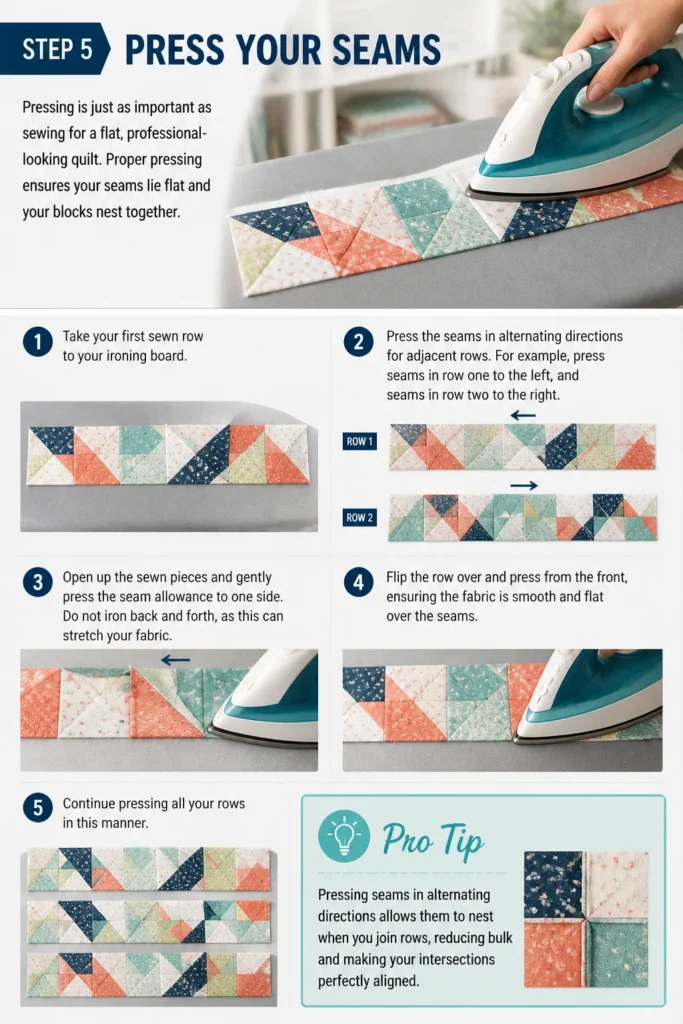
Proper pressing ensures your seams lie flat and your blocks nest together.
Take your first sewn row to your ironing board.
Press the seams in alternating directions for adjacent rows. For example, press seams in row one to the left, and seams in row two to the right.
Open up the sewn pieces and gently press the seam allowance to one side. Do not iron back and forth, as this can stretch your fabric.
Flip the row over and press from the front, ensuring the fabric is smooth and flat over the seams.
Continue pressing all your rows in this manner.
Pro Tip: Pressing seams in alternating directions allows them to “nest” when you join rows, reducing bulk and making your intersections perfectly aligned.
Step 6: Join Your Quilt Rows
Now you’ll connect your individual rows to form the complete quilt top.
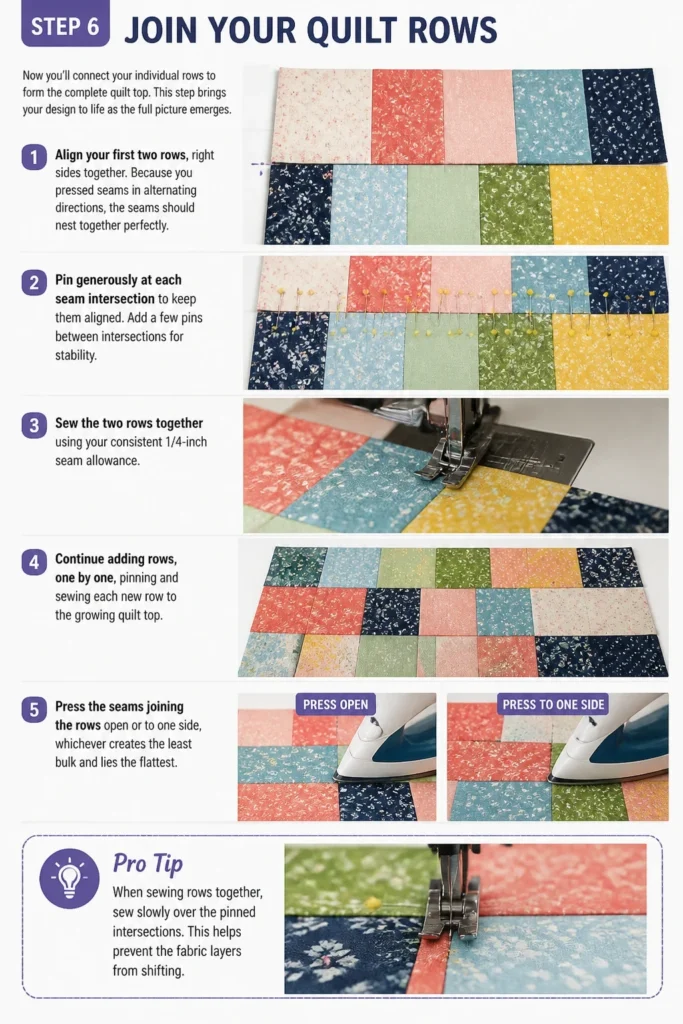
This step brings your design to life as the full picture emerges.
Align your first two rows, right sides together. Because you pressed seams in alternating directions, the seams should “nest” together perfectly.
Pin generously at each seam intersection to keep them aligned. Add a few pins between intersections for stability.
Sew the two rows together using your consistent 1/4-inch seam allowance.
Continue adding rows, one by one, pinning and sewing each new row to the growing quilt top.
Press the seams joining the rows open or to one side, whichever creates the least bulk and lies the flattest.
Pro Tip: When sewing rows together, sew slowly over the pinned intersections. This helps prevent the fabric layers from shifting and ensures your points match up nicely.
Step 7: Create the Quilt Sandwich
The “quilt sandwich” is the three layers of your quilt: backing, batting, and quilt top.
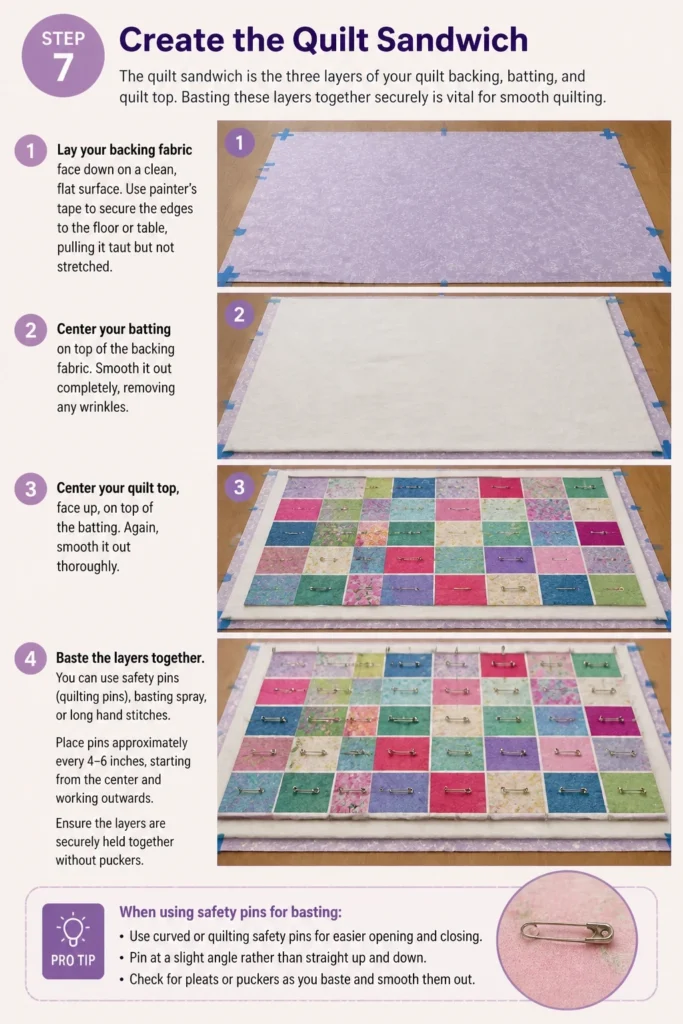
Basting these layers together securely is vital for smooth quilting.
Lay your backing fabric face down on a clean, flat surface. Use painter’s tape to secure the edges to the floor or table, pulling it taut but not stretched.
Center your batting on top of the backing fabric. Smooth it out completely, removing any wrinkles.
Center your quilt top, face up, on top of the batting. Again, smooth it out thoroughly.
Baste the layers together. You can use safety pins (quilting pins), basting spray, or long hand stitches.
Place pins approximately every 4-6 inches, starting from the center and working outwards. Ensure the layers are securely held together without puckers.
Pro Tip: When using safety pins for basting, use curved quilting pins. They are easier to open and close through multiple layers of fabric.
Step 8: Quilt Your Layers
Quilting is the process of stitching through all three layers of the quilt sandwich.
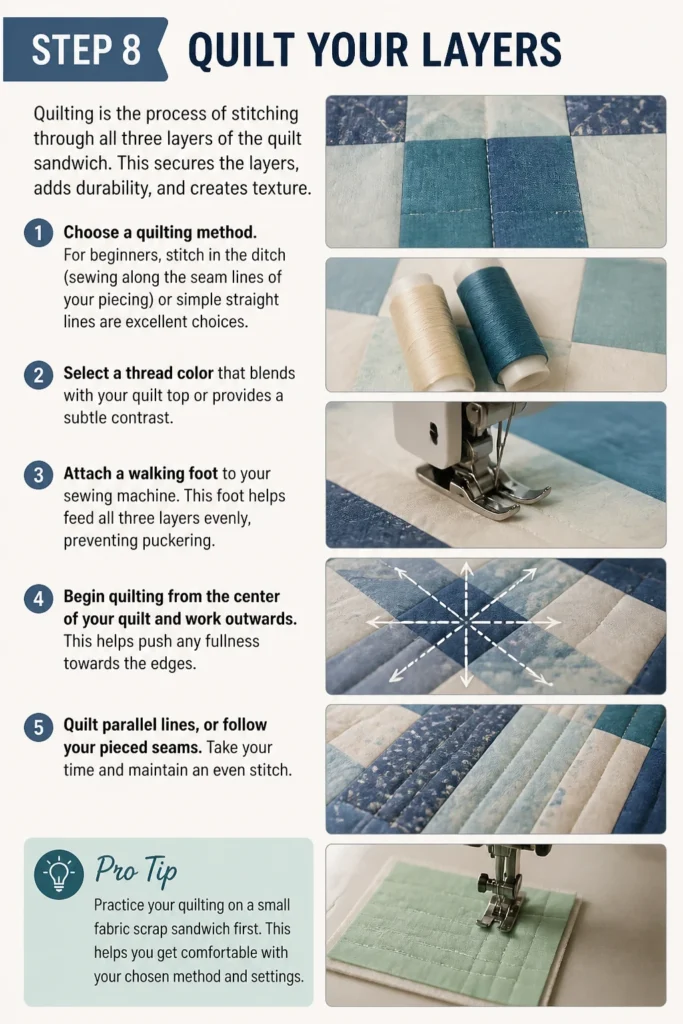
This secures the layers, adds durability, and creates texture.
Choose a quilting method. For beginners, “stitch in the ditch” (sewing along the seam lines of your piecing) or simple straight lines are excellent choices.
Select a thread color that blends with your quilt top or provides a subtle contrast.
Attach a walking foot to your sewing machine. This foot helps feed all three layers evenly, preventing puckering.
Begin quilting from the center of your quilt and work outwards. This helps push any fullness towards the edges.
Quilt parallel lines, or follow your pieced seams. Take your time and maintain an even stitch.
Pro Tip: Practice your quilting on a small fabric scrap sandwich first. This helps you get a feel for the walking foot and your stitch length before working on your actual quilt.
Step 9: Trim and Square Up
Once your quilting is complete, it’s time to make your quilt edges perfectly straight.
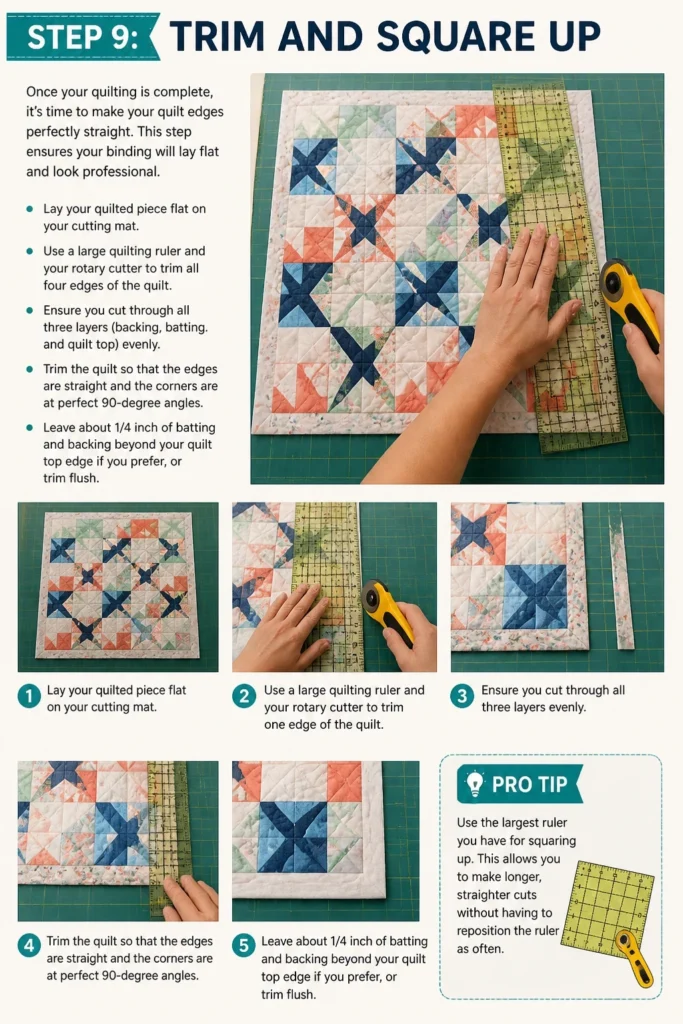
This step ensures your binding will lay flat and look professional.
Lay your quilted piece flat on your cutting mat.
Use a large quilting ruler and your rotary cutter to trim all four edges of the quilt.
Ensure you cut through all three layers (backing, batting, and quilt top) evenly.
Trim the quilt so that the edges are straight and the corners are at perfect 90-degree angles.
Leave about 1/4 inch of batting and backing beyond your quilt top edge if you prefer, or trim flush.
Pro Tip: Use the largest ruler you have for squaring up. This allows you to make longer, straighter cuts without having to reposition the ruler as often.
Step 10: Attach the Binding
Binding is the final border that finishes the raw edges of your quilt, providing a neat and durable finish.
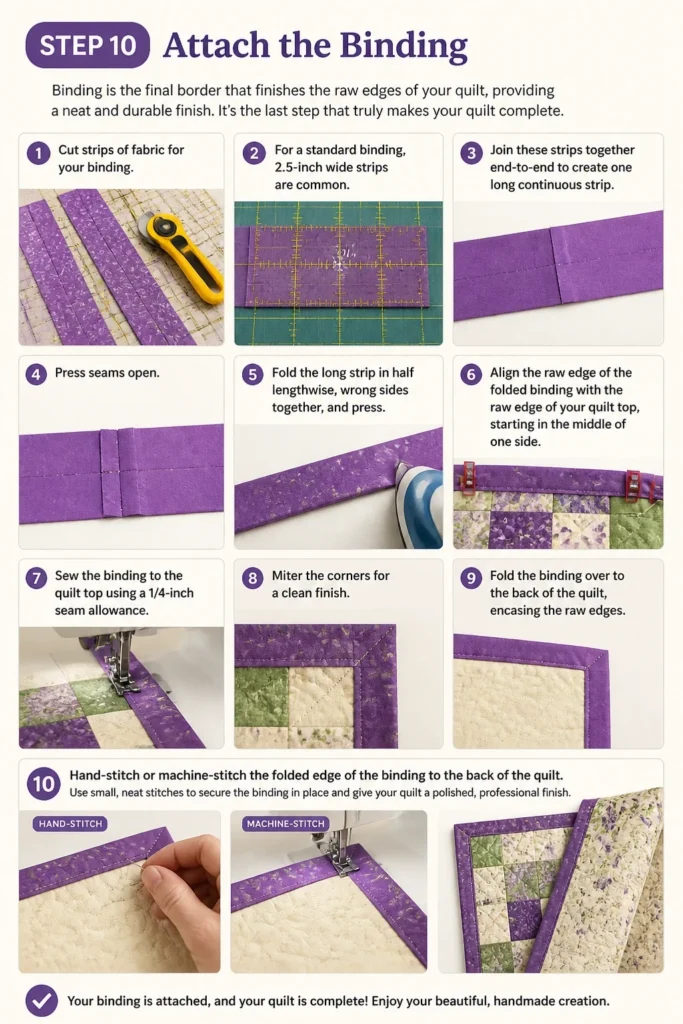
It’s the last step that truly makes your quilt complete.
Cut strips of fabric for your binding. For a standard binding, 2.5-inch wide strips are common.
Join these strips together end-to-end to create one long continuous strip. Press seams open.
Fold the long strip in half lengthwise, wrong sides together, and press.
Align the raw edge of the folded binding with the raw edge of your quilt top, starting in the middle of one side.
Sew the binding to the quilt top using a 1/4-inch seam allowance. Miter the corners for a clean finish.
Fold the binding over to the back of the quilt, encasing the raw edges.
Hand-stitch or machine-stitch the folded edge of the binding to the back of the quilt.
Pro Tip: Leave a 6-inch tail at both the start and end of your binding strip. When you’ve sewn almost all the way around, join these tails together with a diagonal seam for an invisible finish. There are many great tutorials online for this technique!
Common Mistakes to Avoid
Inconsistent Seam Allowance
Using a seam allowance that varies from 1/4 inch can lead to blocks that don’t fit together. This creates a wavy quilt top or misaligned points.
Always use a consistent 1/4-inch seam. Invest in a 1/4-inch foot for your machine or use painter’s tape as a guide to ensure accuracy.
Skipping Pressing Steps
Many beginners rush through or skip pressing, thinking it’s less important than sewing. Poor pressing results in bulky seams and a quilt top that doesn’t lie flat.
Pressing is a crucial step after every seam. It sets stitches, flattens fabric, and prepares pieces for accurate joining, making your quilt much more professional.
Not Squaring Up Fabric
Starting with fabric that isn’t cut perfectly straight can throw off all subsequent cuts. This leads to wonky blocks and a distorted quilt top.
Always trim one edge of your fabric straight before making any other cuts. Use your rotary cutter and ruler with a cutting mat for precise, 90-degree angles.
Rushing the Basting Process
Improper basting, such as using too few pins or not smoothing layers, can cause puckers, tucks, or shifting during quilting. This results in an unevenly quilted surface.
Take your time to lay out and baste your quilt sandwich thoroughly. Ensure all layers are smooth and securely pinned every few inches, working from the center outwards.
Troubleshooting
My Quilt Top is Wavy or Not Square
This often happens due to inconsistent seam allowances or stretching fabric during sewing. Even a tiny difference over many seams can add up.
Try to gently stretch and block your quilt top by misting it with water and pinning it to a large, flat surface. For future projects, double-check your 1/4-inch seam allowance frequently and avoid pulling fabric through your machine.
My Quilt Blocks Don’t Match Up
Misaligned points and seams usually stem from inaccurate cutting or pressing seams in inconsistent directions. It’s a common beginner hurdle.
When joining rows, ensure your seams are pressed in alternating directions so they “nest” together. Pin generously at each intersection. If points are slightly off, a small amount of steam and careful pressing can sometimes help.
Puckers or Tucks While Quilting
These issues typically arise from inadequate basting or not using a walking foot. The top and bottom layers might be feeding at different rates.
Ensure your quilt sandwich is thoroughly basted with plenty of pins. Always use a walking foot when machine quilting to help all layers feed evenly. If puckers appear, try to gently smooth the fabric ahead of the needle.
Key Takeaways
- Precision is paramount: Accurate cutting and consistent seam allowances are the foundation of a great quilt.
- Pressing is powerful: Don’t skip pressing; it flattens seams and helps your quilt lie perfectly flat.
- Basting matters: Securely basting your quilt sandwich prevents shifting and puckering during quilting.
- Start simple: Choose a straightforward pattern for your first quilt to build confidence and master basic techniques.
- Enjoy the process: Quilting is a journey of creativity and patience. Embrace imperfections as part of your unique creation.
- Patience pays off: Take your time with each step; rushing often leads to mistakes that are harder to fix later.
Frequently Asked Questions
What kind of fabric is best for a beginner’s quilt?
100% quilting cotton is highly recommended for beginners. It’s easy to cut, sew, and press, and it holds its shape well. Avoid slippery or stretchy fabrics for your first project.
Do I really need a rotary cutter and mat?
While you can cut with scissors, a rotary cutter, mat, and quilting ruler are game-changers for accuracy and efficiency. They are essential tools for achieving precise, repeatable cuts, which are crucial for successful quilting.
How do I choose batting for my quilt?
For a beginner, a 100% cotton or 80/20 cotton-poly blend batting is a great choice. Cotton is breathable and drapes well, while the blend offers a bit more loft and resilience. Pay attention to the recommended quilting distance on the batting package.
Can I machine wash my finished quilt?
Yes, most cotton quilts are machine washable. Use a gentle cycle with cold water and a mild detergent. Tumble dry on low heat or air dry flat to prevent shrinkage and preserve the quilt’s integrity.
Our Top Recommended Finds
- Omnigrid 6″ x 24″ Quilting Ruler: Ideal for cutting long strips and squaring up larger pieces with clear markings.
- Fiskars 45mm Rotary Cutter: A comfortable, reliable tool for precise fabric cutting, essential for any quilter.
- June Tailor Shape Cut Pro Slotted Ruler: Speeds up repetitive cutting, making it easier to cut multiple squares or strips quickly and accurately.
Your First Stitch Awaits
You now have a solid roadmap to create your very first quilt.
The satisfaction of seeing your fabric pieces transform into a cozy, handmade treasure is truly unmatched.
Don’t hesitate to dive in and let your creativity flow.
Perhaps your next project could be exploring different block patterns or trying out free-motion quilting techniques.
Gather your supplies today and start stitching a piece of your own history.