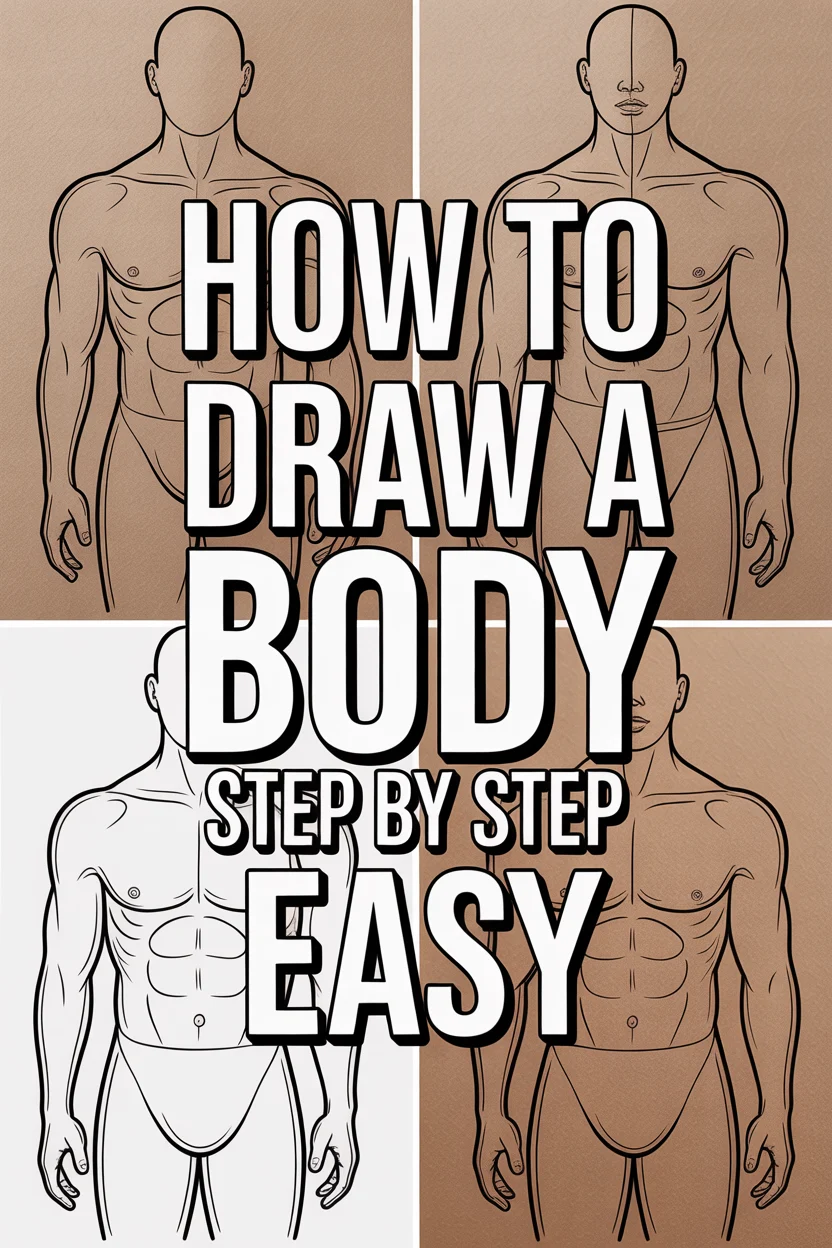
✏️ How To Draw A Body Step By Step Easy
Drawing a body can seem like a huge challenge at first. Many people feel intimidated by the complexity of human anatomy.
I remember starting out, feeling overwhelmed by all the muscles and bones. But I quickly learned that breaking it down into simple shapes makes all the difference.
This guide will show you how to build a body drawing from the ground up, making it accessible and enjoyable for everyone.
Quick Overview
You’re about to learn a straightforward method for sketching the human form. This approach focuses on fundamental shapes and proportions, setting a strong foundation for your artistic journey.
Here’s what you can expect:
- Time needed: 45-75 minutes (for initial sketch and refinement)
- Difficulty: Beginner
- What you’ll need: Pencil (HB or 2B), paper, eraser (kneaded or regular)
Step-by-Step Instructions
Step 1: Gather Your Tools and Relax
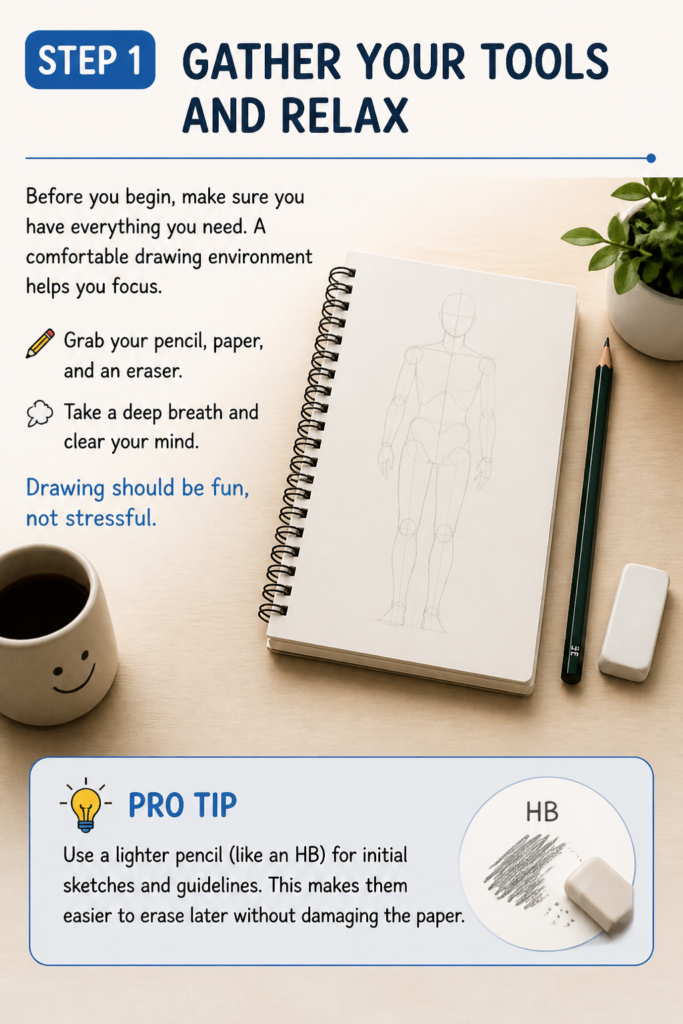
Before you begin, make sure you have everything you need. A comfortable drawing environment helps you focus.
Grab your pencil, paper, and an eraser. Take a deep breath and clear your mind.
Drawing should be fun, not stressful.
Pro Tip: Use a lighter pencil (like an HB) for initial sketches and guidelines. This makes them easier to erase later without damaging the paper.
Step 2: Start with a Simple Stick Figure Gesture
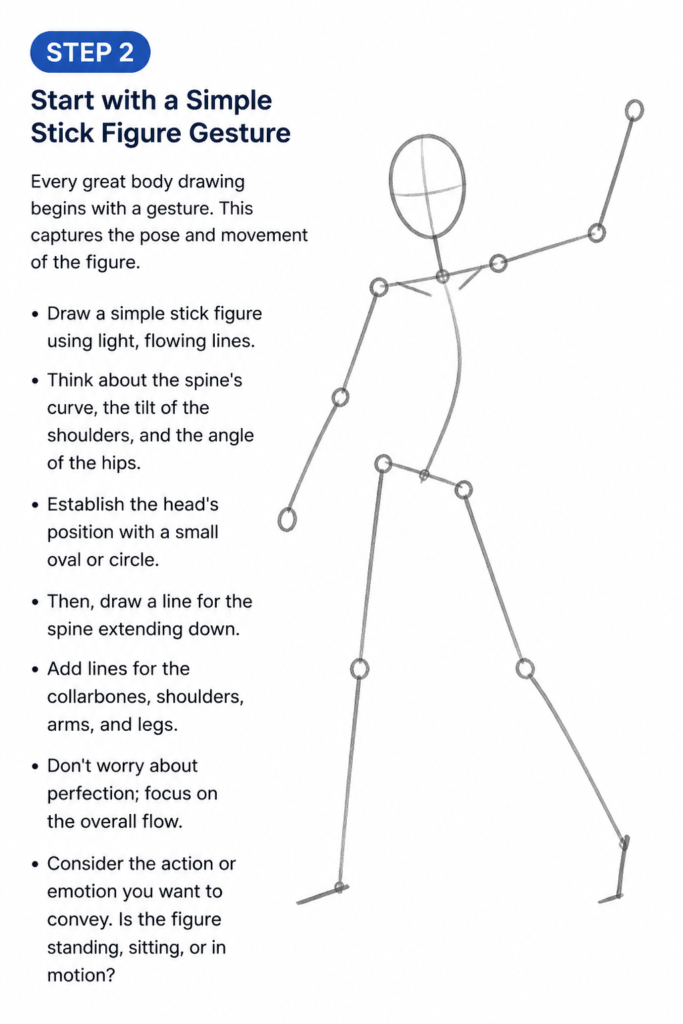
Every great body drawing begins with a gesture. This captures the pose and movement of the figure.
Draw a simple stick figure using light, flowing lines. Think about the spine’s curve, the tilt of the shoulders, and the angle of the hips.
Establish the head’s position with a small oval or circle. Then, draw a line for the spine extending down.
Add lines for the collarbones, shoulders, arms, and legs. Don’t worry about perfection; focus on the overall flow.
Consider the action or emotion you want to convey. Is the figure standing, sitting, or in motion?
Step 3: Define the Head and Neck
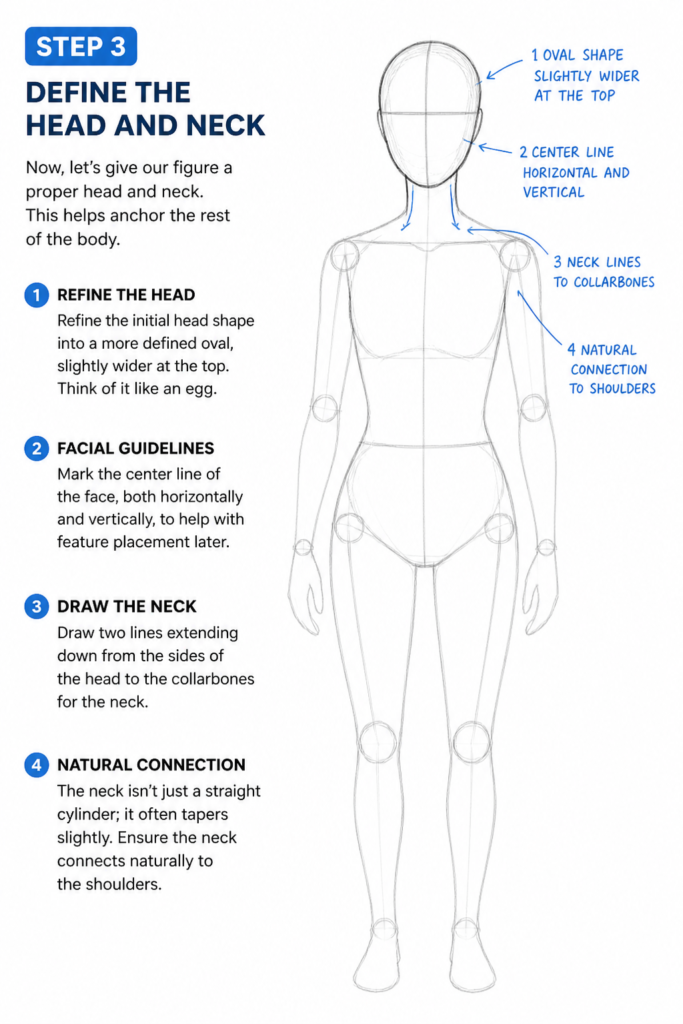
Now, let’s give our figure a proper head and neck. This helps anchor the rest of the body.
Refine the initial head shape into a more defined oval, slightly wider at the top. Think of it like an egg.
Mark the center line of the face, both horizontally and vertically, to help with feature placement later.
Draw two lines extending down from the sides of the head to the collarbones for the neck. The neck isn’t just a straight cylinder; it often tapers slightly.
Ensure the neck connects naturally to the shoulders.
Step 4: Block Out the Torso (Rib Cage & Pelvis)
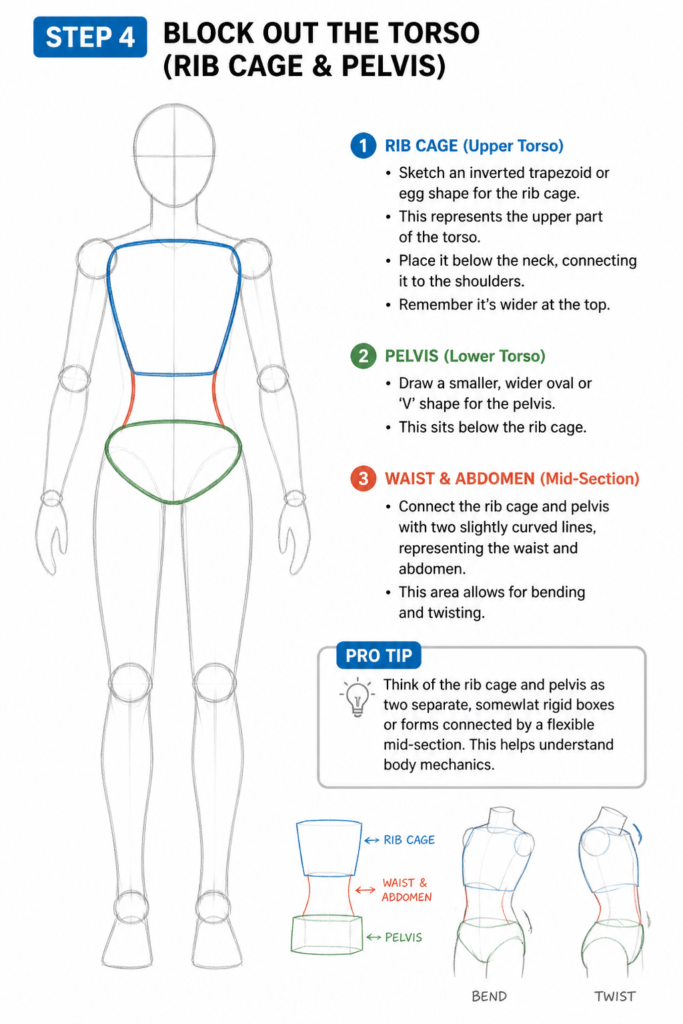
The torso is the core of the body, providing structure and volume. We’ll break it into two main parts.
Sketch an inverted trapezoid or an egg shape for the rib cage. This represents the upper part of the torso.
Place it below the neck, connecting it to the shoulders. Remember it’s wider at the top.
Draw a smaller, wider oval or ‘V’ shape for the pelvis. This sits below the rib cage.
Connect the rib cage and pelvis with two slightly curved lines, representing the waist and abdomen. This area allows for bending and twisting.
Pro Tip: Think of the rib cage and pelvis as two separate, somewhat rigid boxes or forms connected by a flexible mid-section. This helps understand body mechanics.
Step 5: Add Limbs with Simple Shapes
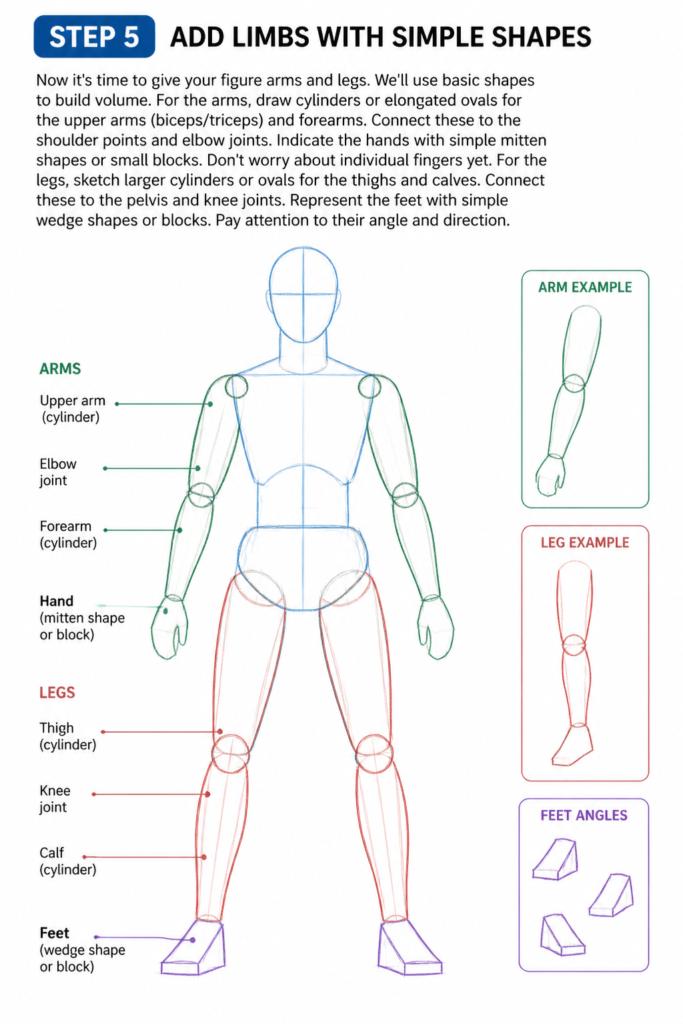
Now it’s time to give your figure arms and legs. We’ll use basic shapes to build volume.
For the arms, draw cylinders or elongated ovals for the upper arms (biceps/triceps) and forearms. Connect these to the shoulder points and elbow joints.
Indicate the hands with simple mitten shapes or small blocks. Don’t worry about individual fingers yet.
For the legs, sketch larger cylinders or ovals for the thighs and calves. Connect these to the pelvis and knee joints.
Represent the feet with simple wedge shapes or blocks. Pay attention to their angle and direction.
Step 6: Connect the Joints
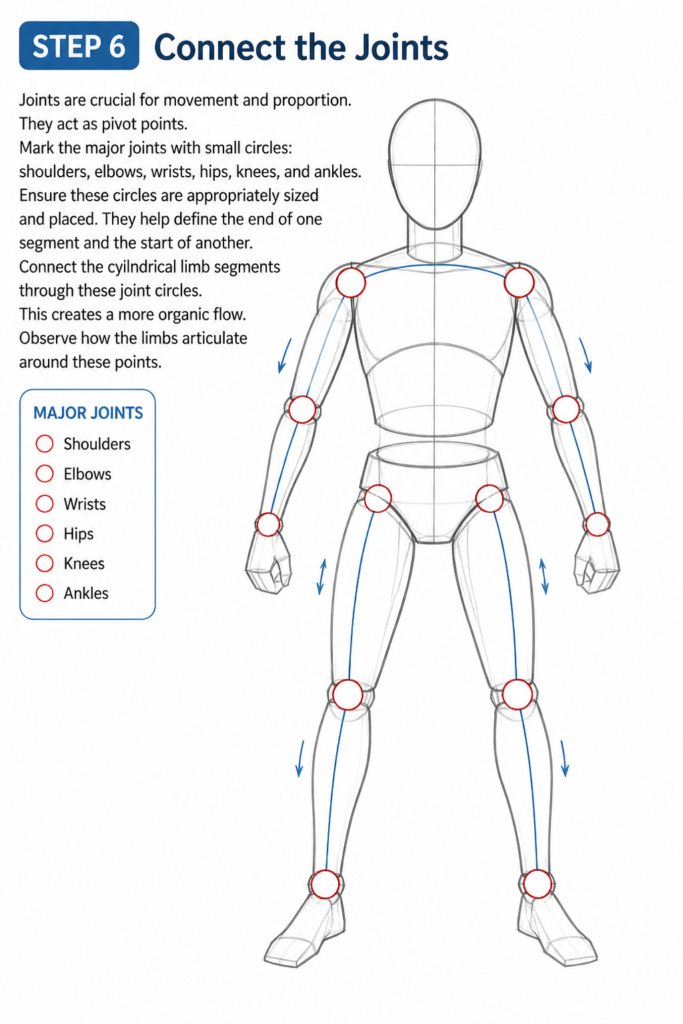
Joints are crucial for movement and proportion. They act as pivot points.
Mark the major joints with small circles: shoulders, elbows, wrists, hips, knees, and ankles.
Ensure these circles are appropriately sized and placed. They help define the end of one segment and the start of another.
Connect the cylindrical limb segments through these joint circles. This creates a more organic flow.
Observe how the limbs articulate around these points.
Step 7: Refine the Form and Add Volume
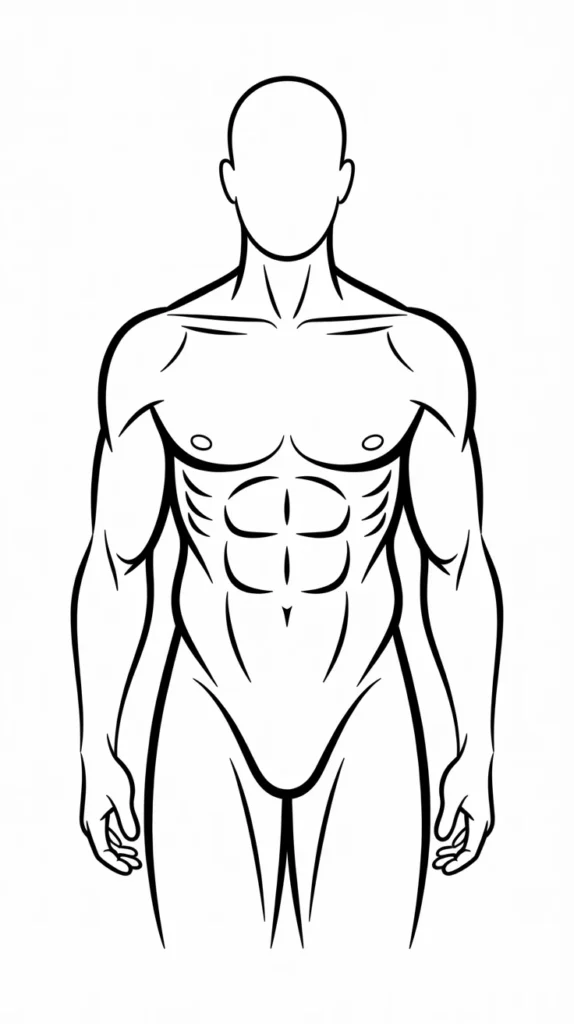
With the basic structure in place, it’s time to add more natural curves and volume. This brings your figure to life.
Smooth out the straight lines and sharp angles of your initial shapes. Think about where muscles would bulge slightly.
Add subtle curves to the torso, arms, and legs. The human body is rarely perfectly straight.
Consider the natural flow of the body. The lines should feel dynamic and organic, not stiff.
Use your reference (if you have one) to guide these refinements.
Step 8: Clean Up and Outline
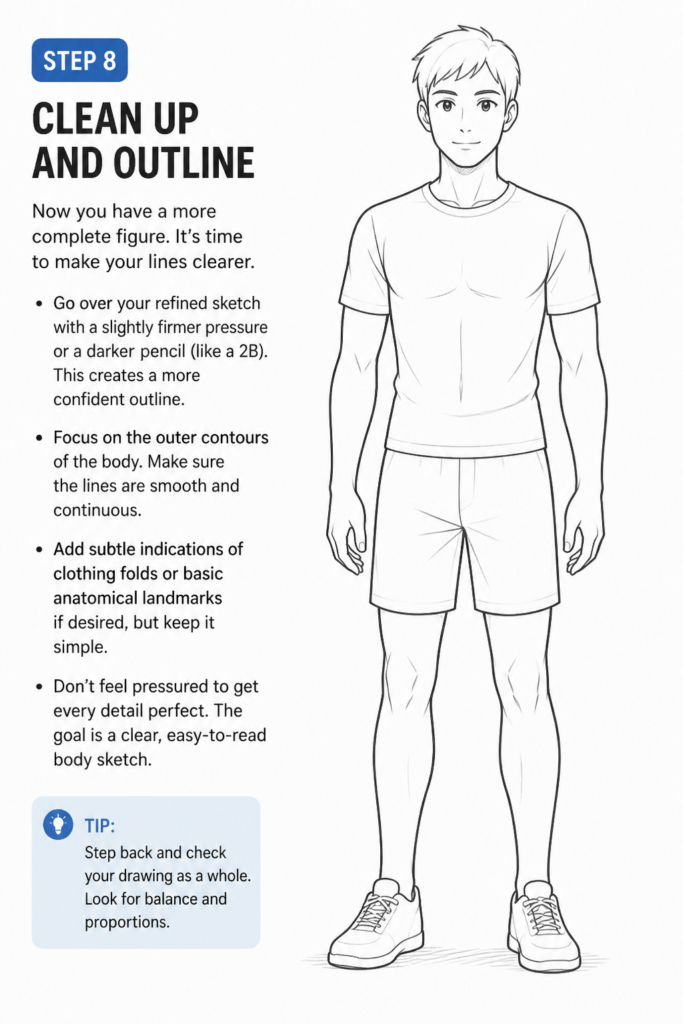
Now you have a more complete figure. It’s time to make your lines clearer.
Go over your refined sketch with a slightly firmer pressure or a darker pencil (like a 2B). This creates a more confident outline.
Focus on the outer contours of the body. Make sure the lines are smooth and continuous.
Add subtle indications of clothing folds or basic anatomical landmarks if desired, but keep it simple.
Don’t feel pressured to get every detail perfect. The goal is a clear, easy-to-read body sketch.
Step 9: Erase Guidelines and Add Basic Details
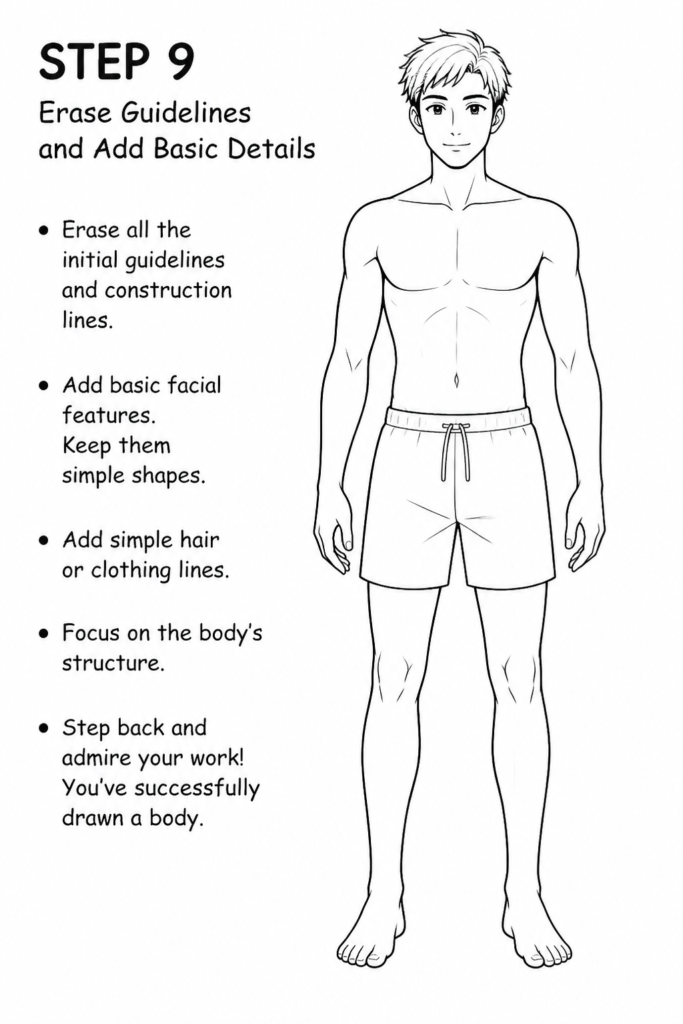
The final step involves cleaning up your work and adding minimal details.
Gently erase all the initial light guidelines and construction lines. You want your final outline to stand out.
Add very basic indications of features like eyes, nose, and mouth on the head, if you wish. Keep them simple shapes.
Consider adding simple hair or clothing lines. Remember, this guide focuses on the body’s structure.
Step back and admire your work! You’ve successfully drawn a body.
Common Mistakes to Avoid
Drawing the human body can be tricky, but knowing common pitfalls helps you improve faster. Be mindful of these issues.
Ignoring Proportions
One of the biggest mistakes beginners make is drawing body parts out of proportion. This leads to figures with tiny heads, overly long arms, or short legs. Always start with a gesture and use your head as a unit of measurement. For example, an average adult is about 7 to 7.5 heads tall.
Stiff Poses
Many new artists draw figures that look rigid, like mannequins. This happens when you focus too much on individual body parts rather than the overall flow and movement. Always begin with a loose gesture drawing to capture dynamism before adding structure. Think about the ‘line of action’ that runs through the figure.
Symmetrical Limbs
It’s common to draw both arms or both legs in exactly the same position. In reality, bodies are rarely perfectly symmetrical, especially in a natural pose. Try to vary the positions and angles of the limbs slightly. One arm might be bent, the other straight, or one leg slightly forward.
Forgetting the Torso’s Movement
The torso isn’t a single, unmoving block. It twists, bends, and arches. Neglecting this movement can make your figures look flat. Remember the rib cage and pelvis are two distinct masses connected by a flexible spine. Show how they shift relative to each other, especially in dynamic poses.
Troubleshooting
Even with a step-by-step guide, you might run into some common issues. Here are solutions to help you get back on track.
My Drawing Looks Stiff and Lifeless
If your figure feels rigid, the problem often lies in the initial gesture. You might be focusing too much on straight lines and individual shapes too early. Try going back to Step 2 and really emphasize loose, curved lines for the spine and limbs. Imagine the figure as a flowing wire sculpture before adding any mass. Practice drawing quick, 30-second gestures to loosen up your hand and eye.
Proportions Feel Off
When proportions seem incorrect, it usually means you haven’t established clear measuring points. Revisit Step 3 and 4, paying close attention to how the head size dictates the overall height. Use the head-height method, or compare the length of the limbs to the torso. You can also lightly draw a vertical line down the center of your paper and horizontal lines for shoulders, hips, and knees to help align elements.
Limbs Look Flat, Not Three-Dimensional
If your arms and legs appear flat, you might be drawing them as simple lines or flat shapes instead of volumes. Remember to think of limbs as cylinders or tubes, as discussed in Step 5. Imagine you’re drawing around a central axis for each limb. Use overlapping lines and subtle curves to suggest the front and back of the limb, giving it depth. Practice drawing basic 3D forms like cylinders and spheres from different angles.
Key Takeaways
- Always start with a light, loose gesture to capture movement and flow.
- Break the body down into simple, manageable shapes like ovals, cylinders, and blocks.
- Pay close attention to proportions, using the head as a consistent measuring unit.
- Remember that the torso consists of a rib cage and pelvis, which move independently.
- Practice regularly; consistency is far more important than perfection in early stages.
- Don’t be afraid to use references from photos or real life to understand anatomy.
Frequently Asked Questions
What’s the best way to learn human anatomy for drawing?
Start with basic skeletal and muscle groups. You don’t need to memorize every single bone and muscle. Focus on the major landmarks and how they affect the surface forms. Drawing from life or photo references is invaluable for understanding how anatomy looks in different poses.
How do I draw different body types?
The principles remain the same for all body types: start with gesture, use simple shapes, and focus on proportions. The key is to adjust the sizes and curves of your basic shapes. Some figures will have wider hips, narrower shoulders, or more pronounced muscle mass. Observe and adapt.
Should I use references when drawing bodies?
Absolutely! Using references is one of the best ways to learn. Look at photos of people in various poses, study anatomy books, or even observe people around you. References help you understand how the body bends, stretches, and appears in different lighting. They are learning tools, not crutches.
How long until I can draw bodies well?
Learning to draw is a journey, not a destination. You’ll see improvement with consistent practice, typically within a few weeks or months. Mastery takes years of dedication. Focus on enjoying the process and celebrating small improvements along the way.
Our Top Recommended Finds
To help you on your drawing journey, here are a few essential tools that make a real difference. These items are fundamental for any aspiring artist.
- Sketchbook: A good quality sketchbook with medium-weight paper (around 80-100 gsm) is perfect for practice. It holds up well to erasing and allows for smooth pencil strokes.
- Drawing Pencils Set: A small set of drawing pencils (e.g., HB, 2B, 4B, 6B) gives you a range of hardness for light sketching and darker lines. This variety adds depth to your drawings.
- Kneaded Eraser: Unlike a regular eraser, a kneaded eraser can be molded to a point for precise erasing. It also lifts graphite without damaging the paper, which is ideal for delicate work.
Your Artistic Journey Continues
You’ve taken a fantastic first step in learning to draw the human body. Remember that drawing is a skill built on practice and observation. Every line you draw, every shape you sketch, contributes to your growth.
Keep exploring different poses and angles. Challenge yourself to draw figures in motion or from various perspectives. The more you draw, the more intuitive the process becomes.
Don’t let perfect be the enemy of good. Just keep drawing, keep experimenting, and most importantly, have fun with it. Pick up your pencil right now and draw another body.