🚗 How To Draw A Car Step By Step Easy
I remember struggling to draw a car that looked like anything other than a box on wheels. It felt frustrating trying to capture the sleek lines and dynamic feel. This guide comes from years of sketching and finding simple methods that truly work for anyone.
You can absolutely learn to draw a cool car, even if you’re just starting out. This guide breaks down the process into simple, manageable steps. By following these instructions, you’ll gain the confidence to sketch your favorite vehicles.
Quick Overview
This guide will walk you through the process of drawing a car from basic shapes to recognizable details. You’ll learn fundamental techniques that apply to various car styles. Get ready to bring your automotive visions to life on paper.
- Time needed: 30-60 minutes
- Difficulty: Beginner
- What you’ll need: Pencil, eraser, paper, a ruler (optional)
Step-by-Step Instructions
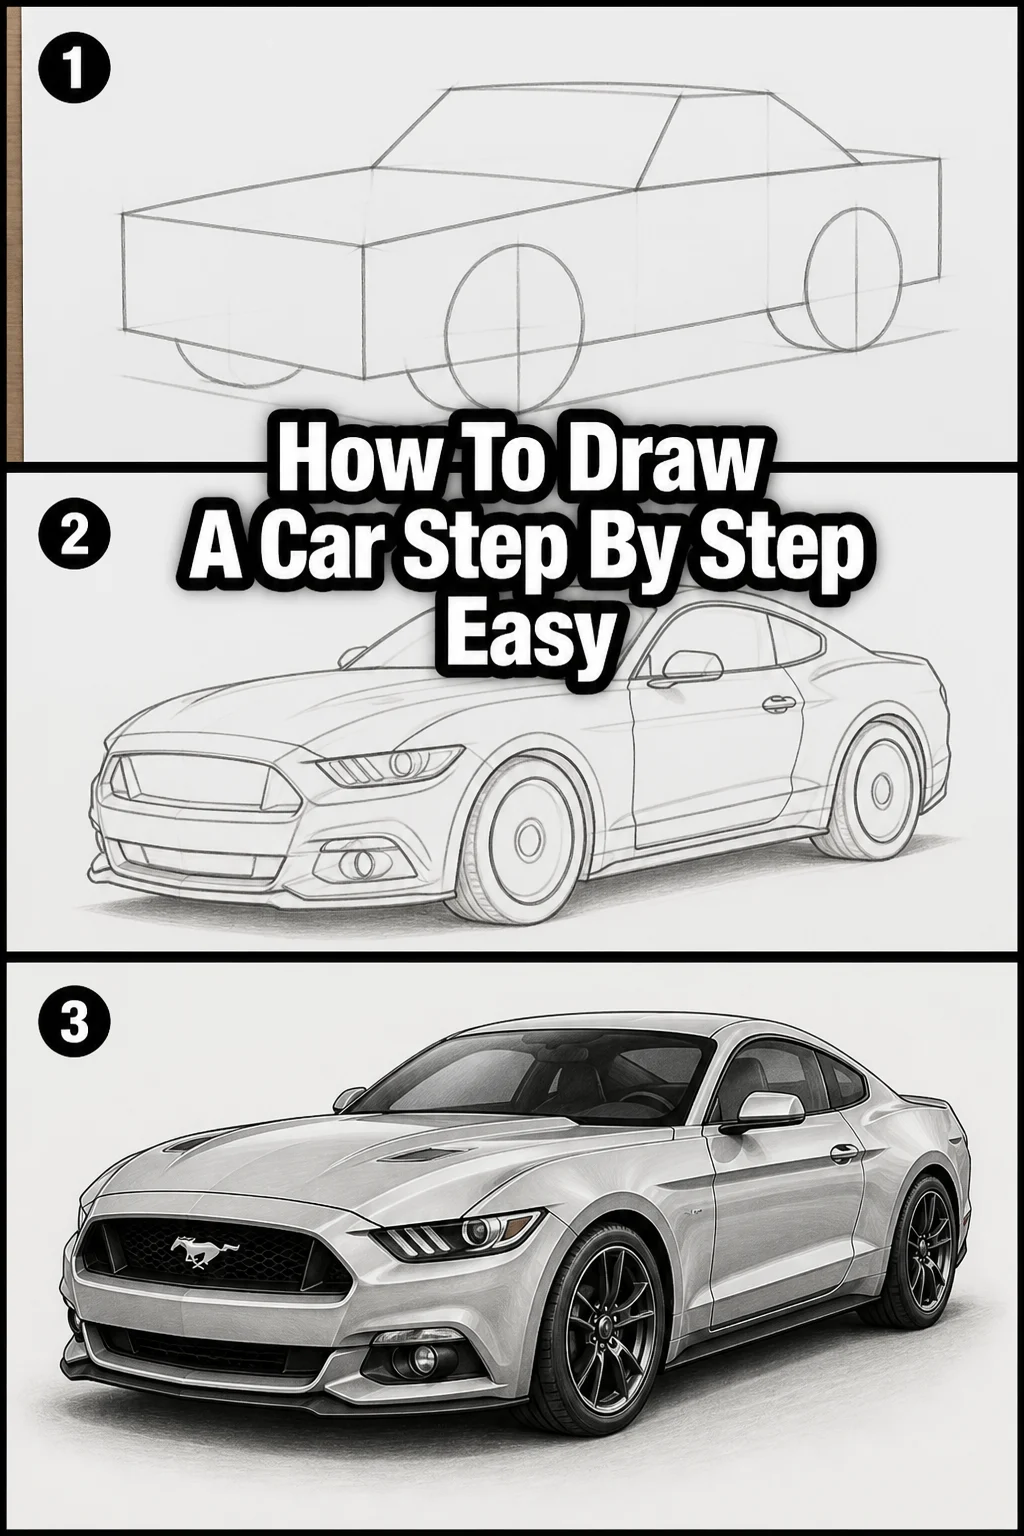
Step 1: Lay Down Your Basic Shapes
Every great car drawing starts with simple forms. Think of the car’s main body as a long rectangle or a squashed oval. This initial shape helps establish the car’s overall proportions.
Lightly sketch a horizontal rectangle in the middle of your paper. This will be the lower body of your car. Don’t press too hard; these are just guide lines.
Next, draw a slightly smaller, curved shape on top of the rectangle, towards the front. This will become the passenger cabin or roofline. Think of it like a dome or a trapezoid with rounded corners.
These two shapes form the fundamental structure. They define the car’s length, height, and general silhouette. Ensure they are proportional to each other.
Pro Tip: Use very light pencil strokes for all initial guide lines. This makes them easy to erase later without leaving marks. You want them to be barely visible.
Step 2: Position the Wheels and Wheel Arches
Wheels are crucial for a car’s appearance and stability. Their placement determines if your car looks balanced or lopsided. We’ll start with their basic position.
Draw two circles for the wheels under the main body rectangle. Position one circle towards the front of the rectangle and the other towards the back. Leave enough space between them for the car’s middle section.
Make sure the bottom of both circles aligns with each other. This ensures your car isn’t leaning one way or the other. Imagine a flat surface beneath them.
Around each wheel circle, sketch an arc for the wheel arch. These arches define the space where the wheels sit within the car’s body. They should be slightly larger than your wheel circles.
Step 3: Define the Car’s Main Body Lines
Now we begin to connect our basic shapes and give the car its distinct form. This is where your car starts to look like a car. Focus on smooth, flowing lines.
Connect the bottom of the front wheel arch to the bottom of the rear wheel arch with a straight or slightly curved line. This forms the bottom edge of the car’s body.
Draw a line from the top of the front wheel arch, curving up to meet the front of your cabin shape. This creates the hood of the car.
Similarly, extend a line from the top of the rear wheel arch, curving upwards to meet the back of the cabin shape. This forms the car’s rear fender and trunk area.
Refine the roofline by smoothing out the curved cabin shape you drew earlier. Make it look sleek and continuous.
Step 4: Add Windows and Windshield
Windows give the car its interior visibility and help define its style. They break up the large body panels and add detail.
Inside your cabin shape, draw the windshield. This is typically a large, curved rectangle at the front. Pay attention to its angle; it usually slopes back.
Next, sketch the side windows. These are often trapezoidal or rectangular shapes, conforming to the curve of the roofline and the upper body. You might draw a front side window and a smaller rear side window.
Outline the window frames. These are thin lines that follow the outer edge of your window shapes. They add definition and structure.
Step 5: Detail the Wheels and Tires
The wheels are often a focal point of a car drawing. Adding detail here makes a big difference in the overall look.
Inside each wheel circle, draw a slightly smaller circle to represent the inner rim. This creates a sense of depth for the tire.
Then, add an even smaller circle in the very center for the hubcap or wheel bolt area. This gives the wheel a central point.
Draw spokes or a design within the rim area. These can be simple lines radiating from the center or more complex patterns. Keep them consistent on both wheels.
Finally, thicken the outer edge of the main wheel circle to create the tire. You can even add a very subtle curve to the bottom of the tire to suggest it’s resting on the ground.
Step 6: Incorporate Headlights, Taillights, and Bumpers
These features are essential for a car’s identity and functionality. They contribute significantly to its character.
At the front of the car, draw the headlights. These can be simple ovals, rectangles, or more intricate shapes depending on the style you’re aiming for. Place them symmetrically on either side of the front.
Towards the back, sketch the taillights. These are usually smaller than headlights and might be rectangular or thin strips. They follow the contours of the rear.
Add the front and rear bumpers. These are typically horizontal bars or extensions at the very front and back of the car, just below the body line. They should wrap slightly around the sides.
Draw a grille at the front of the car, between the headlights and above the bumper. This can be a simple rectangle with horizontal or vertical lines inside.
Step 7: Add Doors, Handles, and Side Mirrors
These details bring realism and functionality to your car drawing. They show how people would interact with the vehicle.
Draw the door lines on the side of the car. These are vertical or slightly angled lines that separate the doors from the rest of the body. Typically, there’s a line for the front door and another for the rear door on a sedan.
Sketch small door handles on each door. These can be simple rectangles or small, elongated shapes. Position them consistently.
Add side mirrors. These usually extend from the base of the windshield or the front door frame. They are typically oval or triangular shapes.
Draw a fuel cap on one of the rear fenders. This is a small circle or square.
Step 8: Refine and Erase
This is where your car really comes to life. You’ll clean up your drawing and make your chosen lines stand out.
Carefully erase all the initial guide lines and any overlapping pencil marks that are no longer needed. Take your time to clean up the drawing.
Go over your chosen final lines with a slightly darker pencil pressure or a fine-point pen. Make these lines crisp and clear.
Add subtle shading to give the car a three-dimensional look. Think about where the light source is coming from and shade the opposite side. This can be done with light pencil strokes or cross-hatching.
You can also add reflections to the windows to suggest glass. Use a few curved lines or light shading for this.
Common Mistakes to Avoid
Inconsistent Perspective
Drawing a car with inconsistent perspective makes it look distorted and unnatural. For example, if one wheel appears to be seen from the front and another from the side, the car won’t look grounded. This often happens when you don’t establish a clear vanishing point or eye level.
To fix this, always start by imagining a horizon line and a vanishing point (or two, for more complex angles). All parallel lines on the car should converge towards these points. Consistently apply this principle to all parts of the car, especially the wheels and body lines.
Disproportionate Elements
A car can look cartoonish or just “off” if its parts are not in proper proportion. For example, tiny wheels on a huge body, or a massive cabin on a short wheelbase, will make the car appear unbalanced. This usually stems from not planning the basic shapes effectively at the start.
Always begin with light, basic shapes for the main body and cabin to establish overall size relationships. Compare the length of the hood to the cabin, or the size of the wheels to the body height. Constantly check these proportions as you add details, making adjustments as needed.
Lack of Smooth Curves and Lines
Many beginners draw cars with jagged, hesitant lines rather than smooth, confident curves. Cars are full of elegant, flowing lines, and choppy strokes can make the drawing look stiff and amateurish. This often results from drawing from the wrist instead of the shoulder or elbow.
Practice drawing long, continuous strokes. Use your whole arm to create smoother curves. Don’t be afraid to make multiple light passes to find the right curve before committing to a darker line. Relax your grip on the pencil and allow your hand to move freely.
Forgetting Depth and Form
A flat-looking car drawing lacks realism and visual interest. If all lines are drawn with the same weight and there’s no suggestion of light and shadow, the car appears two-dimensional. This means you’re not thinking about the car as a three-dimensional object.
Remember that a car is a collection of curved and angled surfaces. Use varying line weights; darker lines for edges closer to the viewer or areas in shadow. Introduce subtle shading or cross-hatching to define contours and suggest the car’s volume. This adds depth and makes it pop off the page.
Troubleshooting
My Car Looks Flat and Lifeless
If your car drawing appears flat, it likely lacks the visual cues that suggest three-dimensionality. This often means you haven’t considered how light interacts with the car’s surfaces. Without shadows and varying line weights, everything looks like it’s on the same plane.
To add life, focus on shading. Identify a light source and apply darker shading to the areas that would be in shadow, such as under the car, beneath bumpers, and within wheel wells. Use lighter shading or reflections on surfaces facing the light. Also, vary your line thickness; make lines that are closer or represent edges darker and more prominent.
The Wheels Aren’t Round or Look Uneven
Getting perfect circles for wheels can be challenging, and uneven wheels can make the entire car look off-balance. This is a common issue that affects the stability and realism of your drawing. Freehand circles are difficult to master.
You can use a compass or a circular object (like a coin or a lid) as a stencil for your initial wheel outlines. Once you have a perfect circle, you can refine it. Alternatively, practice drawing circles repeatedly until you gain better control. Ensure the bottom of both wheels aligns perfectly with your imagined ground line.
My Car’s Proportions Seem Wrong
When the parts of your car don’t seem to fit together correctly, it’s usually a proportion issue. The cabin might be too big, the hood too short, or the wheels too small for the body. This often happens when you jump straight into details without establishing the overall structure.
Always start with very light, simple geometric shapes to represent the main body, cabin, and wheels. Step back and compare these shapes to each other. For instance, is the cabin roughly one-third the length of the body? Are the wheels about one-quarter the height of the car? Make adjustments to these basic shapes before adding any details.
Key Takeaways
- Start with Basic Shapes: Always begin your car drawing by sketching simple rectangles and curves to establish the overall form and proportions.
- Establish Perspective Early: Lightly draw guide lines for your wheels and body to ensure consistent perspective and a grounded appearance.
- Build Details Gradually: Add elements like windows, lights, and door lines only after the main body and wheel placement are finalized.
- Focus on Smooth Lines: Practice drawing continuous, flowing strokes to capture the sleek aesthetics of a car, avoiding choppy or hesitant marks.
- Refine and Shade for Depth: Use an eraser to clean up guide lines, then add varying line weights and subtle shading to give your car drawing a three-dimensional look.
- Practice Makes Perfect: Drawing cars, like any skill, improves with consistent practice. Don’t be afraid to experiment and draw many different types of cars.
Frequently Asked Questions
What kind of pencil should I use?
For sketching, a lighter pencil like an HB or 2H is excellent for initial guide lines because it’s easy to erase. For outlining and adding darker details, a softer pencil like a 2B or 4B provides richer, darker lines. Having a few different hardness levels gives you versatility.
How do I make my car drawing look more realistic?
Realism comes from observing actual cars closely. Pay attention to how light reflects off surfaces, where shadows fall, and the subtle curves and angles. Adding accurate shading, reflections on windows, and variations in line weight will significantly enhance realism. Don’t forget small details like emblems or license plates.
Is it okay to use a ruler for straight lines?
Absolutely! While freehand practice is valuable, a ruler can be a great tool for ensuring perfectly straight lines, especially for the base of the car or window frames. Don’t feel like you’re “cheating” by using tools; they help achieve precision and improve the overall neatness of your drawing.
How can I draw different types of cars, not just sedans?
The fundamental principles of basic shapes, perspective, and proportion apply to all car types. For a truck, you’d start with a larger, boxier main body. For a sports car, you’d emphasize lower, sleeker curves and a more compact cabin. Study reference images of the specific car type you want to draw and apply the step-by-step method to its unique forms.
Our Top Recommended Finds
- Sketching Pencils Set: A good set with various lead hardness (H, HB, B grades) allows you to create both light guide lines and dark, rich details.
- Kneaded Eraser: This type of eraser is gentle on paper, can be molded into different shapes for precise erasing, and lifts graphite without smudging.
- Smooth Drawing Paper: Using paper with a smooth surface helps your pencil glide easily, making it simpler to draw long, continuous curves and lines.
Your Canvas Awaits: Start Drawing Today!
You now have the tools and steps to draw a car you can be proud of. Don’t let hesitation hold you back. Grab your pencil and paper right now.
Begin with those simple shapes and watch as your car takes form, line by line. Each drawing you create builds your skill and confidence. Soon, you’ll be sketching dynamic vehicles with ease. Why not try drawing a different type of car next, like an SUV or a sports car, using these same foundational steps? The road to becoming a better artist starts with that very first line.