🐉 How To Draw A Dragon Step By Step Easy
Have you ever dreamed of bringing a magnificent dragon to life on paper? It’s a truly rewarding experience. I remember my first attempts, filled with scribbles and excitement, always trying to capture that mythical power.
This guide will show you exactly how to draw a dragon, making it simple and fun for everyone. You’ll soon have your own fantastic creature gracing the page.
Quick Overview
You’re about to embark on a creative journey, learning to construct a dragon from simple shapes to detailed features. By the end, you’ll have a complete dragon drawing you can be proud of.
- Time needed: 45-90 minutes (depending on detail)
- Difficulty: Beginner
- What you’ll need: Pencil, eraser, paper, optional: fine-liner, colored pencils
Step-by-Step Instructions
Step 1: Gather Your Tools
Before you begin, make sure your workspace is clear and well-lit. Having the right tools at hand makes the process much smoother. Pick a comfortable spot where you can focus.
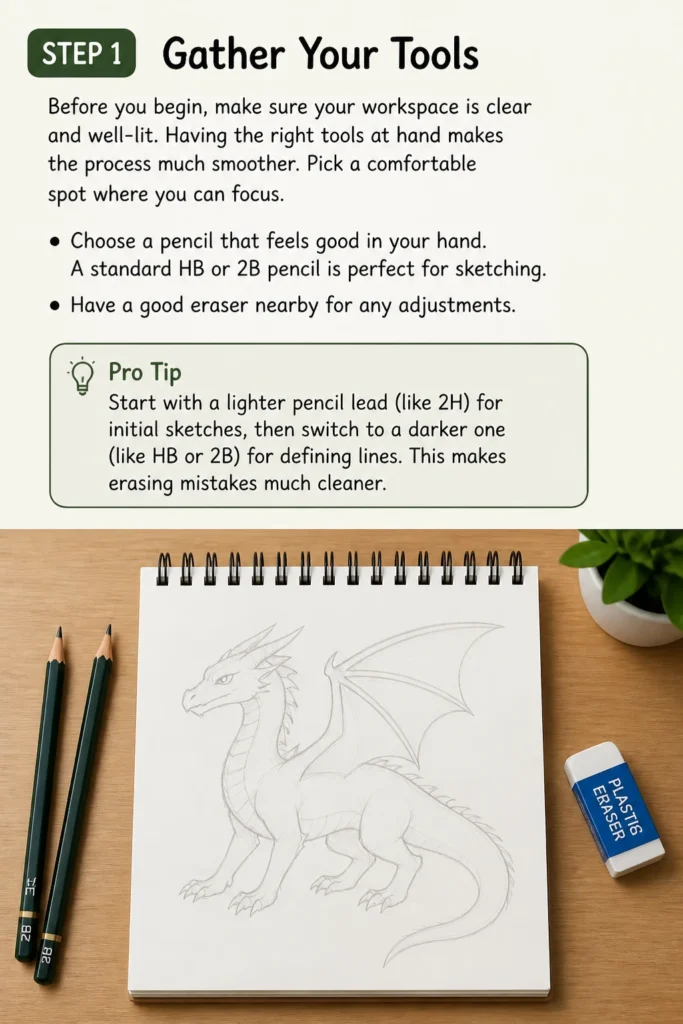
Choose a pencil that feels good in your hand. A standard HB or 2B pencil is perfect for sketching. Have a good eraser nearby for any adjustments.
Pro Tip: Start with a lighter pencil lead (like 2H) for initial sketches, then switch to a darker one (like HB or 2B) for defining lines. This makes erasing mistakes much cleaner.
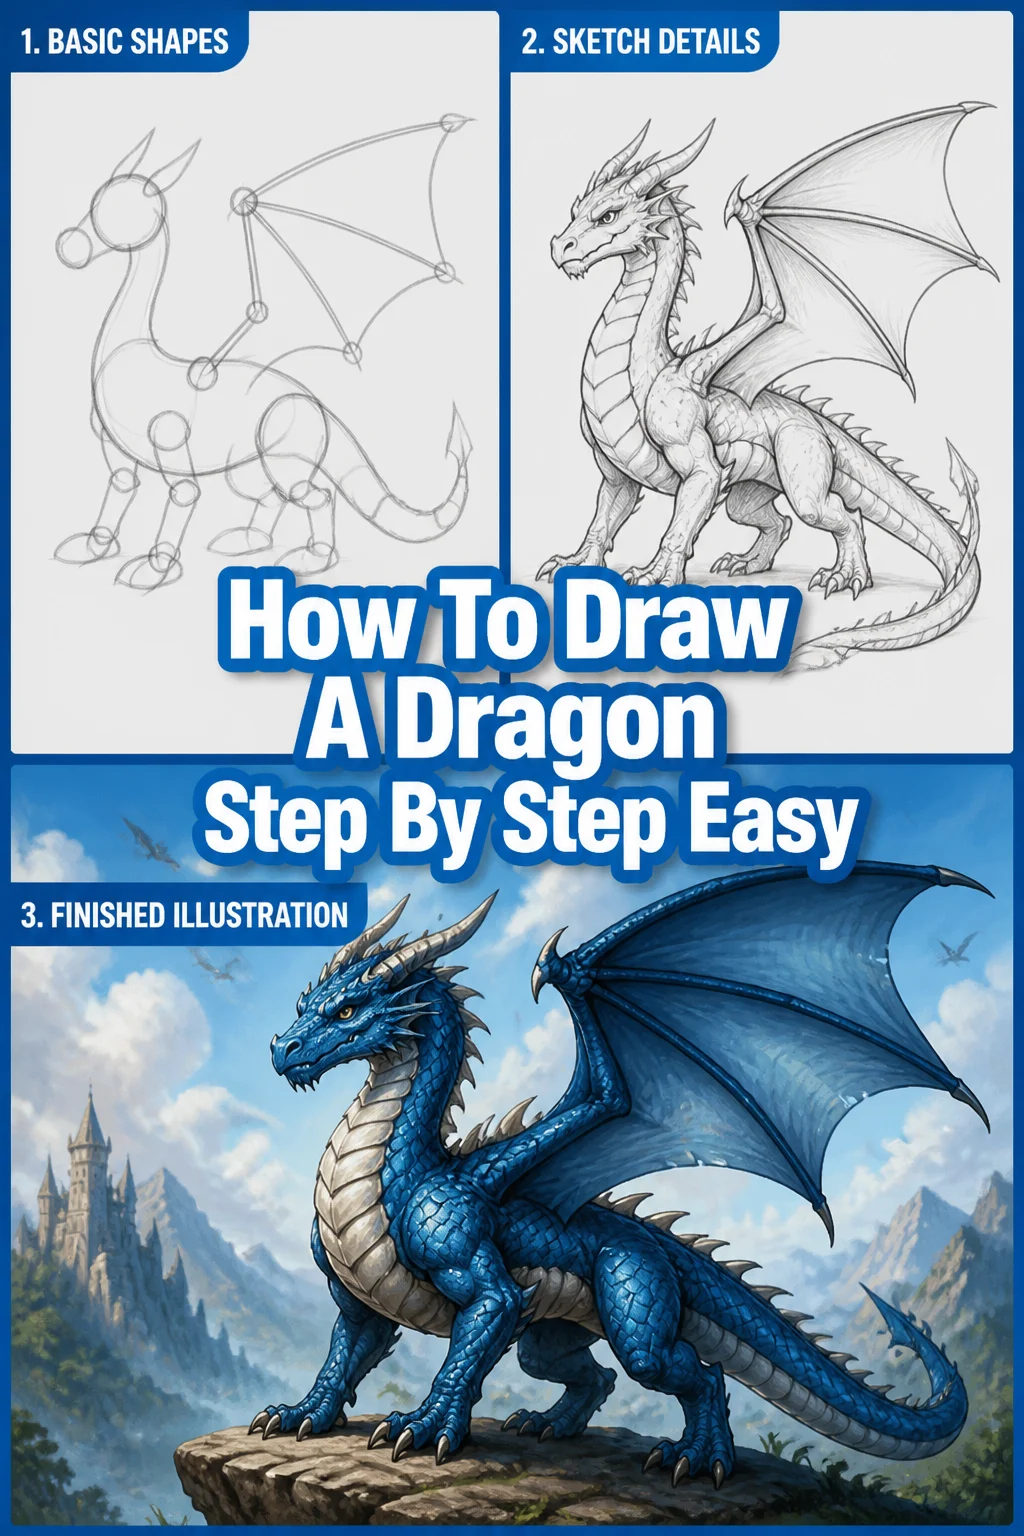
Step 2: Sketch Basic Shapes for the Body
Every great drawing starts with simple foundational shapes. Think of your dragon as a collection of circles and ovals. This helps with proportions and pose.
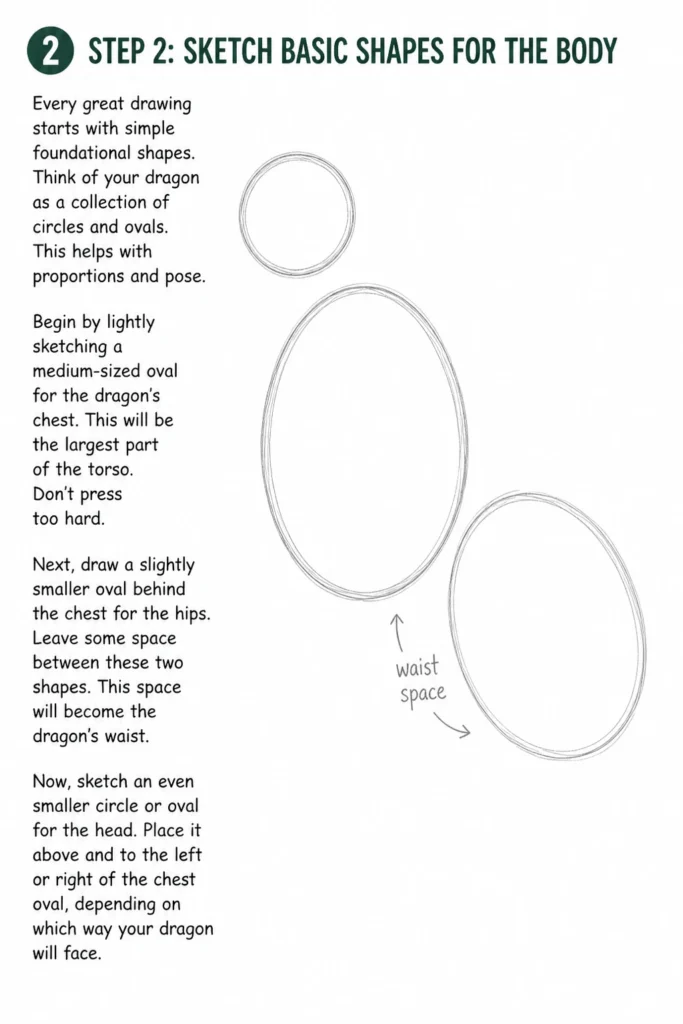
Begin by lightly sketching a medium-sized oval for the dragon’s chest. This will be the largest part of the torso. Don’t press too hard.
Next, draw a slightly smaller oval behind the chest for the hips. Leave some space between these two shapes. This space will become the dragon’s waist.
Now, sketch an even smaller circle or oval for the head. Place it above and to the left or right of the chest oval, depending on which way your dragon will face.
Step 3: Connect and Refine the Form
With your basic shapes in place, it’s time to connect them and give your dragon a flowing form. This stage is about establishing the overall silhouette.
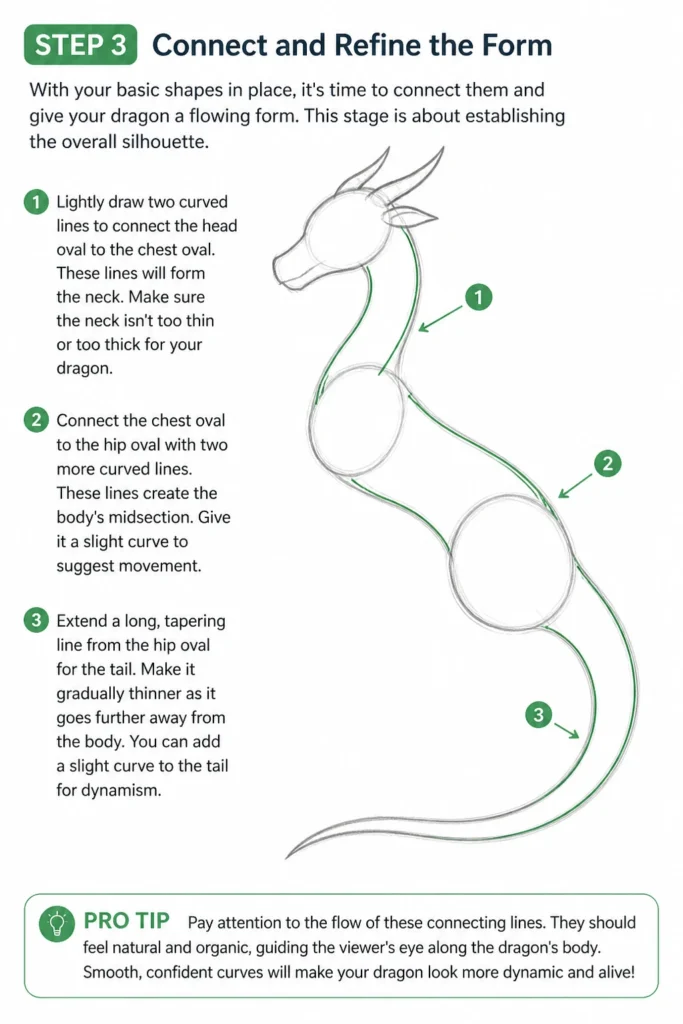
Lightly draw two curved lines to connect the head oval to the chest oval. These lines will form the neck. Make sure the neck isn’t too thin or too thick for your dragon.
Connect the chest oval to the hip oval with two more curved lines. These lines create the body’s midsection. Give it a slight curve to suggest movement.
Extend a long, tapering line from the hip oval for the tail. Make it gradually thinner as it goes further away from the body. You can add a slight curve to the tail for dynamism.
Pro Tip: Pay attention to the flow of these connecting lines. They should feel natural and organic, guiding the viewer’s eye along the dragon’s body. Avoid stiff, straight lines.
Step 4: Add Limbs and Basic Wing Structure
Now we’ll give our dragon the means to move and fly. Start with simple lines and shapes for the limbs and wings.
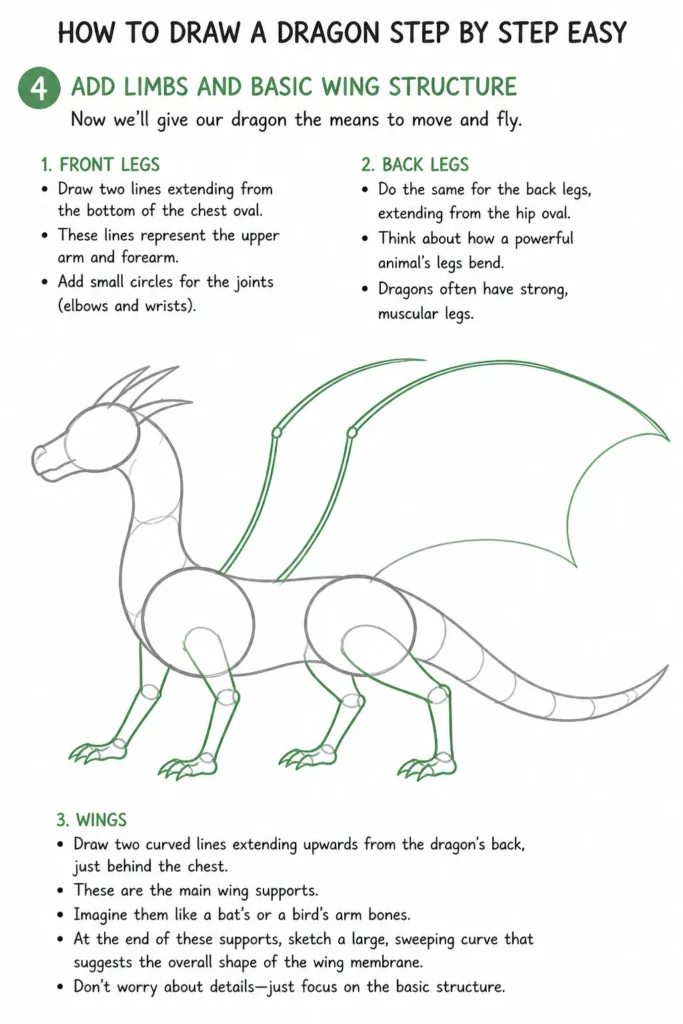
For the front legs, draw two lines extending from the bottom of the chest oval. These lines represent the upper arm and forearm. Add small circles for the joints (elbows and wrists) to keep proportions in check.
Do the same for the back legs, extending from the hip oval. Think about how a powerful animal’s legs bend. Dragons often have strong, muscular legs.
For the wings, draw two curved lines extending upwards from the dragon’s back, just behind the chest. These are the main wing supports. Imagine them like a bat’s or a bird’s arm bones.
At the end of these supports, sketch a large, sweeping curve that suggests the overall shape of the wing membrane. Don’t worry about details yet.
Step 5: Develop Facial Features and Head Details
The dragon’s face is where its personality truly shines. Let’s give our creature some character.
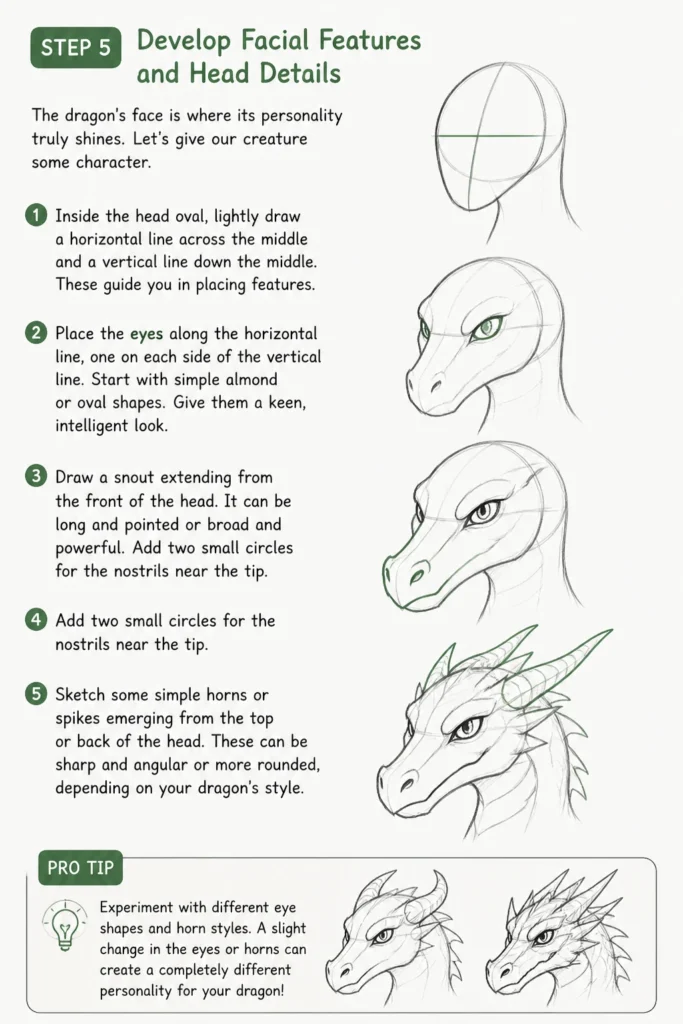
Inside the head oval, lightly draw a horizontal line across the middle and a vertical line down the middle. These guide you in placing features.
Place the eyes along the horizontal line, one on each side of the vertical line. Start with simple almond or oval shapes. Give them a keen, intelligent look.
Draw a snout extending from the front of the head. It can be long and pointed or broad and powerful. Add two small circles for the nostrils near the tip.
Sketch some simple horns or spikes emerging from the top or back of the head. These can be sharp and angular or more rounded, depending on your dragon’s style.
Pro Tip: Experiment with different eye shapes and horn styles. A slight change in the angle of the eyebrow or the curve of a horn can drastically alter the dragon’s expression.
Step 6: Refine Limbs, Claws, and Wing Membranes
With the basic structure in place, we can now add more definition to the extremities. This brings your dragon to life.
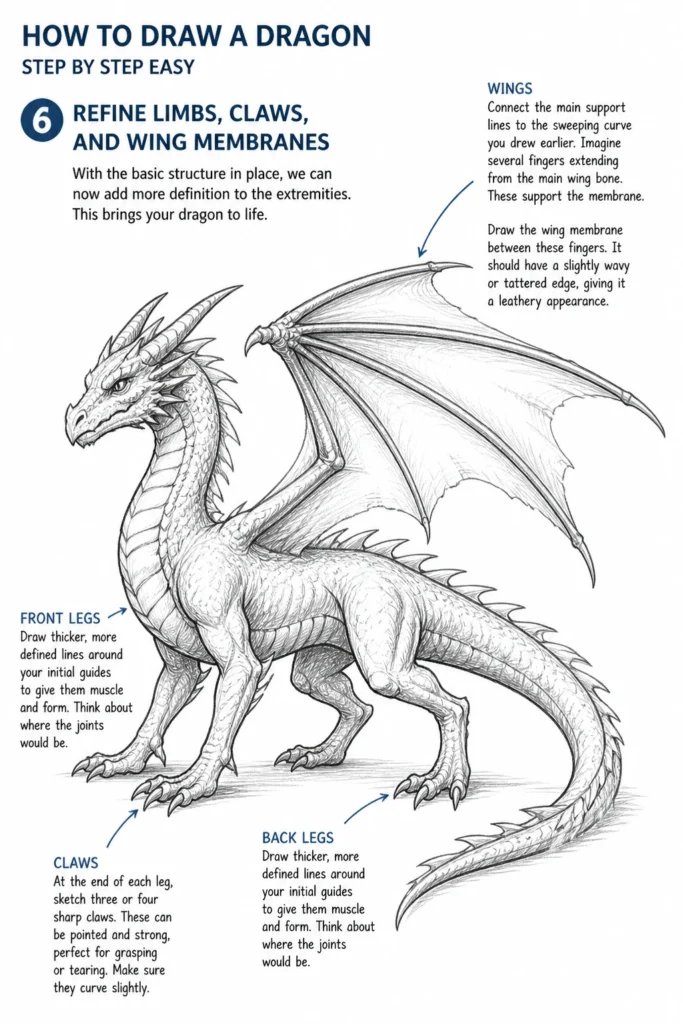
Go back to the front and back legs. Draw thicker, more defined lines around your initial guides to give them muscle and form. Think about where the joints would be.
At the end of each leg, sketch three or four sharp claws. These can be pointed and strong, perfect for grasping or tearing. Make sure they curve slightly.
For the wings, connect the main support lines to the sweeping curve you drew earlier. Imagine several “fingers” extending from the main wing bone. These support the membrane.
Draw the wing membrane between these “fingers.” It should have a slightly wavy or tattered edge, giving it a leathery appearance.
Step 7: Add Scales, Spikes, and Other Details
This is where your dragon truly starts to look like a mythical beast. Details make all the difference.
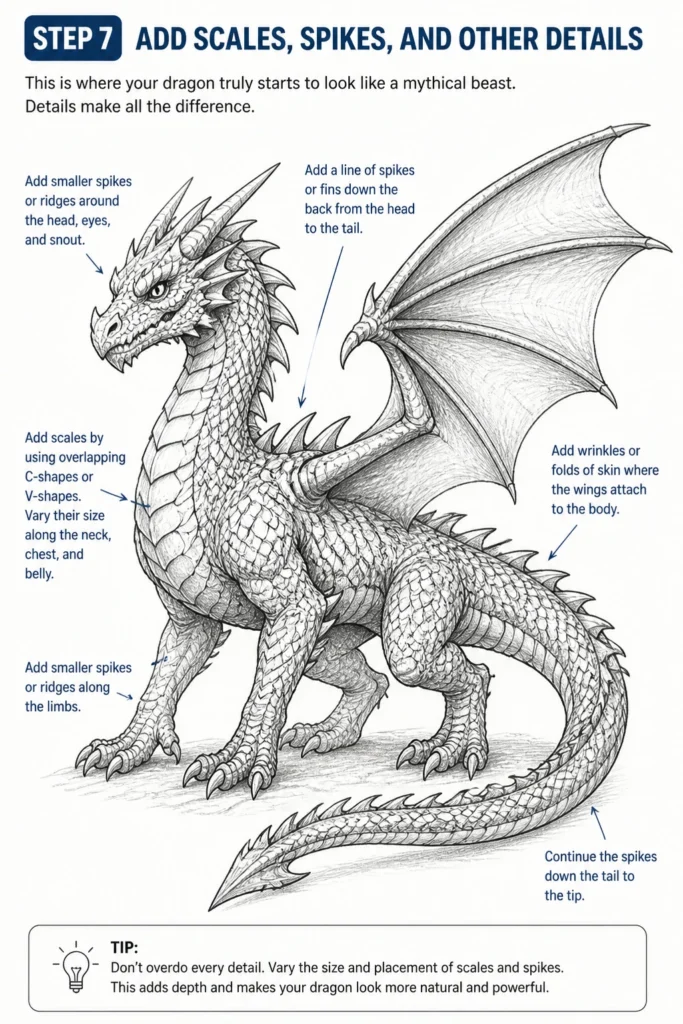
Start by adding scales. You don’t need to draw every single scale. Suggest them with overlapping C-shapes or V-shapes, especially along the neck, chest, and tail. Vary their size.
Draw a line of spikes or fins running down the dragon’s back, from the head all the way to the tip of the tail. These can be triangular, jagged, or flowing.
Consider adding smaller spikes or ridges along the limbs, around the eyes, or on the snout. These details enhance its formidable appearance.
You can also add some wrinkles or folds of skin around the joints or where the wings attach to the body. This adds realism and dimension.
Step 8: Outline and Erase Guide Lines
Now that all your details are in place, it’s time to clean up your drawing and make your dragon pop. This step defines your final lines.
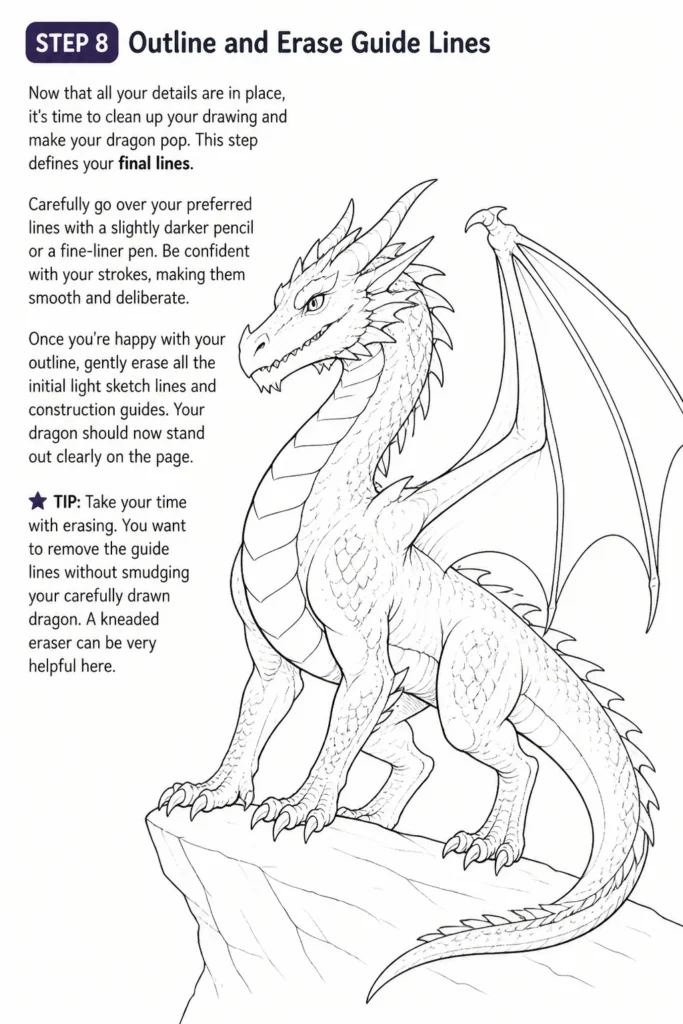
Carefully go over your preferred lines with a slightly darker pencil or a fine-liner pen. Be confident with your strokes, making them smooth and deliberate.
Once you’re happy with your outline, gently erase all the initial light sketch lines and construction guides. Your dragon should now stand out clearly on the page.
Take your time with erasing. You want to remove the guide lines without smudging your carefully drawn dragon. A kneaded eraser can be very helpful here.
Step 9: Shade for Depth and Form
Shading adds volume and makes your dragon look three-dimensional. It’s the final touch that brings it to life.
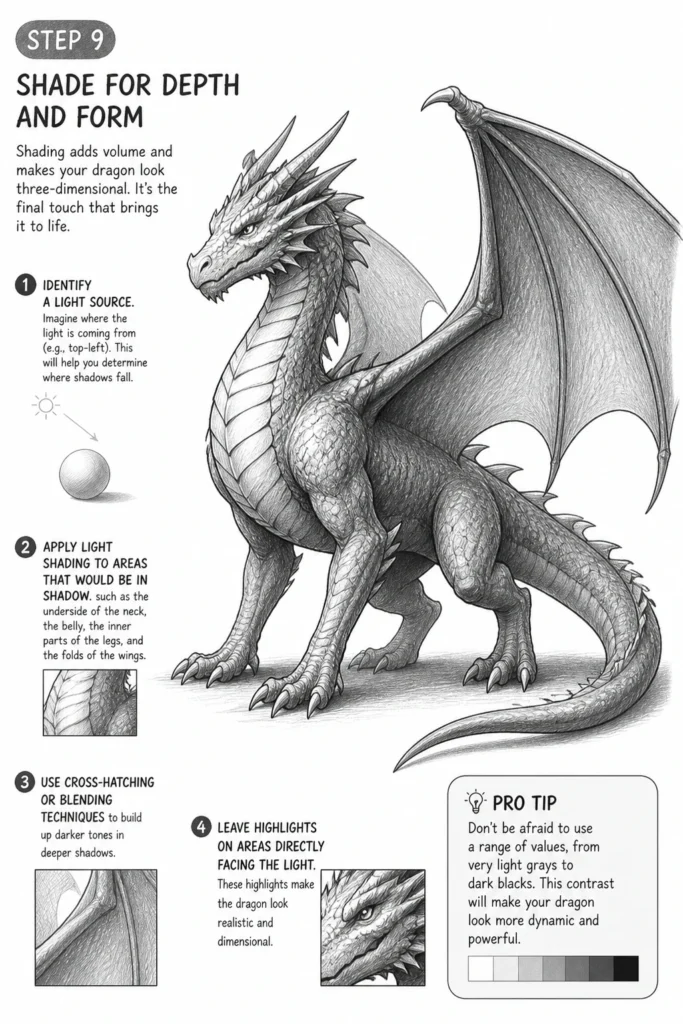
Identify a light source. Imagine where the light is coming from (e.g., top-left). This will help you determine where shadows fall.
Apply light shading to areas that would be in shadow, such as the underside of the neck, the belly, the inner parts of the legs, and the folds of the wings.
Use cross-hatching or blending techniques to build up darker tones in deeper shadows. Leave highlights on areas directly facing the light.
Pro Tip: Don’t be afraid to use a range of values, from very light grays to dark blacks. This contrast will make your dragon look more dynamic and powerful.
Common Mistakes to Avoid
Ignoring Proportions
Many beginners struggle with making parts of the dragon too big or too small compared to the rest of its body. A tiny head on a massive body, or disproportionate wings, can make the dragon look awkward. Always start with basic shapes to establish a solid foundation for proportions before adding details. Constantly compare the size of one part to another.
Stiff Poses
Drawing a dragon in a very static, lifeless pose can make it appear less dynamic and interesting. Dragons are powerful, agile creatures. Avoid drawing them standing perfectly straight or flat. Use curved lines and consider action poses, even subtle ones, to convey movement and energy. Think about how the body would twist or turn.
Too Much Detail Too Soon
Jumping straight into drawing scales and individual teeth before establishing the overall form is a common pitfall. This often leads to a drawing that looks detailed but lacks fundamental structure. Always build your dragon from the largest, simplest shapes first, gradually adding layers of detail. This approach ensures a cohesive and well-constructed final image.
Flat Shading
Applying shading without considering a light source can make your dragon look flat and two-dimensional, even after all the detailed work. Shading is about creating the illusion of depth and form. Always decide on a light source and apply shadows consistently, creating contrast and volume. This makes your dragon pop off the page.
Troubleshooting
My Dragon’s Proportions Look Off
If your dragon feels lopsided or parts seem out of place, it usually means your initial sketch shapes weren’t quite right. Go back to Step 2 and 3. Use very light pencil lines for your ovals and circles. Step back from your drawing frequently to view it from a distance. Sometimes, simply flipping your paper upside down can reveal proportion issues you missed. Don’t be afraid to erase and redraw those initial shapes until they feel balanced.
My Drawing Looks Stiff and Lifeless
A stiff drawing often comes from using too many straight lines and not enough organic curves. Revisit Step 3, focusing on the flow of the neck, body, and tail. Imagine your dragon moving or breathing. Try sketching gesture lines before you even draw the ovals – these are simple, flowing lines that capture the essence of a pose. Exaggerate curves slightly to infuse more life into the form.
I Can’t Get the Scales or Details Right
Don’t get bogged down in drawing every single scale perfectly. The goal is to suggest texture, not to meticulously render each one. For scales, try drawing groups of overlapping ‘C’ or ‘U’ shapes rather than individual ones. Vary their size and direction slightly. For spikes, keep them simple and consistent in their general shape. Remember, details are meant to enhance the form, not overpower it. Focus on the overall effect rather than individual perfection.
Key Takeaways
- Always start with simple geometric shapes to establish the dragon’s basic form and proportions.
- Use light pencil lines initially, allowing you to easily erase and refine your drawing as you go.
- Focus on creating a sense of movement and dynamism by using flowing, curved lines for the body, neck, and tail.
- Build details like scales, spikes, and facial features gradually, layering them onto the established form.
- Define your drawing by outlining and erasing guide lines, then add depth with consistent shading.
- Practice is key; don’t be afraid to experiment and draw multiple dragons to improve your skills.
Frequently Asked Questions
What type of dragon is easiest to draw for beginners?
Western-style dragons with two wings and four legs are often the easiest starting point. They have a clear, recognizable structure that is straightforward to break down into basic shapes. Avoiding very complex features like multiple heads or intricate patterns initially helps a lot.
How can I make my dragon look unique?
Experiment with different horn shapes, scale patterns, wing designs, and tail tips. You can also give your dragon unique expressions by adjusting the eyes and mouth. Try blending features from different animals, like a lion’s mane or an eagle’s talons, to create a truly original creature.
What if I can’t draw perfect circles or ovals?
That’s perfectly fine! Your initial shapes don’t need to be perfect. They are just guides. Focus on getting the general size and placement right. With practice, your freehand shapes will improve, but for now, embrace the imperfections; they add character to your sketch.
How do I draw a dragon in a different pose?
The key is to start with a gesture sketch. Instead of immediately drawing ovals, lightly sketch a line of action that represents the dragon’s spine and overall movement. Then, build your basic shapes (head, chest, hips) around that gesture line. This ensures your dragon will have a dynamic and believable pose from the outset.
Our Top Recommended Finds
- Sketchbook with Quality Paper: A good sketchbook (like a Canson XL Series or Strathmore Sketch) provides a smooth surface that takes pencil well and withstands erasing.
- Pencil Set (HB, 2B, 4B): Having a range of pencil hardness allows you to sketch lightly, define lines, and add rich shading for depth.
- Kneaded Eraser: Unlike standard erasers, a kneaded eraser lifts graphite without smudging or damaging the paper, perfect for fine adjustments and highlights.
Your Dragon Awaits
You’ve just completed your first step into the fantastic world of dragon art. Drawing these magnificent creatures is an incredible journey of imagination and skill. Every line you draw builds confidence and brings your vision closer to reality.
Don’t stop here! Take your new skills and explore different types of dragons, unique poses, or even add color to your creation. Grab your pencil again right now and try drawing another one, perhaps with a slightly different twist. The more you draw, the better you’ll become.