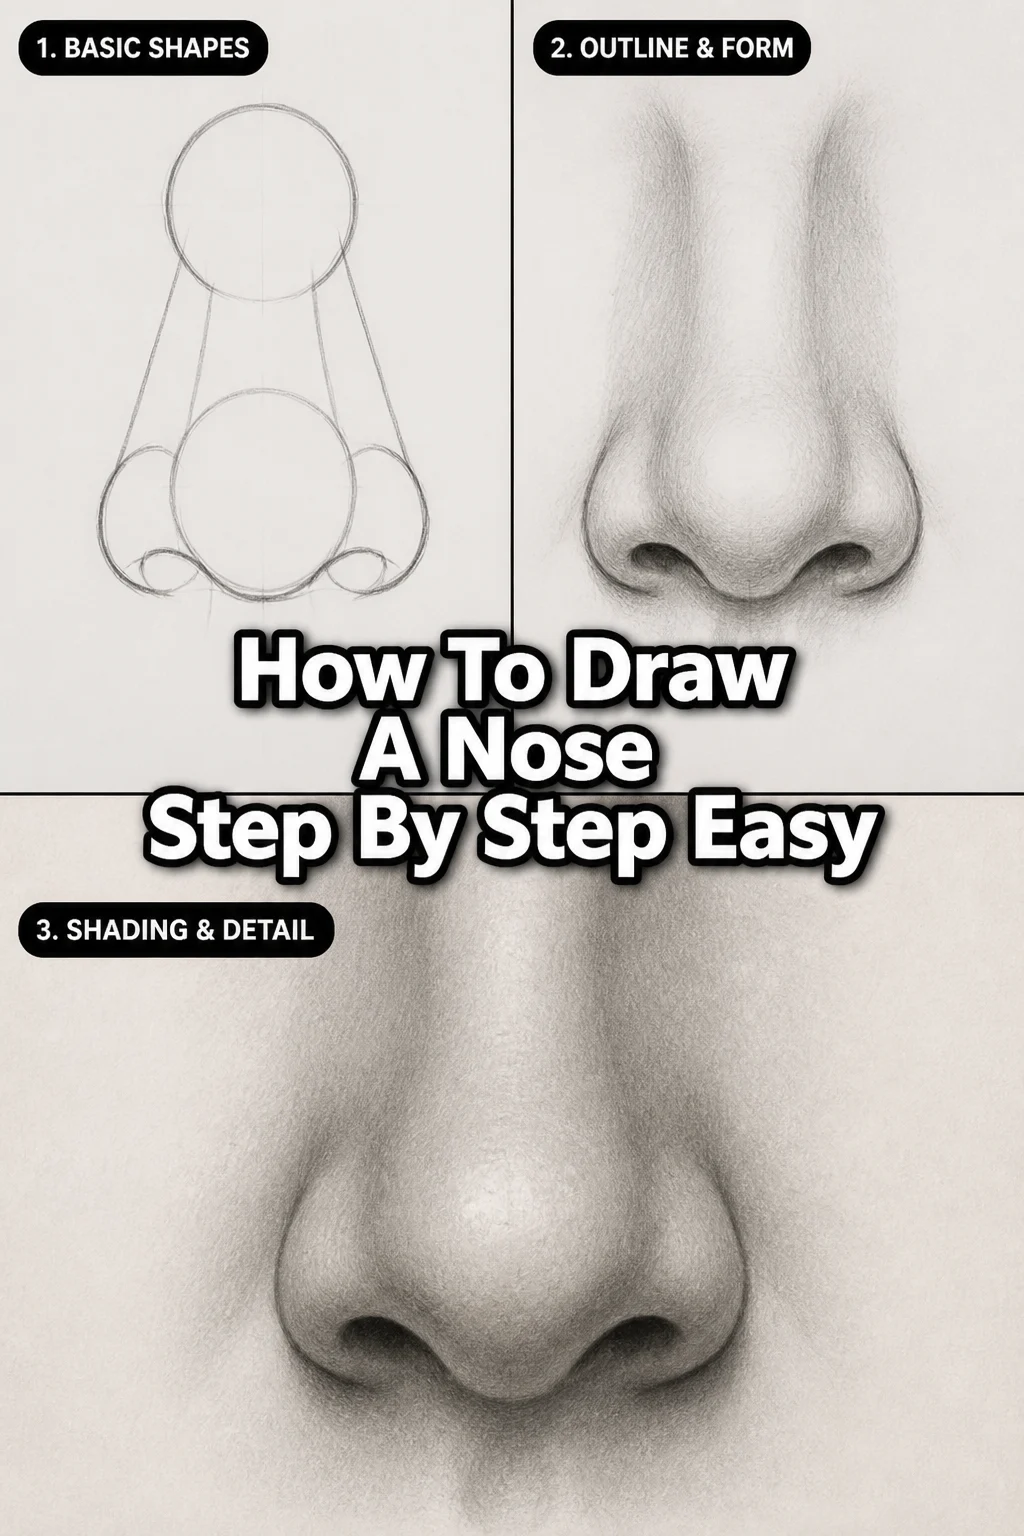
👃 How To Draw A Nose Step By Step Easy
Learning to draw a nose can feel challenging, often because it’s seen as a complex feature. Many artists, including myself when I first started, struggle with making it look natural and integrated into the face.
This guide simplifies the process, breaking it down into manageable steps that build confidence and skill. You’ll soon discover that drawing a convincing nose is more about understanding basic shapes than intricate detail.
Quick Overview
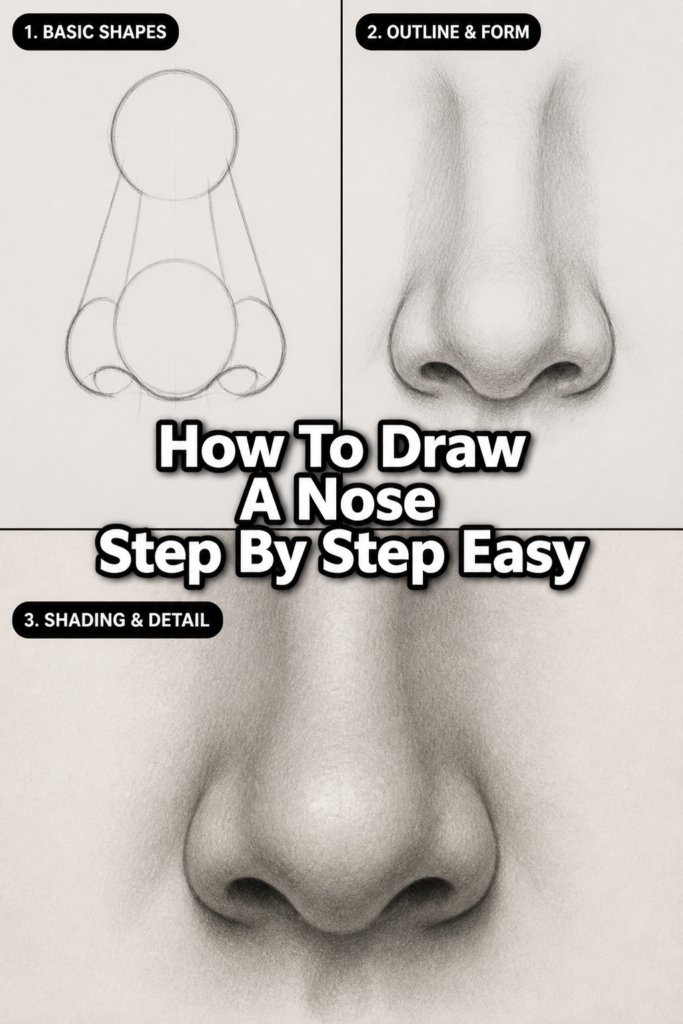
This guide will walk you through the process of drawing a realistic nose using simple geometric shapes and gradual refinement. You’ll gain a fundamental understanding of its structure, making future drawings much easier.
- Time needed: 45-75 minutes
- Difficulty: Beginner
- What you’ll need: Sketching pencil (HB or 2B), paper, kneaded eraser, blending stump (optional)
Step-by-Step Instructions
Step 1: Start with a Simple Sphere
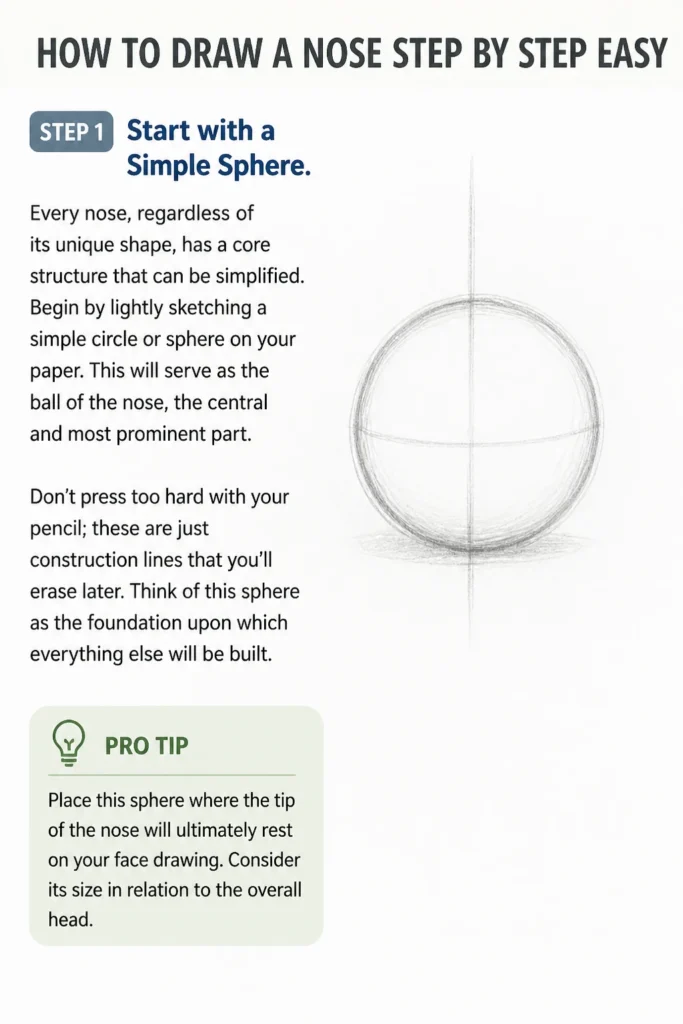
Every nose, regardless of its unique shape, has a core structure that can be simplified. Begin by lightly sketching a simple circle or sphere on your paper. This will serve as the ball of the nose, the central and most prominent part.
Don’t press too hard with your pencil; these are just construction lines that you’ll erase later. Think of this sphere as the foundation upon which everything else will be built.
Pro Tip: Place this sphere where the tip of the nose will ultimately rest on your face drawing. Consider its size in relation to the overall head.
Step 2: Add the Bridge and Nostril Guides
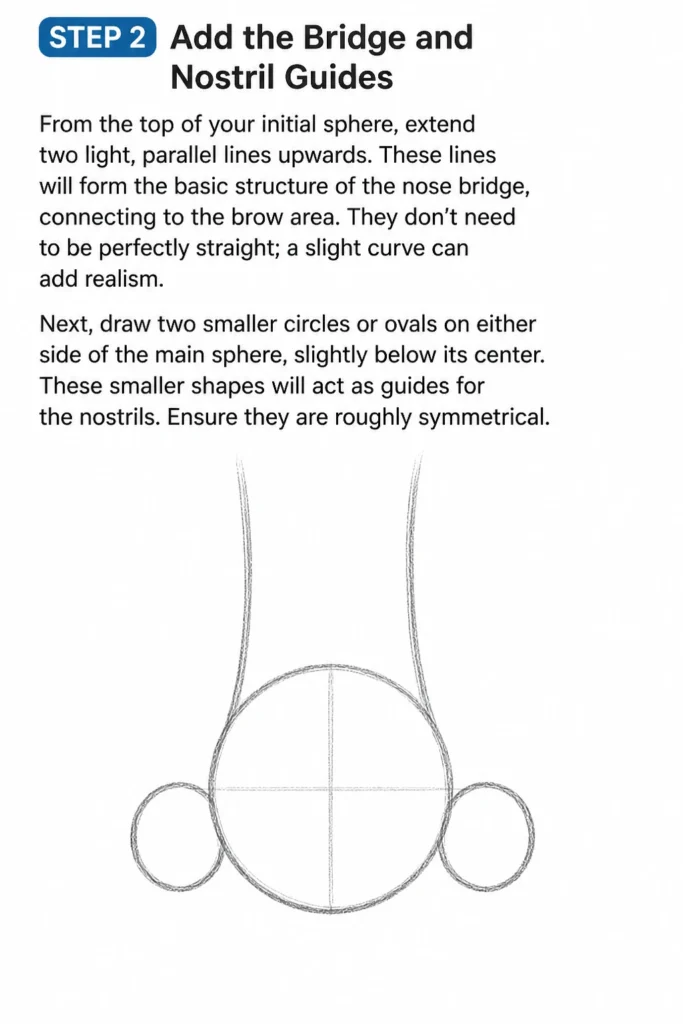
From the top of your initial sphere, extend two light, parallel lines upwards. These lines will form the basic structure of the nose bridge, connecting to the brow area. They don’t need to be perfectly straight; a slight curve can add realism.
Next, draw two smaller circles or ovals on either side of the main sphere, slightly below its center. These smaller shapes will act as guides for the nostrils. Ensure they are roughly symmetrical.
Step 3: Define the Alar Cartilages (Nostril Wings)
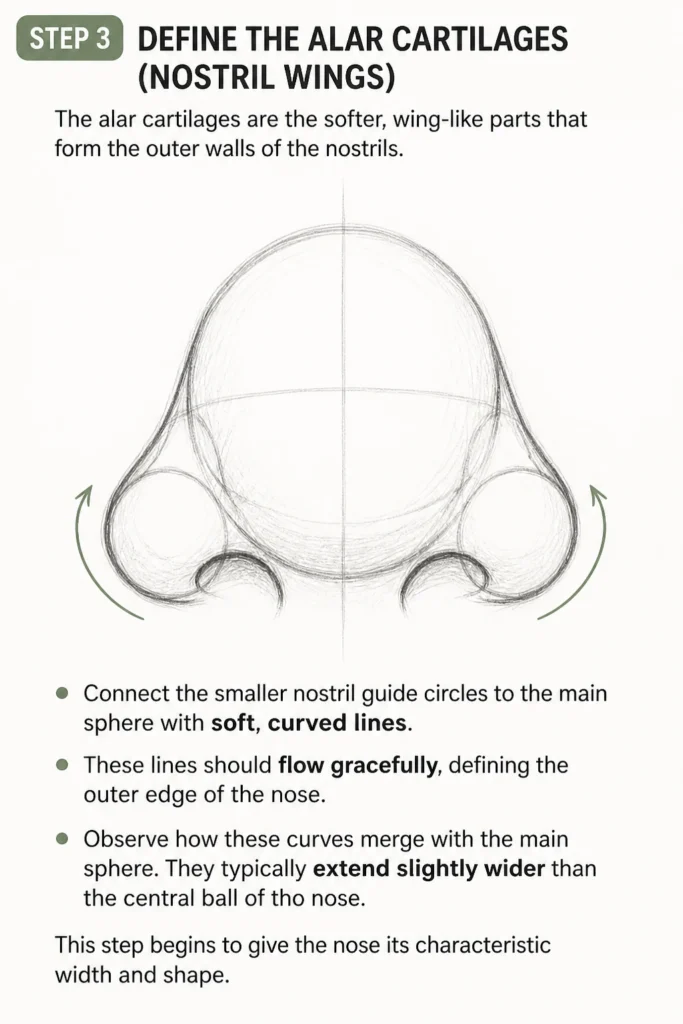
The alar cartilages are the softer, wing-like parts that form the outer walls of the nostrils. Connect the smaller nostril guide circles to the main sphere with soft, curved lines. These lines should flow gracefully, defining the outer edge of the nose.
Observe how these curves merge with the main sphere. They typically extend slightly wider than the central ball of the nose. This step begins to give the nose its characteristic width and shape.
Step 4: Sketch the Nasal Septum and Nostril Openings
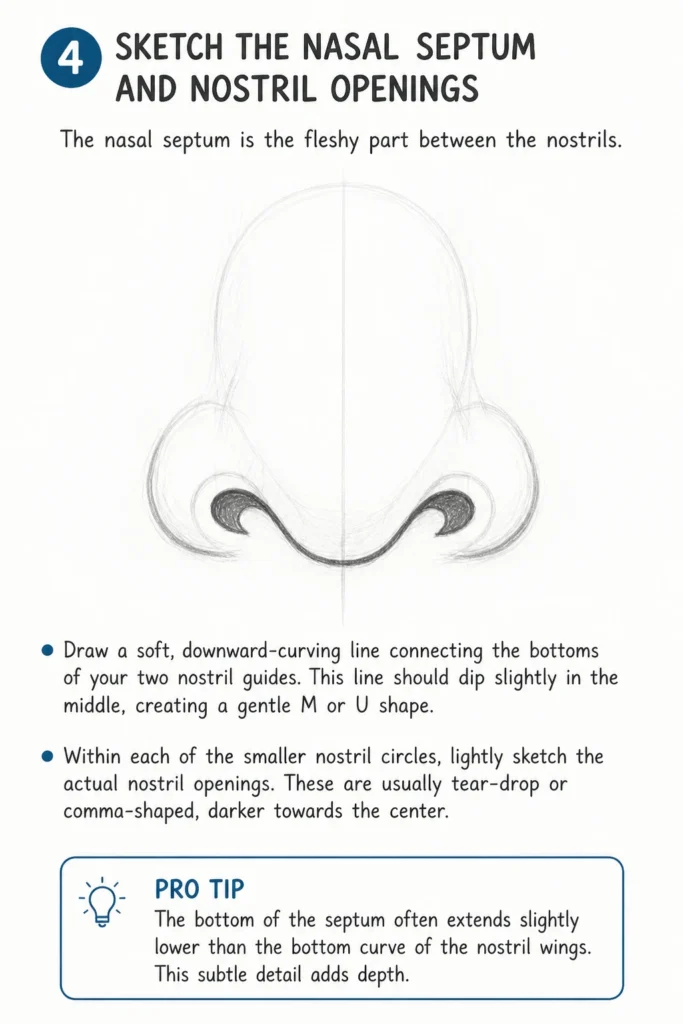
The nasal septum is the fleshy part between the nostrils. Draw a soft, downward-curving line connecting the bottoms of your two nostril guides. This line should dip slightly in the middle, creating a gentle “M” or “U” shape.
Within each of the smaller nostril circles, lightly sketch the actual nostril openings. These are usually tear-drop or comma-shaped, darker towards the center. Remember, they are not perfect circles.
Pro Tip: The bottom of the septum often extends slightly lower than the bottom curve of the nostril wings. This subtle detail adds depth.
Step 5: Refine the Overall Shape and Erase Guides
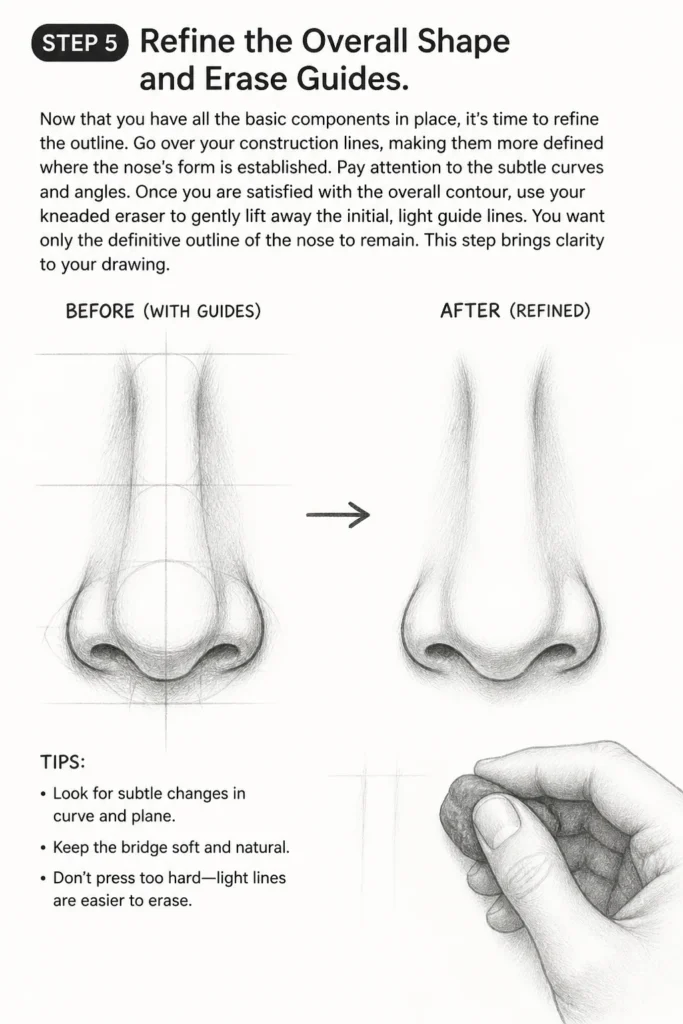
Now that you have all the basic components in place, it’s time to refine the outline. Go over your construction lines, making them more defined where the nose’s form is established. Pay attention to the subtle curves and angles.
Once you are satisfied with the overall contour, use your kneaded eraser to gently lift away the initial, light guide lines. You want only the definitive outline of the nose to remain. This step brings clarity to your drawing.
Step 6: Introduce Basic Shading for Form
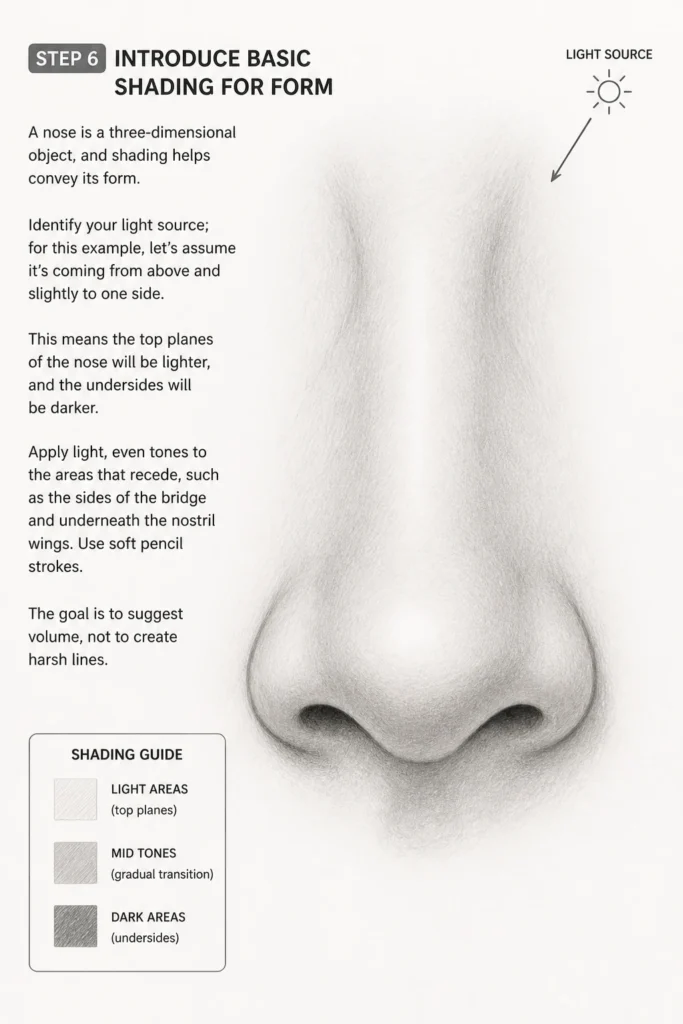
A nose is a three-dimensional object, and shading helps convey its form. Identify your light source; for this example, let’s assume it’s coming from above and slightly to one side. This means the top planes of the nose will be lighter, and the undersides will be darker.
Apply light, even tones to the areas that recede, such as the sides of the bridge and underneath the nostril wings. Use soft pencil strokes. The goal is to suggest volume, not to create harsh lines.
Step 7: Develop Mid-Tones and Highlights
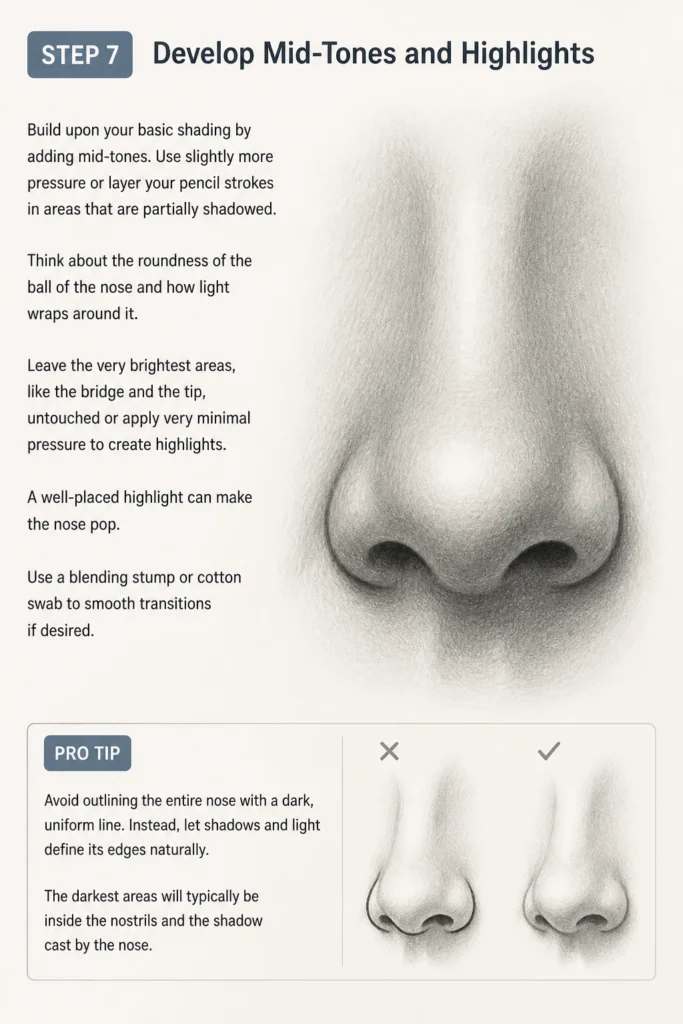
Build upon your basic shading by adding mid-tones. Use slightly more pressure or layer your pencil strokes in areas that are partially shadowed. Think about the roundness of the ball of the nose and how light wraps around it.
Leave the very brightest areas, like the bridge and the tip, untouched or apply very minimal pressure to create highlights. A well-placed highlight can make the nose pop. Use a blending stump or cotton swab to smooth transitions if desired.
Pro Tip: Avoid outlining the entire nose with a dark, uniform line. Instead, let shadows and light define its edges naturally. The darkest areas will typically be inside the nostrils and the shadow cast by the nose.
Step 8: Add Subtle Details and Final Touches
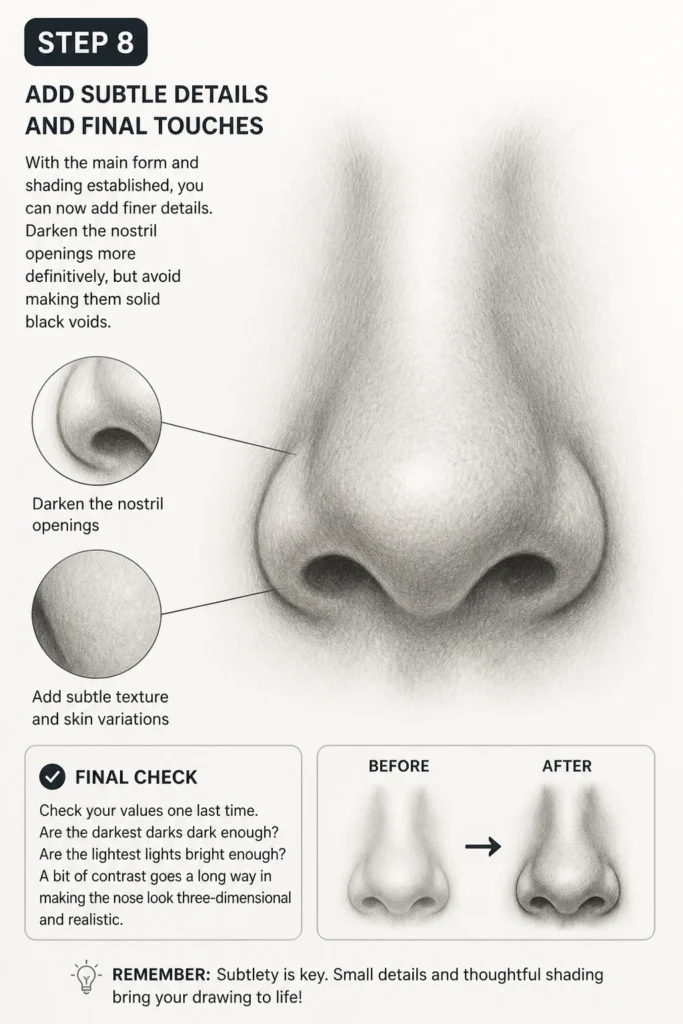
With the main form and shading established, you can now add finer details. Darken the nostril openings more definitively, but avoid making them solid black voids. Introduce slight textural variations if appropriate for your style.
Check your values one last time. Are the darkest darks dark enough? Are the lightest lights bright enough? A bit of contrast goes a long way in making the nose look three-dimensional and realistic.
Common Mistakes to Avoid
Drawing a Hard Outline
Many beginners tend to outline the entire nose with a dark, continuous line. This flattens the nose and makes it look like a cutout. A nose is part of the face and should blend in.
Instead, use values and shadows to define the edges. Let the contrast between light and shadow create the illusion of form and separation from the surrounding skin. Only the nostrils themselves typically have distinct, darker edges.
Making Nostrils Too Symmetrical or Circular
Nostrils are rarely perfectly symmetrical, nor are they perfect circles. They have unique, often irregular shapes, similar to a comma or tear-drop. Forcing them into perfect symmetry makes the nose look unnatural.
Study reference photos to see the variety in nostril shapes. Allow for slight imperfections and variations. This subtle asymmetry adds realism and character to your drawing.
Ignoring the Bridge of the Nose
Focusing too much on the tip and nostrils can lead to neglecting the bridge. The bridge connects the nose to the brow and forehead, and its shape significantly impacts the overall look. A flat bridge can make the nose seem detached.
Always consider the entire structure, from the glabella (between the eyebrows) down to the tip. Ensure the bridge has appropriate width and a gentle curve or angle that flows into the rest of the face.
Over-Shading or Under-Shading
Either extreme can flatten your drawing. Over-shading can make the nose look muddy or heavy, losing its form. Under-shading leaves it looking flat and two-dimensional, lacking depth.
Practice observing light and shadow patterns. Use a range of values, from light mid-tones to dark accents, to create a sense of volume. Gradual transitions are key to making the nose appear rounded and realistic.
Troubleshooting
My Nose Looks Flat
A flat-looking nose often results from insufficient value range or a lack of clear light and shadow. You might be using too few shades of gray, or your shadows aren’t dark enough.
Revisit your shading. Ensure you have distinct areas of highlight, mid-tone, and shadow. Push your darks further, especially in the nostril openings and the shadow cast beneath the nose. A clear light source is crucial for defining form.
The Nose Appears Detached from the Face
This usually happens when the connection points, particularly the bridge and the area where the nostril wings meet the cheeks, are not properly rendered. It can also stem from a hard outline around the entire nose.
Soften the edges where the nose meets the face. Use subtle shading to suggest the transition rather than a strong line. Make sure the bridge lines flow naturally from the brow area, and the nostril wings gently merge into the cheek planes.
Nostrils Look Unrealistic or Cartoonish
If your nostrils appear too uniform, perfectly circular, or simply don’t look right, you’ve likely oversimplified their shape. They are complex and vary greatly from person to person.
Examine reference images closely. Notice the subtle curves, the slight unevenness, and how the shape changes with perspective. Avoid making them perfect ovals or circles. Pay attention to the thickness of the nostril walls as well.
Key Takeaways
- Always start with simple geometric shapes as your foundation, like a sphere for the tip.
- Break down the nose into manageable components: bridge, ball, nostril wings, and septum.
- Use light construction lines initially, then refine and erase them as you establish the form.
- Shading is critical for conveying three-dimensionality; focus on light, mid-tones, and shadows.
- Avoid hard outlines; let value transitions define the edges of the nose.
- Practice observation by studying real noses and reference photos to understand their unique variations.
Frequently Asked Questions
How do I make the nose look symmetrical?
Achieving perfect symmetry can be tricky and isn’t always desirable for realism. Instead of aiming for exact mirror images, focus on balance. Use your initial guide shapes (the main sphere and two smaller circles) to establish a balanced foundation. Constantly compare one side to the other as you draw, making small adjustments. Remember, slight asymmetry can make a face more lifelike.
What pencil hardness should I use for drawing a nose?
For initial sketching and construction lines, an HB or 2H pencil works well because it’s light and easy to erase. For shading and adding darker values, a 2B or 4B pencil is ideal. These softer leads create richer, darker tones and blend more smoothly. You can use a range of pencils to achieve varied values and depth.
How do I draw different nose types?
The basic principles remain the same for all nose types: start with the underlying sphere and build from there. The differences lie in the proportions and specific curves. A larger nose might have a bigger initial sphere and wider nostril guides. A hooked nose would have a more pronounced curve in the bridge. Practice observing these variations in references and adjust your initial shapes accordingly.
Should I draw the nose first when drawing a face?
While there’s no strict rule, it’s generally recommended to establish the overall head shape and placement of major features (eyes, nose, mouth) with light guidelines first. This helps ensure the nose is proportioned correctly within the face. You can then detail the nose, knowing it fits the facial structure you’ve laid out. Some artists like to block in the nose early to anchor the face.
Our Top Recommended Finds
- Sketching Pencil Set: A good set with a range of hardness (e.g., 2H to 6B) allows for versatile line work and shading.
- Kneaded Eraser: Essential for lifting graphite gently without damaging the paper, perfect for subtle adjustments and highlights.
- Blending Stumps: These paper tools help smooth out pencil strokes, creating seamless transitions and a polished look in your shading.
Embrace Your Artistic Journey
You’ve just taken a significant step in understanding how to draw a nose, transforming a seemingly complex feature into manageable shapes and values. This foundation will serve you well in all your portraiture.
The real magic happens with consistent practice. Pick up your pencil, find some reference photos, and apply what you’ve learned today. Each drawing you create builds confidence and refines your artistic eye. Keep exploring, keep experimenting, and most importantly, keep enjoying the process of creation.