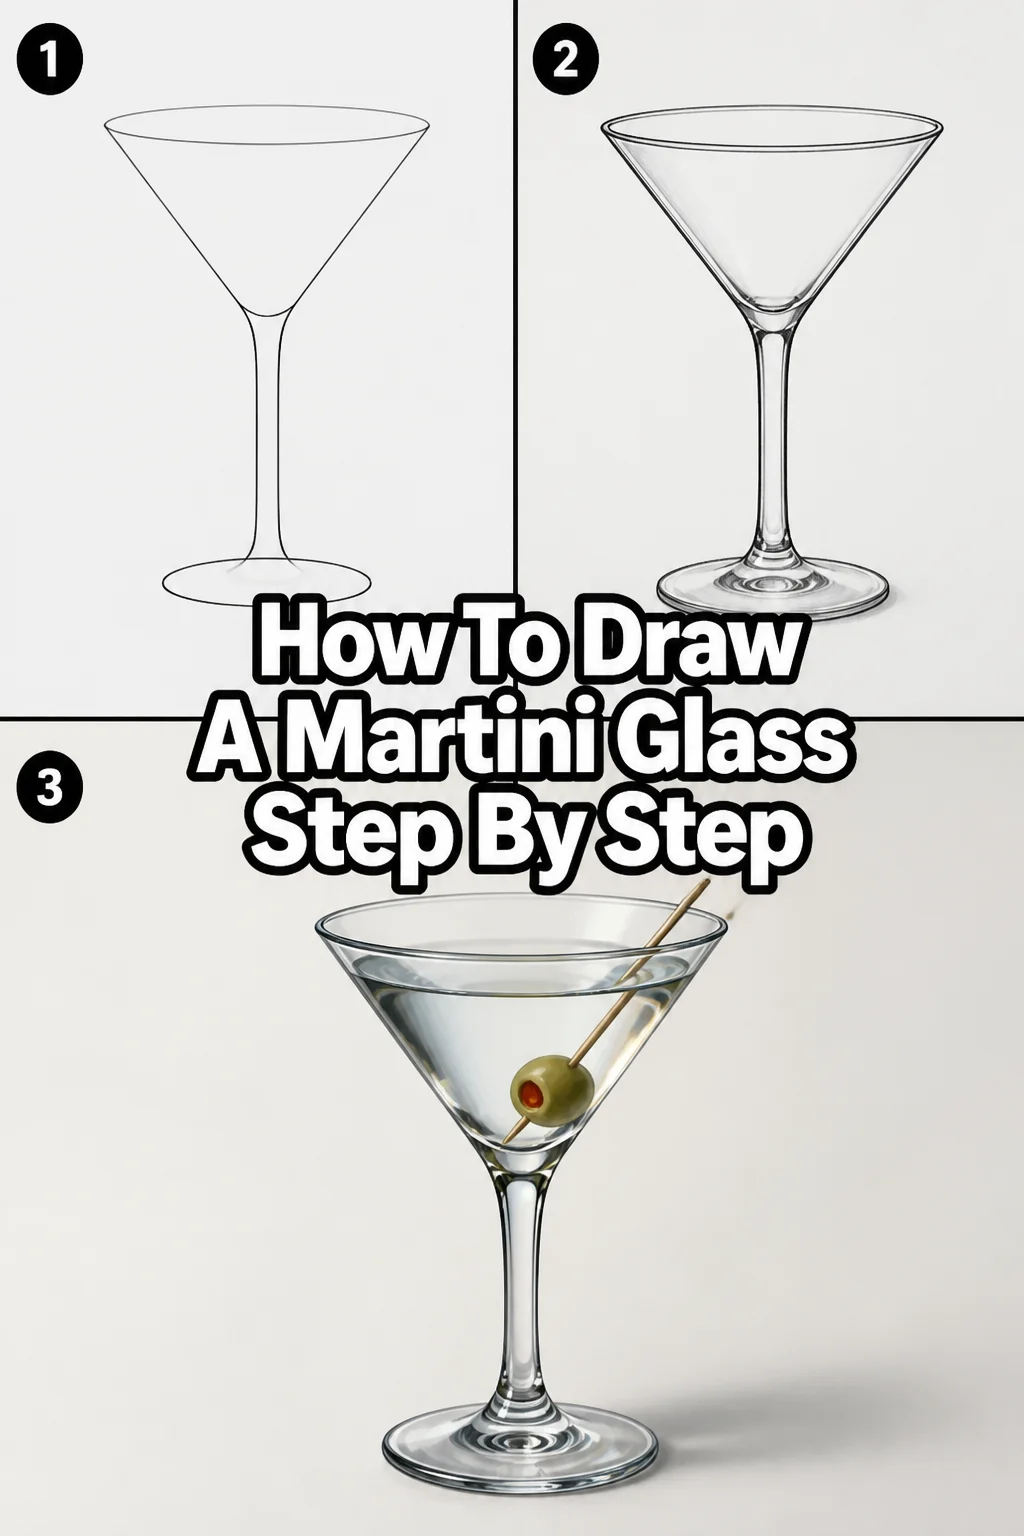
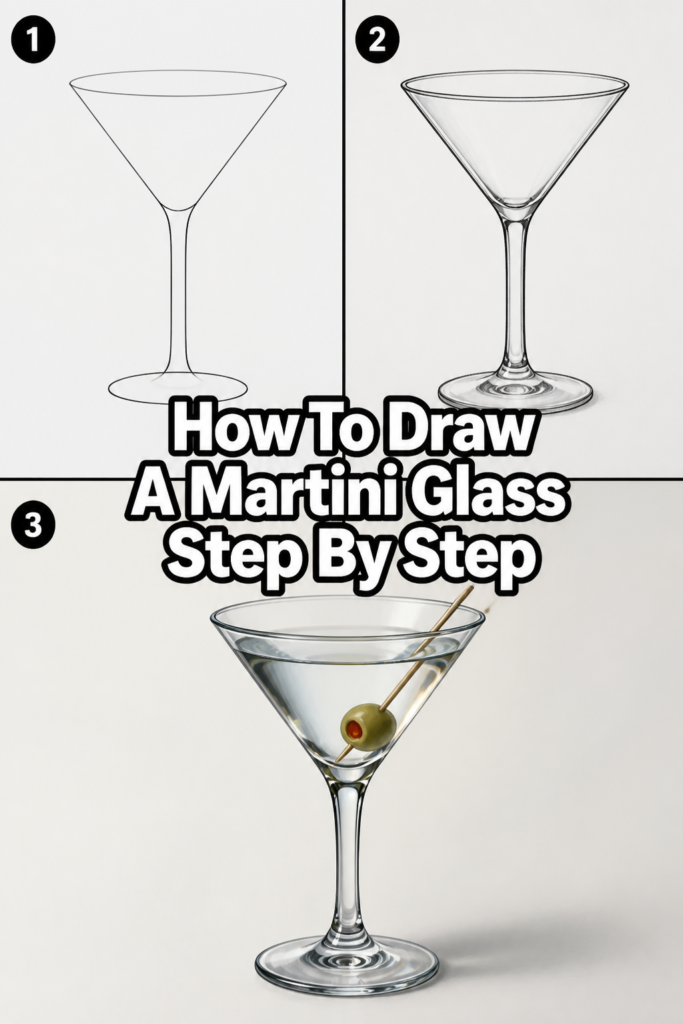
🍸 How To Draw A Martini Glass Step By Step
Learning to capture the sleek, geometric lines of a classic cocktail glass is a rite of passage for any aspiring illustrator.
I spent years sketching glassware in dim lounges to master the way light bends through liquid and glass.
This guide breaks down those complex reflections into simple, manageable shapes that anyone can master.
Quick Overview
This tutorial focuses on the iconic “V” shaped martini glass, emphasizing symmetry and the illusion of transparency.
- Time needed: 30 to 45 minutes
- Difficulty: Beginner
- What you’ll need: Graphite pencils (HB and 2B), a plastic eraser, a ruler, and smooth drawing paper.
Step-by-Step Instructions
Step 1: Establish the Central Axis
Draw a perfectly vertical line down the center of your paper using a ruler and a light HB pencil.
This line serves as your anchor, ensuring the bowl, stem, and base are all perfectly aligned and balanced.
Martini glasses are defined by their symmetry, so taking the time to get this guide line straight is vital for a realistic result.
Pro Tip: Keep your pencil pressure extremely light so you can easily erase this guide later without leaving a ghost image.
Step 2: Map the Top Ellipse
Sketch a wide, flat oval at the top of your vertical line to represent the rim of the glass.
Because we are viewing the glass from a slight angle, the circular rim appears as an ellipse rather than a perfect circle.
Ensure the vertical axis line passes exactly through the center of this oval to maintain the structural integrity of the drawing.
Pay close attention to the roundness of the edges; they should be smooth curves, not pointed like a football.
Step 3: Define the Iconic V-Shaped Bowl
Connect two diagonal lines starting from the outer edges of your ellipse and meeting at a point on the central axis.
The distance from the rim to this point determines the depth of your glass, so choose a length that looks proportional.
Most classic martini glasses have a sharp, straight taper, but you can add a very slight curve if you prefer a more modern look.
Check both sides repeatedly to make sure the angles are identical, creating a perfectly balanced funnel shape.
Step 4: Construct the Stem
Extend two closely spaced parallel lines downward from the bottom point of the bowl.
The stem should be thin and elegant, but thick enough to realistically support the weight of the large bowl above it.
Stop these lines once the stem reaches about two-thirds the height of the bowl itself for a classic aesthetic.
Avoid making the stem too short, as this can make the glass look “stumpy” and lose its sophisticated silhouette.
Pro Tip: Use a ruler for these lines if you want a crisp, commercial illustration look, or freehand them for a more organic, artistic feel.
Step 5: Create the Base Ellipse
Draw another ellipse at the bottom of the stem to serve as the foot of the martini glass.
This ellipse should be slightly narrower than the one you drew for the rim to create a sense of depth and perspective.
Make sure the bottom of the stem meets the exact center of this oval so the glass doesn’t look like it is tipping over.
The curve of this base should mirror the curve of the rim to keep the perspective consistent across the entire piece.
Step 6: Add Glass Thickness
Trace a second, slightly smaller ellipse just inside the first one at the rim to show the thickness of the glass wall.
Continue this inner line down the sides of the bowl, keeping it very close to the outer edge.
At the bottom of the bowl, where the glass meets the stem, draw a small “U” shape to show the solid glass transition.
This small detail is what separates a flat drawing from a professional-looking three-dimensional object.
Step 7: Illustrate the Liquid Level
Sketch a horizontal ellipse inside the bowl to represent the surface of the martini.
This ellipse should be smaller than the rim and sit a small distance below it to show that the glass isn’t quite full.
Remember that the liquid follows the same perspective as the rim, so the curves must match perfectly.
Draw a tiny upward curve where the liquid touches the sides of the glass to represent the meniscus, or the way liquid clings to the surface.
Pro Tip: If you want to draw a “dirty” martini, leave the liquid slightly cloudy by using very soft, light shading inside this area.
Step 8: Place the Garnish
Insert a thin diagonal line for the toothpick and a small oval for the olive resting at the bottom of the bowl.
Part of the toothpick will be “underwater,” so shift the line slightly where it enters the liquid to simulate light refraction.
Draw the olive with a small circle in the center to represent the pimento stuffing, giving it a focal point of color or detail.
The garnish adds character and a sense of scale to the glass, making the drawing feel much more intentional and complete.
Step 9: Shade for Transparency and Reflection
Apply dark tones to the edges of the glass and leave the center almost white to mimic the way light passes through.
Use long, vertical strokes on the stem to suggest a smooth, polished surface that reflects the surrounding room.
Add a few sharp, bright white highlights on the rim and the shoulder of the bowl using a clean eraser or white gel pen.
Contrast is key here; the darker your shadows and the brighter your highlights, the more the glass will appear to shine.
Step 10: Final Refinement
Darken the outlines where the glass would naturally cast a shadow, such as the bottom of the base and the underside of the olive.
Gently erase your original vertical axis line and any overlapping marks from the liquid or garnish steps.
Check the overall balance one last time, ensuring that the glass looks sturdy and the liquid looks level.
Use a soft 2B pencil to add a very faint shadow on the table surface beneath the base to ground the object in space.
Common Mistakes to Avoid
Asymmetrical Bowl Slopes
One of the most frequent errors is drawing one side of the “V” steeper than the other. This makes the glass look like it is warped or melting. Always use your central axis line to measure the distance from the center to the outer edge on both sides to ensure they are identical.
Flat Bases and Rims
Beginners often draw the top and bottom of the glass as straight lines or simple arcs. In reality, because of perspective, these must be full ellipses. If the base is too flat, the glass will look like it is floating or viewed from an unrealistic “dead-on” angle that lacks depth.
Ignoring Glass Thickness
A common pitfall is drawing the glass as a single thin line. Real glass has a measurable thickness, especially at the rim and the base of the bowl. Failing to include the “inner” lines makes the object look like a paper cutout rather than a heavy, crystal vessel.
Troubleshooting
The Glass Looks Tilted
If your glass appears to be leaning to one side, check your vertical axis. Usually, this happens because the stem was drawn at a slight angle or the ellipses are not centered on the axis. You can fix this by redrawing the stem and base, ensuring they align perfectly with the very center of the top rim.
The Liquid Looks Unnatural
Liquid that looks like it is “sliding” out of the glass usually has an ellipse that doesn’t match the rim’s perspective. Ensure the “roundness” or “flatness” of the liquid surface matches the rim exactly. If the rim is a wide oval, the liquid surface must be a slightly smaller, equally wide oval.
The Drawing Lacks Dimension
If your martini glass looks flat, you likely need more contrast in your shading. Glass is all about highlights and deep shadows. Try adding a very dark shadow right where the liquid meets the glass and a very bright, sharp highlight on the opposite side to create a 3D effect.
Key Takeaways
- Always start with a vertical axis line to maintain perfect symmetry throughout the drawing process.
- Use ellipses rather than straight lines for the rim and base to create a realistic sense of perspective.
- Refraction is important; remember to slightly offset any objects, like toothpicks, when they enter the liquid.
- Highlighting is the secret to drawing glass; leave sections of the paper completely white to represent reflected light.
- Keep your initial lines light so that you can refine the “inner” and “outer” walls of the glass without cluttering the image.
- Consistency in the curve of your ellipses ensures that the viewer sees the glass from a single, stable viewpoint.
Frequently Asked Questions
Should I use a ruler for the entire drawing?
While a ruler is helpful for the vertical axis and the straight sides of the bowl, using it for everything can make the drawing look stiff. I recommend using a ruler for the structural guides and then freehanding the final lines to give the glass a more natural, hand-drawn quality. This balance creates a professional yet artistic result.
How do I make the martini look like it has ice or condensation?
Martinis are usually served “up” (chilled but without ice), but you can add condensation by drawing tiny, irregular circles on the outside of the bowl. Shading these droplets with a tiny highlight on top and a small shadow underneath will make them pop. For a frosty look, use a very light, textured shading with a hard pencil like a 2H across the lower half of the bowl.
What is the best way to draw the olive’s reflection?
The reflection of the olive usually appears near the bottom of the bowl or on the surface of the liquid. Draw a fainter, slightly distorted version of the olive shape just below the real one. Keep the edges of the reflection blurry and lighter in tone than the actual garnish to indicate it is a reflection on a curved surface.
Can I use this method for a wine glass too?
Yes, the basic structure is very similar, involving a rim, bowl, stem, and base. The main difference is the shape of the bowl; while a martini glass is a “V” shape, a wine glass is more of a “U” or a “tulip” shape. You can follow the same steps for the axis, stem, and base, but simply curve the sides of the bowl outward instead of keeping them straight.
Our Top Recommended Finds
- Staedtler Mars Lumograph Pencil Set: These pencils offer a wide range of lead hardness, which is perfect for creating the subtle gradients needed for glass.
- Tombow Mono Zero Eraser: A pen-style eraser with a tiny tip that allows you to “draw” white highlights back into your shaded areas with extreme precision.
- Canson XL Series Bristol Paper: The ultra-smooth surface of Bristol paper is ideal for achieving the clean, crisp lines that a geometric object like a martini glass requires.
Elevate Your Artistic Perspective
Once you have mastered the basic silhouette of the martini glass, you can begin experimenting with different lighting setups and backgrounds.
Try placing your glass in a dark environment with a single strong light source to practice high-contrast reflections and dramatic shadows.
You might also consider drawing a series of glasses with different garnishes, such as a lemon twist or an onion, to build a complete cocktail-themed portfolio.
The skills you learned here—symmetry, perspective, and transparency—are foundational techniques that will improve every still life you draw from this point forward.
Grab your sketchbook today and try drawing a pair of glasses at different heights to create a compelling, sophisticated composition.