✨ How To Draw A Disco Ball Step By Step
Remember the thrill of a disco ball spinning, scattering light everywhere? It’s a captivating symbol of celebration and sparkle.
I’ve spent many joyful hours sketching these iconic symbols of fun, experimenting with how light plays on their many facets.
This guide distills my experience into simple steps, so you can capture that dazzling magic on paper with confidence.
Quick Overview
This guide will walk you through creating a stunning, three-dimensional disco ball drawing that truly sparkles. You’ll learn techniques for accurate shape, facet mapping, and realistic shading.
- Time needed: 45-75 minutes
- Difficulty: Intermediate
- What you’ll need: Drawing paper, HB, 2B, and 4B graphite pencils, a good eraser (kneaded and regular), a ruler, and optionally a compass and blending stump.
Step-by-Step Instructions
Step 1: Lay the Foundation with a Perfect Circle
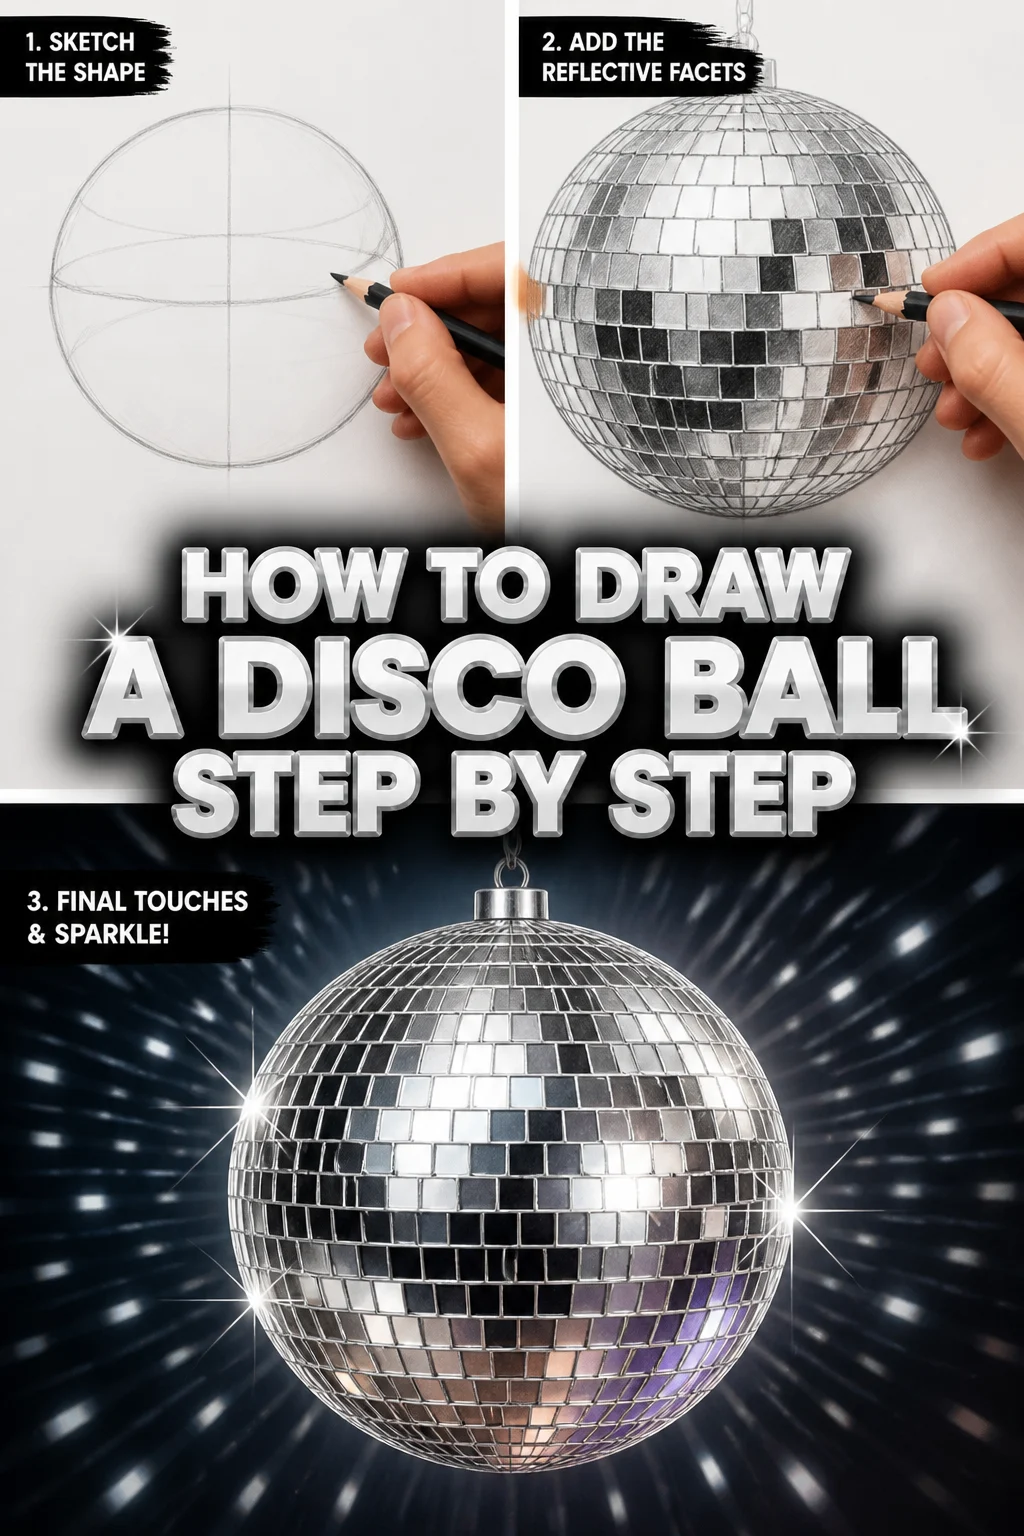
Begin by lightly sketching a perfect circle in the center of your paper. Use a compass if you have one for precision, or freehand it with gentle, overlapping strokes until you achieve a smooth shape. This circle will be the outer boundary of your disco ball.
Keep your lines very faint at this stage. These are just guidelines, meant to be erased later without leaving marks.
Pro Tip: Rotate your paper as you draw freehand circles. This helps your arm move more naturally and creates a smoother curve.
Step 2: Establish the Sphere’s Curve with Guiding Ellipses
To give your circle a three-dimensional, spherical quality, add a subtle curved guideline across the center horizontally. Then, draw another curved guideline vertically. These lines should gently arc, following the implied surface of a ball, not just straight across.
Visualize how a line would wrap around the surface of a globe. These curves will help maintain the illusion of roundness as you add facets.
Step 3: Map Out the Facet Grid System
Now, divide your sphere into a grid of smaller sections. Starting from the center, draw more curved lines, both horizontally and vertically, that follow the contours you established in Step 2. These lines should create a series of “squares” or “rectangles” that appear to wrap around the ball.
Think of it like drawing lines of longitude and latitude on a globe. The lines will appear more curved towards the edges of the sphere and straighter near the center.
Step 4: Define the Individual Facets
Within each section of your grid, carefully draw the actual outlines of the disco ball’s facets. These are typically small squares or rectangles. Adjust their shape slightly to fit the curved grid lines, making them appear to conform to the sphere’s surface.
Make sure the facets near the edges of the sphere appear slightly foreshortened, looking thinner or more distorted as they curve away from the viewer.
Pro Tip: Don’t make every facet perfectly uniform in size. Slight variations add to the realistic, hand-crafted feel of a disco ball.
Step 5: Outline the Details and Clean Up
Once you’re satisfied with the placement and shape of your facets, use a slightly darker pencil (like an HB or 2B) to carefully go over the main outlines of the disco ball and each individual facet. Then, gently erase all the initial light construction lines you drew in the earlier steps.
This step brings clarity to your drawing. Ensure your lines are clean and crisp, defining each reflective surface.
Step 6: Begin Basic Shading for Depth
Identify a light source for your disco ball. Imagine where the light is hitting it directly and where shadows would naturally fall. Using your HB pencil, apply a light, even layer of graphite to the facets that would be in shadow.
Gradually build up the tone, making the shaded areas darker towards the edges of the ball and lighter as they approach the direct light source.
Step 7: Render Facet Reflections and Highlights
This is where the magic happens. For each individual facet, apply varying degrees of shading to simulate reflections. Some facets will be very dark, reflecting deep shadows, while others will be left nearly white to represent bright highlights.
Use your 2B and 4B pencils for the darker reflections and shadows within individual facets. For the brightest highlights, use your kneaded eraser to lift graphite or simply leave the paper white.
Pro Tip: Think of each facet as a tiny mirror. Some will catch direct light, some will reflect the environment, and some will be in shadow. Create sharp contrast within and between facets.
Step 8: Add Cast Shadows and Background Elements
To ground your disco ball in its environment, draw a subtle cast shadow beneath it. The shadow should follow the curve of the ball and extend slightly onto the surface it’s resting on or hanging above.
You might also add a thin string holding the ball, or faint light rays emanating from its brightest points to enhance the disco effect.
Step 9: Refine and Enhance Sparkle
Go back over your drawing with your pencils and eraser. Darken the deepest shadows with your 4B pencil for greater contrast. Use your kneaded eraser to refine and sharpen the brightest highlights on key facets.
Look for opportunities to make certain facets ‘pop’ with intense light, giving the impression of scattered light and brilliant reflections.
Step 10: Review and Polish
Step back from your drawing and observe it critically. Are the facets consistent? Does the ball look round? Is the light source clear? Make any final adjustments to shading, line work, or highlights.
A fresh perspective often reveals areas for improvement. Ensure smooth transitions where needed and sharp edges where reflections demand it.
Common Mistakes to Avoid
Flat Facets
Many beginners struggle with making the facets appear flat, as if drawn on a flat circle rather than a sphere. This happens when the grid lines used for placement are drawn straight instead of curved. The illusion of roundness is lost, making the disco ball look like a simple pattern.
Always ensure your initial grid lines and subsequent facet outlines gently curve around the implied surface of the ball. This subtle distortion is crucial for a three-dimensional effect.
Inconsistent Light Source
Failing to establish a clear and consistent light source can make your disco ball drawing look confused and lack depth. If highlights and shadows are randomly placed, the ball won’t appear illuminated or shiny. It will look dull and unconvincing.
Before you begin shading, decide exactly where your light source is coming from. Then, apply shadows and highlights consistently across all facets, ensuring they logically follow that single light direction.
Overly Dark Lines
Using heavy, dark lines for every facet outline can make your disco ball drawing look harsh and lose its reflective quality. Disco balls are all about light and subtle reflections, not bold, solid outlines. Dark lines can overpower the delicate shading.
Vary your line weight. Use lighter, softer lines for facets that are reflecting light, and slightly darker lines only where a shadow or distinct edge is absolutely necessary. This helps convey the reflective nature of the surfaces.
Uneven Facet Sizes
If the individual facets are drawn in wildly different sizes or shapes, the overall structure of the disco ball can appear distorted and unrealistic. While slight variations are fine, major discrepancies break the illusion of a uniformly constructed object.
Take your time with the initial grid mapping. Use a ruler for guidance if needed, ensuring that the sections are relatively consistent before drawing in the final facet shapes.
Troubleshooting
My ball looks flat, not round!
This is a common issue when the underlying structure doesn’t convey depth. Your initial curved guidelines might not be pronounced enough, or your facets might not be foreshortened correctly at the edges.
Go back to Step 2 and 3. Re-evaluate your curved guidelines. Make sure the lines wrapping around the ball are distinctly curved. Also, ensure the facets on the sides of the ball are drawn narrower and more distorted to show they are curving away.
The facets don’t look shiny enough.
A lack of sparkle usually comes down to insufficient contrast. If your darkest darks aren’t dark enough, and your brightest brights aren’t light enough, the reflective quality will be lost.
Focus on creating strong value differences. Use your 4B pencil to push the shadows within and between facets much darker. Crucially, use your kneaded eraser to create very sharp, brilliant white highlights on the facets directly facing your light source.
It’s hard to make the facets look uniform.
Achieving a consistent pattern of facets requires patience and good planning. If your facets look haphazard, your initial grid was likely too loose or uneven.
Slow down during Step 3 and 4. Use a ruler to help draw your initial curved grid lines more evenly. Don’t rush when outlining the individual facets; aim for consistency in shape and size within each section of your grid.
Key Takeaways
- Start with a precise circular base and curved guidelines to establish a spherical form.
- Carefully map out a curved grid on the sphere to guide facet placement and maintain roundness.
- Define individual facets, remembering to foreshorten them towards the edges of the ball.
- Establish a clear light source and use varying pencil pressures to create realistic shading.
- Achieve sparkle and shine by creating strong contrast between very dark shadows and brilliant highlights.
- Don’t be afraid to use an eraser to refine highlights and clean up lines for a polished look.
Frequently Asked Questions
What’s the best pencil for drawing highlights?
For the brightest, most impactful highlights, it’s best to leave the paper white where the light hits directly. You can also use a kneaded eraser to lift graphite and create crisp, sharp highlights after shading. Some artists use a white gel pen for extreme sparkle.
A kneaded eraser is incredibly versatile for creating soft or sharp highlights by dabbing or shaping it to lift graphite precisely.
How do I make it look like it’s spinning?
To convey motion, you can add subtle motion blur to the light rays emanating from the disco ball, or even a slight blur to the surrounding background elements. Alternatively, a few radiating lines from key highlights can suggest dynamic light.
Focus on emphasizing the light being scattered, rather than blurring the ball itself, to maintain its form while suggesting movement.
Can I draw this with markers instead of pencils?
Yes, you absolutely can! When using markers, focus on layering lighter shades first and building up darker tones for shadows. For highlights, use a very light grey or leave areas untouched, and consider using a white gel pen for crisp reflections.
Blending markers carefully is key to achieving smooth transitions and reflections similar to pencil shading, but with vibrant color.
How do I add a string or stand?
To add a string, draw a thin, slightly curved line originating from the very top center of your disco ball, extending upwards. If it’s on a stand, draw the stand beneath it, ensuring the ball appears to rest naturally and cast a shadow.
Always consider perspective when adding these elements, making sure they align with the disco ball’s position and angle.
Our Top Recommended Finds
- High-Quality Graphite Pencil Set: A good set with pencils ranging from HB to 6B allows for a wide range of tones and shading.
- Blending Stumps/Tortillons: Essential for smoothing out graphite, creating seamless transitions, and achieving soft, diffused shadows.
- Kneaded Eraser: Perfect for lifting graphite precisely, creating soft highlights, and cleaning up without smudging your drawing.
Shine Bright: Your Next Artistic Adventure
You’ve just created a dazzling disco ball, capturing its unique blend of geometry and light. This journey teaches valuable lessons in perspective, shading, and creating the illusion of shine.
Don’t stop here! Practice drawing your disco ball from different angles, or imagine it in various settings – perhaps hanging in a vibrant club, or reflecting sunlight in a whimsical garden. Experiment with adding color to its facets, or drawing multiple disco balls of different sizes. Keep exploring, keep creating, and let your artistic light shine!