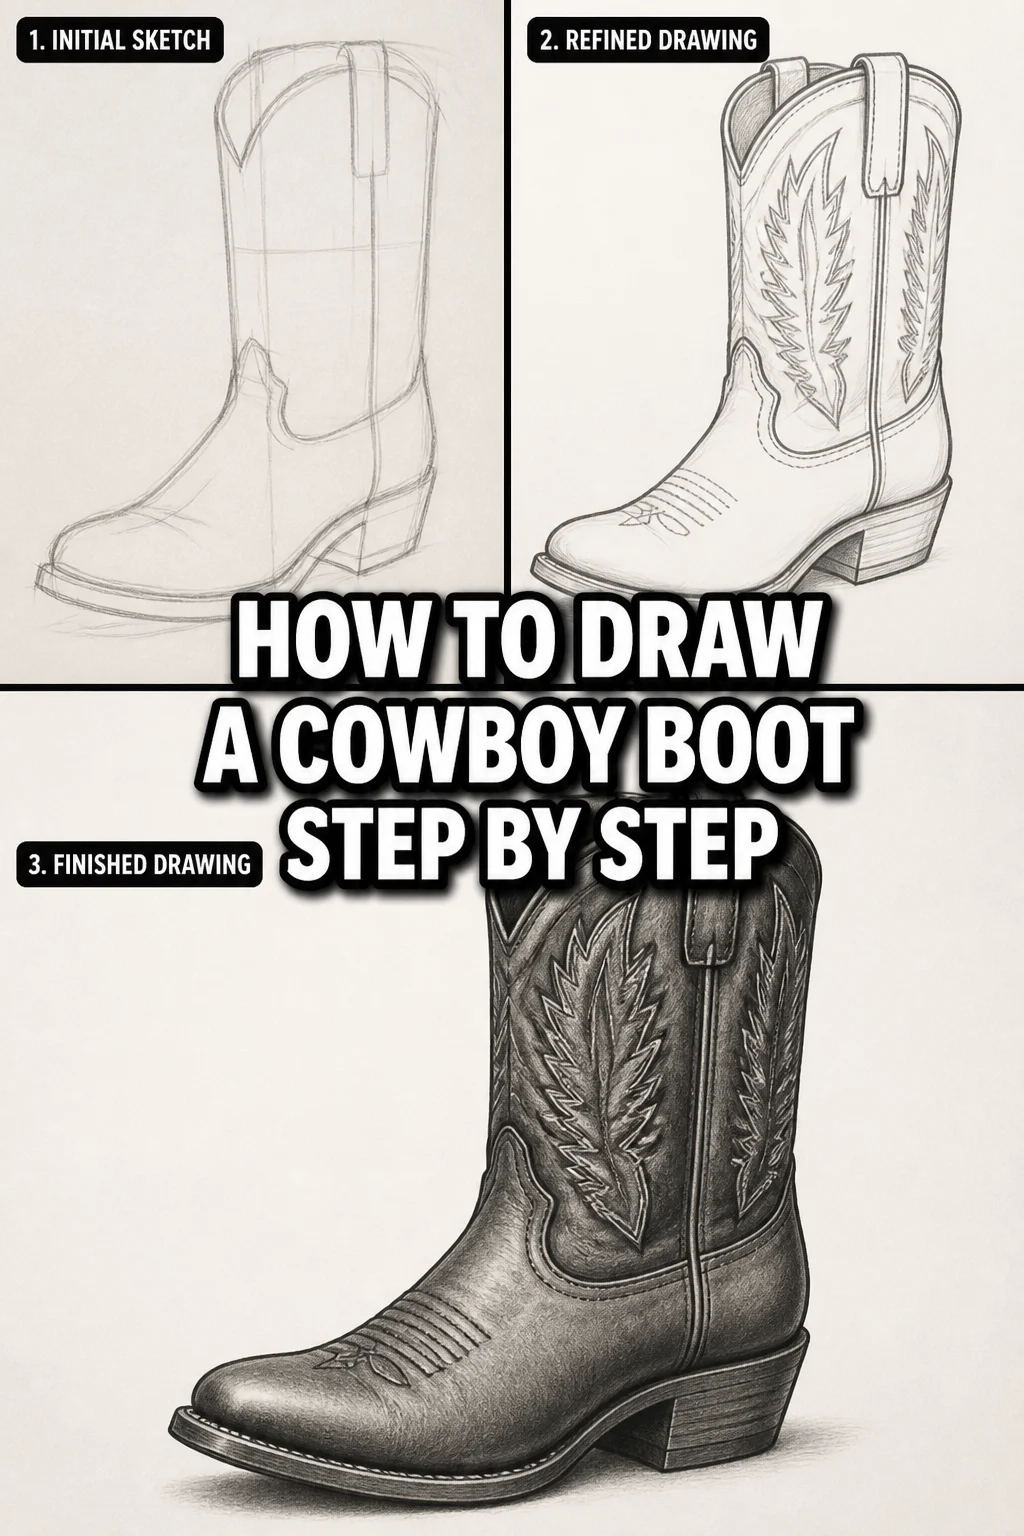
🤠 How To Draw A Cowboy Boot Step By Step
I remember my first attempt at drawing a cowboy boot; it looked more like a lumpy sock than Western wear.
Through practice and breaking it down, I found a clear path to creating a convincing boot.
This guide shares that straightforward method, helping you capture the iconic silhouette and intricate details with confidence.
Quick Overview
This guide will walk you through the process of drawing a classic cowboy boot, from its foundational shapes to its distinctive decorative elements.
You’ll learn to build the boot organically, ensuring each part contributes to a cohesive and authentic final piece.
- Time needed: 45-75 minutes
- Difficulty: Beginner to Intermediate
- What you’ll need: Pencil (HB or 2B), eraser, paper, optional fine-liner pen
Step-by-Step Instructions
Step 1: Lay Down the Basic Shapes
Start with light, loose lines to define the overall form of the boot.
Draw a tall, slightly curved rectangle for the boot’s shaft. This will be the upper part that covers the calf.
Sketch an oval or rounded trapezoid at the bottom of the rectangle to represent the foot part, angling it slightly upwards at the toe.
Add a small, blocky rectangle for the heel beneath the back of the foot shape. Think of it as a solid foundation.
Pro Tip: Keep your initial lines very faint. This allows for easy adjustments without leaving heavy eraser marks, making the refining process much smoother later on.
Step 2: Define the Boot Shaft
Refine the top edge of the shaft. Cowboy boot shafts often have a distinctive scallop or a slightly V-shaped dip at the front and back.
Curve the sides of the shaft inwards slightly as they descend towards the ankle area. This gives the boot a more fitted and realistic appearance.
Ensure the shaft width looks proportional to the foot section you’ve sketched. A too-wide or too-narrow shaft can make the boot look awkward.
Connect the shaft to the foot section with smooth, flowing lines, indicating the ankle and instep curve.
Step 3: Shape the Foot and Heel
Carve out the distinctive toe shape. Cowboy boots typically have pointed, snip, or rounded-off square toes. Choose one that appeals to you.
Develop the curve over the top of the foot, known as the vamp. This line should flow naturally from the shaft to the toe.
Sculpt the heel, giving it a slight underslung angle. Cowboy boot heels are usually stacked and angled forward, providing stability.
Add a subtle curve to the back of the heel, showing its profile. This helps give it dimension.
Pro Tip: Observe real cowboy boots or reference images. Notice how the different toe and heel styles dramatically change the boot’s character. Experiment with a few variations.
Step 4: Add the Sole and Welt
Draw a thin line running around the bottom edge of the foot, extending slightly beyond the main boot shape. This represents the sole.
Create a second, even thinner line just above the sole line, where the sole meets the upper part of the boot. This is the welt, which is a strip of leather that joins the sole to the boot.
Extend the sole slightly past the toe and heel. This overhang is characteristic of many cowboy boots.
Ensure these lines follow the curve and shape of the foot precisely, maintaining a consistent distance from the main boot outline.
Step 5: Sketch the Details (Pull Straps, Stitching Lines)
Add two small pull straps to the inside and outside of the boot shaft’s top edge. These are short loops designed to help pull the boot on.
Draw a stitching line along the top edge of the shaft, following its contour. This indicates the finished edge.
Include a subtle stitching line where the vamp meets the shaft, often called the “wingtip” or “collar” line, depending on the boot style.
Consider a seam line running down the back of the shaft, a common construction detail.
Step 6: Design the Boot Stitching Pattern
Plan your decorative stitching. Cowboy boots are famous for their intricate patterns on the shaft and sometimes the vamp.
Begin with simple, symmetrical designs like “W” shapes, swirls, or stylized florals. These patterns are often repeated.
Sketch these patterns lightly onto the shaft area. Remember that the stitching is usually raised or embroidered, so it adds texture.
Vary the size and complexity of your patterns to create visual interest. You can also add a small pattern to the toe if desired.
Pro Tip: Don’t try to make your stitching perfect right away. Focus on the overall flow and symmetry of the design. You can refine the individual stitches later.
Step 7: Refine and Clean Up Lines
Go over your preferred lines with a slightly darker pencil or a fine-liner pen. This makes your drawing crisp and defined.
Erase all the initial light sketch lines and any unnecessary construction marks. Take your time to clean up the drawing.
Smooth out any jagged or uneven lines, ensuring the boot’s silhouette is elegant and fluid.
Pay attention to the curves and angles, making sure they look intentional and well-executed.
Step 8: Add Shading and Texture
Determine a light source for your boot. This will guide where you add shadows and highlights.
Apply light shading to areas that would naturally be in shadow, such as under the heel, along the inside curves of the shaft, and beneath the sole.
Use cross-hatching or stippling to create texture, suggesting the leather material. A slight sheen can indicate polished leather.
Darken the stitching patterns slightly to make them stand out as embroidered details. This adds depth and realism to your drawing.
Common Mistakes to Avoid
Disproportionate Elements
A common pitfall is making the shaft too tall or short compared to the foot, or the heel too large for the boot. This throws off the entire balance of the drawing.
Always start with basic shapes and continually compare the sizes of each section as you draw. Step back frequently to assess the overall proportions and make adjustments early on.
Flat, Lifeless Form
Drawing the boot as if it’s completely flat on the paper, without any sense of three-dimensionality, makes it appear unconvincing. This often happens when artists only focus on the outline.
Think about the boot as a solid object in space. Use subtle curves, overlapping lines, and eventual shading to suggest its volume and form, making it look grounded and real.
Inconsistent Stitching Patterns
Rushing the decorative stitching can lead to uneven, asymmetrical, or messy patterns. This detracts from the craftsmanship that cowboy boots are known for.
Sketch your patterns lightly first, ensuring they are symmetrical and evenly spaced. Take your time with the details, treating each stitch as a small, deliberate stroke.
Ignoring the Sole and Welt
Sometimes artists forget to include the sole and welt, or they draw them as a single, thin line. This omits crucial structural details that define a boot’s construction.
Always draw both the sole and the welt as distinct, slightly protruding layers. These elements add depth and a sense of realism to the boot’s foundation.
Troubleshooting
My Boot Looks Stiff and Unnatural
If your boot appears rigid, it might be due to overly straight or angular lines. Boots, even sturdy ones, have natural curves and subtle bends.
Go back to your initial sketch and loosen up your hand. Try to introduce more organic curves, especially around the ankle, instep, and the top of the shaft. Practice drawing arcs and gentle S-curves to improve fluidity.
The Perspective Seems Off
Drawing a boot from an angle can be tricky, often resulting in one side looking longer or wider than the other. This indicates a perspective issue.
Use a vanishing point if you’re drawing a pair or multiple objects. For a single boot, focus on parallel lines converging slightly towards the back of the boot. Use a ruler or straight edge for reference points if needed to ensure symmetry.
My Shading Doesn’t Look Right
Inconsistent or haphazard shading can make the boot look muddy or undefined, rather than adding depth and form.
Re-evaluate your light source. Decide where the light is coming from and consistently apply shadows to the areas that would be furthest from that light. Build up your shading in layers, starting light and gradually darkening where needed for a smoother transition.
Key Takeaways
- Start Simple: Begin with basic geometric shapes to establish the boot’s overall structure before adding details.
- Focus on Proportions: Constantly check the size relationships between the shaft, foot, and heel to maintain a balanced look.
- Embrace Curves: Use flowing, natural curves to give the boot a realistic and less rigid appearance.
- Detail Matters: The sole, welt, pull straps, and stitching patterns are crucial for authenticity and character.
- Refine Gradually: Work from light sketch lines to darker, more defined outlines, cleaning up as you go.
- Practice Shading: Understand light and shadow to add depth and make your boot look three-dimensional.
Frequently Asked Questions
What kind of pencil is best for drawing boots?
An HB pencil is a great all-rounder for initial sketching and general lines. For darker outlines and shading, a 2B or 4B pencil works well, offering richer tones. Use a harder pencil like an H for very light construction lines.
How can I make the leather texture look realistic?
To suggest leather, use subtle, varied shading. For smooth leather, aim for soft gradients and slight highlights. For distressed leather, incorporate tiny, irregular lines and smudges. Avoid uniform shading, as leather often has slight imperfections and variations.
Should I draw the boot standing up or lying down?
For beginners, drawing the boot standing upright and slightly angled is often easiest, as it allows you to clearly see all its main components. Once comfortable, you can experiment with boots lying down or in different dynamic poses.
How do I make the stitching look neat and even?
Draw a faint guideline for your stitching pattern first. Then, use short, consistent dashes or dots along that line. Practice drawing small, repetitive shapes to improve your control. Don’t press too hard, as you can always darken them later.
Our Top Recommended Finds
- Sketching Pencils Set: A good set with varying lead hardness (e.g., 2H-6B) offers versatility for light sketches to deep shading.
- Kneaded Eraser: Essential for lifting graphite without damaging paper, perfect for cleaning up light lines or subtle highlights.
- Fine-Liner Pens: A set of black fine-liners (e.g., 0.1mm, 0.3mm, 0.5mm) is excellent for inking your final lines with precision.
Lasso Your Artistic Vision
Bringing a cowboy boot to life on paper is a rewarding journey, combining structural understanding with creative flair.
Each line you draw builds upon the last, transforming simple shapes into an iconic piece of Western heritage.
Grab your pencil, start sketching today, and discover the satisfaction of creating your very own authentic cowboy boot drawing.