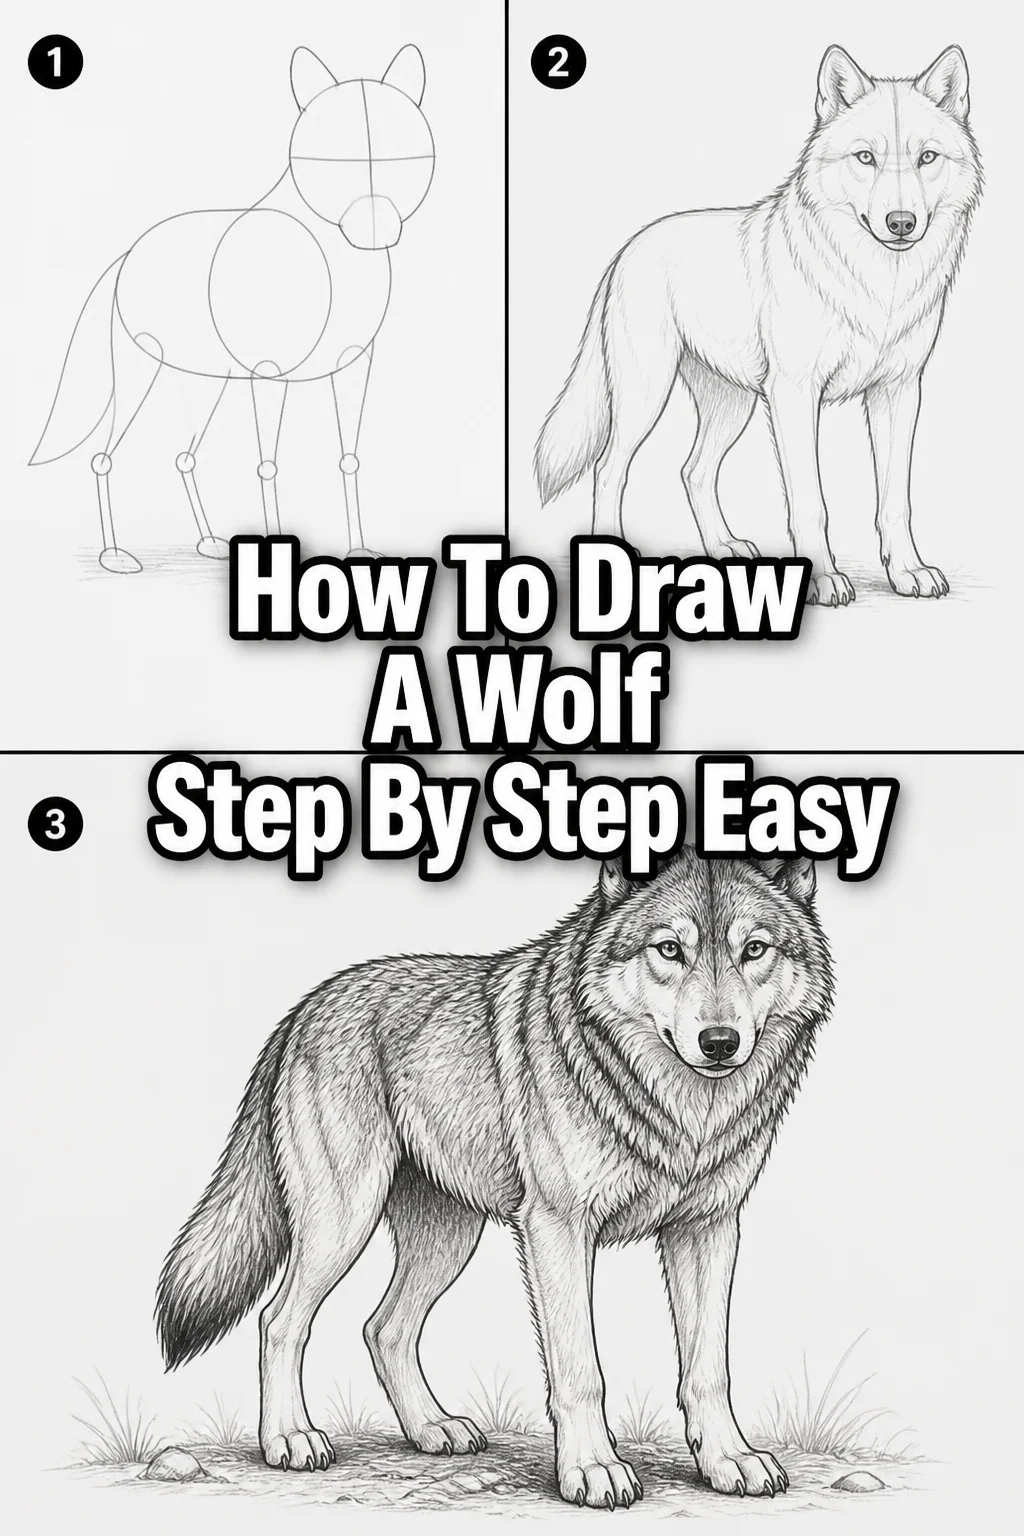
🐺 How To Draw A Wolf Step By Step Easy
Have you ever wanted to capture the majestic spirit of a wolf on paper? It might seem intimidating at first glance, but it’s entirely achievable. I’ve spent countless hours sketching animals, and wolves hold a special place in my heart for their captivating beauty.
This guide will break down the process into simple, manageable steps, making it easy for anyone to follow along. You’ll soon discover the joy of bringing this incredible creature to life with just a pencil and paper.
Quick Overview
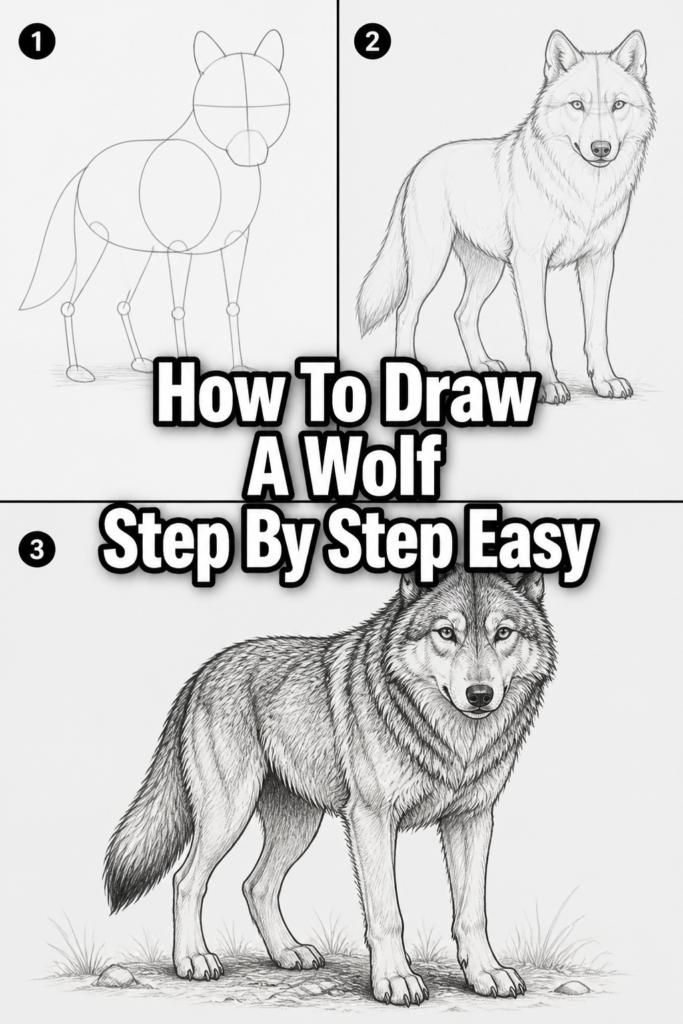
This guide will walk you through creating a beautiful wolf drawing from scratch. We’ll start with basic shapes and gradually add details, ensuring a rewarding experience even for beginners. You’ll finish with a complete wolf sketch you can be proud of.
- Time needed: 45-75 minutes (depending on detail and pace)
- Difficulty: Beginner
- What you’ll need: Pencil, eraser, paper, optional blending tool
Step-by-Step Instructions
Step 1: Lay Down the Basic Head Shapes
Begin by sketching two overlapping circles. The larger circle will form the back of the wolf’s head, while a slightly smaller, elongated oval should overlap its lower right side. This smaller oval will define the muzzle area. Don’t press too hard; these are just guidelines.
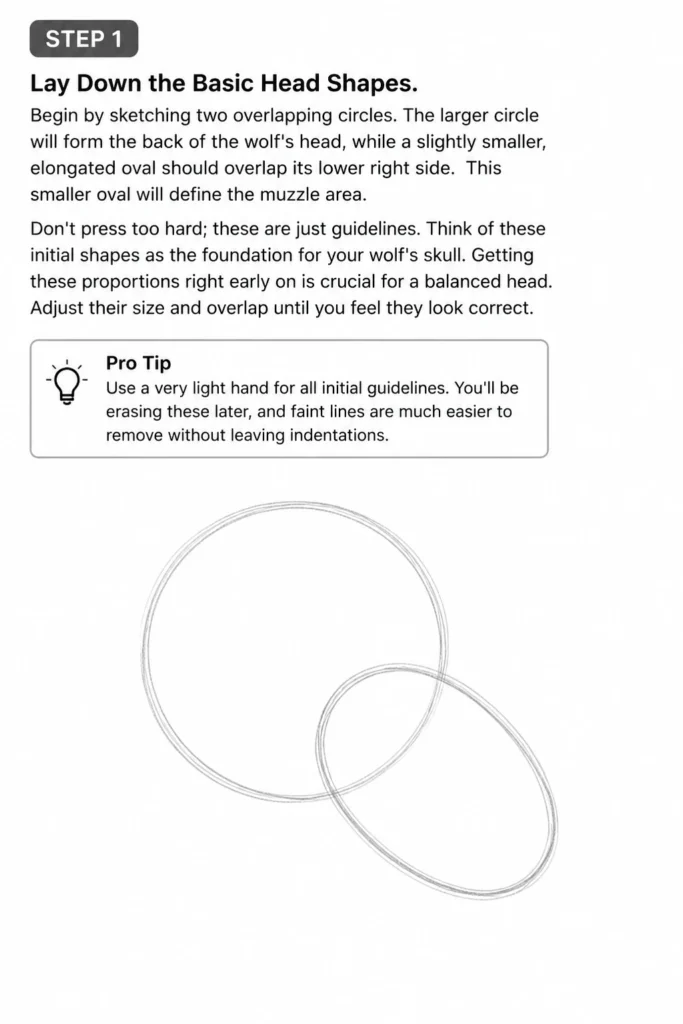
Think of these initial shapes as the foundation for your wolf’s skull. Getting these proportions right early on is crucial for a balanced head. Adjust their size and overlap until you feel they look correct.
Pro Tip: Use a very light hand for all initial guidelines. You’ll be erasing these later, and faint lines are much easier to remove without leaving indentations.
Step 2: Define the Muzzle and Jawline
From the smaller oval, gently extend a curved line downwards and slightly to the left, forming the lower jaw. Connect this line back to the larger head circle. This creates the basic shape for the wolf’s powerful snout and chin.
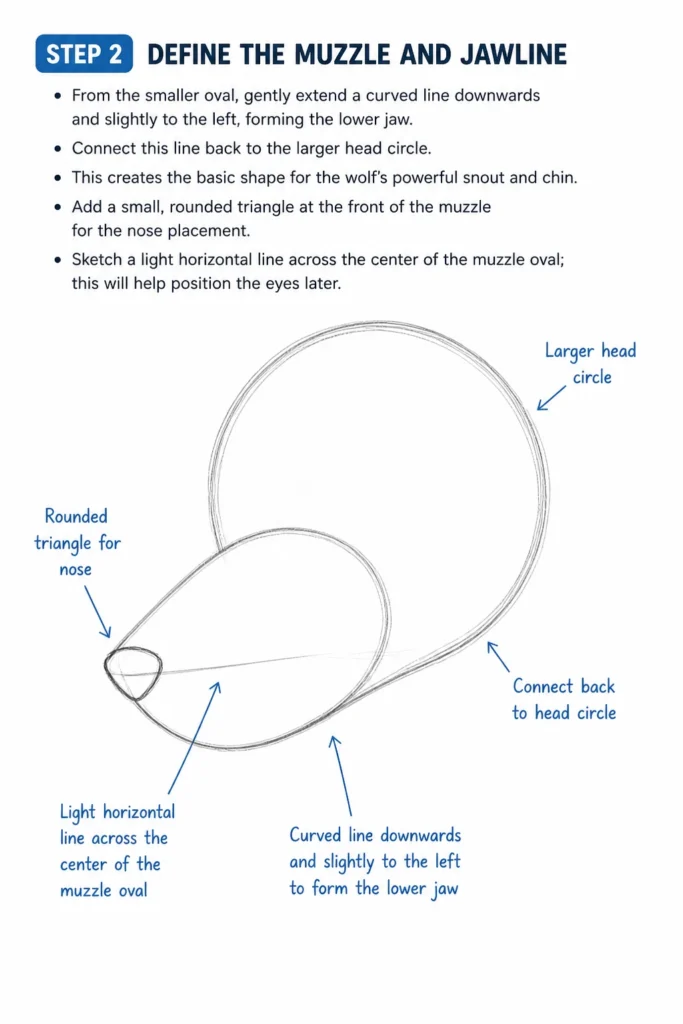
Add a small, rounded triangle at the front of the muzzle for the nose placement. Sketch a light horizontal line across the center of the muzzle oval; this will help position the eyes later.
Step 3: Place the Ears
Wolves have expressive, triangular ears. Draw two prominent, slightly rounded triangles on top of the larger head circle. Position them slightly to the sides, not directly on top.
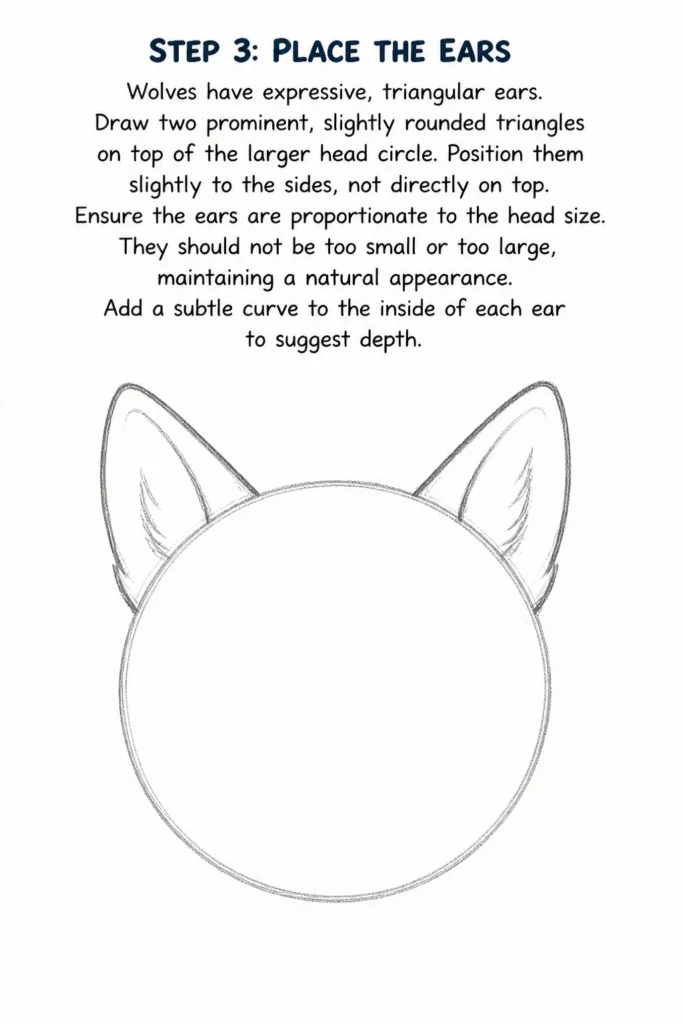
Ensure the ears are proportionate to the head size. They should not be too small or too large, maintaining a natural appearance. Add a subtle curve to the inside of each ear to suggest depth.
Step 4: Sketch the Eyes and Nose
Now it’s time to bring your wolf to life. Draw two almond-shaped eyes along the horizontal guideline you made earlier, inside the larger head circle. Position them slightly above the muzzle.
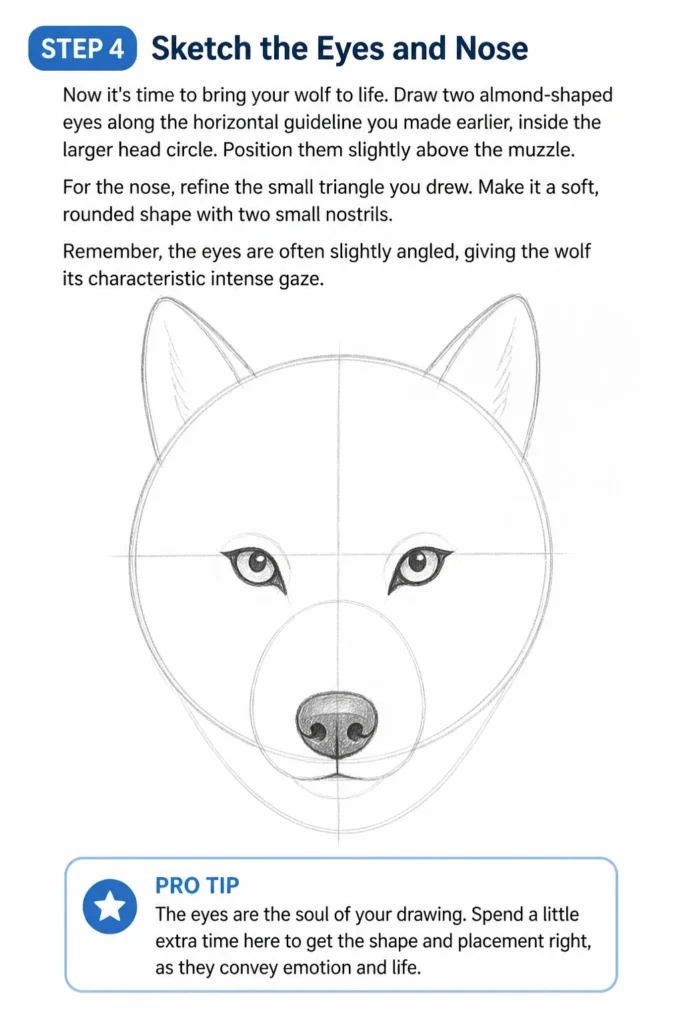
For the nose, refine the small triangle you drew. Make it a soft, rounded shape with two small nostrils. Remember, the eyes are often slightly angled, giving the wolf its characteristic intense gaze.
Pro Tip: The eyes are the soul of your drawing. Spend a little extra time here to get the shape and placement right, as they convey emotion and life.
Step 5: Outline the Head and Fur
Start connecting your basic shapes with more confident, flowing lines. Begin to add the distinct fur texture around the wolf’s head and neck. Use short, jagged strokes rather than long, smooth ones.
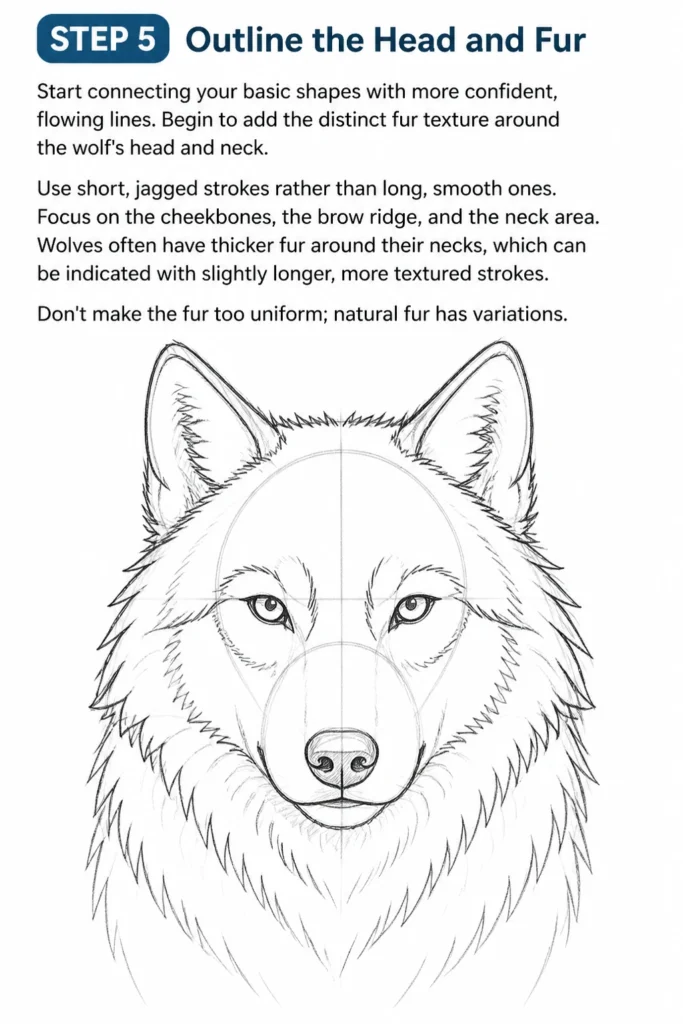
Focus on the cheekbones, the brow ridge, and the neck area. Wolves often have thicker fur around their necks, which can be indicated with slightly longer, more textured strokes. Don’t make the fur too uniform; natural fur has variations.
Step 6: Develop the Body and Legs
Sketch a large, elongated oval or a slightly curved rectangle behind the head for the main body. This will be the wolf’s torso. Connect this body shape to the head with a strong, curved neck line.
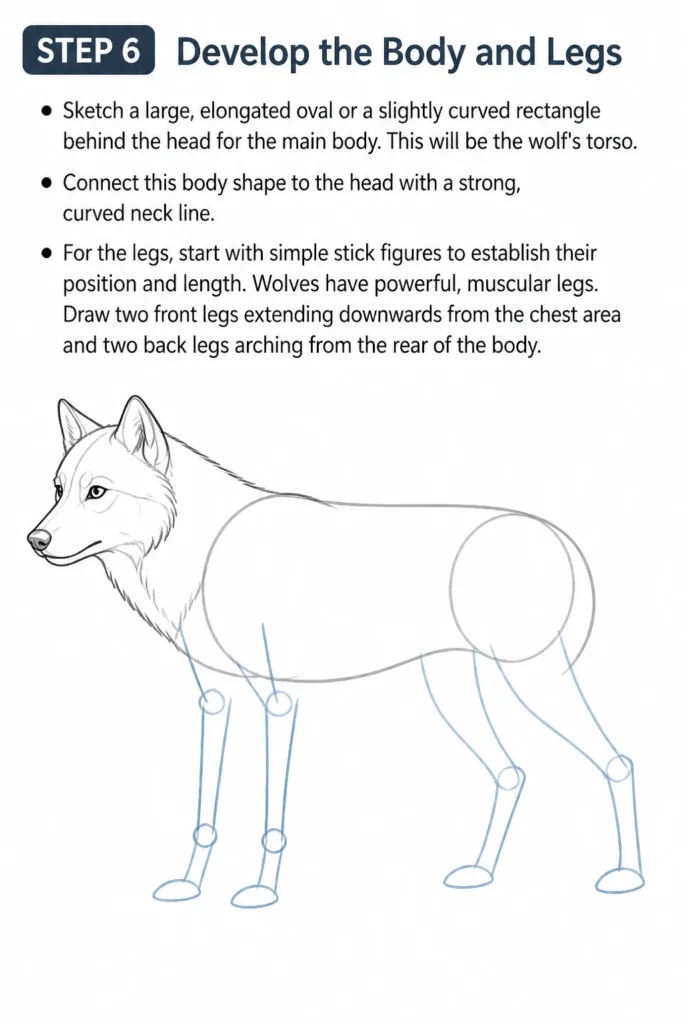
For the legs, start with simple stick figures to establish their position and length. Wolves have powerful, muscular legs. Draw two front legs extending downwards from the chest area and two back legs arching from the rear of the body.
Step 7: Refine the Limbs and Tail
Flesh out the stick figures of the legs, giving them volume and muscle definition. Pay attention to the joints – the elbows and knees – ensuring they bend naturally. Wolves have strong paws; sketch these as rounded, slightly flattened shapes at the end of each leg.
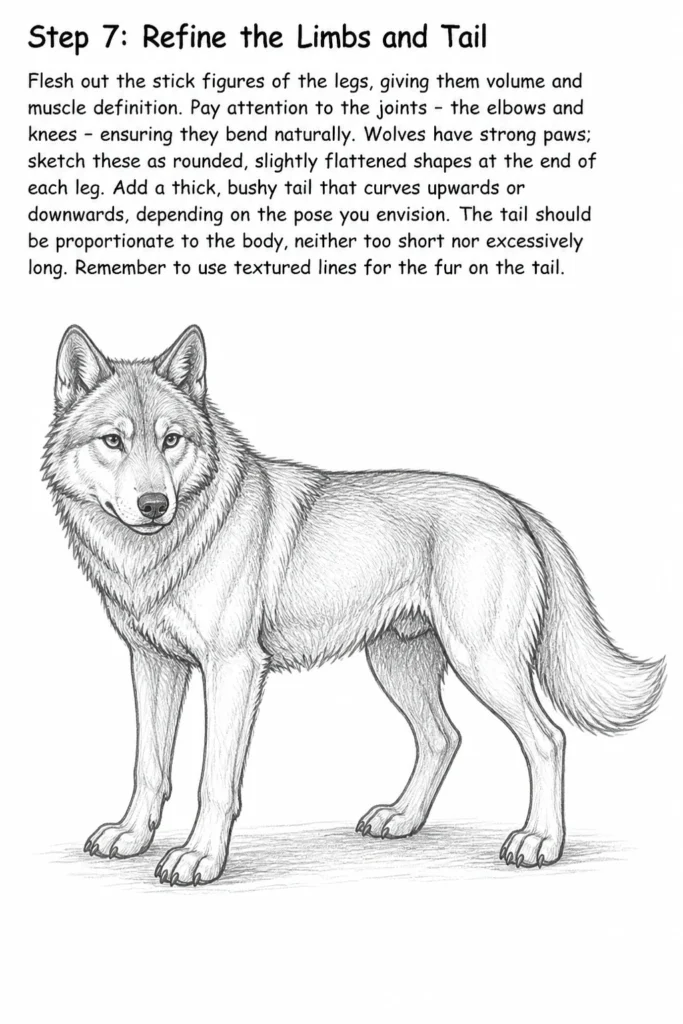
Add a thick, bushy tail that curves upwards or downwards, depending on the pose you envision. The tail should be proportionate to the body, neither too short nor excessively long. Remember to use textured lines for the fur on the tail.
Step 8: Erase Guidelines and Add Detail
Carefully erase all the initial light guidelines from Step 1. Your wolf outline should now be clear and defined. Now, start adding finer details.
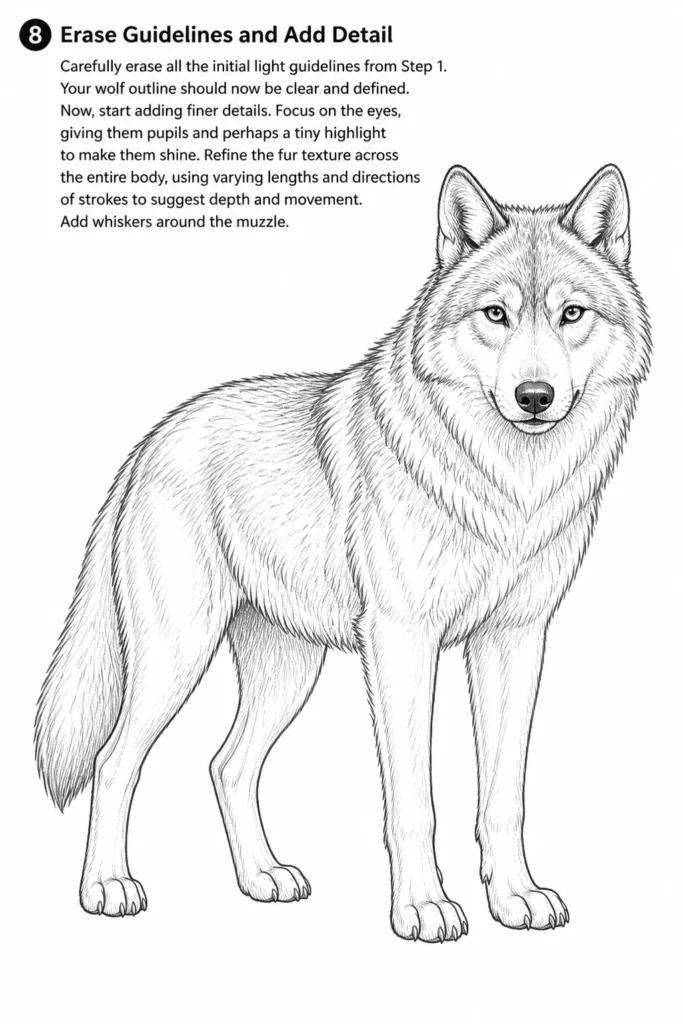
Focus on the eyes, giving them pupils and perhaps a tiny highlight to make them shine. Refine the fur texture across the entire body, using varying lengths and directions of strokes to suggest depth and movement. Add whiskers around the muzzle.
Step 9: Introduce Shading and Texture
This step truly brings your wolf to life. Begin applying light layers of shading to create depth and volume. Think about where light would hit and where shadows would naturally fall.
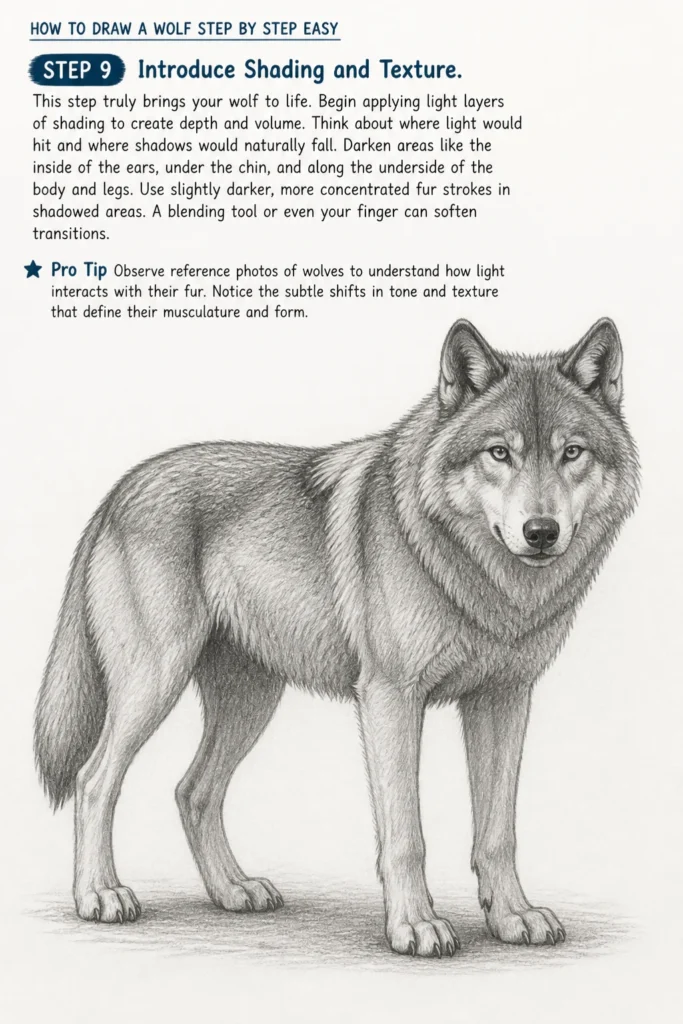
Darken areas like the inside of the ears, under the chin, and along the underside of the body and legs. Use slightly darker, more concentrated fur strokes in shadowed areas. A blending tool or even your finger can soften transitions.
Pro Tip: Observe reference photos of wolves to understand how light interacts with their fur. Notice the subtle shifts in tone and texture that define their musculature and form.
Step 10: Final Touches and Refinement
Stand back and look at your drawing. Are there any areas that need further refinement? Perhaps a bit more contrast in the shading, or a few more detailed fur lines.
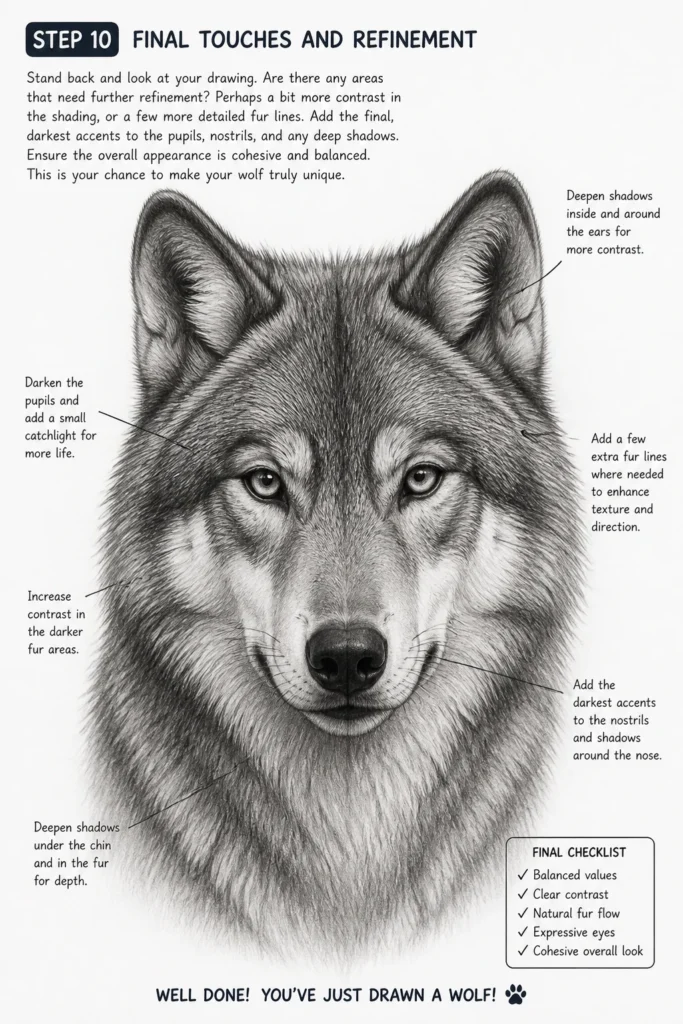
Add the final, darkest accents to the pupils, nostrils, and any deep shadows. Ensure the overall appearance is cohesive and balanced. This is your chance to make your wolf truly unique.
Common Mistakes to Avoid
Proportion Problems
One of the most frequent errors is getting the head or body proportions wrong. A wolf’s head is usually quite large relative to its body, with a strong, broad muzzle. Making the head too small or the muzzle too narrow can result in an unnatural look. Always start with basic shapes and double-check their relative sizes before adding detail.
Stiff or Lifeless Poses
Many beginners draw animals in very rigid, straight-on poses. Wolves are dynamic creatures. Avoid making the legs too straight or the body too flat. Try to introduce slight curves and angles to suggest movement and vitality, even in a standing pose. Observing real wolf photos helps immensely with understanding their natural stance.
Flat Fur Texture
Drawing fur can be tricky. A common mistake is drawing all fur in the same direction or with uniform lines, which results in a flat, unconvincing texture. Remember that fur grows in different directions around the body, and it has varying lengths. Use short, overlapping strokes that follow the contours of the wolf’s form to create a more realistic, three-dimensional effect.
Generic Eyes
The eyes are critical for conveying character. Drawing simple, round dots for eyes often makes the wolf look cartoonish or expressionless. Pay attention to the almond shape, the angle, and the subtle shading around the eyes. Adding a small highlight can make them appear wet and alive, giving your wolf a compelling gaze.
Troubleshooting
My Lines Aren’t Clean or Smooth
If your lines appear shaky or hesitant, it’s often because you’re drawing too slowly or with too much pressure. Try practicing long, confident strokes on a separate piece of paper. Don’t be afraid to make a quick, fluid movement. Remember, initial lines are light and meant to be refined. You can always erase and redraw.
The Proportions Just Look Off
This is a very common challenge. Go back to your basic shapes (circles and ovals). Compare their sizes and positions. Are the head circles the right size compared to the body oval? Is the muzzle too short or too long? Use your pencil to measure distances on your reference image (if using one) and compare them to your drawing. Adjusting the underlying framework before adding details is key.
I Can’t Get the Fur to Look Realistic
Realistic fur requires patience and observation. Avoid drawing individual hairs. Instead, focus on drawing clumps of fur using short, directional strokes. Vary the pressure of your pencil to create darker and lighter areas. Think about the direction the fur grows and how it overlaps. Don’t forget to use your eraser to lift out highlights in the fur, adding to the texture.
Key Takeaways
- Always begin with light, basic geometric shapes to establish proportions and structure.
- Break down the wolf into manageable sections: head, body, legs, tail.
- Use varied line weights and textures to suggest fur and three-dimensionality.
- Pay special attention to the eyes and nose; they are crucial for expression.
- Don’t be afraid to erase and refine; drawing is an iterative process.
- Practice regularly and observe real wolves or high-quality reference photos.
Frequently Asked Questions
How can I make my wolf drawing look more realistic?
Realism comes from careful observation and detail. Study wolf anatomy, fur patterns, and how light affects their form. Focus on subtle shading, varied fur textures, and accurate proportions. Adding depth to the eyes and nose also significantly enhances realism.
What materials are best for drawing a wolf?
For beginners, a simple set of graphite pencils (HB, 2B, 4B), a good quality eraser (kneaded and vinyl), and smooth drawing paper are excellent. As you advance, you might explore charcoal, colored pencils, or digital tools for more expressive results.
How long does it typically take to draw a wolf?
The time can vary greatly. A basic sketch might take 30-45 minutes. Adding detailed fur, shading, and background elements could easily extend it to several hours. Focus on enjoying the process rather than rushing to a finish line.
Can I draw a wolf in a different pose?
Absolutely! Once you’re comfortable with the basic structure, you can adapt it to various poses. Start by finding reference photos of wolves in different actions – howling, running, sitting – and apply the same foundational shape principles to build your drawing.
Our Top Recommended Finds
- Sketchbook with Quality Paper: A good sketchbook provides a smooth surface for your pencil and handles erasures well, making your drawing experience much more pleasant.
- Graphite Pencil Set (HB, 2B, 4B, 6B): Having a range of pencil hardness allows you to create lighter guidelines, medium tones, and deep, dark shadows, adding much more depth to your wolf.
- Kneaded Eraser: Unlike standard erasers, a kneaded eraser lifts graphite without smudging or damaging the paper, perfect for subtle corrections and creating highlights.
Embrace Your Inner Artist
You’ve just completed a journey into drawing the majestic wolf. This is just the beginning of your artistic adventure. Each line you draw, each shadow you blend, builds your skill and confidence.
Don’t stop here. Try drawing your wolf again, perhaps from a different angle or with a unique expression. Explore other wild animals, or even delve into drawing full scenes. The world of art is vast and waiting for you to create something beautiful.