🎸 How To Draw A Guitar Step By Step

& Painting
No rigid rules or pretension. Just practical guides, medium comparisons, and encouraging tips to help you enjoy the drawing & painting process.
Learning to draw an instrument can feel daunting, especially with all its intricate parts. I remember my own early attempts, often ending with distorted shapes that barely resembled a guitar. This guide distills years of sketching into a simple, reliable method. You’ll learn how to break down complex forms into manageable steps, building your confidence with every line.

Quick Overview
This guide will walk you through creating a realistic guitar drawing from scratch. You’ll start with basic shapes and progressively add details, resulting in a complete illustration.
- Time needed: 45-90 minutes (depending on detail and experience)
- Difficulty: Beginner to Intermediate
- What you’ll need: Pencil (HB, 2B), Eraser, Paper, Ruler (optional, but helpful)
Step-by-Step Instructions
Step 1: Sketch the Core Body Shape
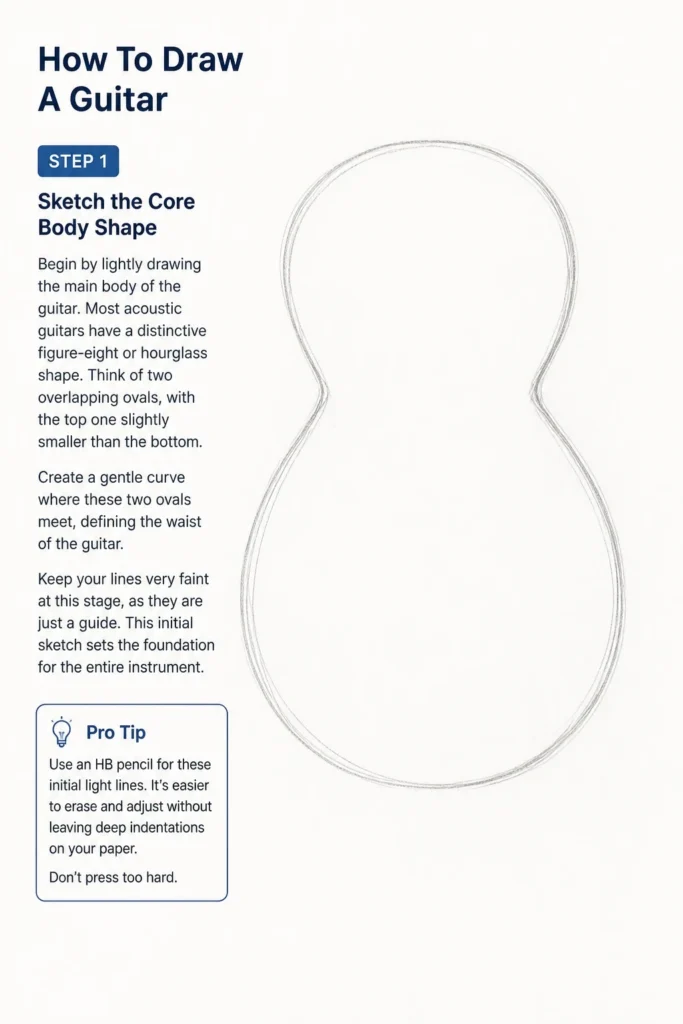
Begin by lightly drawing the main body of the guitar. Most acoustic guitars have a distinctive figure-eight or hourglass shape. Think of two overlapping ovals, with the top one slightly smaller than the bottom.
Create a gentle curve where these two ovals meet, defining the waist of the guitar. Keep your lines very faint at this stage, as they are just a guide. This initial sketch sets the foundation for the entire instrument.
Pro Tip: Use an HB pencil for these initial light lines. It’s easier to erase and adjust without leaving deep indentations on your paper. Don’t press too hard.
Step 2: Add the Neck and Headstock
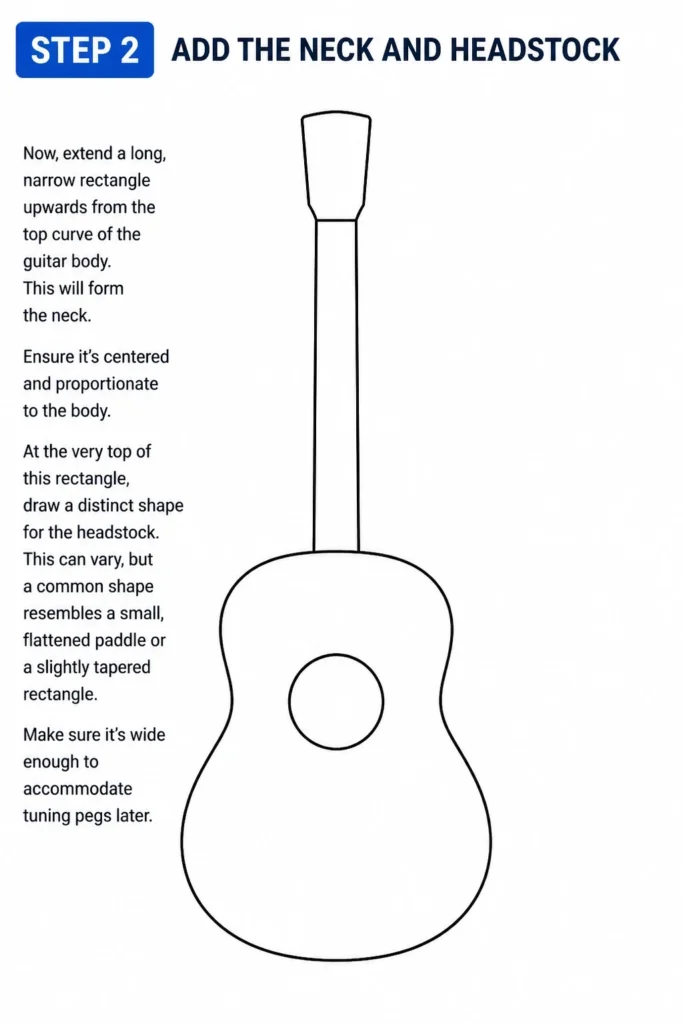
Now, extend a long, narrow rectangle upwards from the top curve of the guitar body. This will form the neck. Ensure it’s centered and proportionate to the body.
At the very top of this rectangle, draw a distinct shape for the headstock. This can vary, but a common shape resembles a small, flattened paddle or a slightly tapered rectangle. Make sure it’s wide enough to accommodate tuning pegs later.
Step 3: Define the Soundhole and Bridge
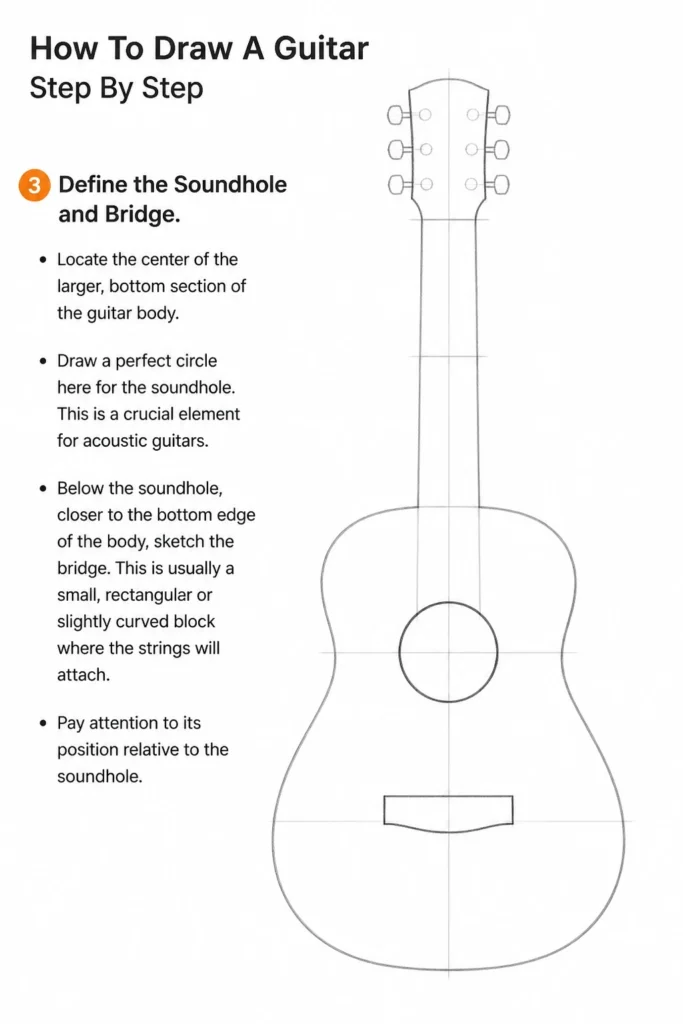
Locate the center of the larger, bottom section of the guitar body. Draw a perfect circle here for the soundhole. This is a crucial element for acoustic guitars.
Below the soundhole, closer to the bottom edge of the body, sketch the bridge. This is usually a small, rectangular or slightly curved block where the strings will attach. Pay attention to its position relative to the soundhole.
Step 4: Draw the Fretboard and Frets
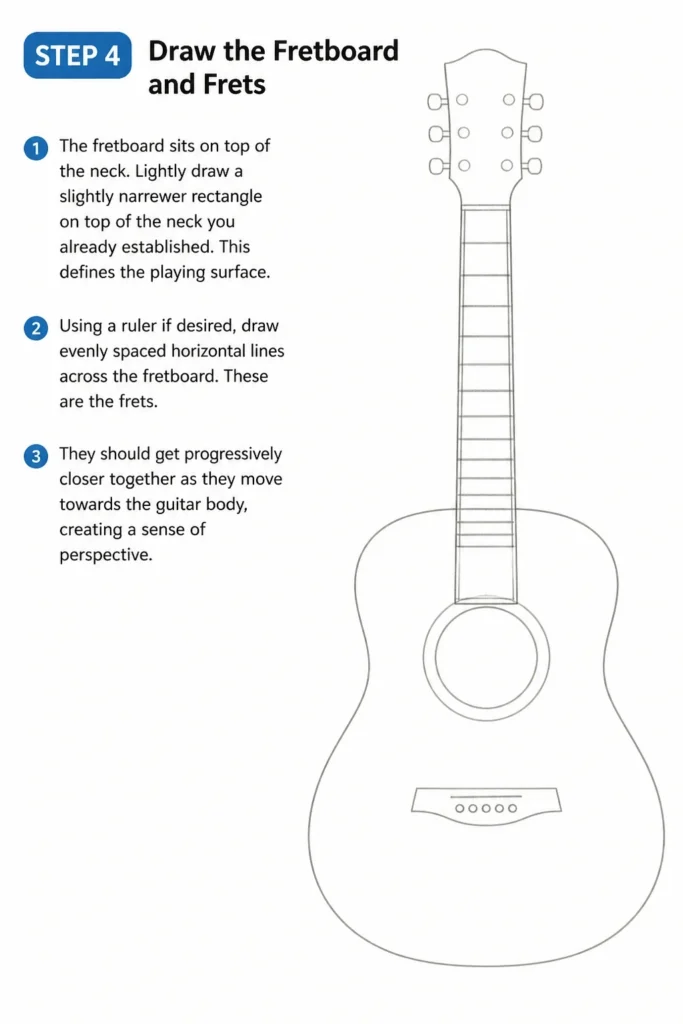
The fretboard sits on top of the neck. Lightly draw a slightly narrower rectangle on top of the neck you already established. This defines the playing surface.
Using a ruler if desired, draw evenly spaced horizontal lines across the fretboard. These are the frets. They should get progressively closer together as they move towards the guitar body, creating a sense of perspective.
Step 5: Illustrate the Strings and Tuning Pegs
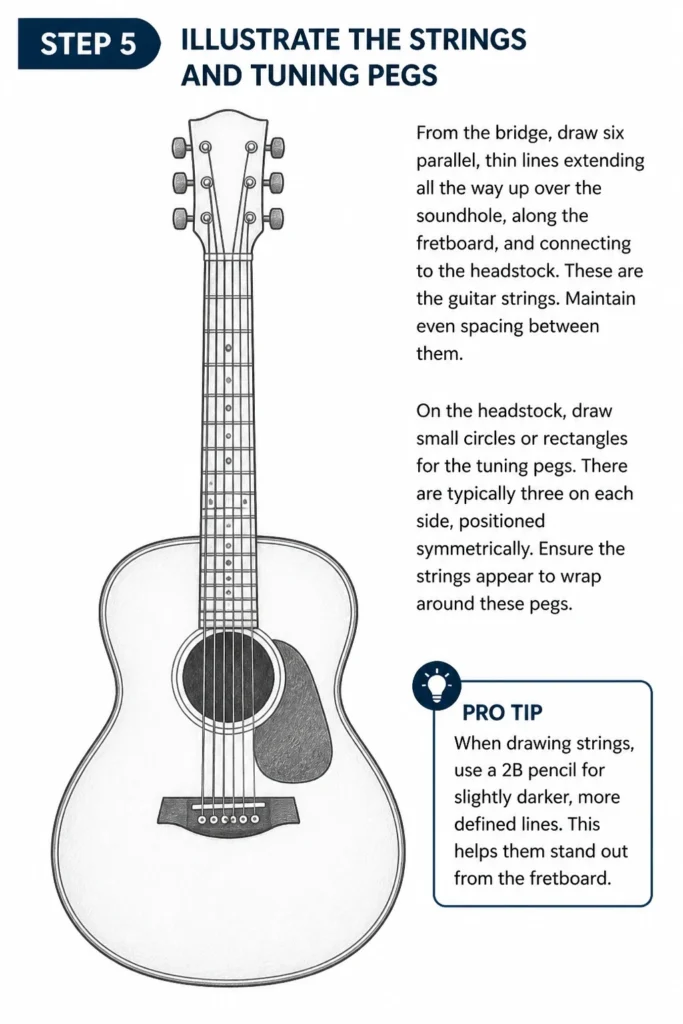
From the bridge, draw six parallel, thin lines extending all the way up over the soundhole, along the fretboard, and connecting to the headstock. These are the guitar strings. Maintain even spacing between them.
On the headstock, draw small circles or rectangles for the tuning pegs. There are typically three on each side, positioned symmetrically. Ensure the strings appear to wrap around these pegs.
Pro Tip: When drawing strings, use a 2B pencil for slightly darker, more defined lines. This helps them stand out from the fretboard.
Step 6: Refine and Erase
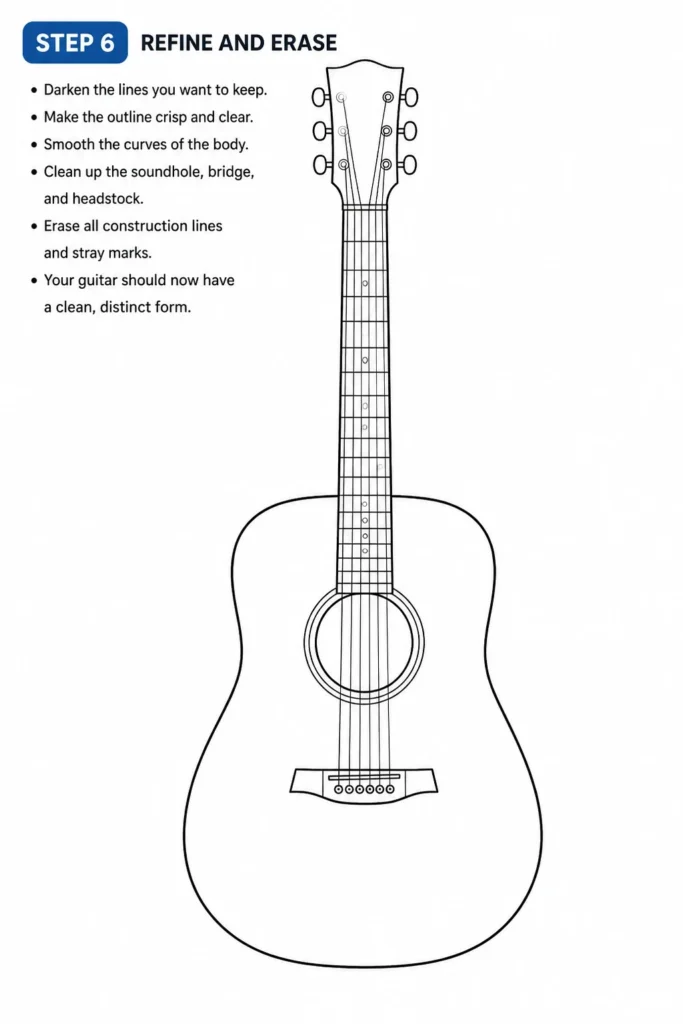
Go back over your entire drawing, carefully darkening the lines you want to keep. Use a firmer hand with your pencil to make the guitar’s outline crisp and clear. Focus on smooth, continuous curves for the body.
Erase all the initial light construction lines and any stray marks. Clean up the edges of the soundhole, bridge, and headstock. Your guitar should now have a distinct, clean form.
Step 7: Add Depth with Basic Shading (Optional)
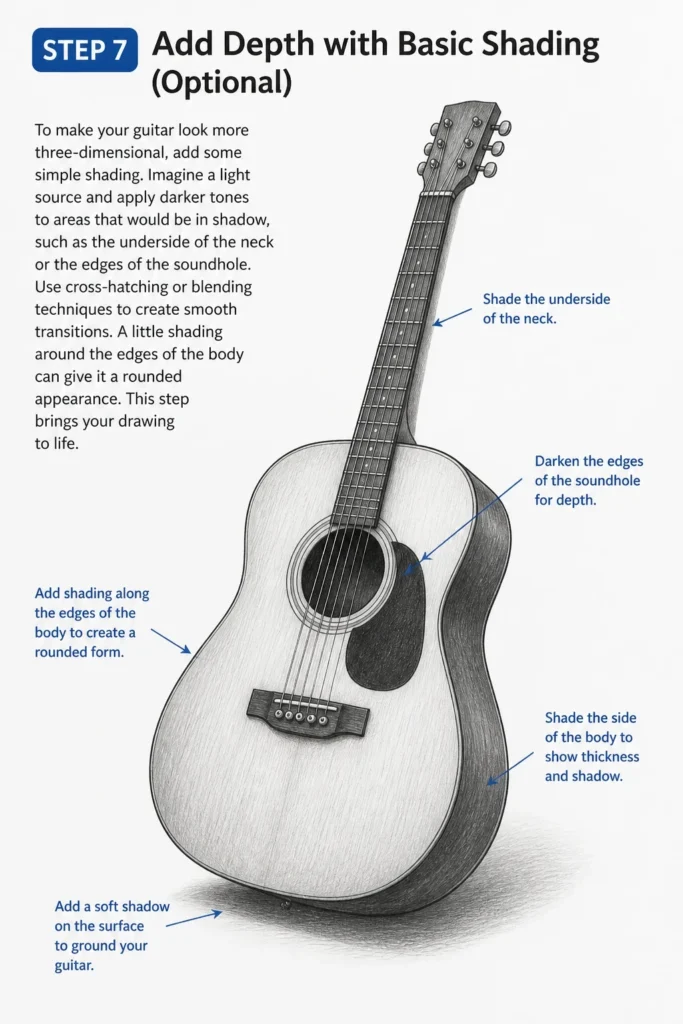
To make your guitar look more three-dimensional, add some simple shading. Imagine a light source and apply darker tones to areas that would be in shadow, such as the underside of the neck or the edges of the soundhole.
Use cross-hatching or blending techniques to create smooth transitions. A little shading around the edges of the body can give it a rounded appearance. This step brings your drawing to life.
Common Mistakes to Avoid
Disproportionate Body Sections
Often, beginners draw the top and bottom halves of the guitar body out of scale with each other. This results in a lopsided or unnatural-looking instrument. Always aim for a balanced, harmonious relationship between the two main curves of the body. Use light guide circles initially to ensure good proportion.
Uneven Fret Spacing
Drawing frets with equal spacing from the headstock to the body is a common error. In reality, frets get closer together as they approach the bridge due to perspective. Failing to account for this makes the neck look flat and unrealistic. Remember to gradually decrease the space between frets as you move down the fretboard.
Misaligned Neck and Headstock
A wobbly or off-center neck can throw off the entire drawing’s balance. The neck should appear as a natural extension of the guitar body. Ensure it’s perfectly aligned with the body’s center axis. The headstock should also be a smooth continuation of the neck, not jutting out at an awkward angle.
Rushed String Placement
The strings are delicate details that can easily be messed up if drawn too quickly. Drawing them unevenly spaced or not perfectly parallel makes the guitar look sloppy. Take your time, use a ruler for guidance if needed, and ensure consistent spacing from the bridge to the tuning pegs.
Troubleshooting
My Guitar Body Looks Flat
If your guitar body lacks depth, it’s likely due to flat, two-dimensional lines. Try adding very subtle curves to the top and bottom edges of the body, suggesting a rounded surface. A tiny bit of shading along the edges can also create the illusion of form and volume. Think about how light would wrap around the instrument.
The Neck Appears Too Short or Too Long
Proportion is key for a realistic neck. If it looks off, compare its length to the body. A good rule of thumb is that the neck, from the body to the headstock, is roughly equal in length to the entire guitar body. Adjust your initial rectangle for the neck until it feels balanced.
My Strings Aren’t Straight
Wobbly strings are a common issue. This often happens when drawing freehand without a steady guide. Use a ruler to help draw perfectly straight lines from the bridge to the headstock. You can draw a very faint guide line with the ruler first, then freehand over it more confidently.
Key Takeaways
- Start with basic shapes: Break down the guitar into simple ovals and rectangles before adding details.
- Keep lines light initially: Use an HB pencil for guide lines that are easy to erase and adjust.
- Pay attention to proportion: Ensure the body, neck, and headstock are all in scale with each other.
- Detail the frets and strings carefully: These small elements significantly impact realism, especially their spacing.
- Use shading for depth: Even basic shadows can transform a flat drawing into a three-dimensional object.
- Practice makes perfect: Don’t be afraid to draw multiple guitars; each attempt improves your skill.
Frequently Asked Questions
What’s the best pencil for drawing guitars?
An HB pencil is excellent for initial sketches and general lines, offering good control and erasability. For darker lines, shading, and defining outlines, a 2B or even 4B pencil provides richer tones and more depth. Having both allows for a greater range of expression.
Should I use a ruler for drawing a guitar?
While not strictly necessary for experienced artists, a ruler can be incredibly helpful for beginners. It ensures straight lines for the neck, even spacing for frets, and parallel strings. It can build confidence and accuracy, especially in the early stages of learning.
How do I make my guitar drawing look more realistic?
Beyond accurate shapes and proportions, realism comes from details and shading. Focus on subtle curves, clean lines, and adding shadows where light wouldn’t reach. Observe real guitars to understand how light reflects off their surfaces and how shadows form.
Can I draw different types of guitars using this method?
Absolutely! While this guide focuses on a classic acoustic guitar, the fundamental principles remain the same. You’d adjust the body shape (e.g., solid body for electric, different cutaways), headstock design, and the number/type of pickups. The core “shapes first, then details” approach is universal.
Our Top Recommended Finds
- Sketching Pencil Set: A good set with varying lead hardness (e.g., HB, 2B, 4B, 6B) offers versatility for different line weights and shading.
- Kneaded Eraser: These are fantastic for lifting graphite gently without smudging or damaging the paper, perfect for refining light lines.
- Quality Sketchbook: A sketchbook with smooth, durable paper prevents bleeding and allows for multiple layers of graphite without tearing.
Your Masterpiece Awaits
You’ve now completed a comprehensive journey into drawing a guitar, from its basic skeleton to its intricate details. Each step builds on the last, transforming simple lines into a recognizable instrument. This process not only teaches you to draw a guitar but also hones your observational skills and understanding of form.
Don’t let your artistic journey stop here. Consider trying other instruments or even experimenting with different guitar styles. Pick up your pencil, find a quiet spot, and create something beautiful today. The more you draw, the better you become!
& Painting
No rigid rules or pretension. Just practical guides, medium comparisons, and encouraging tips to help you enjoy the drawing & painting process.