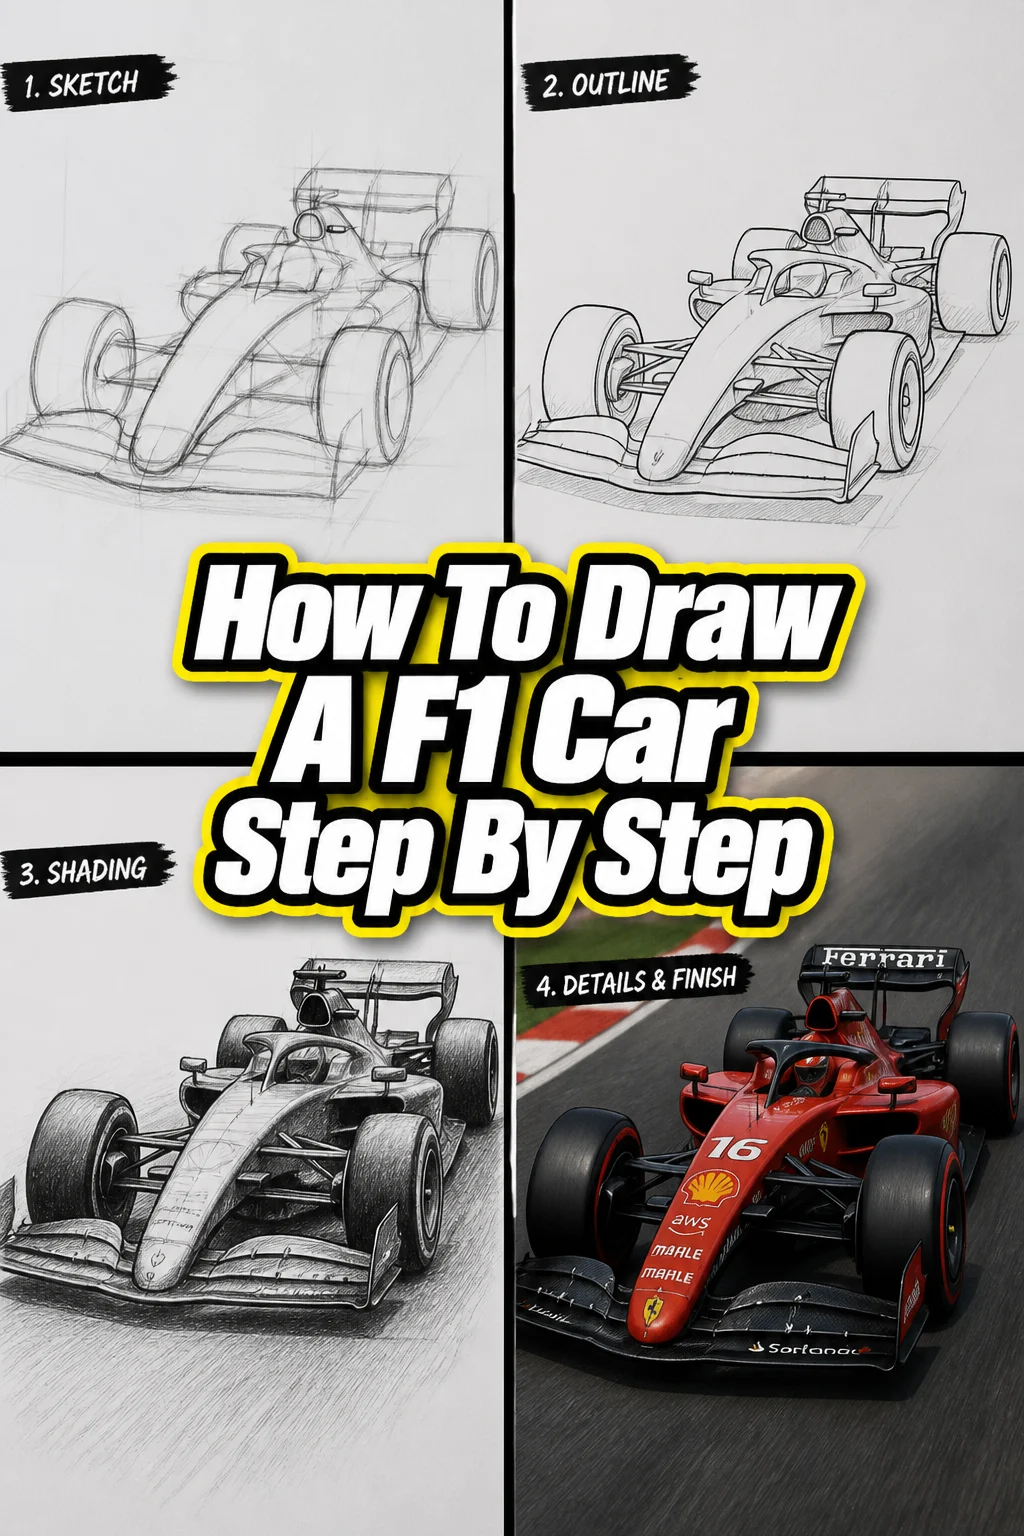
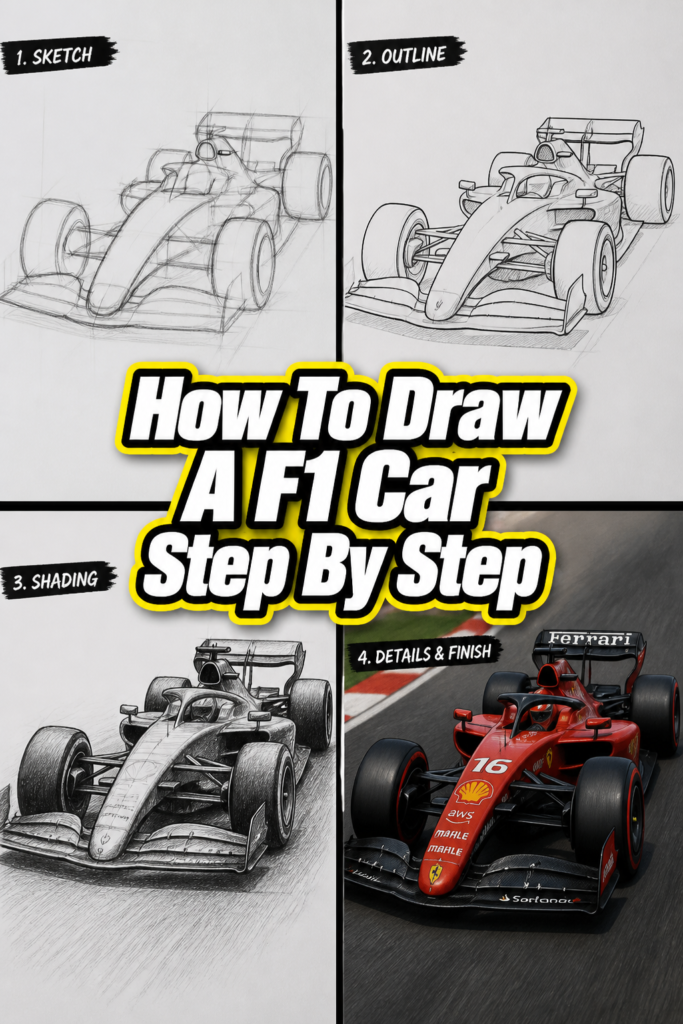
🏎️ How To Draw A F1 Car Step By Step
Have you ever watched an F1 race, mesmerized by those sleek machines darting around the track? Capturing that speed and precision on paper is a thrilling challenge. I remember my first attempt at drawing an F1 car; it looked more like a brick on wheels than a racing machine.
This guide will walk you through the process, helping you create a dynamic F1 car drawing you’ll be proud of. You’ll soon see how breaking down complex shapes makes drawing much more enjoyable.
Quick Overview
This guide will teach you to draw a detailed F1 car from scratch. You’ll learn to capture its distinctive aerodynamic form and powerful presence. By the end, you’ll have a complete drawing and a better understanding of automotive design.
- Time needed: 60-90 minutes (can vary based on detail)
- Difficulty: Intermediate
- What you’ll need: Sketching pencils (HB, 2B, 4B), paper, eraser, ruler (optional)
Step-by-Step Instructions
Step 1: Lay Down Your Basic Framework
Begin by lightly sketching the car’s overall length and width on your paper. Use a ruler if it helps you keep lines straight. This initial box will contain the entire vehicle.
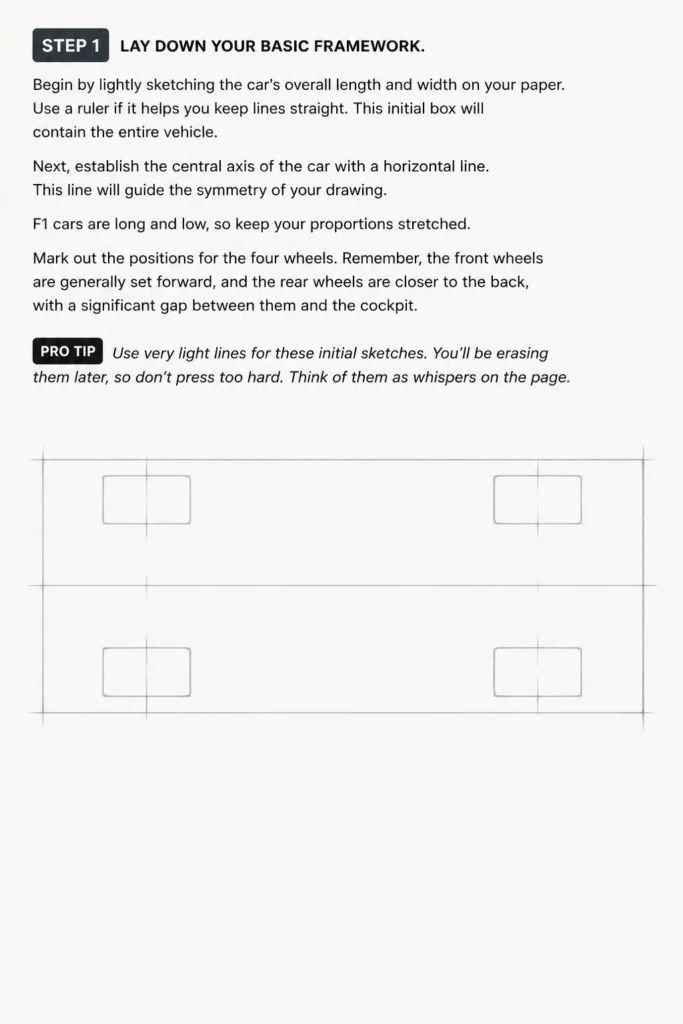
Next, establish the central axis of the car with a horizontal line. This line will guide the symmetry of your drawing. F1 cars are long and low, so keep your proportions stretched.
Mark out the positions for the four wheels. Remember, the front wheels are generally set forward, and the rear wheels are closer to the back, with a significant gap between them and the cockpit.
Pro Tip: Use very light lines for these initial sketches. You’ll be erasing them later, so don’t press too hard. Think of them as whispers on the page.
Step 2: Define the Main Body Shape
Sketch the main body or chassis of the car. This includes the cockpit area, the engine cover, and the sidepods. The F1 car body is not a simple rectangle; it tapers and curves significantly.
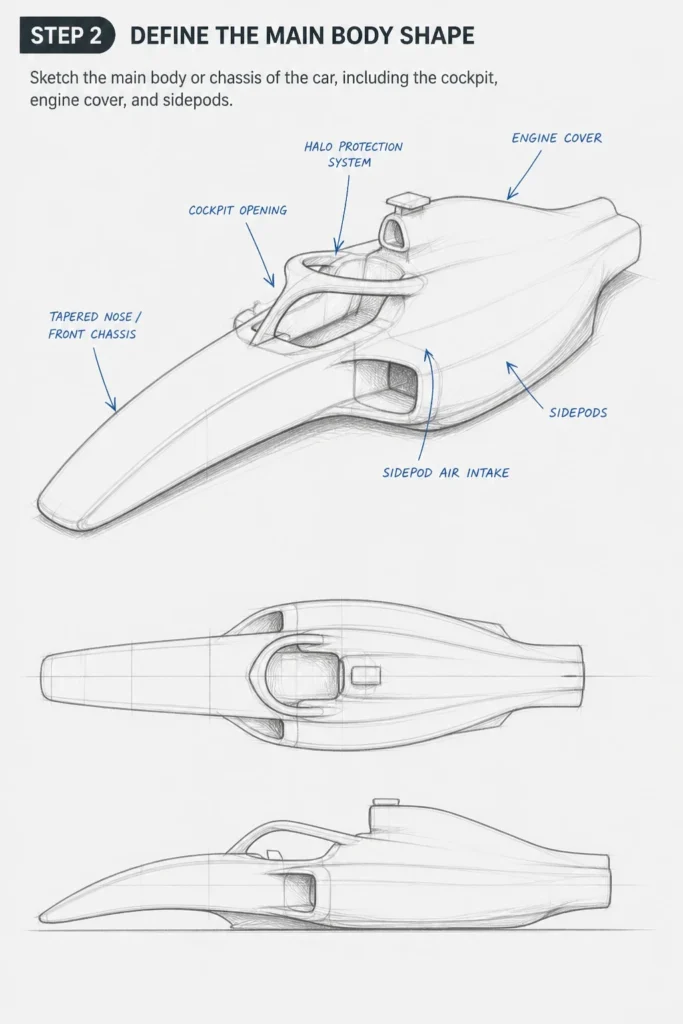
Draw the outline of the cockpit, which is usually a relatively small, enclosed area where the driver sits. It often has a distinct halo protection system curving over the driver’s head. Imagine an elongated teardrop shape for the main body that flows from the nose to the rear.
Indicate the sidepods, which are prominent aerodynamic elements running along the sides of the car. These house radiators and other components, often flaring out from the central chassis. They typically have complex air intakes at the front.
Step 3: Construct the Front Wing
Focus on the distinctive front wing, a crucial aerodynamic component. This wing is wide and complex, extending beyond the main body of the car. It often consists of multiple elements.
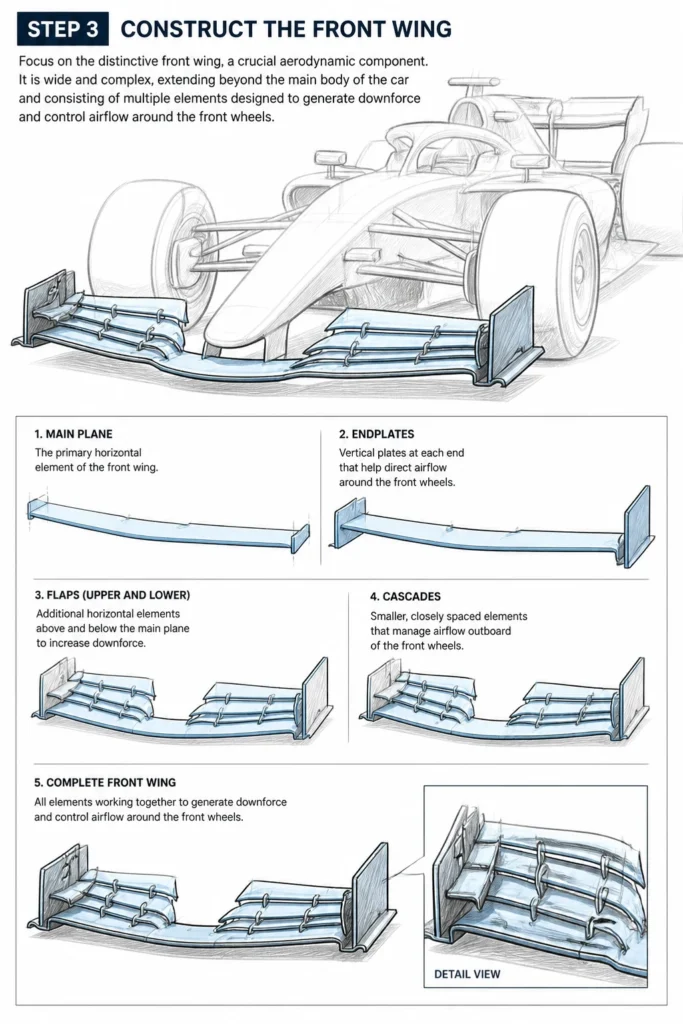
Draw the main plane of the front wing, a long, thin horizontal element. Then, add the endplates, which are vertical sections at each end of the wing. These are key to directing airflow.
Sketch the various flaps and cascades that make up the wing’s intricate design. These elements are designed to generate downforce and control airflow around the front wheels. Pay attention to the subtle curves and angles.
Step 4: Shape the Wheels and Tires
Outline the four large, open-wheel tires. F1 tires are wide and have a significant sidewall. They are a defining characteristic of these cars.
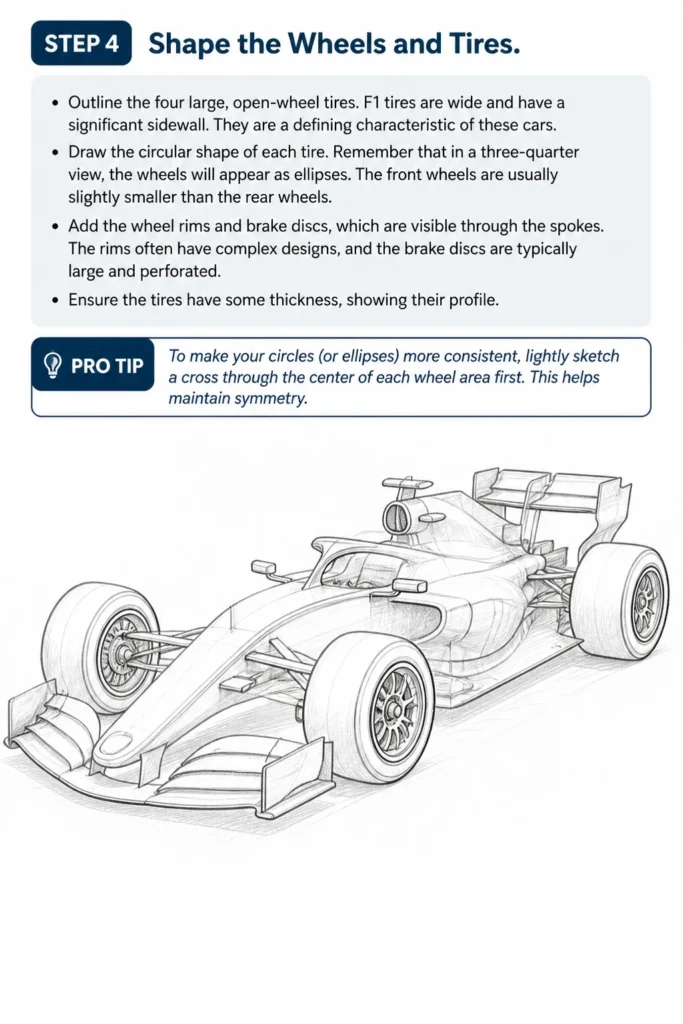
Draw the circular shape of each tire. Remember that in a three-quarter view, the wheels will appear as ellipses. The front wheels are usually slightly smaller than the rear wheels.
Add the wheel rims and brake discs, which are visible through the spokes. The rims often have complex designs, and the brake discs are typically large and perforated. Ensure the tires have some thickness, showing their profile.
Pro Tip: To make your circles (or ellipses) more consistent, lightly sketch a cross through the center of each wheel area first. This helps maintain symmetry.
Step 5: Illustrate the Rear Wing and Diffuser
Create the rear wing, another large and visually impactful aerodynamic element. It’s usually positioned high and wide at the back of the car. This wing is generally simpler in design than the front wing but equally important.
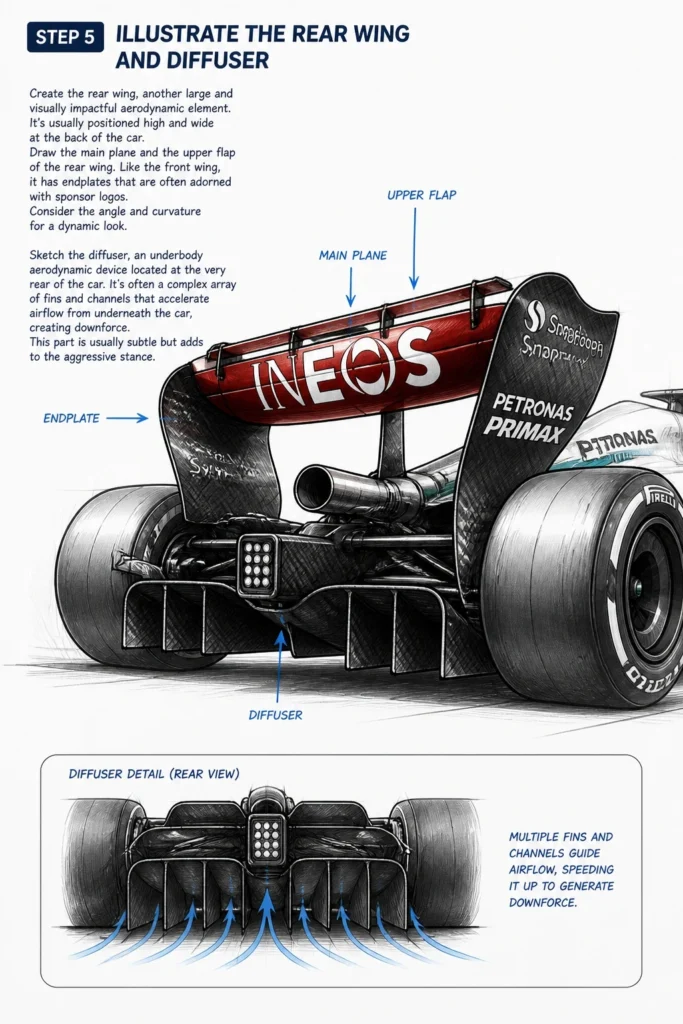
Draw the main plane and the upper flap of the rear wing. Like the front wing, it has endplates that are often adorned with sponsor logos. Consider the angle and curvature for a dynamic look.
Sketch the diffuser, an underbody aerodynamic device located at the very rear of the car. It’s often a complex array of fins and channels that accelerate airflow from underneath the car, creating downforce. This part is usually subtle but adds to the aggressive stance.
Step 6: Refine Body Details and Aerodynamic Elements
Add the intricate details to the main body. This includes the air intakes on the sidepods and above the driver’s head. These intakes are crucial for cooling the engine and brakes.
Draw the small rearview mirrors, which are typically mounted on stalks near the cockpit. They are often sleek and aerodynamic themselves. Also, sketch the steering wheel and the driver’s helmet visible within the cockpit opening.
Include any additional aerodynamic appendages, such as bargeboards, floor edges, and small winglets. Modern F1 cars are covered in these small but crucial elements, all designed to manipulate airflow. These details add a layer of complexity and realism.
Step 7: Erase Guidelines and Darken Lines
Carefully erase all the initial light construction lines you drew in Step 1. Your F1 car’s outline should now be clear and distinct. Take your time to clean up any stray marks.
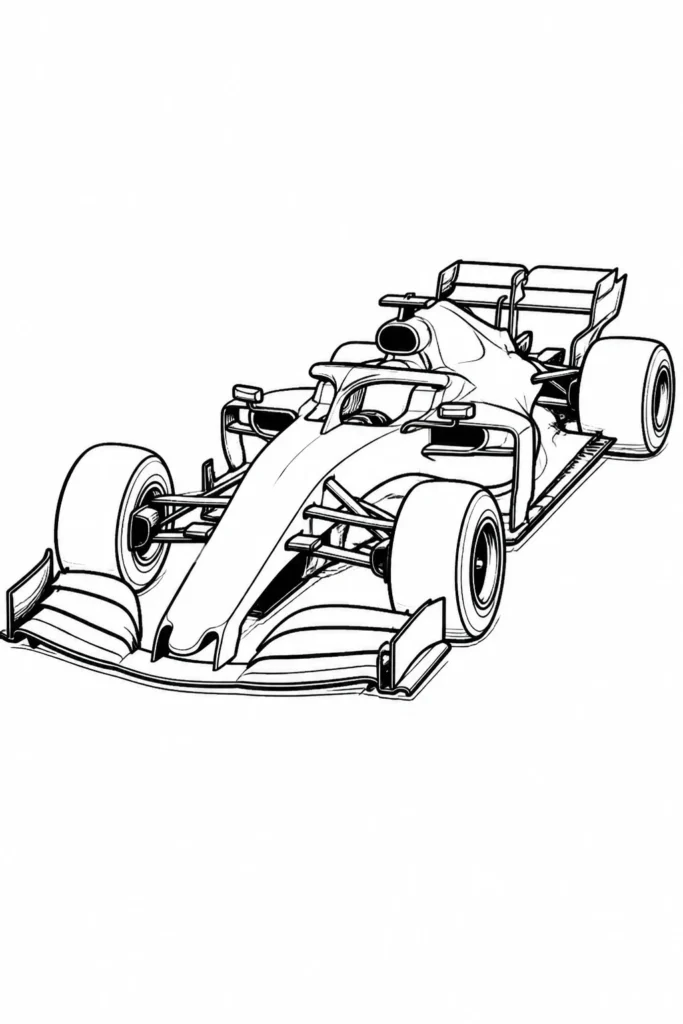
Go over your final lines with a darker pencil (like a 2B or 4B) or an inking pen. This makes your drawing stand out and defines all the shapes. Vary the line weight: thicker lines for the main contours, thinner for internal details.
Ensure crisp edges on the wings and body panels. A clean line drawing forms the foundation for effective shading. This step transforms your sketch into a more finished drawing.
Step 8: Introduce Shading and Texture
Start adding depth to your drawing with shading. Consider where your light source is coming from to determine highlights and shadows. F1 cars are very reflective, so think about gloss and reflections.
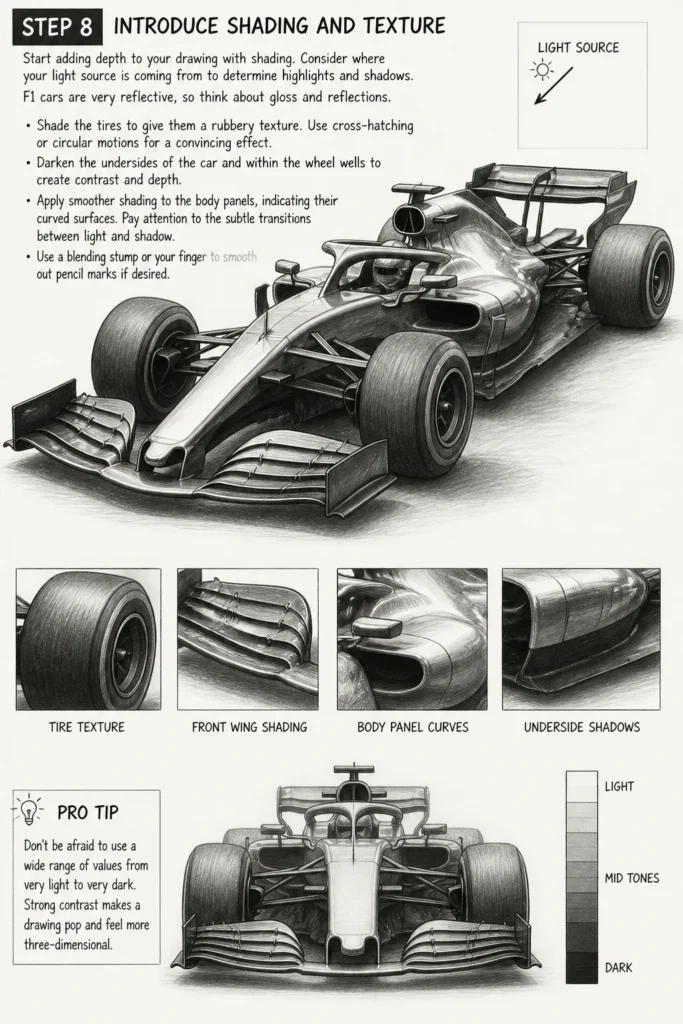
Shade the tires to give them a rubbery texture. Use cross-hatching or circular motions for a convincing effect. Darken the undersides of the car and within the wheel wells to create contrast and depth.
Apply smoother shading to the body panels, indicating their curved surfaces. Pay attention to the subtle transitions between light and shadow. Use a blending stump or your finger to smooth out pencil marks if desired.
Pro Tip: Don’t be afraid to use a wide range of values from very light to very dark. Strong contrast makes a drawing pop and feel more three-dimensional.
Step 9: Add Final Details and Branding
Incorporate the small, distinctive details that bring an F1 car to life. These include sponsor logos, racing numbers, and team livery elements. These can be simplified or detailed depending on your preference.
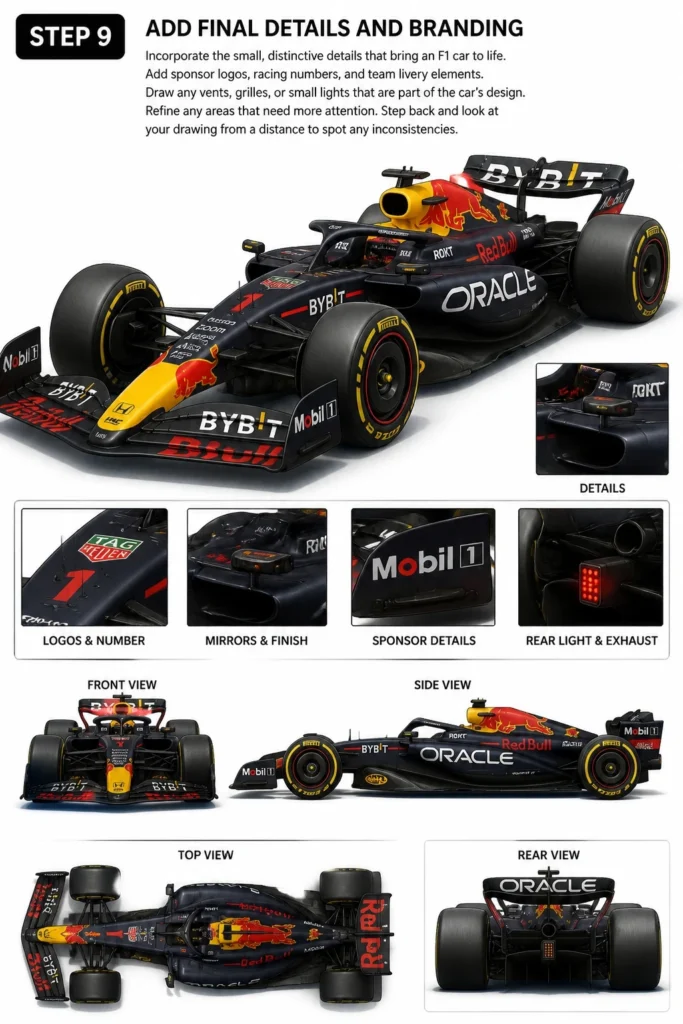
Draw any vents, grilles, or small lights that are part of the car’s design. These tiny elements often add a lot of character and realism. Look at reference images for specific car models.
Refine any areas that need more attention. This might mean sharpening a line, adding a tiny highlight, or deepening a shadow. Step back and look at your drawing from a distance to spot any inconsistencies.
Step 10: Review and Polish
Take a moment to review your entire drawing. Are the proportions correct? Does it feel dynamic and fast? Sometimes stepping away for a few minutes helps you spot errors.
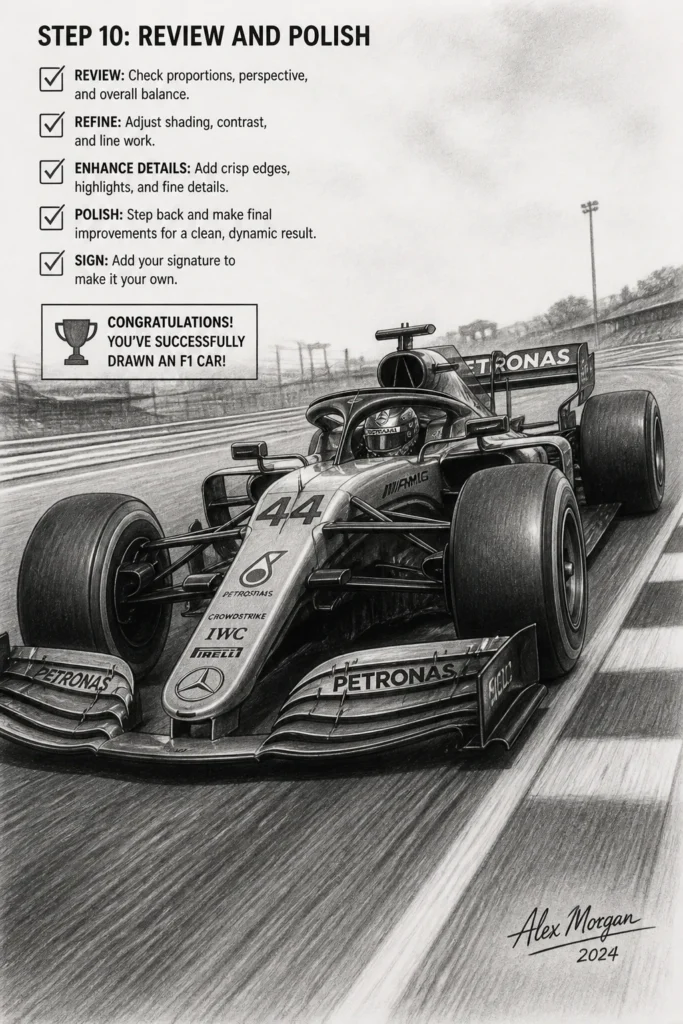
Make any final adjustments to shading, line work, or details. This might involve using a kneaded eraser to lift highlights or a sharp pencil to add crisp edges. The goal is to make it look as polished as possible.
Sign your artwork. You’ve successfully drawn an F1 car! This final step marks your accomplishment and gives the drawing a personal touch.
Common Mistakes to Avoid
Incorrect Proportions
Many beginners struggle with getting the F1 car’s elongated, low-slung proportions right. Drawing the car too tall or too short makes it lose its characteristic speed and elegance. Always start with light construction lines to establish the overall length-to-height ratio, often around 4:1 or 5:1. Constantly compare the length of the chassis to the width of the wings and the size of the wheels to ensure everything fits harmoniously.
Overlooking Aerodynamic Complexity
F1 cars are defined by their aerodynamics, meaning they’re not just simple shapes. Beginners often draw the wings and body panels too flat or simplistic. Neglecting the subtle curves, multiple elements of the front wing, or the intricate sidepod shapes makes the car look less authentic. Pay close attention to reference images to capture the nuanced angles and layers that generate downforce and define its aggressive look.
Flat Tires and Wheels
Drawing wheels as simple circles is a common pitfall, especially when drawing from an angle. This makes the car look static and unrealistic. Remember that wheels are three-dimensional cylinders, and when viewed from an angle, they appear as ellipses. Also, give the tires thickness and a slight bulge where they meet the ground to convey their weight and rubbery texture.
Lack of Contrast in Shading
A drawing can appear flat and uninteresting without a good range of values from light to dark. Beginners sometimes use only mid-tones, failing to create strong shadows or bright highlights. F1 cars are often highly reflective, so push your darks and incorporate sharp highlights to create the illusion of glossy surfaces and three-dimensional form. This contrast brings the car to life and makes it pop off the page.
Troubleshooting
My Car Looks Stiff and Lifeless
If your F1 car appears too rigid, it’s likely due to overly straight lines and a lack of dynamic curves. F1 cars are designed for speed, and their shapes reflect that. Try to introduce more flowing lines, especially on the bodywork and wings. Exaggerate subtle curves and consider drawing the car at a slight angle or with a slight tilt to imply motion, even in a static pose. Lightly sketching action lines or movement lines around the wheels can also add dynamism.
I Can’t Get the Wings to Look Right
The intricate wings are often the most challenging part. If they look clumsy or out of place, you might be simplifying them too much or misjudging their angles. Break them down into simpler components: first the main plane, then endplates, and then the smaller flaps. Use a ruler for initial straight lines, then carefully add the curves. Study reference photos closely, paying attention to how the different elements overlap and connect. Don’t be afraid to erase and redraw until the balance feels right.
My Drawing Lacks Depth
A flat drawing usually means insufficient shading or a lack of variety in line weight. To add depth, ensure you’re using a full range of pencil values from light to dark. Create strong shadows under the car, within the wheel wells, and on surfaces that turn away from the light. Also, vary your line weight: use thicker, darker lines for the parts of the car closest to the viewer and thinner, lighter lines for elements further away or in shadow. This contrast helps define forms and creates a sense of three-dimensionality.
Key Takeaways
- Start with Basic Shapes: Always begin with light construction lines to establish overall proportions and placement.
- Focus on Aerodynamics: Pay close attention to the complex curves and multiple elements of the wings and bodywork.
- Master Wheels and Tires: Draw wheels as ellipses from an angle and give tires thickness for realism.
- Utilize Contrast: Employ a full range of values in your shading to create depth and make your drawing pop.
- Practice Detail Work: Small details like air intakes, mirrors, and branding significantly enhance the final piece.
- Refine and Polish: Take time to erase guidelines, darken final lines, and make subtle adjustments for a clean finish.
Frequently Asked Questions
What’s the best pencil to start with for F1 car drawings?
An HB pencil is an excellent starting point. It’s versatile enough for light sketching and initial outlines, and you can press harder for slightly darker lines. As you progress, having a harder pencil (like 2H) for very light guidelines and softer pencils (like 2B or 4B) for shading and darker lines will be beneficial.
How do I make the car look like it’s moving?
To convey motion, consider a few techniques. You can draw the car at a slight angle or with a subtle lean, suggesting it’s cornering. Adding blur lines or streaks behind the wheels or along the ground can also create a sense of speed. Also, blurring the background slightly while keeping the car sharp helps emphasize its movement.
Should I use a ruler for drawing an F1 car?
Using a ruler for the initial construction lines, especially for the long, straight edges of the chassis or the wings, can be very helpful. It ensures accuracy and symmetry. However, try to freehand the more organic curves and details to keep the drawing from looking too stiff. It’s a tool to assist, not to dictate every line.
How important are reference images?
Reference images are incredibly important, especially for a complex subject like an F1 car. They help you understand the precise shapes, proportions, and intricate aerodynamic details that are unique to these vehicles. Keep several different views of your chosen F1 car handy to ensure accuracy and inspiration.
Our Top Recommended Finds
- Staedtler Mars Lumograph Pencils: A fantastic set of graphite pencils with a wide range of hardness, perfect for detailed sketching and smooth shading.
- Kneaded Eraser: Essential for lifting graphite without damaging the paper, great for creating highlights and cleaning up light lines.
- Sketchbook with Smooth Paper: A good quality sketchbook with smooth, medium-weight paper (like Bristol or a good drawing pad) will make your pencil glide and blend beautifully.
Unleash Your Inner Artist
You’ve just completed a detailed journey into drawing one of the most sophisticated machines on the planet. This isn’t just about lines on paper; it’s about seeing, understanding, and translating complexity into art. You’ve built a foundation for drawing intricate subjects.
Keep practicing these techniques with different F1 models or even other types of vehicles. Explore adding color or different backgrounds to your next drawing. The more you draw, the more your unique style will emerge. Grab your pencils and let your creativity take the wheel today!