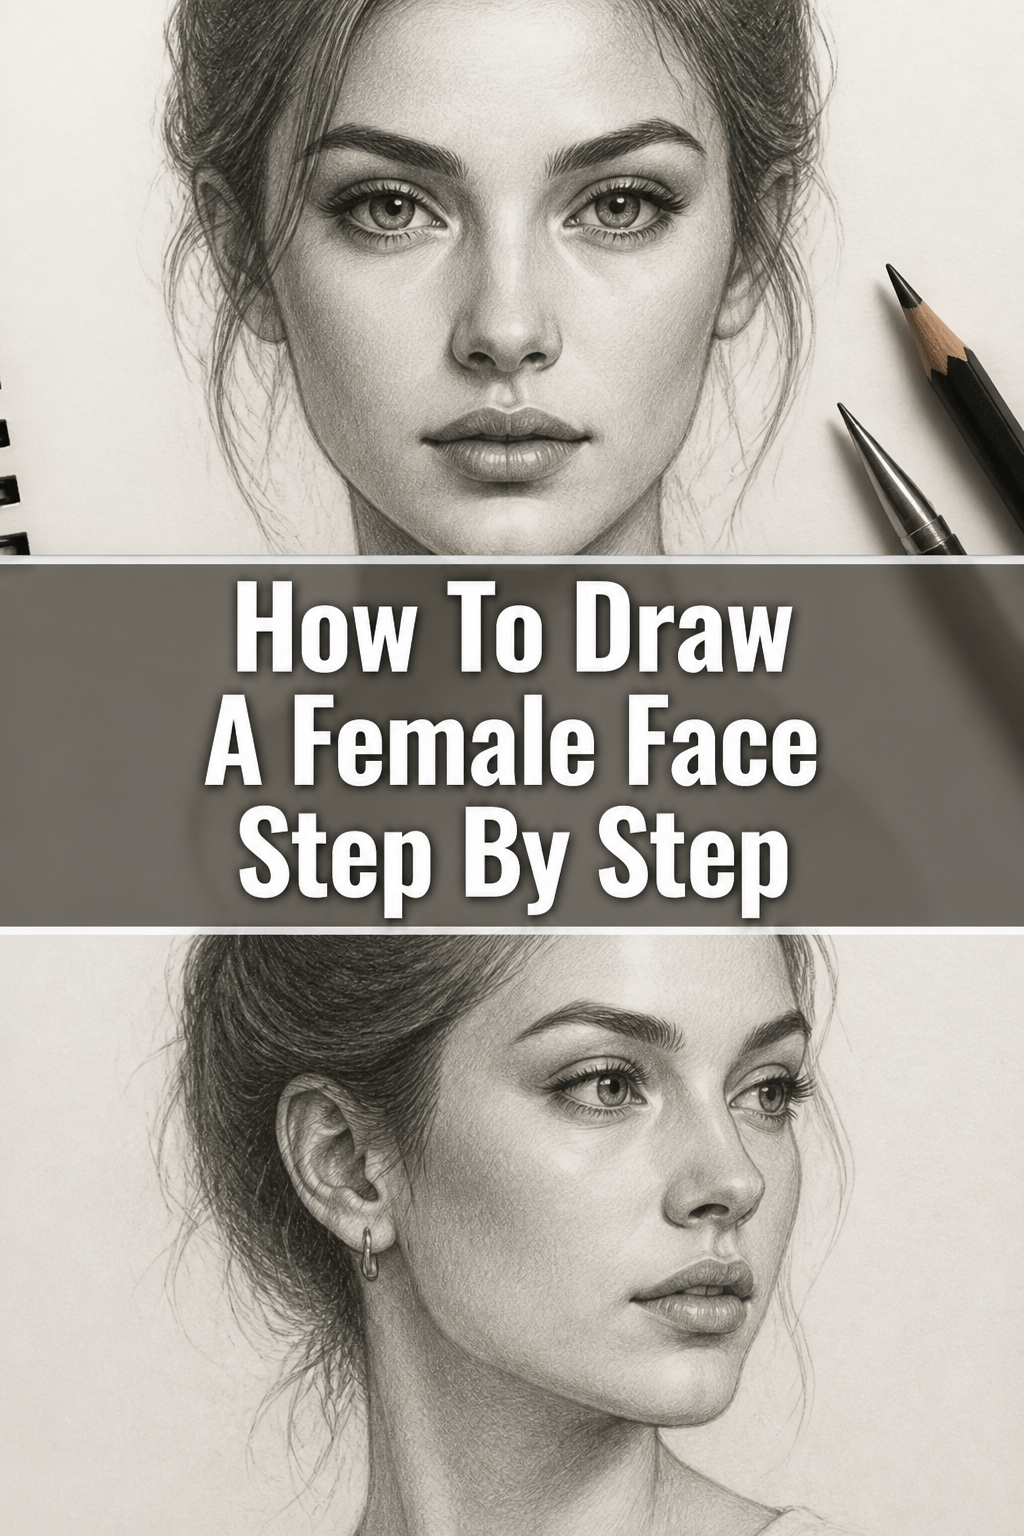
🎨 How To Draw A Female Face Step By Step

& Painting
No rigid rules or pretension. Just practical guides, medium comparisons, and encouraging tips to help you enjoy the drawing & painting process.
Learning to draw a female face can feel daunting at first, especially when aiming for both accuracy and expression.
I remember struggling with proportions and symmetry for years, often ending up with lopsided or stiff-looking results.
This guide distills years of practice into clear, actionable steps, helping you achieve beautiful, lifelike portraits with confidence.
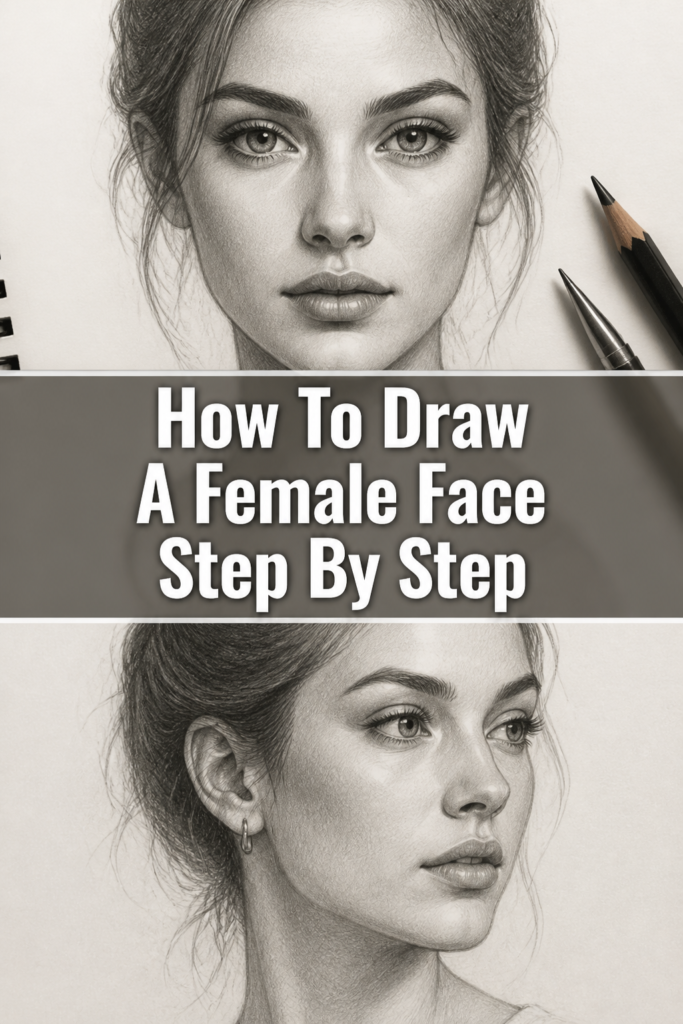
Quick Overview
This guide will walk you through the foundational techniques required to sketch a proportionate and expressive female face from a frontal view.
You will learn how to break down complex forms into simple shapes, place features accurately, and add subtle details that bring your drawing to life.
- Time needed: 1-2 hours for a focused first attempt, with ongoing practice improving speed and skill.
- Difficulty: Beginner
- What you’ll need: Sketching pencil (HB or 2B recommended), kneaded eraser, smooth drawing paper, and a ruler (optional, for initial guidelines).
Step-by-Step Instructions
Step 1: Establish the Basic Head Shape
Begin by lightly sketching a perfect circle on your paper. This circle will form the top part of the skull, which is roughly spherical.
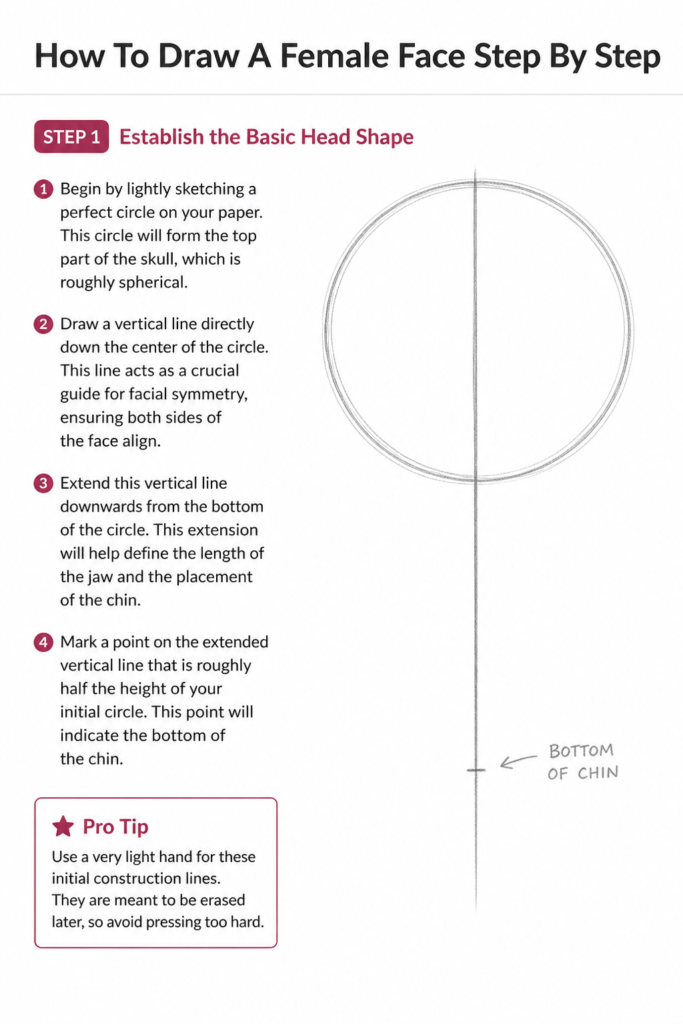
Draw a vertical line directly down the center of the circle. This line acts as a crucial guide for facial symmetry, ensuring both sides of the face align.
Extend this vertical line downwards from the bottom of the circle. This extension will help define the length of the jaw and the placement of the chin.
Mark a point on the extended vertical line that is roughly half the height of your initial circle. This point will indicate the bottom of the chin.
Pro Tip: Use a very light hand for these initial construction lines. They are meant to be erased later, so avoid pressing too hard.
Step 2: Define the Jawline and Criss-Cross Guides
Measure the distance from the top of the circle to the chin point you just marked. Divide this total length into three equal sections.
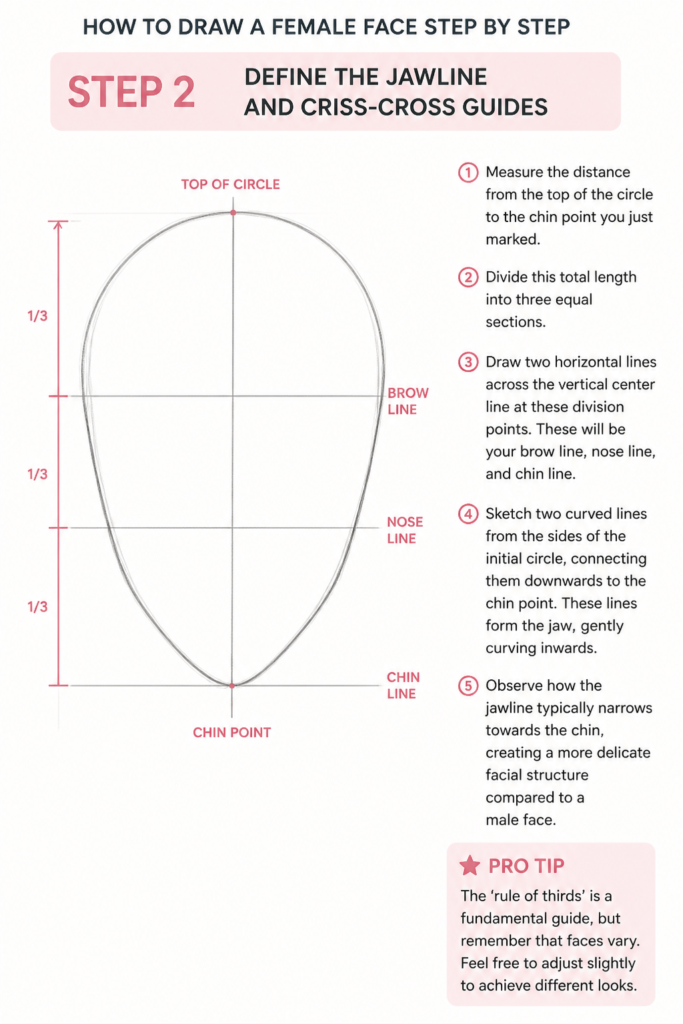
Draw two horizontal lines across the vertical center line at these division points. These will be your brow line, nose line, and chin line.
Sketch two curved lines from the sides of the initial circle, connecting them downwards to the chin point. These lines form the jaw, gently curving inwards.
Observe how the jawline typically narrows towards the chin, creating a more delicate facial structure compared to a male face.
Pro Tip: The ‘rule of thirds’ is a fundamental guide, but remember that faces vary. Feel free to adjust slightly to achieve different looks.
Step 3: Place the Eyes and Eyebrows
Locate the horizontal line that represents the brow line. This line typically sits about one-third of the way down from the top of the head.
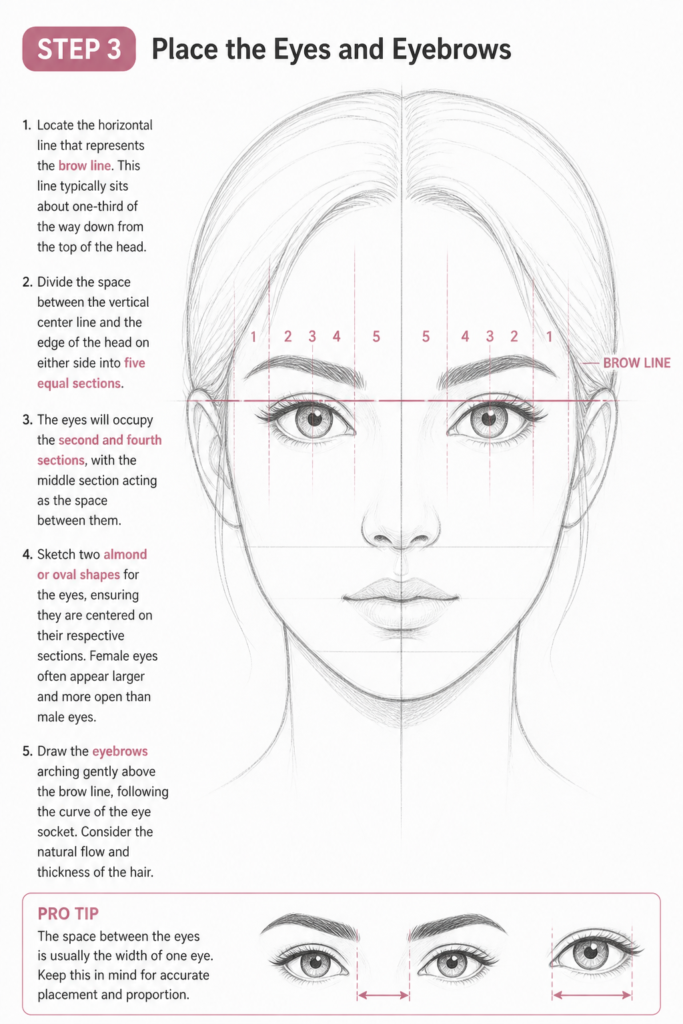
Divide the space between the vertical center line and the edge of the head on either side into five equal sections. The eyes will occupy the second and fourth sections, with the middle section acting as the space between them.
Sketch two almond or oval shapes for the eyes, ensuring they are centered on their respective sections. Female eyes often appear larger and more open than male eyes.
Draw the eyebrows arching gently above the brow line, following the curve of the eye socket. Consider the natural flow and thickness of the hair.
Pro Tip: The space between the eyes is usually the width of one eye. Keep this in mind for accurate placement and proportion.
Step 4: Define the Nose
Find the horizontal nose line, which is the second major guide from the top. The bottom of the nose will rest on this line.
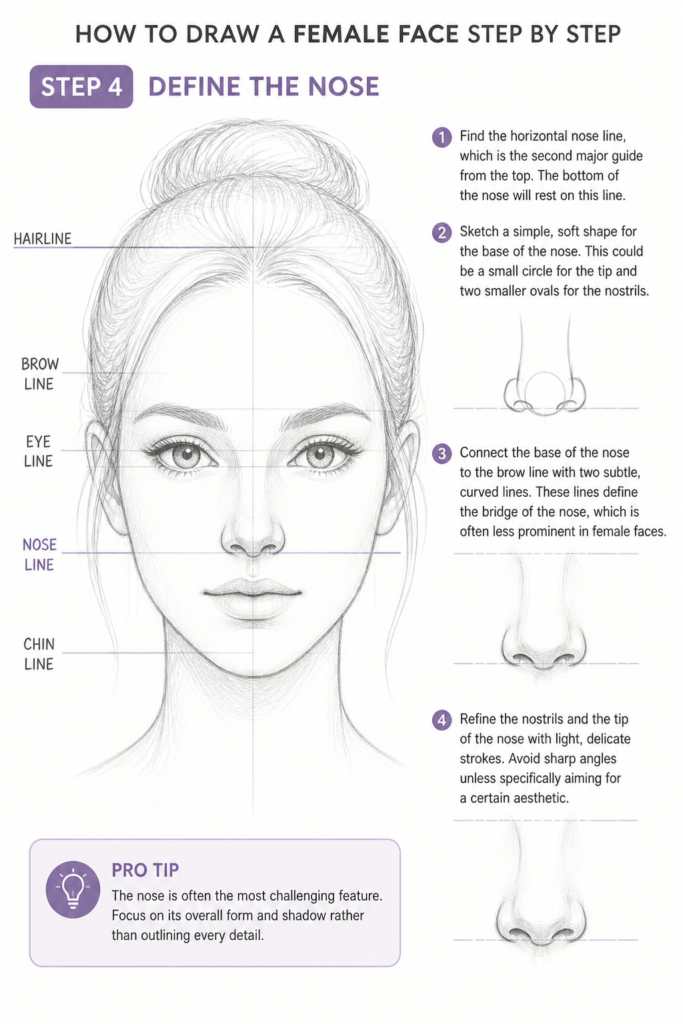
Sketch a simple, soft shape for the base of the nose. This could be a small circle for the tip and two smaller ovals for the nostrils.
Connect the base of the nose to the brow line with two subtle, curved lines. These lines define the bridge of the nose, which is often less prominent in female faces.
Refine the nostrils and the tip of the nose with light, delicate strokes. Avoid sharp angles unless specifically aiming for a certain aesthetic.
Pro Tip: The nose is often the most challenging feature. Focus on its overall form and shadow rather than outlining every detail.
Step 5: Draw the Mouth and Lips
Locate the space between the nose line and the chin line. Divide this space into three equal parts.
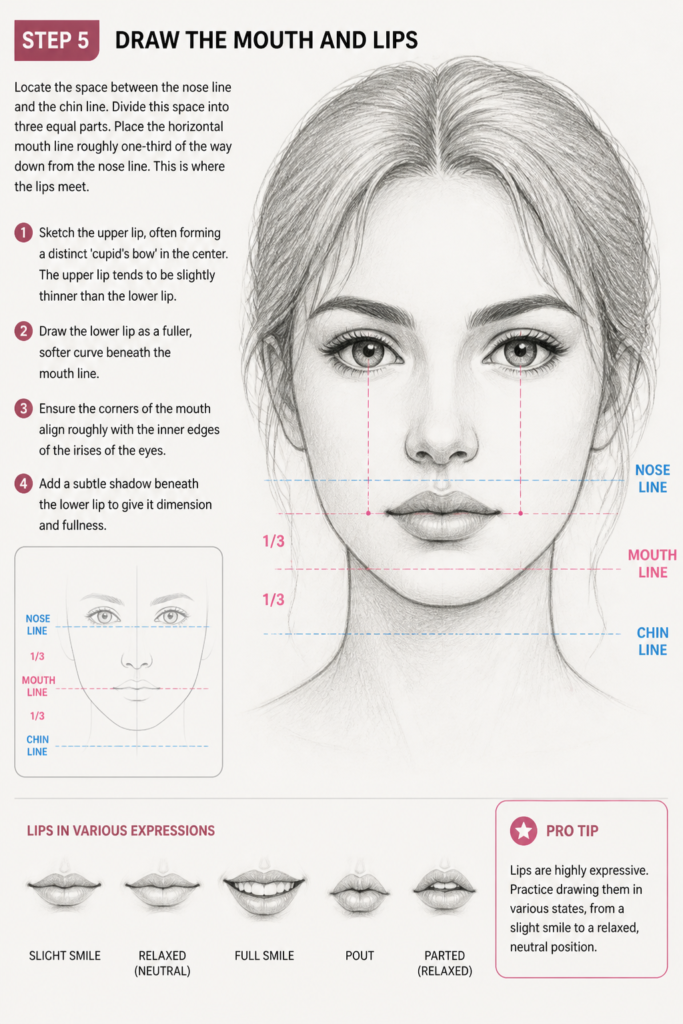
Place the horizontal mouth line roughly one-third of the way down from the nose line. This is where the lips meet.
Sketch the upper lip, often forming a distinct ‘cupid’s bow’ in the center. The upper lip tends to be slightly thinner than the lower lip.
Draw the lower lip as a fuller, softer curve beneath the mouth line. Ensure the corners of the mouth align roughly with the inner edges of the irises of the eyes.
Add a subtle shadow beneath the lower lip to give it dimension and fullness.
Pro Tip: Lips are highly expressive. Practice drawing them in various states, from a slight smile to a relaxed, neutral position.
Step 6: Add the Ears and Hairline
Position the ears between the brow line and the nose line on either side of the head. Their exact placement can vary slightly.
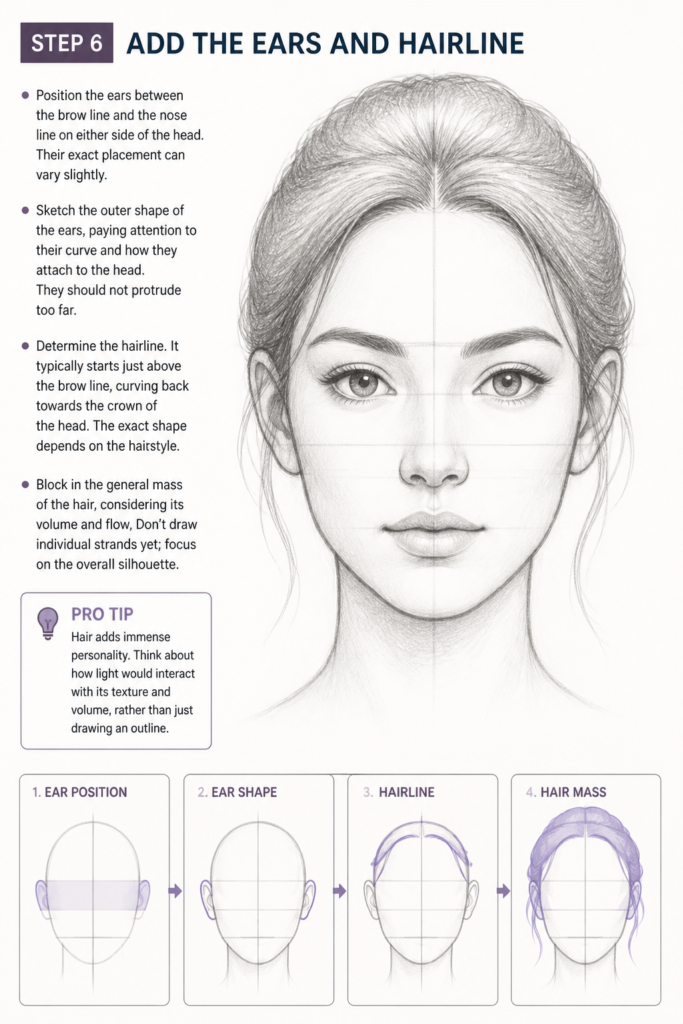
Sketch the outer shape of the ears, paying attention to their curve and how they attach to the head. They should not protrude too far.
Determine the hairline. It typically starts just above the brow line, curving back towards the crown of the head. The exact shape depends on the hairstyle.
Block in the general mass of the hair, considering its volume and flow. Don’t draw individual strands yet; focus on the overall silhouette.
Pro Tip: Hair adds immense personality. Think about how light would interact with its texture and volume, rather than just drawing an outline.
Step 7: Refine Facial Features and Add Detail
Clean up your lines, erasing any unnecessary construction guides or stray marks. Now, you can start to define the features more clearly.
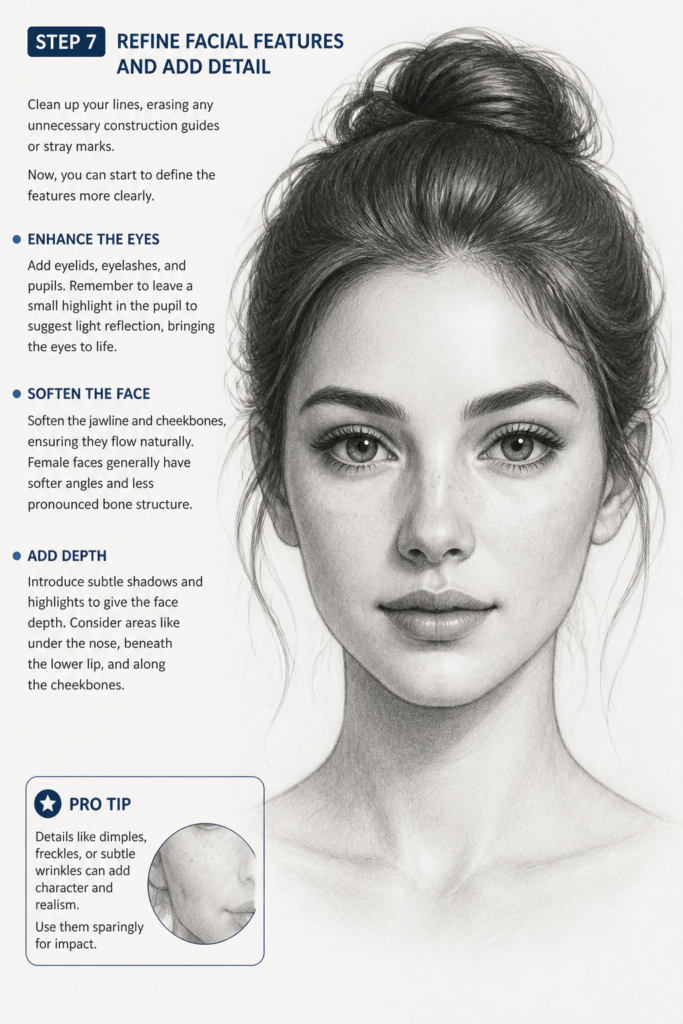
Enhance the eyes by adding eyelids, eyelashes, and pupils. Remember to leave a small highlight in the pupil to suggest light reflection, bringing the eyes to life.
Soften the jawline and cheekbones, ensuring they flow naturally. Female faces generally have softer angles and less pronounced bone structure.
Introduce subtle shadows and highlights to give the face depth. Consider areas like under the nose, beneath the lower lip, and along the cheekbones.
Pro Tip: Details like dimples, freckles, or subtle wrinkles can add character and realism. Use them sparingly for impact.
Step 8: Erase Guidelines and Add Shading
Gently erase all remaining construction lines. Your drawing should now stand on its own without the underlying framework.
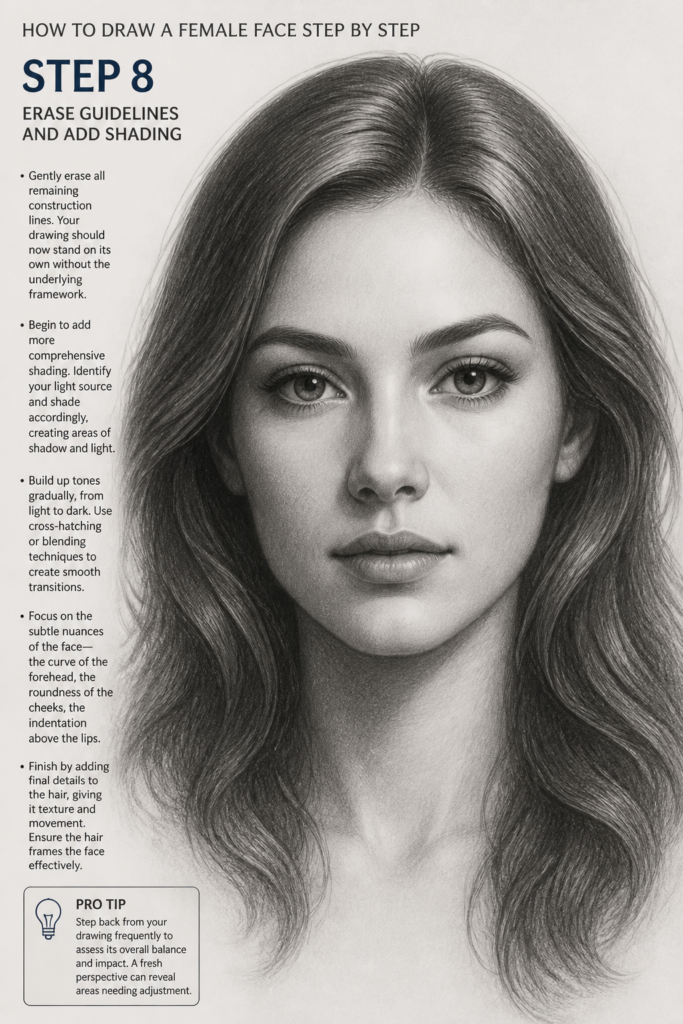
Begin to add more comprehensive shading. Identify your light source and shade accordingly, creating areas of shadow and light.
Build up tones gradually, from light to dark. Use cross-hatching or blending techniques to create smooth transitions.
Focus on the subtle nuances of the face: the curve of the forehead, the roundness of the cheeks, the indentation above the lips.
Finish by adding final details to the hair, giving it texture and movement. Ensure the hair frames the face effectively.
Pro Tip: Step back from your drawing frequently to assess its overall balance and impact. A fresh perspective can reveal areas needing adjustment.
Common Mistakes to Avoid
Proportions are Off
A common pitfall is misplacing features, making eyes too high or a nose too long. This often happens by not relying on the initial guidelines.
Always double-check your measurements against the “rule of thirds” and the eye-width rule. Use your pencil to measure distances on your drawing and compare them.
Remember that the distance from the nose to the mouth is typically shorter than the distance from the mouth to the chin in a balanced face.
Flat Face Syndrome
Many beginners draw faces as if they are completely flat, lacking the three-dimensional quality of a real head. This results in a lifeless appearance.
Think of the head as a sphere with planes. Use subtle curves for the forehead, cheeks, and chin to suggest volume. Shading is crucial for conveying this depth.
Consider how light would fall on a rounded surface, creating gradual transitions from light to shadow rather than stark outlines.
Overly Symmetrical Features
While guidelines emphasize symmetry, real faces are rarely perfectly symmetrical. Drawing features as exact mirror images can make a face look unnatural or robotic.
Allow for slight variations. One eye might be slightly wider, an eyebrow a fraction higher. These small imperfections add character and realism.
Use your guidelines for placement, but then let your eye guide the subtle differences that make a face unique and human.
Rushing the Sketch
Skipping the initial construction steps or rushing through them is a frequent error. This leads to fundamental structural problems that are hard to fix later.
Take your time with the basic shapes and guidelines. These are the foundation of your drawing. A solid foundation makes the rest of the process much smoother.
Light, confident strokes for construction are key. Don’t be afraid to erase and redraw these early lines until they feel right.
Troubleshooting
Face Looks Lopsided
If your female face appears uneven or lopsided, it usually stems from inaccurate initial guidelines or inconsistent feature placement.
Solution: Hold your drawing up to a mirror. This simple trick provides a fresh perspective and often reveals symmetry errors instantly. Also, use a ruler or the edge of a piece of paper to check horizontal and vertical alignments of features.
Features Don’t Look “Female” Enough
Sometimes, despite following steps, the drawn face might lack distinct feminine qualities, appearing generic or masculine.
Solution: Focus on softening angles. Female faces generally feature rounder foreheads, softer jawlines, fuller lips, and often larger, more open eyes. Reduce the prominence of the brow bone and chin. Emphasize subtle curves over sharp lines.
Drawing Looks Stiff or Lifeless
If your finished drawing feels rigid and lacks personality, it could be due to overly stiff lines or a lack of dynamic expression.
Solution: Practice drawing with looser, more flowing lines during your initial sketches. Study various reference photos of women with different expressions. Pay attention to how the muscles around the eyes and mouth shift to convey emotion, and try to incorporate these subtle changes.
Key Takeaways
- The foundation of any good portrait lies in accurate initial shapes and construction lines.
- Mastering proportions, like the “rule of thirds” and eye-width spacing, is crucial for a believable face.
- Female faces often feature softer angles, more rounded forms, and larger, more expressive eyes.
- Don’t be afraid to erase and refine. Drawing is an iterative process of building and adjusting.
- Subtle shading and highlights are essential for giving your drawing depth and a three-dimensional quality.
- Practice observation by studying real faces and diverse reference photos to enhance your understanding of anatomy and expression.
Frequently Asked Questions
How do I make the face look unique and not generic?
To add uniqueness, focus on individual characteristics. Observe variations in nose shape, lip fullness, eye spacing, and jawline definition from different references. Even subtle differences in these features can create a distinct personality for your drawing.
What’s the best way to practice drawing faces?
Consistent practice is key. Start by repeating the basic construction steps many times. Then, draw from diverse reference photos, paying attention to different angles, expressions, and ethnic features. Don’t be afraid to experiment and make mistakes; each attempt is a learning opportunity.
How do I add expression to a female face?
Expression comes from subtle shifts in features. Focus on the eyebrows (raised for surprise, furrowed for anger), the eyes (wide for fear, narrowed for contemplation), and the mouth (upturned for a smile, downturned for sadness). Study how these elements work together in real faces to convey emotion.
Should I always use references when drawing faces?
Yes, especially when you’re learning. References provide crucial information about anatomy, proportion, and how light interacts with features. Over time, you’ll internalize these concepts, allowing you to draw more confidently from imagination, but always refer back to real-world examples to keep your skills sharp.
Our Top Recommended Finds
- Sketchbook with smooth, acid-free paper: A good quality surface allows for clean lines and smooth blending, preventing your paper from degrading over time.
- Set of Graphite Pencils (HB, 2B, 4B, 6B): Having a range of hardness allows you to create light construction lines, mid-tones, and deep shadows for rich, dimensional drawings.
- Kneaded Eraser: This versatile eraser is perfect for lifting graphite without smudging and can be molded into precise shapes for highlighting or cleaning up small areas.
Your Artistic Journey Begins Now
You now possess a solid framework for drawing a female face. This guide has equipped you with the fundamental steps and insights to begin creating compelling portraits.
Don’t stop here. Challenge yourself by drawing faces from different angles, experimenting with various hairstyles, and exploring a range of expressions.
Grab your pencil, find some inspiring references, and start sketching today. The more you practice, the more your unique artistic voice will emerge.
& Painting
No rigid rules or pretension. Just practical guides, medium comparisons, and encouraging tips to help you enjoy the drawing & painting process.