🐼 How To Draw A Red Panda Step By Step

& Painting
No rigid rules or pretension. Just practical guides, medium comparisons, and encouraging tips to help you enjoy the drawing & painting process.
Red pandas are truly captivating creatures, known for their fiery coats and endearing expressions.
Learning to capture their unique charm on paper can be a deeply rewarding experience, transforming simple lines into a lively portrait.
I remember the first time I tried to draw a red panda; it took several attempts to get that distinctive snout just right, and I’m excited to share the refined process that makes it much easier for you.
Quick Overview
This guide will walk you through creating a charming red panda illustration, from initial sketches to final details. You’ll learn how to build the form step-by-step, ensuring your drawing captures its playful spirit.
- Time needed: 45-90 minutes (depending on detail)
- Difficulty: Beginner to Intermediate
- What you’ll need: Pencil, eraser, paper, (optional) colored pencils or markers
Step-by-Step Instructions
Step 1: Sketch the Basic Shapes for the Head and Body
Begin by lightly sketching two primary circles. One larger circle will represent the red panda’s main body, while a slightly smaller, overlapping circle will form the head.
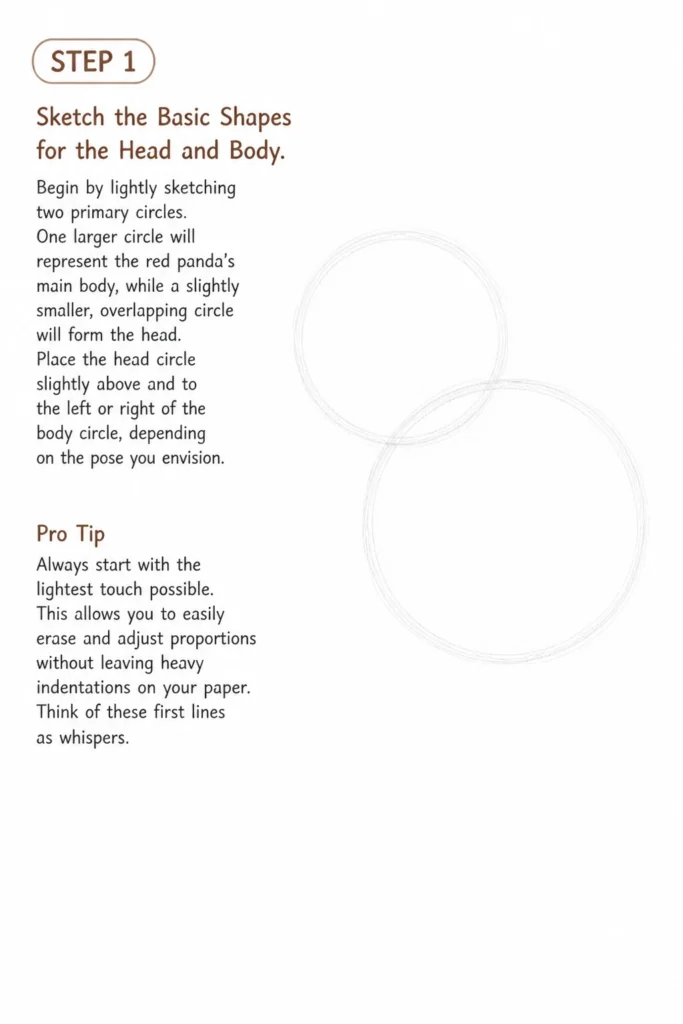
Place the head circle slightly above and to the left or right of the body circle, depending on the pose you envision.
These initial shapes are just guides, so keep your lines very faint.
Pro Tip: Always start with the lightest touch possible. This allows you to easily erase and adjust proportions without leaving heavy indentations on your paper. Think of these first lines as whispers.
Step 2: Connect the Shapes and Define the Muzzle Area
Connect the head and body circles with gentle, curved lines to establish the neck and back. This starts to give your red panda a more fluid silhouette.
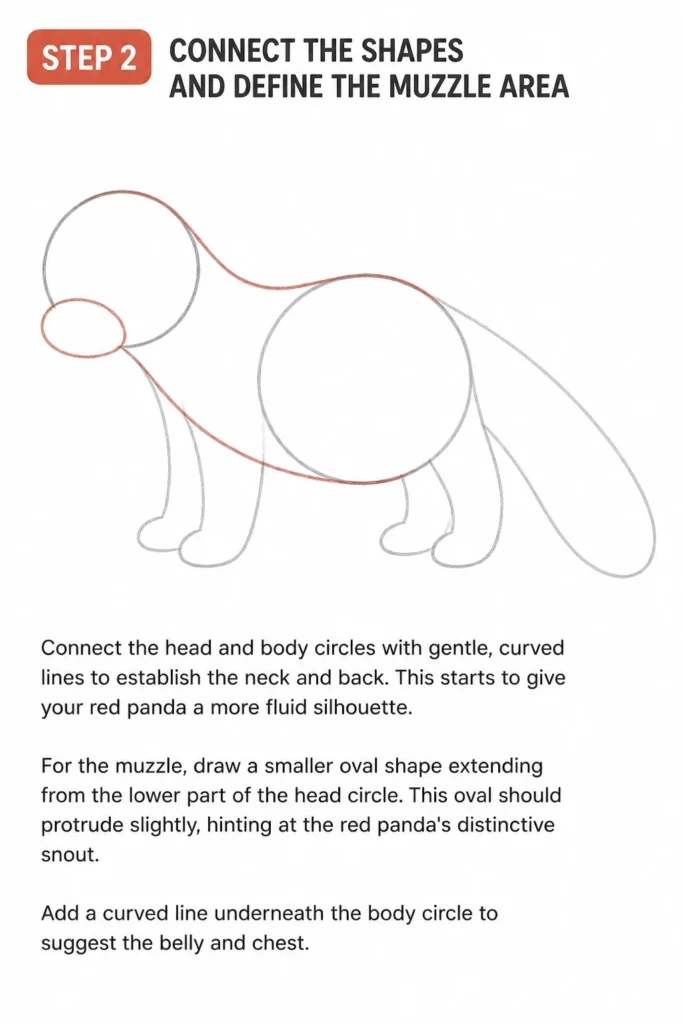
For the muzzle, draw a smaller oval shape extending from the lower part of the head circle. This oval should protrude slightly, hinting at the red panda’s distinctive snout.
Add a curved line underneath the body circle to suggest the belly and chest.
Step 3: Position the Ears and Eye Guidelines
Draw two rounded, almost semicircular shapes on top of the head for the ears. Red panda ears are fairly round and set a bit wide apart.
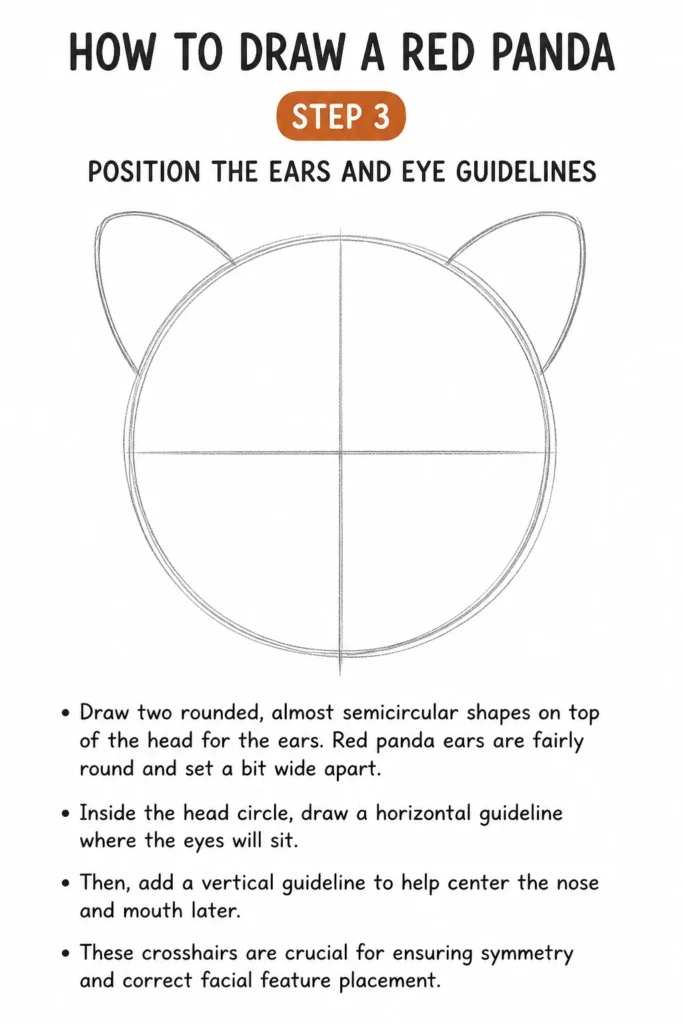
Inside the head circle, draw a horizontal guideline where the eyes will sit. Then, add a vertical guideline to help center the nose and mouth later.
These crosshairs are crucial for ensuring symmetry and correct facial feature placement.
Step 4: Refine Facial Features: Eyes, Nose, and Mouth
Place the eyes along the horizontal guideline. Red panda eyes are typically small, round, and dark, giving them a gentle expression.
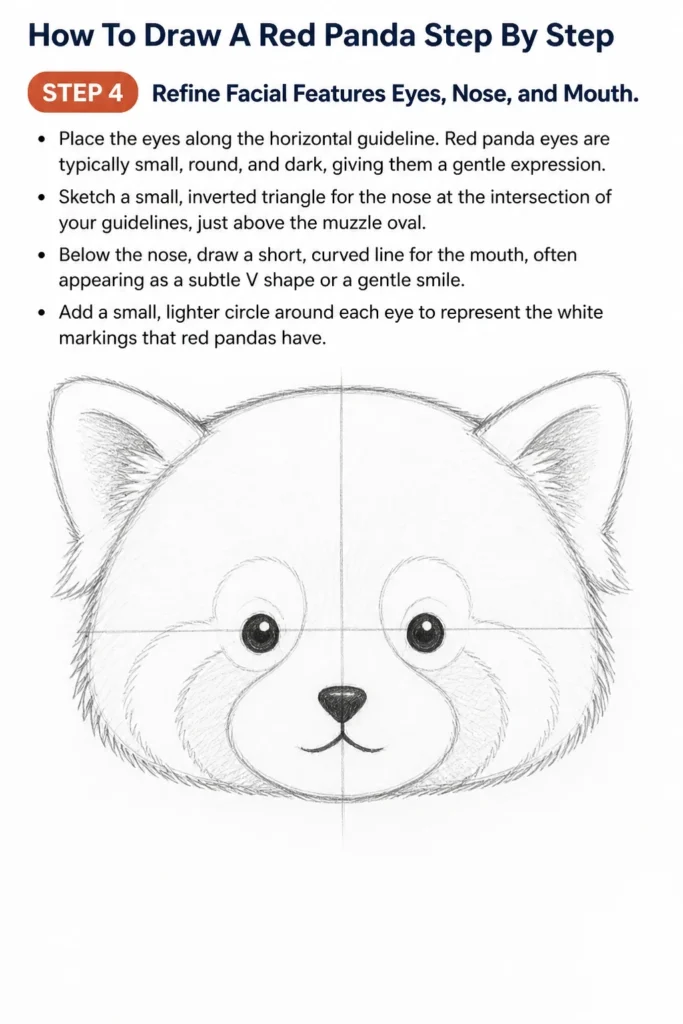
Sketch a small, inverted triangle for the nose at the intersection of your guidelines, just above the muzzle oval. Below the nose, draw a short, curved line for the mouth, often appearing as a subtle “V” shape or a gentle smile.
Add a small, lighter circle around each eye to represent the white markings that red pandas have.
Step 5: Sketch the Legs and Paws
Lightly draw four cylindrical shapes for the legs extending from the body. Red pandas have relatively short, sturdy legs.
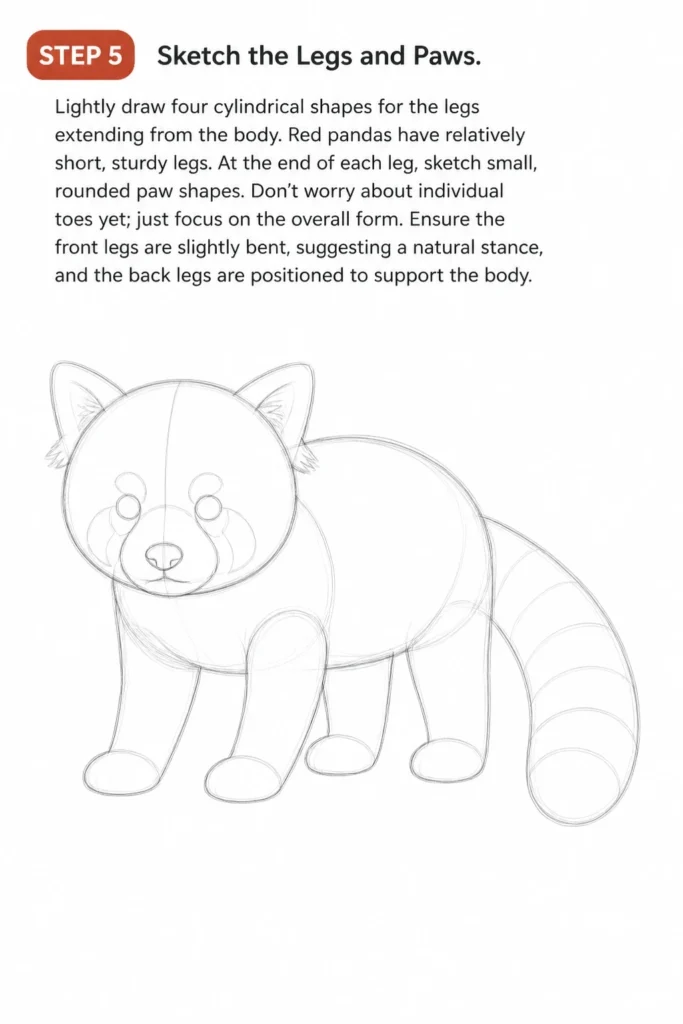
At the end of each leg, sketch small, rounded paw shapes. Don’t worry about individual toes yet; just focus on the overall form.
Ensure the front legs are slightly bent, suggesting a natural stance, and the back legs are positioned to support the body.
Step 6: Add the Signature Bushy Tail
Draw a long, thick, and very bushy tail extending from the back of the body. The red panda’s tail is almost as long as its body and often curls upwards or drapes naturally.
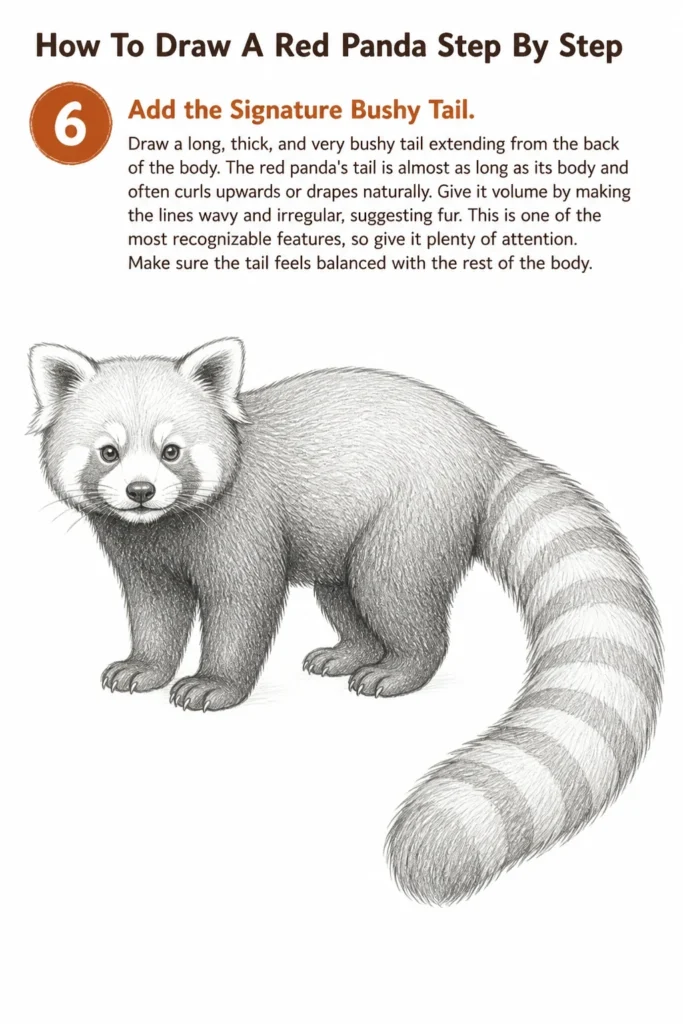
Give it volume by making the lines wavy and irregular, suggesting fur. This is one of the most recognizable features, so give it plenty of attention.
Make sure the tail feels balanced with the rest of the body.
Step 7: Define Fur Texture and Details
Erase all your initial light guidelines now that the basic structure is in place. Use short, feathery strokes to suggest the fur all over the body, head, and tail.
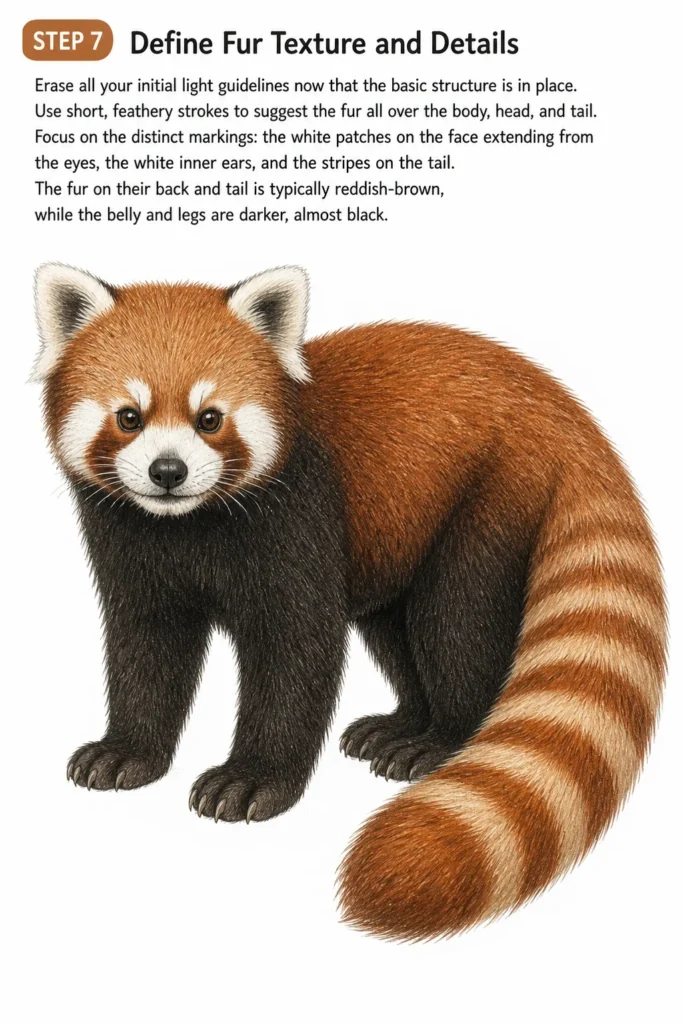
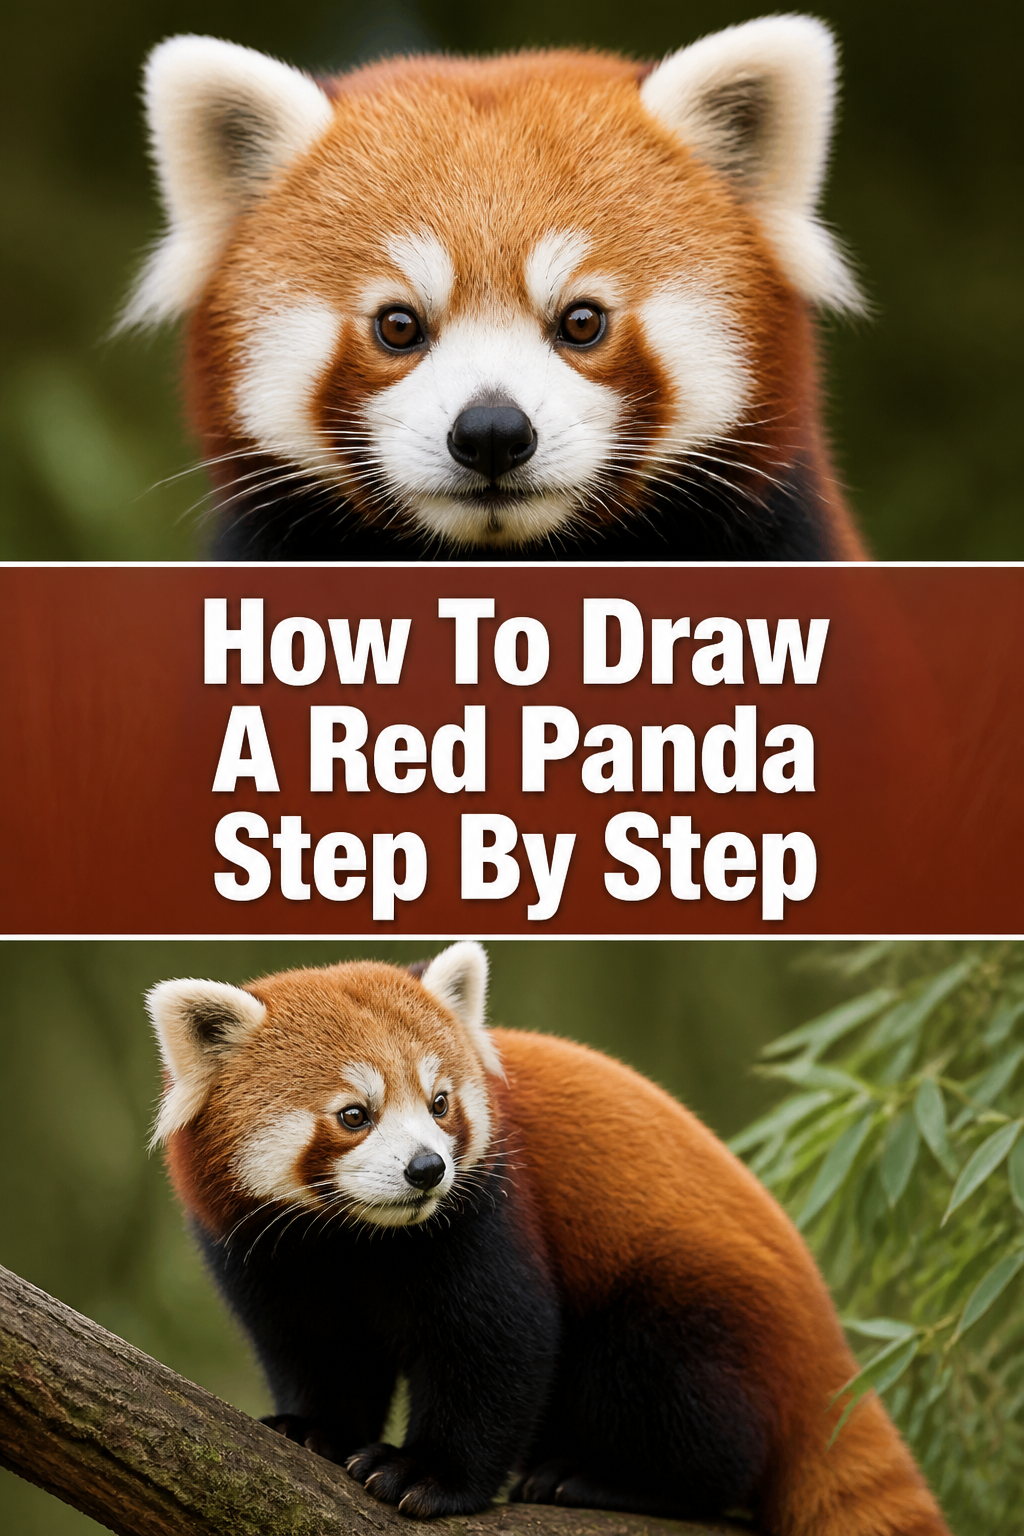
Focus on the distinct markings: the white patches on the face extending from the eyes, the white inner ears, and the stripes on the tail.
The fur on their back and tail is typically reddish-brown, while the belly and legs are darker, almost black.
Step 8: Add Shading and Color (Optional)
Introduce shading to give your red panda depth and dimension. Lightly shade the darker areas like the belly, legs, and the underside of the tail.
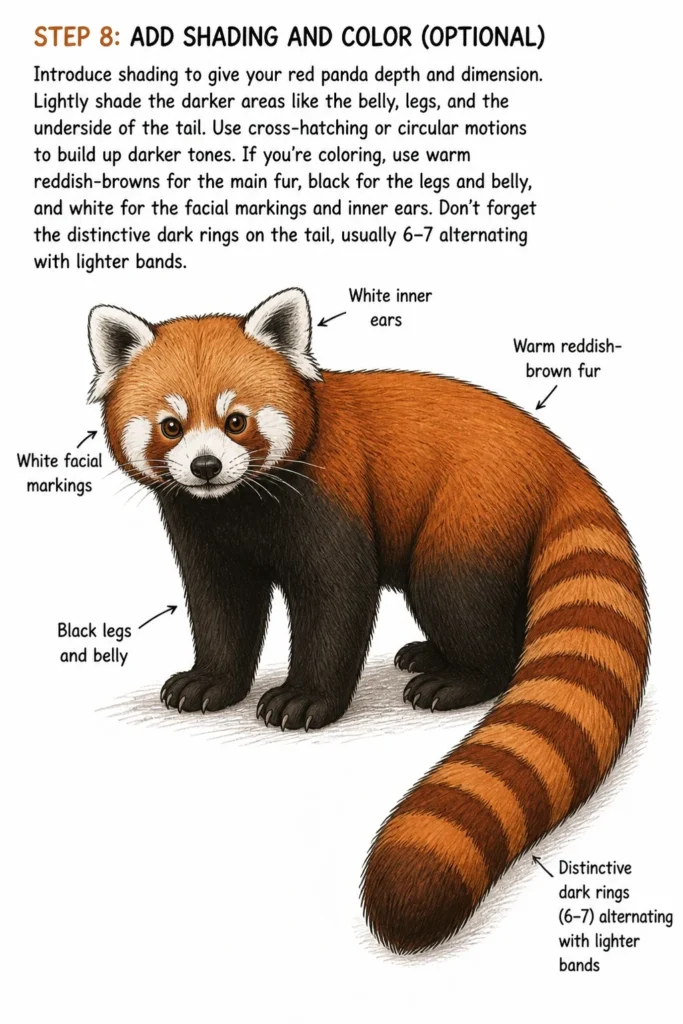
Use cross-hatching or circular motions to build up darker tones. If you’re coloring, use warm reddish-browns for the main fur, black for the legs and belly, and white for the facial markings and inner ears.
Don’t forget the distinctive dark rings on the tail, usually 6-7 alternating with lighter bands.
Common Mistakes to Avoid
Incorrect Proportions
One of the most frequent issues is making the head too big or too small relative to the body, or the tail too short. Red pandas have a relatively large, bushy tail that balances their body. Always double-check your initial circles and adjust them before adding details.
Flat Fur Texture
Simply drawing an outline for the fur makes the animal look flat. Instead, use many short, overlapping strokes in the direction of the fur growth. This creates a fluffy, realistic texture. Vary the pressure on your pencil to show highlights and shadows within the fur.
Missing Facial Markings
The distinctive white tear-like markings around their eyes and white patches on their cheeks are crucial to a red panda’s appearance. Omitting these or placing them incorrectly can make your drawing look less like a red panda. Pay close attention to reference images for accurate placement.
Rushing the Sketching Phase
Skipping the initial light sketch of basic shapes (circles, ovals) leads to lopsided or disproportionate results. Take your time with the foundational lines. They are your blueprint and make the detailed work much easier and more accurate in the long run.
Troubleshooting
My Red Panda Looks Stiff or Unnatural
This often happens when the initial connecting lines between the head and body are too straight or angular. Try using more gentle, flowing curves for the neck, back, and belly. Imagine the natural curve of an animal’s spine. Also, ensure the legs have a slight bend at the joints, even if the animal is standing still.
I’m Struggling with Symmetry for the Face
The horizontal and vertical guidelines you drew in Step 3 are your best friends here. If your eyes or nose seem off-center, erase and re-draw them using these guides. Practice drawing simple symmetrical shapes first. Sometimes, flipping your drawing upside down or viewing it in a mirror can highlight imbalances you didn’t notice before.
The Fur Doesn’t Look Fluffy Enough
To achieve a fluffy look, avoid drawing single, long lines. Instead, use many short, slightly curved strokes that follow the direction of the fur. Layer these strokes, building up density. Vary the length and direction of your strokes, especially around the edges of the body, to create a soft, feathery outline. Don’t be afraid to use your eraser to lift out highlights in the fur.
Key Takeaways
- Start Simple: Always begin with basic geometric shapes to establish proportions and pose.
- Build Up Layers: Progress from light sketches to defined lines, then to texture and shading.
- Observe Closely: Pay attention to unique features like the tail, facial markings, and ear shape.
- Practice Fur Texture: Use short, varied strokes to create a realistic and fluffy fur effect.
- Don’t Fear Erasers: Mistakes are part of the process; use your eraser to refine and adjust.
- Embrace Patience: Drawing takes time and practice; enjoy each step of the creative journey.
Frequently Asked Questions
What’s the best pencil to use for sketching?
A standard HB pencil is excellent for initial sketching because it’s not too dark and erases cleanly. For darker lines and shading, you might want to use a 2B or 4B pencil, which are softer and create richer tones.
How can I make my red panda look more realistic?
Realism comes from careful observation and detail. Study reference photos of red pandas to understand their anatomy, fur patterns, and expressions. Focus on subtle variations in fur direction, the gleam in their eyes, and accurate shading to create depth. Don’t forget the details like claws or whiskers.
Can I simplify this for kids?
Absolutely! For younger artists, focus on the basic shapes (large oval for body, smaller oval for head, long oval for tail). Simplify the facial features to just dots for eyes and a small triangle for the nose. Skip detailed fur textures and shading, allowing them to use bold colors instead.
What if my drawing doesn’t look exactly like a red panda?
That’s perfectly normal, especially when you’re starting out! Every artist develops their own style. The goal is to capture the essence of the animal. Keep practicing, and don’t be afraid to experiment. Each drawing is a learning experience, bringing you closer to your desired outcome.
Our Top Recommended Finds
- Sketchbook with Quality Paper: A good sketchbook prevents bleed-through and handles erasing well, making your drawing experience smoother.
- Set of Graphite Pencils (HB, 2B, 4B, 6B): Having a range of pencil hardness allows for varied line weights and effective shading, adding depth to your artwork.
- Kneaded Eraser: Unlike standard erasers, a kneaded eraser can lift graphite without damaging the paper surface, perfect for subtle corrections and highlights.
Your Next Artistic Adventure Awaits
You’ve just brought a charming red panda to life on paper, a testament to your growing artistic skill and patience.
Now that you’ve mastered this adorable creature, why not try drawing other animals with distinct features, like a fluffy fox or a majestic owl?
Keep practicing, keep observing, and most importantly, keep enjoying the wonderful journey of drawing.
& Painting
No rigid rules or pretension. Just practical guides, medium comparisons, and encouraging tips to help you enjoy the drawing & painting process.