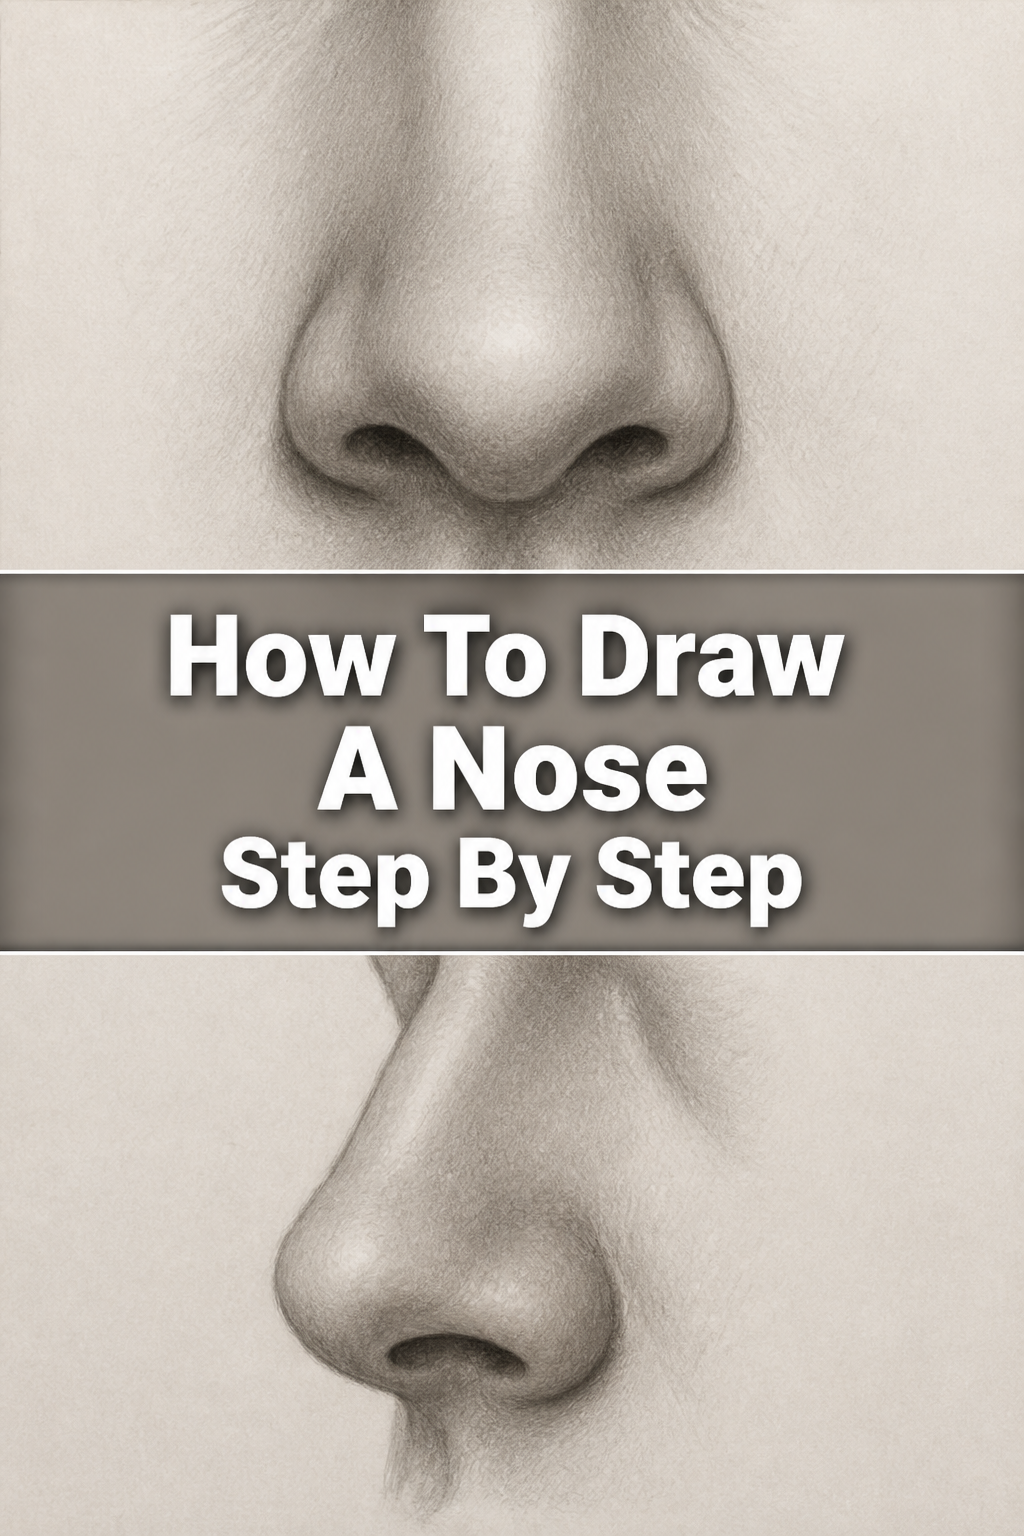
👃 How To Draw A Nose Step By Step

& Painting
No rigid rules or pretension. Just practical guides, medium comparisons, and encouraging tips to help you enjoy the drawing & painting process.
Drawing a nose can feel intimidating, often making artists avoid it or simplify it too much. I remember those struggles myself, feeling like every nose I drew looked cartoonish or out of place. This guide comes from years of practice and breaking down complex forms into manageable steps.
You’ll discover a systematic approach that makes drawing this central facial feature accessible and enjoyable. By the end, you’ll have a solid method for creating realistic, three-dimensional noses for any portrait.
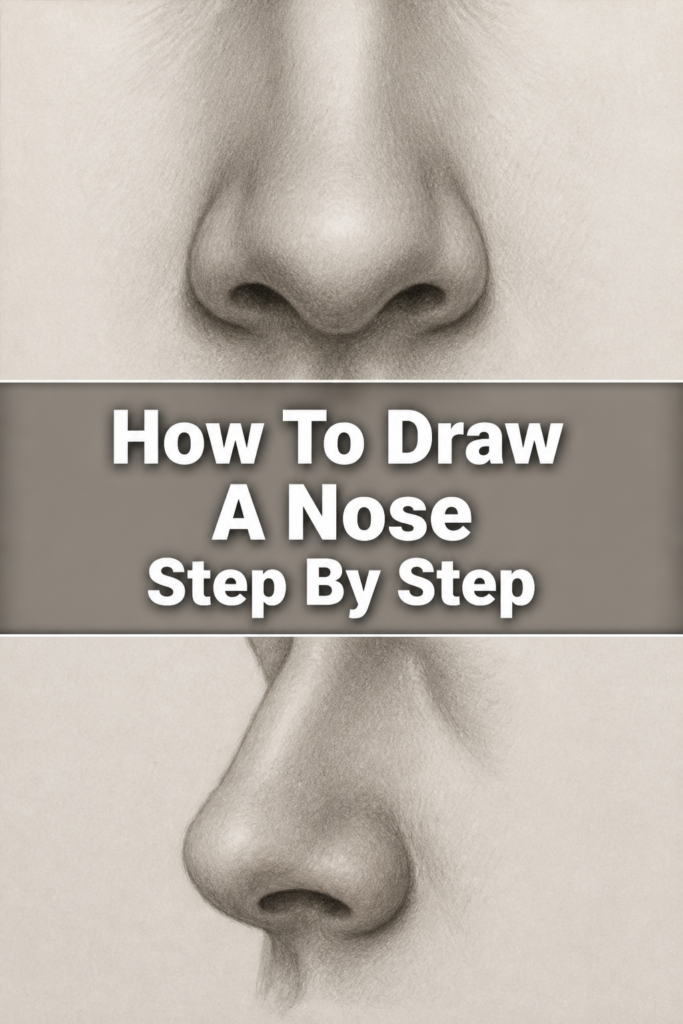
Quick Overview
This guide will walk you through building a nose from basic shapes to refined details. You’ll learn to understand its underlying structure, apply light and shadow, and avoid common pitfalls. The goal is to equip you with a reliable process for drawing convincing noses from imagination or reference.
- Time needed: 45-60 minutes (for a detailed study)
- Difficulty: Beginner to Intermediate
- What you’ll need: Sketchbook or paper, graphite pencils (HB, 2B, 4B), kneaded eraser, blending stump (optional)
Step-by-Step Instructions
Step 1: Start with Basic Shapes
Begin by lightly sketching the fundamental forms. Think of the nose as a collection of simple geometric volumes rather than a single object. This foundational step is crucial for establishing depth and perspective.
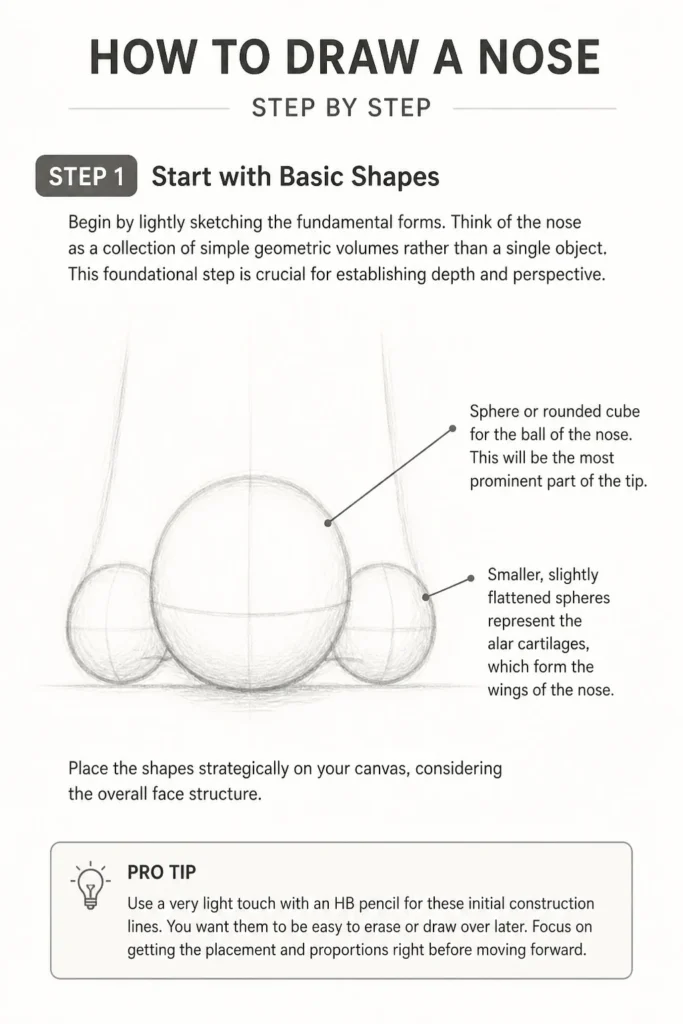
Draw a sphere or a rounded cube for the ball of the nose. This will be the most prominent part of the tip. Place it strategically on your canvas, considering the overall face structure.
Next, add two smaller, slightly flattened spheres on either side of the central sphere. These represent the alar cartilages, which form the wings of the nose. Keep these initial shapes very faint, as they are just guides.
Pro Tip: Use a very light touch with an HB pencil for these initial construction lines. You want them to be easy to erase or draw over later. Focus on getting the placement and general size correct before adding any detail.
Step 2: Define the Bridge and Nostrils
Now, connect these basic shapes to form a cohesive structure. Imagine the bridge of the nose extending upwards from the central sphere. Draw a rectangular or trapezoidal shape for the bridge, connecting the ball of the nose to the brow area.
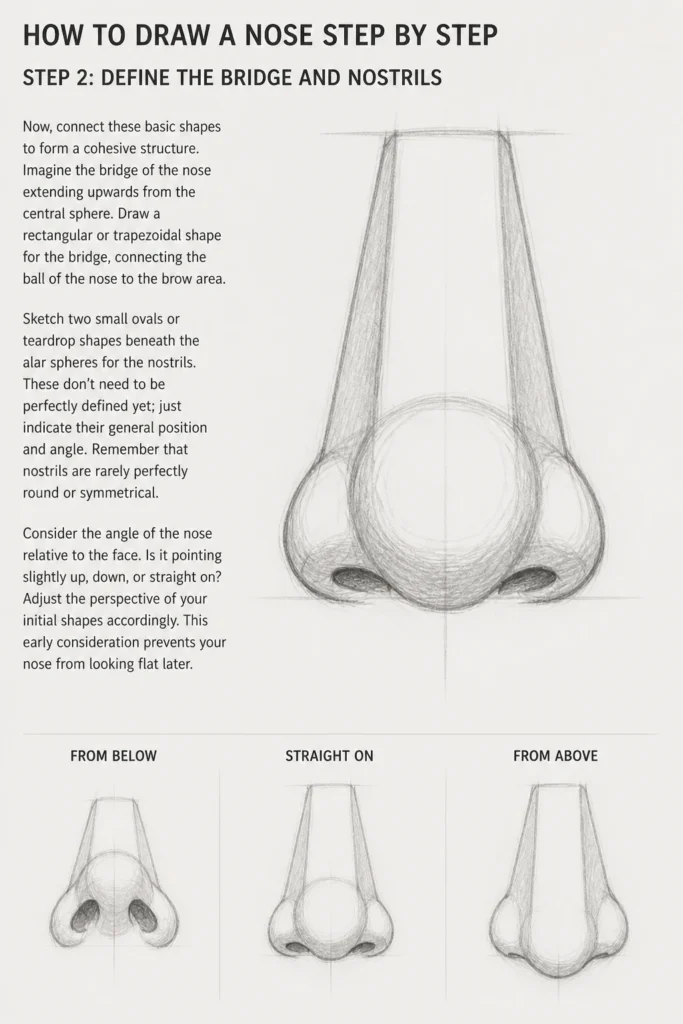
Sketch two small ovals or teardrop shapes beneath the alar spheres for the nostrils. These don’t need to be perfectly defined yet; just indicate their general position and angle. Remember that nostrils are rarely perfectly round or symmetrical.
Consider the angle of the nose relative to the face. Is it pointing slightly up, down, or straight on? Adjust the perspective of your initial shapes accordingly. This early consideration prevents your nose from looking flat later.
Step 3: Refine the Structure with Planes
Think about the nose as a series of planes that catch light and shadow. This step is about defining those planes and adding more anatomical accuracy. Draw lines that suggest the flat surfaces of the bridge, the sides of the nose, and the bottom plane where the nostrils sit.
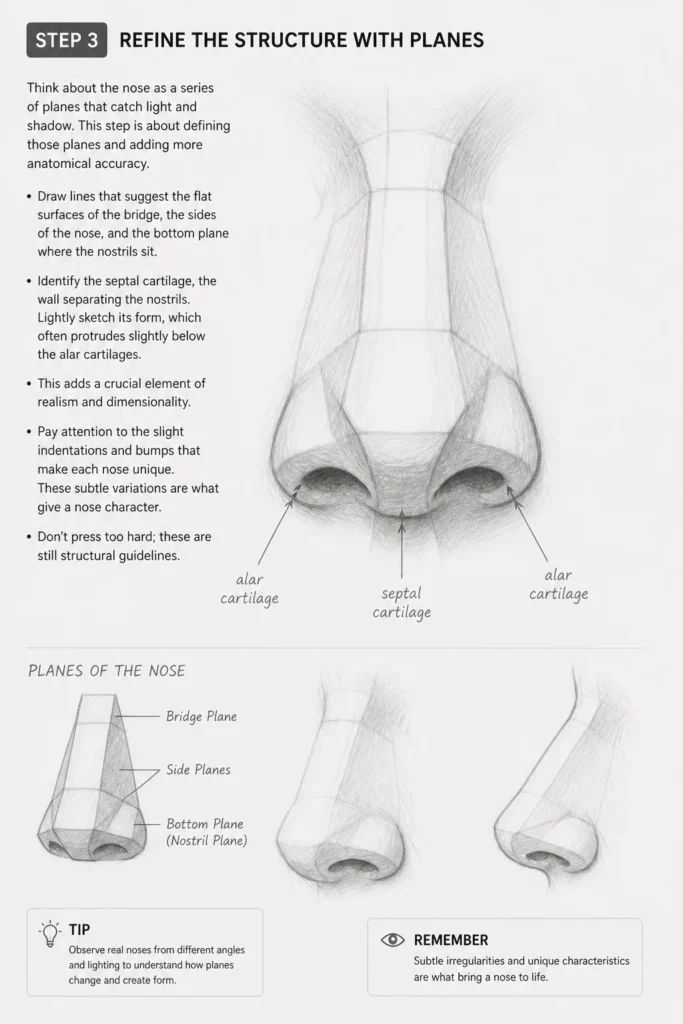
Identify the septal cartilage, the wall separating the nostrils. Lightly sketch its form, which often protrudes slightly below the alar cartilages. This adds a crucial element of realism and dimensionality.
Pay attention to the slight indentations and bumps that make each nose unique. These subtle variations are what give a nose character. Don’t press too hard; these are still structural guidelines.
Step 4: Outline the Form
With your underlying structure in place, begin to lightly sketch the final contours of the nose. Use the construction lines as your guide, but now refine them into the specific curves and angles of the nose you are drawing. This is where you start to erase some of the initial, overlapping construction lines.
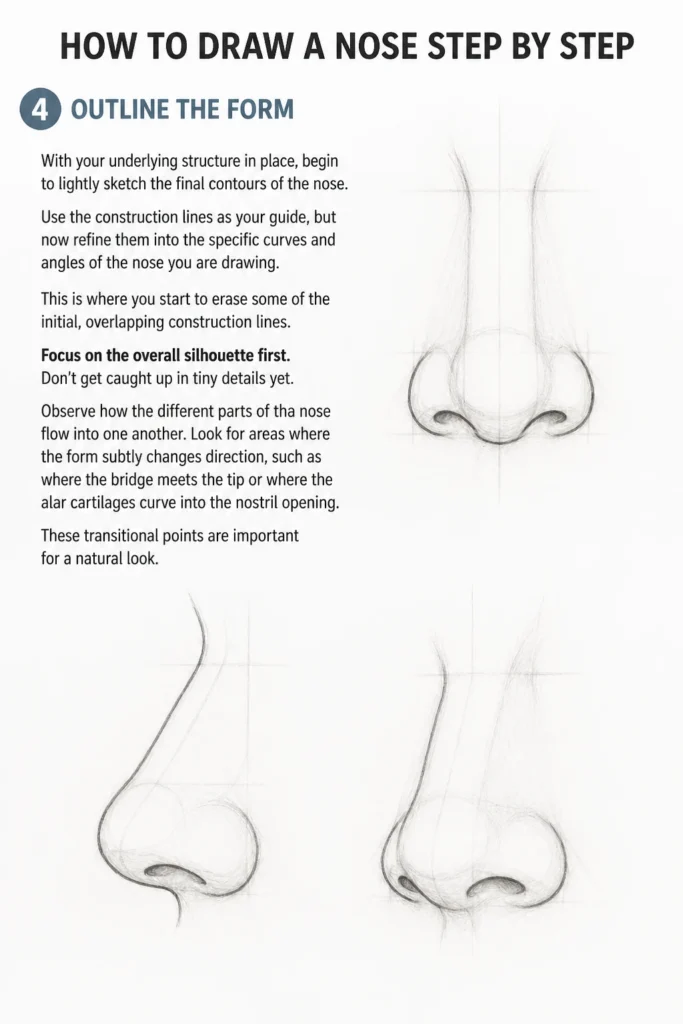
Focus on the overall silhouette first. Don’t get caught up in tiny details yet. Observe how the different parts of the nose flow into one another.
Look for areas where the form subtly changes direction, such as where the bridge meets the tip or where the alar cartilages curve into the nostril opening. These transitional points are important for a natural look.
Step 5: Begin Shading and Form
Establish your light source. This is critical for making the nose appear three-dimensional. Determine where the light is coming from and where the primary shadows will fall.
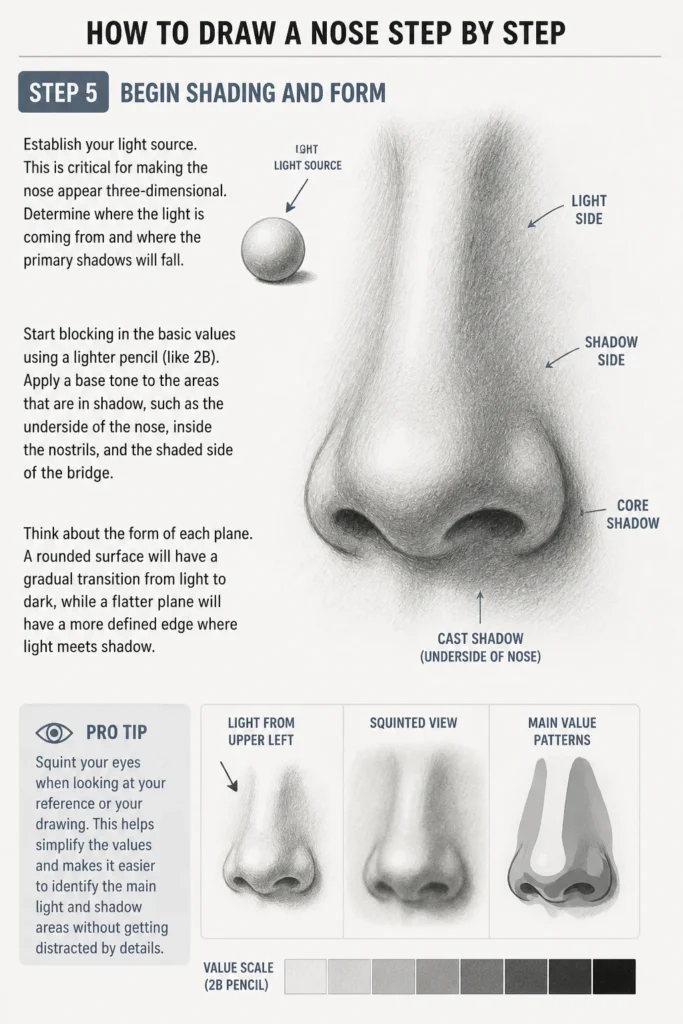
Start blocking in the basic values using a lighter pencil (like 2B). Apply a base tone to the areas that are in shadow, such as the underside of the nose, inside the nostrils, and the shaded side of the bridge.
Think about the form of each plane. A rounded surface will have a gradual transition from light to dark, while a flatter plane will have a more defined edge where light meets shadow.
Pro Tip: Squint your eyes when looking at your reference or your drawing. This helps simplify the values and makes it easier to identify the main light and shadow areas without getting distracted by details.
Step 6: Develop Mid-Tones and Details
Gradually build up the mid-tones. These are the values between the brightest highlights and the deepest shadows. Use a slightly darker pencil (like 4B) to deepen the existing shadows and add more nuanced shading.
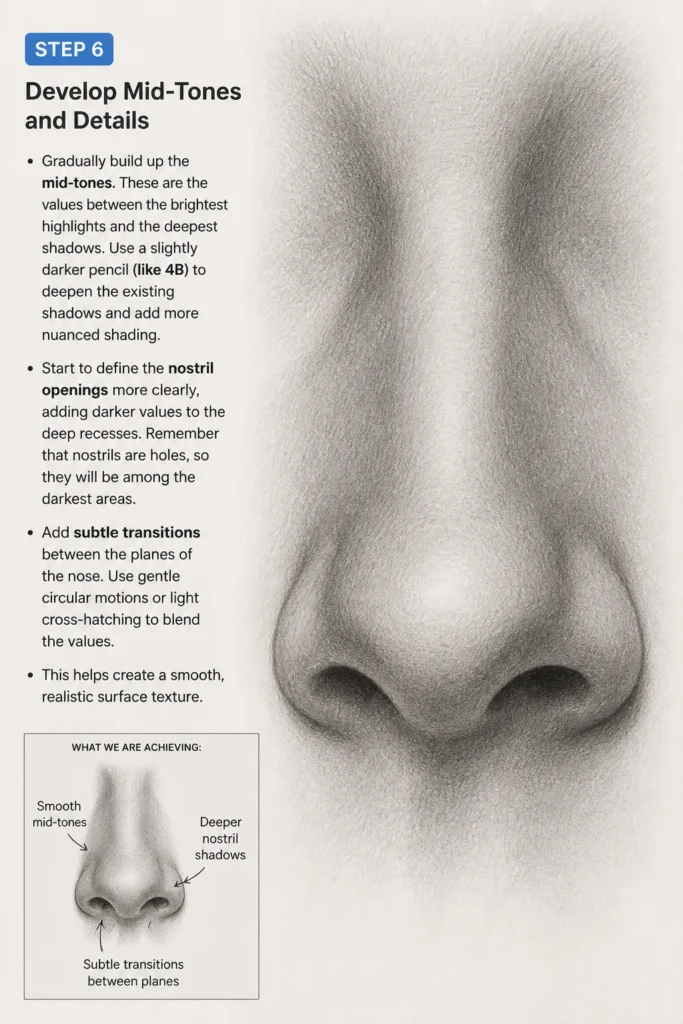
Start to define the nostril openings more clearly, adding darker values to the deep recesses. Remember that nostrils are holes, so they will be among the darkest areas.
Add subtle transitions between the planes of the nose. Use gentle circular motions or light cross-hatching to blend the values. This helps create a smooth, realistic surface texture.
Step 7: Add Highlights and Deep Shadows
Now, enhance the contrast to bring the nose to life. Identify the brightest highlights, which will be where the light source directly hits the most prominent parts of the nose, often the bridge and the tip. Use your kneaded eraser to lift pigment and create these bright spots.
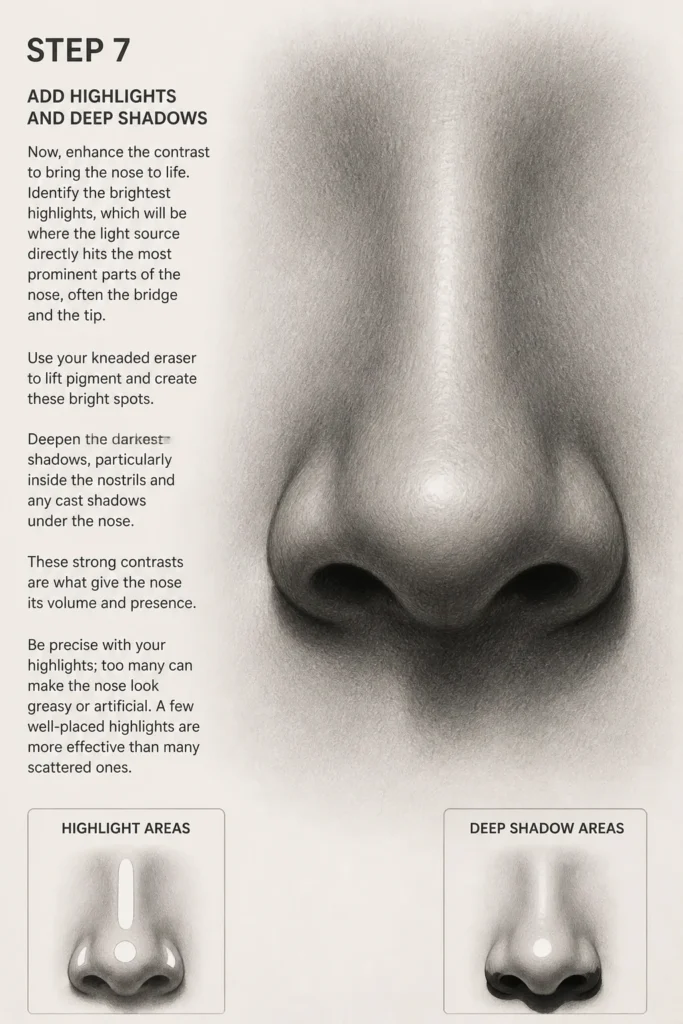
Deepen the darkest shadows, particularly inside the nostrils and any cast shadows under the nose. These strong contrasts are what give the nose its volume and presence.
Be precise with your highlights; too many can make the nose look greasy or artificial. A few well-placed highlights are more effective than many scattered ones.
Step 8: Blend and Finish
Use a blending stump or a clean brush to smooth out the transitions between values. Be careful not to over-blend, as this can make the nose look soft and lose its structure. The goal is to create natural, subtle shifts in tone.
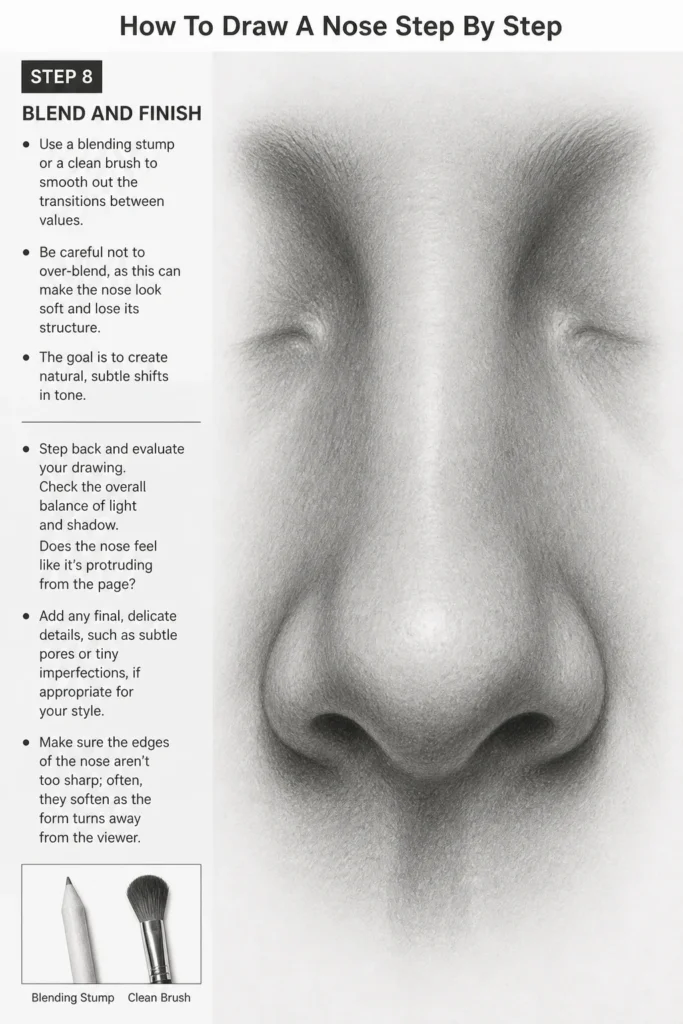
Step back and evaluate your drawing. Check the overall balance of light and shadow. Does the nose feel like it’s protruding from the page?
Add any final, delicate details, such as subtle pores or tiny imperfections, if appropriate for your style. Make sure the edges of the nose aren’t too sharp; often, they soften as the form turns away from the viewer.
Common Mistakes to Avoid
Drawing the Outline First
Many beginners start by drawing a hard, continuous outline of the nose. This approach makes the nose appear flat and two-dimensional, like a cutout. Noses are three-dimensional forms, and starting with an outline ignores their underlying structure and volume. Instead, begin with basic geometric shapes and build the form from the inside out, thinking about how light falls on those forms.
Making the Nose Too Symmetrical or Flat
While noses have a general bilateral symmetry, they are rarely perfectly identical on both sides. Over-symmetrizing can make a nose look artificial and lifeless. Similarly, neglecting the planes and curves can result in a flat appearance. Remember that the nose projects forward from the face and has a distinct top, bottom, and sides that interact with light differently.
Ignoring the Underlying Structure
Failing to understand the cartilages and bone structure beneath the skin is a common pitfall. The nose isn’t just a blob; it has a complex skeletal and cartilaginous framework. Without acknowledging this structure, your nose might lack conviction and realism. Take time to study anatomy references to understand how the bridge, alar cartilages, and septum truly form.
Over-Rendering Details
It’s tempting to draw every pore or tiny crease on the nose. However, too much detail can overwhelm the viewer and make the nose look overly textured or busy. Often, less is more. Focus on the major forms and value shifts, letting subtle suggestions imply texture rather than drawing every single detail.
Troubleshooting
My Nose Looks Flat
If your nose appears flat, you likely haven’t established clear light and shadow planes. Go back to Step 5 and re-evaluate your light source. Ensure you have distinct areas of highlight, mid-tone, and deep shadow. Adding a strong cast shadow under the nose can also help lift it off the face.
The problem might also stem from drawing a continuous outline rather than building up forms. Revisit Step 1 and 3, focusing on seeing the nose as a collection of spheres and planes. These foundational shapes are key to creating a sense of volume.
My Nostrils Look Strange
Nostrils are tricky because they are openings, not just outlines. If yours look like simple circles or ovals, they might appear pasted on. Remember that nostrils are often tucked under the alar cartilages and have varying thicknesses and shapes.
Ensure you’re shading the inside of the nostril opening darkest, and that the surrounding flesh has thickness. Pay attention to the angle and perspective of the nostrils relative to the rest of the nose and the face. They rarely face directly forward.
The Nose Doesn’t Match the Face
This issue often comes from not integrating the nose into the overall facial structure early enough. The nose isn’t an isolated element; it connects to the brow, the cheeks, and the upper lip. If it looks detached, check its scale and placement.
Is it too big or too small for the face? Is it sitting too high or too low? Revisit your initial placement and consider the proportions of the entire face. Lightly sketching the surrounding features can help you gauge the nose’s fit within the whole.
Key Takeaways
- Always start with simple, geometric shapes to build the nose’s underlying structure and establish its 3D form.
- Understand the nose as a series of planes that interact with light and shadow, rather than just an outline.
- Establish a clear light source early on to guide your shading and create a sense of volume.
- Gradually build up values from light to dark, focusing on mid-tones before adding extreme highlights and deep shadows.
- Pay attention to the subtle curves and transitions between different parts of the nose for a natural, organic look.
- Practice regularly and use references to observe the incredible variety and nuances of real noses.
Frequently Asked Questions
What’s the best angle to draw a nose from?
There isn’t a single “best” angle, as each perspective offers unique challenges and opportunities. A three-quarter view often provides a good balance, showing both the front and side planes, which helps in understanding volume. Experiment with profiles, straight-on views, and even looking up or down at the nose to broaden your skills.
How do noses differ between people?
Noses vary immensely in size, shape, and proportion due to genetics and ethnicity. Some have a prominent bridge, others a more rounded tip, or wider nostrils. The key is to observe these individual characteristics rather than drawing a generic “ideal” nose. Embrace these differences to add personality to your portraits.
Should I use a reference image?
Absolutely, yes! Using reference images is invaluable for learning. They help you observe real light and shadow patterns, anatomical variations, and subtle nuances you might not imagine on your own. Start by copying references, then try drawing from imagination, applying what you’ve learned.
How can I make it look less cartoonish?
To avoid a cartoonish look, focus on realism over simplification. This means building form with light and shadow, understanding the underlying anatomy, and avoiding hard, uniform outlines. Also, pay attention to subtle value shifts and soft edges where the nose turns away from the light, rather than sharp, defined lines everywhere.
Our Top Recommended Finds
- Strathmore 400 Series Sketch Pad: A reliable, acid-free paper that holds graphite well and handles erasures without tearing, perfect for practice.
- Staedtler Mars Lumograph Graphite Pencils (Assorted Set): Offers a range of hardness (HB, 2B, 4B, 6B) essential for achieving varied tones and rich contrast.
- Derwent Paper Blending Stumps: Excellent for smoothing out graphite, creating seamless transitions, and achieving soft, subtle shading effects.
Your Next Creative Step
You’ve just taken a fantastic step in mastering one of the most expressive features of the human face. Drawing a nose with confidence and realism opens up a world of portrait possibilities. Don’t let this newfound knowledge sit idle.
Grab your pencil and paper right now. Try drawing a nose from a photo, or even sketch your own reflection in a mirror. The more you practice, the more intuitive these steps will become. Soon, you’ll be able to create compelling portraits that truly come to life.
& Painting
No rigid rules or pretension. Just practical guides, medium comparisons, and encouraging tips to help you enjoy the drawing & painting process.