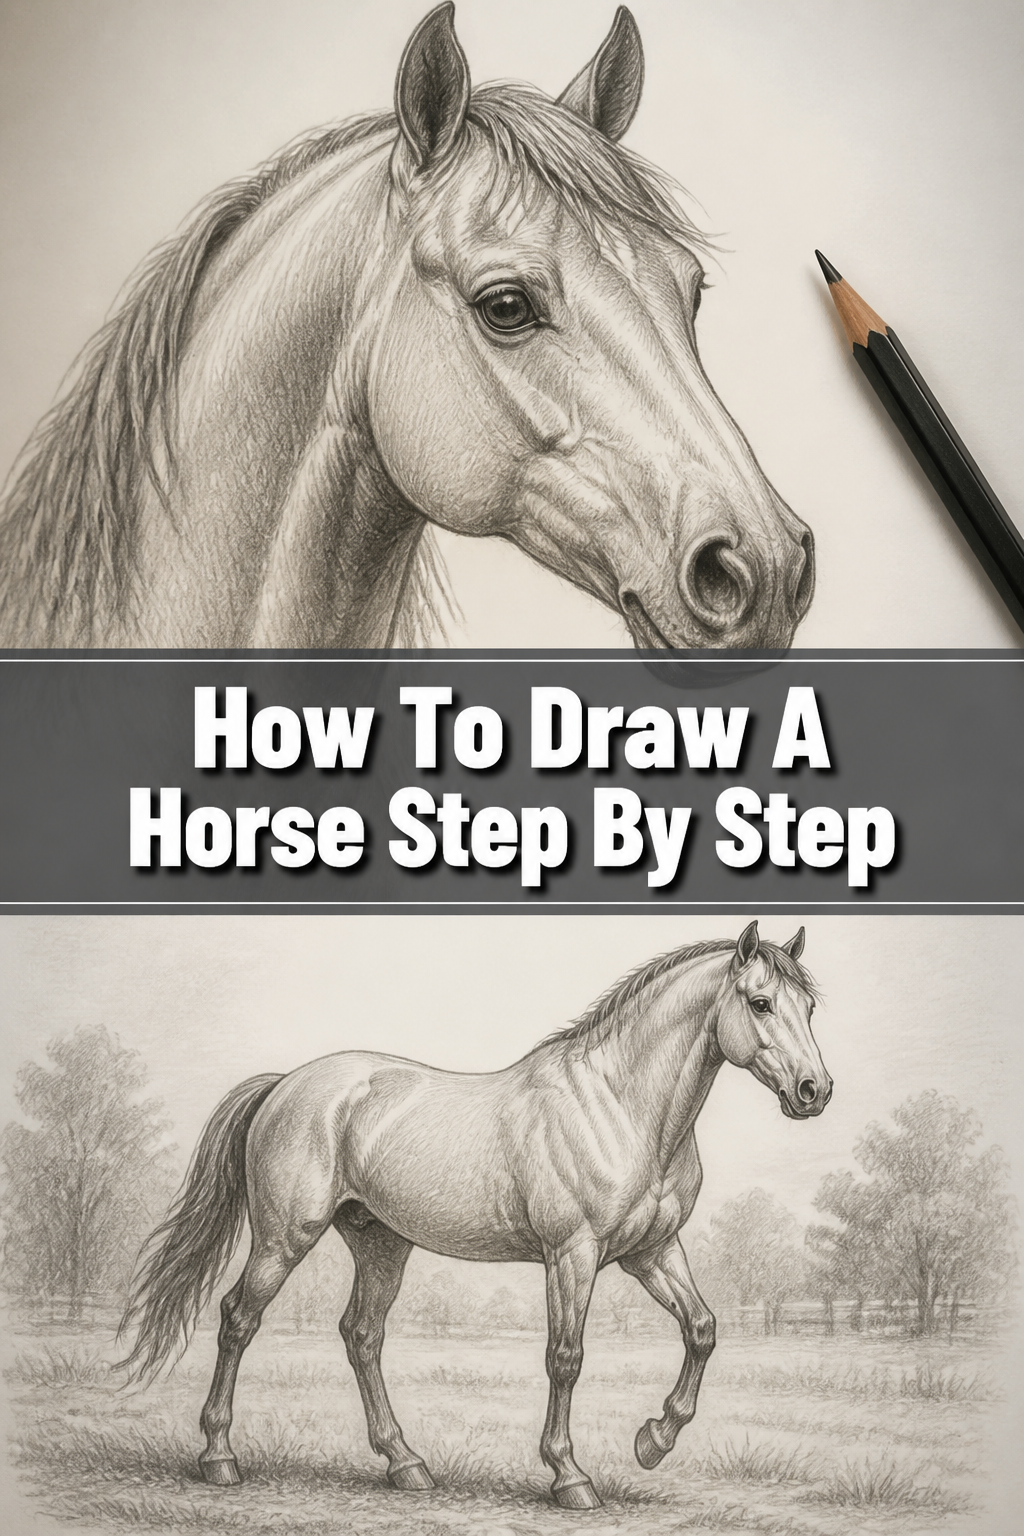
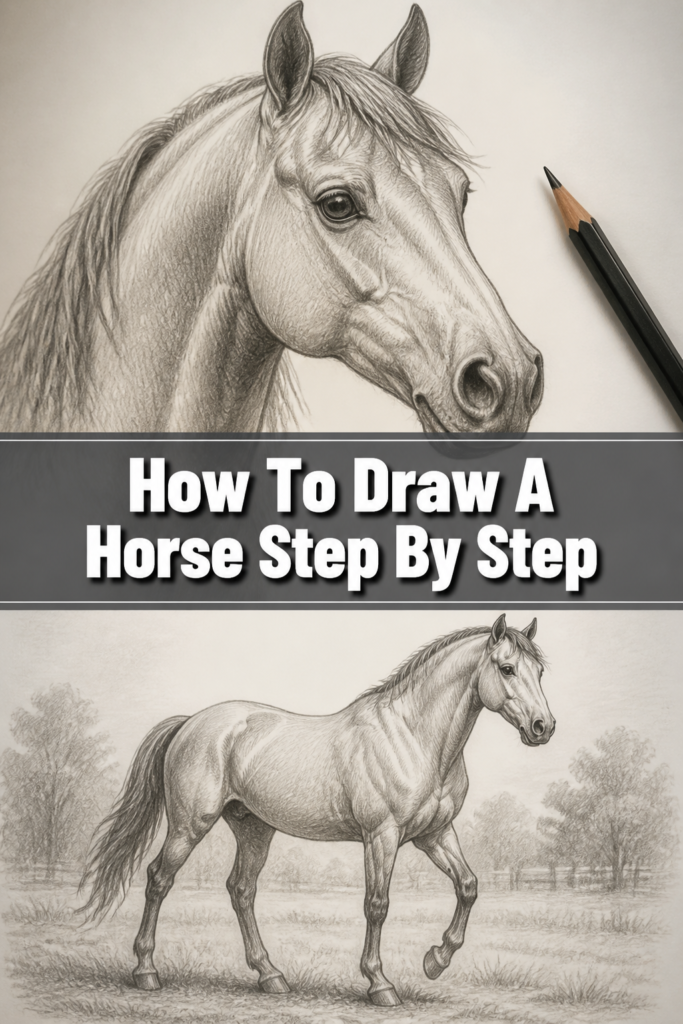
🐎 How To Draw A Horse Step By Step

& Painting
No rigid rules or pretension. Just practical guides, medium comparisons, and encouraging tips to help you enjoy the drawing & painting process.
Drawing a horse can feel like a monumental challenge.
Their elegant forms and powerful anatomy require a keen eye and a structured approach.
Having spent countless hours sketching these magnificent creatures, I’ve learned that breaking down their complexity into simple steps makes all the difference. This guide shares that exact process, designed for you to confidently bring a horse to life on paper.
Quick Overview
This guide will walk you through creating a captivating horse drawing from initial shapes to final details.
You’ll learn how to build up the form, understand basic anatomy, and add personality to your equine artwork.
- Time needed: 60-90 minutes (allowing for careful practice and detail)
- Difficulty: Intermediate (but broken down for confident beginners)
- What you’ll need: Pencil (HB, 2B recommended), paper, eraser (kneaded and regular), optional blending stump.
Step-by-Step Instructions
Step 1: Lay Down Your Basic Shapes and Proportions
Begin by sketching three primary ovals or circles. These will define the horse’s main body masses.
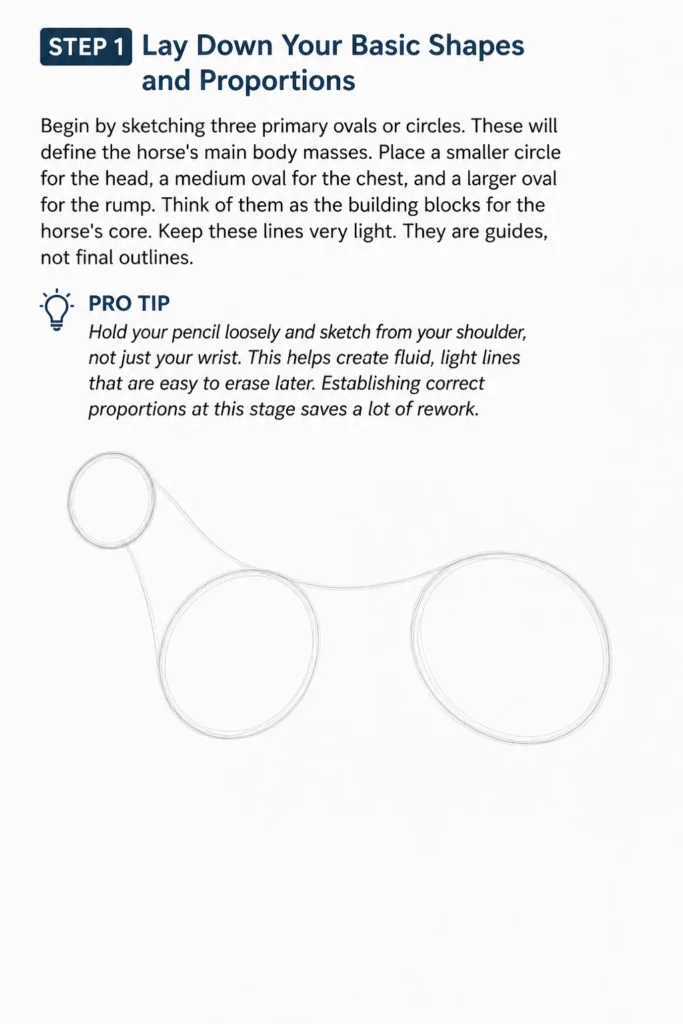
Place a smaller circle for the head, a medium oval for the chest, and a larger oval for the rump. Think of them as the building blocks for the horse’s core.
Keep these lines very light. They are guides, not final outlines.
Pro Tip: Hold your pencil loosely and sketch from your shoulder, not just your wrist. This helps create fluid, light lines that are easy to erase later. Establishing correct proportions at this stage saves a lot of rework.
Step 2: Connect the Body Parts with Fluid Lines
Connect the head circle to the chest oval with two curved lines to form the neck. Consider the natural curve and thickness of a horse’s neck.
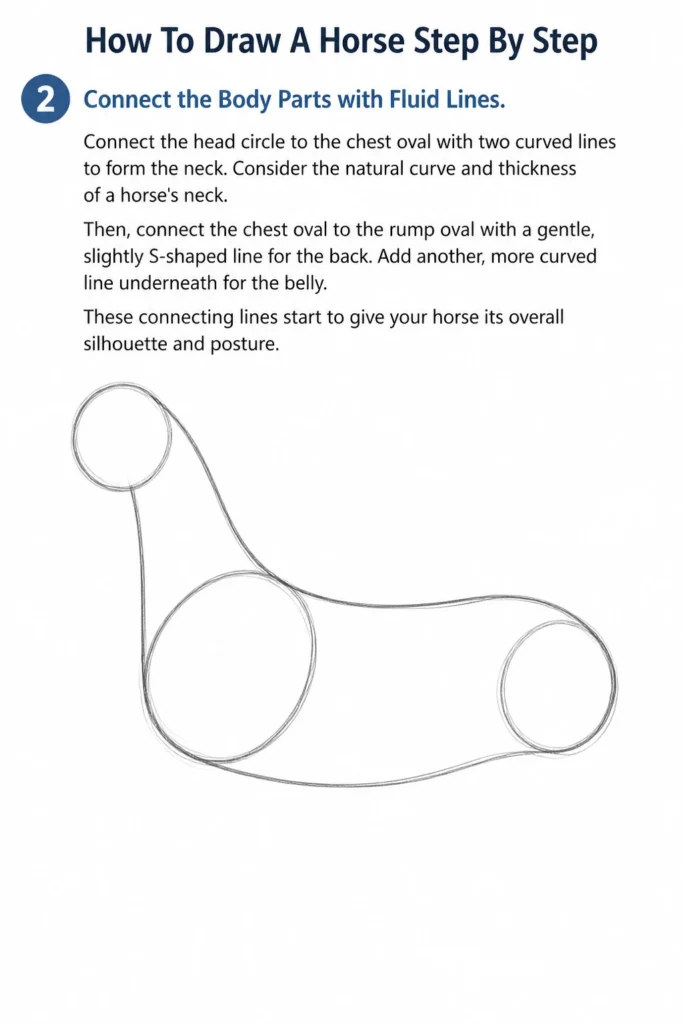
Then, connect the chest oval to the rump oval with a gentle, slightly S-shaped line for the back. Add another, more curved line underneath for the belly.
These connecting lines start to give your horse its overall silhouette and posture.
Step 3: Map Out the Leg Placement and Joints
Draw simple stick lines for the legs, extending from the bottom of the body ovals. Pay attention to their direction and length.
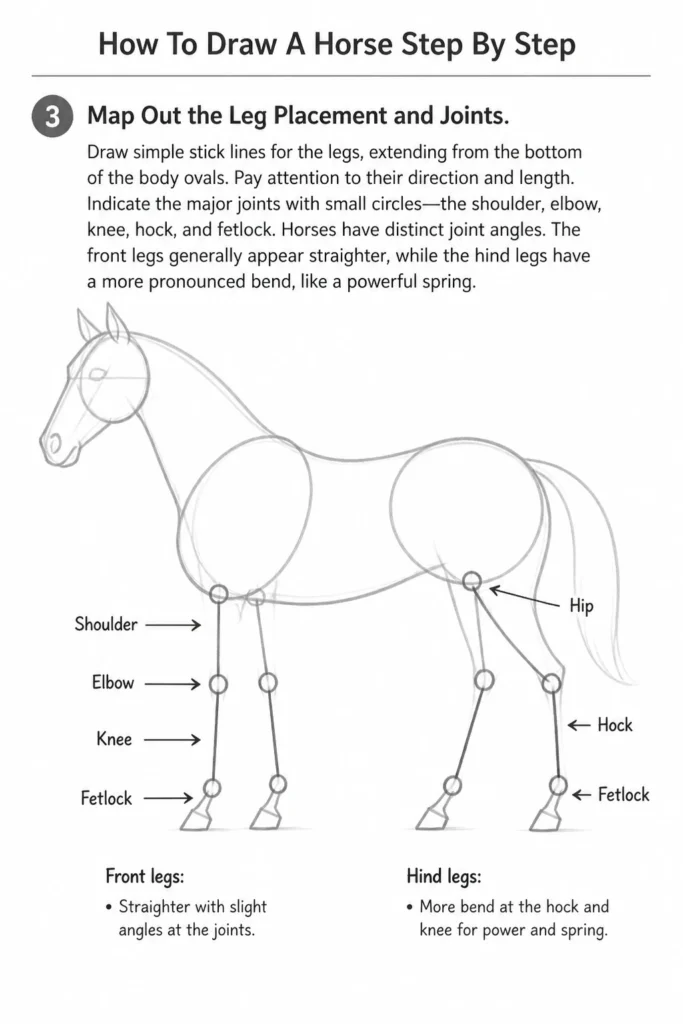
Indicate the major joints with small circles: the shoulder, elbow, knee, hock, and fetlock. Horses have distinct joint angles.
The front legs generally appear straighter, while the hind legs have a more pronounced bend, like a powerful spring.
Step 4: Refine the Head and Facial Features
Shape the head circle into a more defined horse head. Extend the muzzle slightly forward and downward from the main head shape.
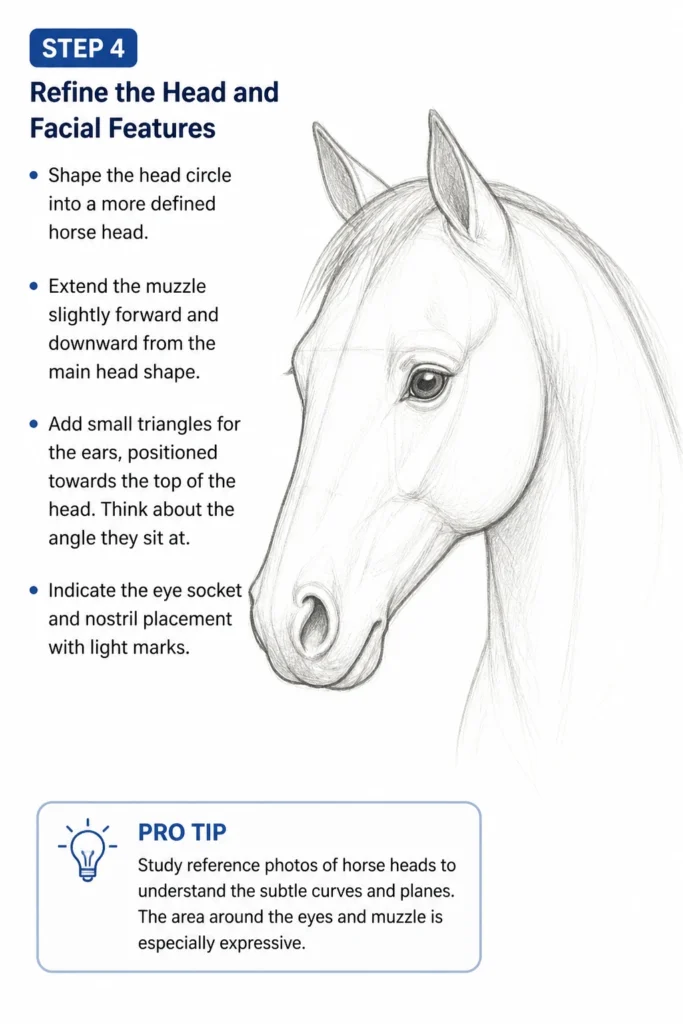
Add small triangles for the ears, positioned towards the top of the head. Think about the angle they sit at.
Indicate the eye socket and nostril placement with light marks.
Pro Tip: Study reference photos of horse heads to understand the subtle curves and planes. The area around the eyes and muzzle is especially expressive.
Step 5: Develop the Legs and Hooves
Flesh out the stick legs by drawing parallel lines around your initial guides, making them thicker and more muscular.
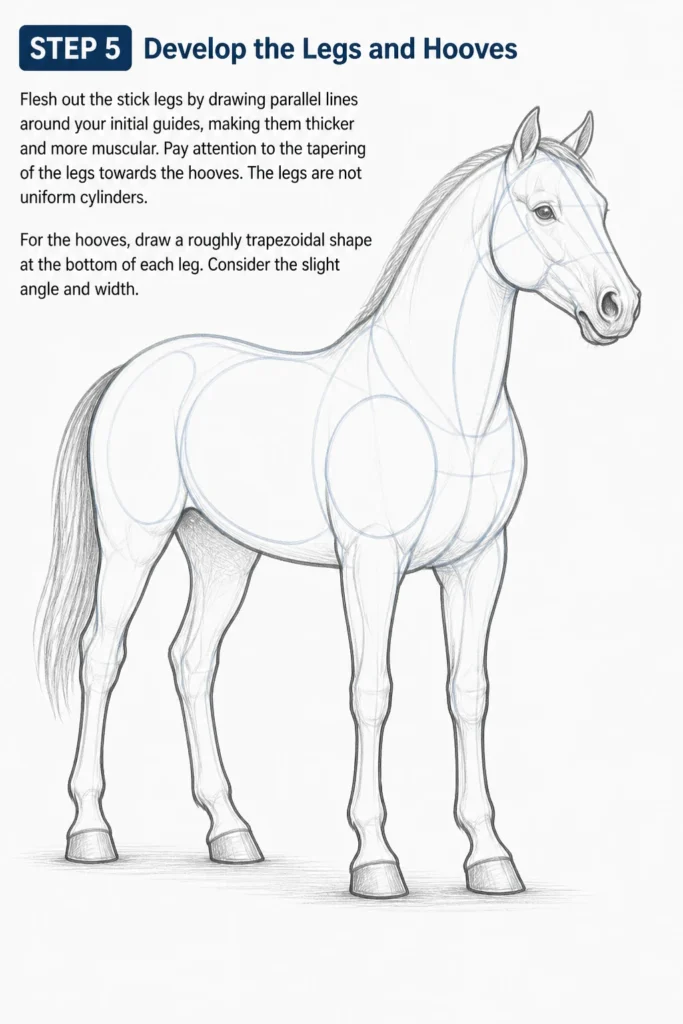
Pay attention to the tapering of the legs towards the hooves. The legs are not uniform cylinders.
For the hooves, draw a roughly trapezoidal shape at the bottom of each leg. Consider the slight angle and width.
Step 6: Add Volume and Muscle Definition to the Body
Smooth out the connecting lines between the ovals, blending them into a cohesive body shape.
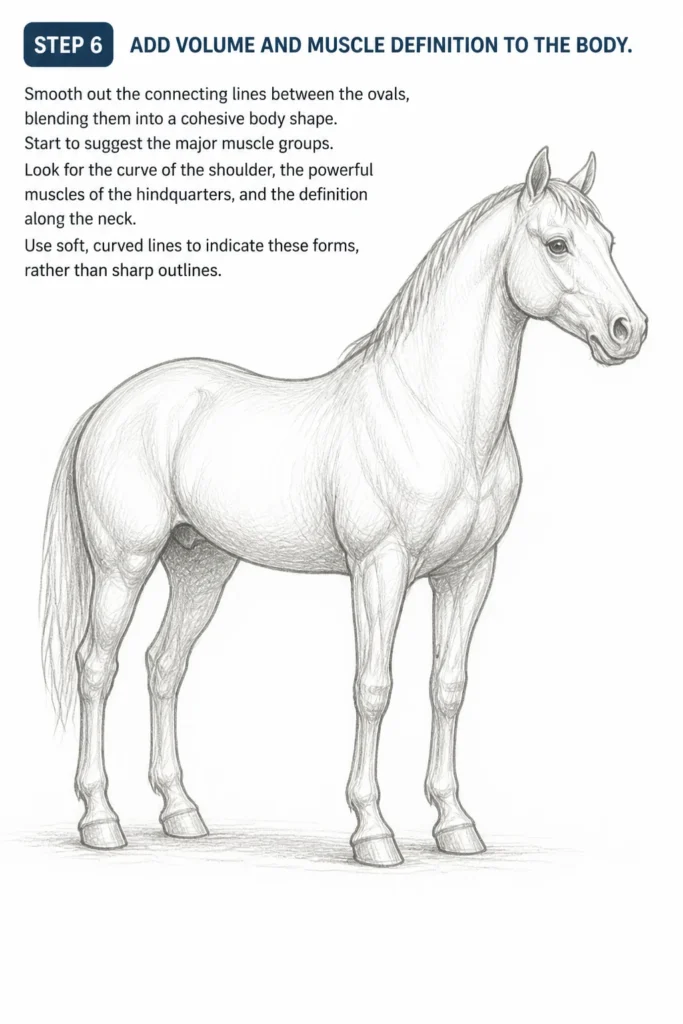
Start to suggest the major muscle groups. Look for the curve of the shoulder, the powerful muscles of the hindquarters, and the definition along the neck.
Use soft, curved lines to indicate these forms, rather than sharp outlines.
Step 7: Sketch the Mane and Tail
Draw the mane flowing from the top of the neck, usually starting from behind the ears and extending down to the withers.
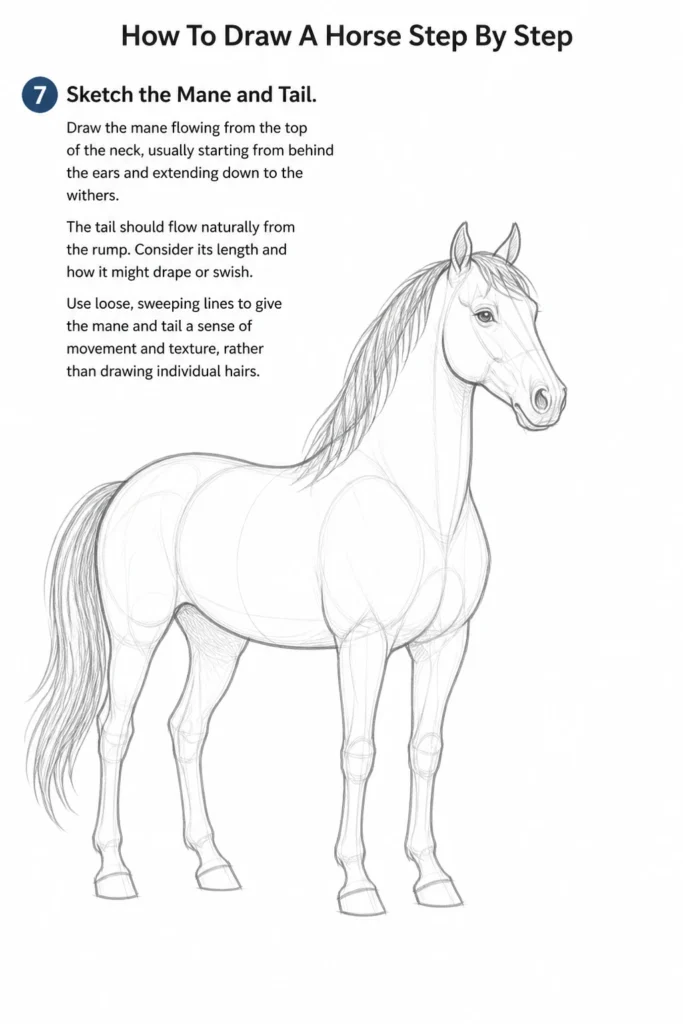
The tail should flow naturally from the rump. Consider its length and how it might drape or swish.
Use loose, sweeping lines to give the mane and tail a sense of movement and texture, rather than drawing individual hairs.
Step 8: Define Facial Features and Refine Outlines
Carefully draw the eye, giving it a gentle almond shape with a pupil. Add a small highlight to make it look alive.
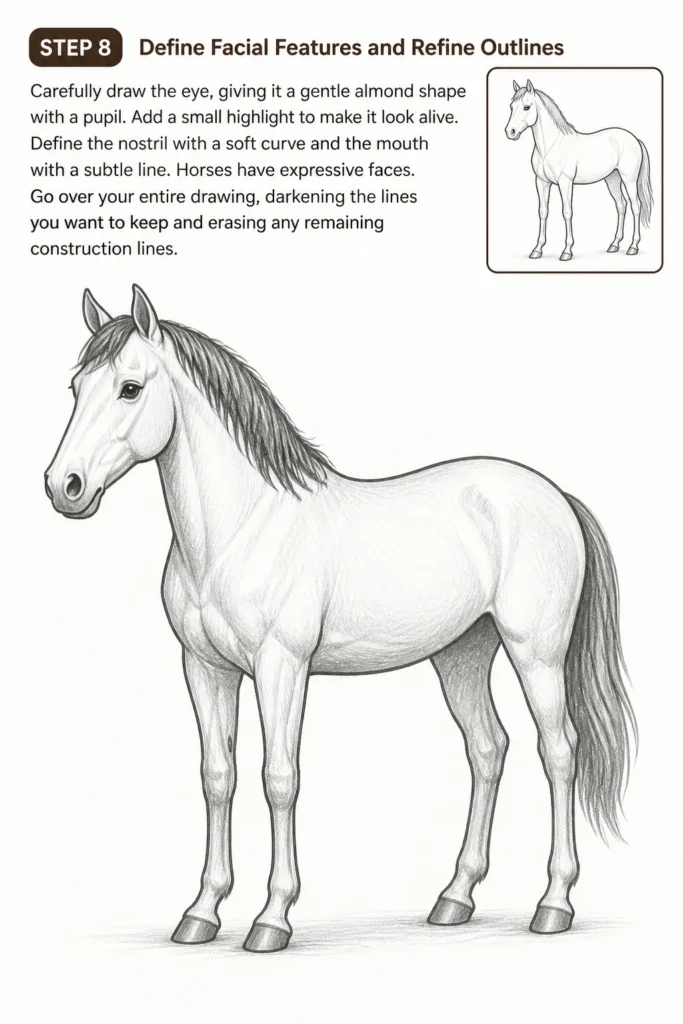
Define the nostril with a soft curve and the mouth with a subtle line. Horses have expressive faces.
Go over your entire drawing, darkening the lines you want to keep and erasing any remaining construction lines.
Step 9: Introduce Shading and Texture
Begin to add simple shading to give your horse depth. Identify a light source and shade the areas that would be in shadow.
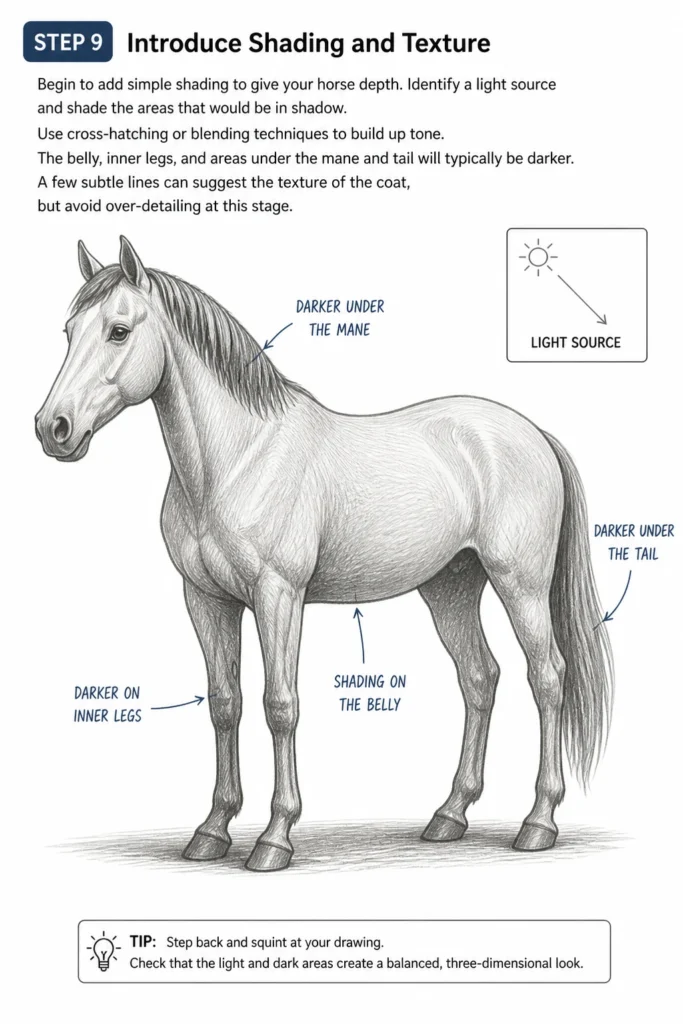
Use cross-hatching or blending techniques to build up tone. The belly, inner legs, and areas under the mane and tail will typically be darker.
A few subtle lines can suggest the texture of the coat, but avoid over-detailing at this stage.
Step 10: Final Touches and Cleanup
Review your drawing from a distance to spot any areas that need adjustment. Sometimes a fresh perspective helps.
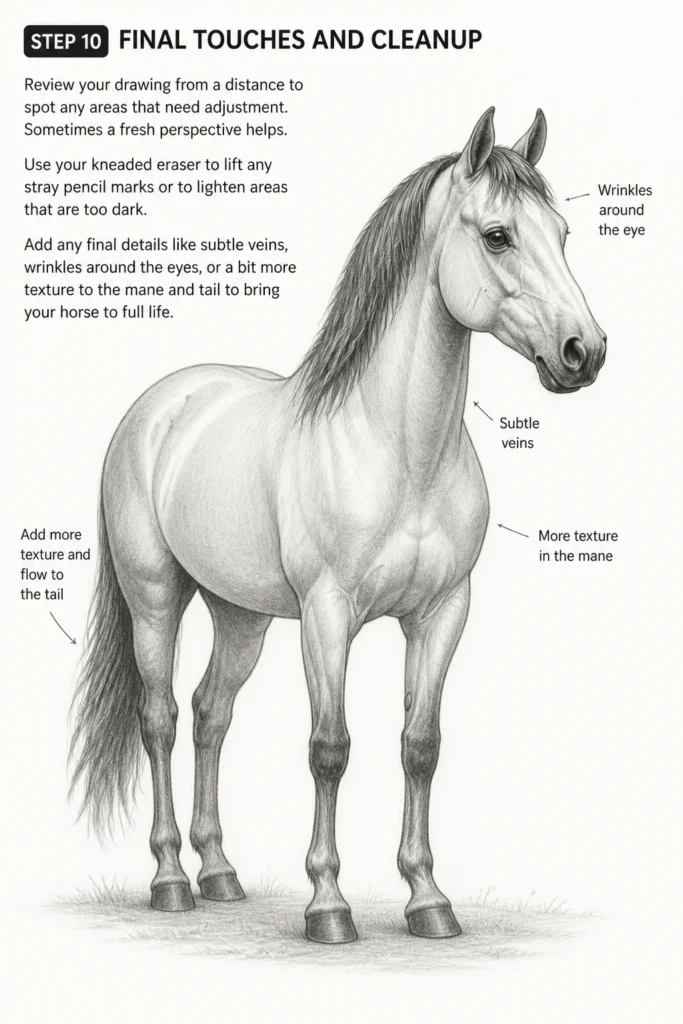
Use your kneaded eraser to lift any stray pencil marks or to lighten areas that are too dark.
Add any final details like subtle veins, wrinkles around the eyes, or a bit more texture to the mane and tail to bring your horse to full life.
Common Mistakes to Avoid
Incorrect Proportions
One of the most frequent errors is getting the head too large or too small in relation to the body. Similarly, legs can often end up too short or too long, making the horse look unbalanced.
Always start with light construction lines and compare the sizes of your initial shapes. Use your pencil to measure distances and compare proportions across your drawing, ensuring everything lines up correctly before moving on to details.
Stiff or Unnatural Poses
Many beginners draw horses standing rigidly, which can make them look lifeless. Horses are dynamic creatures, even when standing still.
Think about the horse’s weight distribution and natural curves. Introduce a slight bend in a leg, a subtle turn of the head, or a gentle curve to the back to convey motion and natural posture. Reference photos are invaluable here.
Ignoring Basic Anatomy
While you don’t need to be a veterinarian, a basic understanding of horse anatomy helps immensely. Placing joints in the wrong spot or drawing muscles without understanding their underlying structure can lead to an awkward drawing.
Take a moment to observe where the major muscle groups bulge and where the bones create angles. Even simplified shapes should reflect the underlying skeletal and muscular forms.
Over-Detailing Too Early
It’s tempting to jump straight to drawing individual hairs or intricate bridle details. However, focusing on these too soon can distract from the fundamental structure.
Work from general to specific. Establish the overall form, proportions, and major masses first. Only when the underlying structure is solid should you begin to add finer details like eyes, nostrils, and individual strands of mane or tail.
Troubleshooting
My horse looks stiff and unnatural.
This often happens when you focus too much on straight lines and symmetrical shapes. Horses have graceful curves and subtle asymmetries.
Try exaggerating the natural curves of the neck, back, and belly. Introduce a slight bend in one of the legs or a gentle tilt to the head. Think about the flow and rhythm of the horse’s form rather than just its static outline.
The legs look wonky or out of proportion.
Legs are notoriously challenging. Misplaced joints or incorrect lengths are common culprits. Ensure your initial stick figures for the legs are accurately positioned and proportional to the body.
Pay close attention to the angles of the joints (knee, hock, fetlock) and remember that hooves are not just rectangles but have a specific shape and angle. Use a ruler or your pencil to measure relative lengths if needed.
I can’t get the head right; it always looks odd.
The horse’s head is complex, with many subtle features. Often, the issue is with the initial proportions of the skull and muzzle, or the placement of the eyes and ears.
Break the head down into simpler shapes: a main skull oval and a muzzle block. Ensure the eyes are positioned correctly on the side of the head, not directly front-facing, and that the ears are proportionate to the head size. Practice drawing heads separately until you feel more confident.
Key Takeaways
- Always begin with light, basic geometric shapes to establish the horse’s fundamental structure.
- Focus on achieving correct proportions and a balanced silhouette before adding any details.
- Observe real horses or use reference photos to understand their anatomy, movement, and expressions.
- Use a variety of line weights and shading to give your drawing depth, form, and texture.
- Don’t be afraid to erase and refine your lines; drawing is an iterative process of building and adjusting.
- Practice consistently, as repetition and observation are key to improving your drawing skills.
Frequently Asked Questions
What kind of pencil should I use for drawing a horse?
A good starting point is an HB pencil for initial sketching and construction lines, as it’s light and easy to erase. For darker lines, shading, and details, a 2B or 4B pencil works well, offering richer tones. A harder pencil like a 2H can be useful for very light groundwork.
How can I make my horse drawing look more realistic?
Realism comes from careful observation and understanding of form. Focus on accurate proportions, subtle muscle definition, and the play of light and shadow. Adding texture to the coat, mane, and tail, and ensuring the eyes have depth and a highlight, will also significantly enhance realism.
Can I draw horses in different poses using this method?
Absolutely! The core principle of starting with basic shapes and understanding proportions applies to any pose. The main difference will be the angles and placement of your initial ovals and stick figures. Practice drawing horses in various action poses by finding good reference images and applying these foundational steps.
Should I use reference photos when drawing a horse?
Yes, using reference photos is highly recommended, especially when you are learning. They help you understand complex anatomy, different poses, and the nuances of light and shadow. Over time, you’ll develop a stronger visual library, but even experienced artists rely on references.
Our Top Recommended Finds
- Sketchbook with Quality Paper: Look for paper that can handle multiple layers of pencil and erasing without tearing or pilling. A smooth, acid-free surface is ideal for detailed work.
- Assorted Pencil Set (HB, 2B, 4B, 6B): Having a range of graphite hardness allows for diverse line weights and shading values, giving your drawing more dimension.
- Kneaded Eraser: Essential for lifting graphite gently without smudging and for creating highlights. It’s soft, pliable, and won’t damage your paper.
Your Equestrian Art Journey Begins Now
You’ve taken the first step toward mastering the art of drawing horses.
Remember, every artist starts somewhere, and consistent practice is your most powerful tool.
Don’t stop here! Try drawing your horse again, perhaps from a different angle or in a new pose. Consider exploring other animal subjects or delving deeper into equine anatomy studies to further refine your skills.
Grab your pencil, find a quiet spot, and let your creativity flow. The magnificent world of drawing awaits!
& Painting
No rigid rules or pretension. Just practical guides, medium comparisons, and encouraging tips to help you enjoy the drawing & painting process.