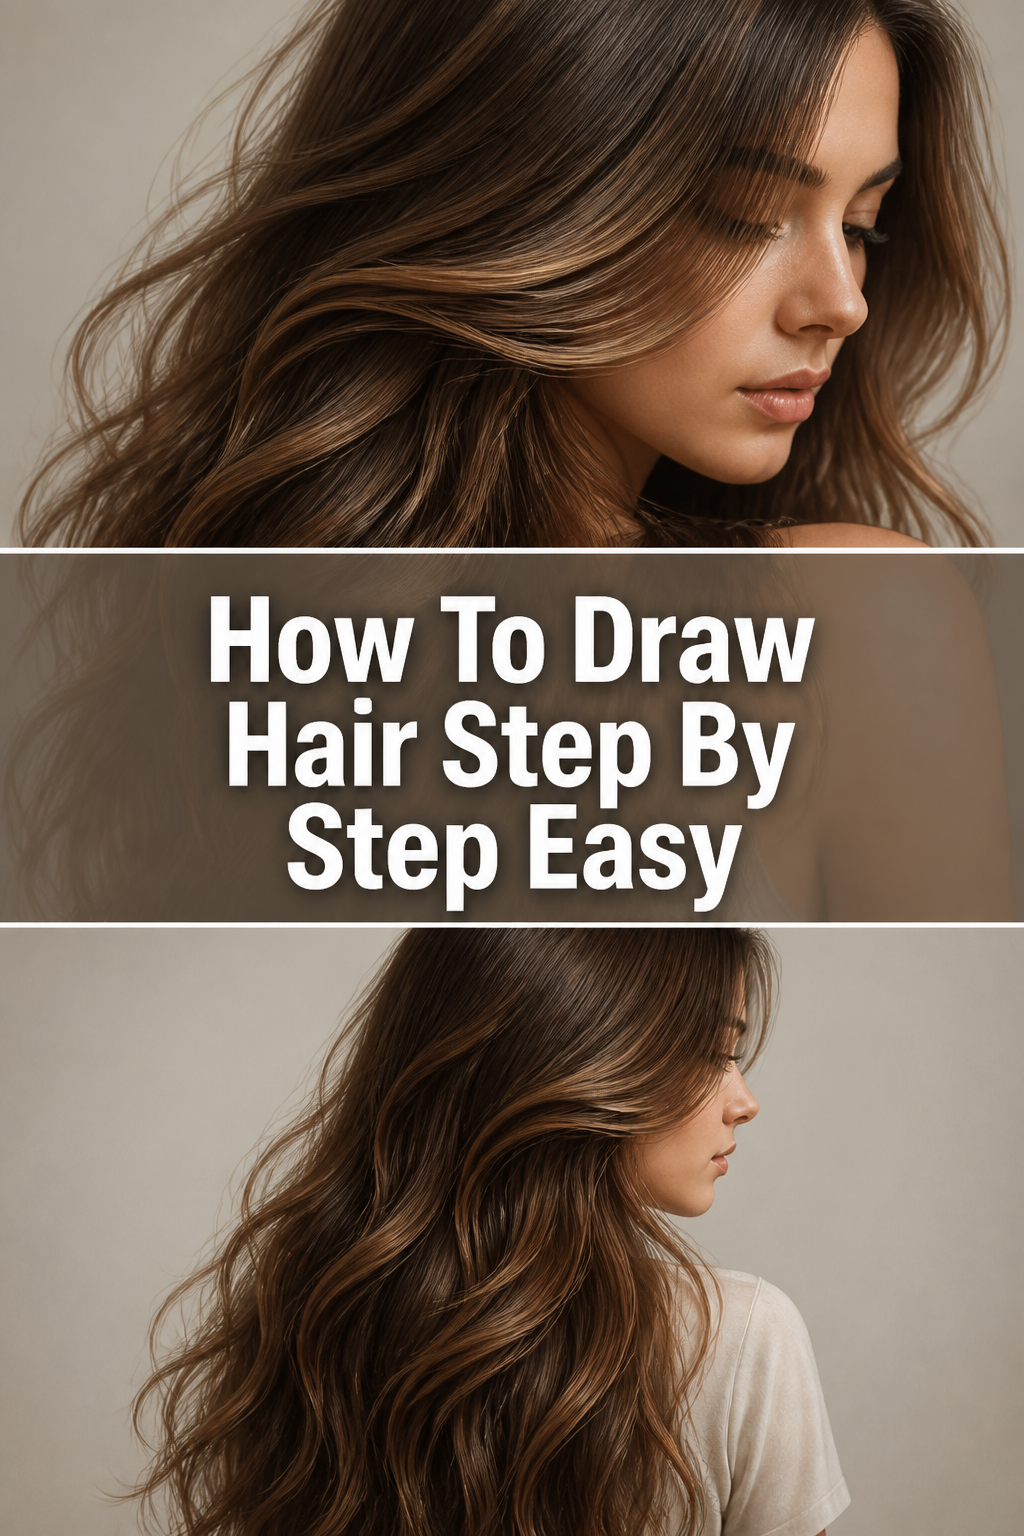
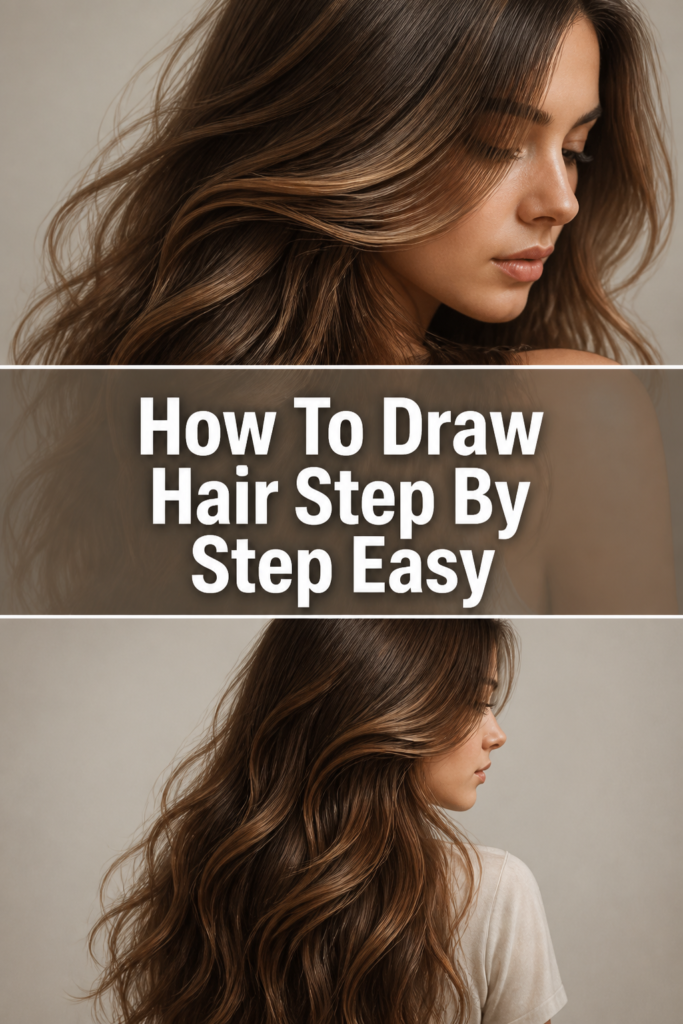
🎨 How To Draw Hair Step By Step Easy

& Painting
No rigid rules or pretension. Just practical guides, medium comparisons, and encouraging tips to help you enjoy the drawing & painting process.
Learning to draw hair can feel like a big challenge for many artists. It often looks like a complex, flowing element on a character.
But it doesn’t have to be intimidating. With a structured approach, you can master drawing beautiful, realistic hair.
I’ve spent years practicing these techniques, and I’m excited to share a simple, practical method that truly works. You’ll soon be drawing hair you’re proud of.
Quick Overview
This guide will walk you through the process of drawing hair from basic shapes to detailed textures. You’ll learn to create hair that looks natural and full of life.
- Time needed: 45-90 minutes (can be longer with practice)
- Difficulty: Beginner
- What you’ll need: Pencil (HB, 2B, 4B recommended), paper, eraser, blending stump (optional)
Step-by-Step Instructions
Step 1: Understand the Skull and Hairline
Before drawing any hair, always visualize the head underneath. The hair grows from a scalp that covers a skull.
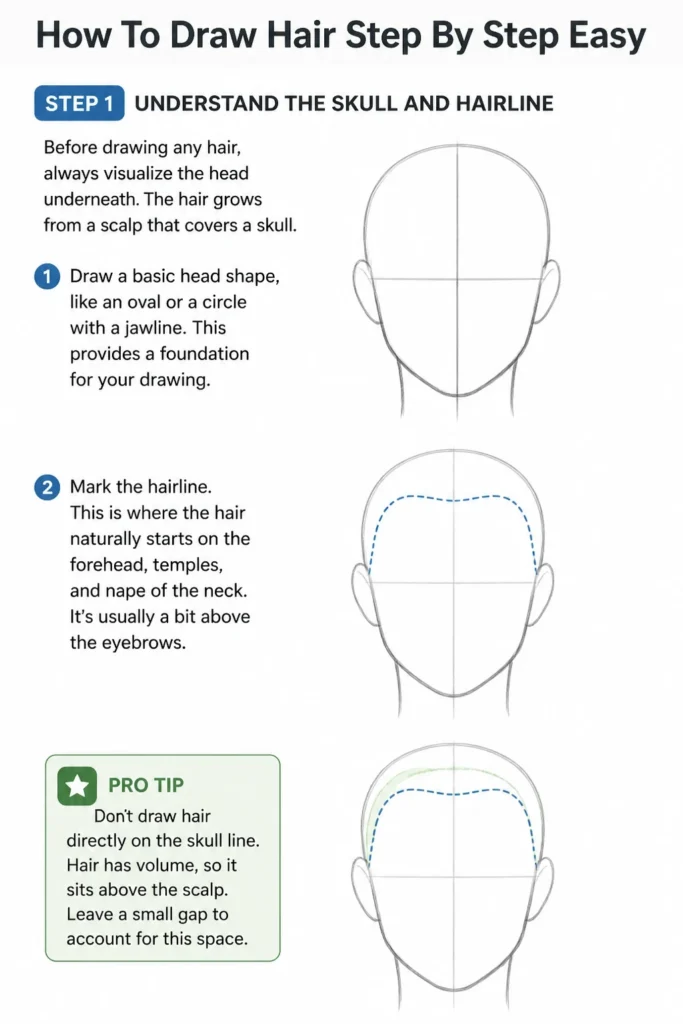
Draw a basic head shape, like an oval or a circle with a jawline. This provides a foundation for your drawing.
Mark the hairline. This is where the hair naturally starts on the forehead, temples, and nape of the neck. It’s usually a bit above the eyebrows.
Pro Tip: Don’t draw hair directly on the skull line. Hair has volume, so it sits above the scalp. Leave a small gap to account for this space.
Step 2: Establish the Flow and Direction
Hair has a natural direction. It doesn’t just stick out randomly; it follows gravity and the way it’s styled.
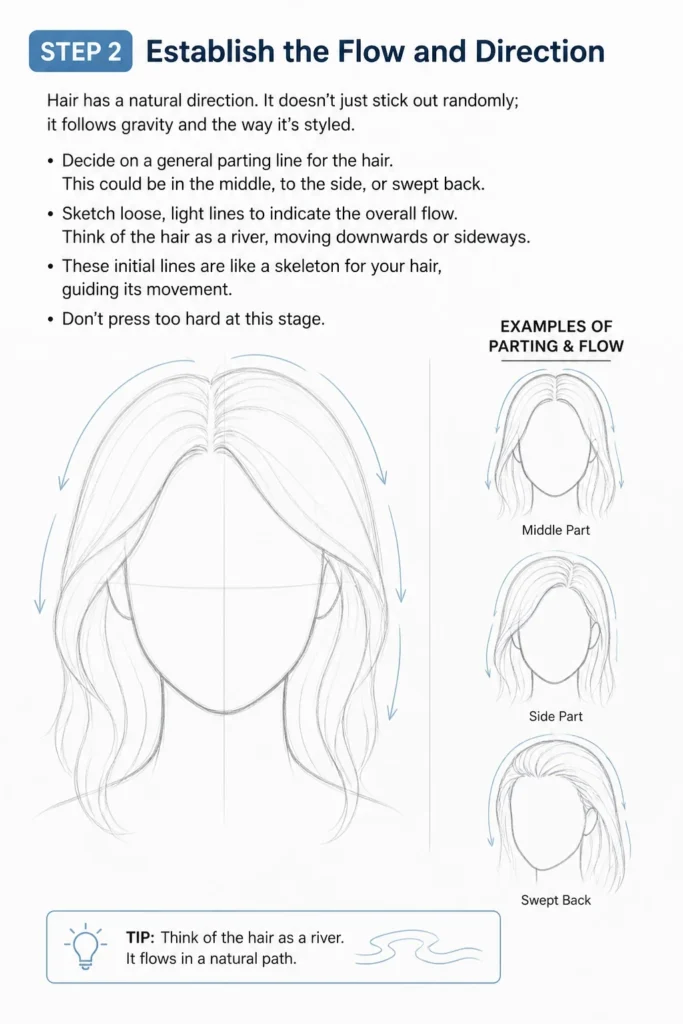
Decide on a general parting line for the hair. This could be in the middle, to the side, or swept back.
Sketch loose, light lines to indicate the overall flow. Think of the hair as a river, moving downwards or sideways.
These initial lines are like a skeleton for your hair, guiding its movement. Don’t press too hard at this stage.
Step 3: Block in the Main Masses
Instead of drawing individual strands, think of hair as large, simplified shapes or “clumps.” This is a crucial step for achieving volume.
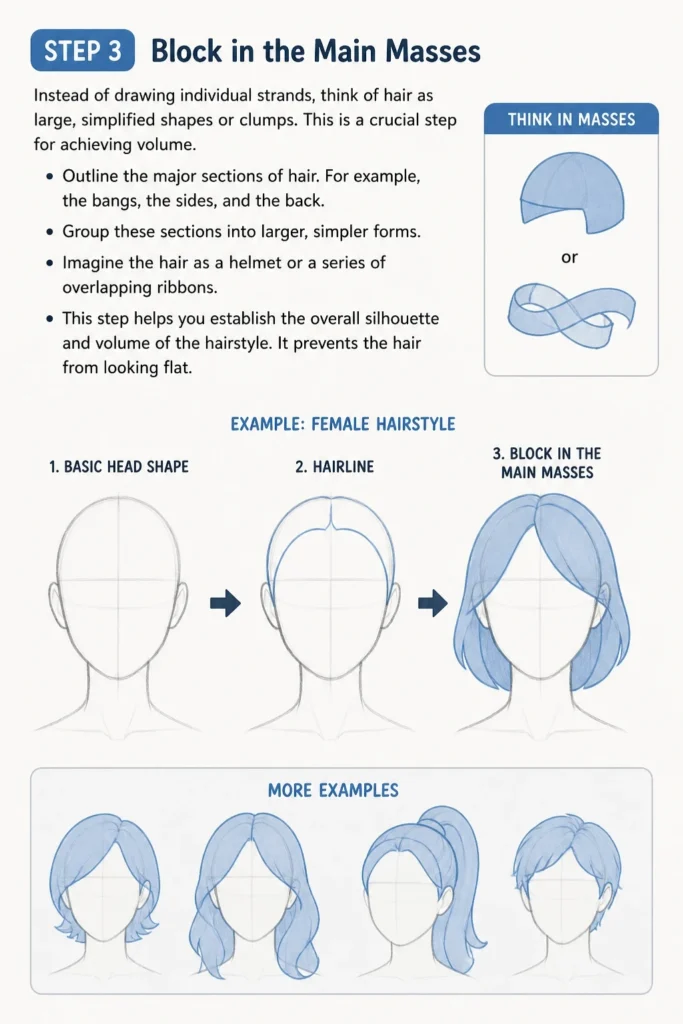
Outline the major sections of hair. For example, the bangs, the sides, and the back.
Group these sections into larger, simpler forms. Imagine the hair as a helmet or a series of overlapping ribbons.
This step helps you establish the overall silhouette and volume of the hairstyle. It prevents the hair from looking flat.
Step 4: Add Volume and Form
Now that you have the main masses, refine them to show three-dimensionality. Hair isn’t flat; it curves and flows.
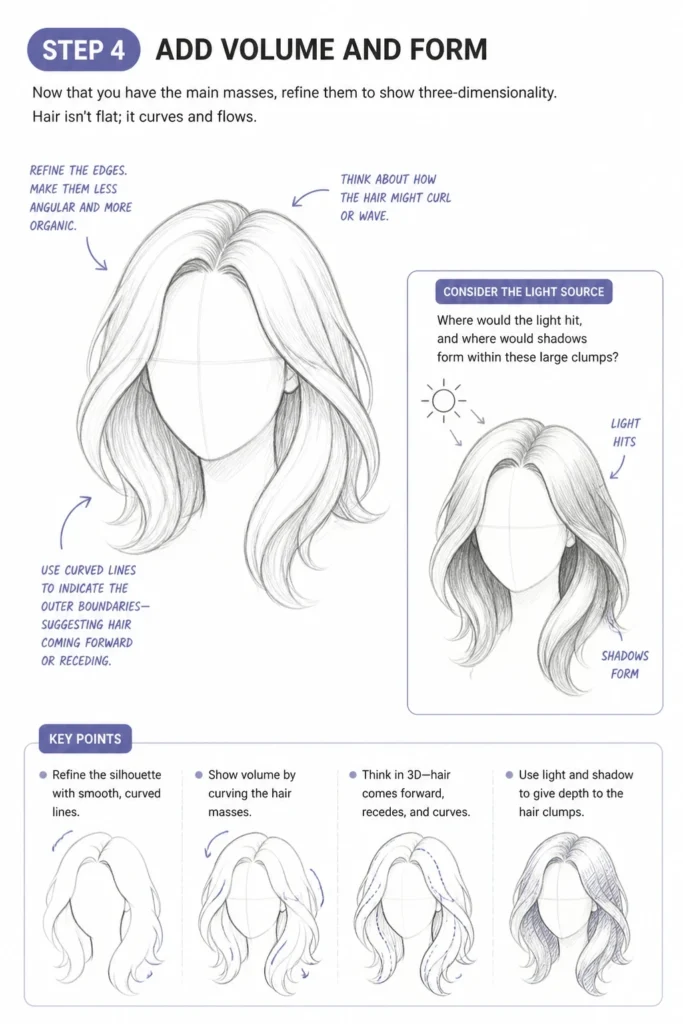
Refine the edges of your hair masses, making them less angular and more organic. Think about how the hair might curl or wave.
Use curved lines to indicate the outer boundaries of the hair. These lines should suggest the hair coming forward or receding.
Consider the light source at this stage. Where would the light hit, and where would shadows form within these large clumps?
Step 5: Introduce Individual Strands and Texture
Once the volume is established, you can start adding detail. This is where the hair begins to look like hair.
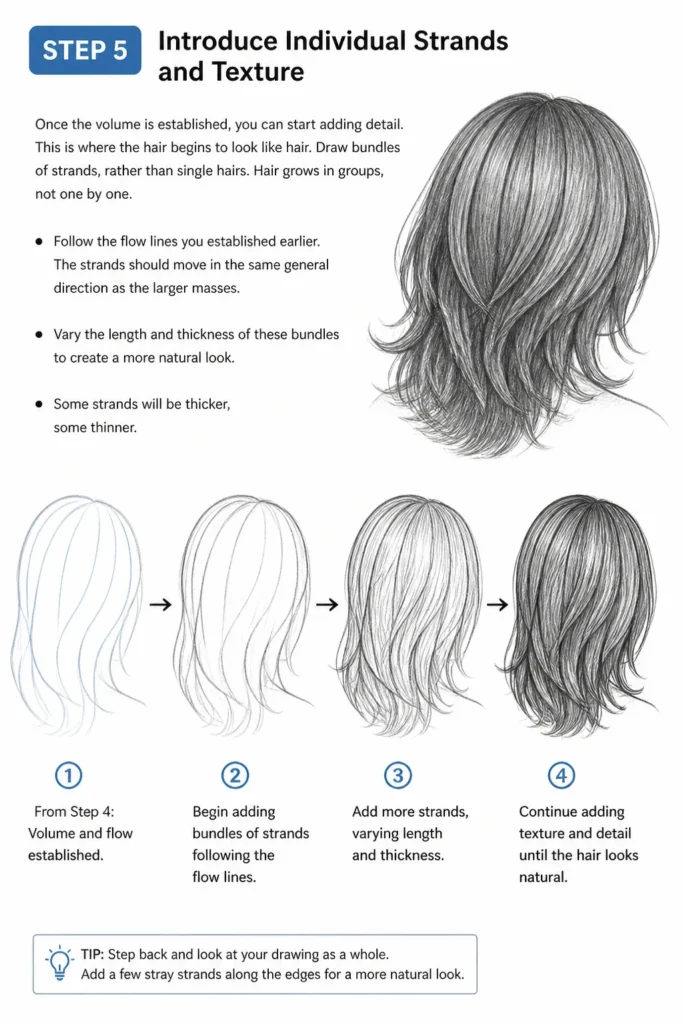
Draw bundles of strands, rather than single hairs. Hair grows in groups, not one by one.
Follow the flow lines you established earlier. The strands should move in the same general direction as the larger masses.
Vary the length and thickness of these bundles to create a more natural look. Some strands will be thicker, some thinner.
Step 6: Focus on Light and Shadow (Shading)
Shading is what gives hair depth and realism. It defines the planes and curves of the hair masses.
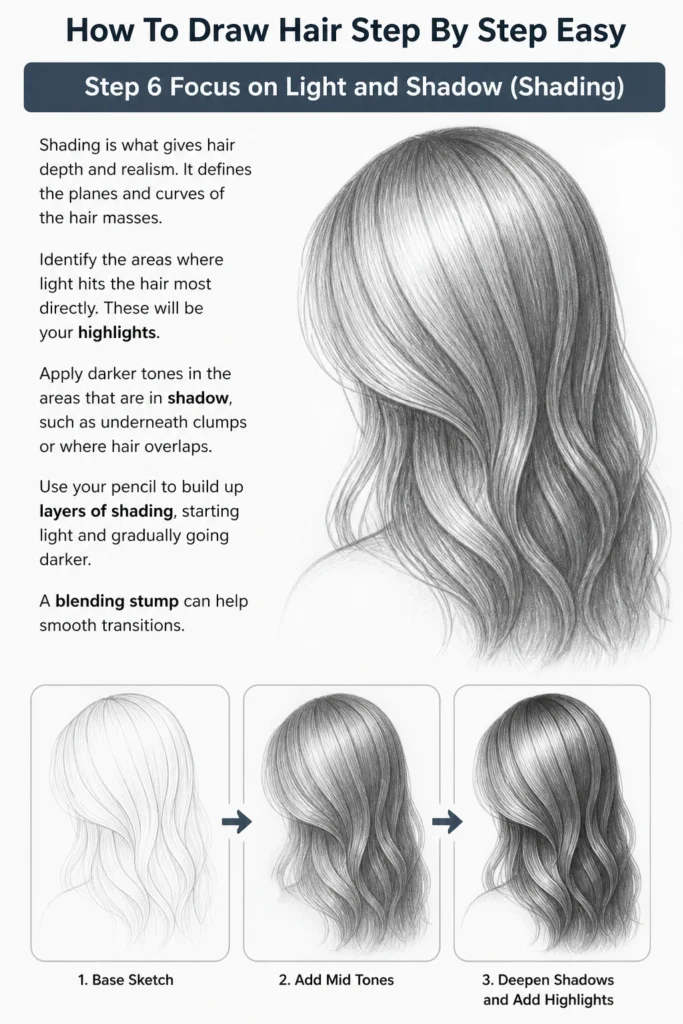
Identify the areas where light hits the hair most directly. These will be your highlights.
Apply darker tones in the areas that are in shadow, such as underneath clumps or where hair overlaps.
Use your pencil to build up layers of shading, starting light and gradually going darker. A blending stump can help smooth transitions.
Step 7: Refine Details and Add Stray Hairs
The final touches make a big difference. This step adds the lifelike imperfections that make hair believable.
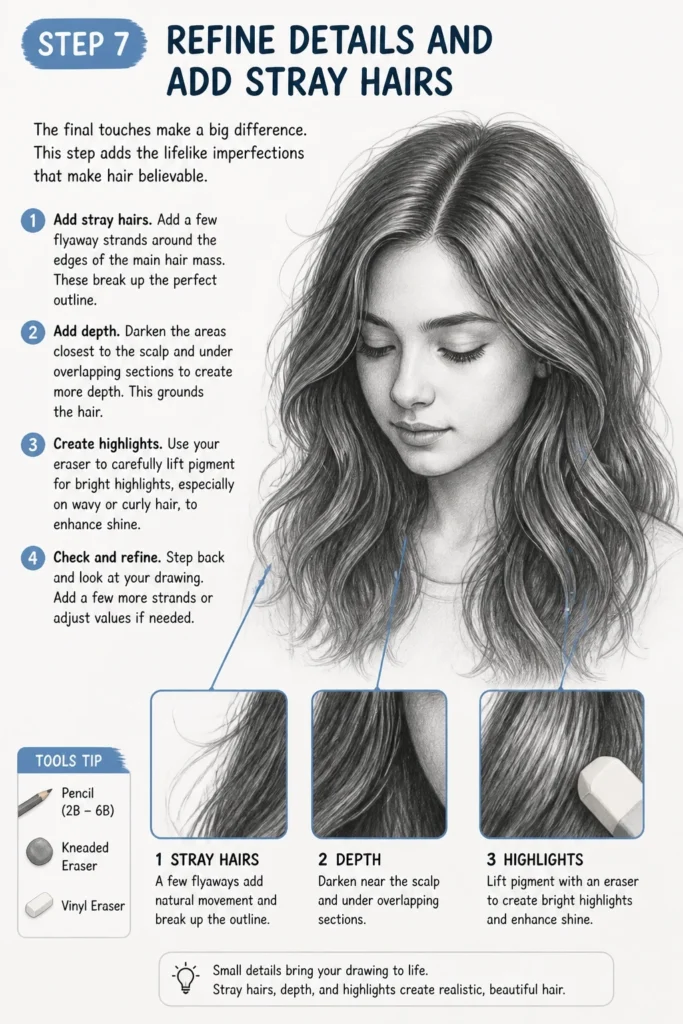
Add a few flyaway strands around the edges of the main hair mass. These break up the perfect outline.
Darken the areas closest to the scalp and under overlapping sections to create more depth. This grounds the hair.
Use your eraser to carefully lift pigment for bright highlights, especially on wavy or curly hair, to enhance shine.
Step 8: Consider Different Hair Types
Not all hair is the same. Straight, wavy, and curly hair each have unique characteristics.
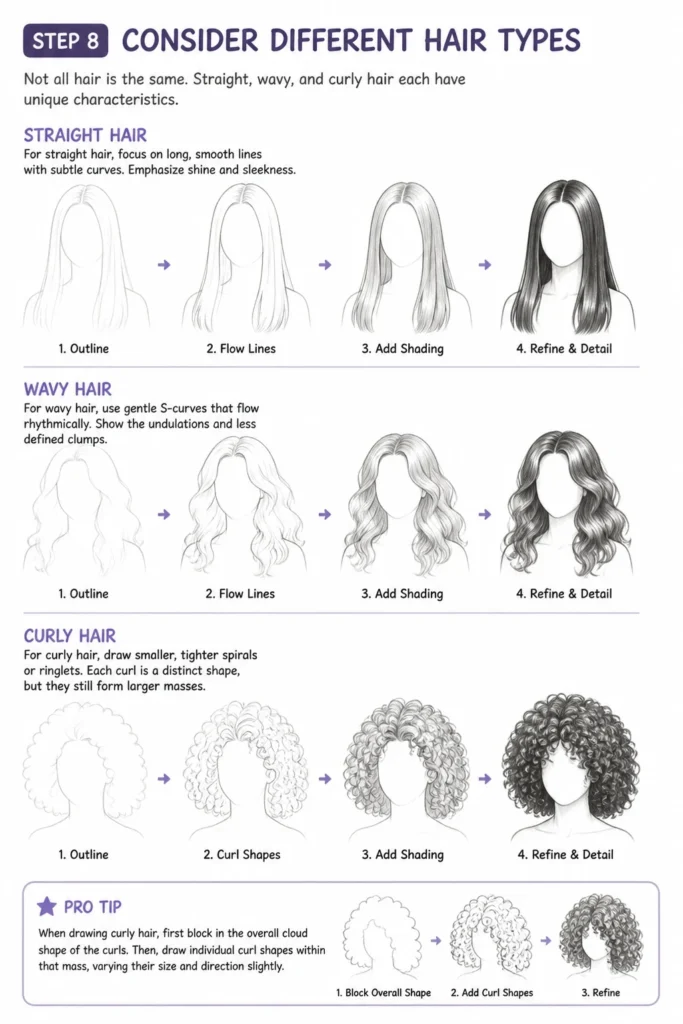
For straight hair, focus on long, smooth lines with subtle curves. Emphasize shine and sleekness.
For wavy hair, use gentle S-curves that flow rhythmically. Show the undulations and less defined clumps.
For curly hair, draw smaller, tighter spirals or ringlets. Each curl is a distinct shape, but they still form larger masses.
Pro Tip: When drawing curly hair, first block in the overall “cloud” shape of the curls. Then, draw individual curl shapes within that mass, varying their size and direction slightly.
Common Mistakes to Avoid
Drawing Hair as Spaghetti Strands
Many beginners draw hair as countless individual, parallel lines, often starting from the scalp and ending uniformly. This makes the hair look stiff and unnatural, like a bundle of spaghetti. Hair grows in clumps and flows in masses, not as separate strings. Focus on drawing groups of strands that form larger shapes, then add individual hairs sparingly for texture.
Ignoring the Scalp and Head Shape
Failing to consider the underlying skull and hairline is a common error. Drawing hair directly on the head’s outline or making it too flat against the head makes it look pasted on. Always start with the head shape, establish the hairline, and remember that hair has volume, lifting slightly off the scalp.
Lack of Volume and Form
Hair often looks flat if you don’t think about its three-dimensional quality. This happens when artists only focus on the outline and don’t shade to show depth. Remember that hair has thickness and curves around the head. Use shading to create highlights and shadows that define its volume and make it appear less like a flat cutout.
Uniform Texture and Direction
Drawing all hair strands or clumps in the exact same direction and with the same texture makes the hair appear synthetic. Real hair has slight variations, stray strands, and different textures within the same head. Vary the direction of some smaller clumps and add a few flyaways to make the hair look more organic and dynamic.
Troubleshooting
Hair Looks Flat and Lifeless
If your hair drawing lacks dimension, it’s likely due to insufficient shading and a lack of focus on volume. Go back to Step 6. Think about a clear light source and identify the brightest highlights and darkest shadows. Build up your shading in layers, using a darker pencil (like a 4B) for deep shadows and an eraser to lift bright highlights. This contrast creates depth.
Hair Looks Messy or Unnatural
When hair appears chaotic, it often means you skipped establishing the main flow and masses (Steps 2 and 3). Before adding any details, ensure you have a clear overall direction and have blocked out the major clumps of hair. All the individual strands should generally follow these larger forms. Too many conflicting directions will make the hair look disheveled in an undesirable way.
Difficulty with Specific Hair Types (e.g., Curly Hair)
Drawing textures like curls can be challenging. For curly hair, avoid drawing each strand individually. Instead, focus on drawing the shapes that curls form. Think of them as small, distinct blobs or spirals that overlap. First, draw the overall “cloud” shape of the curly hair, then subdivide it into these smaller, overlapping curl forms. Practice drawing simple spirals and S-curves first.
Key Takeaways
- Always start with the head and hairline: Hair grows from a defined area on the scalp.
- Focus on flow and main masses first: Don’t draw individual strands until the overall shape and direction are set.
- Build volume with shading: Use light and shadow to make hair appear three-dimensional.
- Draw bundles, not single hairs: Hair grows and moves in groups, creating natural texture.
- Add subtle details: Flyaway strands and varied textures enhance realism.
- Practice different hair types: Each texture requires a slightly different approach to capture its essence.
Frequently Asked Questions
How do I make hair look shiny?
To create shine, you need strong contrast. Identify the brightest areas where light hits the hair directly – these are your highlights. Keep these areas very light, even pure white on paper. Then, ensure the surrounding areas are significantly darker. The sharp contrast between light and dark creates the illusion of reflection and shine.
Should I draw every single hair?
Absolutely not. Trying to draw every single hair is time-consuming and often makes the hair look too busy and unnatural. Instead, focus on drawing bundles or clumps of hair. You can suggest individual strands by varying line pressure and adding a few carefully placed, wispy lines on the edges of these clumps.
How do I make the hair look like it belongs to the character?
Ensure the hair follows the contours of the head and face. The hairline should be appropriate for the character’s age and gender. Also, consider the character’s personality; a neat bun suggests one thing, while wild, flowing hair suggests another. The hair should frame the face and enhance the character’s overall design.
What’s the best pencil for drawing hair?
A range of pencils is best. Start with an HB or 2B for initial sketching and light shading. Use a darker pencil, like a 4B or 6B, for deep shadows and to add richness to the hair. A blending stump can help smooth out graphite for seamless transitions.
Our Top Recommended Finds
- Sketchbook with smooth paper: A good surface reduces toothiness, allowing for smoother lines and blending.
- Graphite pencil set (HB, 2B, 4B, 6B): Provides a versatile range for sketching, shading, and adding deep tones.
- Kneaded eraser: Excellent for lifting highlights and cleaning up without smudging.
Unleash Your Inner Hair Artist
Drawing hair might seem daunting at first, but with practice, it becomes incredibly rewarding. Each step in this guide builds upon the last, helping you create hair that truly enhances your characters.
Don’t be afraid to experiment with different styles and textures. The more you draw, the more intuitive the process will become.
Grab your pencil and paper right now. Apply these steps to your next drawing and watch your characters come to life with beautiful, expressive hair.
& Painting
No rigid rules or pretension. Just practical guides, medium comparisons, and encouraging tips to help you enjoy the drawing & painting process.