✏️ How To Draw A Head Step By Step Easy
Learning to draw a head can feel like a big challenge. Many artists find it intimidating to get the proportions right.
But with a clear, step-by-step approach, anyone can learn. I’ve spent years breaking down complex subjects into simple actions, and I’ll share those insights with you. This guide will make the process straightforward and enjoyable.
Quick Overview
This guide walks you through creating a basic head drawing from scratch. You’ll learn fundamental proportions and placement techniques. By the end, you’ll have a solid foundation for drawing various head types.
- Time needed: 30-60 minutes (or longer if you practice multiple times)
- Difficulty: Beginner
- What you’ll need: Pencil (HB or 2B), eraser, paper
Step-by-Step Instructions
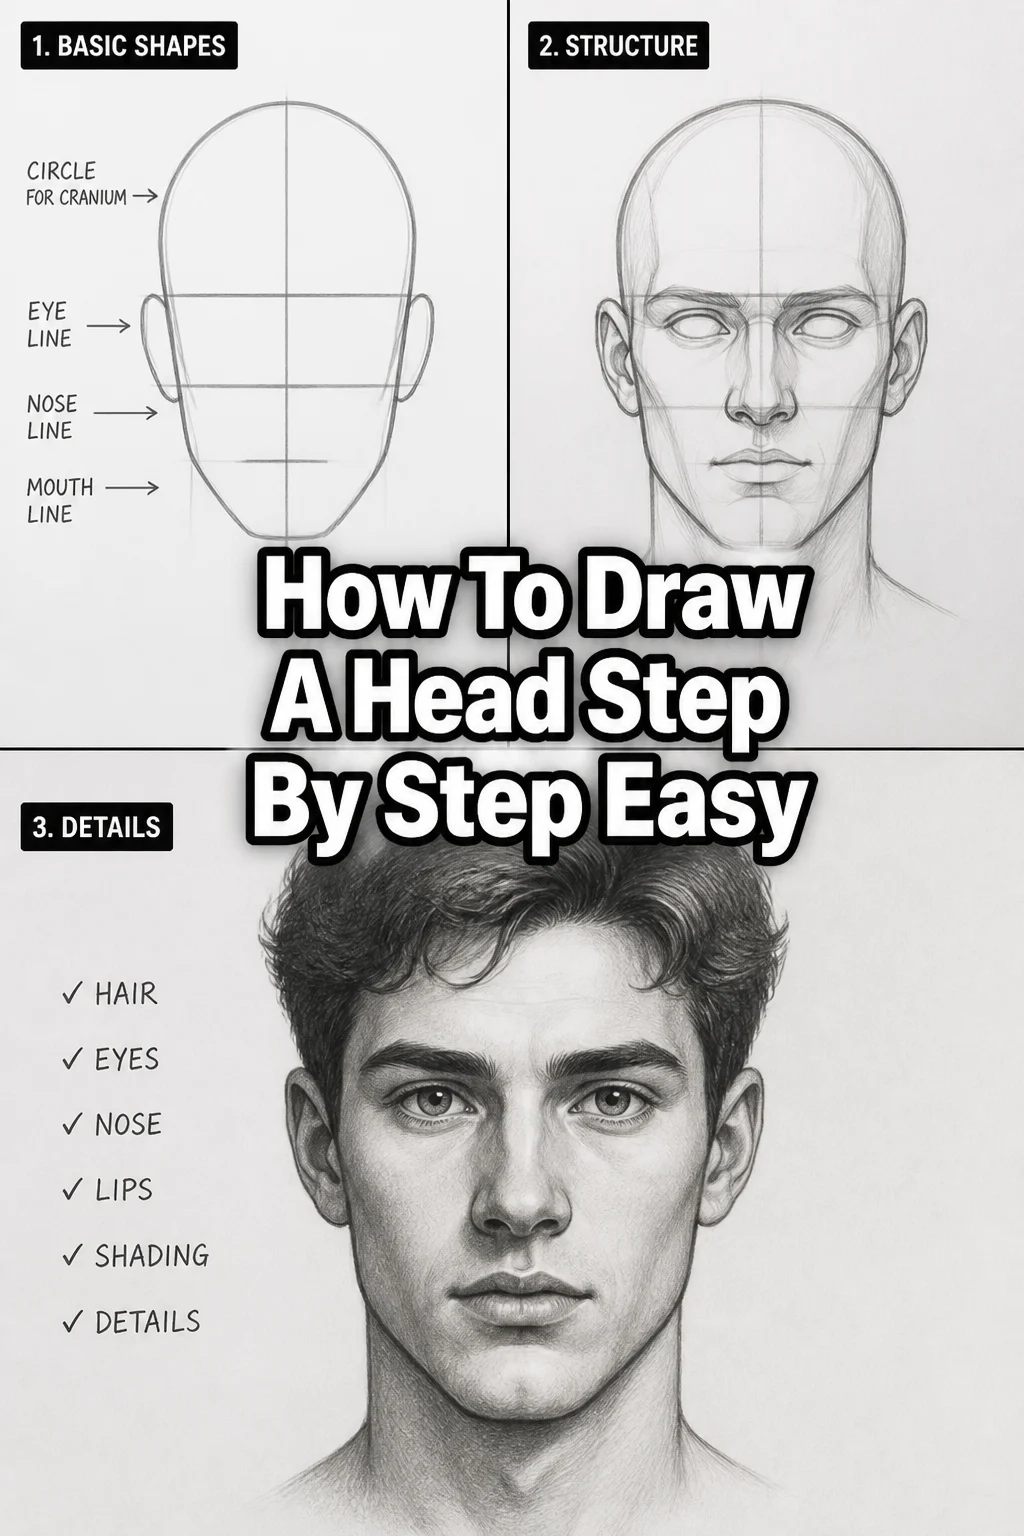
Step 1: Start with a Simple Circle
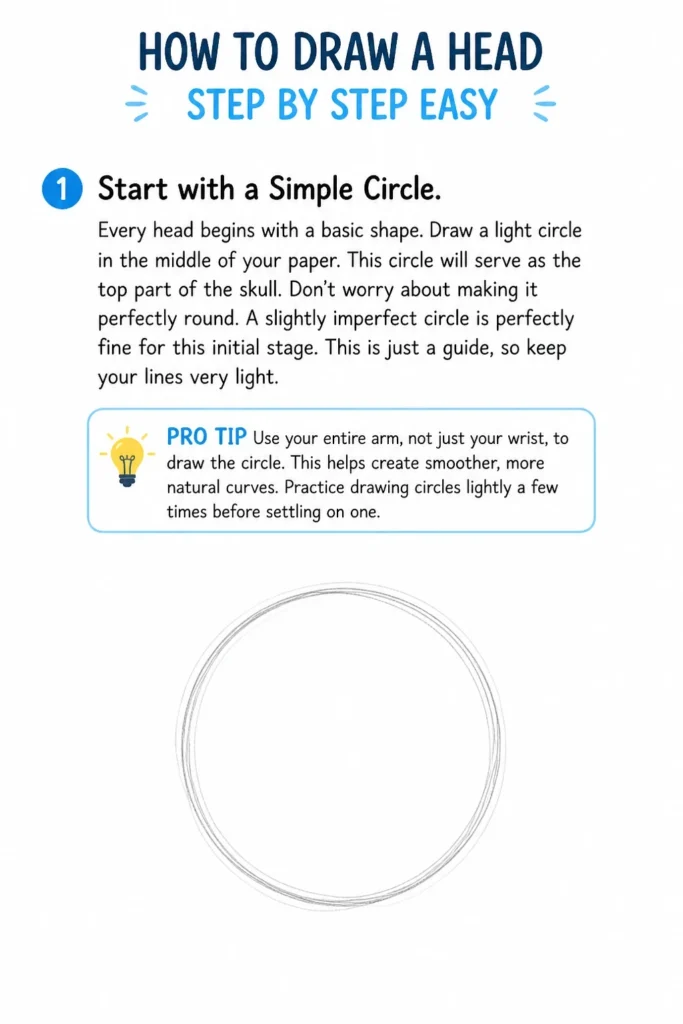
Every head begins with a basic shape. Draw a light circle in the middle of your paper. This circle will serve as the top part of the skull.
Don’t worry about making it perfectly round. A slightly imperfect circle is perfectly fine for this initial stage. This is just a guide, so keep your lines very light.
Pro Tip: Use your entire arm, not just your wrist, to draw the circle. This helps create smoother, more natural curves. Practice drawing circles lightly a few times before settling on one.
Step 2: Add the Jawline and Chin
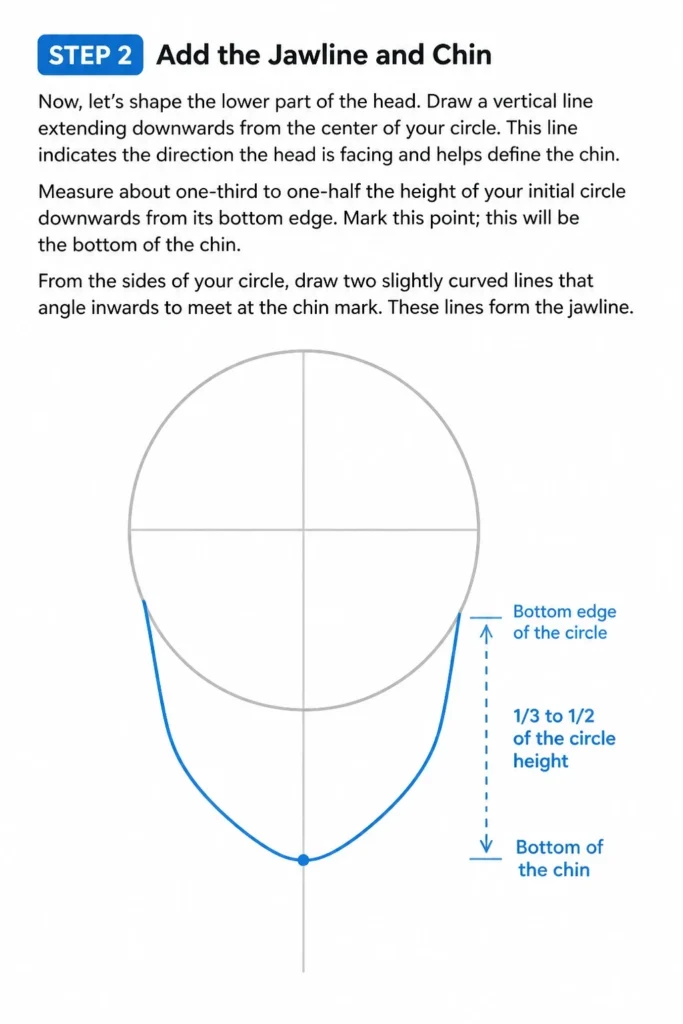
Now, let’s shape the lower part of the head. Draw a vertical line extending downwards from the center of your circle. This line indicates the direction the head is facing and helps define the chin.
Measure about one-third to one-half the height of your initial circle downwards from its bottom edge. Mark this point; this will be the bottom of the chin. From the sides of your circle, draw two slightly curved lines that angle inwards to meet at the chin mark. These lines form the jawline.
Step 3: Establish the Center and Eye Lines
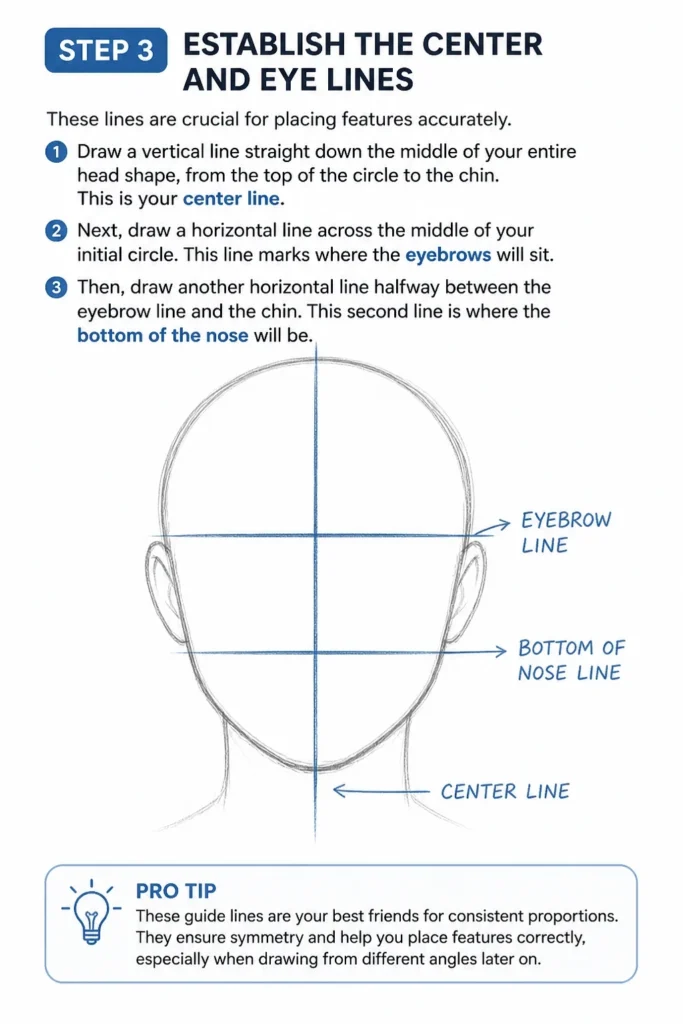
These lines are crucial for placing features accurately. Draw a vertical line straight down the middle of your entire head shape, from the top of the circle to the chin. This is your center line.
Next, draw a horizontal line across the middle of your initial circle. This line marks where the eyebrows will sit. Then, draw another horizontal line halfway between the eyebrow line and the chin. This second line is where the bottom of the nose will be.
Pro Tip: These guide lines are your best friends for consistent proportions. They ensure symmetry and help you place features correctly, especially when drawing from different angles later on.
Step 4: Place the Eyes and Eyebrows
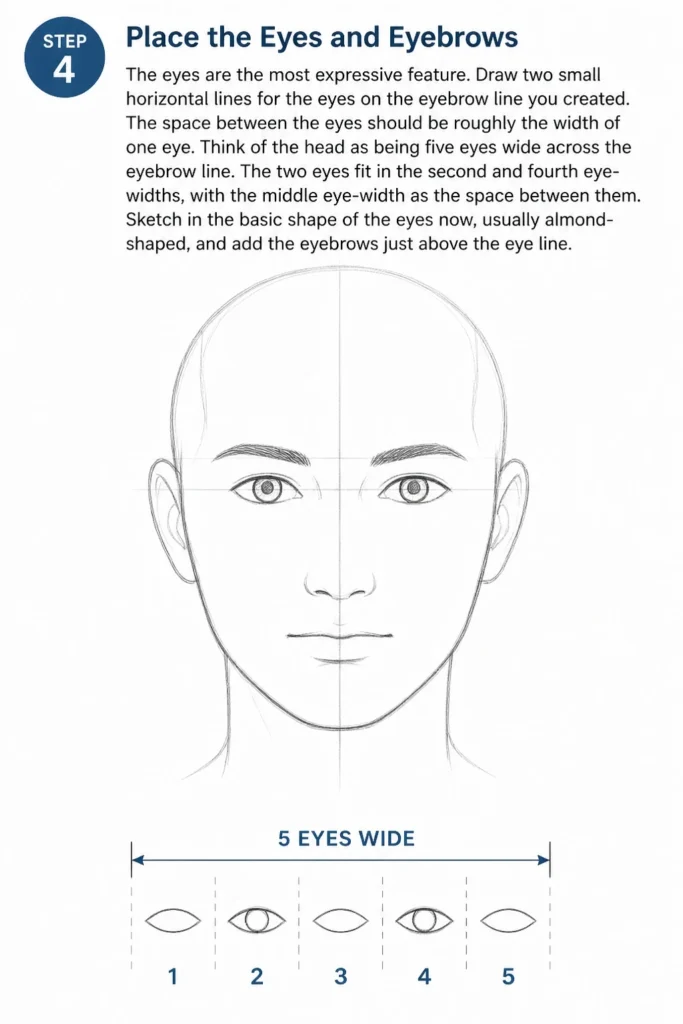
The eyes are the most expressive feature. Draw two small horizontal lines for the eyes on the eyebrow line you created. The space between the eyes should be roughly the width of one eye.
Think of the head as being five eyes wide across the eyebrow line. The two eyes fit in the second and fourth “eye-widths,” with the middle “eye-width” as the space between them. Sketch in the basic shape of the eyes now, usually almond-shaped, and add the eyebrows just above the eye line.
Step 5: Position the Nose and Mouth
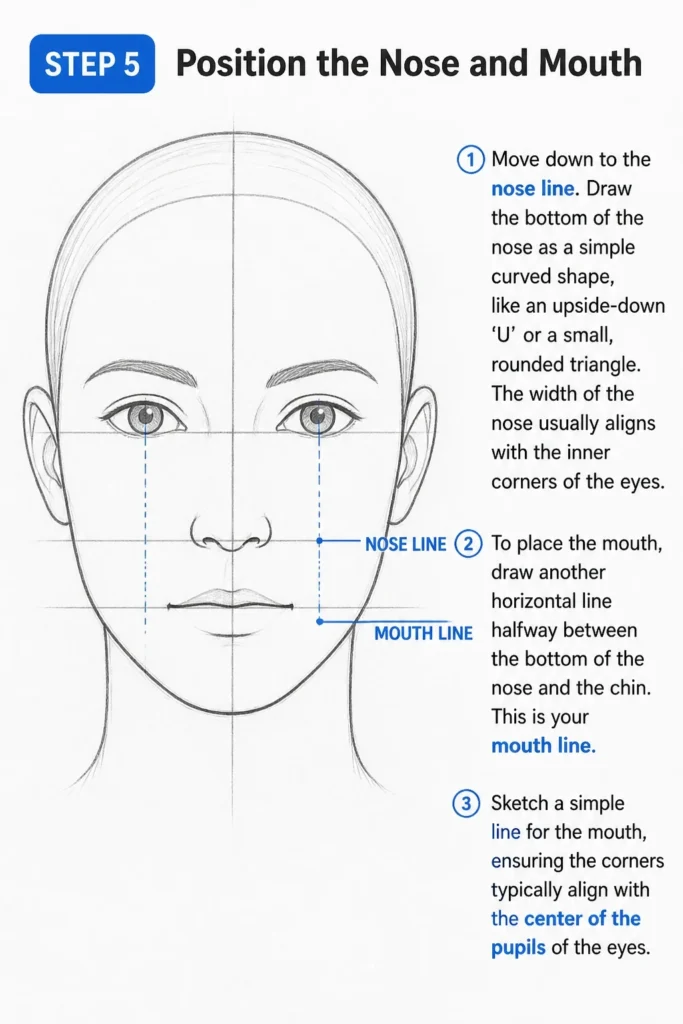
Move down to the nose line. Draw the bottom of the nose as a simple curved shape, like an upside-down ‘U’ or a small, rounded triangle. The width of the nose usually aligns with the inner corners of the eyes.
To place the mouth, draw another horizontal line halfway between the bottom of the nose and the chin. This is your mouth line. Sketch a simple line for the mouth, ensuring the corners typically align with the center of the pupils of the eyes.
Step 6: Add the Ears and Hairline
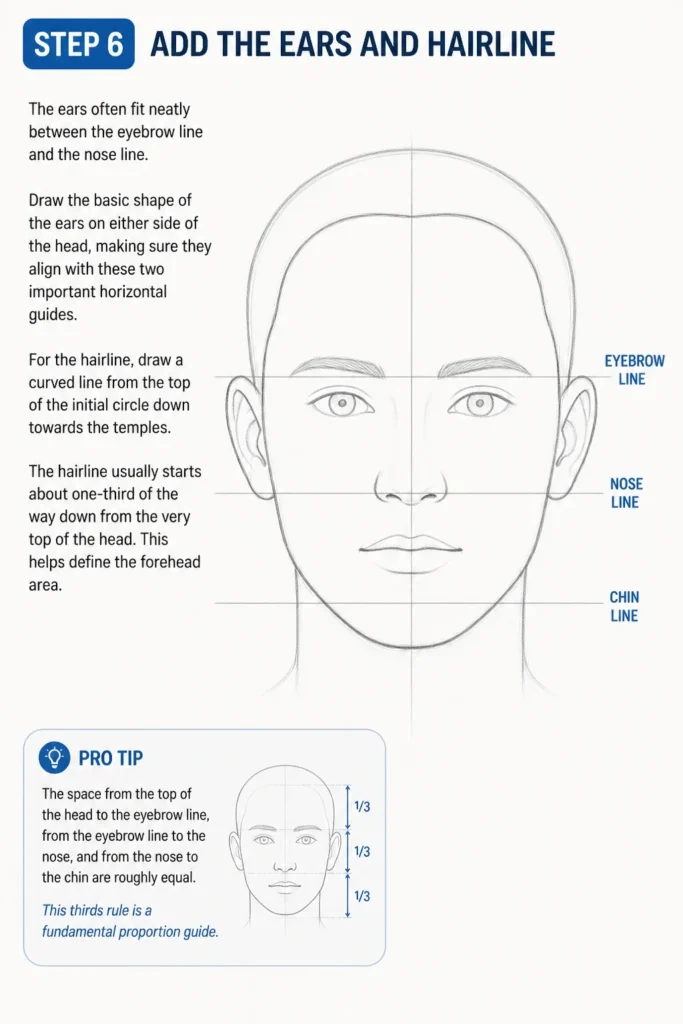
The ears often fit neatly between the eyebrow line and the nose line. Draw the basic shape of the ears on either side of the head, making sure they align with these two important horizontal guides.
For the hairline, draw a curved line from the top of the initial circle down towards the temples. The hairline usually starts about one-third of the way down from the very top of the head. This helps define the forehead area.
Pro Tip: The space from the top of the head to the eyebrow line, from the eyebrow line to the nose, and from the nose to the chin are roughly equal. This “thirds” rule is a fundamental proportion guide.
Step 7: Sketch the Neck and Shoulders
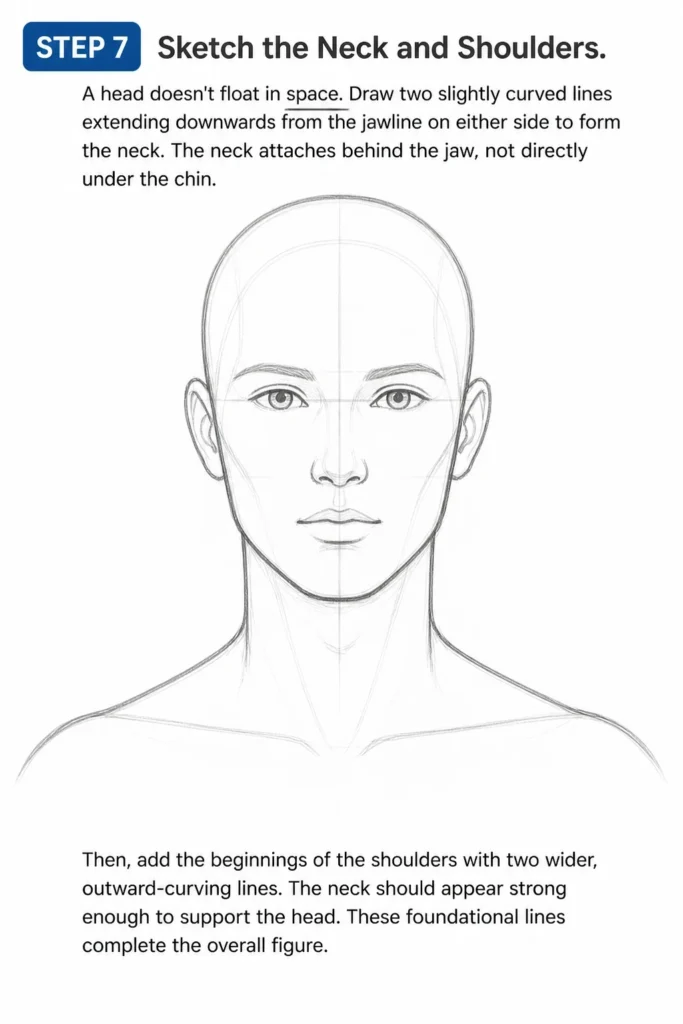
A head doesn’t float in space. Draw two slightly curved lines extending downwards from the jawline on either side to form the neck. The neck attaches behind the jaw, not directly under the chin.
Then, add the beginnings of the shoulders with two wider, outward-curving lines. The neck should appear strong enough to support the head. These foundational lines complete the overall figure.
Step 8: Refine and Erase
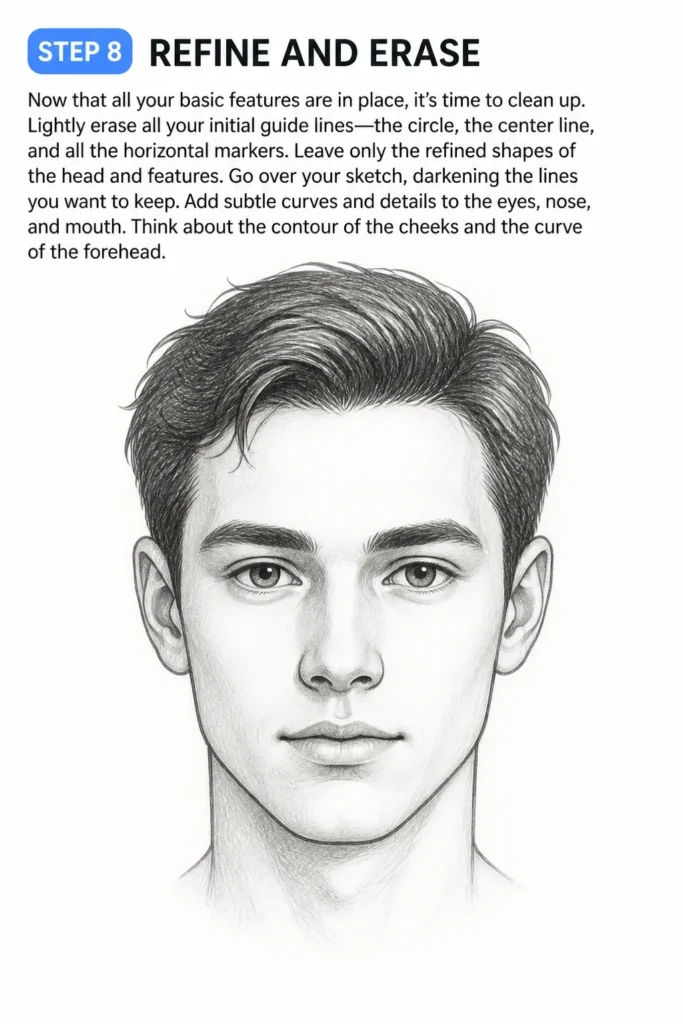
Now that all your basic features are in place, it’s time to clean up. Lightly erase all your initial guide lines—the circle, the center line, and all the horizontal markers. Leave only the refined shapes of the head and features.
Go over your sketch, darkening the lines you want to keep. Add subtle curves and details to the eyes, nose, and mouth. Think about the contour of the cheeks and the curve of the forehead.
Common Mistakes to Avoid
Drawing Features Too High or Too Low
A common error is placing the eyes, nose, or mouth without proper reference. This makes the head look disproportionate. Always rely on your guide lines: eyes on the middle line of the initial circle, nose halfway between eyebrows and chin, and mouth halfway between nose and chin.
Making the Head Too Round or Too Flat
Starting with a perfect circle is good, but forgetting to add the jawline and chin makes the head look like a ball. Conversely, drawing the sides too straight can make the head appear flat. Remember the gentle curves of the jaw and the slight taper towards the chin.
Symmetry Issues
Heads are mostly symmetrical, but beginners often struggle to make both sides match. Use your vertical center line constantly to check that features like eyes and nostrils are equidistant from the middle. If one eye looks higher, adjust it.
Over-Darkening Early Lines
Pressing too hard with your pencil in the initial stages makes it difficult to erase guide lines cleanly. This leaves distracting marks on your final drawing. Keep your initial sketches very light, almost barely visible, until you are sure of your placement.
Troubleshooting
My head looks lopsided.
This is a very common issue, especially when you’re starting. The best solution is to go back to your vertical center line. Ensure all features, like the inner corners of the eyes or the sides of the nose, are an equal distance from this line. You can even use a ruler to check if needed.
The features look squished together or too far apart.
This indicates a proportion problem. Revisit the “thirds” rule for the main facial sections (forehead, nose, chin). For the eyes, remember the “five eyes wide” rule across the head. If your features are too close, widen the space between them; if too far, bring them closer, always using your guide lines as reference.
My drawing looks too flat, not three-dimensional.
A flat drawing often comes from drawing only straight lines. Remember that the head is a sphere with planes. Think about how the light would hit it. Adding very light shading or subtle curves to the forehead, cheeks, and chin can start to give it more depth. Don’t just outline; think about form.
Key Takeaways
- Always start with basic shapes like a circle and a vertical line.
- Guide lines for the eyes, nose, and mouth are essential for correct proportions.
- The “thirds” rule helps accurately divide the face into manageable sections.
- Keep your initial sketch lines very light for easy erasing and refining.
- Practice drawing symmetrical features using your center line.
- Don’t be afraid to erase and adjust; it’s part of the learning process.
Frequently Asked Questions
How can I make my heads look more unique?
Once you master the basic proportions, you can start to subtly alter them. Experiment with different jawline shapes, chin lengths, eye sizes, or nose types. Varying the hairline or adding different hairstyles also creates unique looks.
Should I use a ruler for drawing guide lines?
While freehand is ideal for developing skill, using a ruler for your initial guide lines can be incredibly helpful when you’re starting out. It ensures accuracy and helps you internalize correct proportions before you can draw them freehand.
What if my circle isn’t perfect?
Don’t worry about it! The initial circle is just a starting point. It’s meant to be a loose guide that you will refine and erase. Focus more on its placement and general size than on its perfect roundness.
How do I make the head look like it’s facing different directions?
To change direction, simply angle your initial vertical center line. If the head is looking left, the center line will curve slightly to the left. All features will then follow this new curved center line, making them appear to wrap around the head.
Our Top Recommended Finds
- Sketch Pencils (HB, 2B, 4B): A set provides varying hardness for light sketching and darker lines.
- Kneaded Eraser: This type of eraser doesn’t leave crumbs and can be molded to lift graphite gently without damaging paper.
- Smooth Drawing Paper: Paper with a slight tooth but not too rough allows for easy line work and blending.
Your Creative Journey Begins Now
You’ve taken the first exciting step in drawing a head. This foundational skill opens up a world of possibilities for character design and portraiture. Remember, consistent practice is your most powerful tool.
Don’t stop here. Try drawing the head again, perhaps from a slightly different angle next time, or experiment with different hairstyles. Keep these basic principles in mind, and you’ll see your drawing skills grow with every attempt. Pick up your pencil and create something new today!