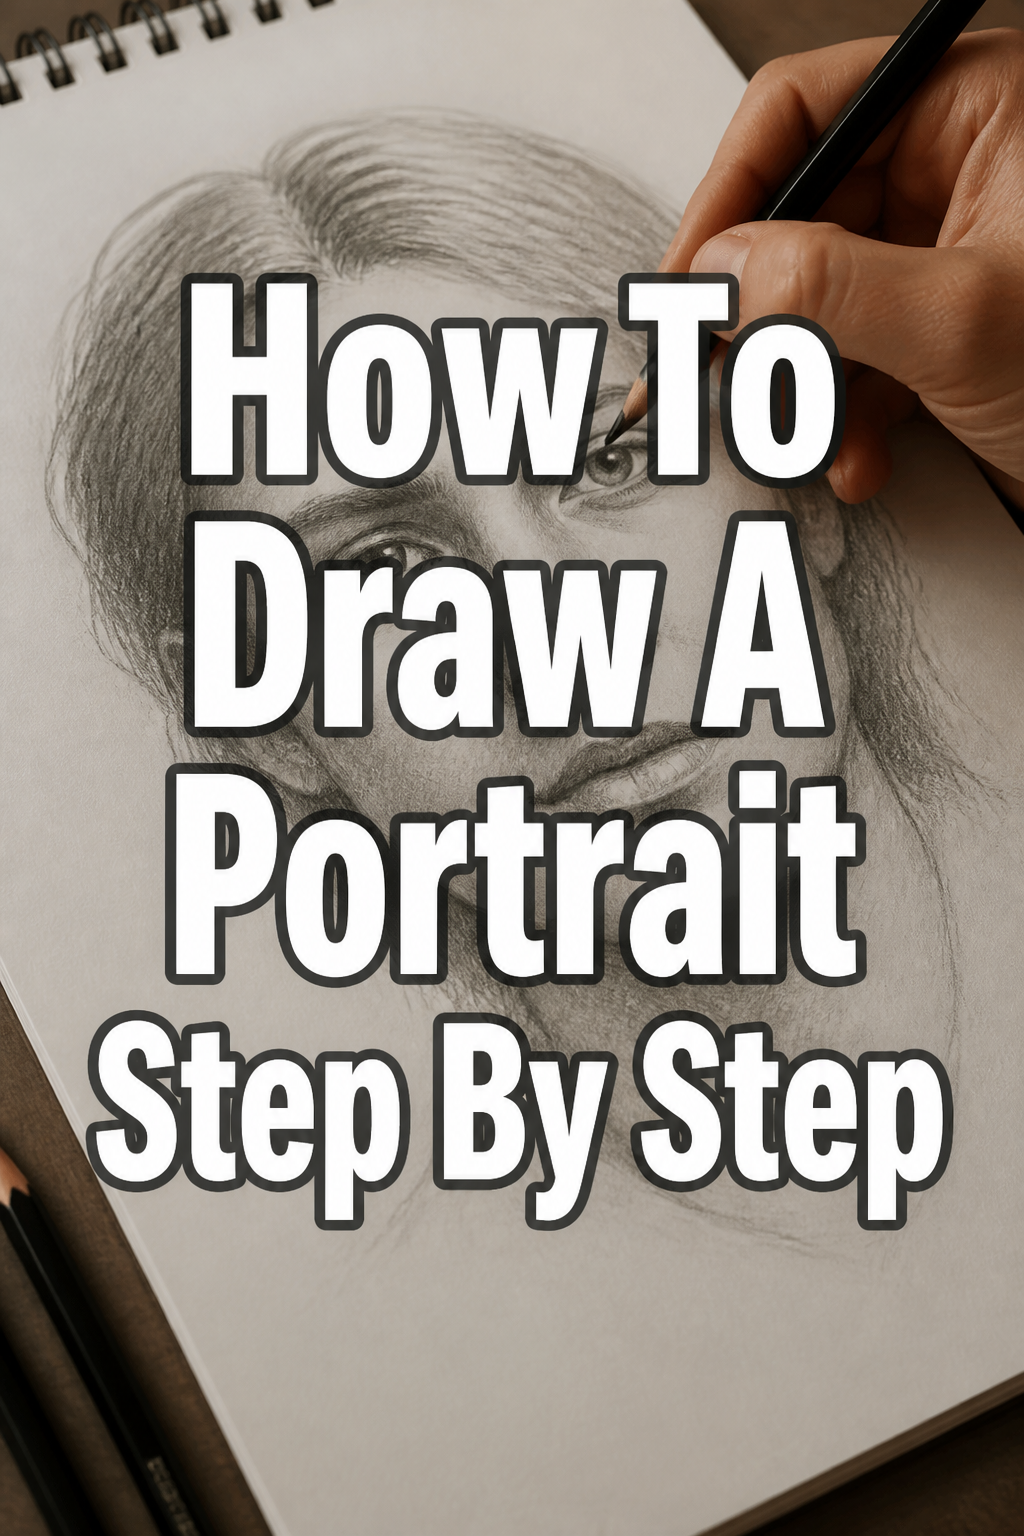
🎨 How To Draw A Portrait Step By Step

& Painting
No rigid rules or pretension. Just practical guides, medium comparisons, and encouraging tips to help you enjoy the drawing & painting process.
I remember the first time I tried to draw my grandfather’s face and ended up with something that looked more like a lumpy potato than a human being.
After years of filling sketchbooks and studying classical techniques, I realized that portraiture isn’t about talent, but about learning to see shapes and proportions correctly.
This guide simplifies the complex anatomy of the human face into manageable steps that anyone can follow to create a realistic likeness.
Quick Overview
This tutorial will guide you through the process of constructing a human head from scratch, placing features accurately, and adding realistic depth through shading.
- Time needed: 60 to 90 minutes
- Difficulty: Beginner to Intermediate
- What you’ll need: Graphite pencils (HB, 2B, 4B), a kneaded eraser, smooth drawing paper, and a ruler.
Step-by-Step Instructions
Step 1: Construct the Basic Head Shape
Draw a perfect circle in the center of your paper to represent the cranium.
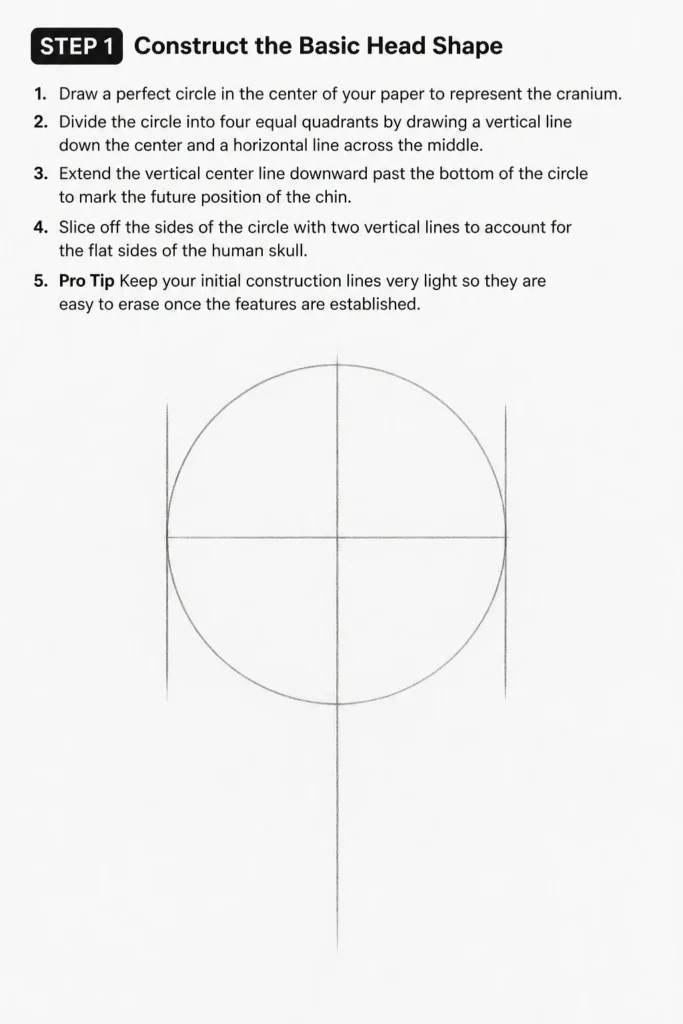
Divide the circle into four equal quadrants by drawing a vertical line down the center and a horizontal line across the middle.
Extend the vertical center line downward past the bottom of the circle to mark the future position of the chin.
Slice off the sides of the circle with two vertical lines to account for the flat sides of the human skull.
Pro Tip: Keep your initial construction lines very light so they are easy to erase once the features are established.
Step 2: Establish the Proportional Guidelines
Mark the brow line at the horizontal center of your original circle.
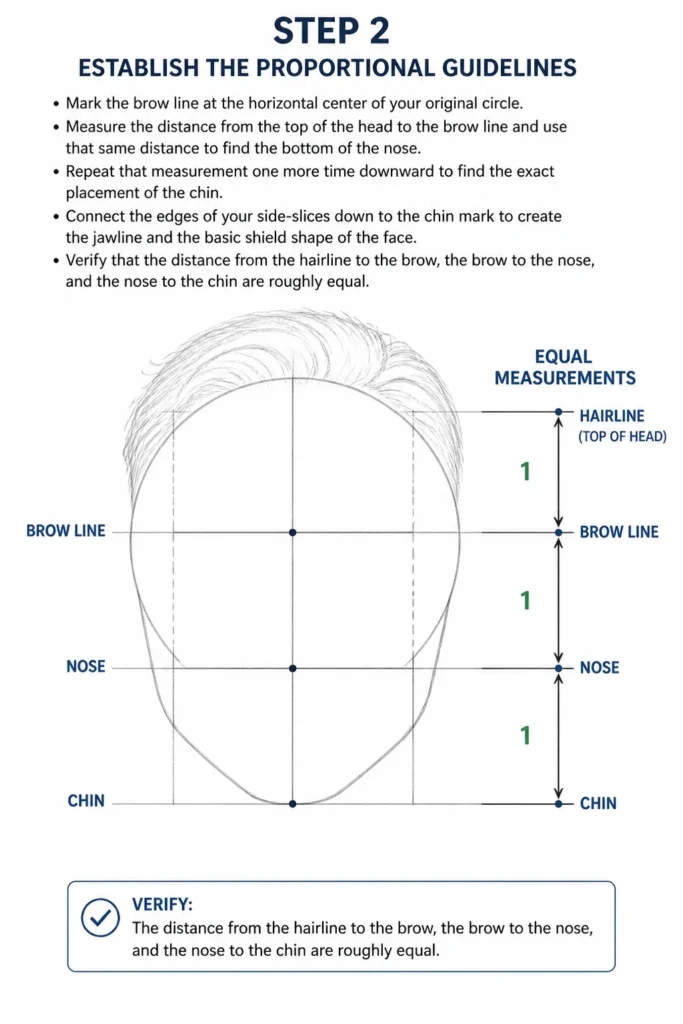
Measure the distance from the top of the head to the brow line and use that same distance to find the bottom of the nose.
Repeat that measurement one more time downward to find the exact placement of the chin.
Connect the edges of your side-slices down to the chin mark to create the jawline and the basic shield shape of the face.
Verify that the distance from the hairline to the brow, the brow to the nose, and the nose to the chin are roughly equal.
Step 3: Map the Eye Placement
Sketch a horizontal line halfway between the top of the head and the chin, which is where the eyes actually sit.
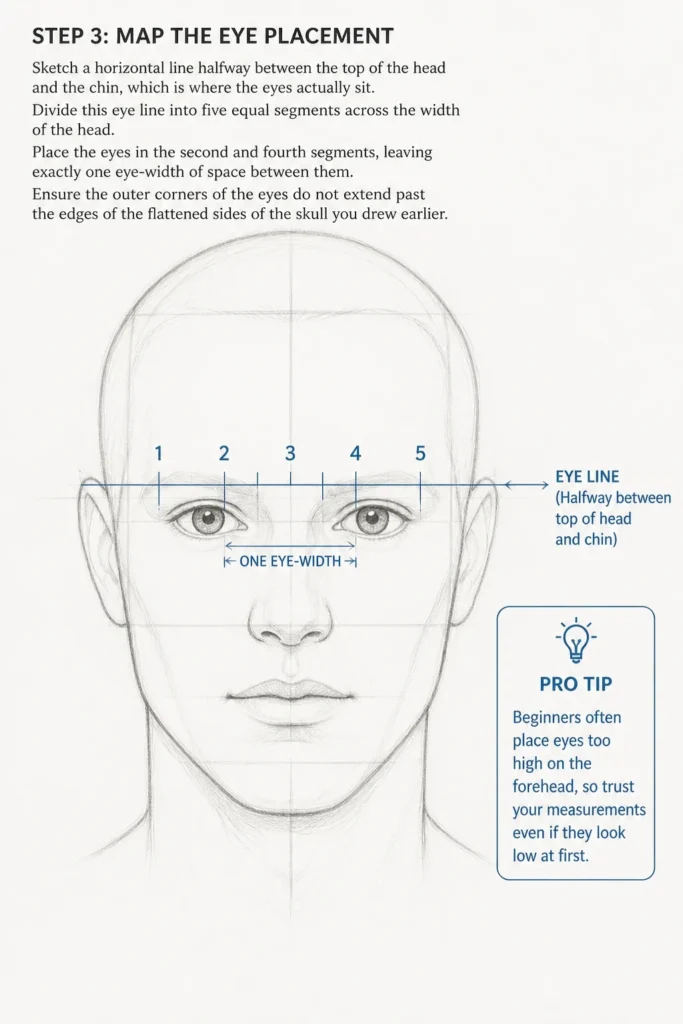
Divide this eye line into five equal segments across the width of the head.
Place the eyes in the second and fourth segments, leaving exactly one eye-width of space between them.
Ensure the outer corners of the eyes do not extend past the edges of the flattened sides of the skull you drew earlier.
Pro Tip: Beginners often place eyes too high on the forehead, so trust your measurements even if they look “low” at first.
Step 4: Define the Nose and Mouth
Drop two light vertical lines down from the inner corners of the eyes to find the width of the nose wings.
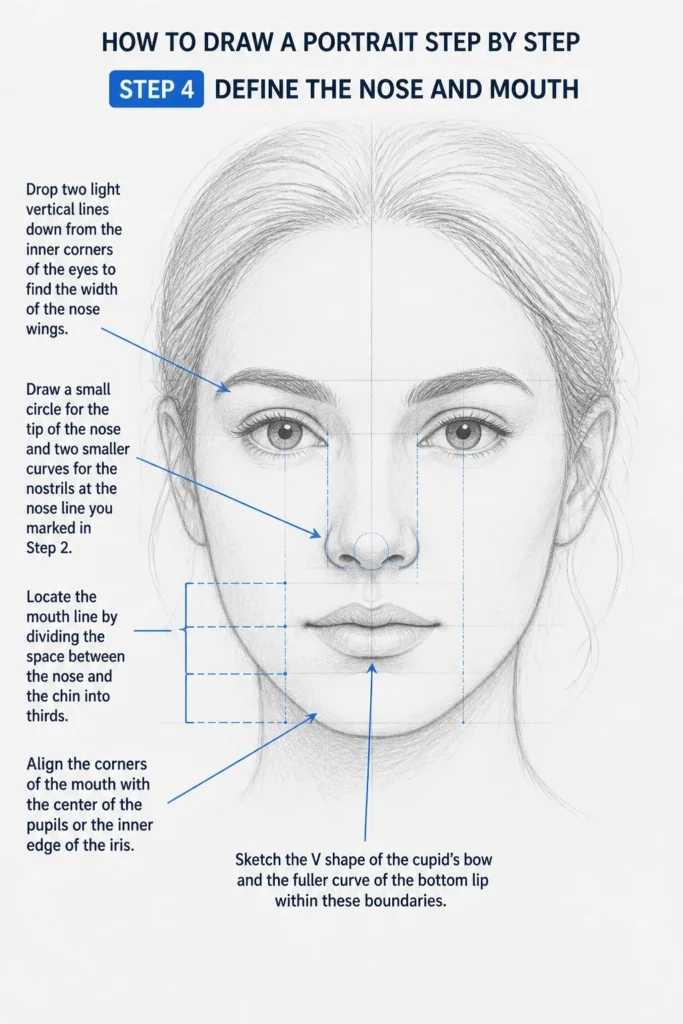
Draw a small circle for the tip of the nose and two smaller curves for the nostrils at the nose line you marked in Step 2.
Locate the mouth line by dividing the space between the nose and the chin into thirds.
Align the corners of the mouth with the center of the pupils or the inner edge of the iris.
Sketch the “V” shape of the cupid’s bow and the fuller curve of the bottom lip within these boundaries.
Step 5: Shape the Ears and Neck
Position the top of the ears so they align perfectly with the brow line.
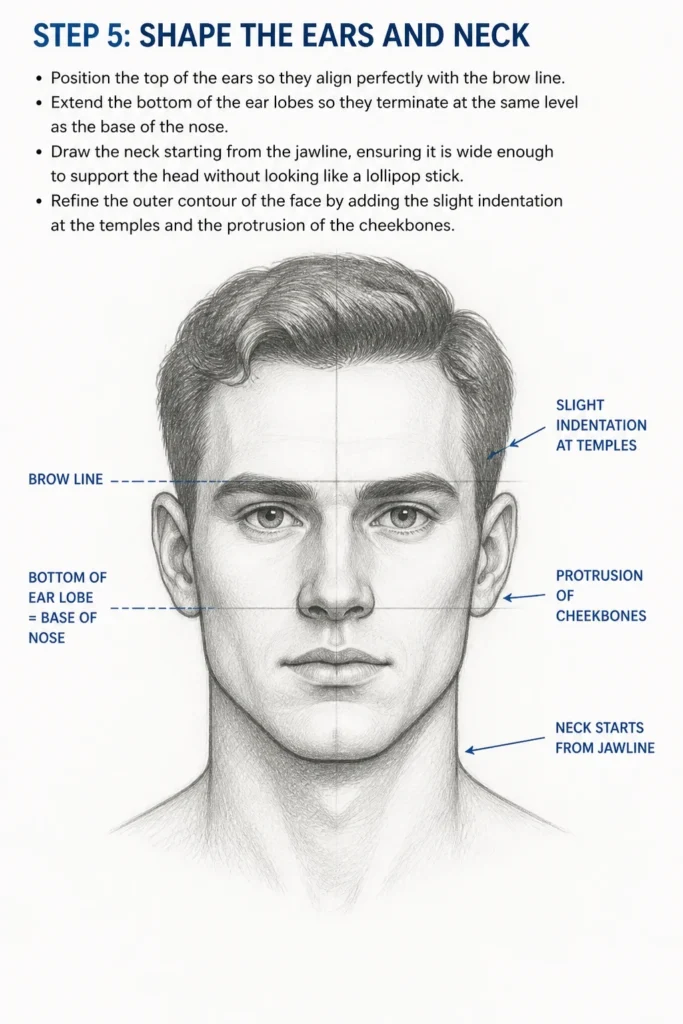
Extend the bottom of the ear lobes so they terminate at the same level as the base of the nose.
Draw the neck starting from the jawline, ensuring it is wide enough to support the head without looking like a “lollipop stick.”
Refine the outer contour of the face by adding the slight indentation at the temples and the protrusion of the cheekbones.
Step 6: Add Detail to the Eyes
Outline the upper eyelid with a thicker line to represent the shadow cast by the eyelashes.
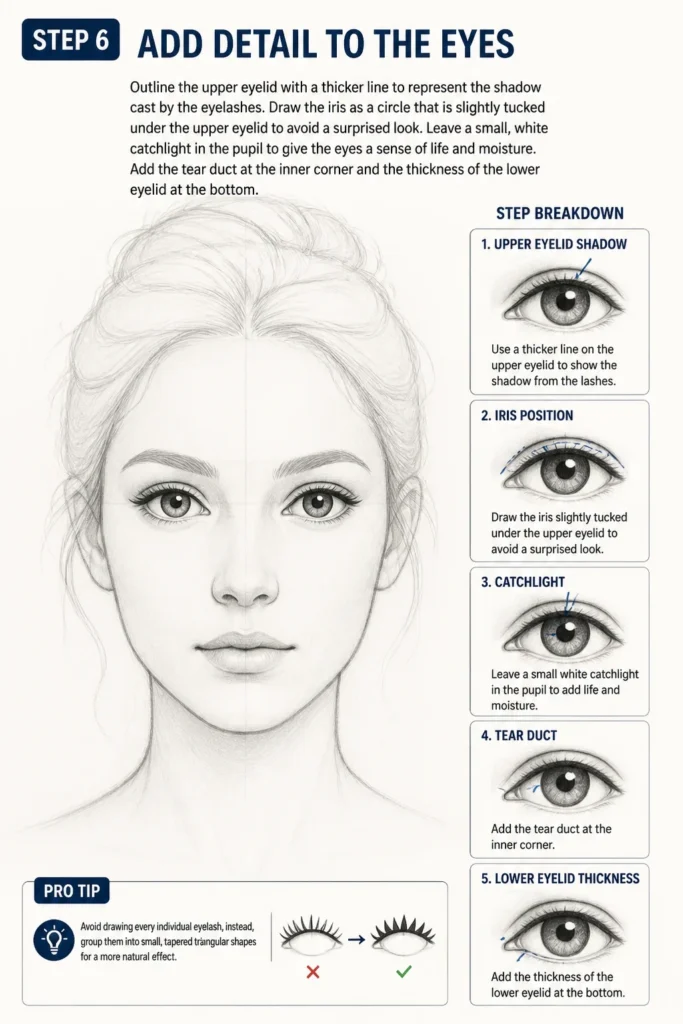
Draw the iris as a circle that is slightly tucked under the upper eyelid to avoid a “surprised” look.
Leave a small, white “catchlight” in the pupil to give the eyes a sense of life and moisture.
Add the tear duct at the inner corner and the thickness of the lower eyelid at the bottom.
Pro Tip: Avoid drawing every individual eyelash; instead, group them into small, tapered triangular shapes for a more natural effect.
Step 7: Render the Hair and Eyebrows
Identify the hairline, which usually sits about one-third of the way down from the top of the head.
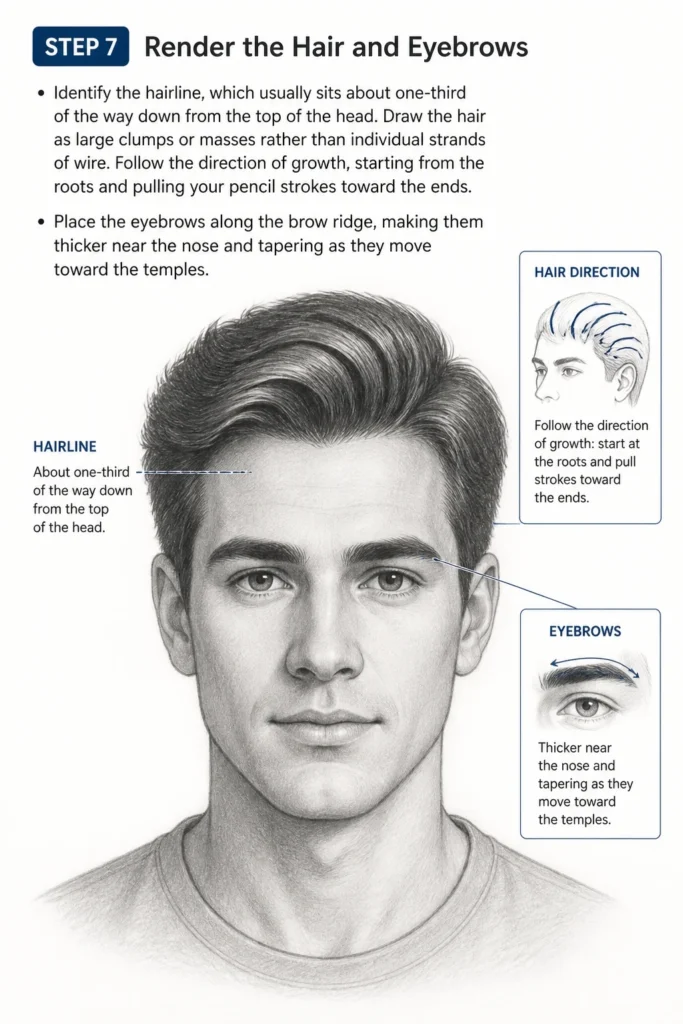
Draw the hair as large “clumps” or masses rather than individual strands of wire.
Follow the direction of growth, starting from the roots and pulling your pencil strokes toward the ends.
Place the eyebrows along the brow ridge, making them thicker near the nose and tapering as they move toward the temples.
Step 8: Develop Value and Shading
Determine the direction of your light source to know where the shadows will fall.
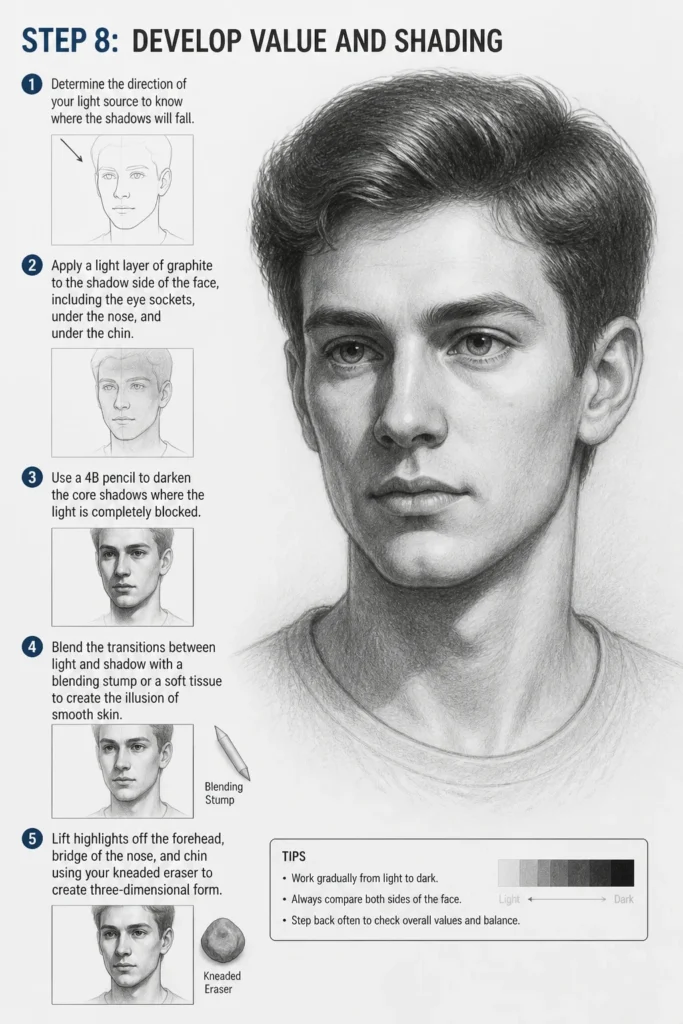
Apply a light layer of graphite to the “shadow side” of the face, including the eye sockets, under the nose, and under the chin.
Use a 4B pencil to darken the core shadows where the light is completely blocked.
Blend the transitions between light and shadow with a blending stump or a soft tissue to create the illusion of smooth skin.
Lift highlights off the forehead, bridge of the nose, and chin using your kneaded eraser to create three-dimensional form.
Common Mistakes to Avoid
The Floating Feature Syndrome
Many artists focus so much on drawing a beautiful eye or nose that they forget how these features connect to the underlying skull. This results in features that look like stickers placed on a flat surface rather than parts of a solid object. Always draw the structure of the head first before committing to the details of the features.
Making the Forehead Too Small
The human brain often perceives the face as ending at the hairline, leading many people to draw the eyes near the top of the head. In reality, the eyes are situated in the exact vertical center of the head. If you find your portrait looks distorted, check the distance from the eyes to the top of the skull.
Using Harsh Outlines
Faces are made of soft transitions and planes, not hard black lines. Drawing a dark line around the lips or the nose will make the portrait look like a cartoon. Instead, use changes in value and shading to define where one part of the face ends and another begins.
Troubleshooting
The Portrait Doesn’t Look Like the Subject
Likeness is usually found in the specific distances between features rather than the features themselves. Use a ruler or your pencil to measure the angle from the corner of the eye to the corner of the mouth on your reference photo. If these angles and distances are off by even a millimeter, the brain will struggle to recognize the person.
The Face Looks Flat and Two-Dimensional
This is usually caused by a lack of contrast or missing “form shadows.” Ensure you have a clear range of values from the white of the paper to a deep, dark grey. Pay special attention to the “halftones” which are the subtle shadows that wrap around the curves of the cheeks and forehead.
The Eyes Look Pointed or Unnatural
Human eyes are not simple almond shapes; they are spheres sitting inside a socket. Remember to draw the thickness of the eyelid and ensure the iris is a perfect circle. If the iris is even slightly oval or wobbly, the gaze will look broken or distorted.
Key Takeaways
- Start with a sphere: Use the Loomis method or basic geometric shapes to build a solid foundation before adding details.
- Center the eyes: Always remember that the eyes sit at the halfway point between the top of the head and the bottom of the chin.
- Measure the gaps: Use the “five-eye width” rule to ensure the eyes and head width are in proper proportion.
- Think in planes: Treat the face like a series of flat surfaces catching light at different angles to create depth.
- Values over lines: Use shading and gradients instead of hard outlines to define the soft features of the human face.
- Practice patience: A realistic portrait requires multiple layers of graphite and careful observation of your reference.
Frequently Asked Questions
What pencil should I use for drawing portraits?
It is best to use a range of graphite pencils. An HB pencil is perfect for the initial light sketch and construction lines. You should then move to a 2B for general shading and a 4B or 6B for the darkest shadows and pupils.
How do I draw realistic skin texture?
Skin texture is achieved by layering graphite and using a kneaded eraser to “dab” highlights back into the shaded areas. Avoid over-blending with your fingers, as the oils from your skin can create a muddy, flat appearance. Use a very sharp pencil to add tiny pores or imperfections at the very end.
Is it better to draw from a photo or a live model?
Drawing from a live model helps you understand three-dimensional form and depth much better than a flat photo. However, photos are excellent for beginners because the subject doesn’t move and the lighting stays consistent. If you use a photo, make sure it has high contrast and clear shadows.
How long does it take to get good at portraits?
Portraiture is a skill that develops through consistent practice over months and years. Most artists see a significant improvement after completing 20 to 30 focused portrait studies. Focus on one feature at a time, like drawing 50 pairs of eyes, to build your “visual library.”
Our Top Recommended Finds
- Staedtler Mars Lumograph Pencil Set: These pencils offer consistent grading and high-quality graphite that doesn’t break easily under pressure.
- Strathmore 400 Series Toned Tan Sketchbook: Drawing on toned paper allows you to use white charcoal for highlights, which makes portraits pop off the page.
- Tombow Mono Zero Eraser: This ultra-fine pen-style eraser is essential for lifting tiny highlights in the eyes and individual strands of hair.
Mastering The Art Of The Human Face
Learning how to draw a portrait is a journey of translating what you see into what you know about anatomy. Each drawing you complete is a lesson in observation that sharpens your artistic eye and improves your hand-eye coordination.
Once you feel comfortable with the basic front-facing view, try tilting the head or drawing a profile to challenge your understanding of perspective. You might also want to explore different mediums like charcoal or colored pencils to see how they change your approach to shading.
Grab your sketchbook and a reference photo today, and start by drawing just the basic construction sphere. The only way to bridge the gap between where you are and where you want to be is to keep your pencil moving every single day.
& Painting
No rigid rules or pretension. Just practical guides, medium comparisons, and encouraging tips to help you enjoy the drawing & painting process.