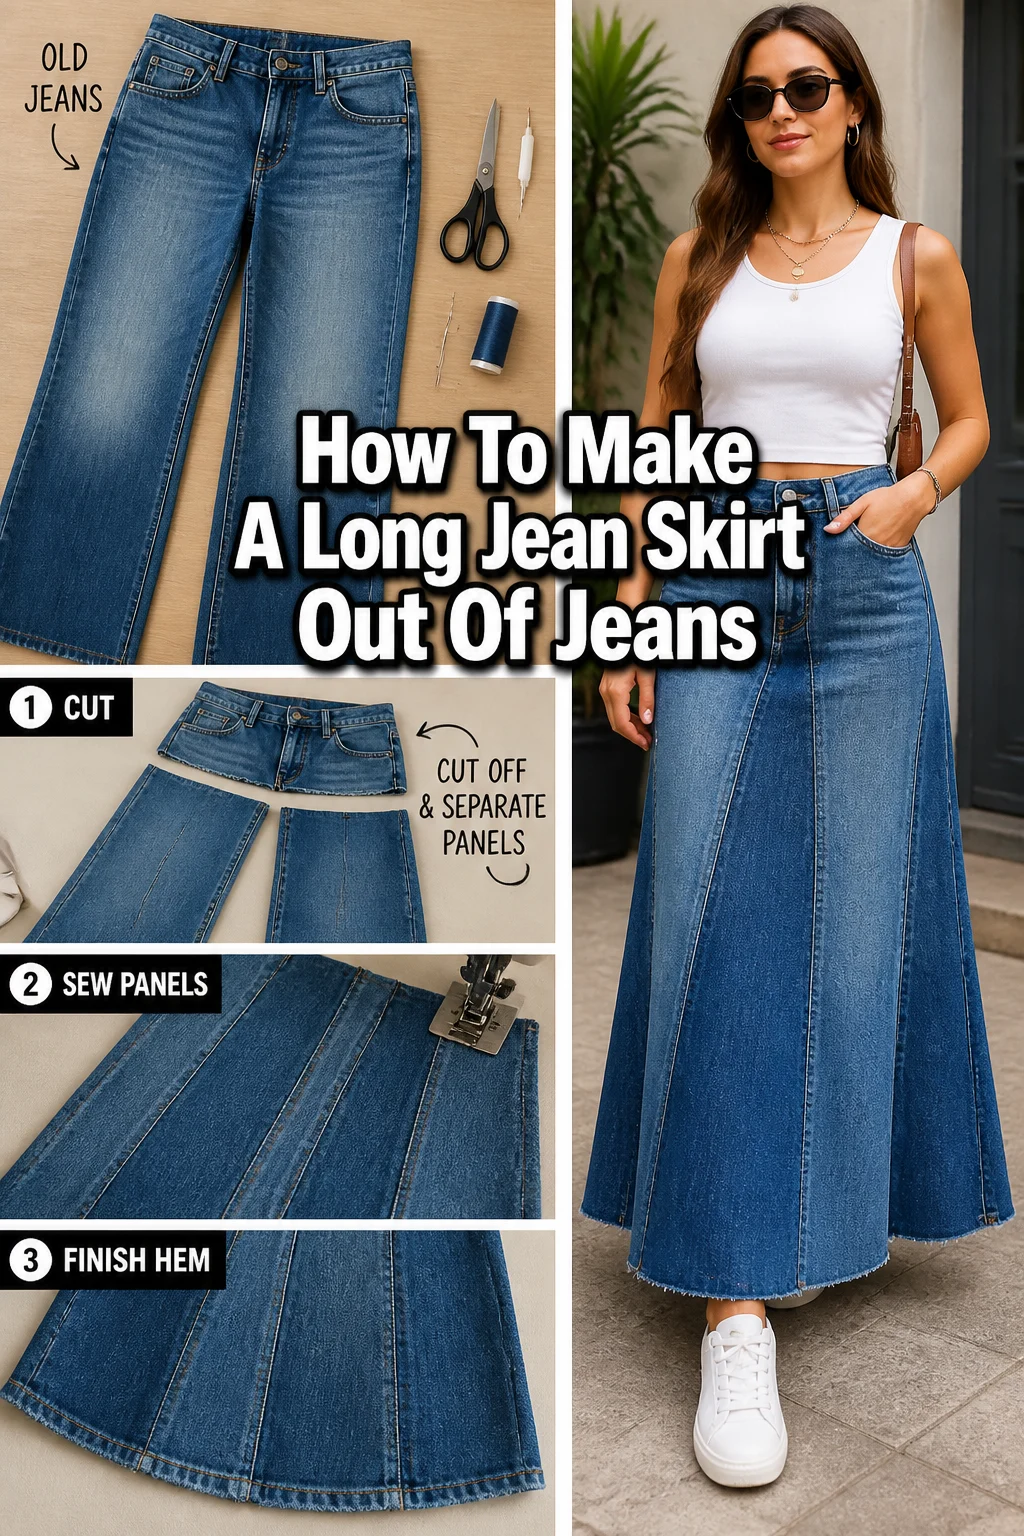
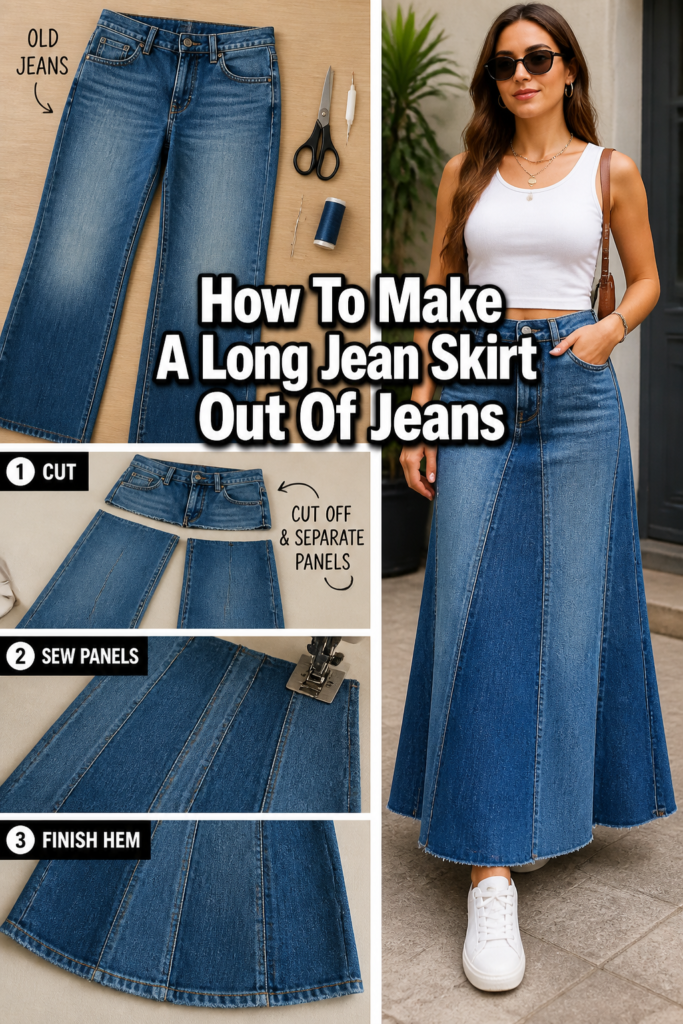
🧵 How To Make A Long Jean Skirt Out Of Jeans
Do you have a favorite pair of jeans that just doesn’t fit right anymore, or perhaps they’re simply out of style?
I’ve spent countless hours in my sewing room, transforming old denim into exciting new pieces, and a long jean skirt is one of the most rewarding.
This comprehensive guide shares all my proven techniques and practical advice to help you create a stylish, custom-fit skirt you’ll love.
Quick Overview
Transforming an old pair of jeans into a chic, long skirt is a fantastic way to upcycle and express your personal style.
You’ll learn how to deconstruct your jeans, create new seams, and finish your skirt for a professional look.
- Time needed: 4-8 hours (depending on sewing experience)
- Difficulty: Intermediate
- What you’ll need: An old pair of jeans, sewing machine, sturdy denim thread, sharp fabric scissors, seam ripper, sewing pins, fabric marker or chalk, measuring tape, iron, and ironing board.
Step-by-Step Instructions
Step 1: Choose and Prepare Your Jeans
Select the right pair of jeans for your project. Look for jeans that fit well around your waist and hips, as this part will remain largely intact.
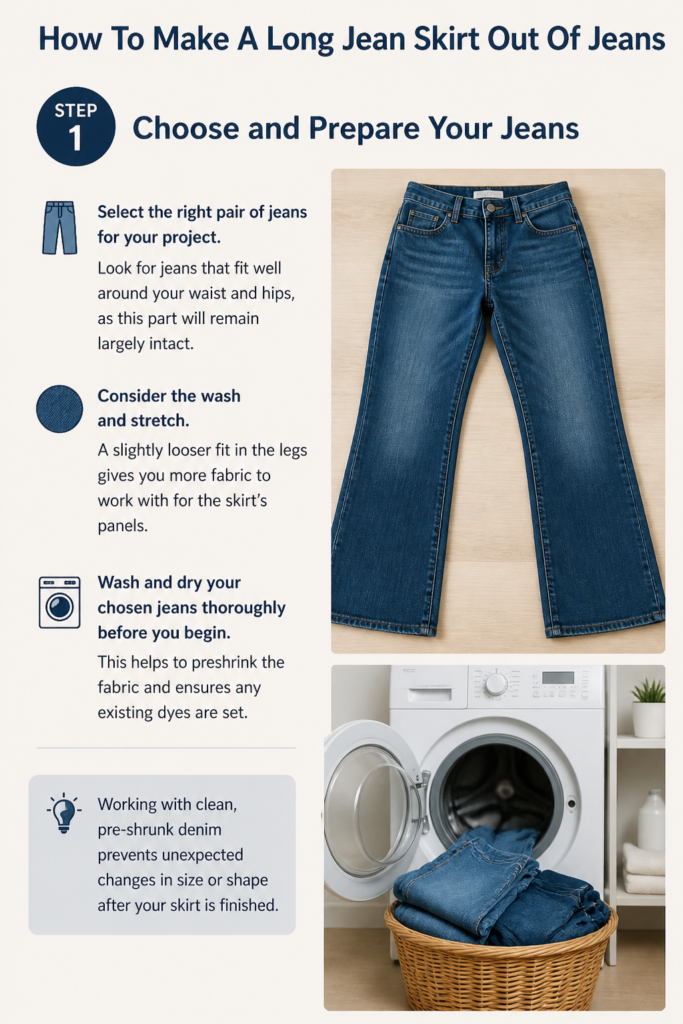
Consider the wash and stretch. A slightly looser fit in the legs gives you more fabric to work with for the skirt’s panels.
Wash and dry your chosen jeans thoroughly before you begin. This helps to preshrink the fabric and ensures any existing dyes are set.
Working with clean, pre-shrunk denim prevents unexpected changes in size or shape after your skirt is finished.
Step 2: Gather Your Tools and Workspace
Lay out all your necessary tools in a clean, well-lit area. Having everything organized saves time and reduces frustration during the process.
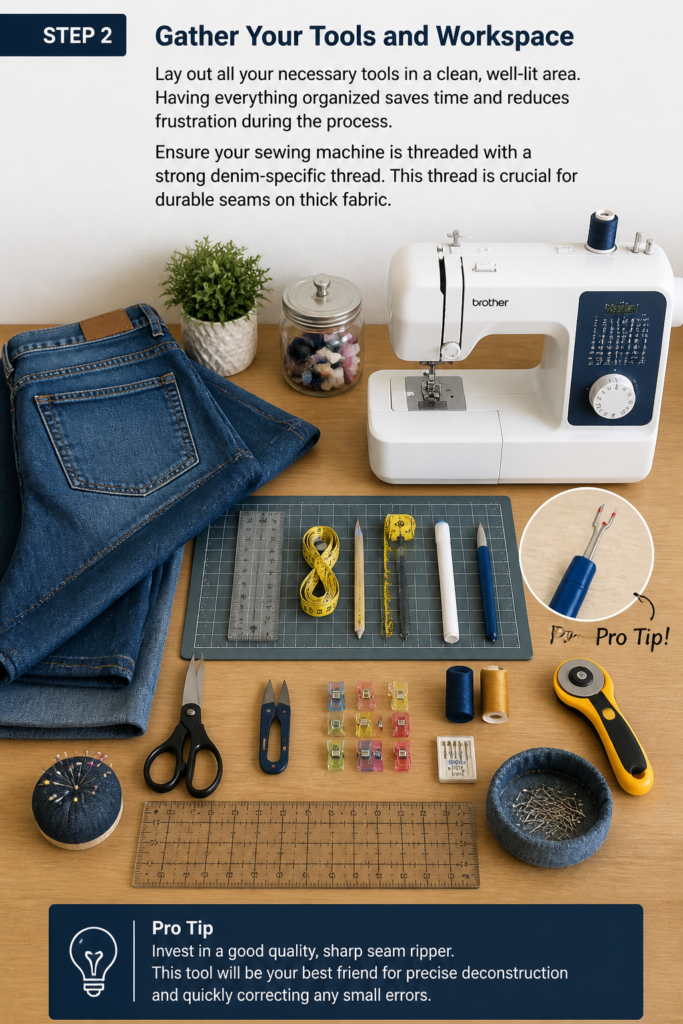
Ensure your sewing machine is threaded with a strong denim-specific thread. This thread is crucial for durable seams on thick fabric.
Pro Tip: Invest in a good quality, sharp seam ripper. This tool will be your best friend for precise deconstruction and quickly correcting any small errors.
Step 3: Deconstruct the Jeans
Turn your jeans inside out. Begin by carefully using your seam ripper to open the inseams of both pant legs.
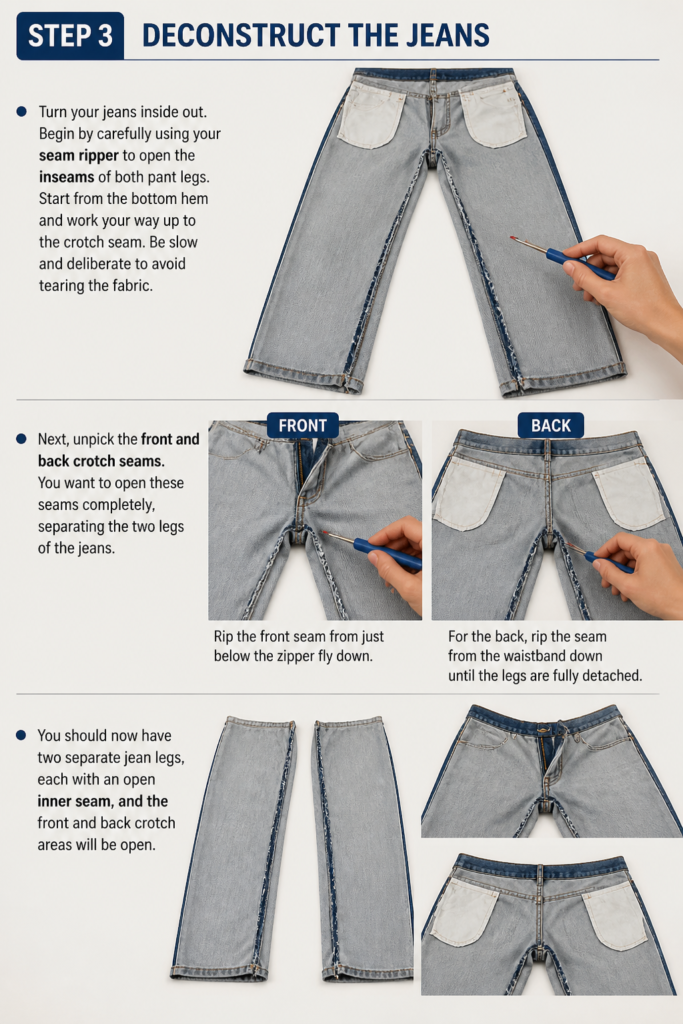
Start from the bottom hem and work your way up to the crotch seam. Be slow and deliberate to avoid tearing the fabric.
Next, unpick the front and back crotch seams. You want to open these seams completely, separating the two legs of the jeans.
Rip the front seam from just below the zipper fly down. For the back, rip the seam from the waistband down until the legs are fully detached.
You should now have two separate jean legs, each with an open inner seam, and the front and back crotch areas will be open.
Step 4: Prepare the Front Panel
Lay out the deconstructed jeans flat on your work surface, with the front side facing up. The two separated front crotch edges will create a “V” shape.
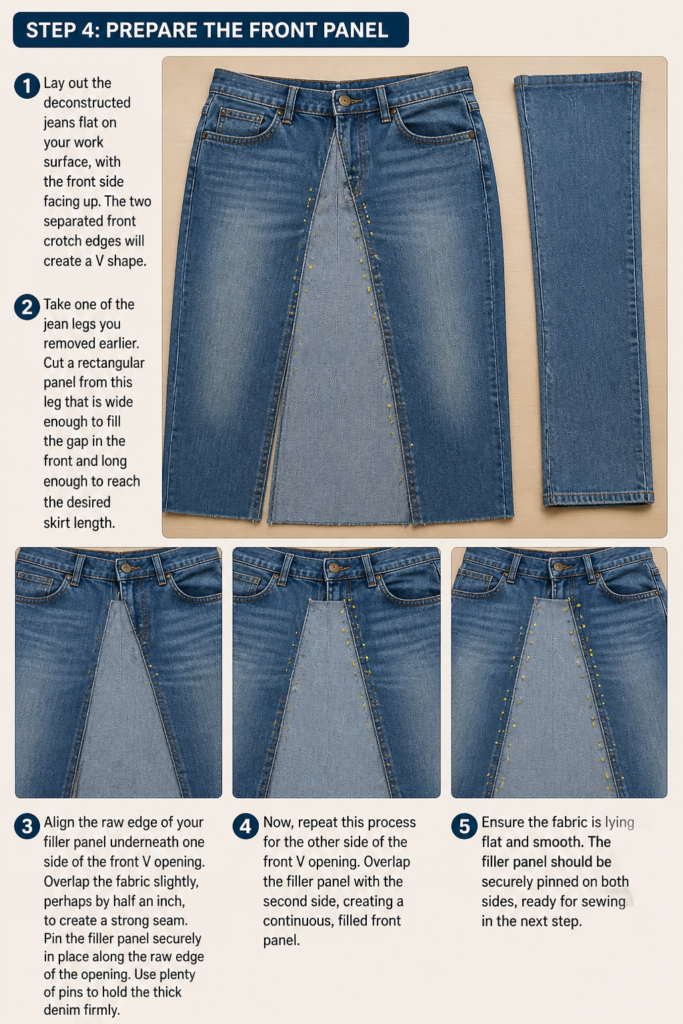
Take one of the jean legs you removed earlier. Cut a rectangular panel from this leg that is wide enough to fill the gap in the front and long enough to reach the desired skirt length.
Align the raw edge of your filler panel underneath one side of the front “V” opening. Overlap the fabric slightly, perhaps by half an inch, to create a strong seam.
Pin the filler panel securely in place along the raw edge of the opening. Use plenty of pins to hold the thick denim firmly.
Now, repeat this process for the other side of the front “V” opening. Overlap the filler panel with the second side, creating a continuous, filled front panel.
Ensure the fabric lays flat and smooth, with no puckering or pulling. The goal is to create a seamless transition.
Pro Tip: When pinning the filler panel, make sure the grain of the denim runs in the same direction as the rest of the skirt for a consistent look and drape.
Step 5: Stitch the Front Panel
Take your pinned jeans to the sewing machine. Using a straight stitch, sew along the pinned lines, attaching the filler panel to the main body of the skirt.
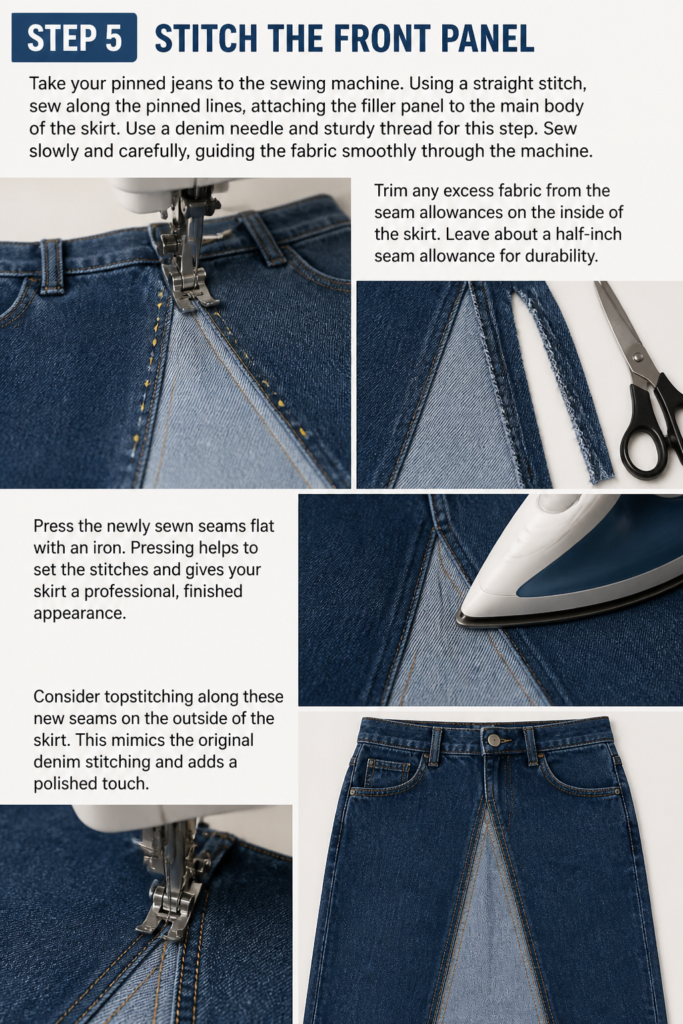
Use a denim needle and sturdy thread for this step. Sew slowly and carefully, guiding the fabric smoothly through the machine.
Trim any excess fabric from the seam allowances on the inside of the skirt. Leave about a half-inch seam allowance for durability.
Press the newly sewn seams flat with an iron. Pressing helps to set the stitches and gives your skirt a professional, finished appearance.
Consider topstitching along these new seams on the outside of the skirt. This mimics the original denim stitching and adds a polished touch.
Step 6: Prepare and Stitch the Back Panel
Flip the jeans over so the back side is facing up. You will see a similar “V” opening at the back crotch area.
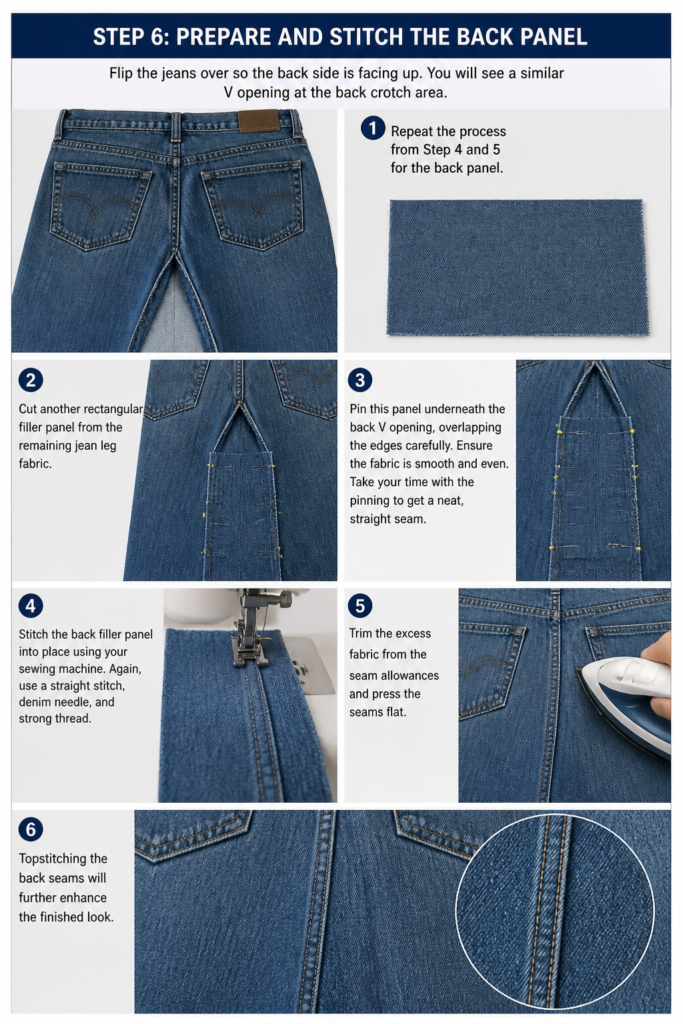
Repeat the process from Step 4 and 5 for the back panel. Cut another rectangular filler panel from the remaining jean leg fabric.
Pin this panel underneath the back “V” opening, overlapping the edges carefully. Ensure the fabric is smooth and even.
Take your time with the pinning to get a neat, straight seam.
Stitch the back filler panel into place using your sewing machine. Again, use a straight stitch, denim needle, and strong thread.
Trim the excess fabric from the seam allowances and press the seams flat. Topstitching the back seams will further enhance the finished look.
Step 7: Refine the Skirt Shape and Length
Try on your partially constructed skirt. This is a crucial step for checking the fit and determining the final length.
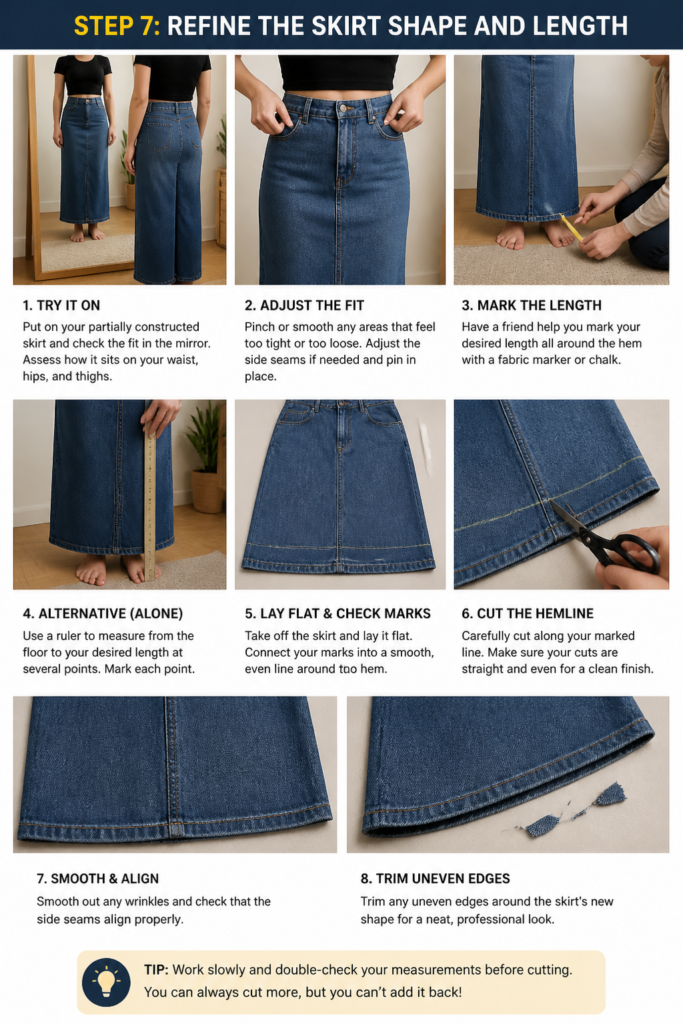
Stand in front of a mirror and assess how the skirt hangs. Adjust any areas that feel too tight or too loose around the hips or thighs.
Mark your desired skirt length while wearing it. Have a friend help you mark an even line around the hem with a fabric marker or chalk.
If you’re working alone, stand still and use a ruler to measure from the floor up to your desired length at several points, then connect the dots.
Take off the skirt and lay it flat. Carefully cut along your marked hemline. Ensure your cuts are straight and even for a clean finish.
Smooth out any wrinkles and check that the skirt’s side seams align properly. Trim any uneven edges around the skirt’s new shape.
Step 8: Hem the Skirt
Fold the raw edge of the hem up by about half an inch. Press this fold firmly with an iron to create a crisp crease.
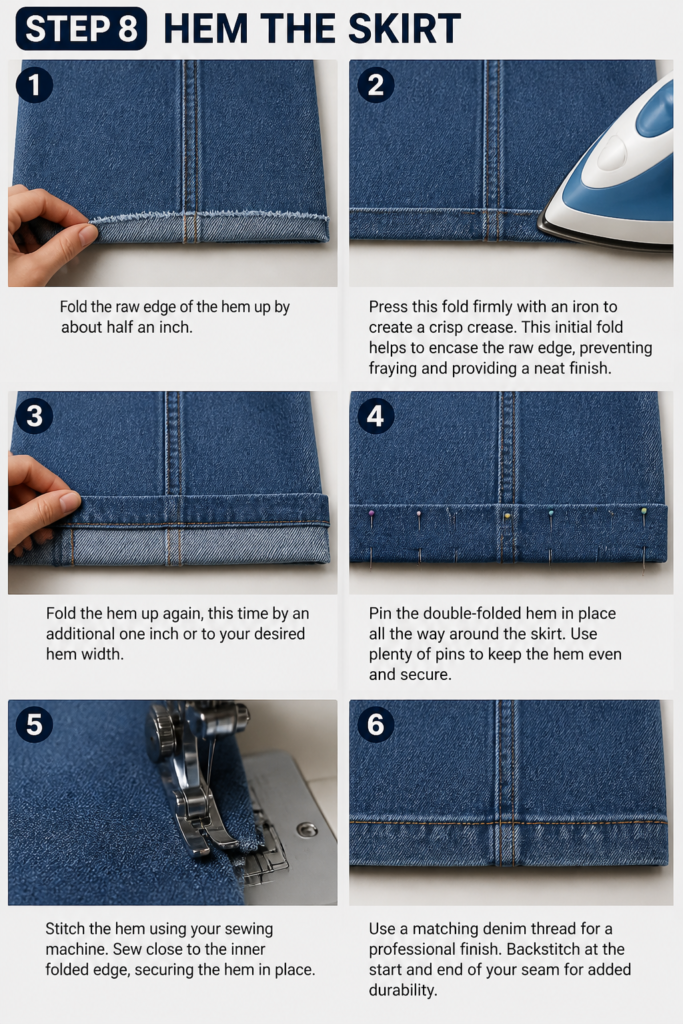
This initial fold helps to encase the raw edge, preventing fraying and providing a neat finish.
Fold the hem up again, this time by an additional one inch or to your desired hem width. Press this second fold firmly as well.
Pin the double-folded hem in place all the way around the skirt. Use plenty of pins to keep the hem even and secure.
Stitch the hem using your sewing machine. Sew close to the inner folded edge, securing the hem in place.
Use a matching denim thread for a professional finish. Backstitch at the start and end of your seam for added durability.
Step 9: Add Finishing Touches (Optional)
Consider adding some decorative elements to personalize your new skirt. You can distress the denim for a worn-in look.
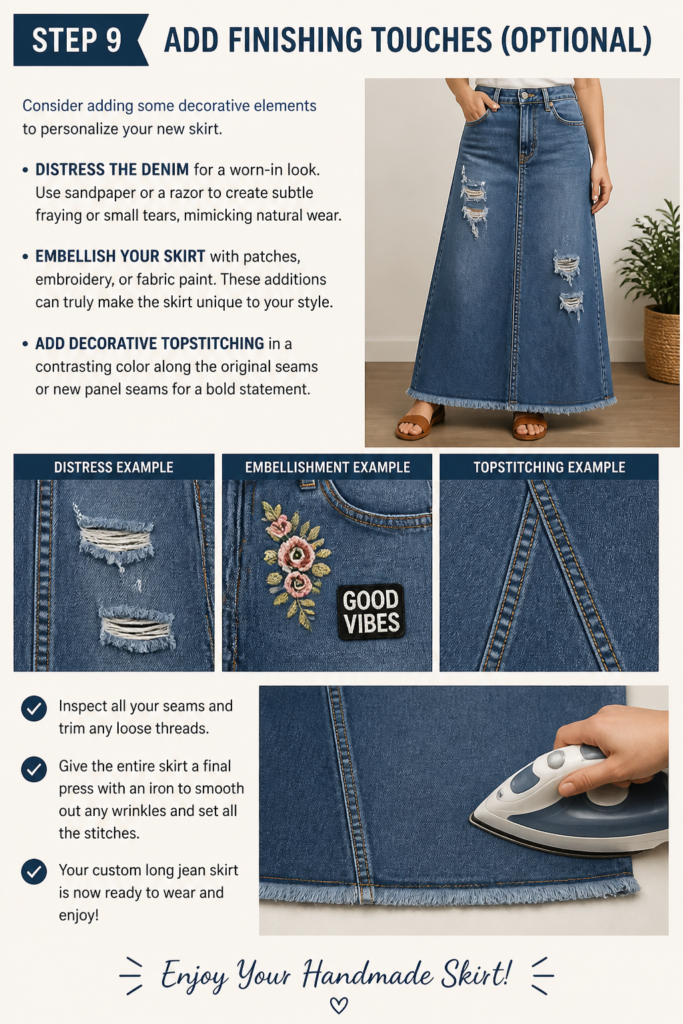
Use sandpaper or a razor to create subtle fraying or small tears, mimicking natural wear.
Embellish your skirt with patches, embroidery, or fabric paint. These additions can truly make the skirt unique to your style.
Think about adding decorative topstitching in a contrasting color along the original seams or new panel seams for a bold statement.
Inspect all your seams and trim any loose threads. Give the entire skirt a final press with an iron to smooth out any wrinkles and set all the stitches.
Your custom long jean skirt is now ready to wear and enjoy!
Common Mistakes to Avoid
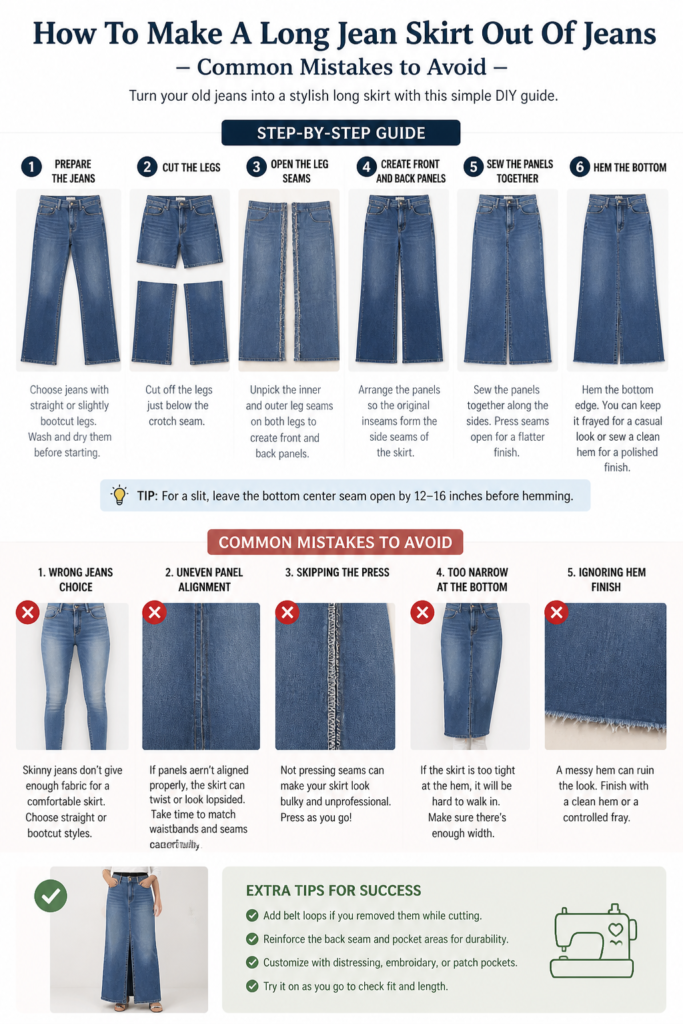
Rushing the Seam Ripping
Many people get excited and rip seams too quickly, often tearing the main fabric of the jeans. This can create holes that are difficult to repair neatly.
Instead, take your time with the seam ripper. Work slowly, one stitch at a time, especially around thicker areas like the crotch seams. Patience here prevents irreparable damage.
Ignoring the Fit Check
Not trying on the skirt during the construction phase is a common oversight. People often wait until the very end, only to find the skirt is too tight, too loose, or uneven.
Always try on the skirt after stitching the front and back panels, before hemming. This allows you to make adjustments to the width and length, ensuring a perfect fit.
Using the Wrong Thread or Needle
Using regular all-purpose thread or a standard sewing needle on thick denim can lead to broken needles, skipped stitches, and weak seams that won’t last.
Always use a strong, polyester denim thread and a heavy-duty denim needle (size 16 or 18). These are designed to penetrate thick fabrics and create durable, long-lasting stitches.
Uneven Hemming
A wobbly or uneven hem can make an otherwise well-made skirt look unprofessional. This often happens when the hem is marked or cut without careful measurement.
Mark your hem while wearing the skirt, or measure precisely from the waistband down to ensure an even line all around. Take the time to press and pin the hem meticulously before stitching.
Troubleshooting
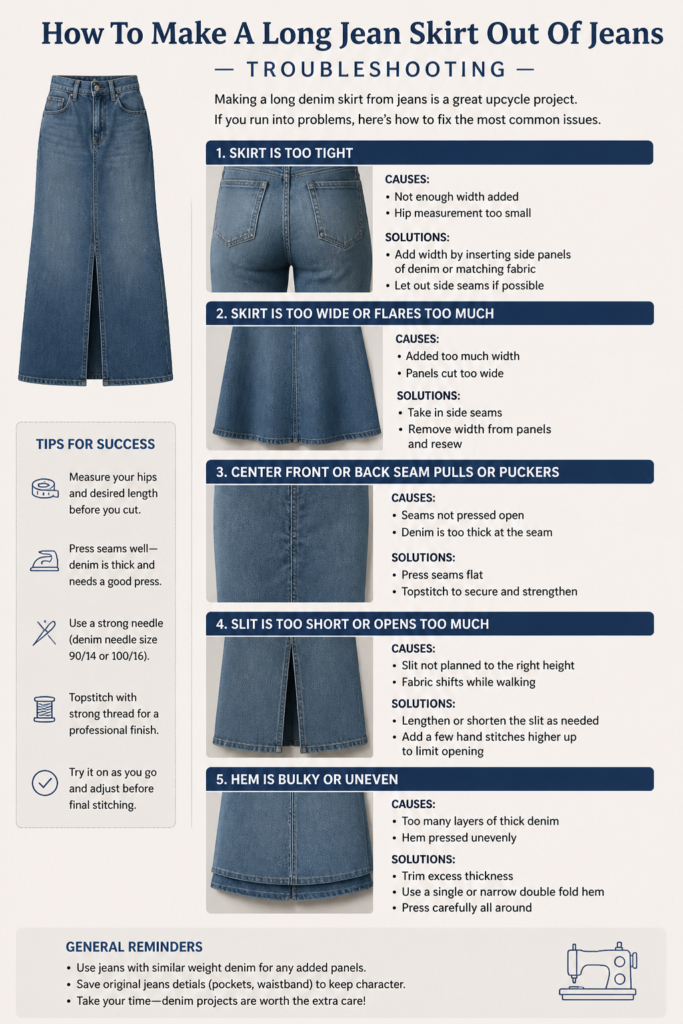
Uneven Hemline
If your finished hem looks uneven, don’t worry, it’s a common issue. The best way to fix this is to try the skirt on again.
While wearing it, have a friend help you mark a new, even hemline. Then, carefully unpick the existing hem, trim the fabric to the new line, and re-hem following the steps precisely.
Gaps in the Seams
Sometimes, after stitching the filler panels, small gaps or puckers can appear in the new seams, especially at the crotch curve. This usually means the fabric wasn’t stretched or laid flat enough during pinning.
Carefully unpick the problematic section of the seam. Repin the fabric, ensuring it lies completely flat without any tension or excess fabric, then restitch slowly and carefully.
Skirt Feels Too Tight/Loose After Panels are Added
If the skirt feels uncomfortable around the hips or thighs after you’ve sewn the panels, it might be due to the amount of overlap or how the panels were cut.
For a tighter fit, you can take in the side seams slightly. For a looser fit, you might need to unpick the panel seams, trim less fabric, or even replace the panels with slightly wider ones if you have enough extra denim.
Key Takeaways
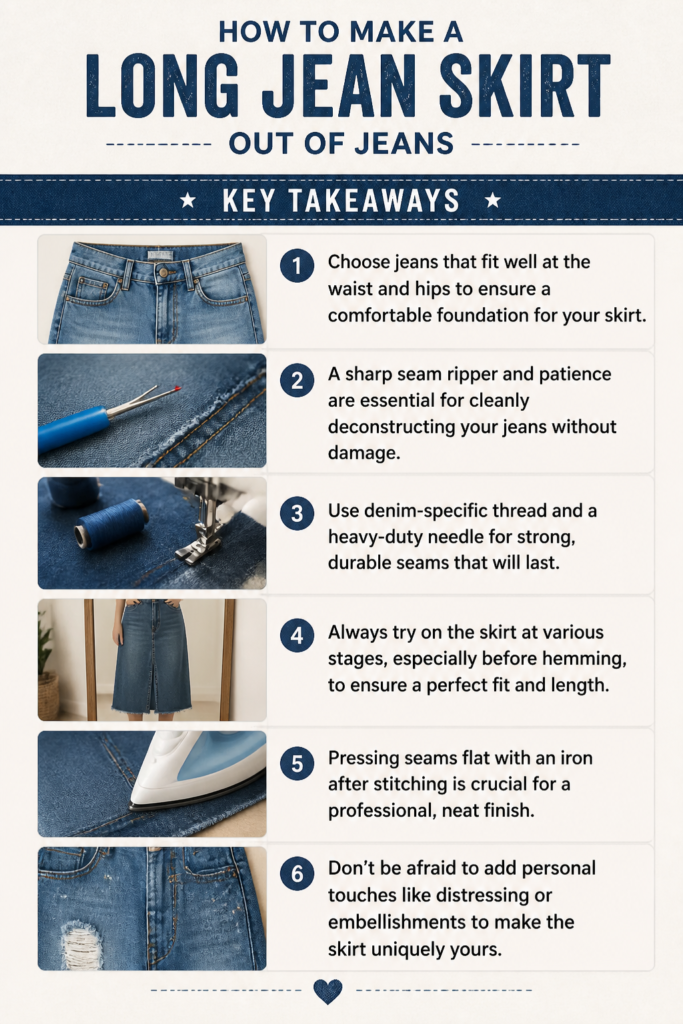
- Choose jeans that fit well at the waist and hips to ensure a comfortable foundation for your skirt.
- A sharp seam ripper and patience are essential for cleanly deconstructing your jeans without damage.
- Use denim-specific thread and a heavy-duty needle for strong, durable seams that will last.
- Always try on the skirt at various stages, especially before hemming, to ensure a perfect fit and length.
- Pressing seams flat with an iron after stitching is crucial for a professional, neat finish.
- Don’t be afraid to add personal touches like distressing or embellishments to make the skirt uniquely yours.
Frequently Asked Questions
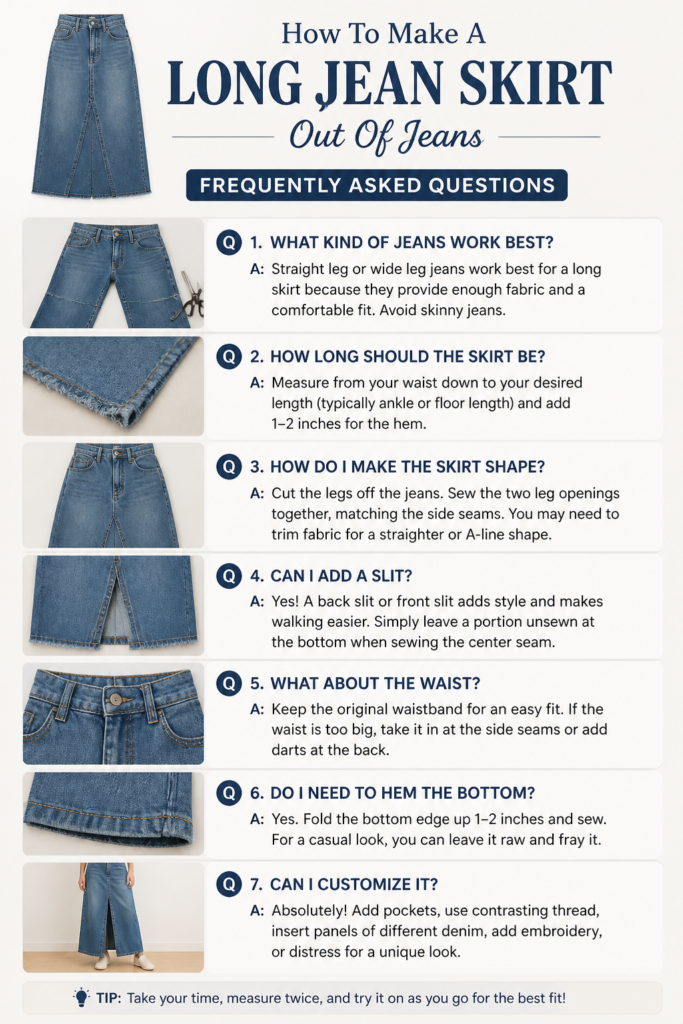
Can I make this skirt without a sewing machine?
While technically possible with hand-sewing, it would be extremely challenging and time-consuming. Denim is a very thick fabric, requiring strong, consistent stitches that are difficult to achieve by hand. A sewing machine with a denim needle is highly recommended for durability and ease.
What type of jeans work best for this project?
Straight-leg or bootcut jeans often work best because they provide ample fabric for the filler panels. Avoid super skinny jeans, as they might not yield enough material. Jeans with a medium to heavy weight denim are ideal for a good drape and structure.
How do I make the skirt longer than the original jeans?
If you want a truly maxi skirt and your jeans aren’t long enough, you can add an extra fabric panel at the bottom. This could be a contrasting denim or even a different type of fabric for a unique look. Just ensure you sew it securely and hem it neatly.
Can I use two different pairs of jeans for this project?
Absolutely! Using two different pairs of jeans, perhaps in contrasting washes, can create a very stylish, patchwork-inspired skirt. Just ensure the denim weights are similar enough so they sew together without too much difficulty.
Our Top Recommended Finds
- Heavy Duty Denim Needles: Essential for piercing thick denim without breaking or bending, ensuring smooth stitching.
- Strong Polyester Denim Thread: Specifically designed for denim, it provides superior strength and durability compared to all-purpose thread.
- Ergonomic Seam Ripper: A comfortable handle and sharp blade make the crucial deconstruction step much easier and less tiring.
Your Denim Design Journey Begins
You’ve now got all the knowledge and practical steps to transform those forgotten jeans into a stunning, one-of-a-kind long skirt.
This project is more than just sewing; it’s about giving new life to old favorites and creating something truly unique.
Take pride in your craftsmanship and enjoy the satisfaction of wearing a piece you made yourself. Why not start looking through your closet today?