🎨 How To Draw Body Poses Step By Step

& Painting
No rigid rules or pretension. Just practical guides, medium comparisons, and encouraging tips to help you enjoy the drawing & painting process.
Learning to draw dynamic and convincing body poses can feel like a huge challenge. I remember my early attempts, often resulting in stiff, lifeless figures that just didn’t convey the movement I imagined.
It was only by breaking down the human form into simpler components and understanding fundamental principles that my drawings truly started to move. This guide will walk you through the very same practical steps I used to transform my approach.
Quick Overview
Mastering body poses is an essential skill for any artist, from illustrators to comic creators. This guide will equip you with the foundational techniques to construct dynamic and anatomically sound figures from scratch.
- Time needed: 1-2 hours (for initial understanding, ongoing practice recommended)
- Difficulty: Beginner
- What you’ll need: Pencil, paper, eraser, and optional reference images
Step-by-Step Instructions
Step 1: Understand Basic Forms and Proportions
Begin by simplifying the human body into basic three-dimensional shapes. Think of the head as an oval, the rib cage as an egg or box, and the pelvis as a shield or box. This approach makes the complex human form manageable.
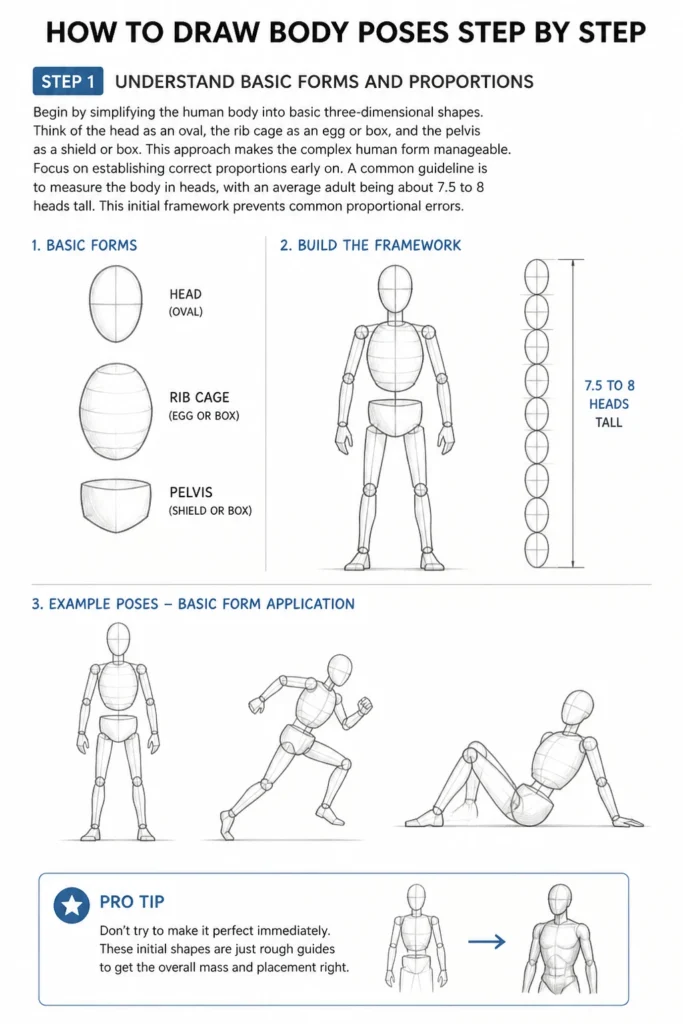
Focus on establishing correct proportions early on. A common guideline is to measure the body in “heads,” with an average adult being about 7.5 to 8 heads tall. This initial framework prevents common proportional errors.
Pro Tip: Don’t try to make it perfect immediately. These initial shapes are just rough guides to get the overall mass and placement right.
Step 2: Master the Line of Action
The line of action is perhaps the most crucial element for creating dynamic poses. It’s an imaginary line that flows through the main action of your pose, often following the spine or the dominant curve of the body.
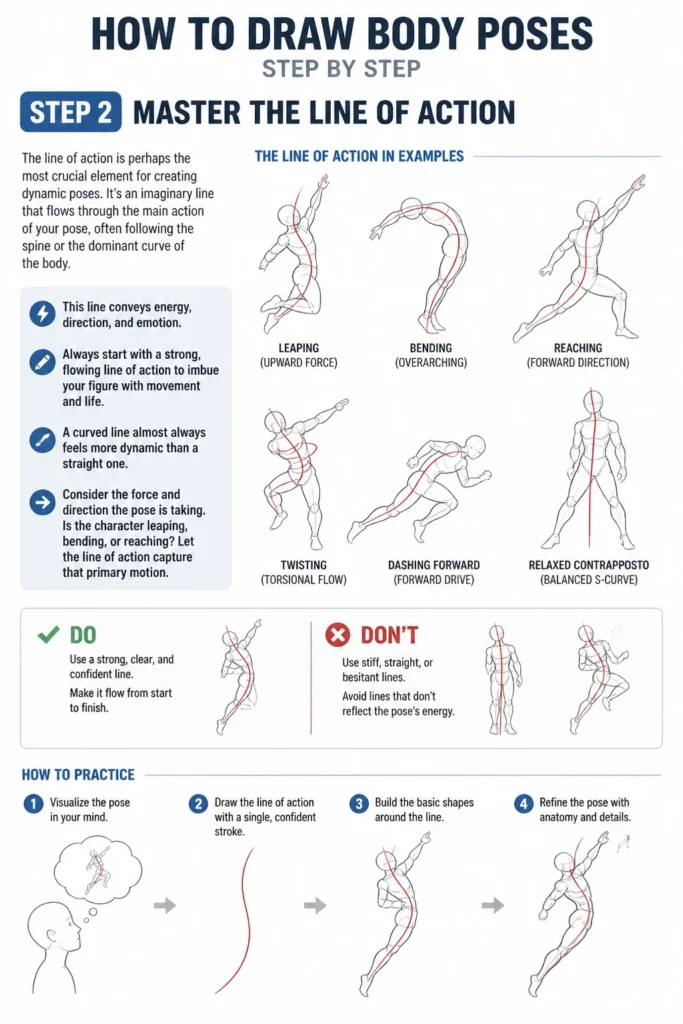
This line conveys energy, direction, and emotion. Always start with a strong, flowing line of action to imbue your figure with movement and life. A curved line almost always feels more dynamic than a straight one.
Consider the force and direction the pose is taking. Is the character leaping, bending, or reaching? Let the line of action capture that primary motion.
Step 3: Construct the Skeleton (Stick Figure)
Once you have your line of action, draw a simple stick figure skeleton over it. This acts as the structural foundation for your pose. Mark the joints clearly: shoulders, elbows, wrists, hips, knees, and ankles.
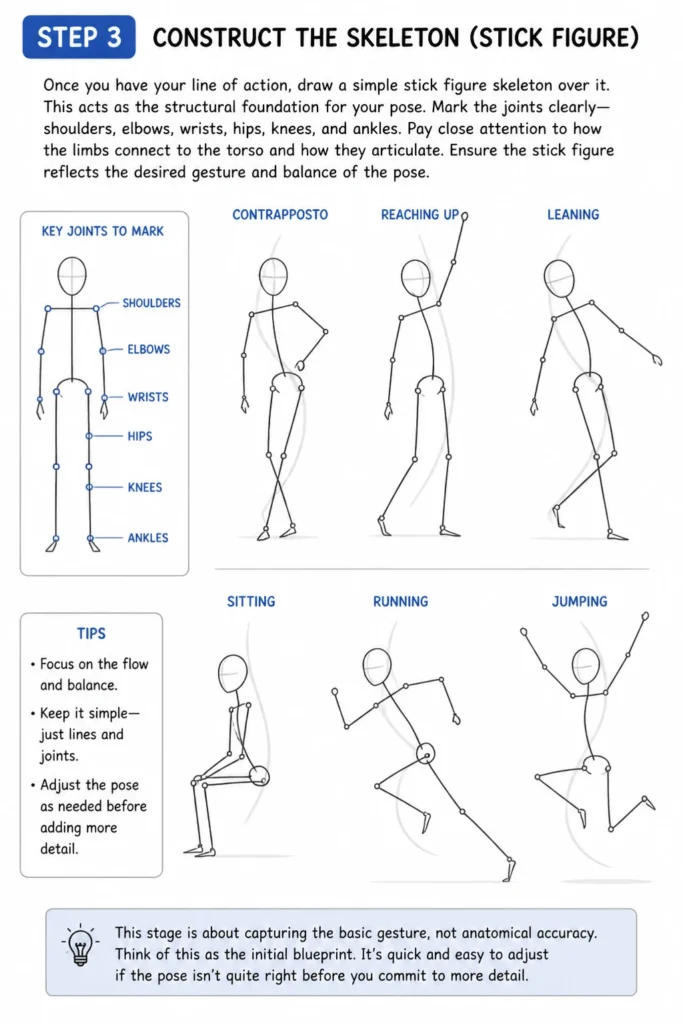
Pay close attention to how the limbs connect to the torso and how they articulate. Ensure the stick figure reflects the desired gesture and balance of the pose. This stage is about capturing the basic gesture, not anatomical accuracy.
Think of this as the initial blueprint. It’s quick and easy to adjust if the pose isn’t quite right before you commit to more detail.
Step 4: Build with Basic Shapes (Mannequinization)
Now, build volume onto your stick figure using those basic 3D shapes. Turn the head oval into a sphere or egg, the rib cage into a box or cylinder, and the pelvis into a slightly tilted box.
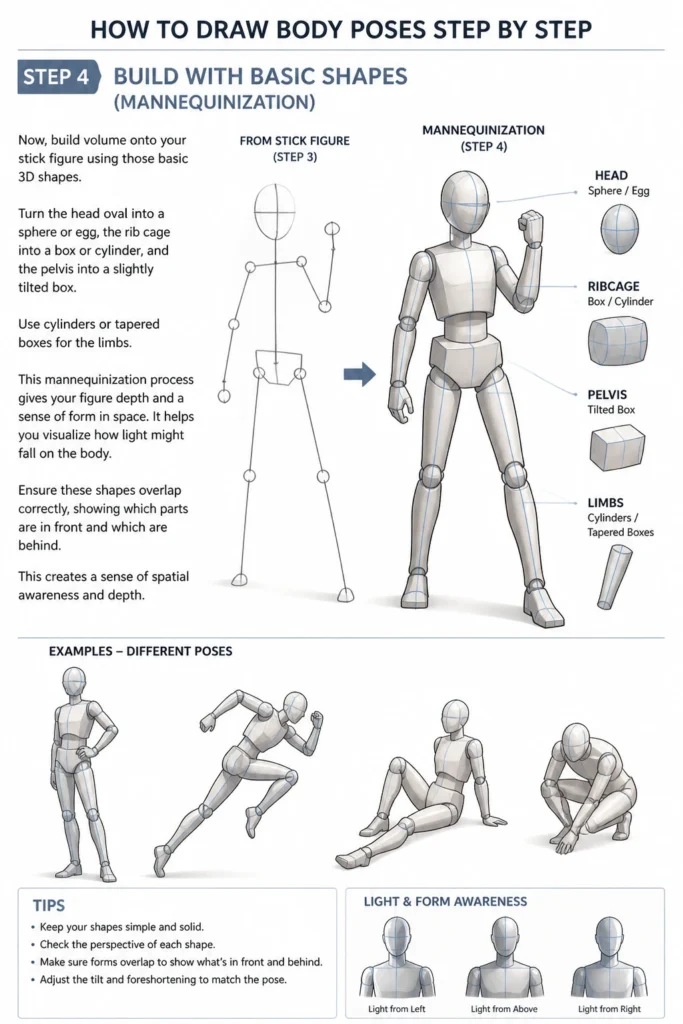
Use cylinders or tapered boxes for the limbs. This “mannequinization” process gives your figure depth and a sense of form in space. It helps you visualize how light might fall on the body.
Ensure these shapes overlap correctly, showing which parts are in front and which are behind. This creates a sense of spatial awareness and depth.
Step 5: Define Joints and Proportions
With the basic forms in place, refine the joints. Think of them as connecting spheres or hinges. The shoulders, elbows, and knees are key points of rotation and movement.
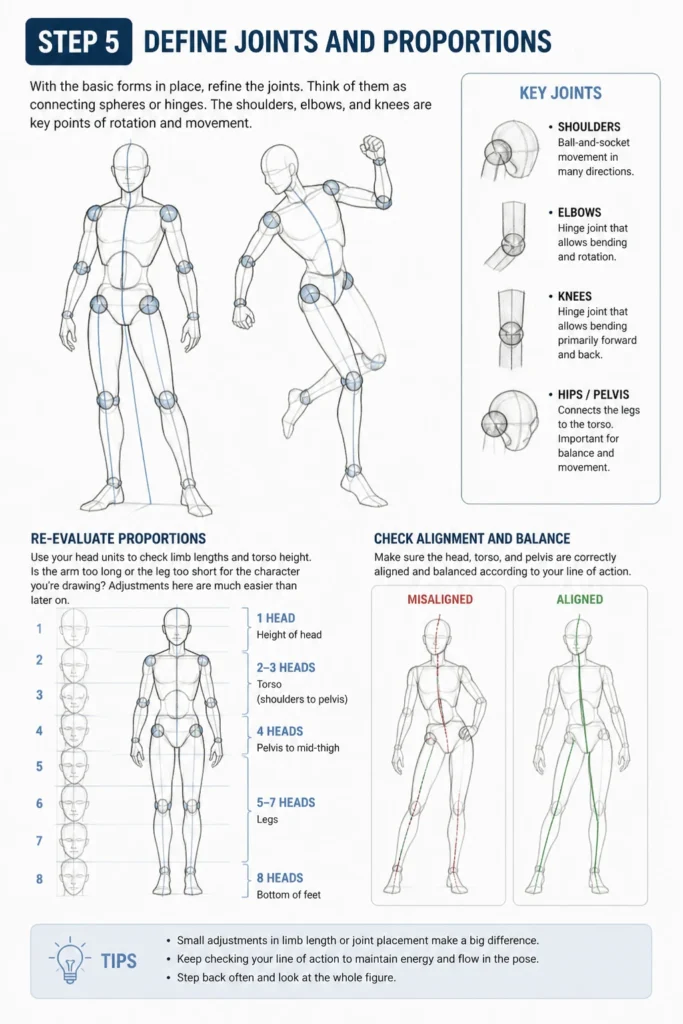
Re-evaluate your proportions at this stage. Use your “head units” to check limb lengths and torso height. Is the arm too long or the leg too short for the character you’re drawing?
Adjustments here are much easier than later on. Make sure the head, torso, and pelvis are correctly aligned and balanced according to your line of action.
Step 6: Refine the Anatomy and Musculature
Now, you can start to add more specific anatomical details over your basic shapes. Think about the major muscle groups and how they attach and flex in your chosen pose.
You don’t need to be an anatomy expert, but understanding the general placement of muscles like biceps, triceps, and quadriceps will make your figure look more believable. Observe how muscles stretch and compress with movement.
Draw lightly at first, building up the forms. Focus on the overall flow of the muscles rather than drawing every single fiber.
Step 7: Add Details and Clothing
Once the underlying pose and anatomy feel solid, you can start adding details. This includes facial features, hands, and feet. These elements often require their own dedicated study.
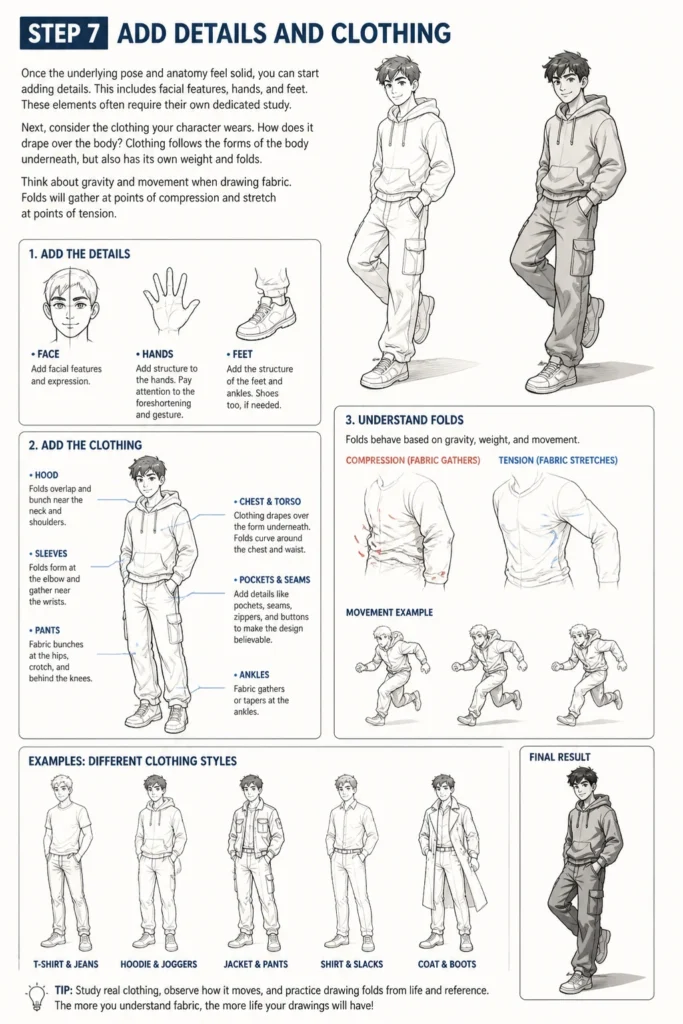
Next, consider the clothing your character wears. How does it drape over the body? Clothing follows the forms of the body underneath, but also has its own weight and folds.
Think about gravity and movement when drawing fabric. Folds will gather at points of compression and stretch at points of tension.
Step 8: Practice with References
Consistent practice with reference images is vital. Look at photos of people in various poses, use online pose databases, or even draw from life. Observing real bodies helps you understand how forms interact and move.
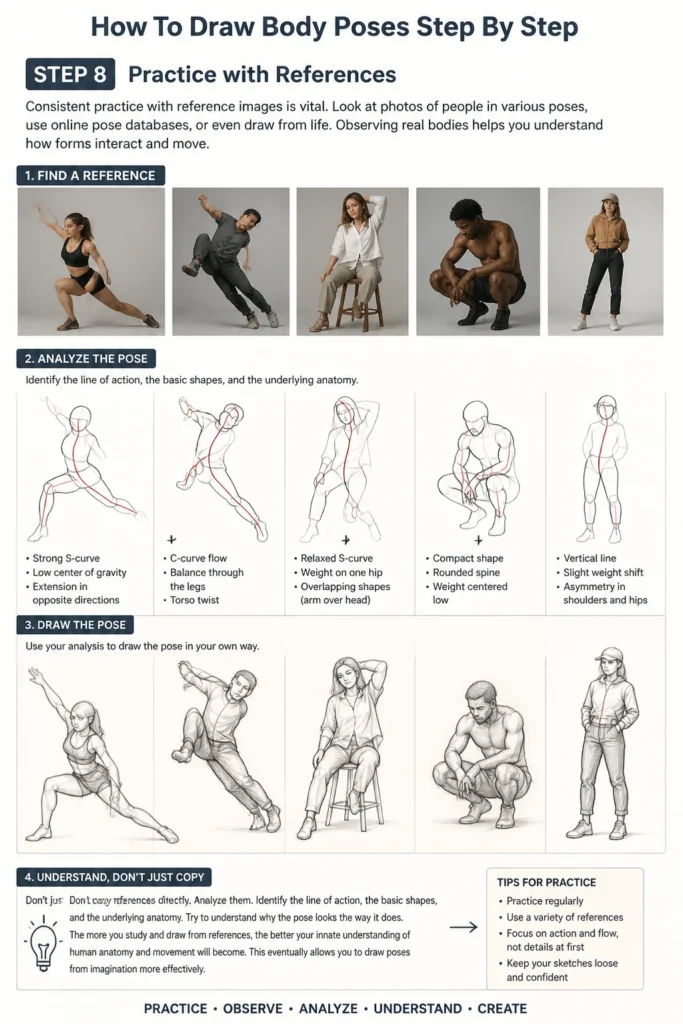
Don’t just copy references directly. Analyze them. Identify the line of action, the basic shapes, and the underlying anatomy. Try to understand why the pose looks the way it does.
The more you study and draw from references, the better your innate understanding of human anatomy and movement will become. This eventually allows you to draw poses from imagination more effectively.
Common Mistakes to Avoid
Stiff, Lifeless Poses
A common pitfall is drawing figures that look rigid and unnatural. This often stems from neglecting the line of action or relying too heavily on straight lines. Figures need a sense of flow and energy. Always start with a strong, curved line of action to guide your pose and inject dynamism.
Inaccurate Proportions
Many beginners struggle with getting body parts the right size relative to each other. This can make figures look distorted or awkward. The solution is to consistently use a “head unit” measurement system and check your proportions at every stage, especially during the stick figure and basic shapes phases.
Ignoring Weight Distribution
If your figure looks like it’s floating or about to fall over, you’re likely not considering weight distribution. Every pose, even a dynamic one, needs a sense of balance. Imagine a plumb line dropping from the figure’s center of gravity to the ground. This line should fall within the base of support.
Over-detailing Too Early
Jumping straight to muscles, fingers, and facial features before the underlying structure is sound is a recipe for frustration. You’ll end up with detailed mistakes. Always build your pose from general to specific: line of action, stick figure, basic shapes, then anatomy, and finally details.
Troubleshooting
My poses look flat or lack depth
This often happens when you draw the figure as if it’s perfectly flat on the page, without considering its three-dimensional form. Focus on using 3D shapes (boxes, cylinders) instead of flat shapes. Think about how limbs overlap and recede in space. Practice drawing figures from multiple angles to improve your spatial understanding.
I can’t get the proportions right, no matter what
If proportions are consistently off, it might be an issue with your initial measurements or how you’re applying them. Go back to basics: draw a simple head unit, then measure out 7-8 head lengths for the total height. Practice gesture drawing where you quickly block out proportions without getting bogged down in detail. Using a grid or even drawing a central axis can also help align elements.
My figures still look stiff, even with a line of action
Sometimes, a line of action alone isn’t enough if the individual limbs are still stiff. Exaggerate the curves in the spine and limbs more. Think about contrapposto, where the weight is shifted to one side, creating opposing curves in the shoulders and hips. Use more dynamic reference images and try to push the pose beyond what feels comfortable.
Key Takeaways
- Always start with a strong line of action to give your pose dynamism and energy.
- Break down the complex human body into simple 3D shapes like boxes, cylinders, and spheres.
- Use a “head unit” system to establish and check proportions throughout your drawing process.
- Build your figure from general forms to specific details, never the other way around.
- Consistent practice with various reference images is essential for improving your understanding of anatomy and movement.
- Don’t be afraid to make mistakes; they are crucial learning opportunities in your artistic journey.
Frequently Asked Questions
How long does it take to get good at drawing poses?
Mastering body poses is an ongoing journey that requires consistent practice. You can see significant improvement in a few months with dedicated effort, but true mastery takes years of observation and drawing. The key is regular, focused practice.
Do I need to know anatomy first to draw poses well?
You don’t need to be an expert anatomist to start drawing poses. A basic understanding of major muscle groups and skeletal landmarks is helpful, but the foundational steps of line of action, proportions, and basic shapes are more critical initially. You can build your anatomy knowledge gradually as you practice.
What kind of references should I use for drawing poses?
Excellent references include photographs of people in various actions, online pose databases (many are free), and even 3D poseable mannequins (physical or digital). Life drawing classes are also incredibly beneficial if available. Look for diverse body types and dynamic actions.
Can I use this method for different art styles, like manga or realism?
Absolutely. The principles of line of action, basic shapes, and proportions are universal fundamentals that apply to virtually all art styles, from highly stylized manga to realistic portraiture. Once you grasp these basics, you can adapt them to fit any aesthetic.
Our Top Recommended Finds
- Quality Sketchbook: A durable sketchbook with paper that can handle multiple layers and erasing without tearing is invaluable for daily practice.
- Graphite Pencil Set: A set ranging from hard (2H, H) for initial light lines to soft (2B, 4B, 6B) for shading and darker details provides versatility.
- Poseable Art Mannequin: A wooden or digital mannequin can be a fantastic tool for visualizing complex poses and understanding depth and foreshortening.
Your Artistic Journey Begins Now
Drawing dynamic body poses is a skill that will profoundly elevate your artwork. It allows you to tell stories, convey emotions, and bring your characters to life in compelling ways. Don’t let the complexity of the human form deter you.
Keep exploring different poses, challenge yourself with new angles, and maintain a dedicated sketch journal. The more you observe and practice, the more intuitive the process will become. Pick up your pencil today and start bringing your figures to life!
& Painting
No rigid rules or pretension. Just practical guides, medium comparisons, and encouraging tips to help you enjoy the drawing & painting process.