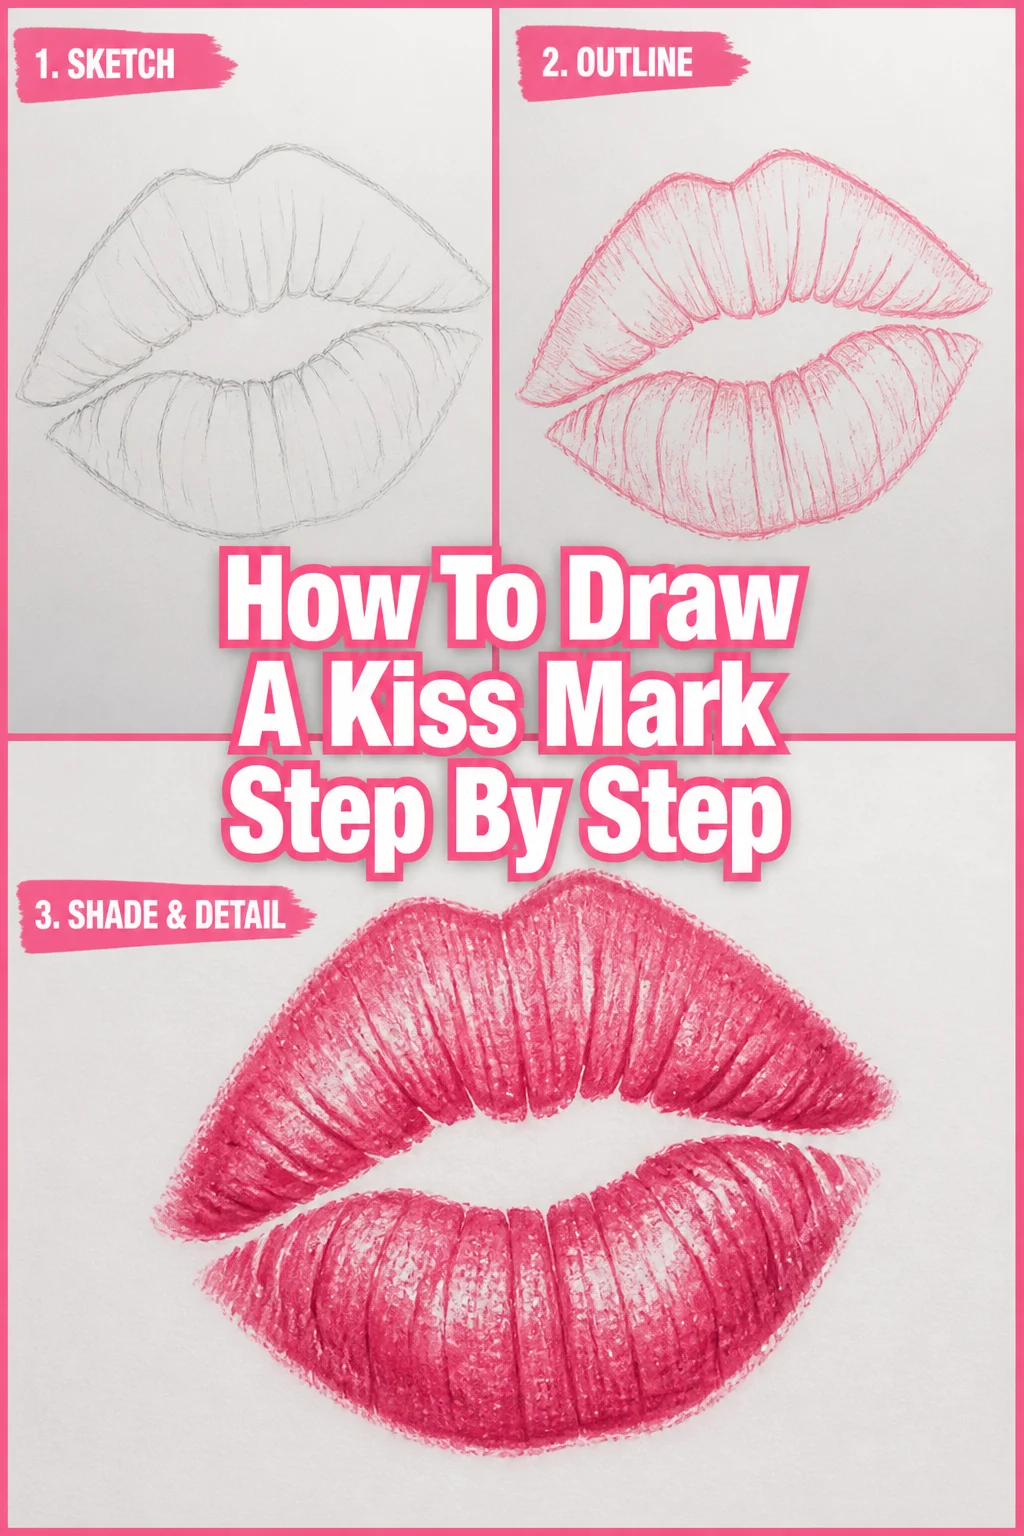
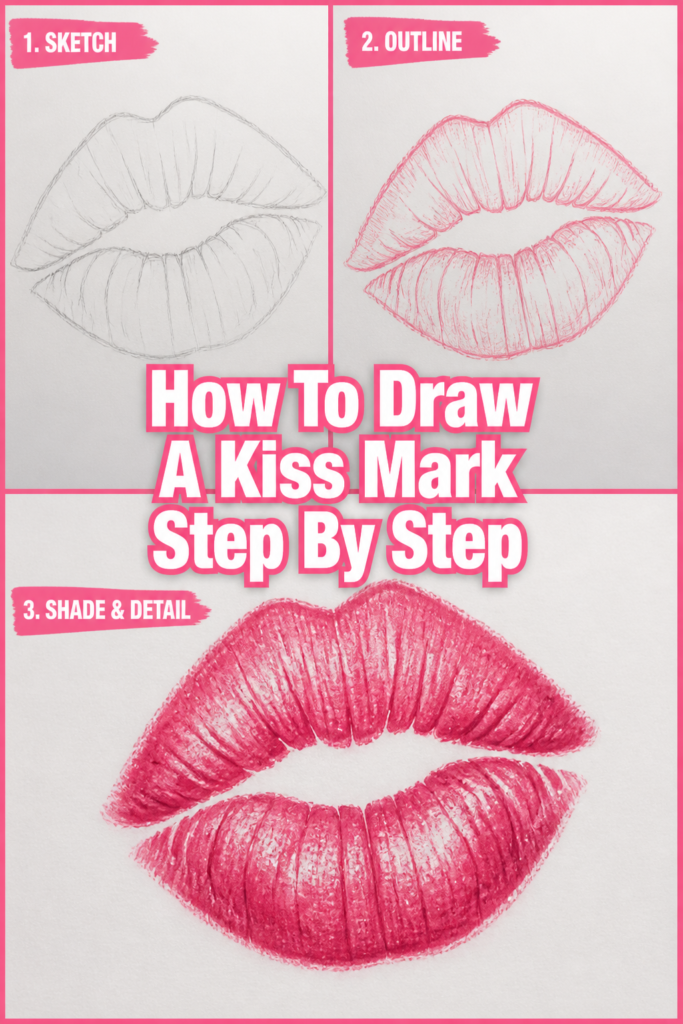
💋 How To Draw A Kiss Mark Step By Step
Have you ever wanted to add a playful, passionate touch to a greeting card, a note, or even a piece of art? A kiss mark is an iconic symbol that instantly conveys affection.
It’s surprisingly simple to create, once you understand the underlying shapes and textures. I’ve spent years breaking down complex drawings into easy-to-follow steps, and I’m excited to share this fun technique with you.
This guide will walk you through each stage, ensuring your drawing looks authentic and charming.
Quick Overview
Creating a convincing kiss mark involves a few simple shapes and an understanding of how lipstick transfers. You’ll master the iconic outline and add subtle details that bring it to life.
- Time needed: 15-30 minutes
- Difficulty: Beginner
- What you’ll need: Pencil (HB or 2B), paper, eraser, optional: red pen or marker
Step-by-Step Instructions
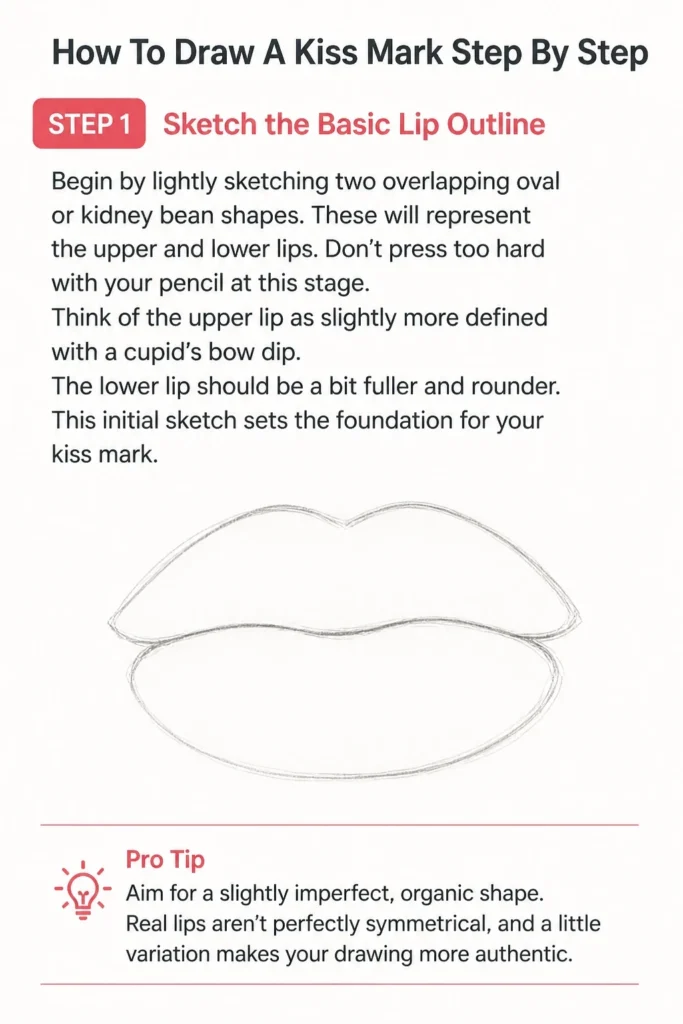
Step 1: Sketch the Basic Lip Outline
Begin by lightly sketching two overlapping oval or kidney bean shapes. These will represent the upper and lower lips. Don’t press too hard with your pencil at this stage.
Think of the upper lip as slightly more defined with a cupid’s bow dip. The lower lip should be a bit fuller and rounder. This initial sketch sets the foundation for your kiss mark.
Pro Tip: Aim for a slightly imperfect, organic shape. Real lips aren’t perfectly symmetrical, and a little variation makes your drawing more authentic.
Step 2: Define the Upper Lip’s Cupid’s Bow
Focus on the upper lip. Draw a distinct “M” shape, or a gentle curve that dips in the center, to form the cupid’s bow. This is a hallmark feature of a lip print.
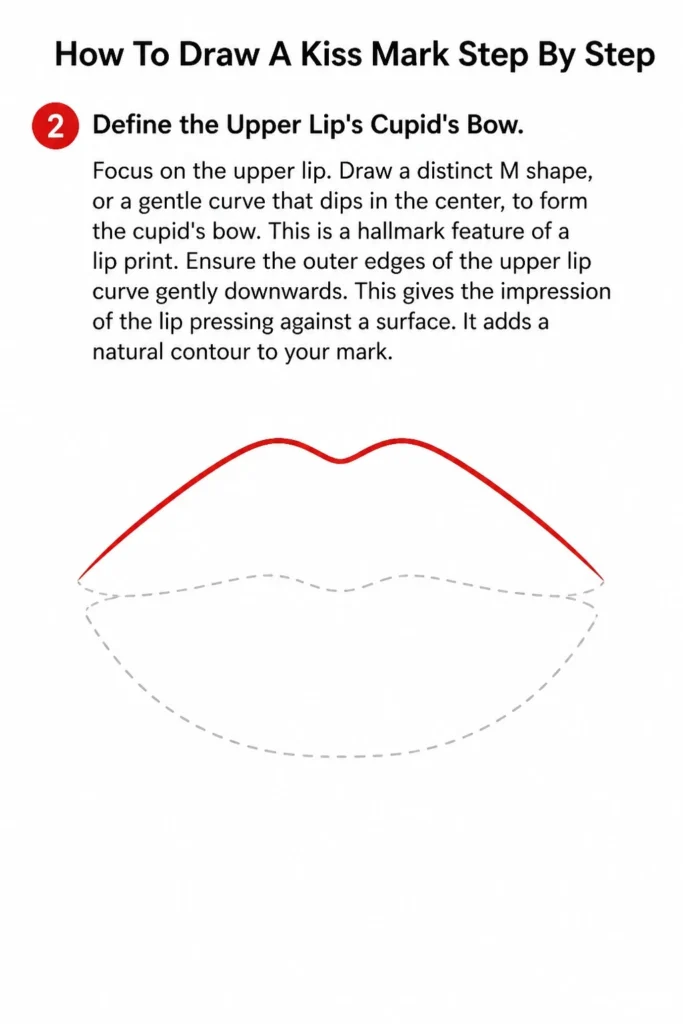
Ensure the outer edges of the upper lip curve gently downwards. This gives the impression of the lip pressing against a surface. It adds a natural contour to your mark.
Step 3: Shape the Lower Lip
Now, refine the lower lip’s outline. It should appear fuller and have a softer, more rounded curve compared to the upper lip. The edges should also gently curve inward.
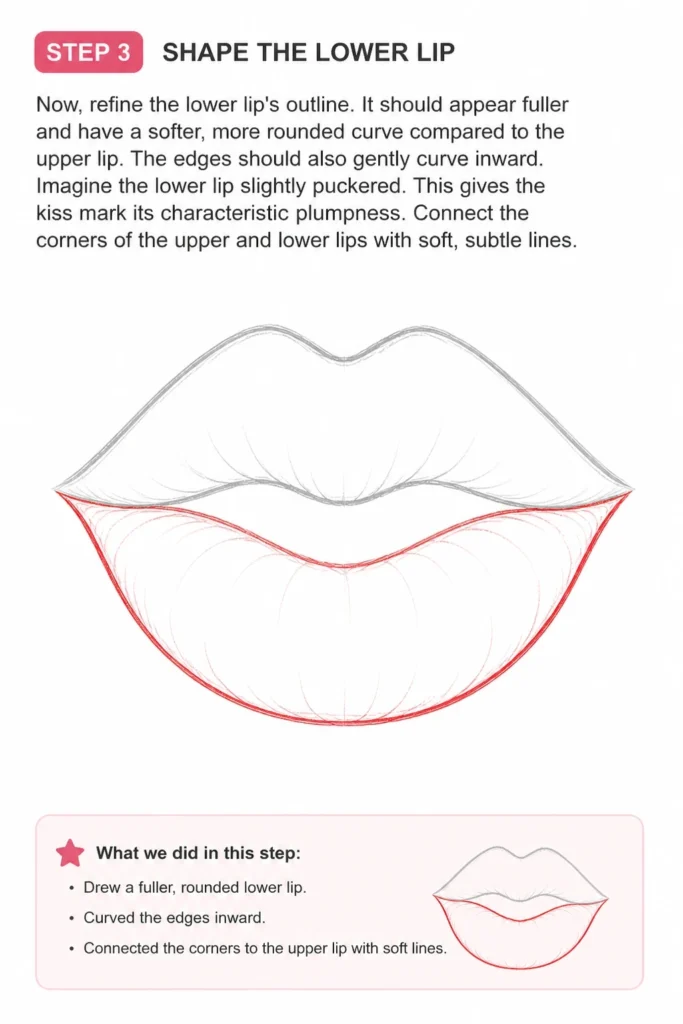
Imagine the lower lip slightly puckered. This gives the kiss mark its characteristic plumpness. Connect the corners of the upper and lower lips with soft, subtle lines.
Step 4: Create the Inner Lip Line
Draw a line that follows the general curve of the upper and lower lips, but slightly inside the main outline. This represents where the lips meet. It helps define the inner edge of the kiss.
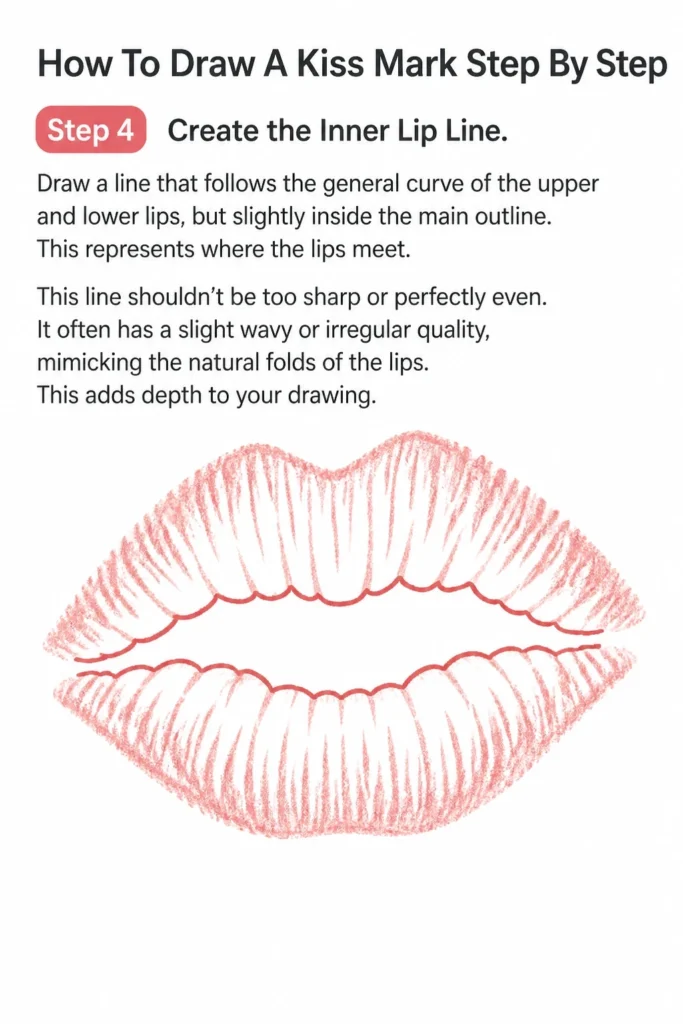
This line shouldn’t be too sharp or perfectly even. It often has a slight wavy or irregular quality, mimicking the natural folds of the lips. This adds depth to your drawing.
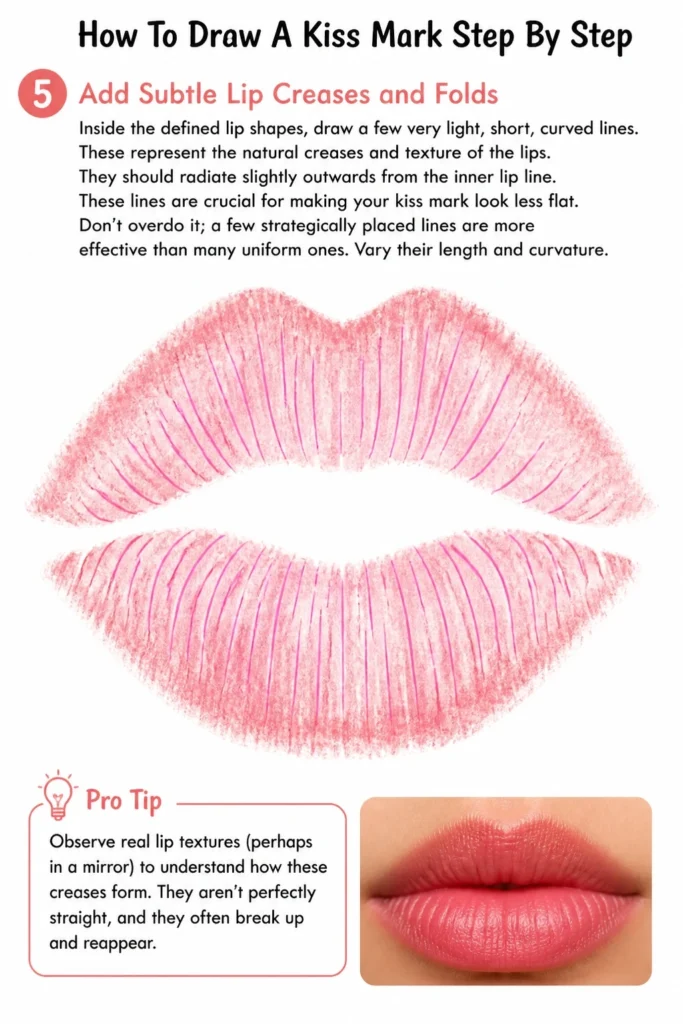
Step 5: Add Subtle Lip Creases and Folds
Inside the defined lip shapes, draw a few very light, short, curved lines. These represent the natural creases and texture of the lips. They should radiate slightly outwards from the inner lip line.
These lines are crucial for making your kiss mark look less flat. Don’t overdo it; a few strategically placed lines are more effective than many uniform ones. Vary their length and curvature.
Pro Tip: Observe real lip textures (perhaps in a mirror) to understand how these creases form. They aren’t perfectly straight, and they often break up and reappear.
Step 6: Introduce Smudges and Imperfections
A real kiss mark is rarely perfectly clean. Add a few light, smudged areas around the edges of the lips. These can be small, irregular blotches of color.
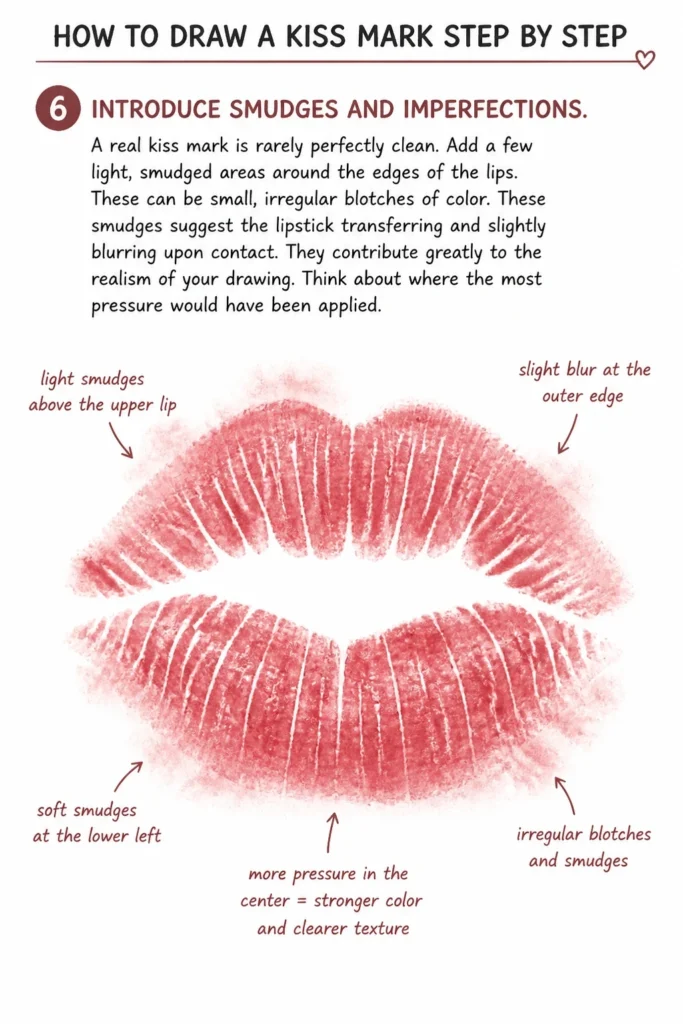
These smudges suggest the lipstick transferring and slightly blurring upon contact. They contribute greatly to the realism of your drawing. Think about where the most pressure would have been applied.
Step 7: Erase Unnecessary Guide Lines
Carefully erase any initial sketch lines or overlapping guides that are no longer needed. You want to leave only the strong, defined lines of your kiss mark. Use a kneaded eraser for precision if you have one.
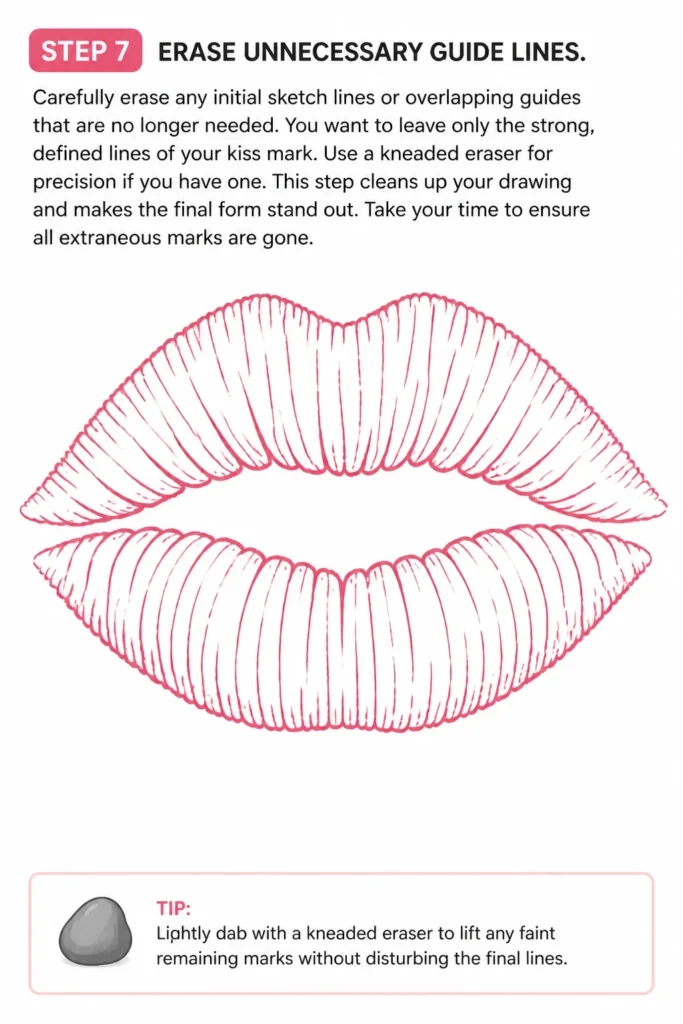
This step cleans up your drawing and makes the final form stand out. Take your time to ensure all extraneous marks are gone.
Step 8: Add Color (Optional) and Refine
If you’re using color, now is the time to apply it. A vibrant red or deep pink is typical for a kiss mark. Fill in the entire shape evenly with your chosen color.
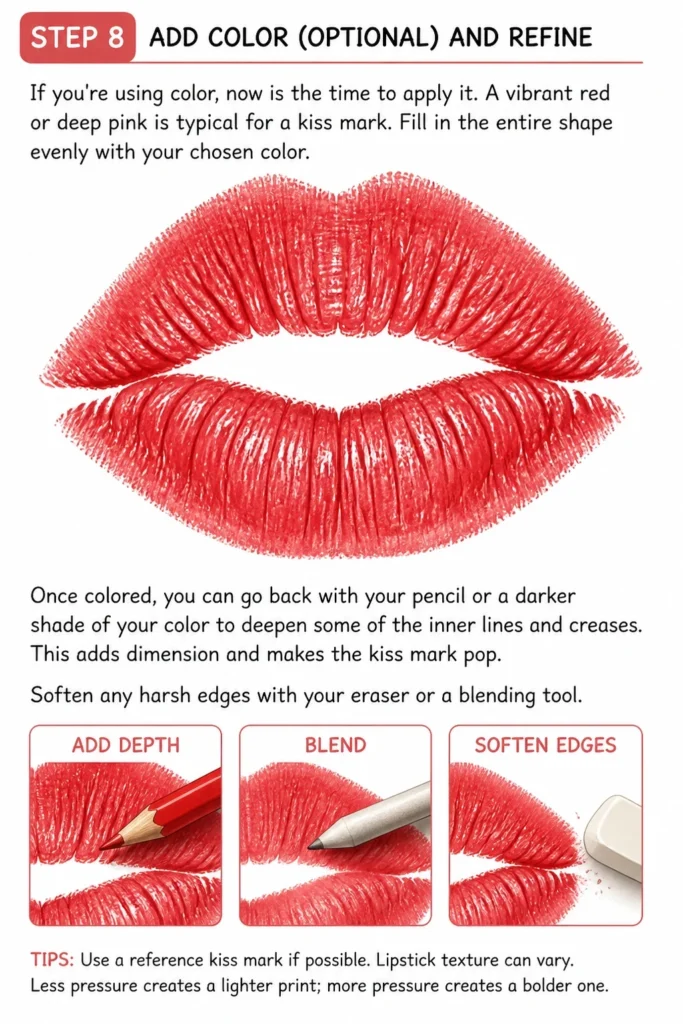
Once colored, you can go back with your pencil or a darker shade of your color to deepen some of the inner lines and creases. This adds dimension and makes the kiss mark pop. Soften any harsh edges with your eraser or a blending tool.
Common Mistakes to Avoid
Making the Lips Too Symmetrical
Many beginners try to draw a perfectly symmetrical kiss mark, like a mirrored image. Real lips, and the marks they leave, are often slightly asymmetrical. This attempt at perfection can make the drawing look stiff and unnatural.
Instead, embrace slight variations in the curves and sizes of the upper and lower lips. Allow for a more organic flow, which will give your kiss mark a more authentic and charming appearance. A little imperfection adds character.
Forgetting Inner Lip Details
Just drawing the outer outline of the lips often results in a flat, unconvincing shape. The inner line where the lips meet, and the subtle creases within the lips, are vital. Without these, the mark lacks depth and realism.
Always include a distinct inner lip line and a few radiating, light creases. These details provide the necessary texture and dimension, making it clear that this is a pressed lip print, not just an abstract shape.
Overdoing Smudges and Texture
While smudges and texture are important for realism, it’s easy to go overboard. Too many smudges can make the kiss mark look messy or ill-defined, losing its iconic shape. Too many harsh crease lines can make the lips look wrinkled rather than soft.
Apply smudges sparingly, focusing on the outer edges and areas of potential pressure. For creases, use very light, broken lines rather than dark, continuous ones. Subtlety is key for a convincing effect.
Drawing Sharp, Hard Edges
Kiss marks are made from soft, fleshy lips pressing against a surface. If you draw with very sharp, hard, and unbroken outlines, the mark will look rigid and artificial. It won’t convey the softness of a lip print.
Use softer pencil strokes for the initial outlines and avoid pressing too hard. When refining, ensure edges have a slight softness or subtle blur, especially in the smudged areas. This mimics the natural transfer of lipstick.
Troubleshooting
My Kiss Mark Looks Flat
If your kiss mark appears two-dimensional and lacks depth, it’s likely missing crucial internal details. The absence of an inner lip line or subtle creases will make it look like a simple silhouette.
Go back and add the distinct inner line where the upper and lower lips meet. Introduce a few light, short, curved lines radiating from this inner line to suggest lip texture. These elements create the illusion of volume.
The Shape Doesn’t Look Like Lips
Sometimes the initial outline might resemble a generic blob rather than a recognizable lip shape. This usually happens when the distinctive features of the upper and lower lips aren’t emphasized.
Focus on the cupid’s bow for the upper lip – that clear “M” shape. For the lower lip, ensure it’s rounder and fuller than the upper. Clearly define the corners where the lips meet. These specific contours will instantly make it look like a lip print.
It Looks Too Messy or Unclean
If your drawing has too many smudges or stray marks, it can lose its intended charm and look more like a stain. This often occurs from applying too much pressure with the pencil or over-smudging.
Use your eraser to carefully clean up any excessive smudges, especially those that detract from the main lip shape. Be more selective with your smudges, placing them strategically at the edges. Practice lighter pencil pressure for initial sketches.
Key Takeaways
- Start with basic shapes: Overlapping ovals form the foundation of your kiss mark.
- Define key features: The cupid’s bow and the fuller lower lip are essential for recognition.
- Add internal details: An inner lip line and subtle creases provide crucial depth and texture.
- Embrace imperfections: Light smudges and slight asymmetry make the mark look more authentic.
- Use light pressure: Begin with gentle pencil strokes and gradually build up definition.
- Refine and color: Erase guide lines and add color for a polished, vibrant finish.
Frequently Asked Questions
What’s the best color for a kiss mark?
Traditionally, a vibrant red or a deep pink is most commonly associated with a kiss mark. These colors evoke feelings of passion and affection. However, you can experiment with any color that fits your creative vision or the context of your drawing.
How can I make the kiss mark look more “wet” or glossy?
To achieve a glossy effect, leave a few small, uncolored highlights within the colored area. These bright spots mimic reflections on a shiny surface. You can also use a white gel pen over your color for extra sparkle.
Should I draw the teeth or tongue?
No, a typical kiss mark is an impression left by the lips, specifically the outer edges and texture. Including teeth or a tongue would transform it into a different kind of drawing, like an open mouth, rather than a simple lip print. Keep the focus on the lips themselves.
Can I draw a kiss mark from a side angle?
Absolutely! A side-angle kiss mark would appear more elongated and less symmetrical. You would still define the cupid’s bow and lower lip fullness, but they would be foreshortened. The smudges might be more pronounced on the side pressed against the surface.
Our Top Recommended Finds
- Sketching Pencils Set: A good set with varying lead hardness (HB, 2B, 4B) allows for different line weights and shading. This range helps create subtle textures and darker lines.
- Kneaded Eraser: Unlike standard erasers, a kneaded eraser can be molded to a fine point for precise cleanup without damaging the paper. It’s excellent for lifting graphite gently.
- Red or Pink Fineliner Pens: For adding vibrant, clean color to your kiss mark, a good quality fineliner pen provides smooth, consistent ink flow. It helps achieve that classic bold lipstick look.
Your Creative Journey Awaits
You’ve just walked through all the steps to create a charming and realistic kiss mark. This simple symbol is a fantastic way to add personality and warmth to so many projects. It’s a testament to how small details can make a big impact.
Don’t stop here! Try drawing kiss marks of different sizes, in various colors, or even slightly overlapping. Practice makes perfect, and each attempt builds your confidence. Grab your tools and start drawing your next lovely creation today!