🎨 How To Draw Disney Characters Step By Step Easy
Drawing Disney characters might seem like a magical skill reserved for animation legends. Yet, anyone can learn to bring these beloved figures to life on paper. I remember starting with wobbly circles and feeling intimidated by their iconic expressions.
This guide will show you how simple it can be. You’ll discover the core techniques that make Disney characters so recognizable. Get ready to create your own enchanting art.
Quick Overview
This guide will walk you through the foundational steps of drawing Disney characters. You’ll learn how to break down complex designs into simple shapes. By the end, you’ll have the confidence to tackle many of your favorite characters.
Time needed: 1-2 hours for a first attempt, ongoing practice for mastery
Difficulty: Beginner
What you’ll need: Pencil (HB or 2B), eraser, paper, reference images of your chosen character
Step-by-Step Instructions
Step 1: Gather Your Tools and Reference
Before you even touch a pencil, make sure you have everything ready. A good setup makes the drawing process much smoother. This initial preparation saves time and frustration later on.
Choose a Disney character you genuinely love. Find several clear reference images of them in different poses and expressions. Having multiple angles helps you understand their form better.
Pro Tip: Don’t just pick one image. Look for character sheets or turnaround references if possible. These show the character from various sides, which is invaluable.
Step 2: Start with Basic Shapes and Proportions
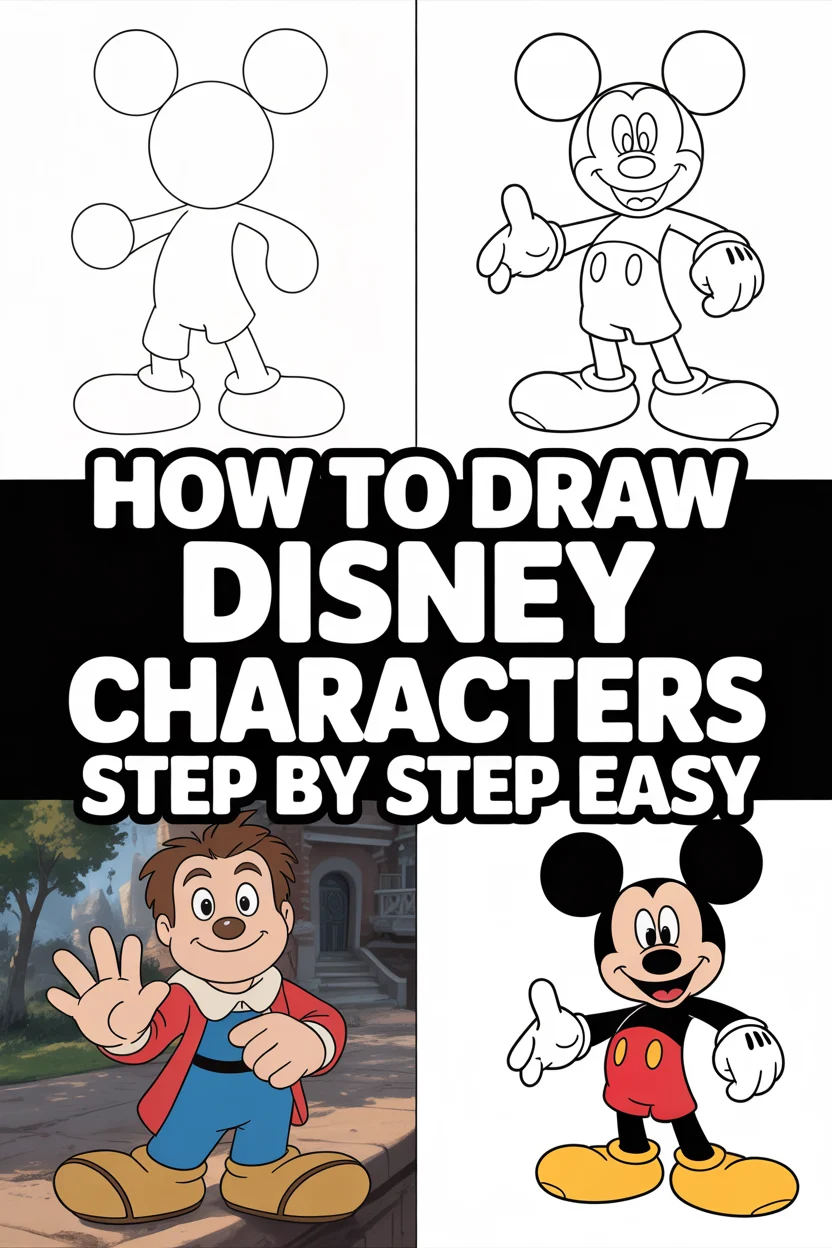
Every Disney character, no matter how intricate, is built upon simple geometric forms. Think circles, ovals, squares, and triangles. These are your foundational building blocks.
Lightly sketch the main head shape first. Is it a perfect circle, an elongated oval, or something more unique? Then, add guidelines for the eyes, nose, and mouth. These lines help ensure symmetry and correct placement.
Next, block out the torso and limbs using simple shapes. An oval for the chest, a rectangle for the waist, and cylinders for arms and legs work wonders. Focus on getting the overall size and placement right relative to the head.
Don’t press hard with your pencil. These lines are merely guides and will be erased later. Keep them faint and loose. This allows for easy adjustments without leaving indents on your paper.
Step 3: Define the Character’s Pose and Action Line
Disney characters are known for their lively and expressive poses. An “action line” or “line of appeal” is an invisible curve that runs through the character, conveying motion and energy. It gives your drawing dynamism.
Look at your reference image and identify this underlying curve. Lightly draw it through your basic shapes. This line dictates the flow of the character’s body.
Adjust your initial basic shapes to follow this action line. If the character is leaning, ensure your circles and ovals reflect that lean. This step is crucial for capturing their personality.
Think about the character’s weight distribution. Where are they putting their weight? How does that affect their posture? Even simple poses have an underlying balance.
Step 4: Refine the Outline and Add Facial Features
Now it’s time to connect those basic shapes and start forming the actual character’s body. Begin to draw smoother, more accurate lines over your initial sketches. This is where the character truly starts to emerge.
Carefully observe the curves and angles in your reference. Pay attention to how the shoulders connect to the arms, or how the neck flows into the head. These details make a big difference.
Move on to the face, which is often the most expressive part of a Disney character. Use your guidelines to place the eyes, nose, and mouth. Disney eyes are typically large and expressive, often with thick lashes for female characters.
Sketch the eyebrows, which are critical for conveying emotion. A slight change in eyebrow angle can completely alter a character’s mood. Practice different expressions.
Pro Tip: When drawing eyes, remember they are spheres. This understanding helps you give them depth and ensures they look natural within the eye sockets, even in a stylized Disney way.
Step 5: Detail the Hair, Clothing, and Accessories
Hair in Disney animation often has a distinctive, flowing quality. Don’t draw individual strands initially. Instead, think of hair in large, stylized masses or “chunks.”
Sketch the overall shape of the hair, following its natural movement and volume. Then, add smaller lines within these masses to suggest texture and individual locks. Think about how light would hit it.
Next, focus on clothing. Disney clothing often has simple, clear folds that suggest movement without being overly complex. Don’t overdo the wrinkles; focus on the main folds that define the garment’s shape.
Add any accessories like bows, hats, jewelry, or props. These small details contribute significantly to the character’s identity and story. Ensure they are proportionate to the character.
Step 6: Ink Your Drawing (Optional but Recommended)
Inking, or outlining your drawing with a darker pen, gives it a clean, finished look. This step is where your drawing truly pops off the page. It makes your lines crisp and permanent.
Choose a fine-tip pen or marker. Carefully trace over your refined pencil lines. Try to make your lines smooth and confident. Varying line weight (thicker lines for outlines, thinner for internal details) can add depth.
Once the ink is completely dry, use your eraser to gently remove all the underlying pencil lines. Be patient and thorough. The clean lines will reveal your character beautifully.
Pro Tip: Use a light box if you have one. You can trace your pencil drawing onto a fresh sheet of paper, allowing you to make a perfectly clean ink drawing without erasing.
Step 7: Add Color and Shading (Optional)
Color brings your Disney character to life. Refer to your original images for accurate color palettes. Disney characters have very specific and iconic colors.
You can use colored pencils, markers, watercolors, or digital tools. Start with flat base colors, filling in each section evenly. This creates a solid foundation.
Once the base colors are down, add shading to give your character dimension. Observe where the light source is hitting the character in your reference. Shadows will fall on the opposite side.
Think about highlights too. A small, bright highlight in the eyes or on shiny surfaces can add sparkle and life. Practice blending colors for smoother transitions.
Step 8: Practice and Experiment
Drawing is a skill that improves with consistent practice. Don’t expect perfection on your first try. Every artist started somewhere.
Try drawing different Disney characters. Each one presents unique challenges and learning opportunities. Experiment with various poses and expressions.
Don’t be afraid to make mistakes. They are valuable learning experiences. The more you draw, the more comfortable you’ll become with the process and the better your results will be.
Common Mistakes to Avoid
Not Using Reference Images Enough
Many beginners try to draw characters from memory alone. While impressive, this often leads to inaccuracies in proportions, details, and expressions. Disney characters have very specific design rules. Always keep a reference image handy, even if you think you know the character well. It helps you capture their true likeness and avoid generic interpretations.
Pressing Too Hard Initially
Starting with dark, heavy lines makes it difficult to erase mistakes or make adjustments. This can lead to messy drawings with visible indentations. Always begin with very light, loose pencil strokes. These are your exploratory lines. You can always darken them later once you are confident in your shapes and proportions.
Ignoring Basic Shapes and Proportions
Jumping straight into details like eyes or hair without first establishing the underlying structure is a common pitfall. This often results in characters that look “off” or disproportionate. Spend ample time on the foundational circles, ovals, and lines. These simple shapes are the skeleton of your drawing and ensure everything is correctly placed and sized before you add the finer elements.
Rushing the Process
Drawing takes patience. Rushing through steps, especially the initial sketching and refining phases, can lead to frustration and a less polished final product. Take your time with each stage. Focus on accuracy and clean lines. If you feel yourself getting impatient, take a short break and come back with fresh eyes. Enjoy the journey of creation.
Troubleshooting
My Lines Look Wobbly and Uneven
This is a very common issue for beginners. It often stems from trying to draw long lines with your wrist. Instead, try to draw lines using your whole arm. Practice drawing long, sweeping strokes on a separate piece of paper. Additionally, try to draw lines quickly and confidently rather than slowly and hesitantly. Overlap lines lightly if you need to, then choose the best one.
My Character’s Proportions Seem Off
Proportional issues usually happen when the initial basic shapes aren’t accurate or when you rush the early stages. Go back to Step 2 and carefully re-evaluate your basic circles and ovals. Compare them directly to your reference image. Are the head, torso, and limb sizes correct relative to each other? Use a ruler or your pencil to measure distances on your reference and transfer those ratios to your drawing. Don’t be afraid to erase and redraw.
I Can’t Get the Character’s Expression Right
Facial expressions are subtle and can be tricky. Often, the issue lies in the placement and angle of the eyebrows and mouth. Study your reference image’s face very closely. Pay attention to the distance between the eyes and eyebrows, the curve of the mouth, and even the shape of the pupils. Sometimes, just a slight adjustment to an eyebrow angle can dramatically change the emotion. Practice drawing just the character’s face multiple times.
I Feel Discouraged and My Drawings Don’t Look Like Disney
It’s completely normal to feel this way. Disney artists train for years! Remember that drawing is a skill, not an innate talent. Every attempt, even one you’re not happy with, is a learning opportunity. Focus on small improvements rather than perfection. Try simplifying your goals: maybe just focus on getting the head shape right in one session, or the eyes in another. Consistency and patience will lead to progress.
Key Takeaways
Start every drawing with light, basic geometric shapes to establish proportions.
Always use multiple reference images to understand the character’s design.
Focus on the “action line” to give your character dynamic and lively poses.
Refine your lines gradually, moving from loose sketches to clean outlines.
Practice regularly and don’t be afraid to make mistakes; they are part of learning.
Patience is key; take your time with each step of the drawing process.
Frequently Asked Questions
Is it easier to draw classic Disney characters or modern ones?
Generally, classic Disney characters like Mickey Mouse or Snow White might seem simpler due to their less complex designs and fewer intricate details. Modern characters often have more complex hair, clothing, and subtle facial expressions. However, the foundational principles of drawing them remain the same, so choose whichever character inspires you most.
How can I make my Disney characters look more “on model”?
To make your characters look “on model,” meticulous observation of reference images is crucial. Pay extreme attention to proportions, the unique shapes of their features (eyes, nose, mouth), and their specific color palette. Even a slight deviation can make them look off. Practice tracing over official art to internalize their shapes.
Should I draw digitally or traditionally?
Both digital and traditional methods have their advantages. Traditional drawing with pencil and paper is excellent for developing foundational skills and hand-eye coordination. Digital drawing offers undo functions, layers, and a wide range of brushes, which can be very forgiving and allow for easy experimentation. Choose the method that feels most comfortable and accessible to you.
How long does it take to get good at drawing Disney characters?
The time it takes varies greatly from person to person. With consistent practice (even just 15-30 minutes a few times a week), you can see significant improvement in a few months. Mastery, however, is an ongoing journey that can take years. The key is to enjoy the process and celebrate your progress, no matter how small.
Our Top Recommended Finds
Sketchbook with smooth paper: A good quality sketchbook prevents pencil lines from bleeding or indenting too deeply. Look for paper that holds up well to erasing.
Assorted pencil set (HB, 2B, 4B): Having a range of pencil hardness allows you to sketch lightly, refine lines, and add darker details with ease.
Kneaded eraser: This type of eraser is gentle on paper and can lift pencil marks without smudging or damaging your drawing surface. It’s excellent for making light adjustments.
Your Disney Art Adventure Awaits
You now have the tools and knowledge to start drawing your favorite Disney characters. The magic isn’t just in the finished product; it’s in the joy of creating. Each line you draw brings you closer to mastering this delightful art form.
Don’t wait for the perfect moment. Grab your pencil and paper right now. Let your imagination soar and bring those beloved characters to life. The world of Disney art is yours to explore!