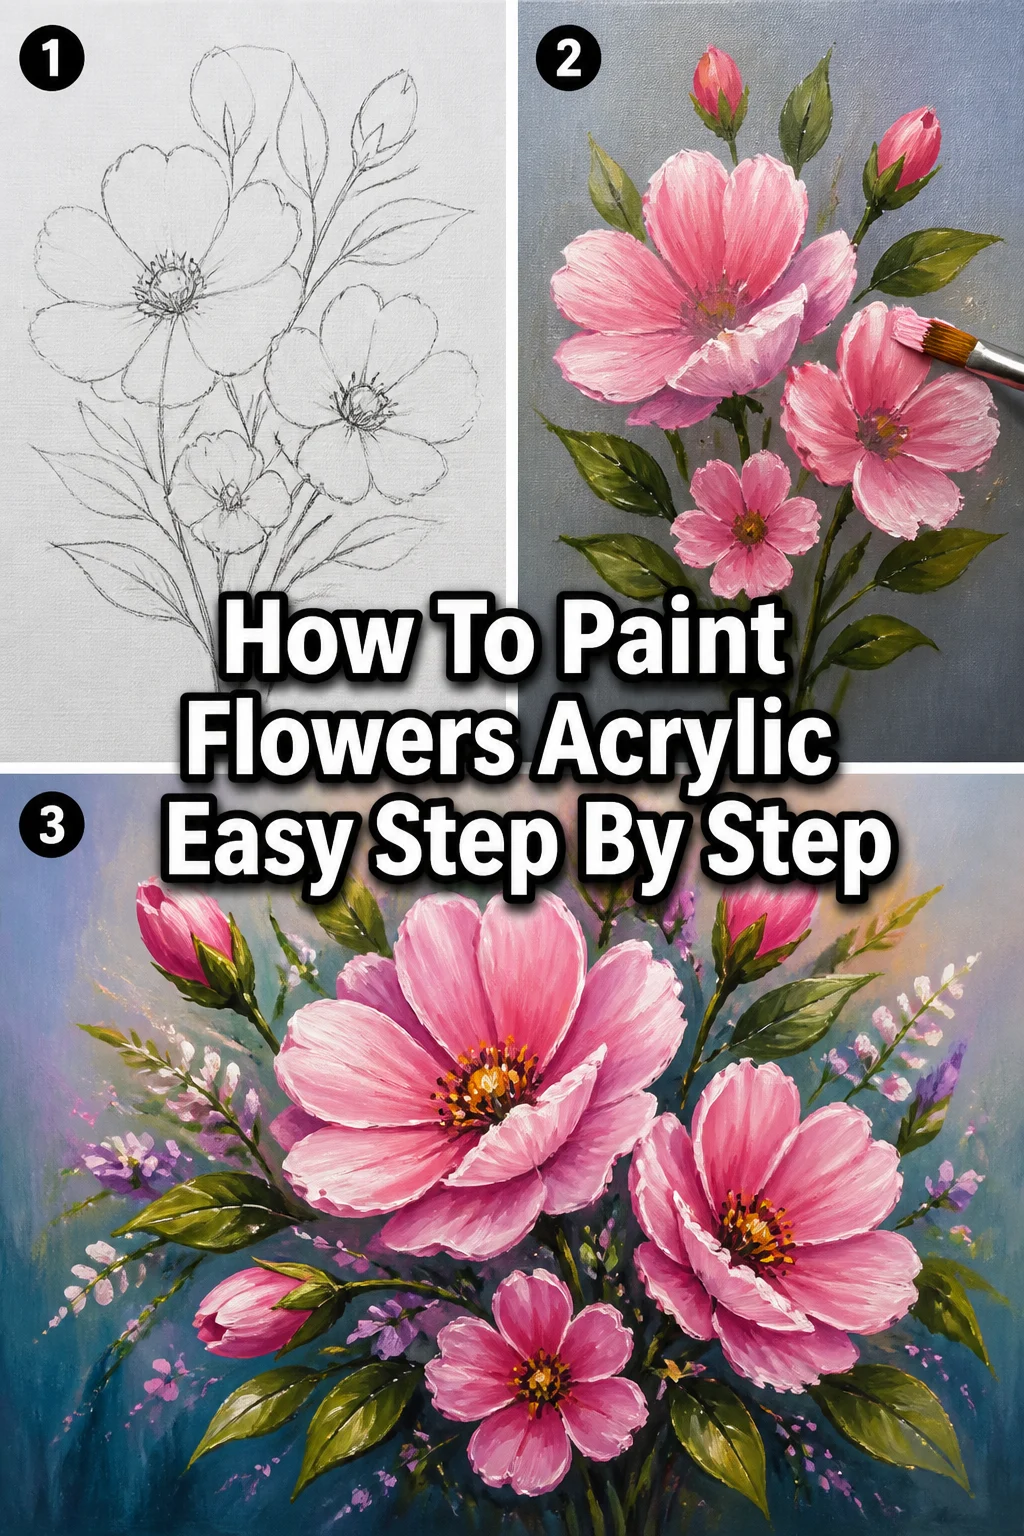
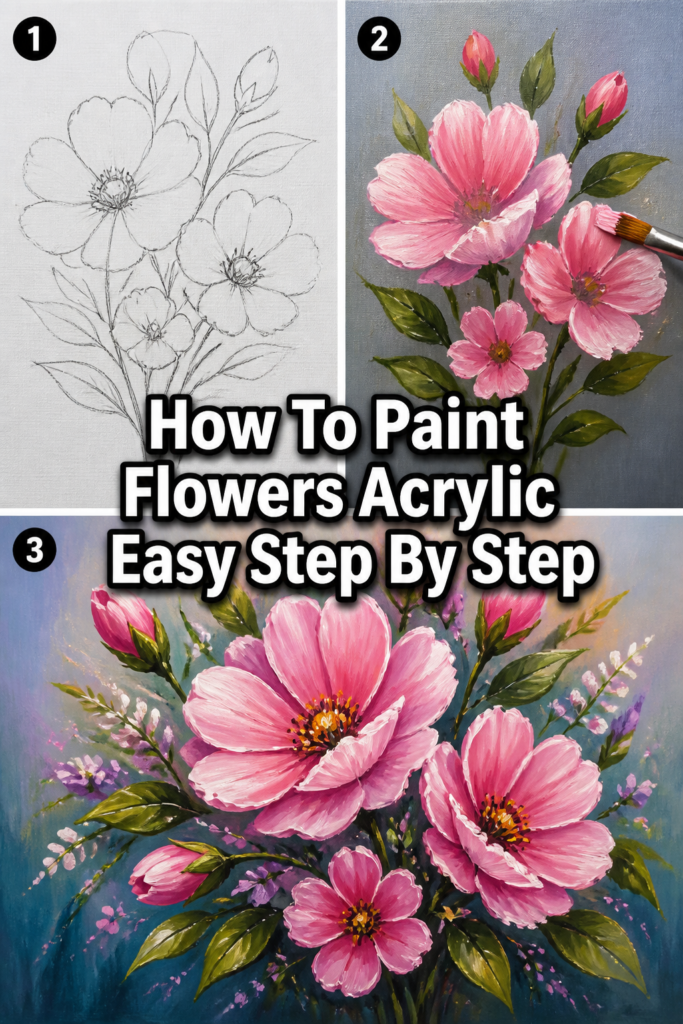
🎨 How To Paint Flowers Acrylic Easy Step By Step
Have you ever gazed at a beautiful floral painting and wished you could create something similar? It might seem intimidating at first glance. But I assure you, painting vibrant acrylic flowers is much simpler than you think.
I remember my own first attempts, filled with hesitation and smudges. With a few key techniques, however, you can transform a blank canvas into a blooming masterpiece. This guide will walk you through every stroke, making the process joyful and achievable.
Quick Overview
This guide will equip you with the fundamental techniques to paint stunning acrylic flowers, even if you’re a complete beginner. You’ll learn how to approach your canvas with confidence and create beautiful botanical art.
Time needed: 1-3 hours (depending on detail and drying time)
Difficulty: Beginner
* What you’ll need: Acrylic paints, brushes, canvas, water, paper towel
Step-by-Step Instructions
Step 1: Gather Your Artistic Arsenal
Before you begin painting, ensure you have all your supplies ready and organized. A well-prepared workspace makes the creative process smooth and enjoyable.
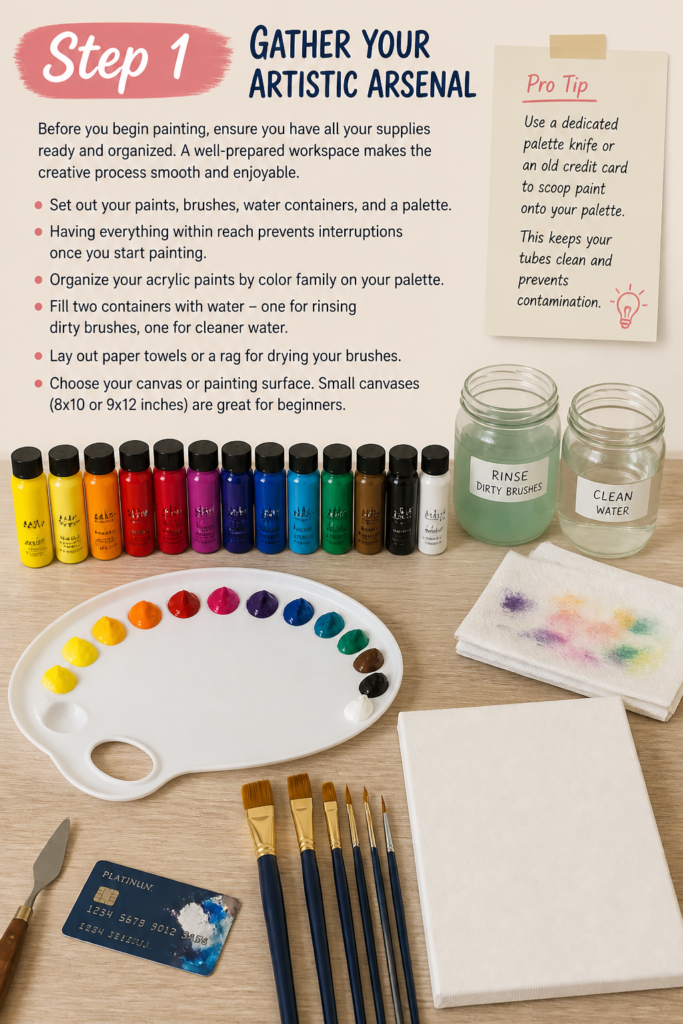
Set out your paints, brushes, water containers, and a palette. Having everything within reach prevents interruptions once you start painting.
- Organize your acrylic paints by color family on your palette.
- Fill two containers with water – one for rinsing dirty brushes, one for cleaner water.
- Lay out paper towels or a rag for drying your brushes.
- Choose your canvas or painting surface. Small canvases (8×10 or 9×12 inches) are great for beginners.
Pro Tip: Use a dedicated palette knife or an old credit card to scoop paint onto your palette. This keeps your tubes clean and prevents contamination.
Step 2: Find Your Floral Inspiration
Deciding what flower to paint is the first creative choice. Look for simple shapes and clear petal structures.
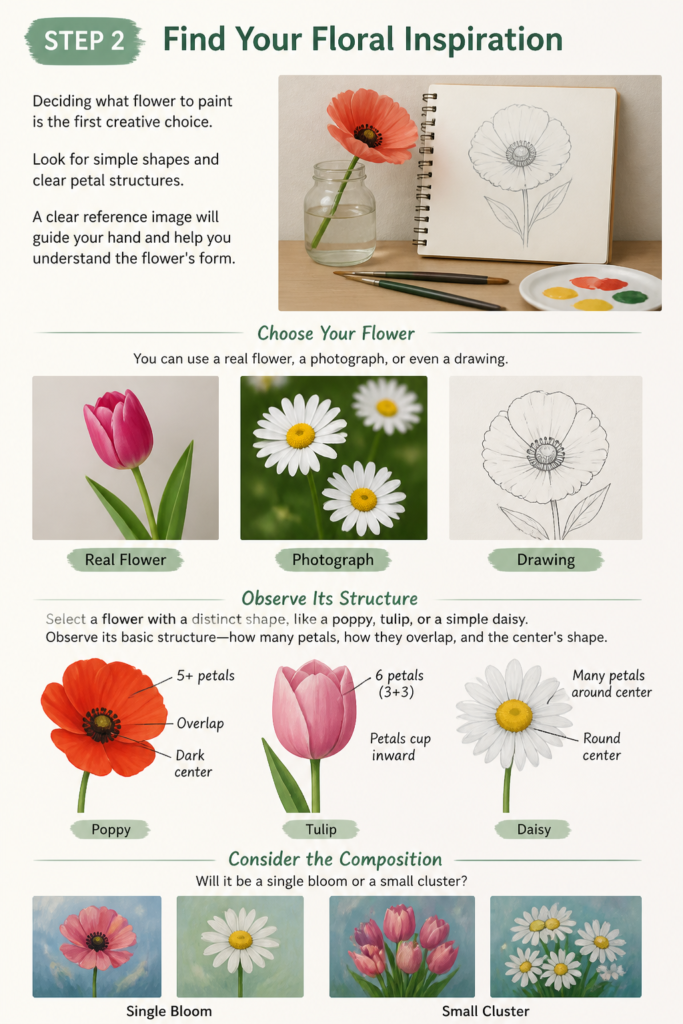
A clear reference image will guide your hand and help you understand the flower’s form. You can use a real flower, a photograph, or even a drawing.
- Select a flower with a distinct shape, like a poppy, tulip, or a simple daisy.
- Observe its basic structure: how many petals, how they overlap, and the center’s shape.
- Consider the overall composition. Will it be a single bloom or a small cluster?
Step 3: Sketch Your Blueprint
A light sketch provides a roadmap for your painting. This step helps establish proportions and placement before you commit with paint.
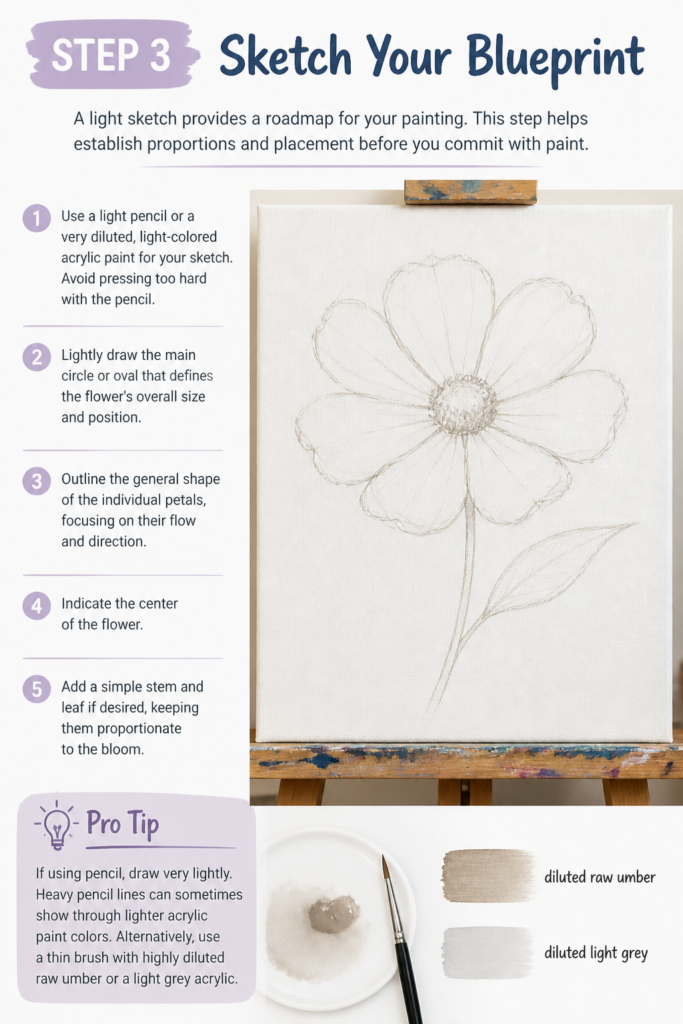
Use a light pencil or a very diluted, light-colored acrylic paint for your sketch. Avoid pressing too hard with the pencil.
- Lightly draw the main circle or oval that defines the flower’s overall size and position.
- Outline the general shape of the individual petals, focusing on their flow and direction.
- Indicate the center of the flower.
- Add a simple stem and leaf if desired, keeping them proportionate to the bloom.
Pro Tip: If using pencil, draw very lightly. Heavy pencil lines can sometimes show through lighter acrylic paint colors. Alternatively, use a thin brush with highly diluted raw umber or a light grey acrylic.
Step 4: Establish Your Background
The background sets the mood for your flower. A simple, soft background allows your flower to truly shine.
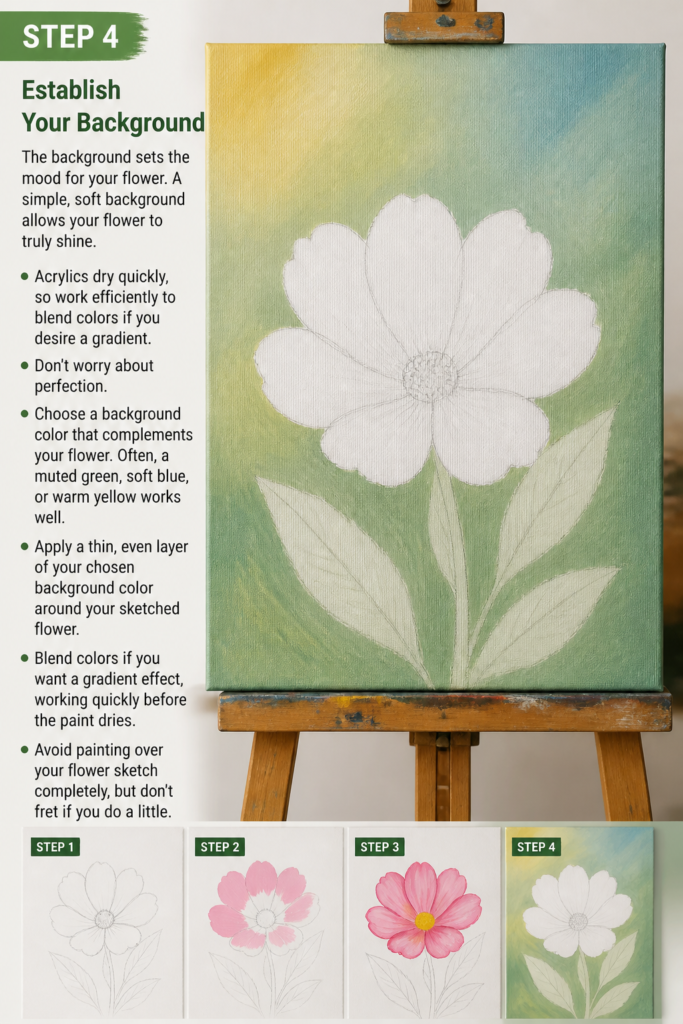
Acrylics dry quickly, so work efficiently to blend colors if you desire a gradient. Don’t worry about perfection.
- Choose a background color that complements your flower. Often, a muted green, soft blue, or warm yellow works well.
- Apply a thin, even layer of your chosen background color around your sketched flower.
- Blend colors if you want a gradient effect, working quickly before the paint dries.
- Avoid painting over your flower sketch completely, but don’t fret if you do a little.
Step 5: Lay Down the Base Colors
This is where your flower starts to take shape. Apply flat, opaque layers of your main flower and leaf colors.
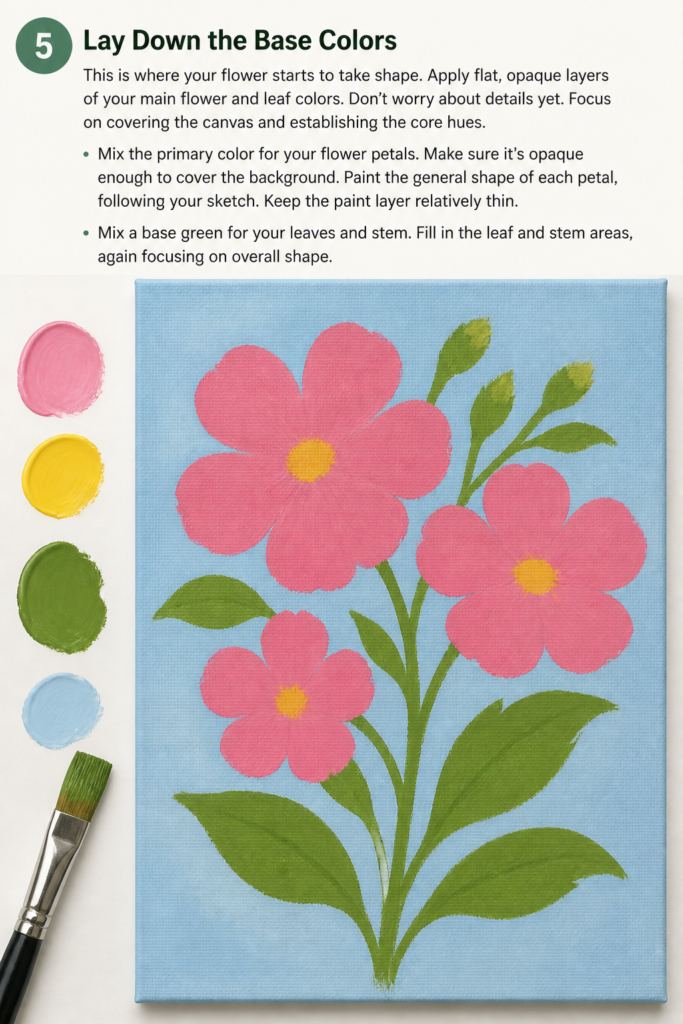
Don’t worry about details yet. Focus on covering the canvas and establishing the core hues.
- Mix the primary color for your flower petals. Make sure it’s opaque enough to cover the background.
- Paint the general shape of each petal, following your sketch. Keep the paint layer relatively thin.
- Mix a base green for your leaves and stem.
- Fill in the leaf and stem areas, again focusing on overall shape.
Step 6: Build Up Petal Layers and Form
Now you’ll add dimension to your petals using lighter and darker shades of your base color. This creates depth and realism.
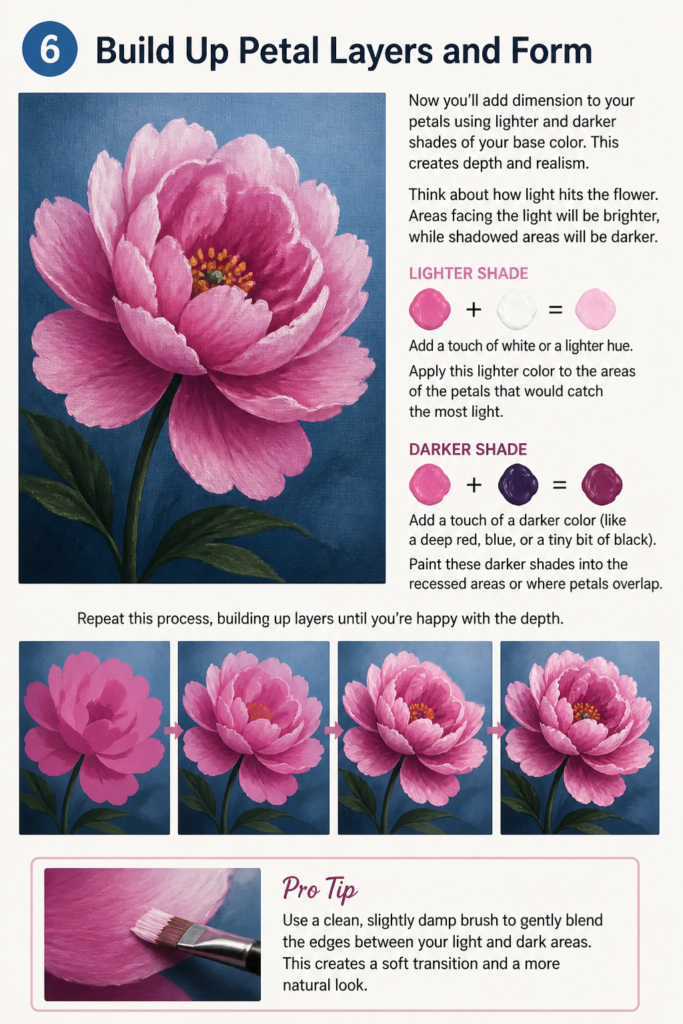
Think about how light hits the flower. Areas facing the light will be brighter, while shadowed areas will be darker.
- Mix a slightly lighter version of your petal color by adding a touch of white or a lighter hue.
- Apply this lighter color to the areas of the petals that would catch the most light.
- Mix a slightly darker version by adding a touch of a darker color (like a deep red, blue, or a tiny bit of black).
- Paint these darker shades into the recessed areas or where petals overlap.
- Repeat this process, building up layers until you’re happy with the depth.
Pro Tip: Use a clean, slightly damp brush to gently blend the edges between your light and dark areas. This creates a softer transition.
Step 7: Define the Flower’s Center
The center of the flower often provides a focal point and adds crucial detail. This area can be surprisingly complex or beautifully simple.
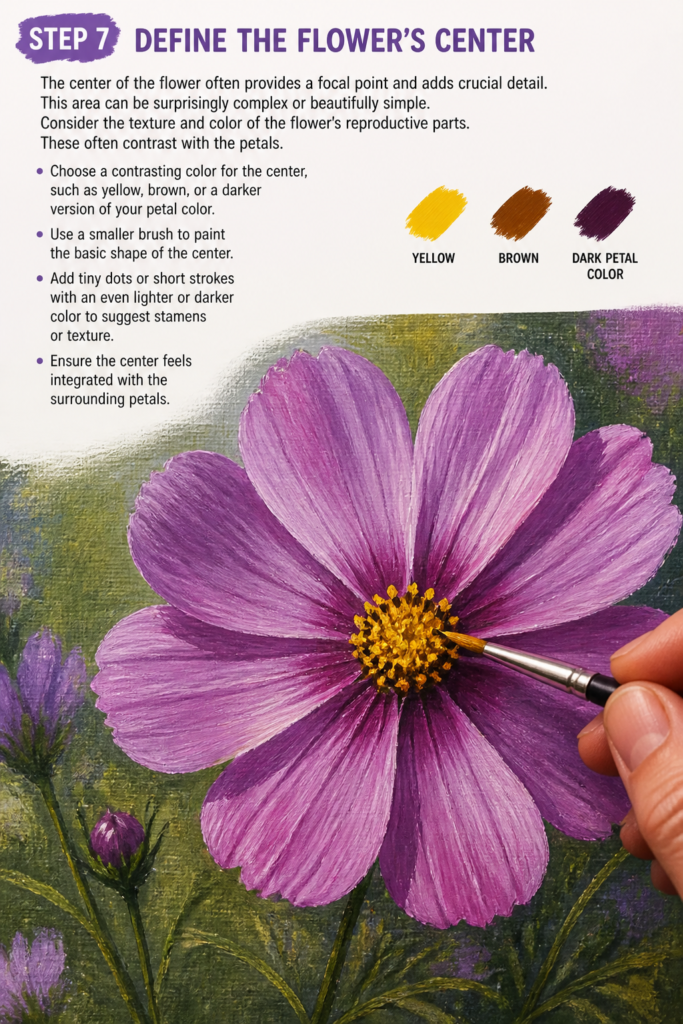
Consider the texture and color of the flower’s reproductive parts. These often contrast with the petals.
- Choose a contrasting color for the center, such as yellow, brown, or a darker version of your petal color.
- Use a smaller brush to paint the basic shape of the center.
- Add tiny dots or short strokes with an even lighter or darker color to suggest stamens or texture.
- Ensure the center feels integrated with the surrounding petals.
Step 8: Add Highlights and Shadows
These final touches bring your flower to life, making it pop off the canvas. They create the illusion of three-dimensionality.
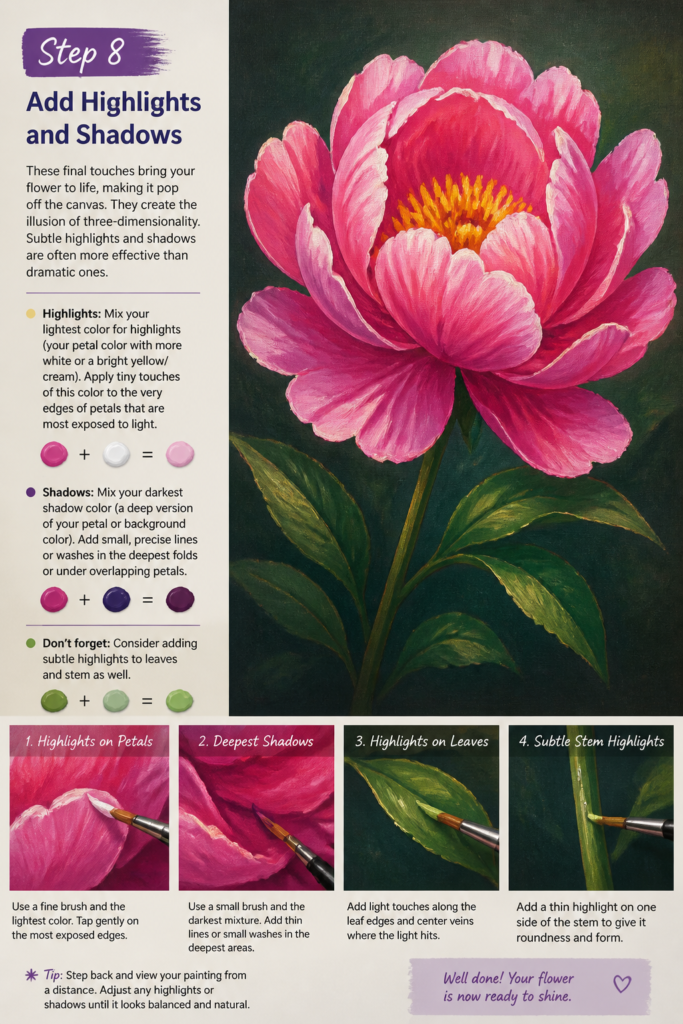
Subtle highlights and shadows are often more effective than dramatic ones. Observe your reference photo closely.
- Mix your lightest color for highlights (your petal color with more white or a bright yellow/cream).
- Apply tiny touches of this color to the very edges of petals that are most exposed to light.
- Mix your darkest shadow color (a deep version of your petal or background color).
- Add small, precise lines or washes in the deepest folds or under overlapping petals.
- Consider adding subtle highlights to leaves and stem as well.
Step 9: Refine and Finish
Take a step back and look at your painting with fresh eyes. This is the time for small adjustments.
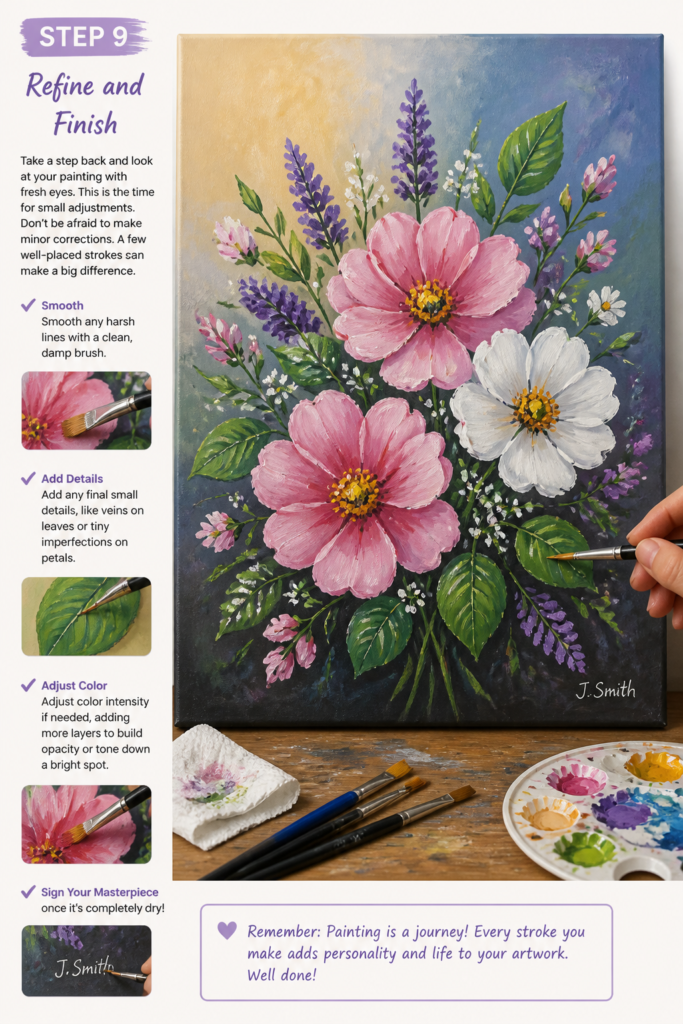
Don’t be afraid to make minor corrections. A few well-placed strokes can make a big difference.
- Smooth any harsh lines with a clean, damp brush.
- Add any final small details, like veins on leaves or tiny imperfections on petals.
- Adjust color intensity if needed, adding more layers to build opacity or tone down a bright spot.
- Sign your masterpiece once it’s completely dry!
Common Mistakes to Avoid
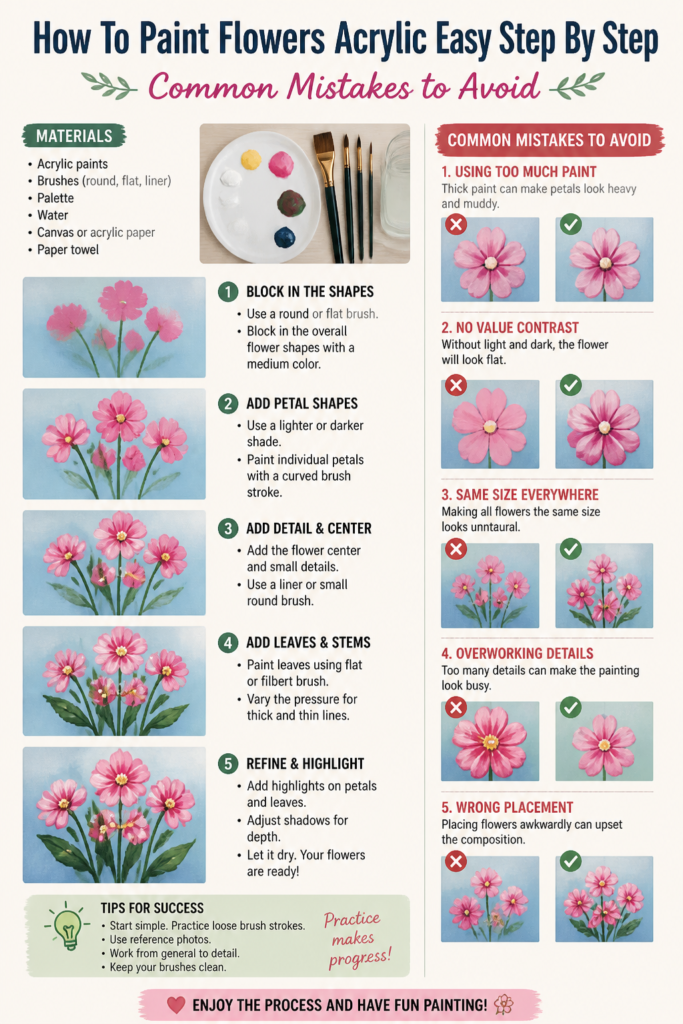
Overworking the Paint
One common pitfall for beginners is applying too many layers or blending too much, especially with acrylics. Acrylics dry quickly, and overworking can lead to muddy colors or a thick, clumpy texture. Instead, apply paint in distinct layers, allowing each to dry if you want crisp edges. If you need to blend, work swiftly and with minimal strokes.
Using Too Much Water
While water helps thin acrylics, using too much can make your paint transparent and watery. This reduces its vibrancy and makes it difficult to achieve opaque coverage. Instead, use a few drops of water at a time or opt for a medium specifically designed for thinning acrylics, like a flow improver, to maintain color intensity.
Neglecting Reference Photos
Many beginners try to paint flowers from memory, which can lead to generic or unrealistic results. Without a reference, you miss subtle details of form, light, and shadow. Always use a good quality reference photo or a real flower. It guides your eye and helps you understand the natural structure of the bloom.
Fear of Darker Colors
Beginners often shy away from using dark colors, which can result in a painting that lacks depth and contrast. Shadows are crucial for making your flower look three-dimensional. Don’t be afraid to mix and apply darker shades in the recessed areas or under overlapping petals. This will make your highlights truly pop.
Troubleshooting
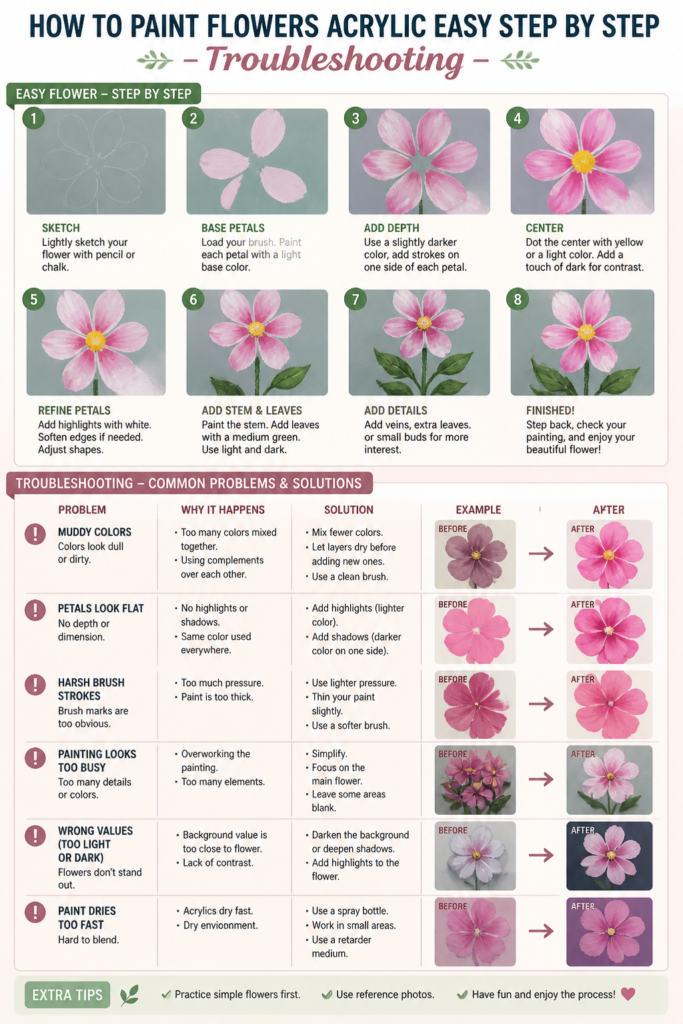
My Colors Look Muddy
If your colors are turning muddy, it’s often due to over-blending or mixing too many colors on the palette. To fix this, first scrape off any wet, muddy paint from your canvas. Let the area dry completely. Then, reapply fresh, clean layers of your desired colors. Try to mix colors only with their direct complements or analogous shades to avoid creating brown or grey mixtures.
The Paint is Drying Too Fast
Acrylics indeed have a fast drying time, which can be frustrating. To slow it down, you can add a “slow-drying medium” to your paints. Another trick is to mist your palette and canvas lightly with water from a spray bottle. You can also work in smaller sections or use a stay-wet palette to keep your paints workable for longer periods.
My Flower Looks Flat
A flat-looking flower usually indicates a lack of contrast between light and shadow. To add depth, identify the areas where light would hit and apply brighter highlights. Conversely, find the deepest folds and overlapping petals and add darker shadows. Build up these contrasts gradually, allowing layers to dry, to create a sense of volume and dimension.
Key Takeaways
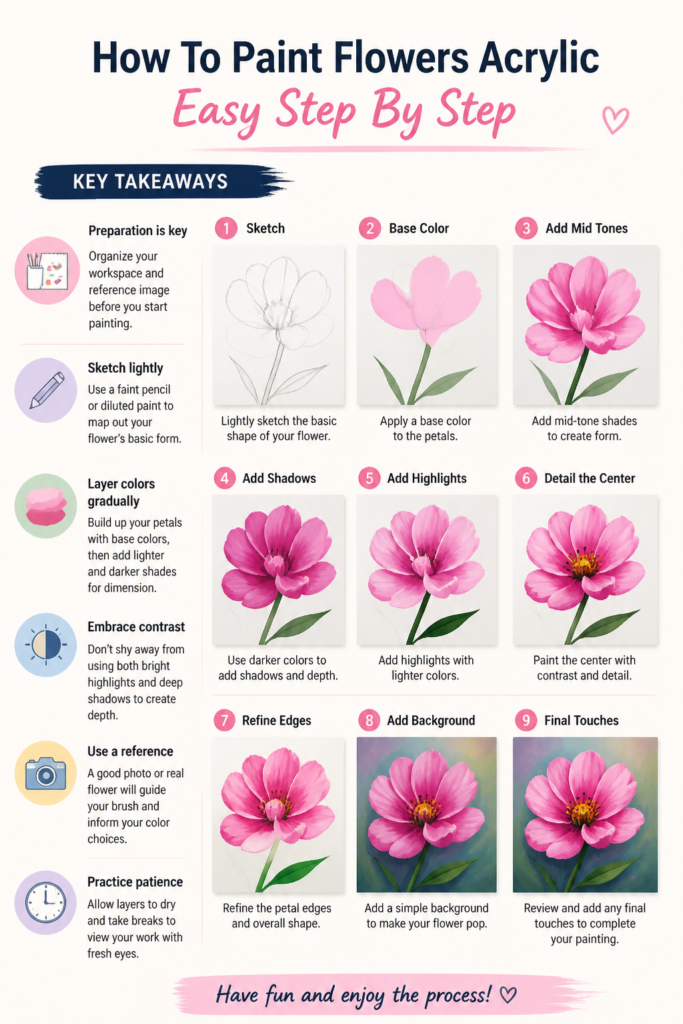
- Preparation is key: Organize your workspace and reference image before you start painting.
- Sketch lightly: Use a faint pencil or diluted paint to map out your flower’s basic form.
- Layer colors gradually: Build up your petals with base colors, then add lighter and darker shades for dimension.
- Embrace contrast: Don’t shy away from using both bright highlights and deep shadows to create depth.
- Use a reference: A good photo or real flower will guide your brush and inform your color choices.
- Practice patience: Allow layers to dry and take breaks to view your work with fresh eyes.
Frequently Asked Questions
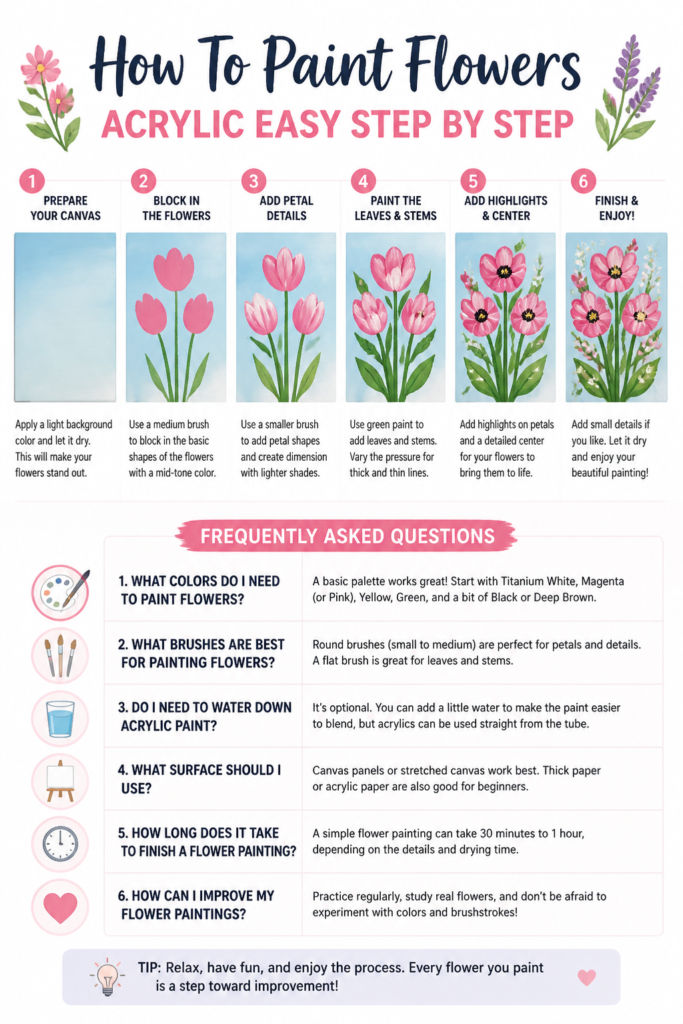
What kind of brushes are best for painting flowers?
For flowers, a variety of brushes is helpful. Round brushes (sizes 4-8) are great for petals and curves. Flat brushes (sizes 6-12) can be used for blocking in larger areas or creating crisp petal edges. A small detail brush (size 0-2) is essential for fine lines and tiny highlights. Experiment to find what feels best for you.
How do I make my acrylic colors more vibrant?
To achieve vibrant colors, start with good quality artist-grade acrylics, which have higher pigment concentration. Avoid over-thinning your paint with water, as this dilutes the color. Instead, use thin, opaque layers and allow them to dry. Glazing with transparent layers of pure color can also intensify vibrancy.
Can I mix acrylics with other types of paint?
No, it’s generally not recommended to mix acrylics with other types of paint like oils or watercolors. Acrylics are water-based and dry by evaporation, while oils dry by oxidation and are oil-based. Mixing them can lead to cracking, poor adhesion, and an unstable paint film. Stick to acrylic paints and mediums for the best results.
How do I clean my acrylic brushes properly?
Proper cleaning extends the life of your brushes. Immediately after painting, rinse excess paint in your first water pot, then clean thoroughly in the second. Use a mild soap (like dish soap or artist’s brush cleaner) and gently work it into the bristles until all paint is removed. Rinse well, reshape the bristles, and let them dry flat or brush-side up to prevent water from seeping into the ferrule.
Our Top Recommended Finds
- Beginner Acrylic Paint Set: A good starter set offers a range of colors to experiment with without a huge investment.
- Assorted Brush Set: Look for a set that includes various shapes and sizes, from flats to rounds, to tackle different painting tasks.
- Canvas Panels: These affordable, pre-primed surfaces are perfect for practice and experimentation without the commitment of stretched canvas.
Your Blooming Artistic Journey Begins Now
You now have the tools and knowledge to embark on your own floral painting adventure. The beauty of acrylics lies in their versatility and quick-drying nature, making them perfect for layering and experimentation. Don’t be afraid to make mistakes; they are simply opportunities to learn and grow.
Why not grab your brushes and paints today? Pick a simple flower, follow these steps, and watch as your canvas blossoms with color. Explore different flower types, experiment with backgrounds, and discover your unique artistic voice. The world of floral art is waiting for you to add your personal touch.