👗 How To Pose For Pictures In A Dress

& Painting
No rigid rules or pretension. Just practical guides, medium comparisons, and encouraging tips to help you enjoy the drawing & painting process.
I remember feeling so awkward in photos, especially when wearing a beautiful dress. It felt like my limbs didn’t know where to go, and I always ended up looking stiff or uncomfortable. But after years of experimenting and helping friends find their best angles, I discovered that posing isn’t about being a supermodel; it’s about understanding your body and feeling confident. This guide will share those practical insights, so you can transform your photos from “okay” to “absolutely stunning.”
Quick Overview
This guide will empower you to confidently pose in any dress, capturing your best self with natural grace. You’ll learn simple techniques to enhance your figure, express your personality, and feel fantastic in front of the camera.
- Time needed: 30-60 minutes for initial practice
- Difficulty: Beginner
- What you’ll need: A dress you love, a full-length mirror, a phone or camera, good lighting, and a positive attitude
Step-by-Step Instructions
Step 1: Master Your Foundation – The Posture Perfect
Every great pose starts with excellent posture. It instantly adds elegance and confidence to your stance, making your dress hang beautifully.
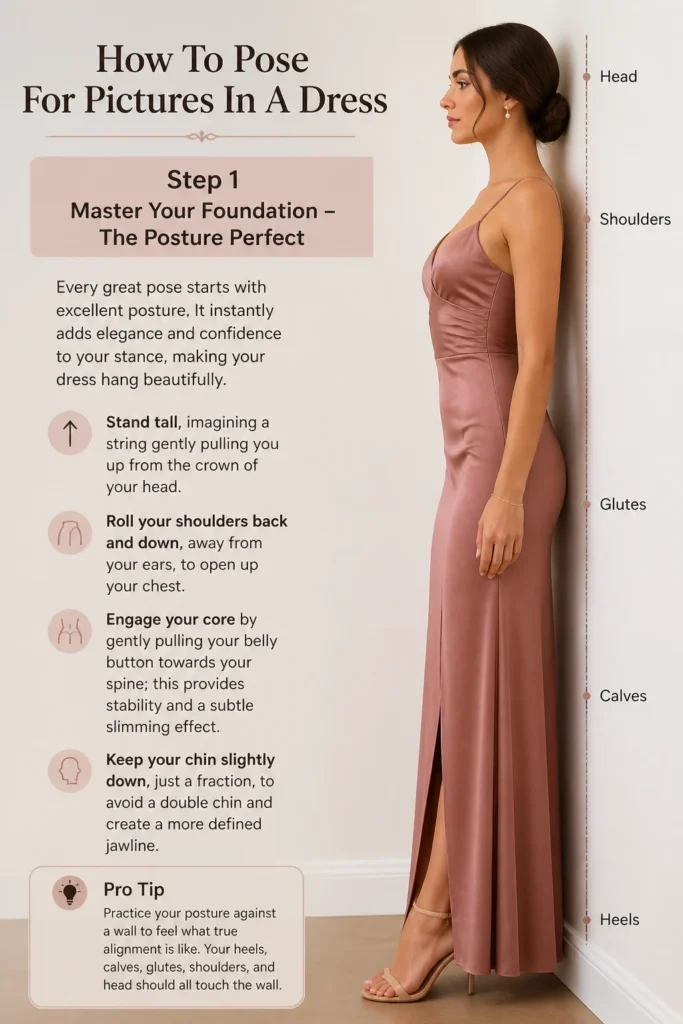
- Stand tall, imagining a string gently pulling you up from the crown of your head.
- Roll your shoulders back and down, away from your ears, to open up your chest.
- Engage your core by gently pulling your belly button towards your spine; this provides stability and a subtle slimming effect.
- Keep your chin slightly down, just a fraction, to avoid a double chin and create a more defined jawline.
Pro Tip: Practice your posture against a wall to feel what true alignment is like. Your heels, calves, glutes, shoulders, and head should all touch the wall.
Step 2: Find Your Angles – The Art of the S-Curve
Straight-on photos can sometimes feel flat or widen your silhouette. Turning your body creates depth and visually slims your figure.
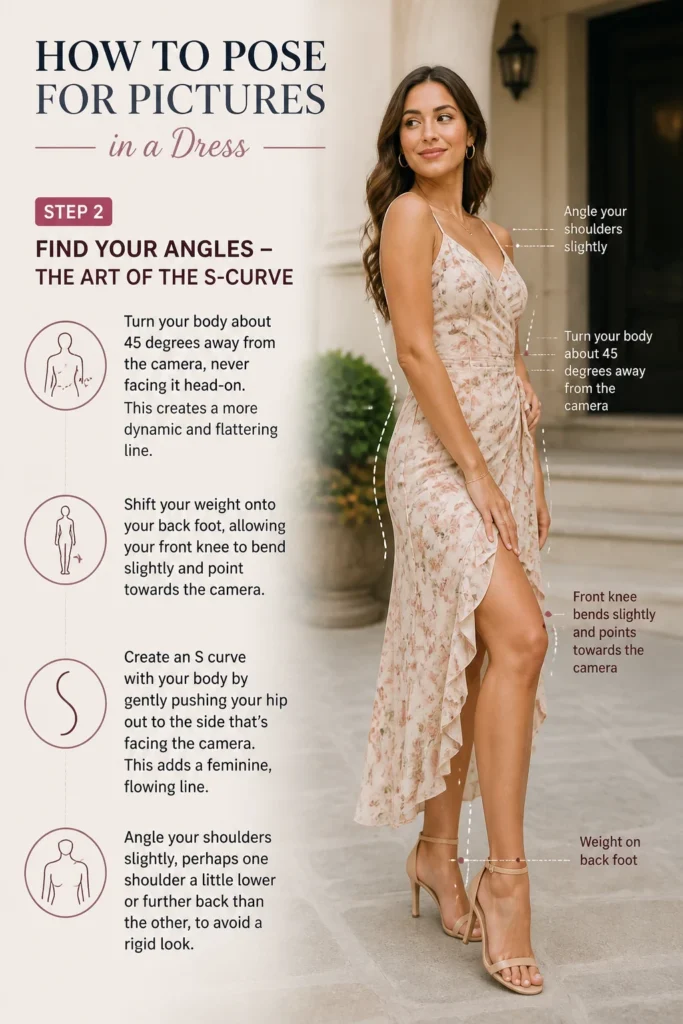
- Turn your body about 45 degrees away from the camera, never facing it head-on. This creates a more dynamic and flattering line.
- Shift your weight onto your back foot, allowing your front knee to bend slightly and point towards the camera.
- Create an “S” curve with your body by gently pushing your hip out to the side that’s facing the camera. This adds a feminine, flowing line.
- Angle your shoulders slightly, perhaps one shoulder a little lower or further back than the other, to avoid a rigid look.
Step 3: Place Your Hands – Natural and Elegant Gestures
Awkward hands can ruin an otherwise perfect pose. The key is to keep them soft, relaxed, and purposeful.
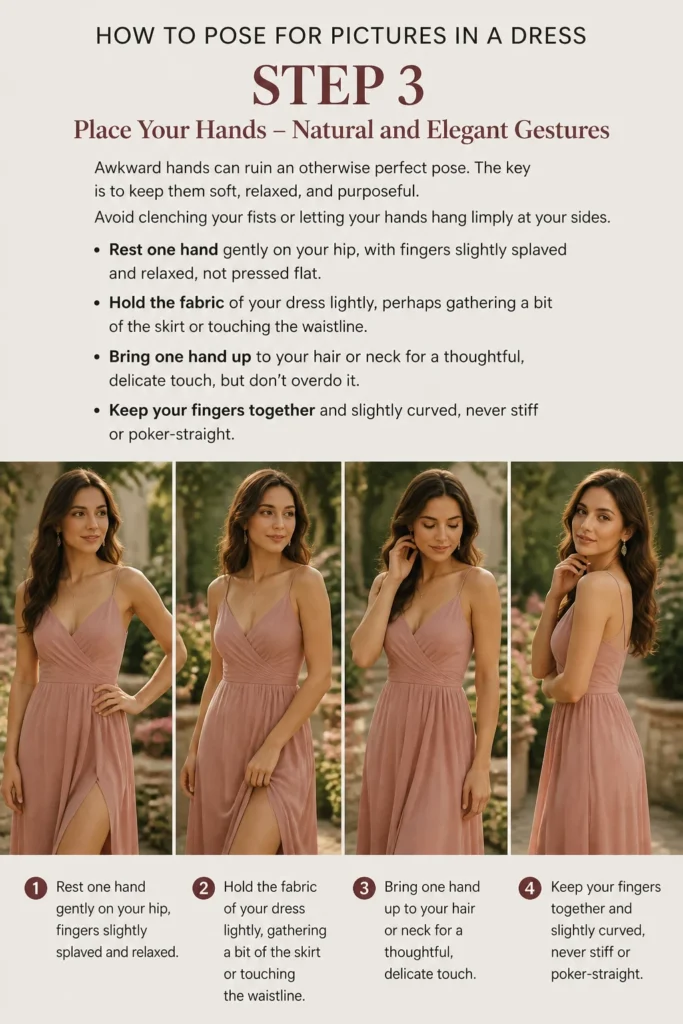
- Avoid clenching your fists or letting your hands hang limply at your sides.
- Rest one hand gently on your hip, with fingers slightly splayed and relaxed, not pressed flat.
- Hold the fabric of your dress lightly, perhaps gathering a bit of the skirt or touching the waistline.
- Bring one hand up to your hair or neck for a thoughtful, delicate touch, but don’t overdo it.
- Keep your fingers together and slightly curved, never stiff or poker-straight.
Step 4: Engage Your Legs – Length and Movement
Your legs can add incredible length and dynamism to your pose, especially when wearing a flowy dress.
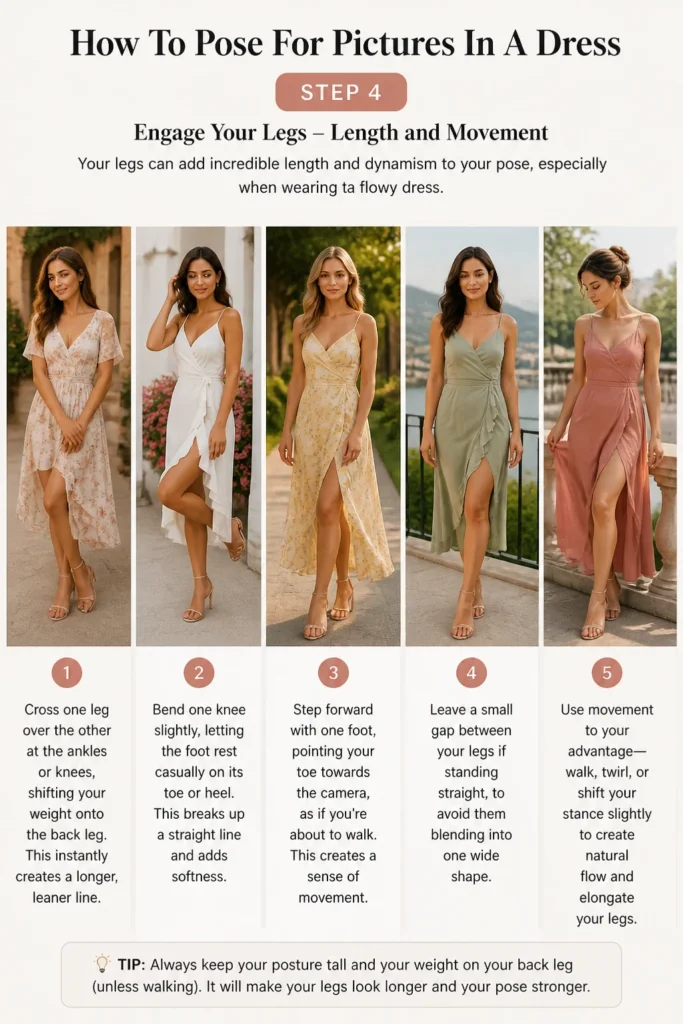
- Cross one leg over the other at the ankles or knees, shifting your weight onto the back leg. This instantly creates a longer, leaner line.
- Bend one knee slightly, letting the foot rest casually on its toe or heel. This breaks up a straight line and adds softness.
- Step forward with one foot, pointing your toe towards the camera, as if you’re about to walk. This creates a sense of movement.
- Leave a small gap between your legs if standing straight, to avoid them blending into one wide shape.
Step 5: Position Your Arms – Away From the Body
Arms pressed flat against your torso can make them appear wider and your body look boxy. Create space and shape.
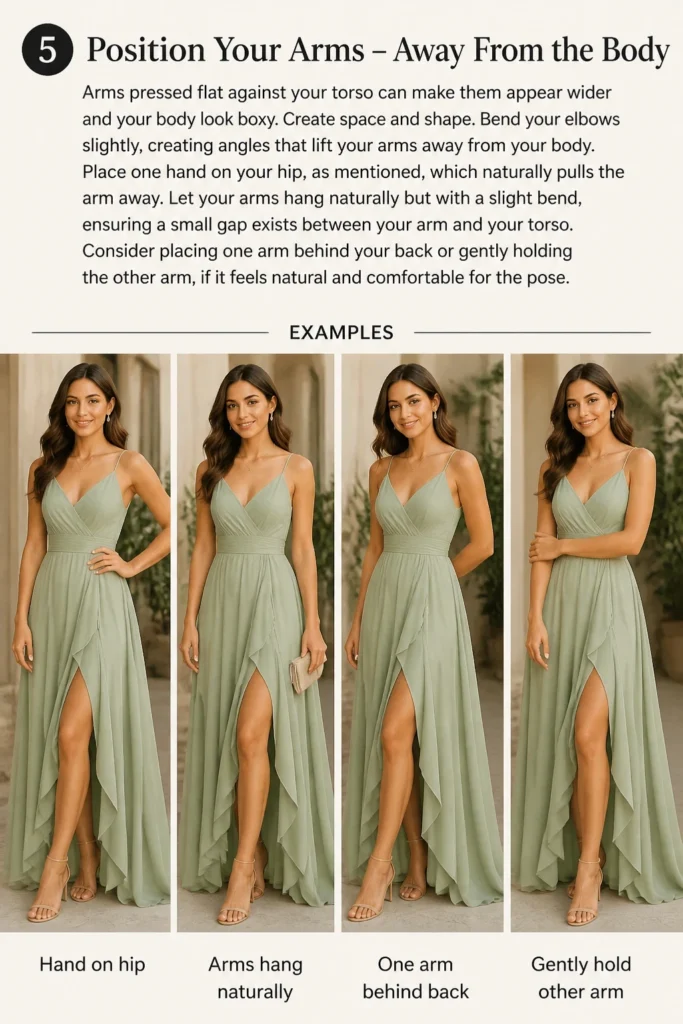
- Bend your elbows slightly, creating angles that lift your arms away from your body.
- Place one hand on your hip, as mentioned, which naturally pulls the arm away.
- Let your arms hang naturally but with a slight bend, ensuring a small gap exists between your arm and your torso.
- Consider placing one arm behind your back or gently holding the other arm, if it feels natural and comfortable for the pose.
Step 6: Express With Your Face – Eyes, Chin, and Smile
Your face is the focal point of many pictures, conveying emotion and personality.
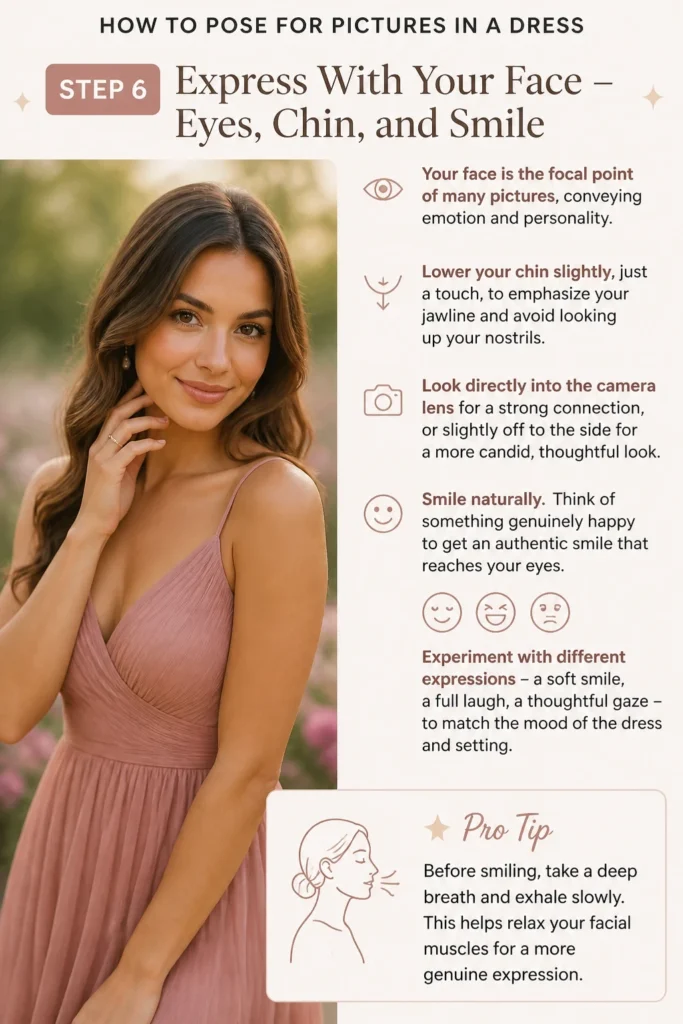
- Lower your chin slightly, just a touch, to emphasize your jawline and avoid looking up your nostrils.
- Look directly into the camera lens for a strong connection, or slightly off to the side for a more candid, thoughtful look.
- Smile naturally. Think of something genuinely happy to get an authentic smile that reaches your eyes.
- Experiment with different expressions – a soft smile, a full laugh, a thoughtful gaze – to match the mood of the dress and setting.
Pro Tip: Before smiling, take a deep breath and exhale slowly. This helps relax your facial muscles for a more genuine expression.
Step 7: Interact With Your Dress – Make It Part of the Pose
Your dress isn’t just clothing; it’s an extension of your pose. Use its fabric, flow, and silhouette to your advantage.
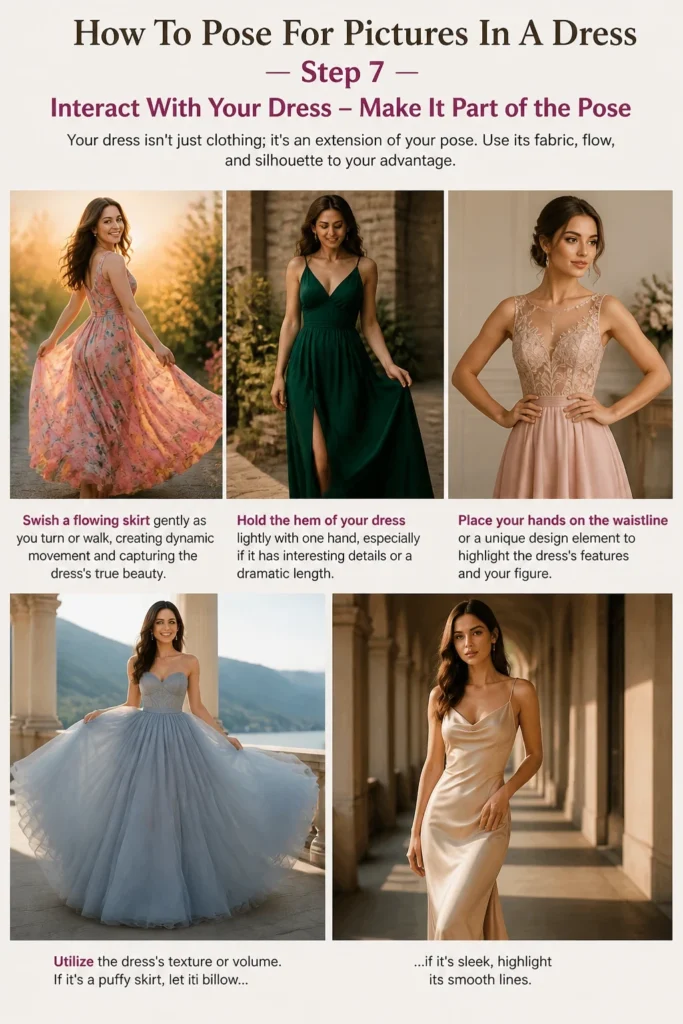
- Swish a flowing skirt gently as you turn or walk, creating dynamic movement and capturing the dress’s true beauty.
- Hold the hem of your dress lightly with one hand, especially if it has interesting details or a dramatic length.
- Place your hands on the waistline or a unique design element to highlight the dress’s features and your figure.
- Utilize the dress’s texture or volume. If it’s a puffy skirt, let it billow; if it’s sleek, highlight its smooth lines.
Step 8: Incorporate Movement – Dynamic Shots
Static poses are good, but movement adds life and energy to your photos, especially in a dress.
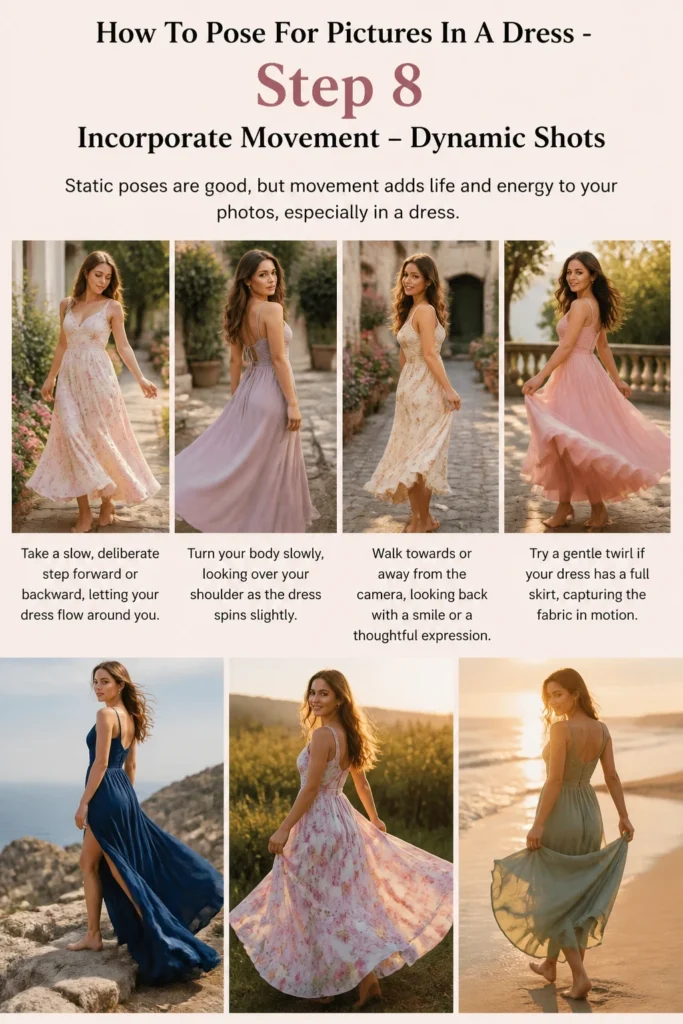
- Take a slow, deliberate step forward or backward, letting your dress flow around you.
- Turn your body slowly, looking over your shoulder as the dress spins slightly.
- Walk towards or away from the camera, looking back with a smile or a thoughtful expression.
- Try a gentle twirl if your dress has a full skirt, capturing the fabric in motion.
Step 9: Use Your Environment – Props and Backgrounds
Your surroundings can enhance your pose and tell a story.
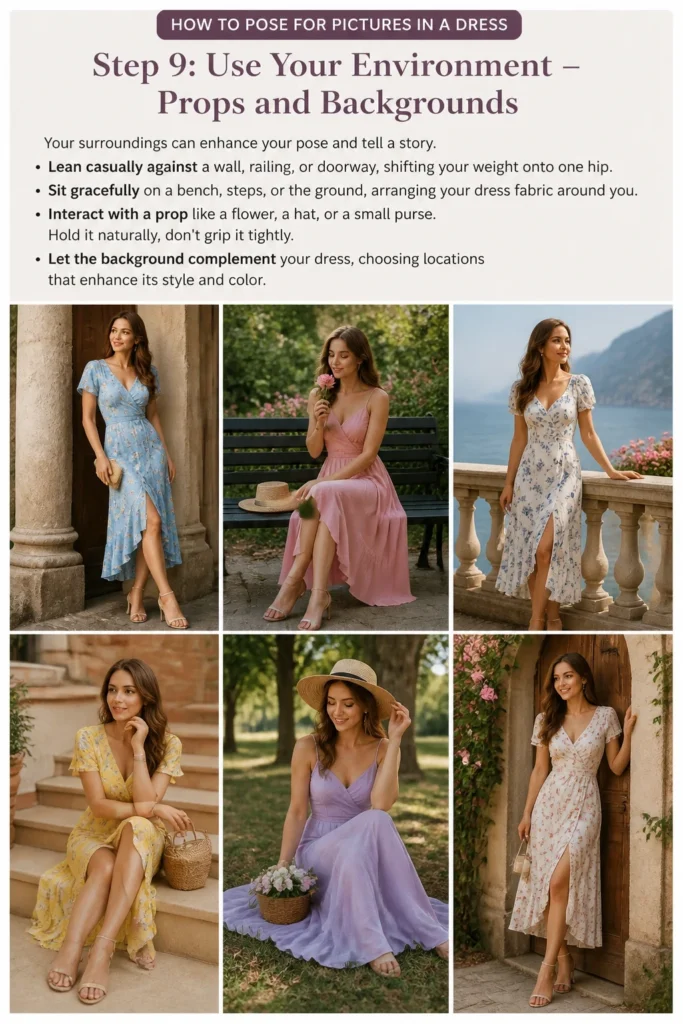
- Lean casually against a wall, railing, or doorway, shifting your weight onto one hip.
- Sit gracefully on a bench, steps, or the ground, arranging your dress fabric around you.
- Interact with a prop like a flower, a hat, or a small purse. Hold it naturally, don’t grip it tightly.
- Let the background complement your dress, choosing locations that enhance its style and color.
Common Mistakes to Avoid
Slouching or Stiff Posture
A slumped back or rigid body can make you look uncomfortable and diminish the elegance of your dress. It also creates unflattering lines. Always prioritize good posture as your starting point. Imagine you have a string pulling you up from your head, keeping your shoulders relaxed and back.
Arms Glued to Your Sides
When your arms press against your body, they can appear wider and make your torso look less defined. This creates a ‘blocky’ silhouette. Remember to create space between your arms and your body by slightly bending your elbows or placing a hand on your hip.
Awkward Hand Placement
Clenched fists, splayed fingers, or hands hanging lifelessly can distract from an otherwise great shot. Hands should look relaxed and natural, never forced. Practice gentle gestures, like lightly touching your dress or hair, or resting them softly on your hip.
Facing the Camera Head-On
Standing directly facing the camera can make you appear wider and flatter in photos. It removes depth and can feel very static. Always turn your body slightly, ideally at a 45-degree angle, to create more flattering lines and dynamic shapes.
Troubleshooting
“I feel awkward and unnatural.”
This is a very common feeling, especially when starting out. The solution is to practice in front of a mirror without the pressure of a camera. Put on your dress and try different poses, paying attention to how your body feels. The more you practice, the more natural these movements will become, building muscle memory and confidence. Focus on one element at a time, like just your hands, then just your legs, before combining them.
“My photos still don’t look good.”
If you’re still not happy with the results, consider factors beyond just your pose. Check your lighting – harsh overhead light or direct midday sun can be unflattering. Soft, diffused light (like near a window or during golden hour) works wonders. Also, experiment with different camera angles. Sometimes, shooting from slightly below eye level can elongate your figure, or a slightly higher angle can create a more intimate feel. Don’t be afraid to take many photos and learn what works.
“My dress isn’t falling correctly or looks wrinkled.”
Sometimes the dress itself needs a little help. Before the shoot, make sure your dress is wrinkle-free and fits well. During the pose, consciously arrange the fabric. If it’s a flowing dress, give it a gentle swish to let it settle. If it’s a fitted dress, smooth out any bunched fabric. A well-fitting, well-maintained dress will always photograph better and make posing easier.
Key Takeaways
- Start with strong posture: Always stand tall with shoulders back and core engaged for an instant boost in elegance.
- Embrace angles: Turn your body 45 degrees, shift weight, and create an S-curve to add dimension and flatter your figure.
- Keep hands natural: Avoid stiffness; place hands gently on hips, touch your dress, or lightly interact with your hair.
- Create leg length: Cross or bend your legs to break straight lines and give a sense of movement and elongation.
- Use movement and interaction: Swish your skirt, walk, or lean against elements in your environment to add dynamism and interest.
- Confidence is key: The most beautiful pose comes from feeling good. Practice, relax, and let your personality shine through.
Frequently Asked Questions
What’s the most universally flattering pose for a dress?
The “S-curve” pose, where you turn your body 45 degrees, shift weight to your back foot, and gently push your hip out, is widely considered the most flattering. It creates an elegant, dynamic line and visually slims the figure. Pairing this with good posture makes a significant difference.
How can I make my legs look longer in a dress?
To make your legs appear longer, try crossing them at the ankles or knees, or stepping forward with one foot, pointing your toe towards the camera. Shifting your weight onto your back leg while keeping the front leg slightly bent also helps create a longer line. High heels can also dramatically enhance leg length.
Should I practice posing before a photoshoot?
Absolutely, practicing is crucial! Spend time in front of a full-length mirror, trying out different poses and expressions. This helps you understand your body’s best angles, build muscle memory, and feel more comfortable and confident when the actual camera comes out. The more you practice, the more natural your poses will become.
What if my dress is very simple and doesn’t have much to interact with?
Even with a simple dress, you can still create dynamic poses. Focus on your body language: posture, angles, and hand placement become even more critical. You can also introduce subtle movement like a gentle turn or a slow walk. Consider using your environment – leaning against a wall or sitting gracefully – to add interest without relying on the dress’s features.
Our Top Recommended Finds
- Full-Length Mirror: Essential for practicing poses and seeing your whole outfit before a shoot.
- Portable Ring Light with Tripod: Provides flattering, even lighting and a stable setup for self-portraits or video recording your practice.
- Posture Corrector (for practice): A gentle reminder to maintain good posture during your daily routine, which will translate to better posing.
Capture Your Confidence: Your Moment to Shine
Now that you have these practical steps, it’s time to put them into action. Don’t just read about posing; experience it. Grab your favorite dress, find a mirror, and start experimenting. Each small adjustment can make a huge difference in how you look and, more importantly, how you feel in your photos.
Remember, the goal isn’t perfection, but authentic expression. Embrace the journey of discovering your most beautiful angles and confident self. Your next picture in a dress won’t just be a photograph; it will be a celebration of your unique style and inner radiance. Go ahead, strike a pose, and let your confidence truly shine.
& Painting
No rigid rules or pretension. Just practical guides, medium comparisons, and encouraging tips to help you enjoy the drawing & painting process.