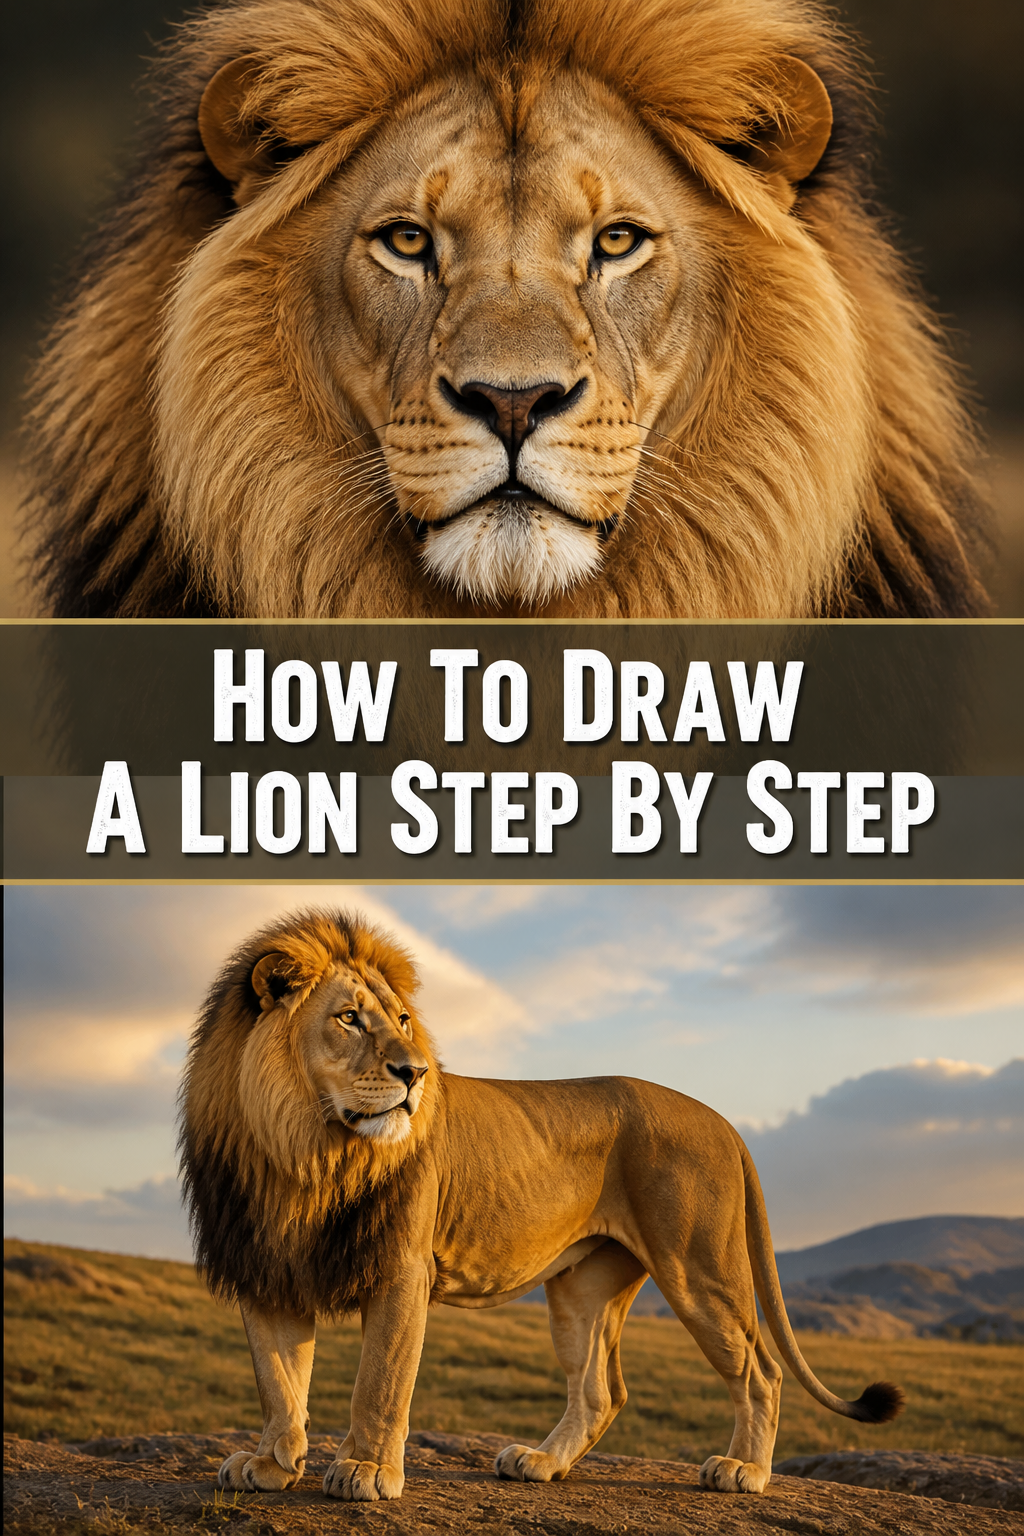
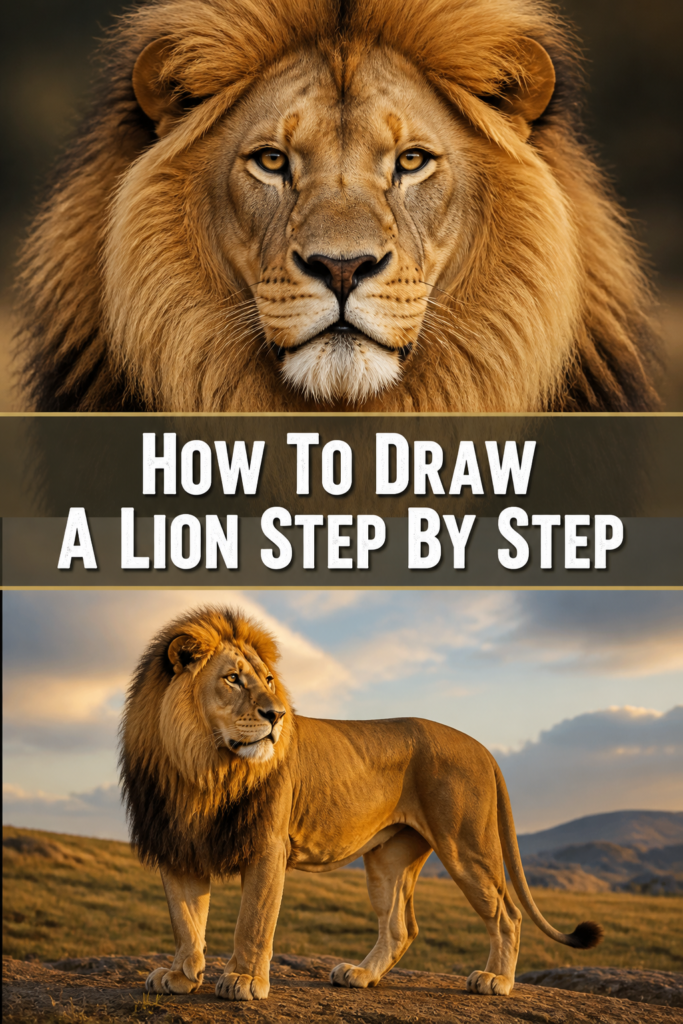
🦁 How To Draw A Lion Step By Step

& Painting
No rigid rules or pretension. Just practical guides, medium comparisons, and encouraging tips to help you enjoy the drawing & painting process.
I have spent over a decade teaching beginners how to translate the beauty of the wild onto a simple sheet of paper.
Lions are often the most requested subject because they represent strength and grace, yet many artists feel intimidated by their complex manes.
This guide simplifies the process into manageable shapes, ensuring your “King of the Jungle” looks regal rather than like a messy house cat.
Quick Overview
Before you press your pencil to the paper, let’s look at what this project involves.
- Time needed: 45 to 60 minutes
- Difficulty: Beginner to Intermediate
- What you’ll need: Drawing paper, HB and 2B pencils, a kneaded eraser, and a blending stump or cotton swab.
Step-by-Step Instructions
Step 1: Sketch the Foundation Circles
Start by drawing a medium-sized circle in the upper left quadrant of your paper to represent the head.
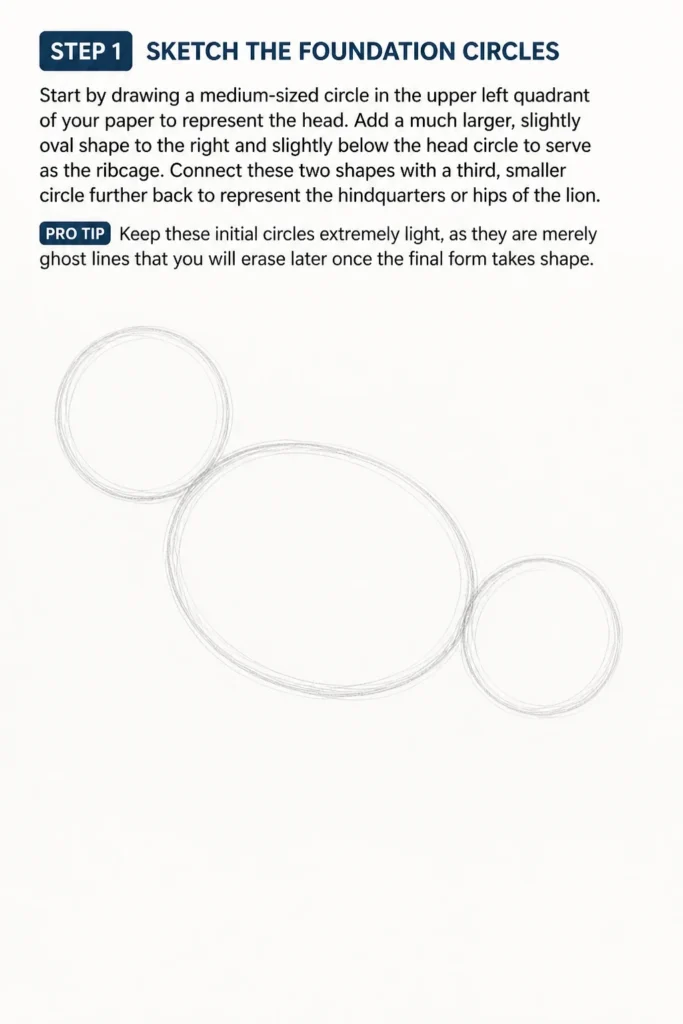
Add a much larger, slightly oval shape to the right and slightly below the head circle to serve as the ribcage.
Connect these two shapes with a third, smaller circle further back to represent the hindquarters or hips of the lion.
Pro Tip: Keep these initial circles extremely light, as they are merely “ghost lines” that you will erase later once the final form takes shape.
Step 2: Map the Facial Guidelines
Divide the head circle with a vertical line down the center to establish the symmetry of the face.
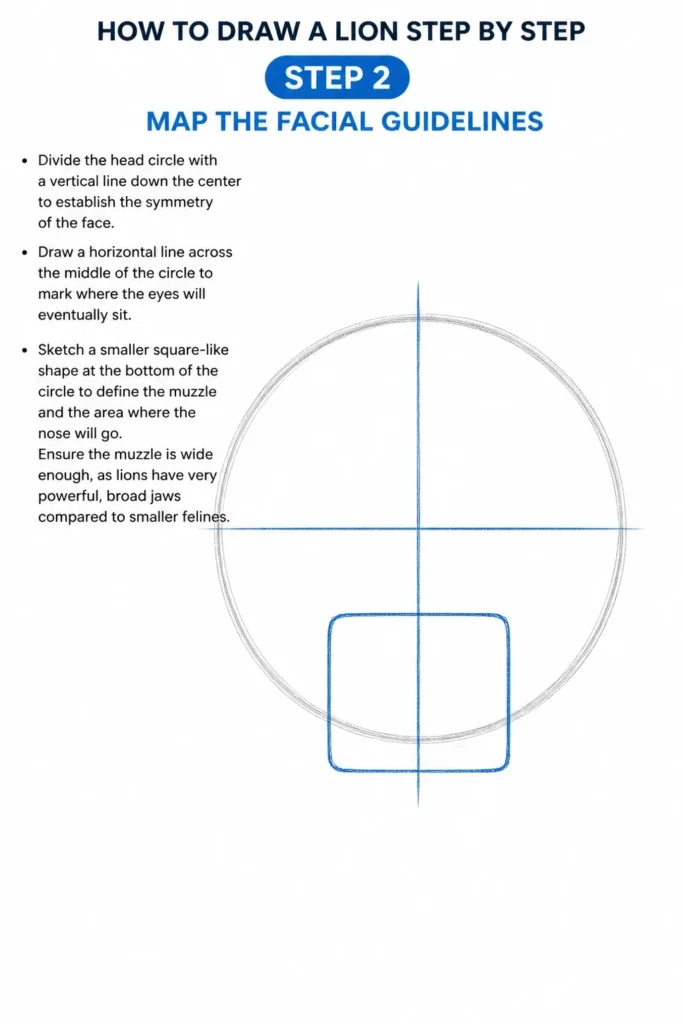
Draw a horizontal line across the middle of the circle to mark where the eyes will eventually sit.
Sketch a smaller square-like shape at the bottom of the circle to define the muzzle and the area where the nose will go.
Ensure the muzzle is wide enough, as lions have very powerful, broad jaws compared to smaller felines.
Step 3: Connect the Body and Neck
Draw two curved lines connecting the head to the large ribcage oval to create a thick, muscular neck.
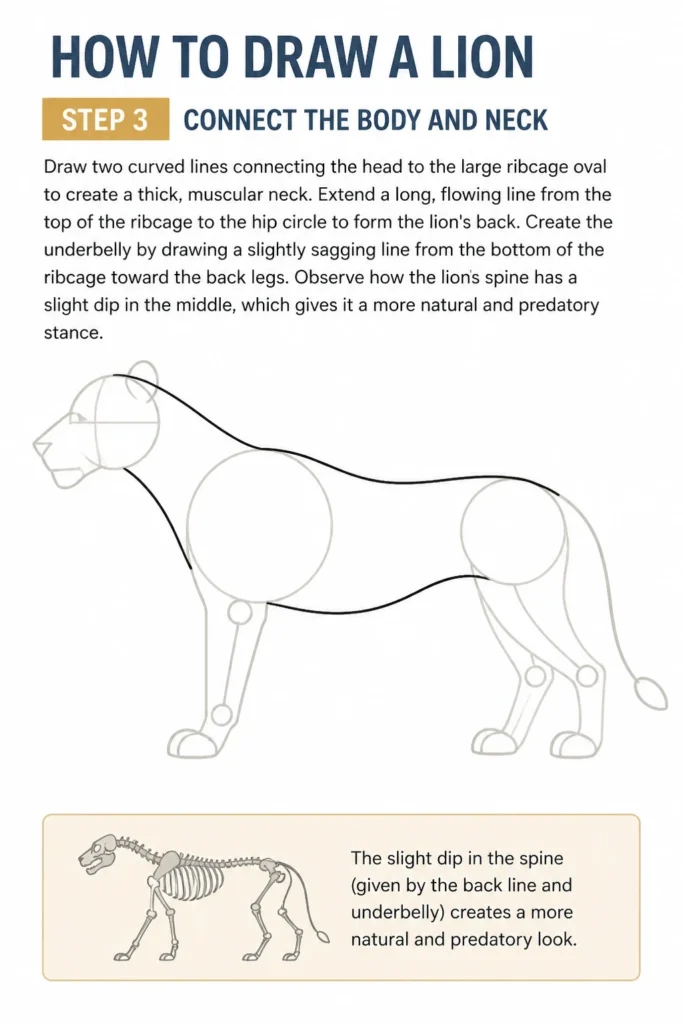
Extend a long, flowing line from the top of the ribcage to the hip circle to form the lion’s back.
Create the underbelly by drawing a slightly sagging line from the bottom of the ribcage toward the back legs.
Observe how the lion’s spine has a slight dip in the middle, which gives it a more natural and predatory stance.
Step 4: Structure the Front Legs
Outline the front leg closest to the viewer by drawing two parallel lines extending down from the ribcage.
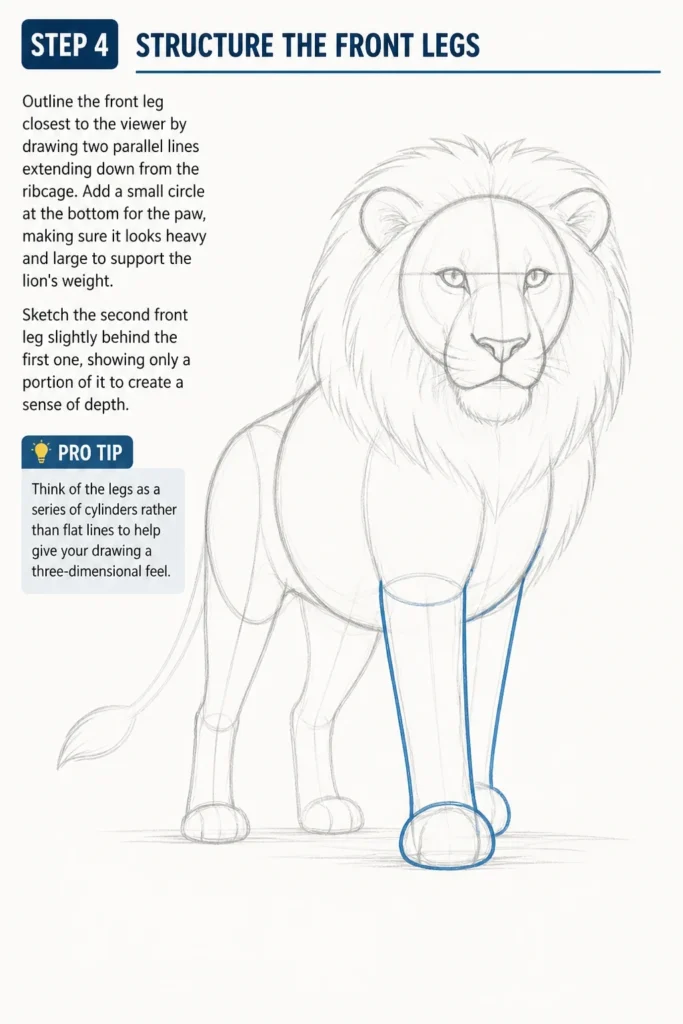
Add a small circle at the bottom for the paw, making sure it looks heavy and large to support the lion’s weight.
Sketch the second front leg slightly behind the first one, showing only a portion of it to create a sense of depth.
Pro Tip: Think of the legs as a series of cylinders rather than flat lines to help give your drawing a three-dimensional feel.
Step 5: Define the Powerful Hind Legs
Shape the back leg by drawing a large, rounded muscle starting from the hip circle and tapering down toward the heel.
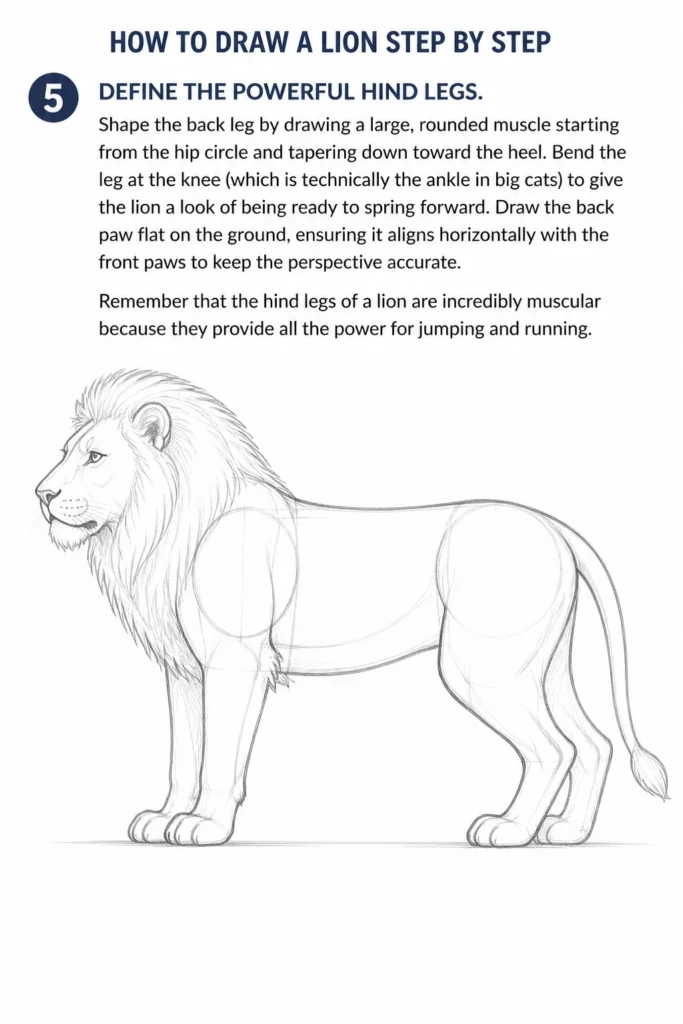
Bend the leg at the “knee” (which is technically the ankle in big cats) to give the lion a look of being ready to spring forward.
Draw the back paw flat on the ground, ensuring it aligns horizontally with the front paws to keep the perspective accurate.
Remember that the hind legs of a lion are incredibly muscular because they provide all the power for jumping and running.
Step 6: Outline the Iconic Mane
Enclose the head and neck area with a large, jagged, or cloud-like shape to establish the boundaries of the mane.
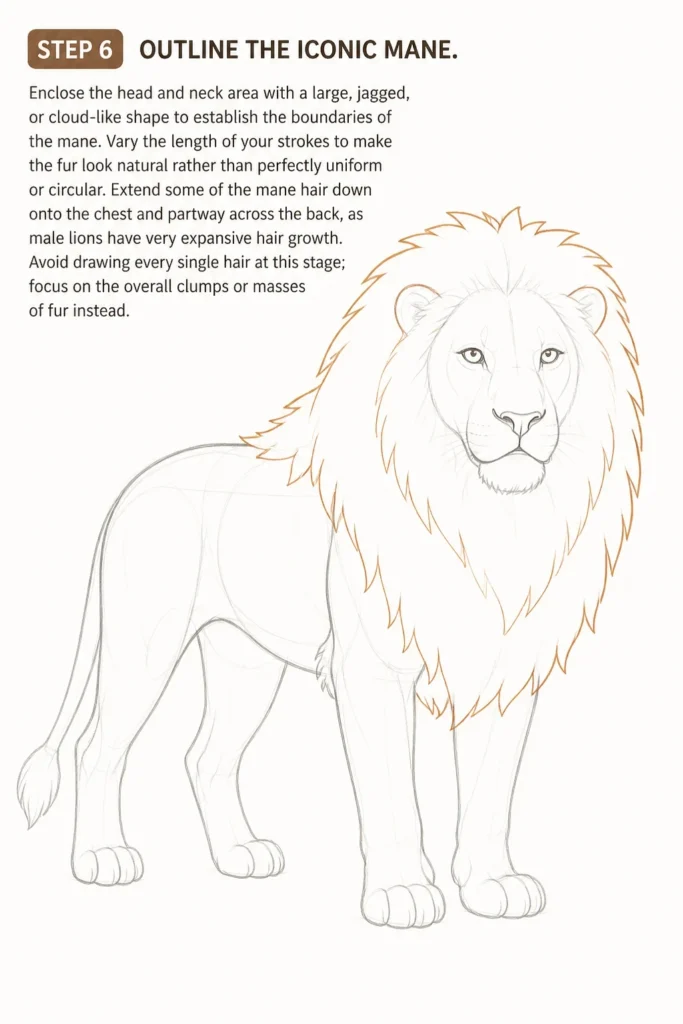
Vary the length of your strokes to make the fur look natural rather than perfectly uniform or circular.
Extend some of the mane hair down onto the chest and partway across the back, as male lions have very expansive hair growth.
Avoid drawing every single hair at this stage; focus on the overall “clumps” or masses of fur instead.
Step 7: Detail the Facial Features
Place two almond-shaped eyes on the horizontal guideline you drew earlier, making sure they are spaced evenly from the center line.
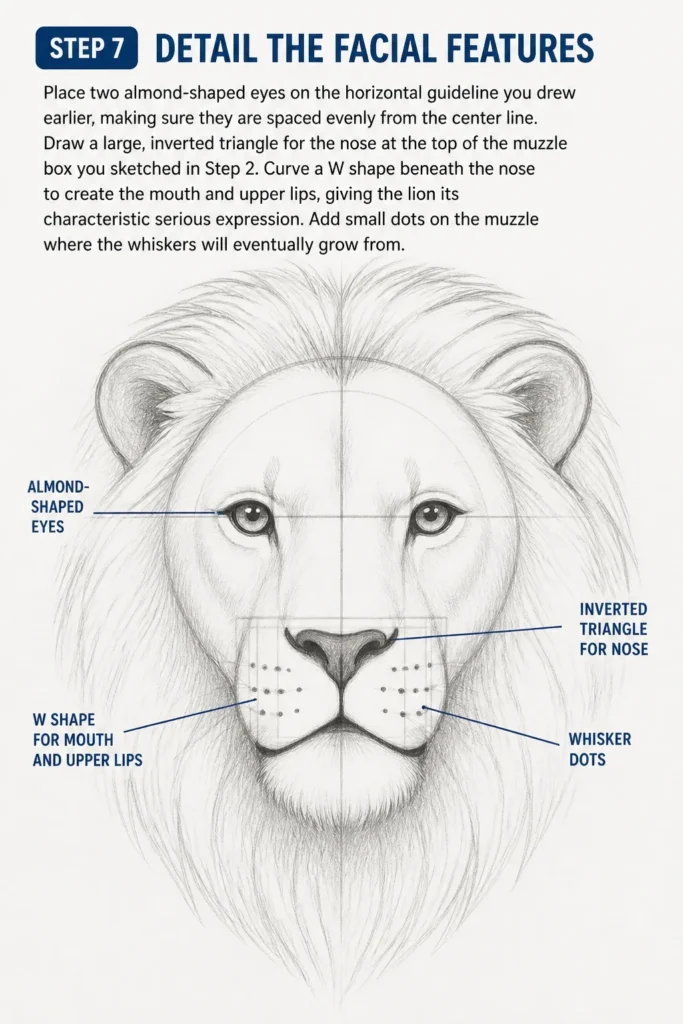
Draw a large, inverted triangle for the nose at the top of the muzzle box you sketched in Step 2.
Curve a “W” shape beneath the nose to create the mouth and upper lips, giving the lion its characteristic serious expression.
Add small dots on the muzzle where the whiskers will eventually grow from.
Step 8: Refine the Tail and Paws
Draw a long, “S” curved line coming off the back of the hip circle to form the tail.
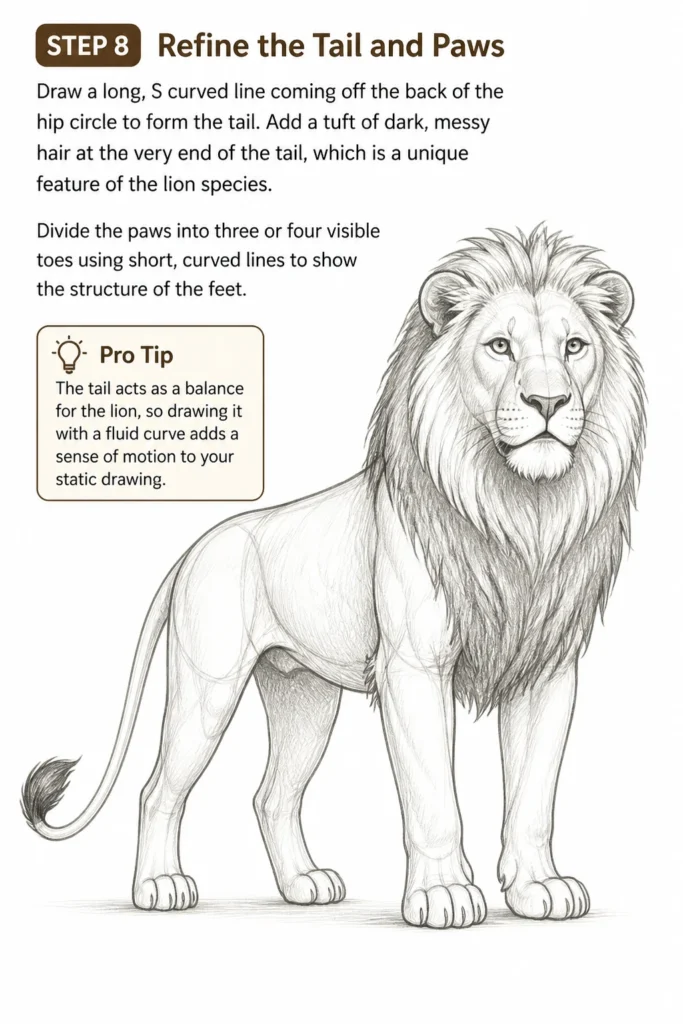
Add a tuft of dark, messy hair at the very end of the tail, which is a unique feature of the lion species.
Divide the paws into three or four visible toes using short, curved lines to show the structure of the feet.
Pro Tip: The tail acts as a balance for the lion, so drawing it with a fluid curve adds a sense of motion to your static drawing.
Step 9: Add Shading and Texture
Identify your light source—usually from the top or side—and begin shading the opposite sides of the body.
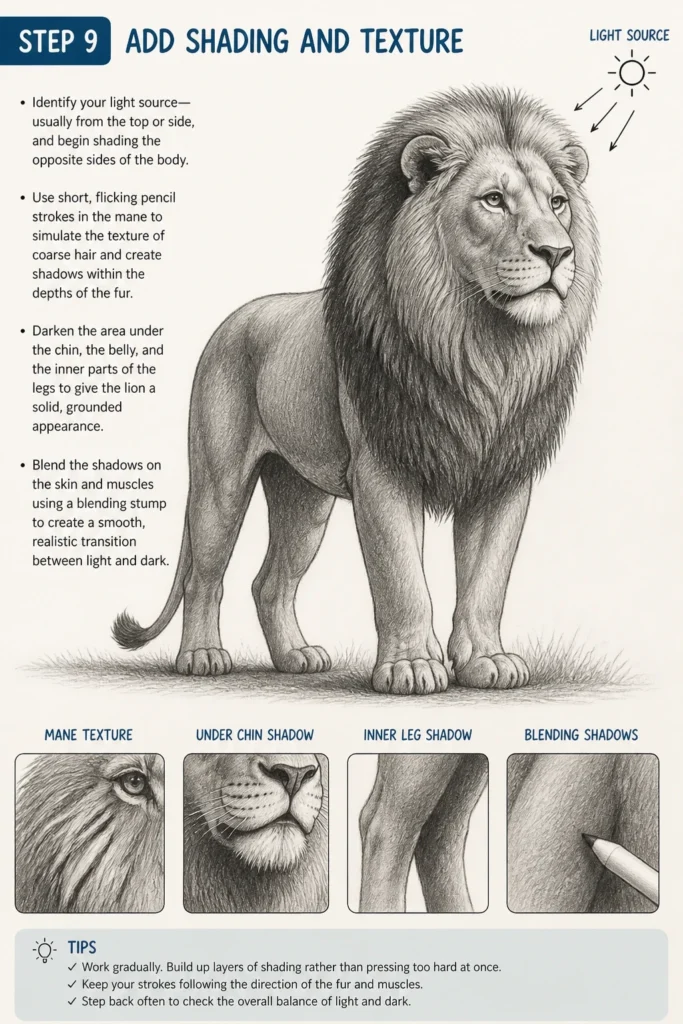
Use short, flicking pencil strokes in the mane to simulate the texture of coarse hair and create shadows within the depths of the fur.
Darken the area under the chin, the belly, and the inner parts of the legs to give the lion a solid, grounded appearance.
Blend the shadows on the skin and muscles using a blending stump to create a smooth, realistic transition between light and dark.
Step 10: Final Highlights and Cleanup
Erase any remaining construction lines from your initial circles and guidelines using a clean eraser.
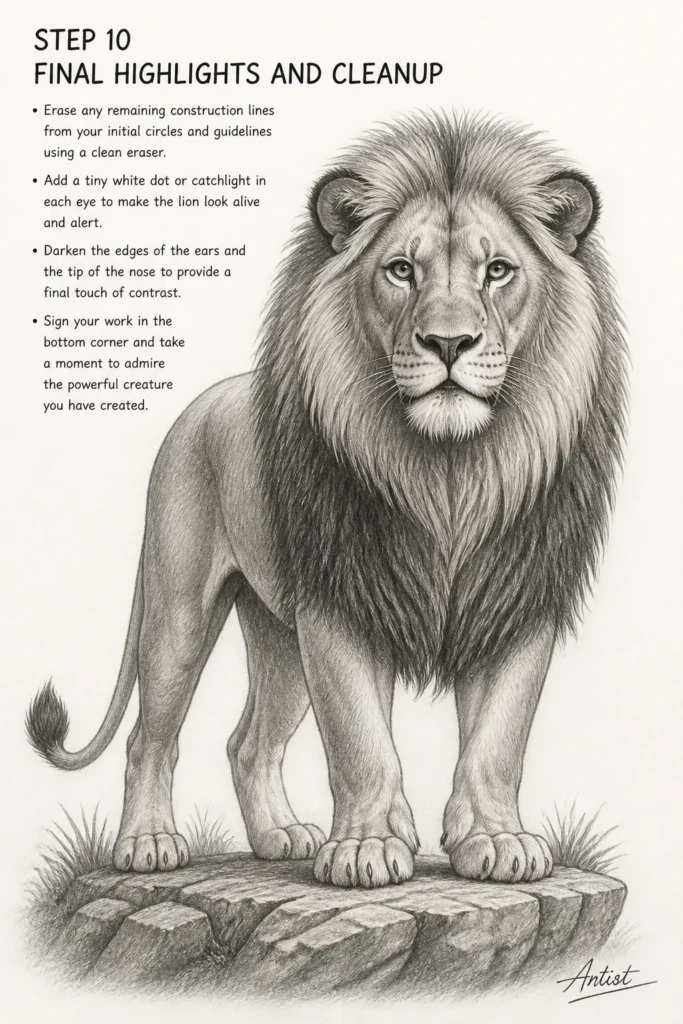
Add a tiny white dot or “catchlight” in each eye to make the lion look alive and alert.
Darken the edges of the ears and the tip of the nose to provide a final touch of contrast.
Sign your work in the bottom corner and take a moment to admire the powerful creature you have created.
Common Mistakes to Avoid
Making the Mane Too Circular
Many beginners draw the mane as a perfect circle around the face, which makes the lion look like a flower. In reality, a lion’s mane is heavy and hangs down toward the chest due to gravity. It should be asymmetrical and follow the contours of the neck and shoulders.
Drawing Tiny Paws
Lions have massive paws that act like snowshoes to distribute their weight and provide grip. If you draw the paws too small, the lion will look top-heavy and unstable. Always err on the side of making the paws look slightly too large rather than too small.
Ignoring the Thickness of the Neck
The neck of a lion is one of its strongest features, but many artists draw it too thin. A thin neck makes the lion look like a domestic cat rather than a 400-pound predator. Ensure the neck transition from the head to the shoulders is wide and robust.
Placing Eyes Too High
Putting the eyes at the very top of the head circle is a frequent error that ruins the anatomy. Big cats have a significant amount of forehead and skull above their eyes. Always place the eyes on the middle horizontal line of your head circle to maintain realism.
Troubleshooting
The Lion Looks Like a Dog
This usually happens when the muzzle is too long or pointed. To fix this, shorten the muzzle and make the nose wider and flatter. A lion’s face is much more “square” than a dog’s face, so focus on those blocky angles around the jawline.
The Drawing Looks Flat and Lifeless
If your lion lacks depth, your shading might be too light or too uniform. Increase the contrast by making your darkest shadows much darker, especially under the mane and belly. Adding a cast shadow on the ground beneath the lion will also help anchor it in space.
The Mane Looks Like a Solid Helmet
If the hair looks like a solid piece of plastic, you need more “negative space” and varying line weights. Break up the outer edge of the mane with stray hairs and use different pencil pressures to create layers. Think of the mane as several overlapping chunks of fur rather than one single mass.
Key Takeaways
- Start with basic geometry to ensure the proportions are correct before adding any details.
- Use light pressure for your initial sketches so you can easily erase mistakes without leaving marks.
- Focus on the mane’s weight by drawing it longer at the bottom and shorter at the top.
- Observe big cat anatomy specifically focusing on the large paws and thick neck for a regal look.
- Layer your shading to create the appearance of thick fur and powerful underlying muscles.
- Add a catchlight in the eyes as the final touch to bring your drawing to life.
Frequently Asked Questions
What is the hardest part of drawing a lion?
Most artists struggle with the mane because it requires a balance between detail and simplicity. If you draw every hair, the drawing becomes cluttered, but if you don’t draw enough, it looks flat. The secret is to shade the large masses of the mane and only add fine hair details at the edges.
Should I use a reference photo?
Yes, even professional artists use reference photos to understand how muscles move and how light hits the fur. Look for photos of lions in different lighting to see how the shadows define their facial structure. Using a reference will help you avoid “drawing what you think a lion looks like” and instead draw what a lion actually looks like.
Can I draw a female lion using this guide?
You can certainly use the same body and head structure for a lioness. Simply skip the steps involving the mane and make the neck slightly more slender. Lionesses have very sleek, muscular bodies, so you might want to spend more time detailing the muscle definition in the legs and shoulders.
Which pencil is best for the mane?
A softer pencil like a 2B or 4B is ideal for the mane because it allows for dark, rich shadows and smooth blending. You can use a sharpened HB pencil for the fine, individual hairs that stick out at the edges. Switching between different lead grades will give the fur more dimension and realism.
Our Top Recommended Finds
- Kneaded Eraser: This tool is essential for lifting highlights out of the mane without smearing the graphite.
- Blending Stumps: These paper tools help you create smooth transitions on the lion’s coat and muzzle for a realistic finish.
- Drawing Pencil Set: A variety of lead weights (from 2H to 6B) allows you to capture both the fine details and the deep shadows of the “King of the Jungle.”
Take Your Art To The Savanna
Now that you have mastered the basic structure of the lion, try experimenting with different poses. You might draw your lion mid-roar or perhaps lounging on a rock in the afternoon sun.
The more you practice these proportions, the more natural your sketches will become. Grab your sketchbook today and try drawing a lion from a different angle to challenge your perspective skills.
Once you feel confident, you can even add a background like tall grass or a distant acacia tree to complete the scene. Your journey into wildlife art is just beginning, and there are many more creatures waiting for you to capture them on paper.
& Painting
No rigid rules or pretension. Just practical guides, medium comparisons, and encouraging tips to help you enjoy the drawing & painting process.