🍰 How To Draw A Cake Step By Step

& Painting
No rigid rules or pretension. Just practical guides, medium comparisons, and encouraging tips to help you enjoy the drawing & painting process.
Are you ready to add a delicious touch to your sketchbook?
I’ve personally sketched countless confections, perfecting the art of a delightful cake on paper.
This guide will show you exactly how to create your own sweet masterpiece, even if you’ve never drawn before.
Quick Overview
You’re about to learn how to draw a charming, multi-layered cake, complete with icing and decorations. By the end, you’ll have a delightful drawing ready for coloring or display.
- Time needed: 30-60 minutes
- Difficulty: Beginner
- What you’ll need: Pencil (HB or 2B recommended), eraser, paper, optional: fine-liner, colored pencils or markers.
Step-by-Step Instructions
Step 1: Sketch the Base Shape
Begin by lightly drawing a flat oval for the top of your cake. This will be the uppermost surface of your dessert.
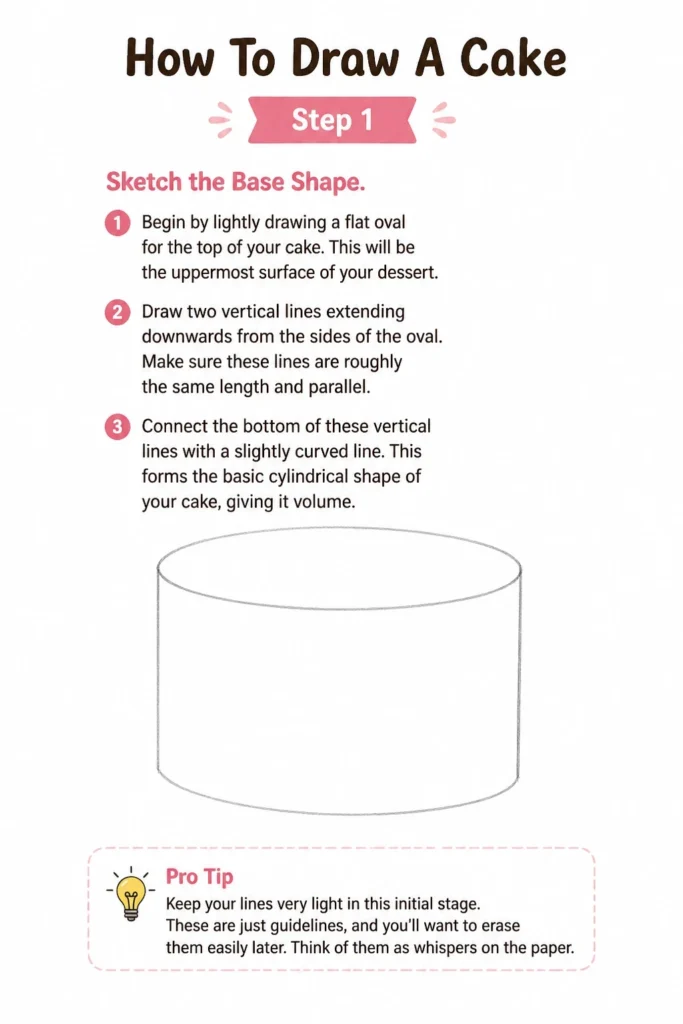
Draw two vertical lines extending downwards from the sides of the oval. Make sure these lines are roughly the same length and parallel.
Connect the bottom of these vertical lines with a slightly curved line. This forms the basic cylindrical shape of your cake, giving it volume.
Pro Tip: Keep your lines very light in this initial stage. These are just guidelines, and you’ll want to erase them easily later. Think of them as whispers on the paper.
Step 2: Define the Cake Layers
Add horizontal, slightly curved lines inside your main cake shape. These lines will indicate the different layers of your cake.
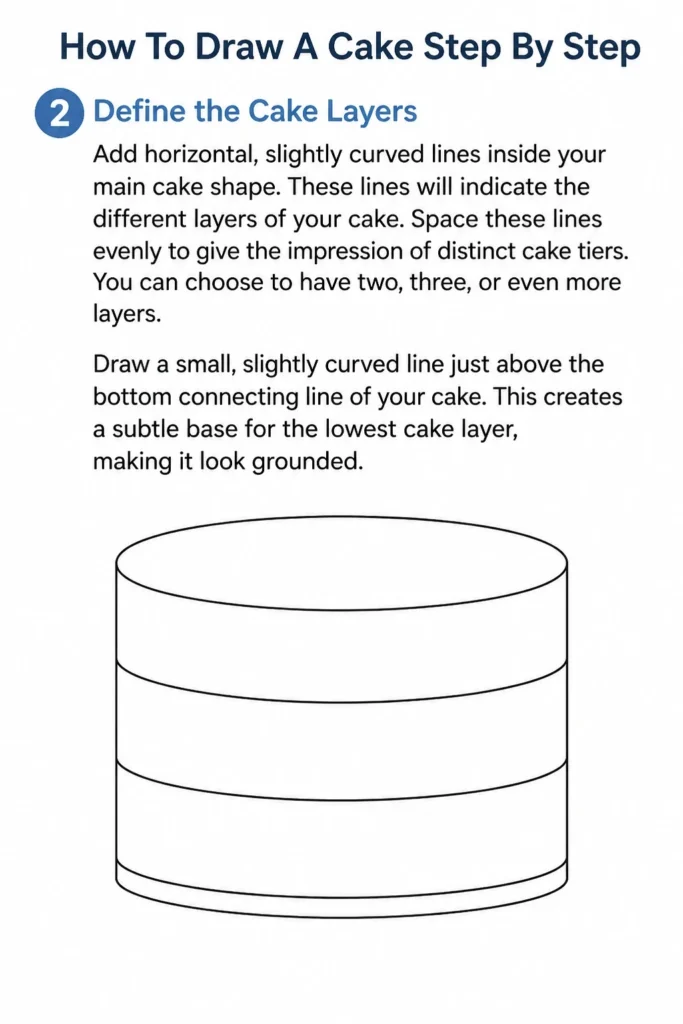
Space these lines evenly to give the impression of distinct cake tiers. You can choose to have two, three, or even more layers.
Draw a small, slightly curved line just above the bottom connecting line of your cake. This creates a subtle base for the lowest cake layer, making it look grounded.
Step 3: Outline the Icing and Drips
Sketch a wavy, organic line along the top edge of your cake’s oval. This represents the generous layer of frosting on top.
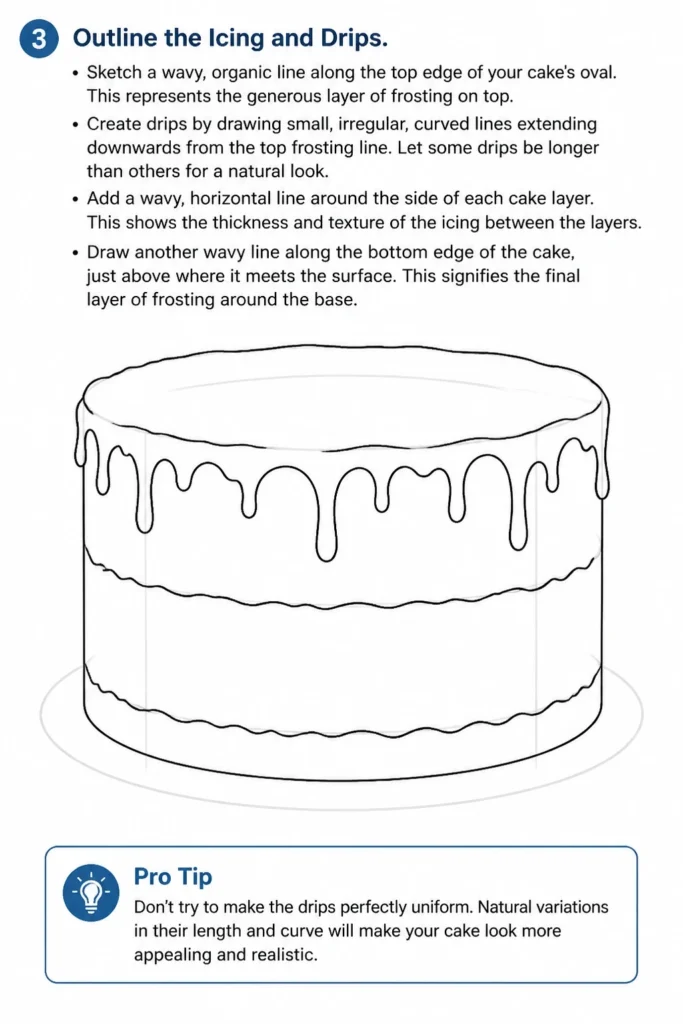
Create drips by drawing small, irregular, curved lines extending downwards from the top frosting line. Let some drips be longer than others for a natural look.
Add a wavy, horizontal line around the side of each cake layer. This shows the thickness and texture of the icing between the layers.
Draw another wavy line along the bottom edge of the cake, just above where it meets the surface. This signifies the final layer of frosting around the base.
Pro Tip: Don’t try to make the drips perfectly uniform. Natural variations in their length and curve will make your cake look more appealing and realistic.
Step 4: Add Decorative Elements
Consider what kind of decorations you want. Common choices include candles, cherries, sprinkles, or even simple swirls.
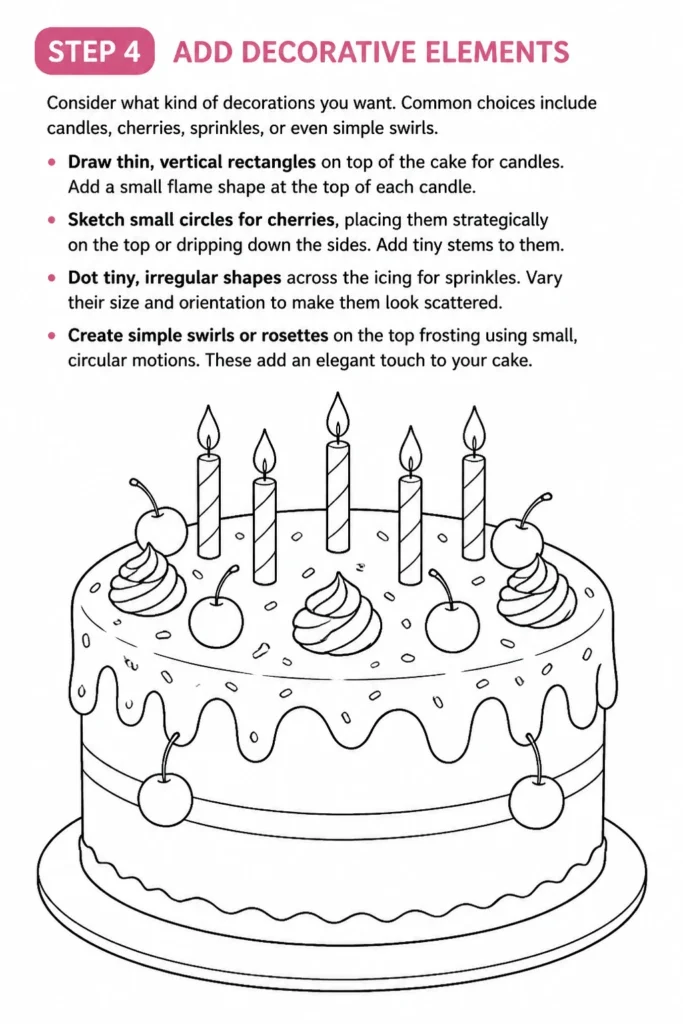
Draw thin, vertical rectangles on top of the cake for candles. Add a small flame shape at the top of each candle.
Sketch small circles for cherries, placing them strategically on the top or dripping down the sides. Add tiny stems to them.
Dot tiny, irregular shapes across the icing for sprinkles. Vary their size and orientation to make them look scattered.
Create simple swirls or rosettes on the top frosting using small, circular motions. These add an elegant touch to your cake.
Step 5: Draw the Cake Stand or Plate
Place a flat, slightly curved oval beneath the bottom of your cake. This will serve as the plate or stand.
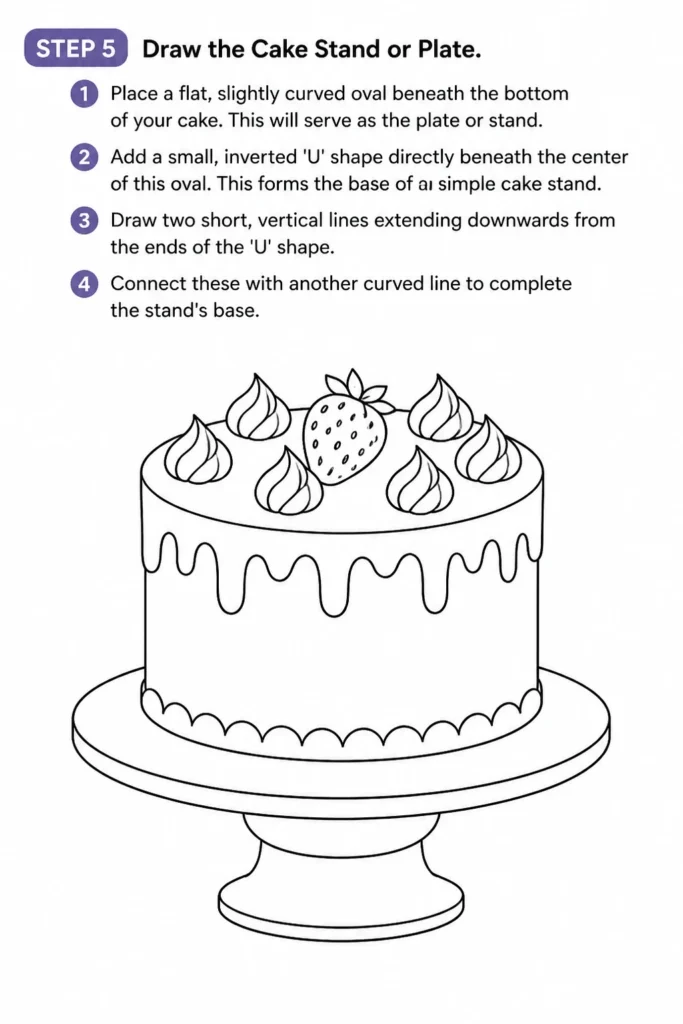
Add a small, inverted ‘U’ shape directly beneath the center of this oval. This forms the base of a simple cake stand.
Draw two short, vertical lines extending downwards from the ends of the ‘U’ shape. Connect these with another curved line to complete the stand’s base.
Ensure the stand looks proportionate to your cake. It should support the cake without overpowering it.
Pro Tip: Pay attention to perspective here. The plate or stand should look like it’s holding the cake, not floating beneath it. The curve of the plate should match the curve of the cake’s base.
Step 6: Refine Your Lines
Go over your preferred lines with a slightly firmer hand or a darker pencil. Make these lines clearer and more defined.
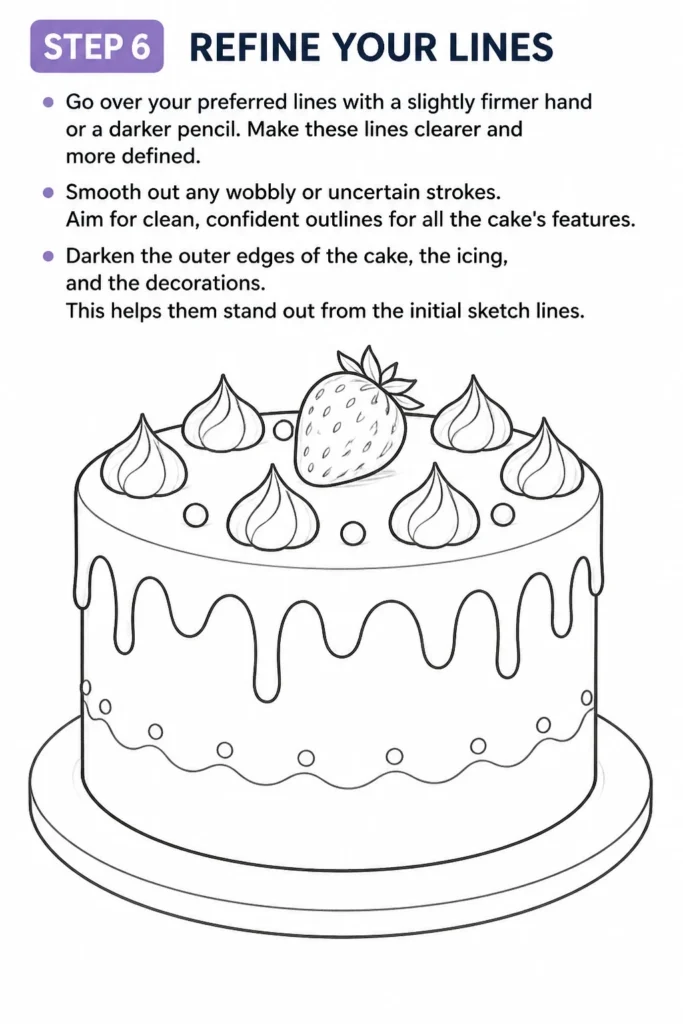
Smooth out any wobbly or uncertain strokes. Aim for clean, confident outlines for all the cake’s features.
Darken the outer edges of the cake, the icing, and the decorations. This helps them stand out from the initial sketch lines.
Step 7: Erase Unnecessary Guidelines
Gently erase all the light construction lines you drew in the first few steps. These are the initial base shapes and internal layer guides.
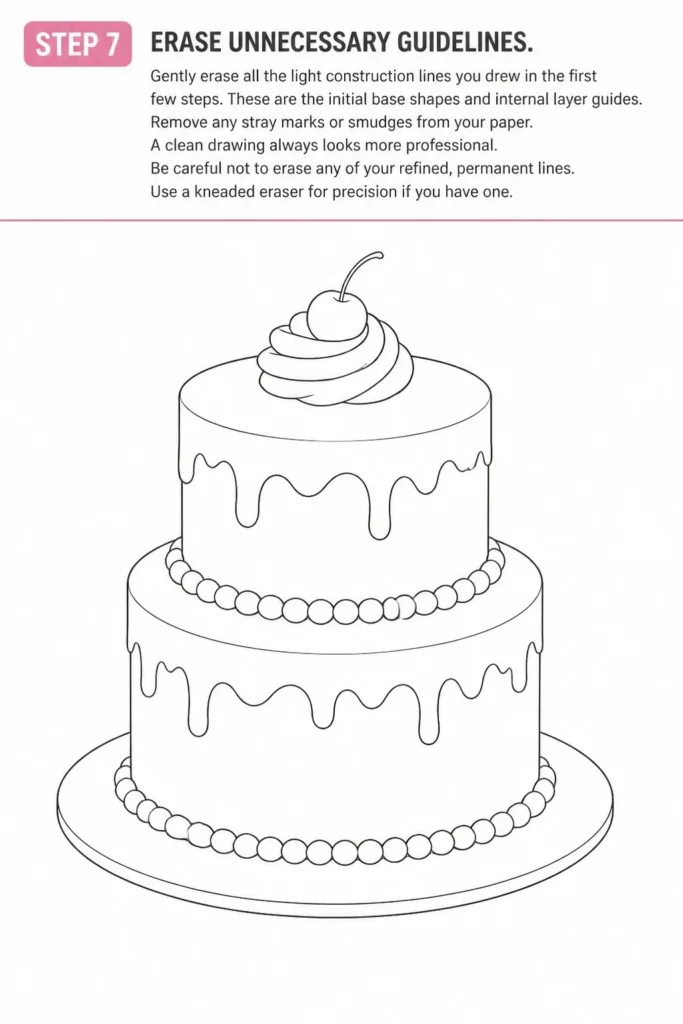
Remove any stray marks or smudges from your paper. A clean drawing always looks more professional.
Be careful not to erase any of your refined, permanent lines. Use a kneaded eraser for precision if you have one.
Step 8: Apply Shading and Highlights
Decide on a light source. Imagine where the light is coming from (e.g., top-left) and stick to it consistently.
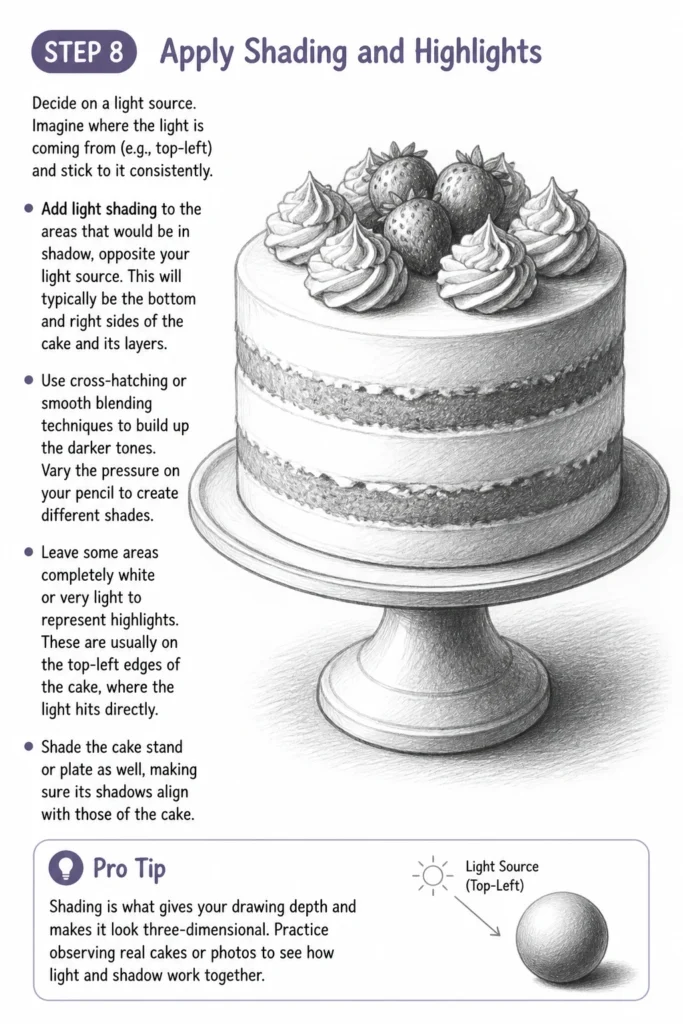
Add light shading to the areas that would be in shadow, opposite your light source. This will typically be the bottom and right sides of the cake and its layers.
Use cross-hatching or smooth blending techniques to build up the darker tones. Vary the pressure on your pencil to create different shades.
Leave some areas completely white or very light to represent highlights. These are usually on the top-left edges of the cake, where the light hits directly.
Shade the cake stand or plate as well, making sure its shadows align with those of the cake.
Pro Tip: Shading is what gives your drawing depth and makes it look three-dimensional. Practice observing real cakes or photos to see how light interacts with their surfaces.
Step 9: Introduce Color
Choose your desired colors for the cake, icing, and decorations. Think about classic cake flavors or fun, vibrant combinations.
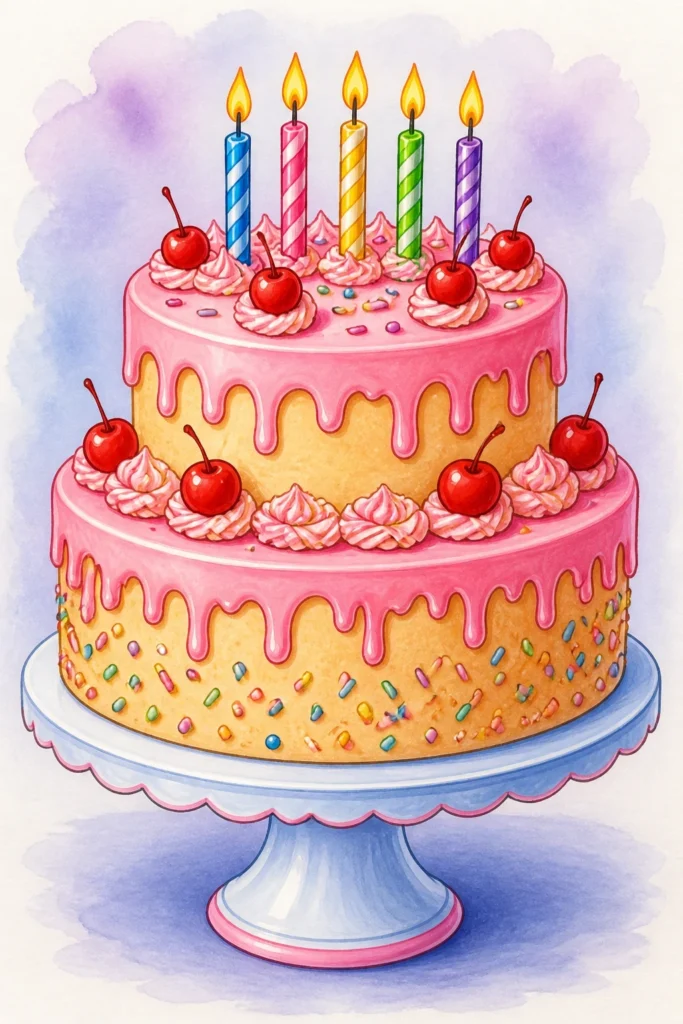
Apply your base colors evenly, staying within your refined lines. Start with lighter shades and build up to darker ones.
Use different shades of the same color to enhance the shading you already established. For example, use a darker pink for the shadowed areas of pink icing.
Color in the details like candles, flames, cherries, and sprinkles. Make them pop with bright, contrasting colors.
Add a soft wash of color to the background or a subtle shadow beneath the cake and stand to ground it further.
Common Mistakes to Avoid
Uneven Layers
A common pitfall is drawing cake layers that are not parallel or appear to be leaning. This often happens when the initial base shapes are not carefully constructed. Always start with light, straight guidelines for your vertical sides and ensure your horizontal layer lines follow the same gentle curve.
To correct this, re-evaluate your initial cylinder or rectangle. Use a ruler to ensure your vertical lines are truly parallel, and then freehand the curved layer lines to match the perspective of your top oval. Lightly sketching helps you make adjustments before committing to darker lines.
Flat Icing
Sometimes, the frosting can look like a thin, painted-on surface rather than a thick, delicious coating. This happens when the lines for the icing are too straight or don’t show enough volume. Icing, especially dripping icing, should have an organic, slightly irregular quality.
To avoid this, use wavy, flowing lines for your frosting and drips. Give the icing a bit of thickness by drawing two parallel lines for the edges of the frosting, rather than just one. Think about how real frosting sits and flows, creating soft mounds and gentle drips.
Over-Decorating
While decorations add personality, too many can make your cake look cluttered and messy. It’s easy to get carried away with sprinkles, cherries, and candles, losing the overall appeal of the cake itself. A balanced design is more aesthetically pleasing.
Focus on a few key decorative elements rather than trying to include everything. Consider a focal point, like a cluster of cherries or a single, beautifully drawn candle. Distribute your decorations thoughtfully, allowing some “breathing room” on the cake’s surface.
Ignoring Light Source
Failing to consistently apply shading based on a single light source can make your cake look flat and unrealistic. If shadows appear on different sides of different elements, the drawing loses its sense of depth and form. This breaks the illusion of a three-dimensional object.
Always decide where your light is coming from at the beginning of the shading process. Imagine how that light would hit every part of the cake, creating highlights on the side facing the light and shadows on the opposite side. Apply shading uniformly across all elements, including the cake, icing, and decorations.
Troubleshooting
My cake looks lopsided
If your cake appears to be tilting or leaning, the initial base shape might be off-kilter. The vertical sides of your cylinder might not be parallel, or your top and bottom curves might not match in perspective. This creates an unstable look.
Go back to Step 1 and re-evaluate your initial light sketch. Use a ruler to ensure your vertical lines are perfectly straight and parallel. Make sure the curve of your bottom line mirrors the curve of your top oval, just slightly less pronounced. Erase and redraw these foundational lines until they feel balanced.
My frosting looks stiff, not soft
If your icing lacks that luscious, soft appearance, you might be drawing with lines that are too rigid or angular. Frosting is typically smooth and flowing, not sharp or geometric. Stiff lines prevent the illusion of creamy texture.
Practice drawing gentle, undulating curves for your icing. Think of soft waves or melting wax. Avoid straight lines when outlining frosting or drips. Embrace slight imperfections in the curves; these often add to the natural, appealing look of soft frosting.
My details feel messy
When decorative elements like sprinkles or cherries look haphazard rather than intentionally placed, it can detract from the overall drawing. This often happens when you press too hard too early or don’t plan the placement of your details.
Always sketch details lightly first. If you’re drawing sprinkles, vary their sizes and slightly overlap them naturally. For cherries or larger decorations, plan their arrangement before committing. Build up your details gradually, refining them as you go, rather than trying to perfect them in one go.
Key Takeaways
- Start with basic shapes: Building your cake from simple ovals and cylinders ensures a solid foundation.
- Build layers gradually: Define each section of the cake and icing step by step for clarity.
- Details add personality: Decorations like candles and sprinkles bring your cake to life, but use them thoughtfully.
- Shading creates realism: Consistent light and shadow transform your flat drawing into a three-dimensional treat.
- Practice improves skill: The more you draw, the better you’ll become at capturing textures and forms.
- Embrace imperfections: Don’t strive for photographic perfection; a hand-drawn cake has its own unique charm.
Frequently Asked Questions
Can I draw a different cake shape?
Absolutely! This guide uses a round cake as an example, but you can easily adapt the principles. For a square cake, start with a square or rectangle for the top and draw straight vertical lines down. For a sheet cake, make your initial rectangle wider and flatter. The layering and decorating steps remain similar.
What if I don’t have colored pencils?
No problem at all! You can still create a stunning cake drawing using only your pencil. Focus intensely on shading and cross-hatching to create depth and texture. Use different pencil pressures to achieve a wide range of values from light gray to dark black. A monochromatic drawing can be incredibly elegant and expressive.
How do I make it look 3D?
The key to making your cake look three-dimensional lies in two main areas: perspective and shading. Ensure your initial shapes (ovals for round cakes, rectangles for square) show a slight angle, giving the illusion of depth. Then, apply consistent shading according to a single light source, creating highlights where light hits and shadows where it doesn’t. This contrast brings out the form.
How do I draw realistic sprinkles?
For realistic sprinkles, avoid making them all the same size and perfectly spaced. Draw tiny, varied shapes (short lines, dots, small ovals) and scatter them irregularly across the icing. Overlap some, leave gaps for others. Adding a tiny bit of shadow underneath each sprinkle can make them appear to sit on top of the frosting, adding to their realism.
Our Top Recommended Finds
- Sketchbook with good paper: A quality sketchbook (90-120 gsm) prevents bleed-through and holds pencil marks well, making erasing easier.
- Set of drawing pencils: A range from 2H (hard, light) to 6B (soft, dark) allows for precise linework and rich shading.
- Kneaded eraser: This soft, pliable eraser can lift graphite without smudging or damaging the paper, perfect for subtle corrections.
Your Sweetest Creation Awaits!
You’ve just learned the essential steps to drawing a delightful cake. Remember, every stroke is a chance to express your creativity and bring a little sweetness to your art.
Don’t stop here! Try drawing different types of cakes, cupcakes, or even a whole dessert spread. Experiment with new colors and decorative styles.
Grab your pencil right now and let your imagination bake up something truly special. Share your masterpiece with friends or keep it as a testament to your growing artistic skills!
& Painting
No rigid rules or pretension. Just practical guides, medium comparisons, and encouraging tips to help you enjoy the drawing & painting process.