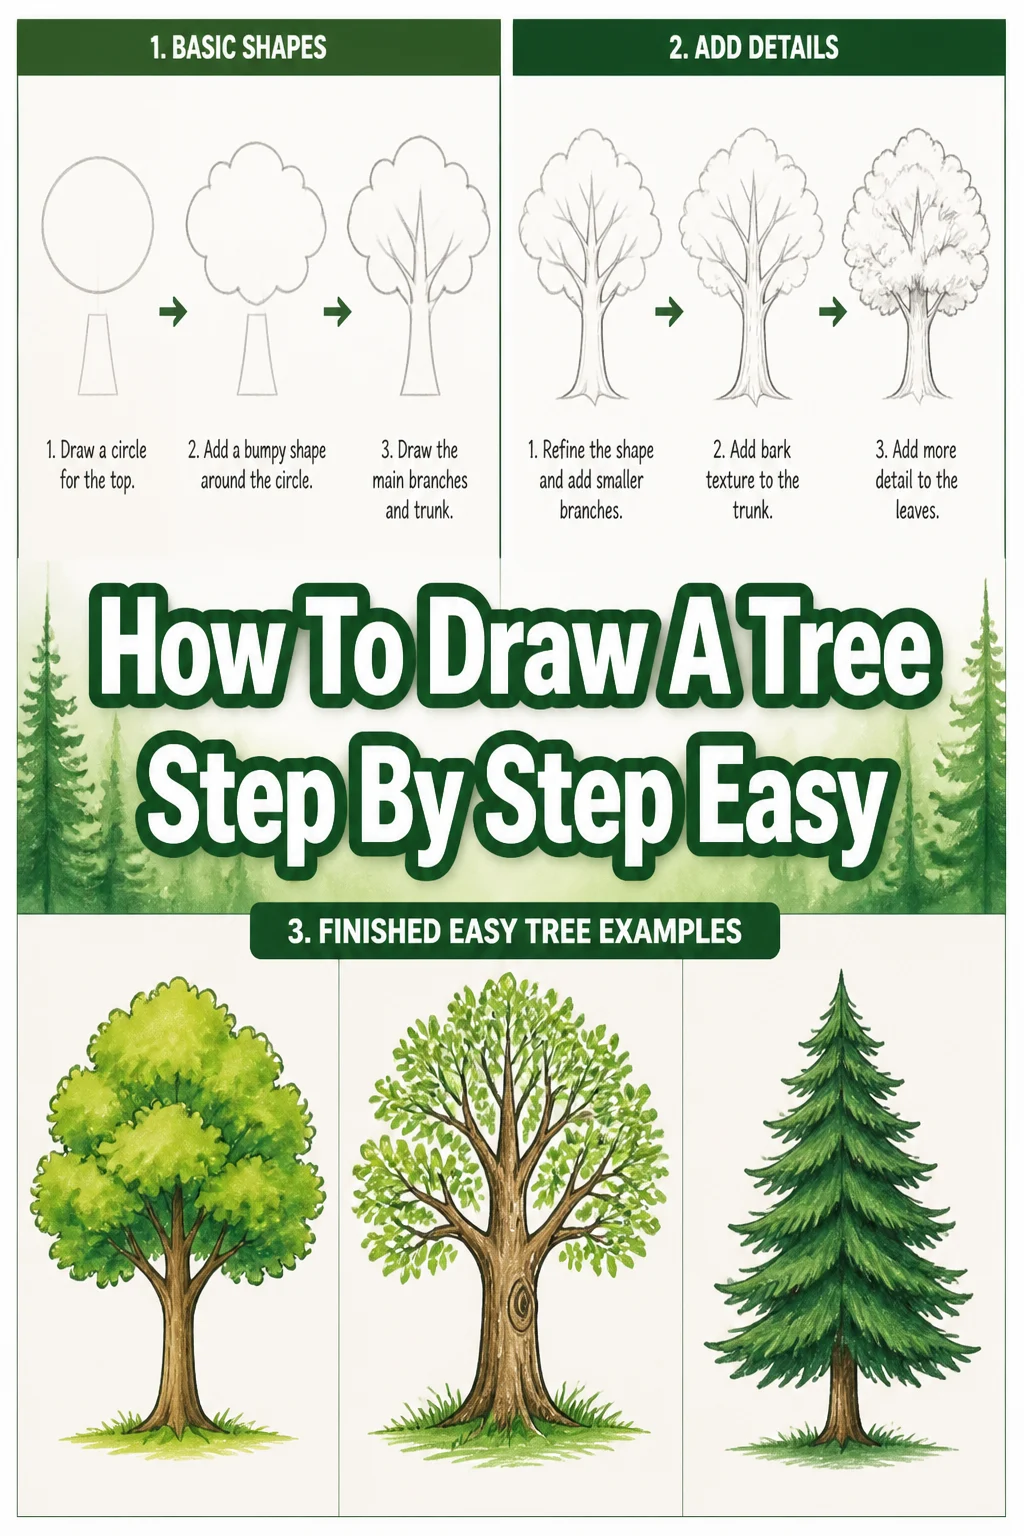
🌳 How To Draw A Tree Step By Step Easy
Drawing a tree might seem like a big challenge at first. I remember feeling overwhelmed by all the leaves and branches.
But with a few simple shapes and an understanding of how trees grow, anyone can create a beautiful drawing. This guide breaks it down into easy, manageable steps.
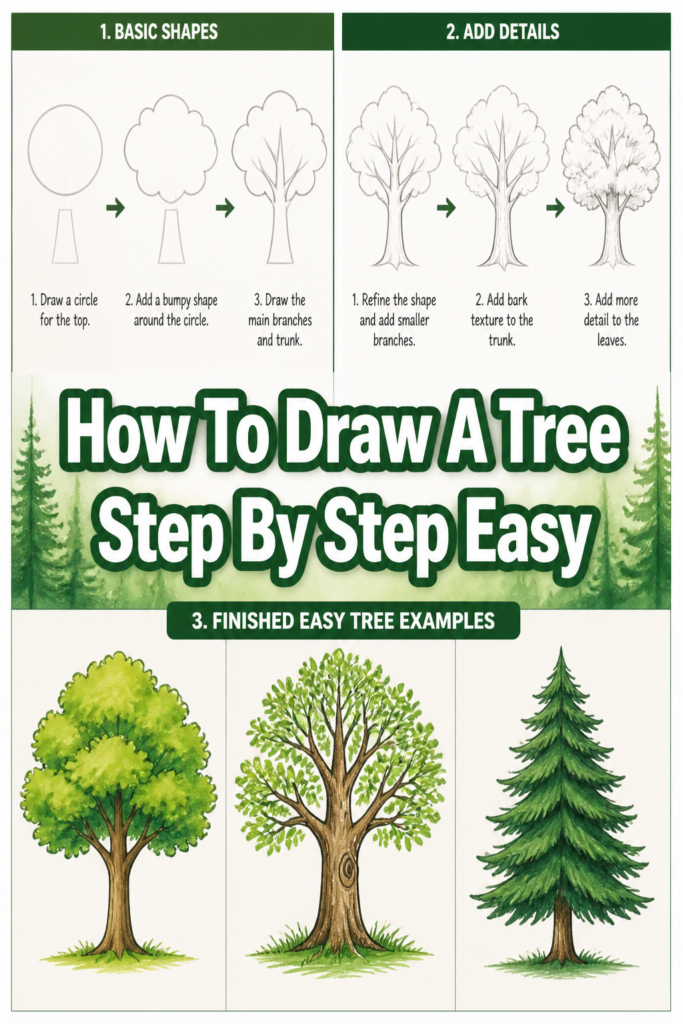
Quick Overview
You’re about to learn how to sketch a natural-looking tree, building it up from basic shapes to detailed textures. We will focus on making the process simple and enjoyable.
Time needed: 30-60 minutes
Difficulty: Beginner
What you’ll need: Pencil (HB or 2B recommended), eraser, drawing paper
Step-by-Step Instructions
Step 1: Sketch the Trunk’s Foundation
Begin by lightly sketching the central line for your tree’s trunk. This line acts as the backbone, guiding the overall height and posture of your tree. It does not need to be perfectly straight.
Think of this as the initial skeleton before adding any muscle or skin. Keep your lines very faint, as you might adjust them later.
Lightly draw a slightly wavy vertical line.
Determine the approximate height you want your tree to be.
Allow for a gentle curve or lean, as most natural trees aren’t perfectly rigid.
Pro Tip: Use a very light hand when you start. This allows you to erase and refine your lines without leaving deep indentations on the paper.
Step 2: Define the Trunk’s Shape
Now, give your trunk some volume by drawing two more lines around your initial guide. These lines will create the width and form of the trunk. Remember that trunks are usually wider at the base and gradually narrow as they reach upwards.
Vary the width slightly, rather than making it perfectly symmetrical. This adds a more organic feel.
Draw two curved lines extending from the base of your initial line.
Connect these lines towards the top, gradually narrowing the trunk.
Ensure the base is noticeably wider, rooting the tree firmly to the ground.
Step 3: Establish the Main Branches
From the upper part of your trunk, begin to sketch the main branches. These are the primary limbs that extend outwards, supporting the rest of the tree’s canopy. Think of them like arms reaching out.
Avoid making them too uniform; branches grow in different directions and at varying angles. They also taper, becoming thinner as they move away from the trunk.
Extend 3-5 main branches from different points on the upper trunk.
Vary their lengths and angles to create a dynamic silhouette.
Remember that branches also thin out as they get longer.
Pro Tip: Imagine the internal structure of the tree. Branches should look like they could physically support the weight of leaves, not just float. Connect them firmly to the trunk.
Step 4: Add Secondary Branches and Twigs
Build upon your main branches by adding smaller, secondary branches and twigs. These fill out the internal structure of the tree, creating density and complexity. Each main branch can split into two or three smaller branches.
These smaller branches are crucial for giving the tree a full, realistic appearance. They also taper, becoming very thin at their tips.
Draw smaller branches emerging from your main branches.
Continue to add even finer twigs at the ends of these secondary branches.
Ensure that all branches and twigs follow the tapering rule, getting thinner towards their ends.
Step 5: Outline the Foliage Shape
Now it’s time to give your tree its leafy crown. Instead of drawing individual leaves, think about the overall shape of the foliage. Sketch a loose, cloud-like outline that encompasses your branches.
Trees come in many shapes—round, oval, triangular, or irregular. Choose one that appeals to you. This outline will define the general mass of leaves.
Sketch a light, bumpy, cloud-like shape around the ends of your branches.
Vary the bumps and indentations to avoid a perfectly symmetrical look.
Consider the type of tree you’re drawing; some have broad canopies, others are more columnar.
Step 6: Develop Foliage Texture
With your foliage outline in place, begin to add texture within that shape. Use a series of loose, overlapping scribbles, squiggles, or small, irregular circles. This creates the impression of many leaves without drawing each one.
Focus on creating depth and variation. Some areas can be denser, others lighter. Don’t press too hard.
Use quick, light, circular or scribble motions to fill the foliage outline.
Vary the pressure and direction of your strokes to create different textures.
Leave some small gaps or lighter areas to suggest light filtering through the leaves.
Pro Tip: Think of the foliage as many small clusters of leaves. This helps break up the overall mass and adds realism. Avoid drawing a single, uniform blob.
Step 7: Add Bark Texture to the Trunk
Give your trunk and main branches character by adding bark texture. Use short, irregular lines, curves, and small dashes that follow the direction of the trunk. Bark isn’t smooth; it has grooves and bumps.
This step adds age and realism to your tree. Different trees have different bark patterns, but a general sense of ruggedness works well for most.
Draw short, broken lines and subtle curves along the trunk and main branches.
Emphasize the vertical direction of the bark’s texture.
Add small, irregular marks to suggest knots or rough patches.
Step 8: Define the Ground and Roots
A tree doesn’t float; it needs to be grounded. Draw a simple line to represent the ground where your tree stands. You can also add subtle root flares at the base of the trunk.
These small details help anchor your tree in its environment and make it feel more complete. Roots often spread out a bit before disappearing into the earth.
Draw a horizontal line to indicate the ground level.
Add slight bumps or curves at the very base of the trunk to suggest exposed roots.
Ensure the tree looks firmly planted, not just sitting on top of the ground.
Step 9: Introduce Shading and Light
Shading brings your tree to life by creating depth and dimension. Decide on a light source (e.g., coming from the upper left). Then, shade the opposite side of the trunk and the underside of the foliage.
Use varying pressure to create lighter and darker areas. This makes the tree appear three-dimensional instead of flat.
Choose a consistent light source direction for your entire drawing.
Shade the side of the trunk opposite your light source, making it darker.
Add darker tones to the undersides and interior areas of the foliage mass.
Leave some areas lighter to suggest direct light hitting the leaves.
Step 10: Refine and Erase
Take a moment to step back and observe your drawing. Erase any visible initial guide lines that are no longer needed. Darken important outlines or add a few more details where necessary.
This is your chance to make any final adjustments and give your tree a polished look. Don’t be afraid to make small corrections.
Gently erase any faint construction lines from earlier steps.
Darken the outer edges of the trunk and main branches slightly for emphasis.
Add a few more small texture marks to the foliage or bark if needed.
Common Mistakes to Avoid
Making the Trunk Too Symmetrical
Many beginners draw a trunk that is perfectly straight and uniform on both sides. This makes the tree look artificial and stiff. Real tree trunks often have slight bends, bulges, and irregularities.
Instead, let your trunk have a natural curve. Vary its width slightly, making one side a little more uneven than the other. This simple change adds immediate realism.
Creating “Lollipop” Foliage
A common pitfall is drawing a perfectly round or oval blob of leaves on top of the trunk, resembling a lollipop. This lacks character and natural form. Trees rarely have such perfectly manicured canopies in nature.
Break up the outline of your foliage. Use a series of bumpy, irregular curves. Imagine clusters of leaves rather than one solid mass.
Drawing Uniform Branches
If all your branches extend at the same angle, are the same length, or have the same thickness, your tree will look robotic. Nature is full of variation, and trees are no exception.
Vary the angles, lengths, and thicknesses of your branches. Let some reach higher, others lower, and ensure they all taper naturally from thick at the trunk to thin at the tips.
Forgetting Shading and Depth
Drawing only outlines makes a tree appear flat and two-dimensional. Without shading, the form and volume of the tree are lost. Shading is essential for making your drawing pop off the page.
Always consider a light source. Apply darker tones to areas that would be in shadow—the underside of branches, the side of the trunk away from the light, and deeper within the foliage. This creates depth and makes the tree feel solid.
Troubleshooting
My Tree Looks Flat
If your tree appears flat, it likely lacks sufficient shading and texture. Flatness often comes from uniform lines and a lack of tonal variation.
Revisit your shading step. Ensure you have a clear light source and that you’re applying darker tones to the shadowed areas of the trunk, branches, and foliage. Also, add more varied textures to both the bark and the leaves to break up flat surfaces.
The Branches Don’t Look Realistic
Unrealistic branches often stem from making them too straight, too uniform, or not connected properly to the trunk. They might look like they’re floating or just stuck on.
Examine how branches grow. They typically emerge from the trunk and then split into smaller, tapering limbs. Make sure your branches are firmly attached and that they gradually thin out as they extend away from the main trunk. Add slight curves and bends to mimic natural growth.
The Foliage Looks Like a Solid Mass
A solid, undifferentiated mass of foliage can make your tree look heavy or artificial. It lacks the airiness and detail of real leaves.
Break up the foliage. Use a variety of light, quick scribbles or irregular circular motions. Create areas of denser texture and lighter areas to suggest depth and individual leaf clusters. Allow for small gaps and overlaps in your foliage outline.
Key Takeaways
- Start Light: Begin with very faint lines for your initial sketches, allowing for easy adjustments.
- Vary Shapes: Avoid perfect symmetry in trunks, branches, and foliage outlines for a natural look.
- Taper Branches: Ensure all branches thin out as they extend away from the main trunk.
- Texture, Not Detail: Use scribbles and irregular marks to suggest leaves and bark, rather than drawing every single detail.
- Use Shading: Apply consistent shading to create depth, volume, and define a light source.
- Ground Your Tree: Anchor your tree with a clear ground line and subtle root indications.
Frequently Asked Questions
What kind of pencil should I use for drawing trees?
An HB or 2B pencil is a great starting point for drawing trees. HB offers a good balance for sketching and light shading, while a 2B provides slightly darker lines and is excellent for adding shadows and richer textures. You can experiment to find what feels best for you.
How do I make my tree look less like a cartoon?
To avoid a cartoonish look, focus on adding natural imperfections and variations. Avoid perfectly symmetrical shapes, uniform lines, and simple outlines. Introduce subtle curves, bumps, and textures in the trunk, branches, and foliage. Shading is also key to adding realism and dimension.
Should I draw every single leaf?
No, you absolutely do not need to draw every single leaf. Drawing individual leaves is incredibly time-consuming and often makes the tree look too busy or unnatural. Instead, focus on creating the impression of foliage using varied textures, light scribbles, and irregular patterns within your overall canopy shape.
How can I make my tree look like a specific type of tree?
To draw a specific tree type, observe its unique characteristics. Pay attention to its overall silhouette (e.g., tall and slender like a cypress, broad and spreading like an oak), its bark texture, and how its branches grow and foliage clusters. Practice sketching from reference photos of that particular tree species.
Our Top Recommended Finds
- Sketchbook with Quality Paper: A good sketchbook prevents bleed-through and holds pencil marks well, making your drawing experience much more pleasant.
- Set of Graphite Pencils (2H to 6B): Having a range of pencil hardness allows you to create lighter sketches and darker, richer shadows, adding more depth to your trees.
- Kneaded Eraser: This soft, pliable eraser lifts graphite without damaging paper, perfect for subtle corrections and highlights without smudging.
Embrace Your Inner Artist
You’ve taken the first step towards bringing a beautiful tree to life on paper. This process is about observation, patience, and enjoying the creative journey. Each tree you draw will be uniquely yours.
Keep practicing, and don’t be afraid to experiment with different shapes, textures, and shading. Perhaps your next drawing could feature a forest, or a tree in a different season. Pick up your pencil today and let your imagination take root!