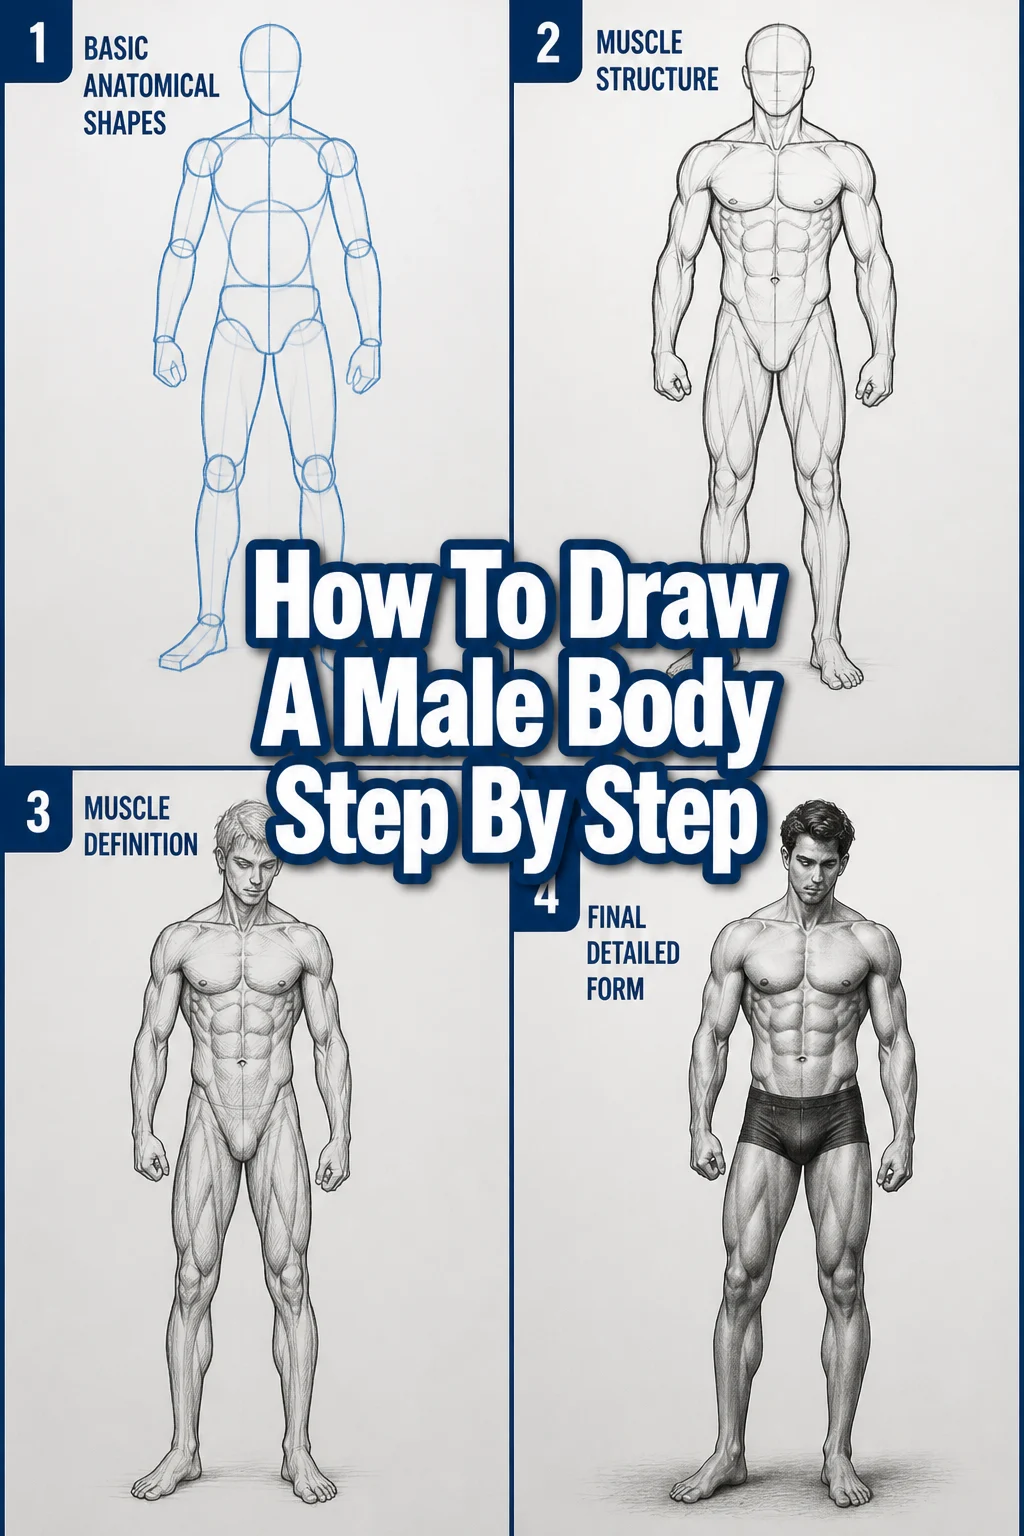
How To Draw A Male Body Step By Step
Drawing the human figure can feel intimidating. Many artists struggle to capture natural proportions and dynamic poses.
I remember my own frustrations early on, with figures often looking stiff or disproportionate. This guide is built on practical experience, designed to help you build confidence and skill.
You will learn a systematic way to approach the male form, making the process much more manageable.
Quick Overview
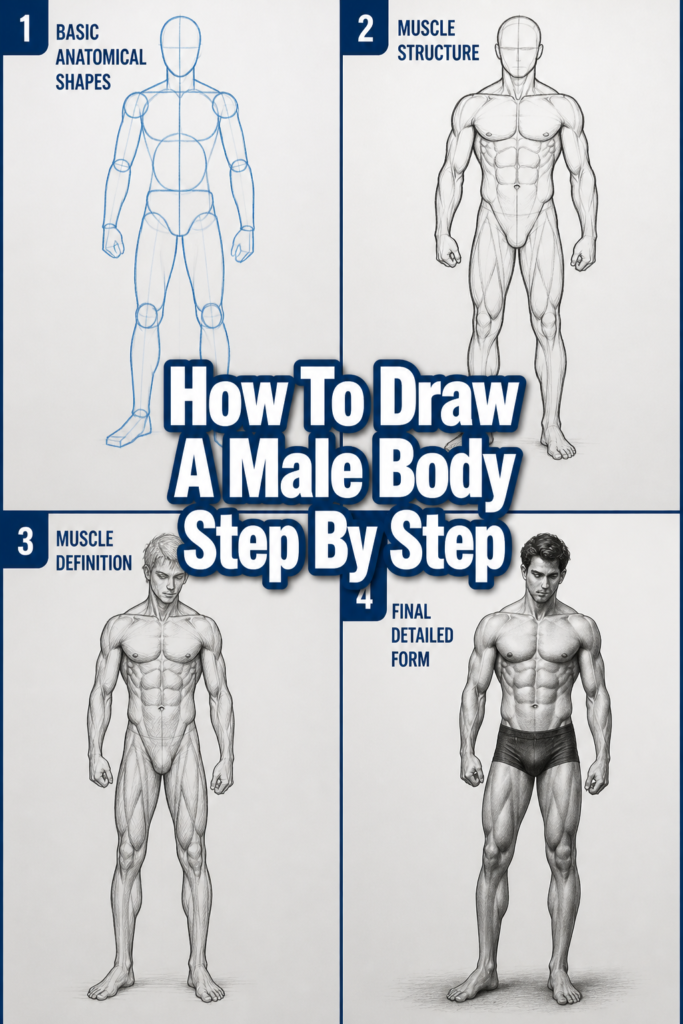
This guide will walk you through constructing a male figure from basic shapes to refined contours. You’ll gain a foundational understanding of anatomy and proportion.
Time needed: 1-2 hours for a focused drawing session.
Difficulty: Beginner.
What you’ll need: Pencil (HB, 2B), paper, eraser, optional reference images.
Step-by-Step Instructions
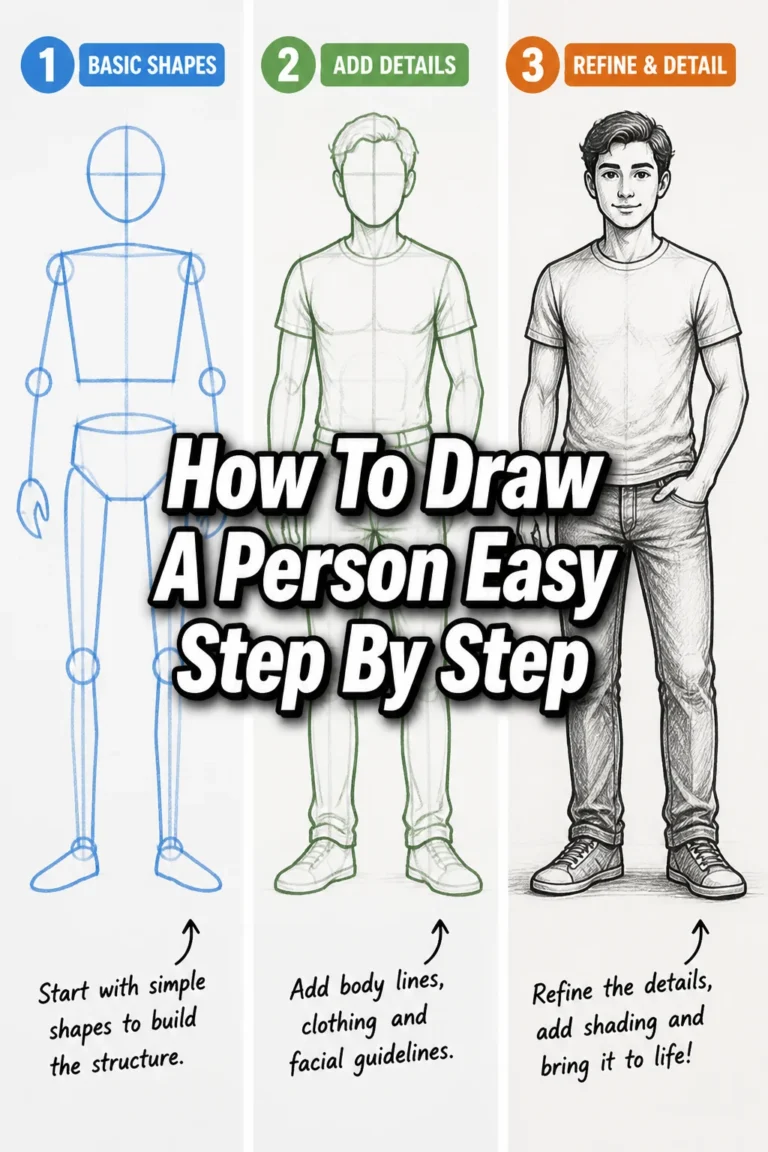
Step 1: Establish the Gesture and Flow
Begin by lightly sketching the overall pose and movement of your figure. Think about the spine’s curve and the weight distribution. This initial “gesture” drawing is about energy, not accuracy.
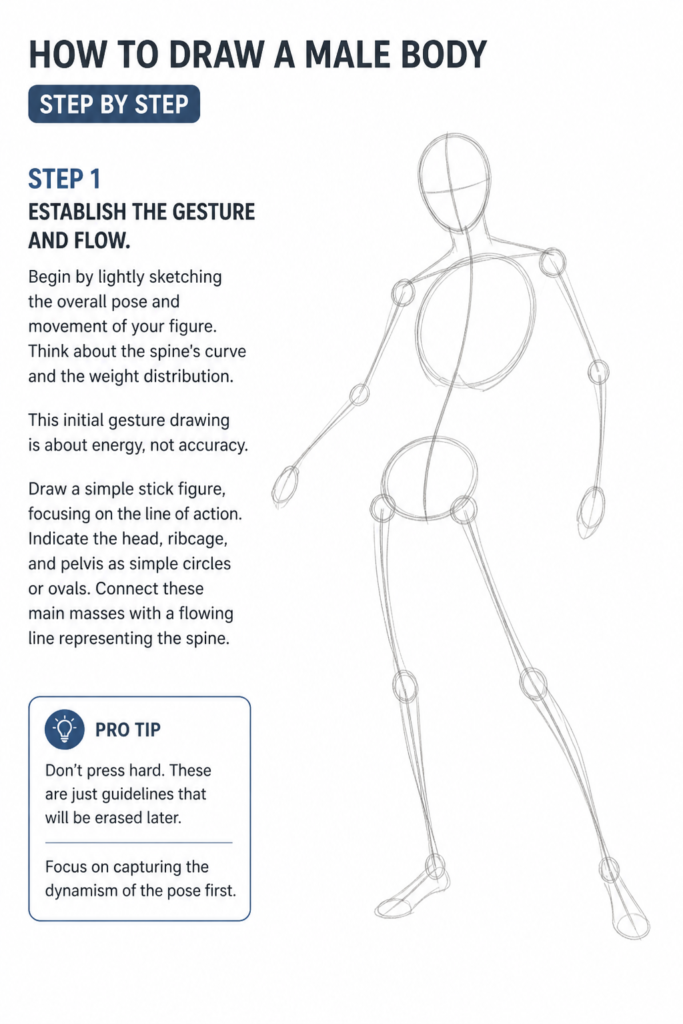
Draw a simple stick figure, focusing on the line of action.
Indicate the head, ribcage, and pelvis as simple circles or ovals.
Connect these main masses with a flowing line representing the spine.
Pro Tip: Don’t press hard. These are just guidelines that will be erased later. Focus on capturing the dynamism of the pose first.
Step 2: Block Out the Main Masses (Torso and Pelvis)
Now, transform your simple ovals into more defined geometric shapes for the torso. These blocks help establish the figure’s volume.
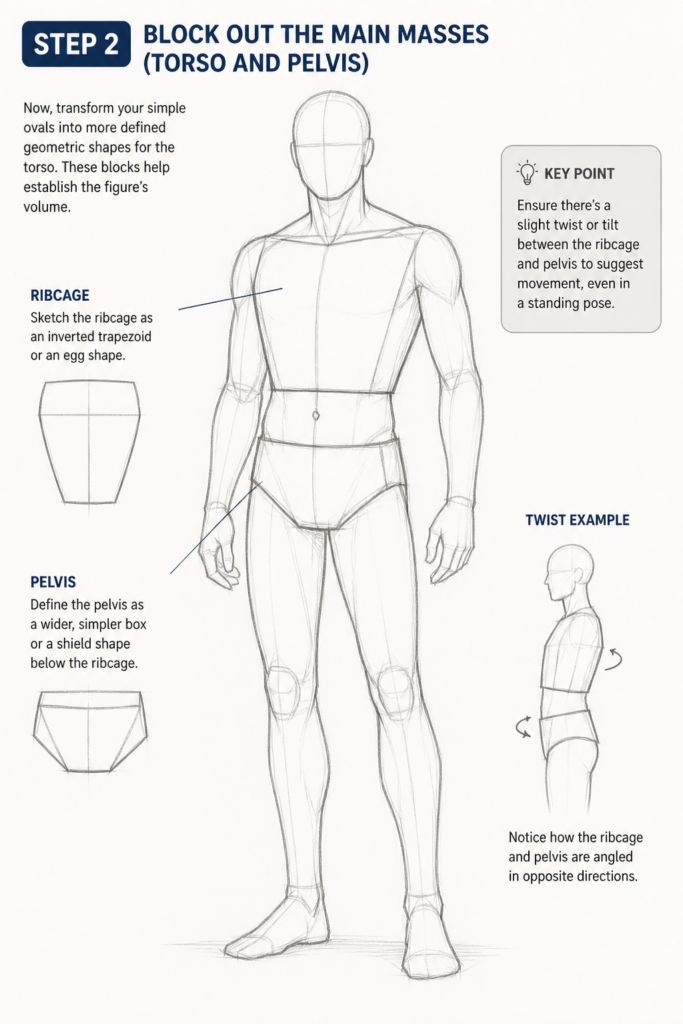
Sketch the ribcage as an inverted trapezoid or an egg shape.
Define the pelvis as a wider, simpler box or a shield shape below the ribcage.
Ensure there’s a slight twist or tilt between the ribcage and pelvis to suggest movement, even in a standing pose.
Step 3: Lay Down the Limbs and Joints
Extend from your main masses to create the arms and legs. Use simple cylinders or tapered boxes for the limbs and circles for the joints.
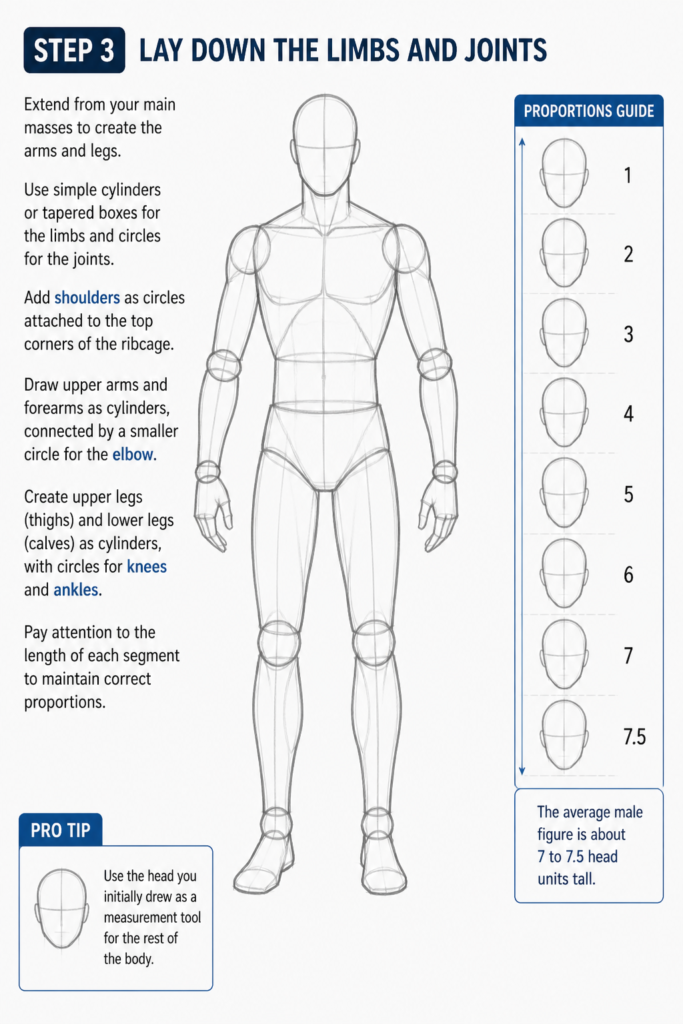
Add shoulders as circles attached to the top corners of the ribcage.
Draw upper arms and forearms as cylinders, connected by a smaller circle for the elbow.
Create upper legs (thighs) and lower legs (calves) as cylinders, with circles for knees and ankles.
Pay attention to the length of each segment to maintain correct proportions.
Pro Tip: The average male figure is about 7 to 7.5 head units tall. Use the head you initially drew as a measurement tool for the rest of the body.
Step 4: Connect the Forms and Define Major Muscle Groups
Start to “flesh out” your figure by drawing lines that connect the geometric shapes, hinting at muscle forms. This is where the male physique’s distinct angularity begins to emerge.
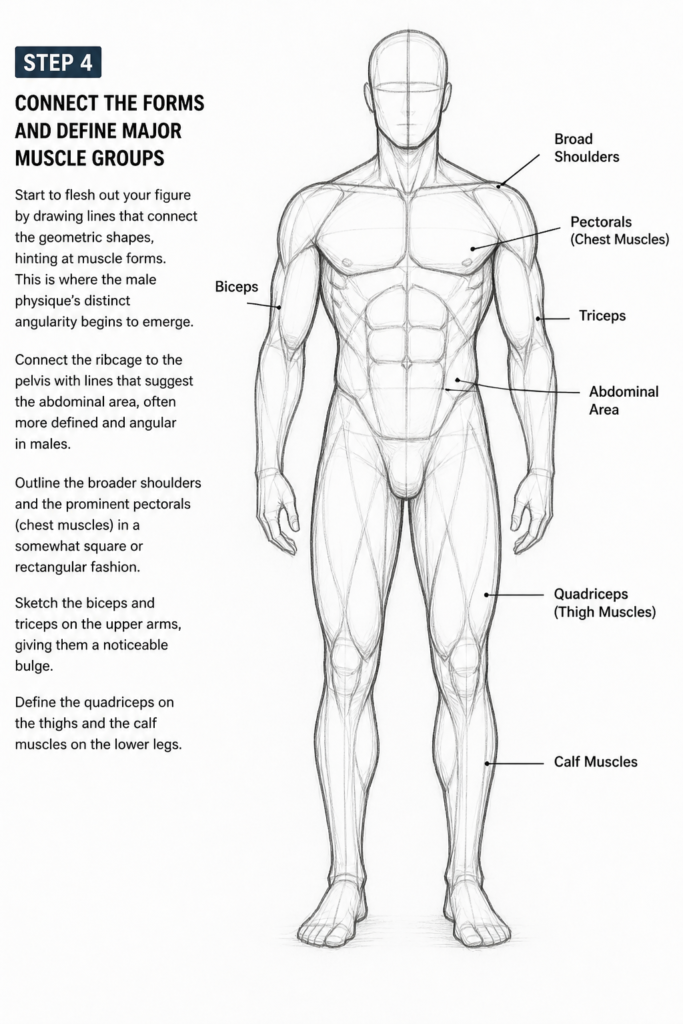
Connect the ribcage to the pelvis with lines that suggest the abdominal area, often more defined and angular in males.
Outline the broader shoulders and the prominent pectorals (chest muscles) in a somewhat square or rectangular fashion.
Sketch the biceps and triceps on the upper arms, giving them a noticeable bulge.
Define the quadriceps on the thighs and the calf muscles on the lower legs.
Step 5: Refine the Anatomy and Contours
With the basic muscle masses in place, begin to smooth out lines and add more specific anatomical details. Focus on the major muscle groups that give the male body its characteristic shape.
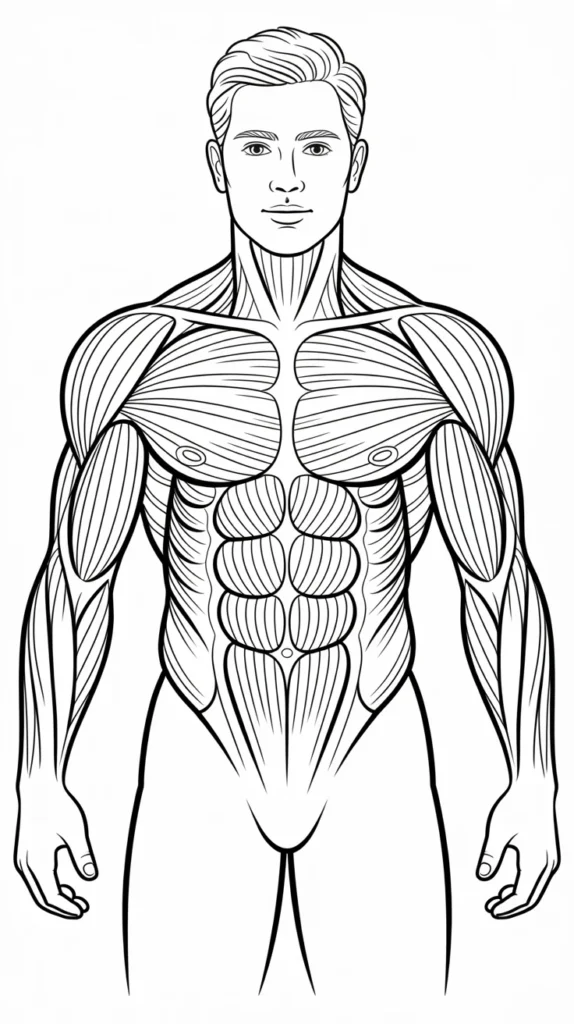
Sharpen the lines for the deltoids (shoulder muscles) and the trapezius (neck/upper back).
Emphasize the V-taper from the shoulders to the waist, a common male characteristic.
Add subtle indications of the serratus anterior (finger-like muscles on the side of the ribcage) and the obliques.
Develop the musculature of the arms and legs, making sure they flow naturally.
Pro Tip: Male bodies tend to have narrower hips relative to their shoulders compared to female bodies. Keep this proportion in mind as you refine the torso.
Step 6: Detail the Head, Hands, and Feet
These areas are complex, but for a full figure, they need attention. Keep them somewhat simplified for now, as the focus is on the body.
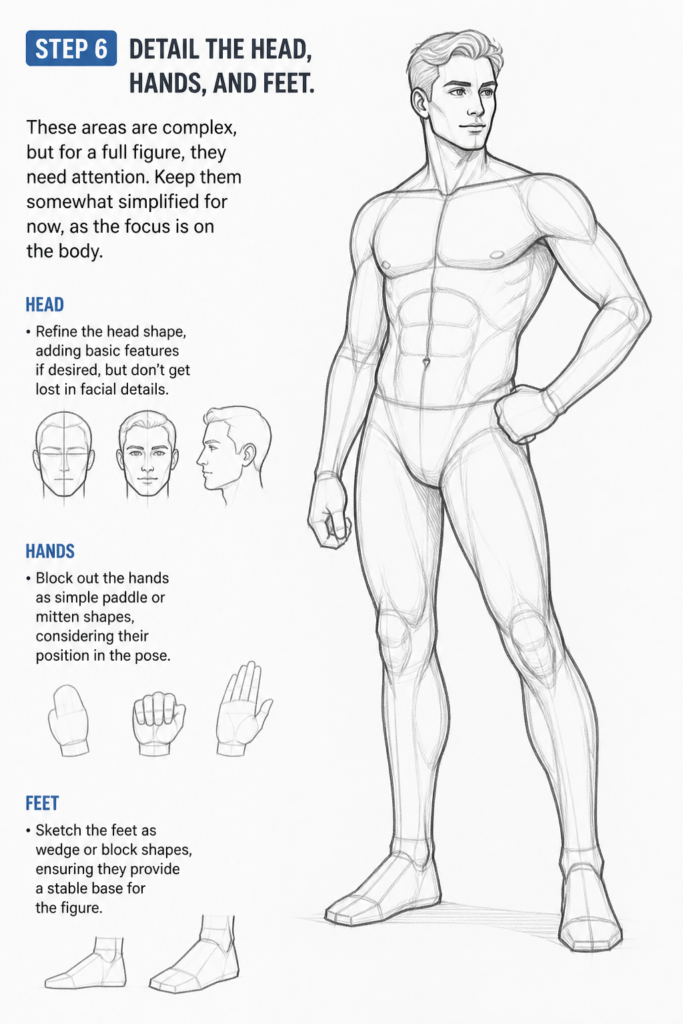
Refine the head shape, adding basic features if desired, but don’t get lost in facial details.
Block out the hands as simple paddle or mitten shapes, considering their position in the pose.
Sketch the feet as wedge or block shapes, ensuring they provide a stable base for the figure.
Step 7: Clean Up and Add Finishing Touches
Erase your initial construction lines and strengthen the final outlines. Add subtle shading to give the figure depth and volume.
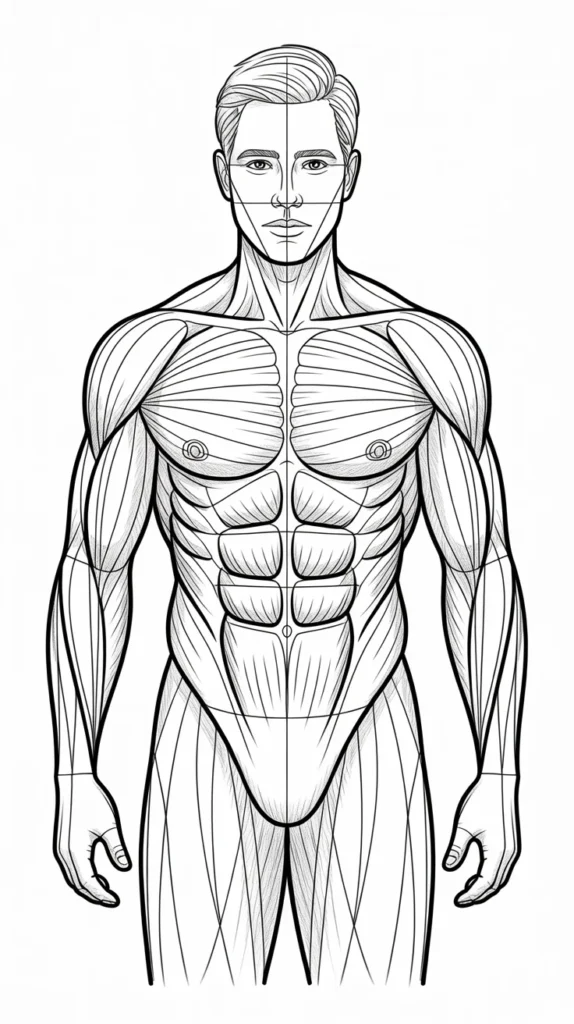
Carefully erase all the underlying stick figure and geometric construction lines.
Darken the final contour lines, varying line weight to suggest form and shadow.
Introduce light shading to indicate muscle definition and areas of shadow, enhancing the three-dimensional feel.
Review your drawing for overall balance and proportion, making any final adjustments.
Common Mistakes to Avoid
Ignoring Underlying Structure
Many beginners draw lines without understanding what’s underneath. This leads to flat, unrealistic figures. Always think about the skeleton and major muscle groups that create the outer form. Imagine the bones and muscles beneath the skin as you draw.
Stiff or Lifeless Poses
A common pitfall is drawing figures that look rigid, like mannequins. This usually happens when you start with straight lines and neglect the initial gesture. Always begin with a dynamic line of action and flowing shapes to imbue your figure with movement and life.
Proportion Problems
Figures with heads too large, limbs too short, or torsos out of scale are frequently seen in beginner work. Inconsistent proportions immediately break the illusion of realism. Regularly check your measurements against a standard (like head units) and compare limb lengths to each other.
Over-detailing Too Soon
Focusing on tiny muscles, facial features, or clothing wrinkles before the overall structure is sound is a mistake. You’ll end up with a detailed but fundamentally flawed drawing. Always work from big shapes to small details, ensuring the foundation is correct first.
Troubleshooting
My Figure Looks Flat
If your drawing lacks depth and appears two-dimensional, you might be thinking too much in lines and not enough in forms.
Solution: Practice thinking about your figure as a collection of three-dimensional objects (cylinders, spheres, boxes). Use overlapping forms to show depth. Incorporate basic light and shadow by imagining a light source and shading the areas that would be in shadow.
My Poses Are Stiff
When your figures feel rigid and lack natural movement, it usually stems from neglecting the initial gesture.
Solution: Dedicate more time to Step 1. Practice quick gesture drawings (30 seconds to 2 minutes) from dynamic references. Focus on the curve of the spine and the overall flow, not details. Exaggerate the movement slightly to make it feel more alive.
I Can’t Get Proportions Right
Struggling with accurate limb lengths or body segment sizes is a common hurdle for new artists.
Solution: Utilize measurement techniques. Use your pencil to measure distances on your reference photo (if using one), and then transfer those measurements to your paper. Consistently use the head as a unit of measurement for the entire body. Practice drawing figures from life or photos, constantly comparing your drawing to the reference.
Key Takeaways
Always start with a light, dynamic gesture drawing to capture movement.
Build your figure using simple geometric shapes for the main masses.
Pay close attention to male proportions: broader shoulders, narrower hips.
Work from general forms to specific details, never the other way around.
Use reference images extensively to understand anatomy and poses.
Practice consistently; improvement comes with dedicated effort.
Frequently Asked Questions
How do I make my male figures look distinctly masculine?
Focus on broader shoulders relative to the hips, a more angular jawline, and defined muscle groups, particularly in the chest, shoulders, and arms. Emphasize the V-taper from the shoulders to the waist. Male anatomy often features more pronounced bone structure and less body fat than female anatomy.
Should I use reference photos when drawing a male body?
Absolutely. Reference photos are invaluable for understanding anatomy, proportions, foreshortening, and dynamic poses. Even experienced artists use references constantly. Don’t copy directly, but study them to learn how the body works in different positions.
How long does it take to get good at drawing the human body?
Learning to draw the human body well is a continuous journey, not a destination. Consistent practice, focused study, and patience are key. You’ll see improvement with regular effort over months and years, not days. Enjoy the process of learning and growing.
What about drawing different male body types?
Once you master the standard male proportions, you can adjust them to create different body types. For a more slender figure, reduce overall mass and muscle definition. For a heavier figure, broaden the torso and limbs, and soften muscle definition. Understanding the underlying skeleton remains crucial for all variations.
Our Top Recommended Finds
Sketchbook with Smooth Paper: A good quality sketchbook provides a pleasant surface for your pencil, making lines smoother and erasing cleaner. Look for paper weights around 80-100 gsm.
Graphite Pencil Set (HB, 2B, 4B): Having a range of pencil hardness allows you to create light construction lines (HB), darker outlines (2B), and deep shadows (4B), adding dimension to your drawings.
* Kneaded Eraser: Unlike standard erasers, a kneaded eraser can be molded to a point for precise erasing or dabbed to lift graphite gently without damaging the paper.
Embrace Your Artistic Journey
Drawing the male body is a foundational skill that opens up a world of possibilities in your art. You now have a clear, actionable roadmap to begin your practice. Remember, every master started where you are, with a blank page and a pencil.
Keep practicing these steps, observe the human form around you, and don’t be afraid to experiment. Your artistic journey is just beginning, and with each line, you’re building skill and confidence. Pick up your pencil and start drawing today!