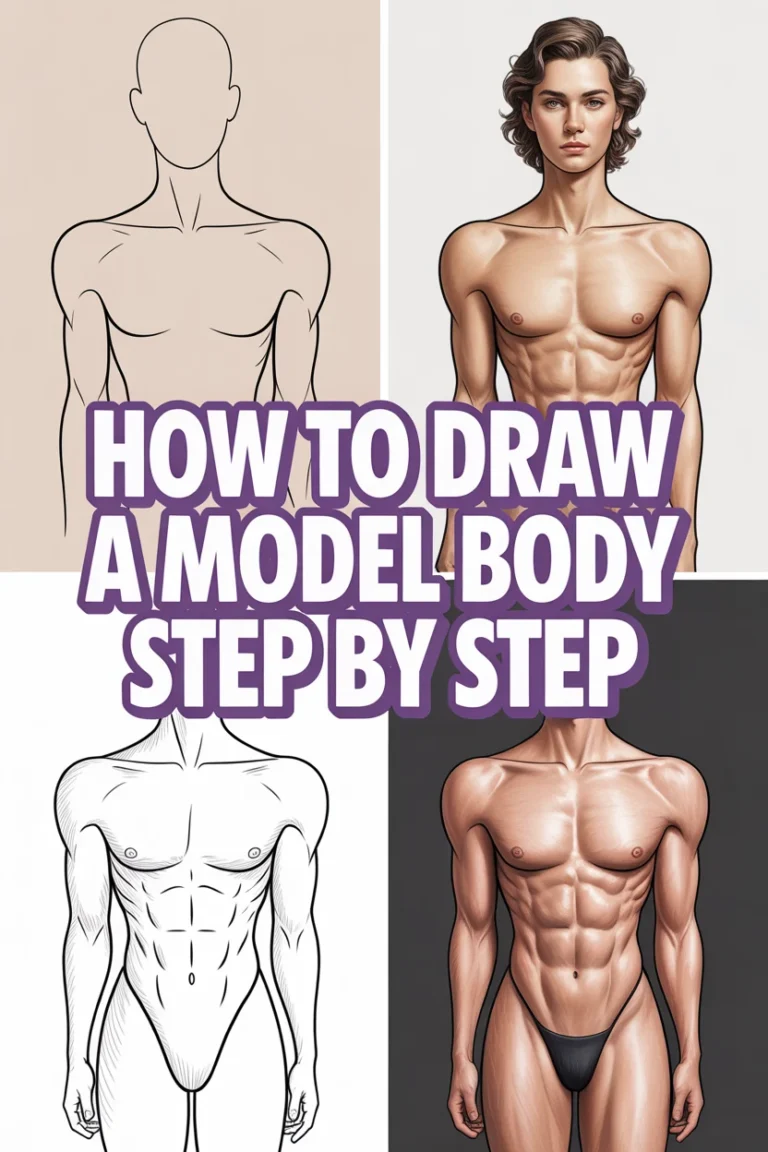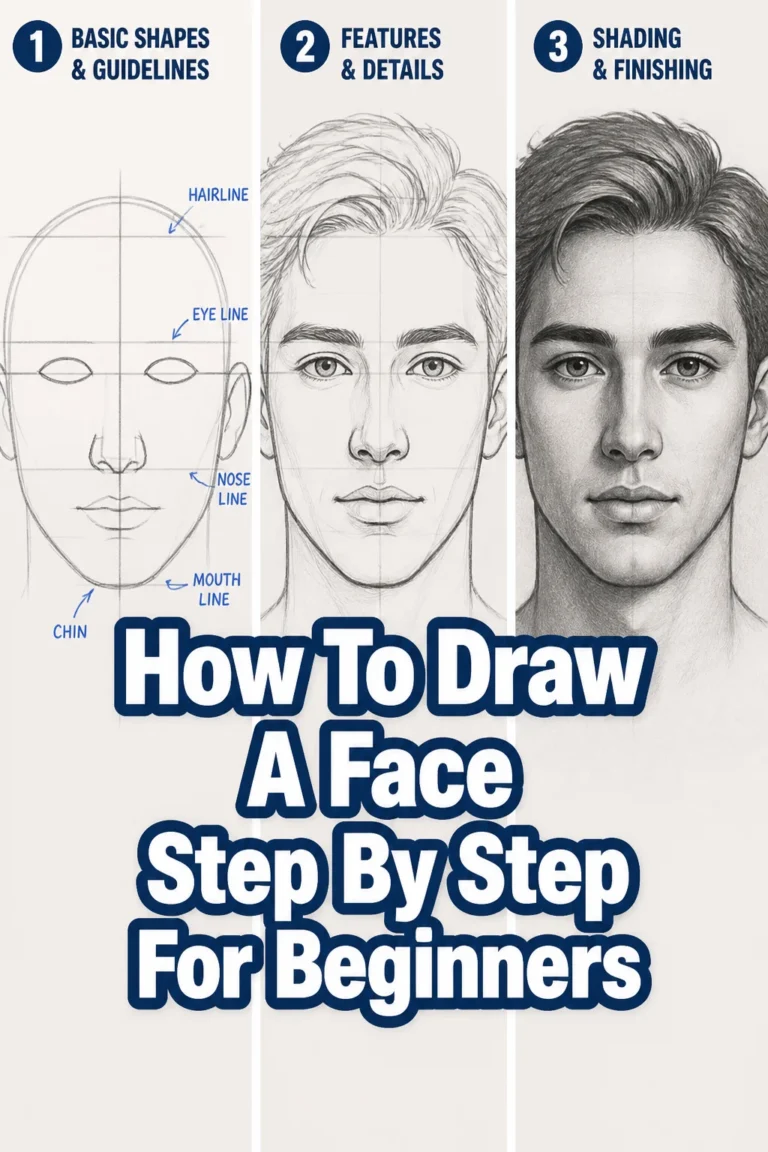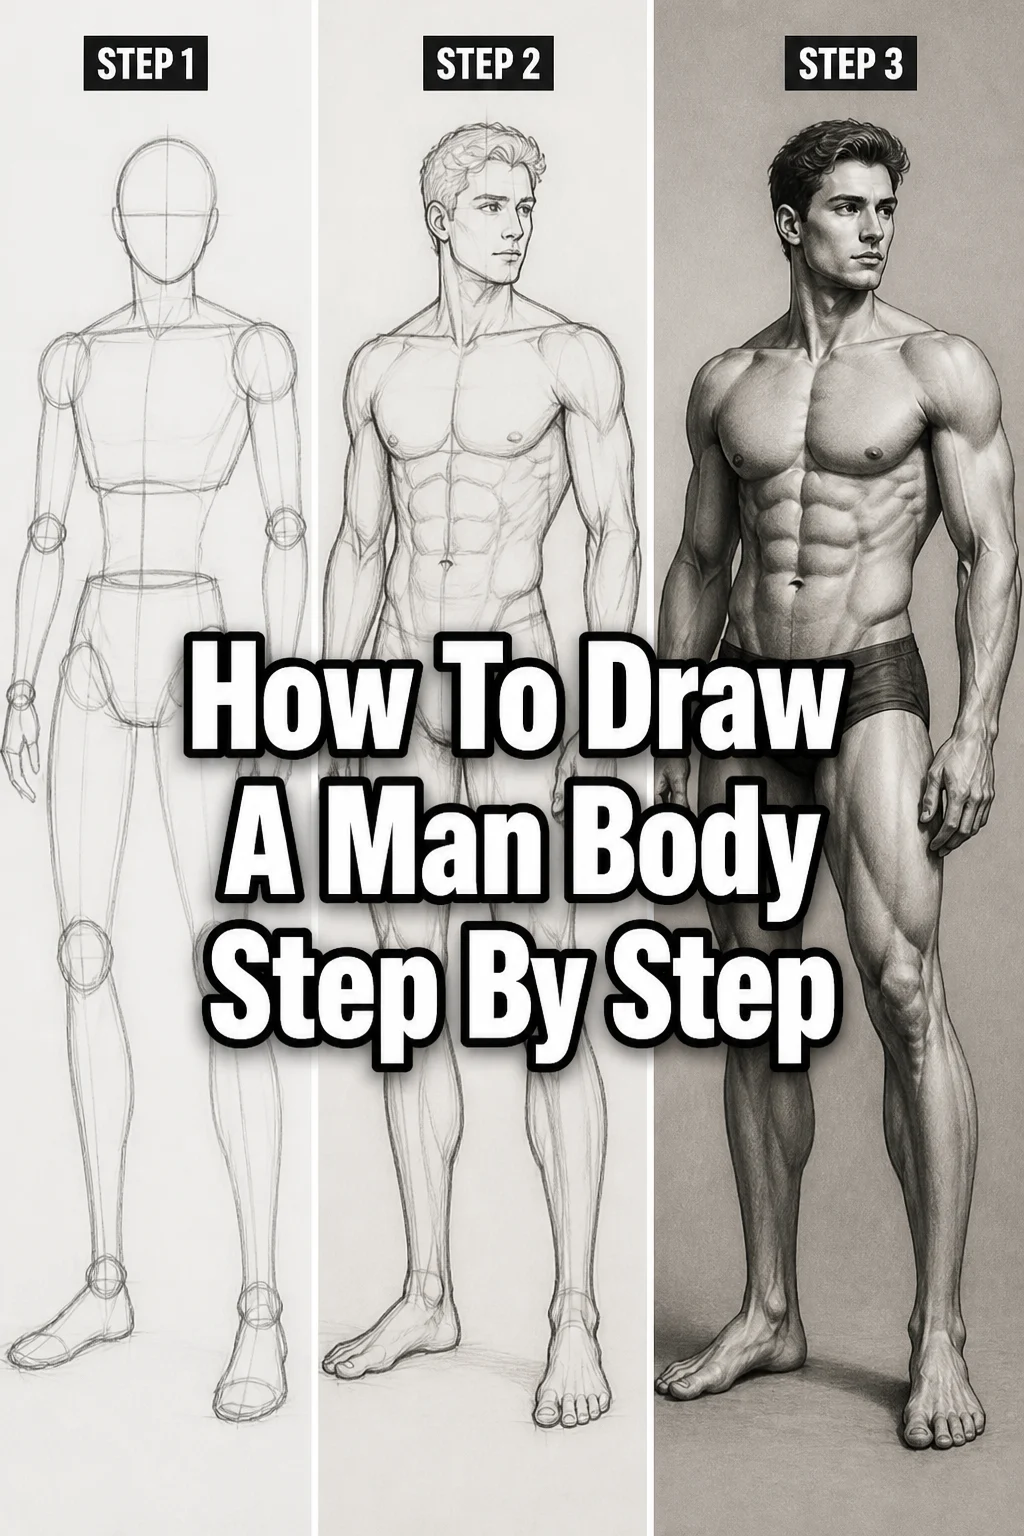
✏️ How To Draw A Man Body Step By Step
Learning to draw the human figure can feel daunting at first.
I remember my early struggles trying to capture realistic proportions and dynamic poses.
This guide distills years of practice and observation into actionable steps, helping you build a solid foundation for drawing the male form.
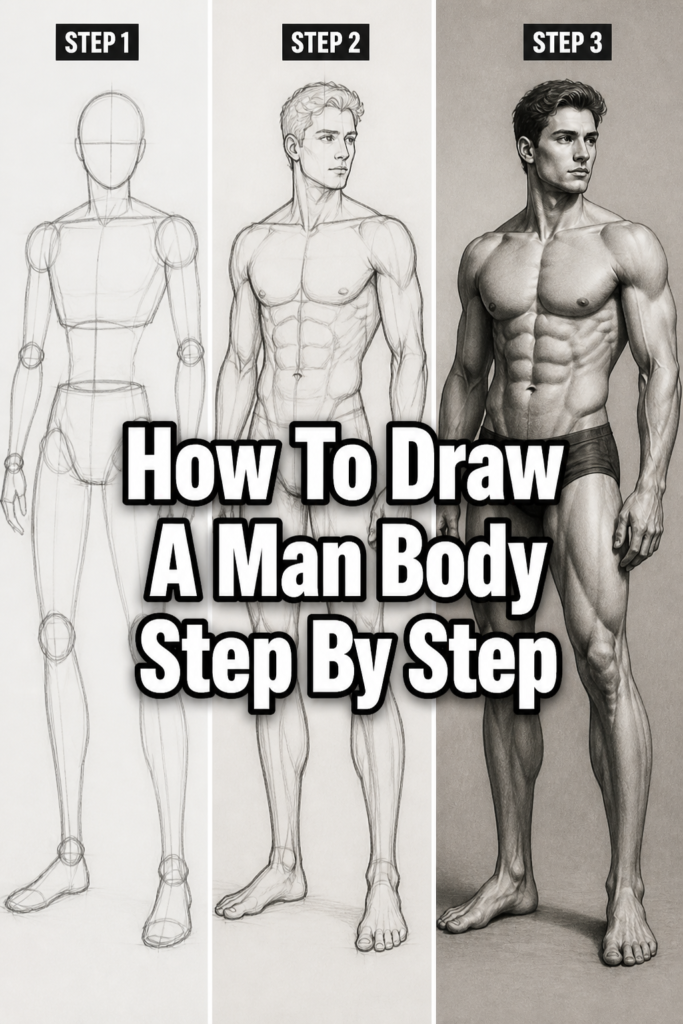
Quick Overview
You’re about to embark on a creative journey, breaking down the complex human body into manageable, understandable parts.
By the end, you’ll have a clear framework for constructing a male figure from scratch, ready to be refined further.
- Time needed: 1-3 hours for a focused first attempt; ongoing practice yields mastery.
- Difficulty: Beginner to Intermediate.
- What you’ll need: Paper, pencils (HB, 2B, 4B recommended), a good eraser (kneaded and plastic), and optional reference images.
Step-by-Step Instructions
Step 1: Gather Your Tools and Mindset
Before you even make a mark, ensure your workspace is comfortable and well-lit.
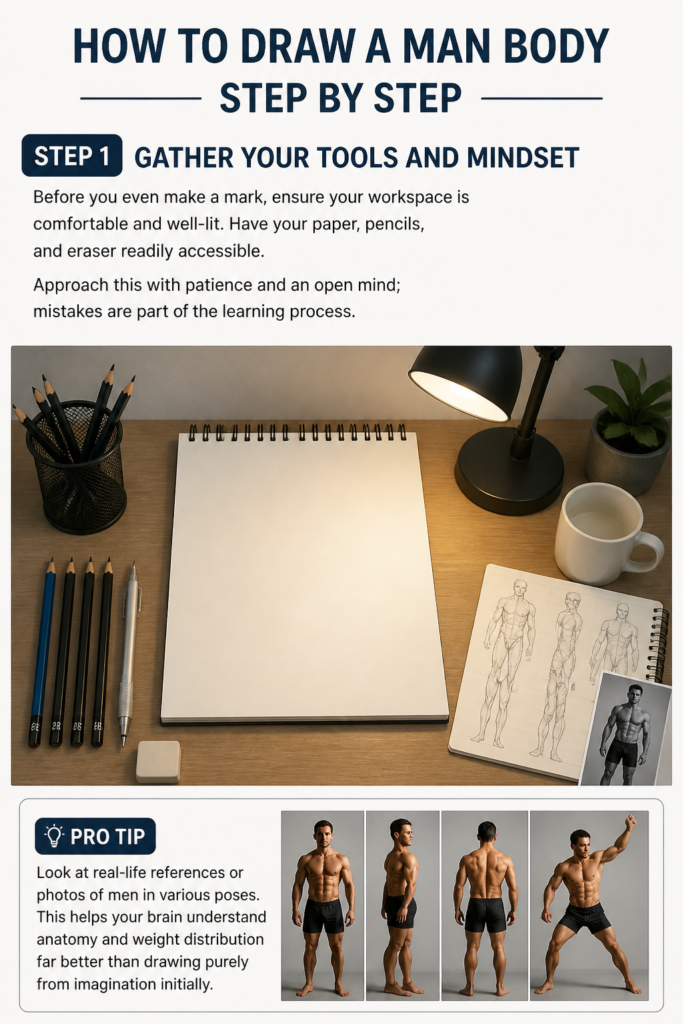
Have your paper, pencils, and eraser readily accessible.
Approach this with patience and an open mind; mistakes are part of the learning process.
Pro Tip: Look at real-life references or photos of men in various poses. This helps your brain understand anatomy and weight distribution far better than drawing purely from imagination initially.
Step 2: Establish the Line of Action and Head
Begin by drawing a single, flowing curve that represents the main energy or “line of action” of the pose.
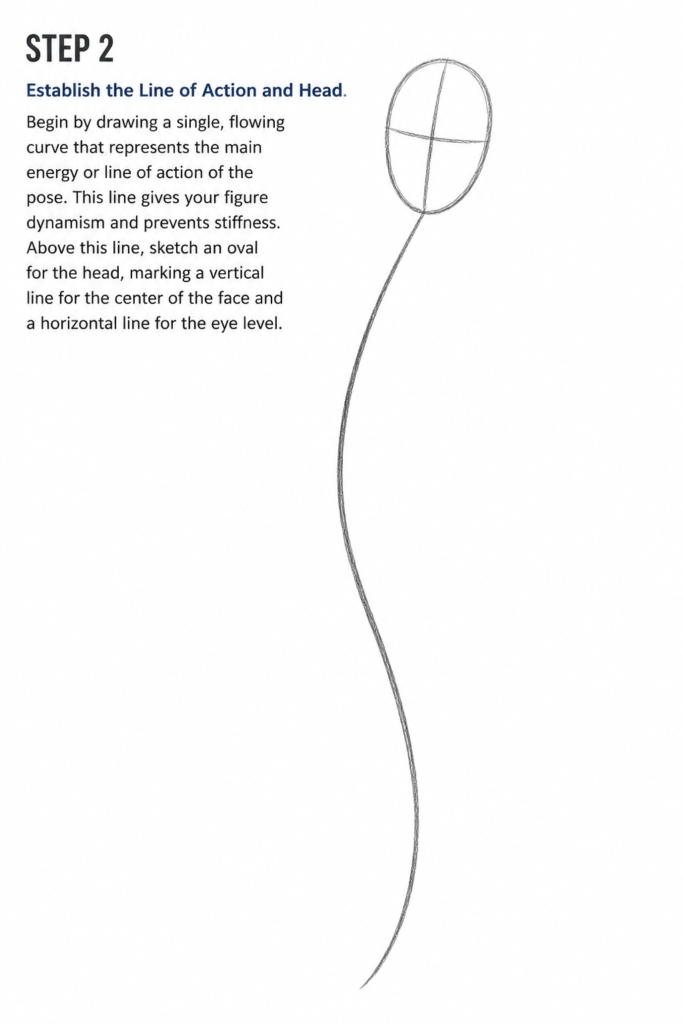
This line gives your figure dynamism and prevents stiffness.
Above this line, sketch an oval for the head, marking a vertical line for the center of the face and a horizontal line for the eye level.
Step 3: Block In the Torso and Pelvis
From the head, measure down approximately two head-lengths to find the bottom of the ribcage.
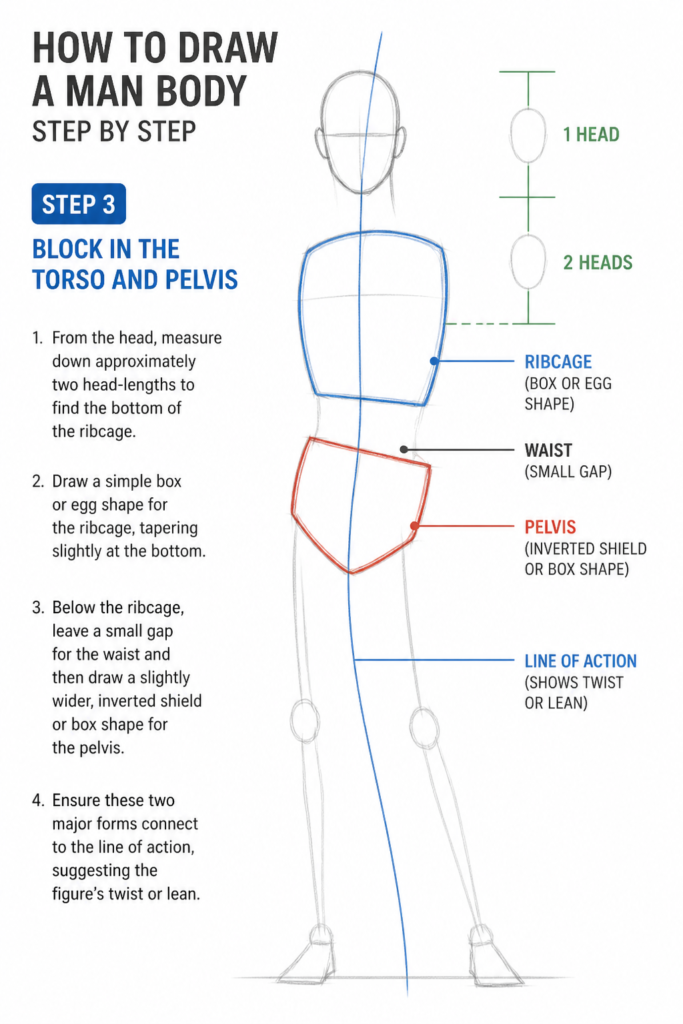
Draw a simple box or egg shape for the ribcage, tapering slightly at the bottom.
Below the ribcage, leave a small gap for the waist and then draw a slightly wider, inverted shield or box shape for the pelvis.
Ensure these two major forms connect to the line of action, suggesting the figure’s twist or lean.
Step 4: Set Up the Proportions and Joints
Use the head as your unit of measurement. A typical adult male is about 7.5 to 8 heads tall.
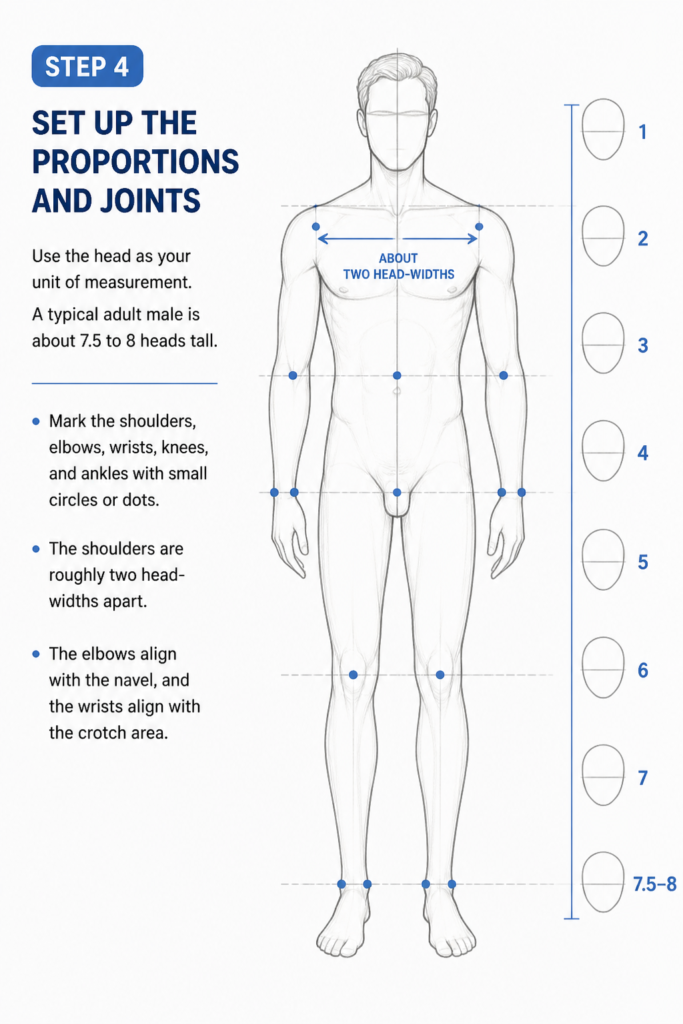
Mark the shoulders, elbows, wrists, knees, and ankles with small circles or dots.
The shoulders are roughly two head-widths apart.
The elbows align with the navel, and the wrists align with the crotch area.
Step 5: Construct the Limbs with Cylinders and Ovals
Now, connect your joint markers using simple cylindrical or oval shapes for the upper arms, forearms, thighs, and calves.
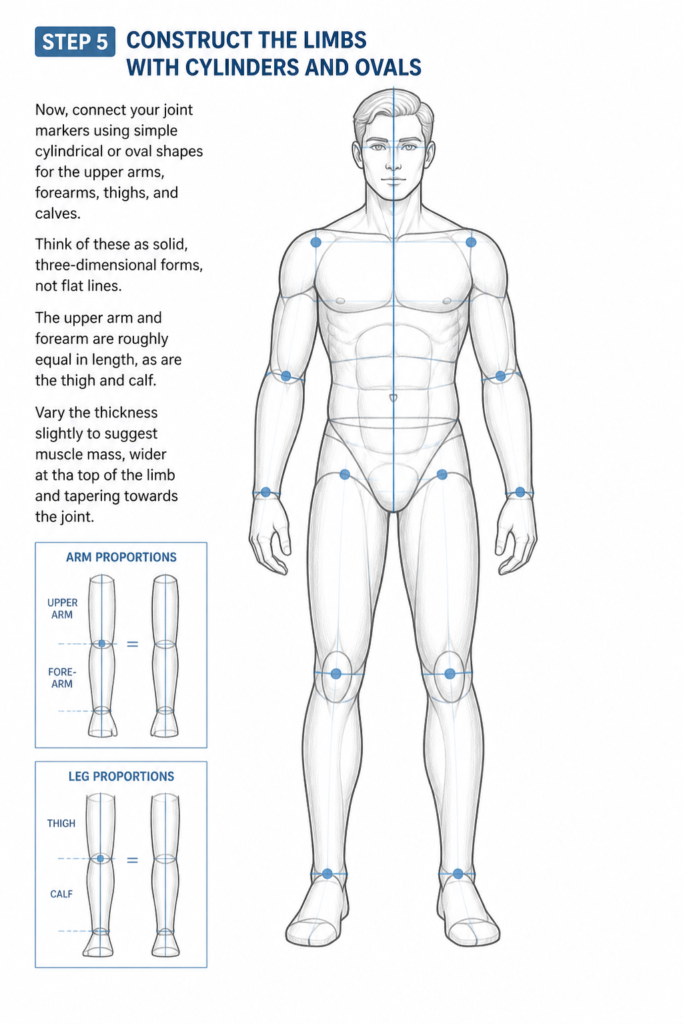
Think of these as solid, three-dimensional forms, not flat lines.
The upper arm and forearm are roughly equal in length, as are the thigh and calf.
Vary the thickness slightly to suggest muscle mass, wider at the top of the limb and tapering towards the joint.
Step 6: Refine the Forms and Connect the Masses
Begin to smooth out the connections between the ribcage, pelvis, and limbs.
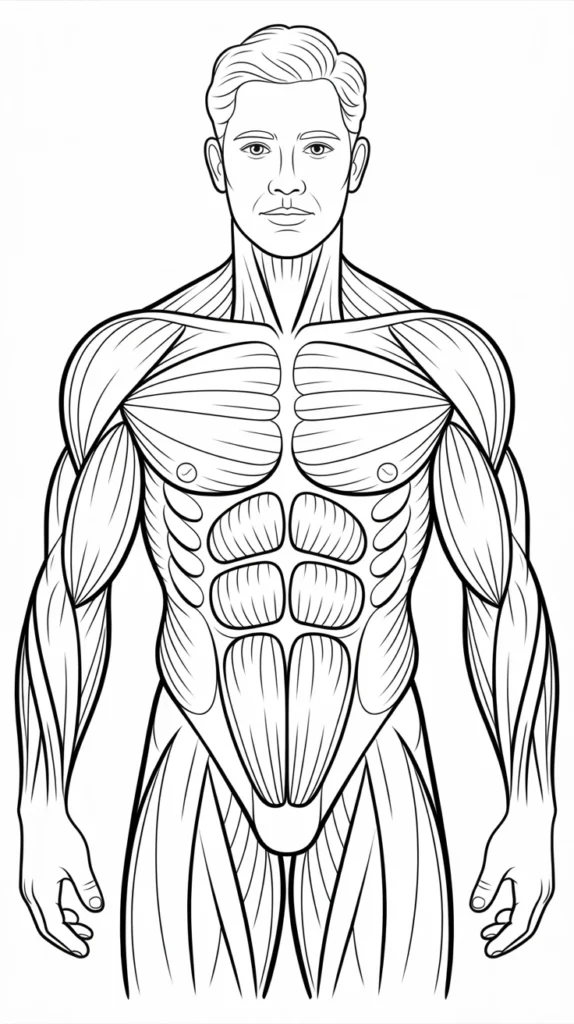
Consider the major muscle groups, like the deltoids (shoulders), pectorals (chest), biceps, and quadriceps, as larger, rounded forms that attach to your basic shapes.
Don’t draw every muscle fiber, but suggest their presence and how they flow into each other.
Look for the natural curves and indentations of the body.
Step 7: Add Details to the Head and Neck
Refine the head by adding the jawline, ears, and basic features of the face.
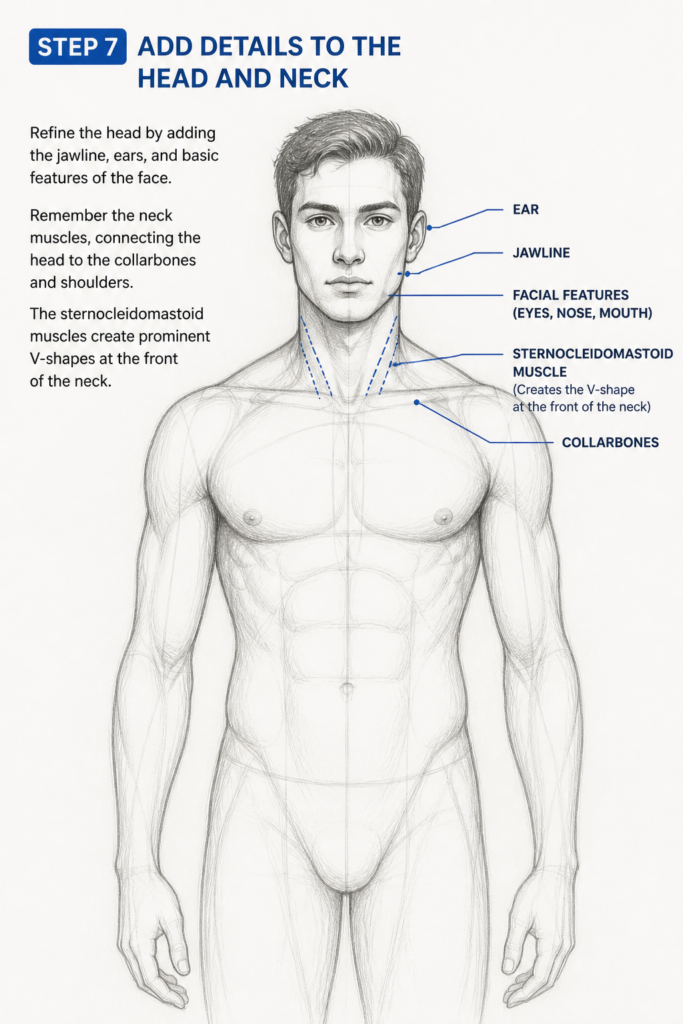
Remember the neck muscles, connecting the head to the collarbones and shoulders.
The sternocleidomastoid muscles create prominent V-shapes at the front of the neck.
Step 8: Sketch Hands and Feet
Hands and feet are complex, so start with simplified shapes.
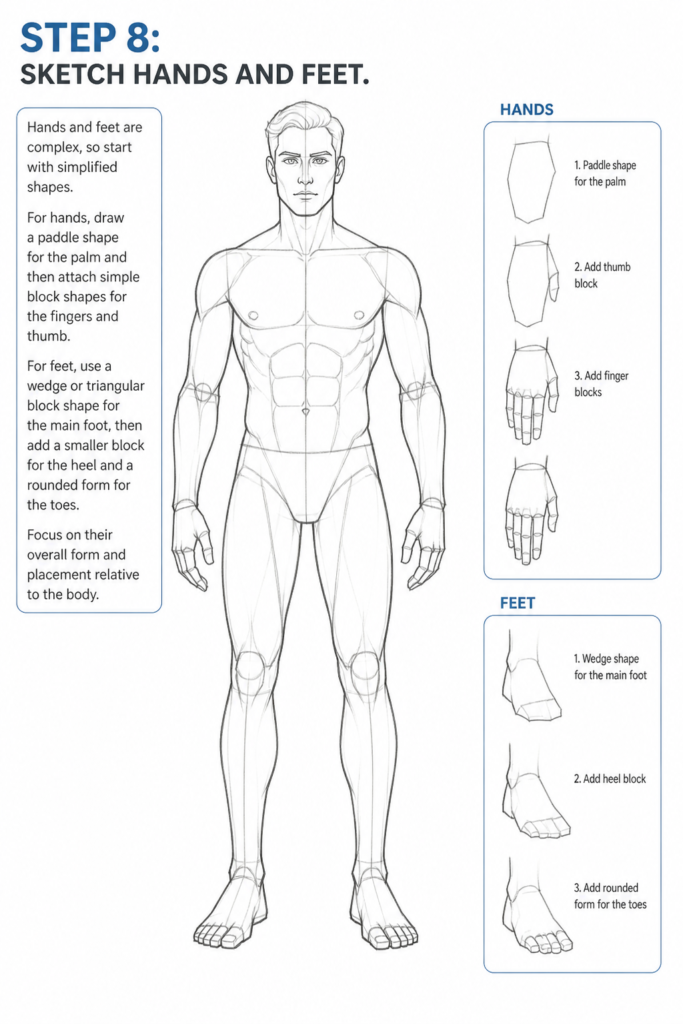
For hands, draw a paddle shape for the palm and then attach simple block shapes for the fingers and thumb.
For feet, use a wedge or triangular block shape for the main foot, then add a smaller block for the heel and a rounded form for the toes.
Focus on their overall form and placement relative to the body.
Step 9: Clean Up, Erase, and Add Definition
Once you’re satisfied with the overall structure, lightly erase your initial construction lines.
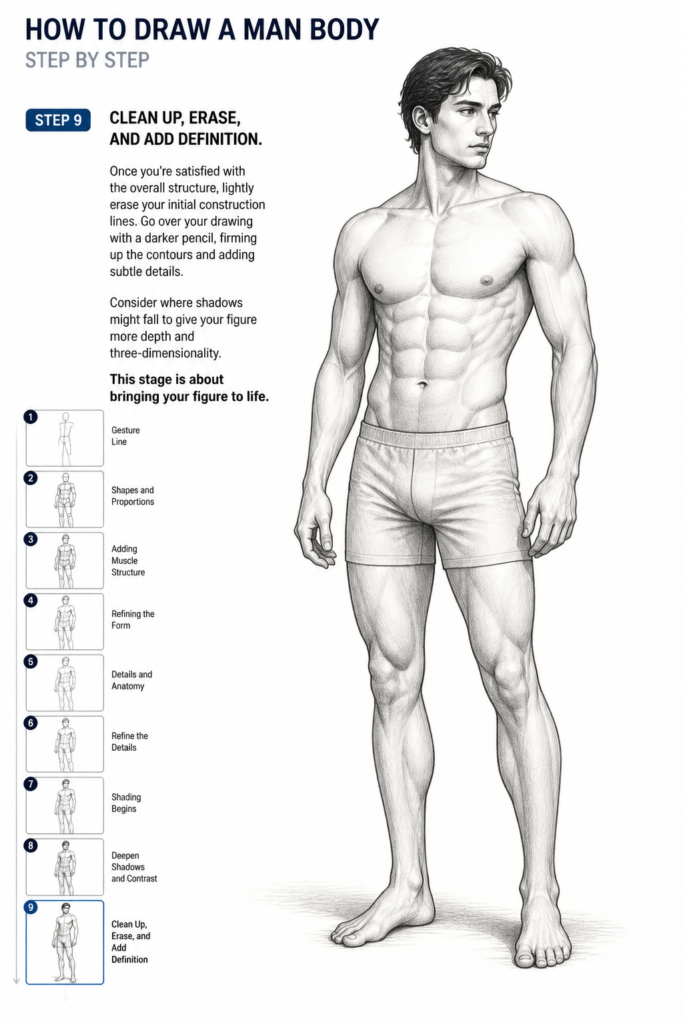
Go over your drawing with a darker pencil, firming up the contours and adding subtle details.
Consider where shadows might fall to give your figure more depth and three-dimensionality.
This stage is about bringing your figure to life.
Common Mistakes to Avoid
Ignoring the Line of Action
Many beginners draw figures that look stiff and unnatural.
This often happens when they focus too much on individual body parts without considering the overall flow.
Always start with a dynamic line of action to give your figure energy and a sense of movement, even in a static pose.
Inconsistent Proportions
One of the biggest challenges is keeping body parts in correct relation to each other.
Drawing limbs too long or a torso too short makes the figure look alien.
Consistently use the head as a measurement unit and frequently compare the lengths and widths of different body parts to ensure harmony.
Drawing Symmetrically
The human body is not perfectly symmetrical, especially in dynamic poses.
Trying to make both sides mirror each other exactly will result in a lifeless drawing.
Embrace subtle differences and shifts in weight; one shoulder might be lower, or one hip might be slightly higher.
Focusing on Details Too Early
It’s tempting to jump straight to drawing eyes or individual muscles.
However, getting lost in small details before establishing the underlying structure leads to drawings that are technically detailed but fundamentally flawed in form.
Always build from the largest forms to the smallest details.
Troubleshooting
My Drawing Looks Flat and Lifeless
If your figure lacks depth, you might be drawing with lines instead of thinking in three dimensions.
Revisit the idea of basic shapes like cylinders and boxes for limbs and torso.
Also, consider adding subtle shading to suggest light and shadow, which instantly adds volume.
I Can’t Get the Pose to Look Right
This usually indicates an issue with your initial line of action or the placement of your major forms (ribcage and pelvis).
Try redrawing the pose with a stronger, clearer line of action.
Spend more time observing how the ribcage and pelvis twist and tilt in your reference.
Hands and Feet Are Still Too Hard
Hands and feet are notoriously difficult due to their complex bone and muscle structure.
Don’t try to draw every knuckle and toe at first.
Simplify them into basic geometric blocks or mittens, focusing on their overall silhouette and how they interact with the ground or other objects.
Practice them separately in quick sketches.
Key Takeaways
- Always start with a dynamic line of action to give your figure natural movement.
- Break down the body into simple, three-dimensional shapes like ovals, boxes, and cylinders.
- Mastering proportions using the head as a unit is crucial for realistic figures.
- Don’t be afraid to use reference images; they are invaluable learning tools.
- Build your drawing from large forms to small details, never the other way around.
- Consistent practice and patience are the keys to improving your figure drawing skills.
Frequently Asked Questions
How long does it take to get good at drawing the human body?
Improvement is a continuous journey, not a destination. With dedicated practice, you can see significant progress in a few months, but true mastery takes years of consistent effort and study.
Should I draw from imagination or reference photos?
Both are important. Start with reference photos or life drawing to build a strong understanding of anatomy and proportion. As you gain confidence, you can integrate that knowledge to draw more effectively from imagination.
What’s the best pencil for drawing figures?
A range of graphite pencils is ideal. An HB is great for initial light sketches, a 2B for building form and definition, and a 4B or 6B for darker shadows and accents.
How important is understanding anatomy for drawing?
Understanding basic anatomy is incredibly important. You don’t need to be a doctor, but knowing where major bones and muscle groups lie helps you draw convincing forms that feel solid and believable, even when simplified.
Our Top Recommended Finds
- Strathmore 400 Series Sketch Pad: Excellent, acid-free paper that handles multiple layers and erasures well, perfect for practice.
- Staedtler Mars Lumograph Graphite Pencil Set: Offers a good range of hardness (from 2H to 6B), allowing for versatility in line work and shading.
- Faber-Castell Kneaded Eraser: Essential for lifting graphite without damaging the paper, allowing for subtle corrections and highlights.
Your Artistic Journey Awaits
Drawing the human body is a journey of observation, understanding, and endless practice.
You’ve now laid a strong foundation, equipped with practical steps and insights.
Don’t stop here; pick up your pencil today and start sketching your next figure.
Experiment with different poses, explore musculature, or begin adding clothing to your forms.
The more you draw, the more intuitive and rewarding the process becomes.