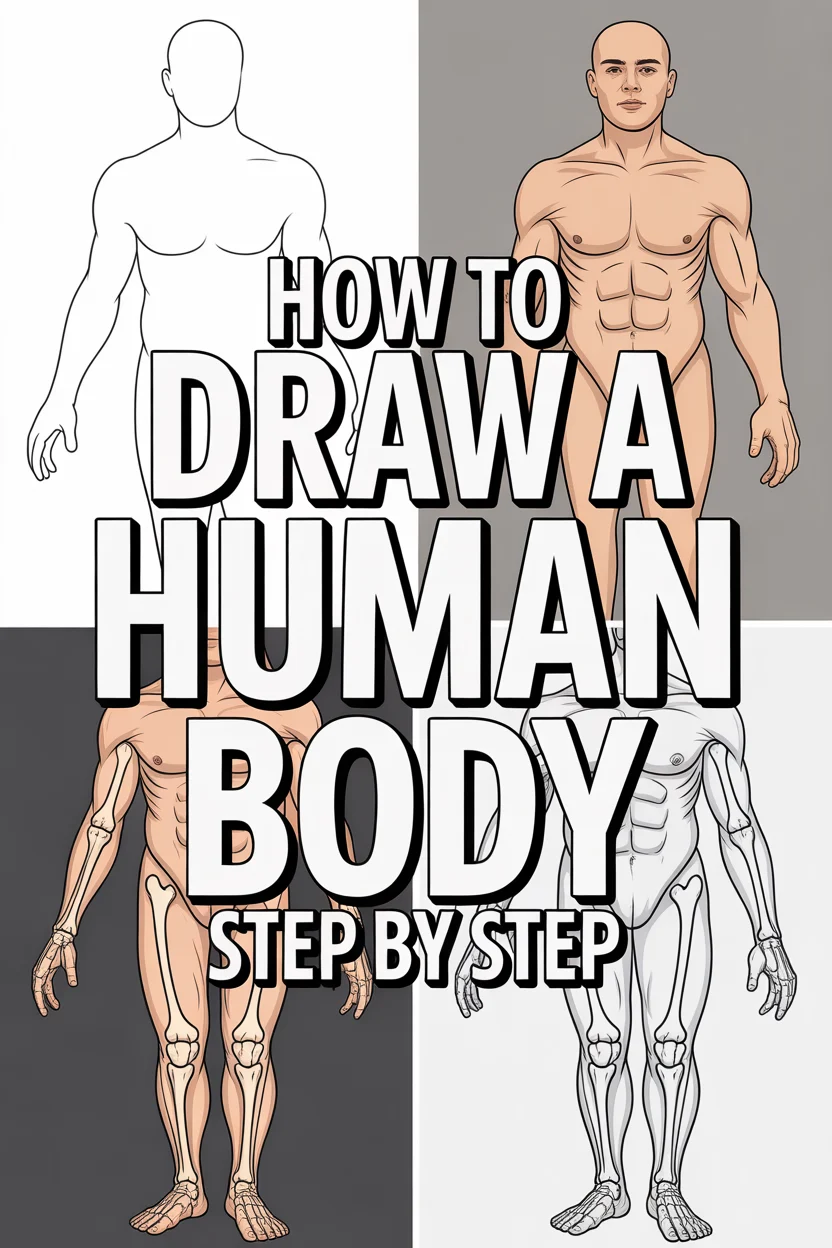
🎨 How To Draw A Human Body Step By Step
Learning to draw the human body can feel like a monumental task.
It’s often seen as the ultimate test for any aspiring artist.
Having navigated the complexities of anatomy and proportion myself, I’ve developed a method that breaks down this intimidating subject into manageable, practical steps.
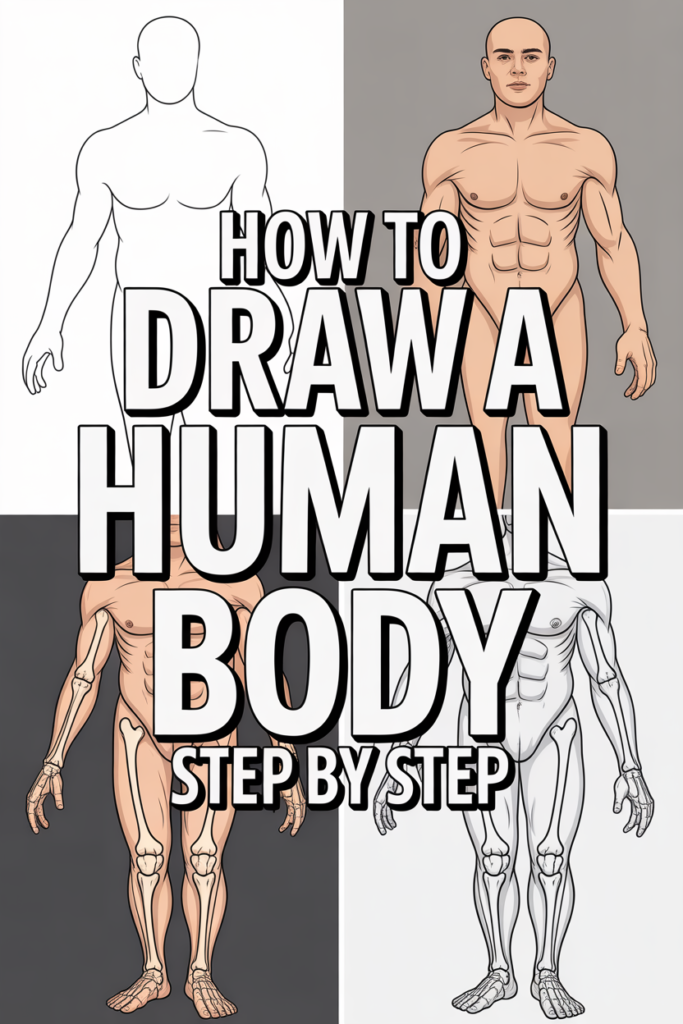
Quick Overview
This guide will equip you with a foundational understanding of human anatomy, proportions, and construction techniques.
You’ll learn to build a figure from simple shapes, making the process less daunting and more enjoyable.
- Time needed: 1-2 hours for the initial practice, ongoing for mastery
- Difficulty: Beginner to Intermediate
- What you’ll need: Pencil (HB, 2B), eraser, drawing paper, optional: reference images
Step-by-Step Instructions
Step 1: Get Loose with Gestural Drawing
Before diving into details, it’s crucial to warm up and capture the essence of movement.
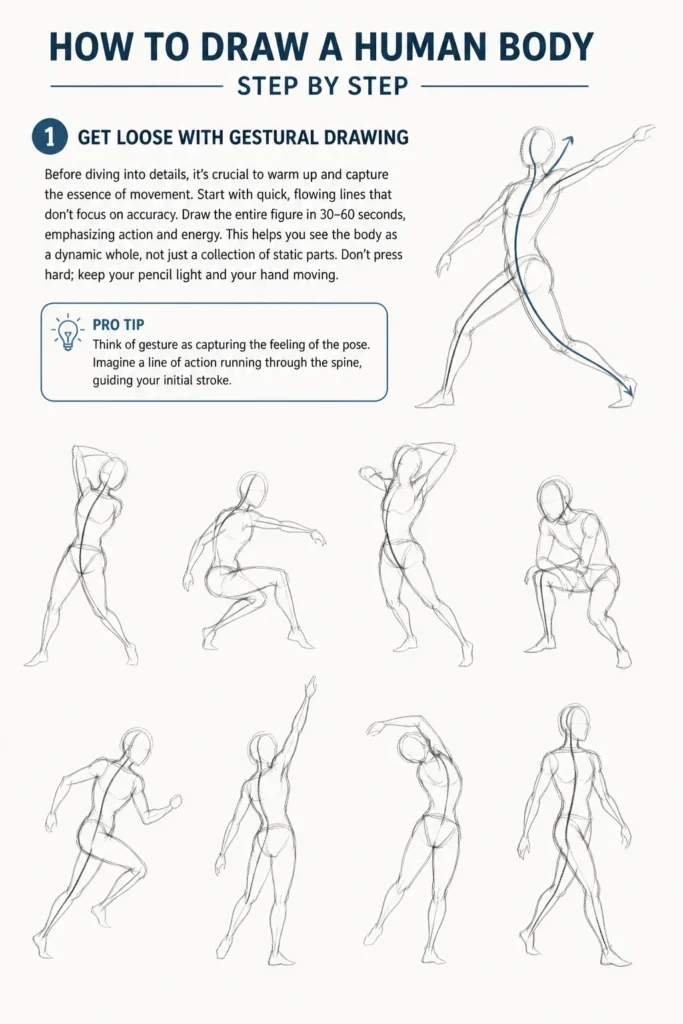
Start with quick, flowing lines that don’t focus on accuracy.
Draw the entire figure in 30-60 seconds, emphasizing action and energy.
This helps you see the body as a dynamic whole, not just a collection of static parts.
Don’t press hard; keep your pencil light and your hand moving.
Pro Tip: Think of gesture as capturing the “feeling” of the pose. Imagine a line of action running through the spine, guiding your initial stroke.
Step 2: Understand Basic Proportions – The Head Unit
The human body is often measured in “head units” for consistent proportion.
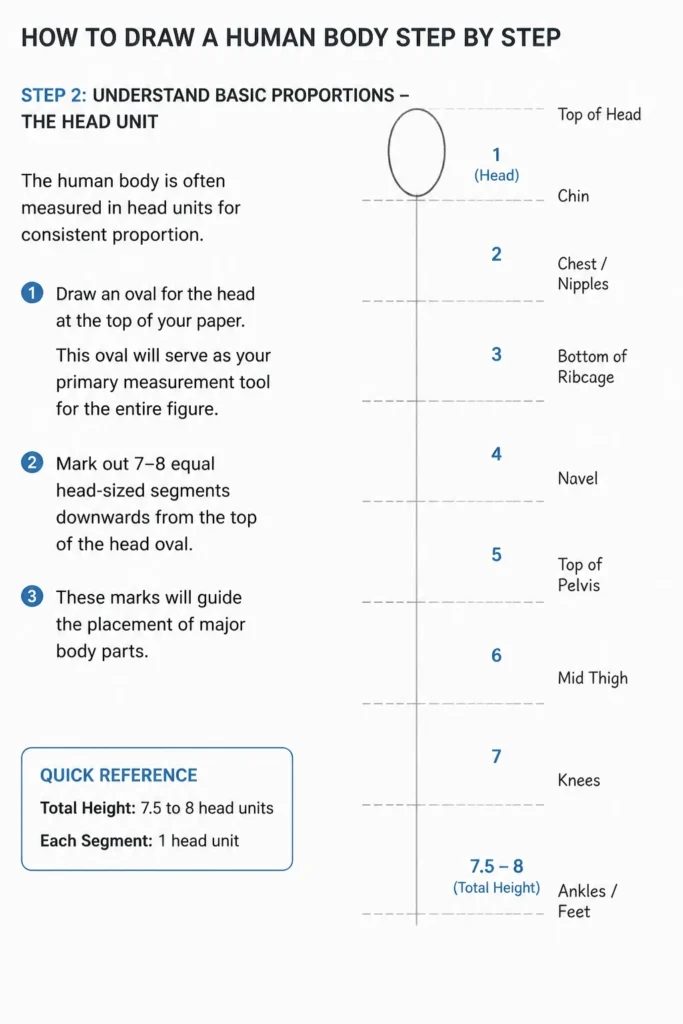
Draw an oval for the head at the top of your paper.
This oval will serve as your primary measurement tool for the entire figure.
A typical adult figure is roughly 7.5 to 8 head units tall.
Mark out 7-8 equal head-sized segments downwards from the top of the head oval.
These marks will guide the placement of major body parts.
Step 3: Construct the Skeleton with Simple Shapes
Think of the body as a sophisticated stick figure with joints.
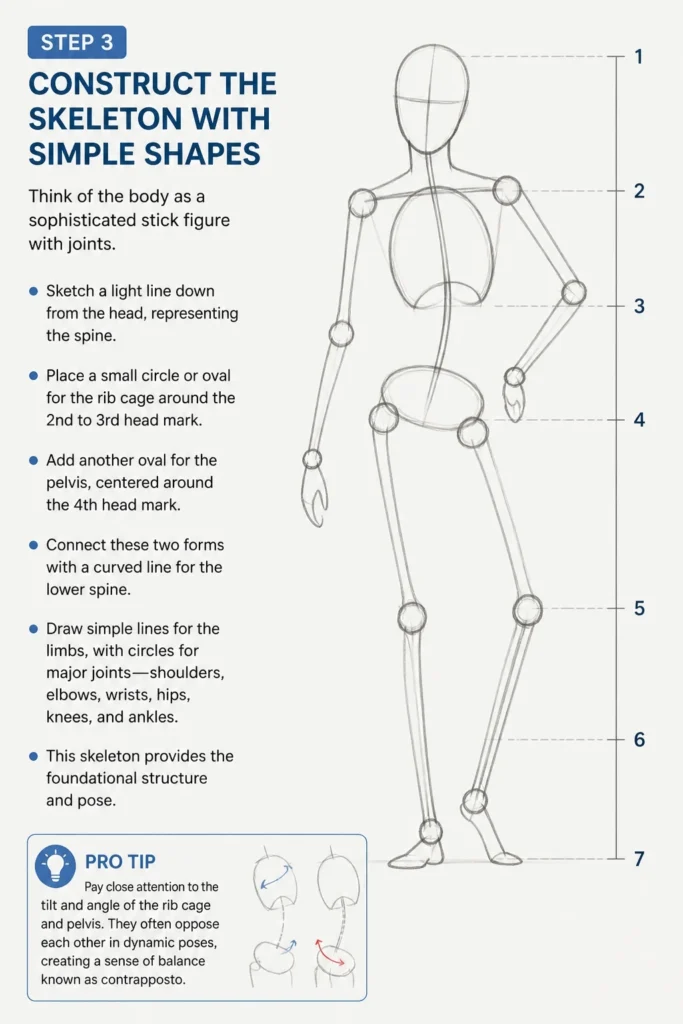
Sketch a light line down from the head, representing the spine.
Place a small circle or oval for the rib cage around the 2nd to 3rd head mark.
Add another oval for the pelvis, centered around the 4th head mark.
Connect these two forms with a curved line for the lower spine.
Draw simple lines for the limbs, with circles for major joints: shoulders, elbows, wrists, hips, knees, and ankles.
This “skeleton” provides the foundational structure and pose.
Pro Tip: Pay close attention to the tilt and angle of the rib cage and pelvis. They often oppose each other in dynamic poses, creating a sense of balance known as “contrapposto.”
Step 4: Add Volume with Basic Geometric Forms
Now, transform your stick figure into a three-dimensional form.
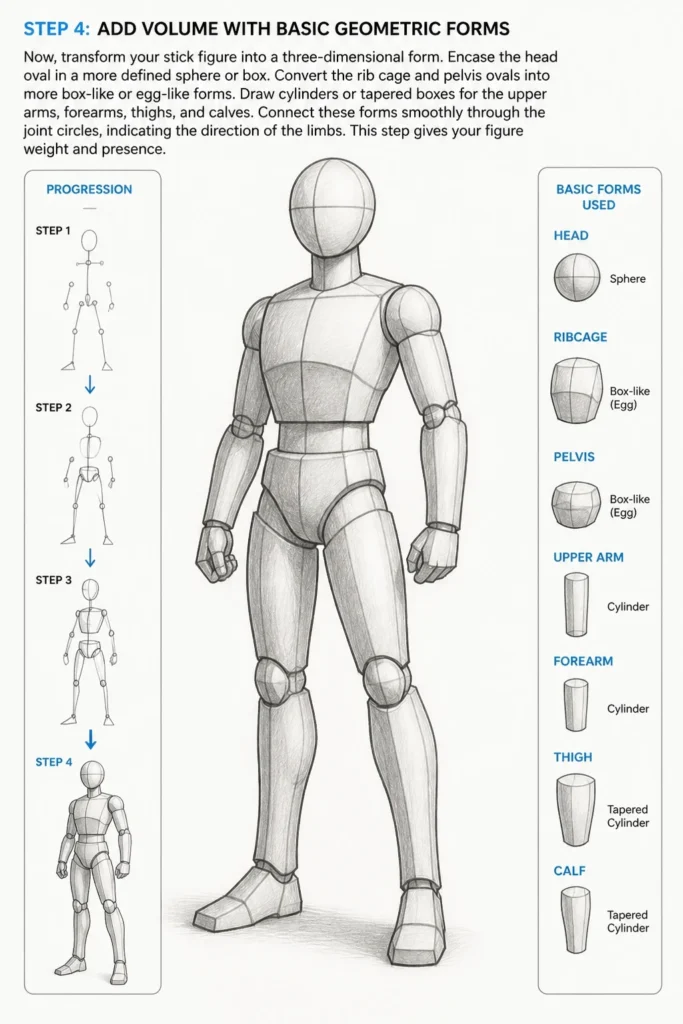
Encase the head oval in a more defined sphere or box.
Convert the rib cage and pelvis ovals into more box-like or egg-like forms.
Draw cylinders or tapered boxes for the upper arms, forearms, thighs, and calves.
Connect these forms smoothly through the joint circles, indicating the direction of the limbs.
This step gives your figure weight and presence.
Step 5: Refine the Torso – Rib Cage and Pelvis Interaction
The torso is the core of the figure and requires careful attention.
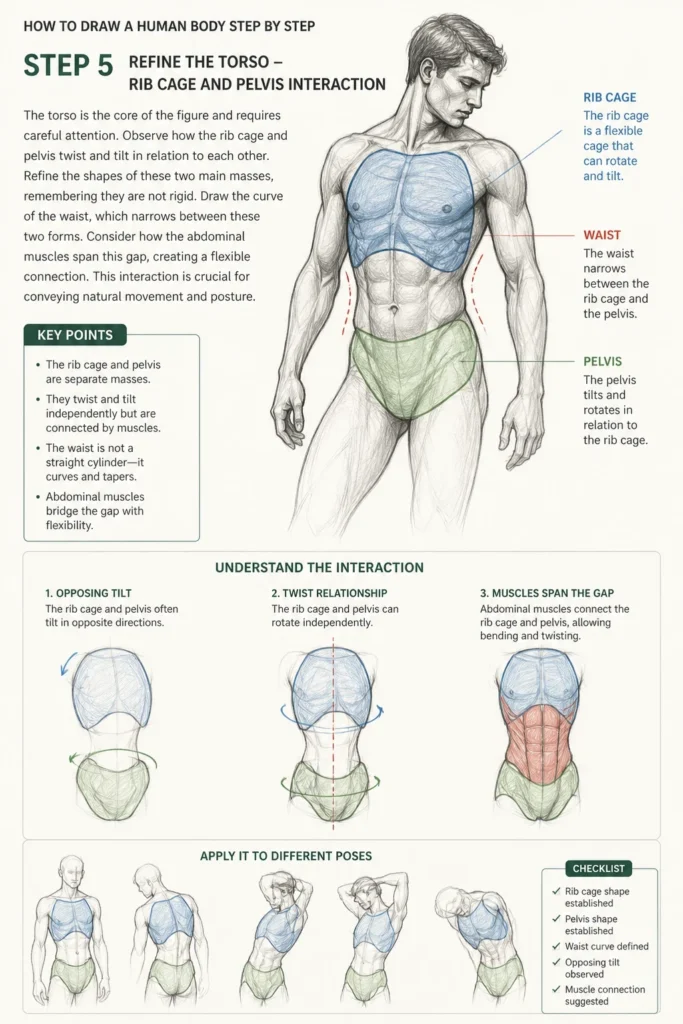
Observe how the rib cage and pelvis twist and tilt in relation to each other.
Refine the shapes of these two main masses, remembering they are not rigid.
Draw the curve of the waist, which narrows between these two forms.
Consider how the abdominal muscles span this gap, creating a flexible connection.
This interaction is crucial for conveying natural movement and posture.
Step 6: Connect the Limbs – Shoulders and Hips
The shoulder girdle and hip structure are key to limb movement.
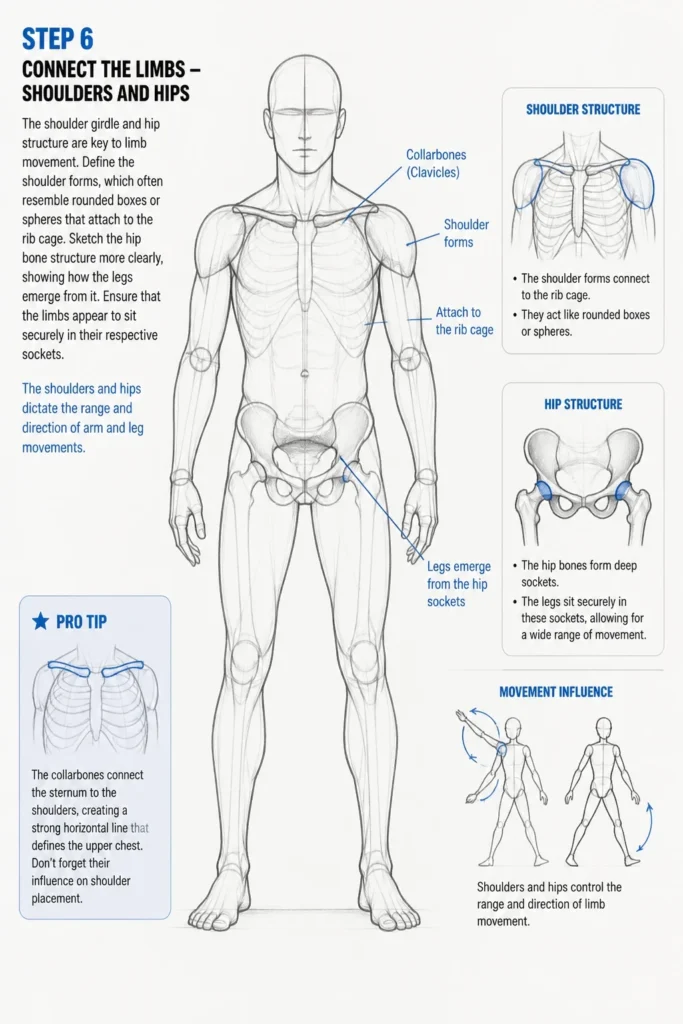
Define the shoulder forms, which often resemble rounded boxes or spheres that attach to the rib cage.
Sketch the hip bone structure more clearly, showing how the legs emerge from it.
Ensure that the limbs appear to “sit” securely in their respective sockets.
The shoulders and hips dictate the range and direction of arm and leg movements.
Pro Tip: The collarbones connect the sternum to the shoulders, creating a strong horizontal line that defines the upper chest. Don’t forget their influence on shoulder placement.
Step 7: Define Major Muscle Groups
You don’t need to be an anatomy expert, but understanding major muscle groups helps.
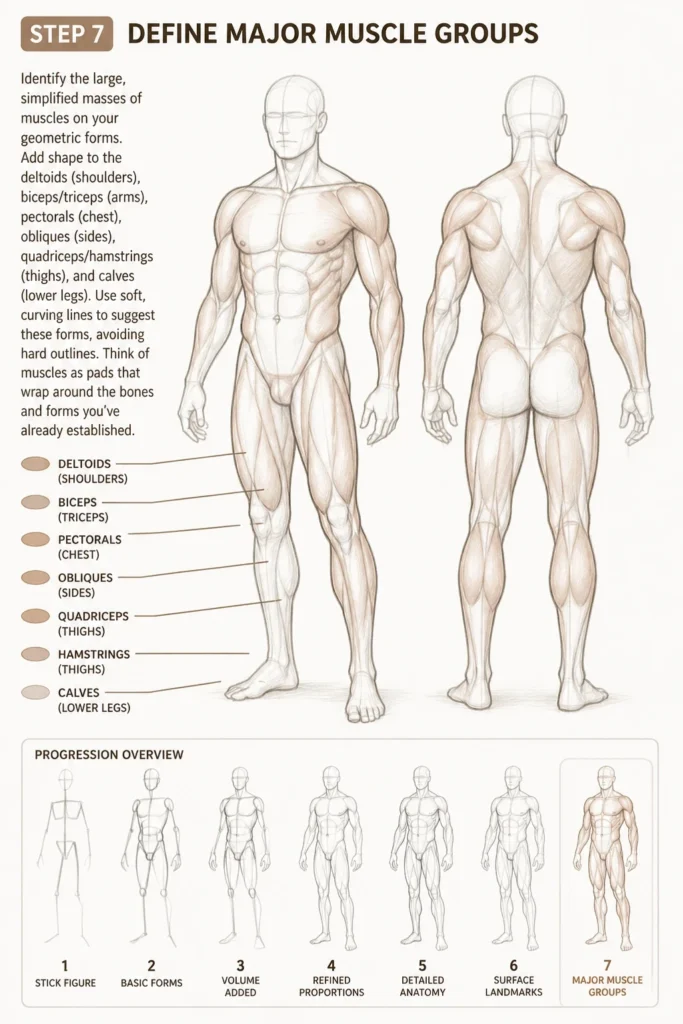
Identify the large, simplified masses of muscles on your geometric forms.
Add shape to the deltoids (shoulders), biceps/triceps (arms), pectorals (chest), obliques (sides), quadriceps/hamstrings (thighs), and calves (lower legs).
Use soft, curving lines to suggest these forms, avoiding hard outlines.
Think of muscles as pads that wrap around the bones and forms you’ve already established.
Step 8: Simplify Hands and Feet
Hands and feet can be challenging, so start with simplified forms.
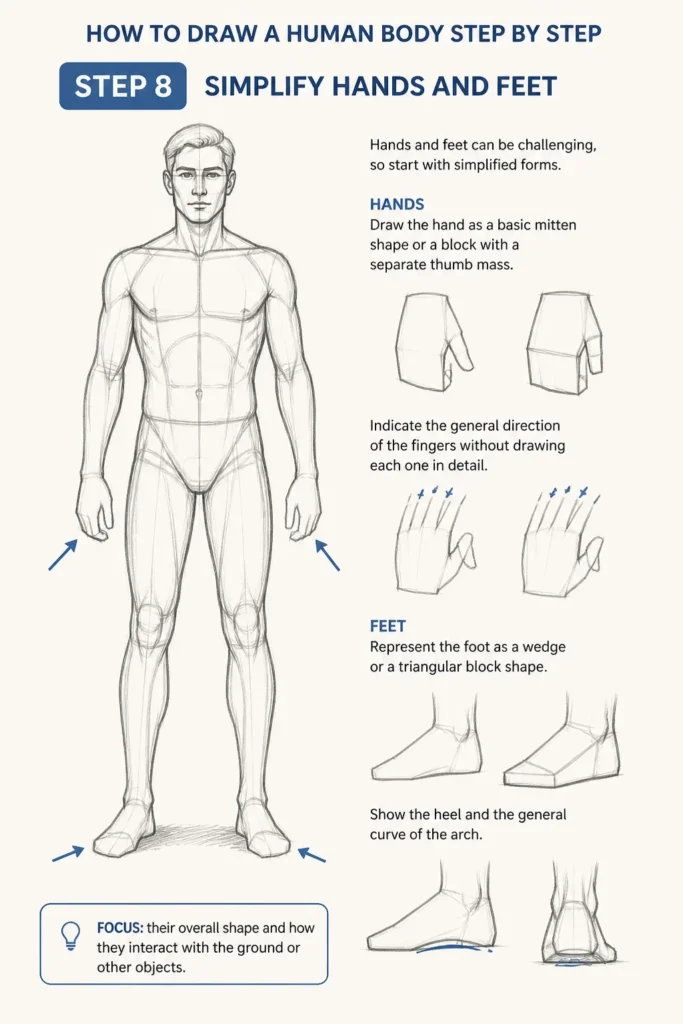
Draw the hand as a basic mitten shape or a block with a separate thumb mass.
Indicate the general direction of the fingers without drawing each one in detail.
Represent the foot as a wedge or a triangular block shape.
Show the heel and the general curve of the arch.
Focus on their overall shape and how they interact with the ground or other objects.
Step 9: Bring it to Life with Contours and Details
Now, it’s time to refine and clean up your drawing.
Lighten your initial construction lines with an eraser.
Draw a more confident, continuous contour line around your figure.
Add subtle details like kneecaps, elbows, and the curve of the ankle bones.
Consider the play of light and shadow to give your figure more dimension.
Step back and assess the overall balance and flow of your drawing.
Common Mistakes to Avoid
Ignoring Proportions
Many beginners rush into drawing details without establishing proper proportions. This leads to figures with unusually long limbs, tiny heads, or unbalanced torsos. Always start with head units and major anatomical landmarks before adding any detail.
Take the time to measure and compare sections of the body. A well-proportioned figure feels correct and natural, even if simplified.
Drawing Symmetrically
The human body is rarely perfectly symmetrical, especially in a natural pose. Beginners often draw both sides of the body as mirror images. This results in stiff, lifeless figures.
Allow for subtle differences in limb position, shoulder height, and hip tilt. Embrace the slight imperfections that make a figure dynamic and realistic.
Focusing on Outlines Too Early
It’s tempting to immediately draw the outer contour of the body. However, this often leads to flat, two-dimensional figures. You end up drawing what you think the body looks like, rather than building it up.
Always build your figure from the inside out, starting with gesture, then skeleton, then forms, before refining the outer lines. This ensures your figure has volume and structure.
Fear of Foreshortening
Foreshortening, where parts of the body appear shorter because they are closer to the viewer, can be intimidating. Many artists avoid it or draw limbs at full length regardless of perspective. This makes figures look flat and unnatural in dynamic poses.
Practice drawing simple cylinders and boxes in perspective first. Then apply this understanding to limbs, seeing them as forms receding or projecting in space. Start with simple angles and gradually challenge yourself.
Troubleshooting
My Figure Looks Stiff and Lifeless
This usually happens when you focus too much on drawing individual parts rather than the overall flow. Go back to step 1 and practice more gestural drawings.
Try drawing with a continuous line, without lifting your pencil, to capture the rhythm of the pose. Exaggerate the natural curves of the spine and the opposing tilts of the rib cage and pelvis to add dynamism.
My Proportions Are Constantly Off
If your proportions are consistently incorrect, you might be rushing the measurement stage. Revisit step 2 and practice drawing multiple head units accurately.
Use a pencil to measure distances on your reference image and transfer those measurements to your paper. Don’t be afraid to erase and redraw sections until they feel right. Consistency comes with careful practice.
I Can’t Get the Limbs to Connect Naturally
The problem often lies in how you’re envisioning the joints. Think of joints as spheres or simple hinge mechanisms that allow movement but also provide a solid connection point.
Ensure your cylinders for the limbs smoothly transition into these joint spheres. Visualize the bones underneath and how muscles wrap around them. Practice drawing simple arm and leg forms in various rotations to understand their attachment.
Key Takeaways
- Start with Gesture: Always begin with loose, energetic lines to capture movement and overall form.
- Master Proportions: Use the “head unit” system to ensure your figure is balanced and realistic.
- Build from Forms: Construct the body from simple geometric shapes (ovals, boxes, cylinders) before adding details.
- Understand Anatomy Simply: Focus on major muscle groups and skeletal landmarks, not intricate details initially.
- Practice Regularly: Drawing the human body is a skill that improves with consistent effort and observation.
- Embrace Imperfection: Don’t strive for perfect realism from day one; focus on understanding and improving with each drawing.
Frequently Asked Questions
How long does it take to get good at drawing the human body?
Mastering human anatomy and figure drawing is a lifelong journey for many artists. You can start seeing significant improvement in a few weeks of consistent practice, but true proficiency takes months or even years. The key is regular, focused effort.
Should I draw from imagination or reference photos?
Both are valuable. Start by drawing from reference photos or live models to build a strong understanding of anatomy, proportion, and how the body moves. Once you’ve internalized these principles, drawing from imagination becomes much easier and more informed.
What’s the best way to learn anatomy for artists?
Focus on “artistic anatomy” rather than medical anatomy. Learn the major bones and muscle groups that affect the surface form of the body. Resources like “Figure Drawing for All It’s Worth” by Andrew Loomis or “Anatomy for Artists” by Sarah Simblet are excellent starting points.
Is it okay to trace when learning?
Tracing can be a useful tool for understanding proportions and contours, but it shouldn’t be your only method. Use tracing as a way to analyze a pose or understand a specific anatomical feature, then try to replicate it freehand. The goal is to build your visual library and understanding, not just copy lines.
Our Top Recommended Finds
- Sketchbook (unlined): A simple, unlined sketchbook encourages freedom and fluid movement, perfect for gestural drawing.
- Graphite Pencils (HB, 2B, 4B): A range of pencil hardness allows for light construction lines and darker, more confident final contours.
- Kneaded Eraser: This versatile eraser can lighten lines without smudging and is excellent for subtle adjustments.
Your Artistic Journey Starts Now
Drawing the human body is a rewarding pursuit that deepens your understanding of art and observation.
Don’t let the initial complexity deter you; every master artist started with basic shapes and a willingness to learn.
Grab your pencil, choose a pose, and begin your creative exploration today.