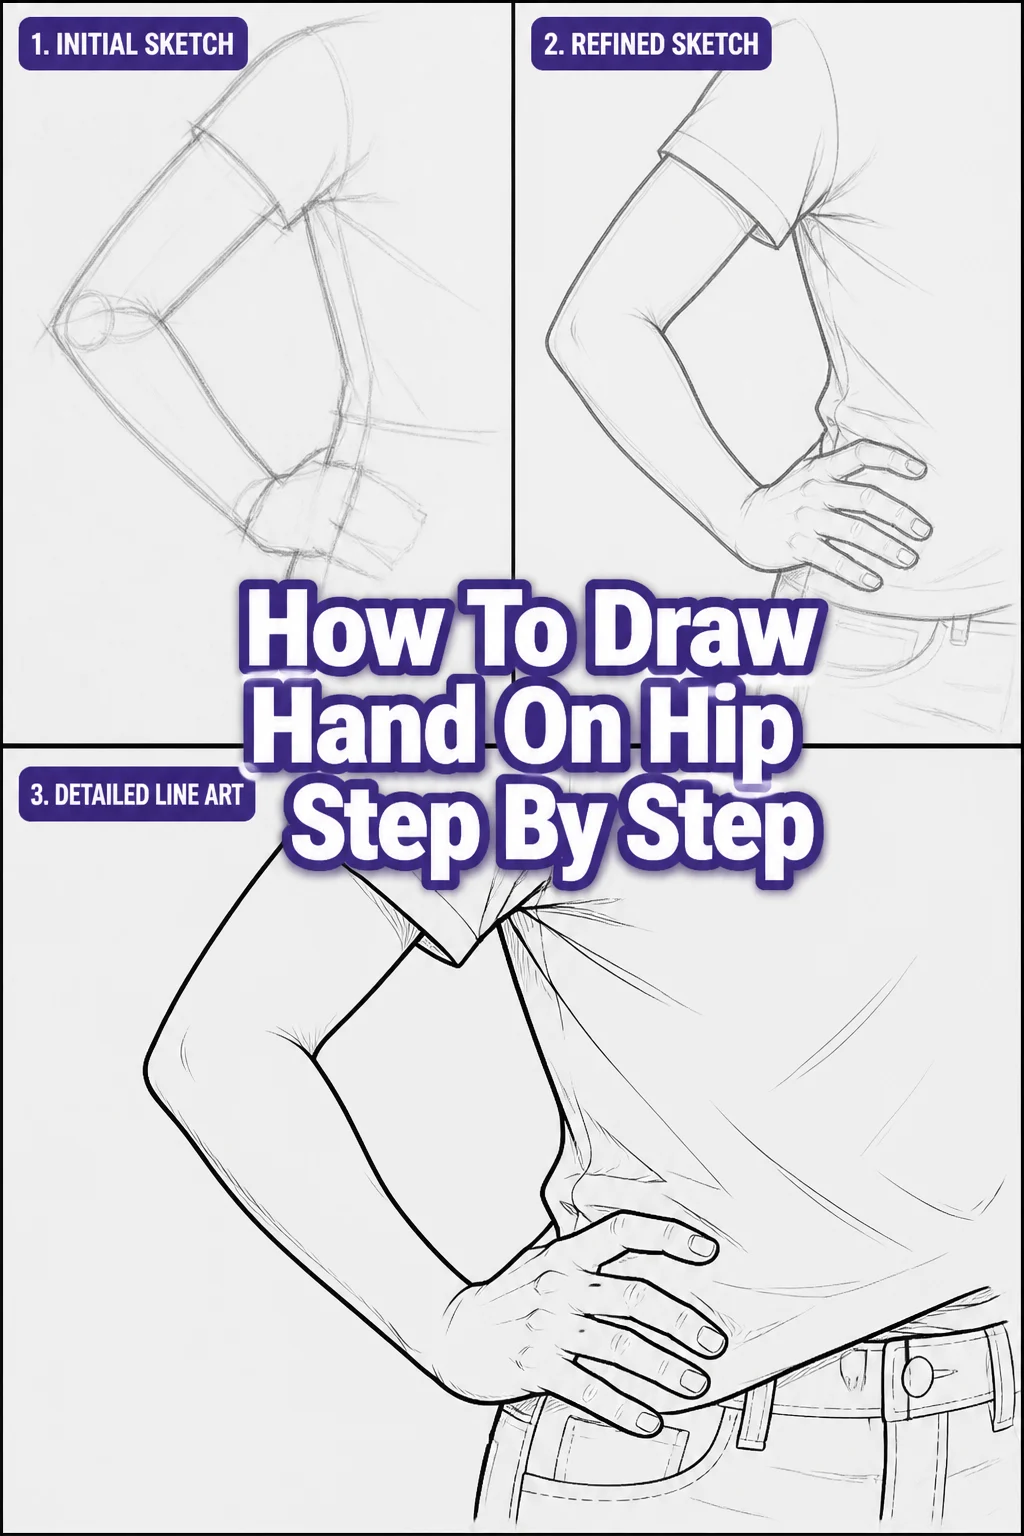
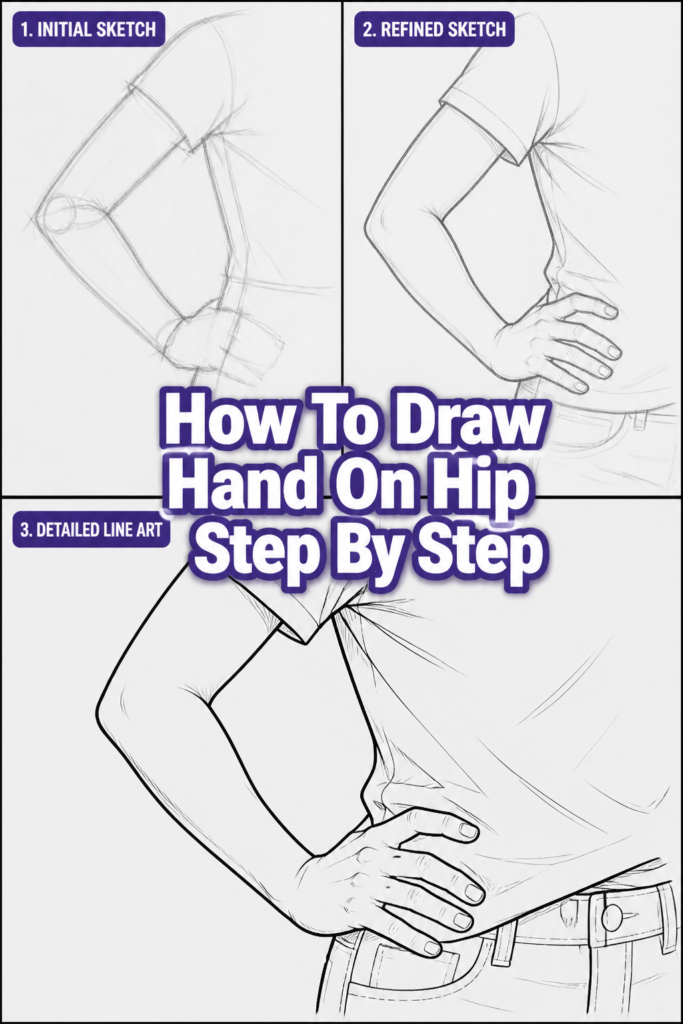
✍️ How To Draw Hand On Hip Step By Step
Drawing hands can feel like a daunting challenge for many artists. I remember struggling for years to make them look natural and expressive. The “hand on hip” pose, in particular, requires a good understanding of anatomy and gesture.
This guide comes from countless hours of practice and observation. It breaks down a complex pose into manageable, easy-to-follow steps. You’ll gain the confidence to draw this dynamic and common hand position with clarity.
Quick Overview
Mastering the hand-on-hip pose adds a dynamic and confident touch to your character drawings. This guide will walk you through the process from basic shapes to refined details. You’ll learn to capture the natural curve and structure.
- Time needed: 45-75 minutes
- Difficulty: Intermediate
- What you’ll need: Pencil (HB, 2B), paper, eraser (kneaded and plastic), optional reference photos
Step-by-Step Instructions
Step 1: Understand the Gesture and Anatomy
Before you draw any lines, take a moment to understand the overall gesture. The hand on the hip isn’t just a flat shape; it’s a dynamic interaction with the body. Think about the slight curve of the spine and the tilt of the pelvis.
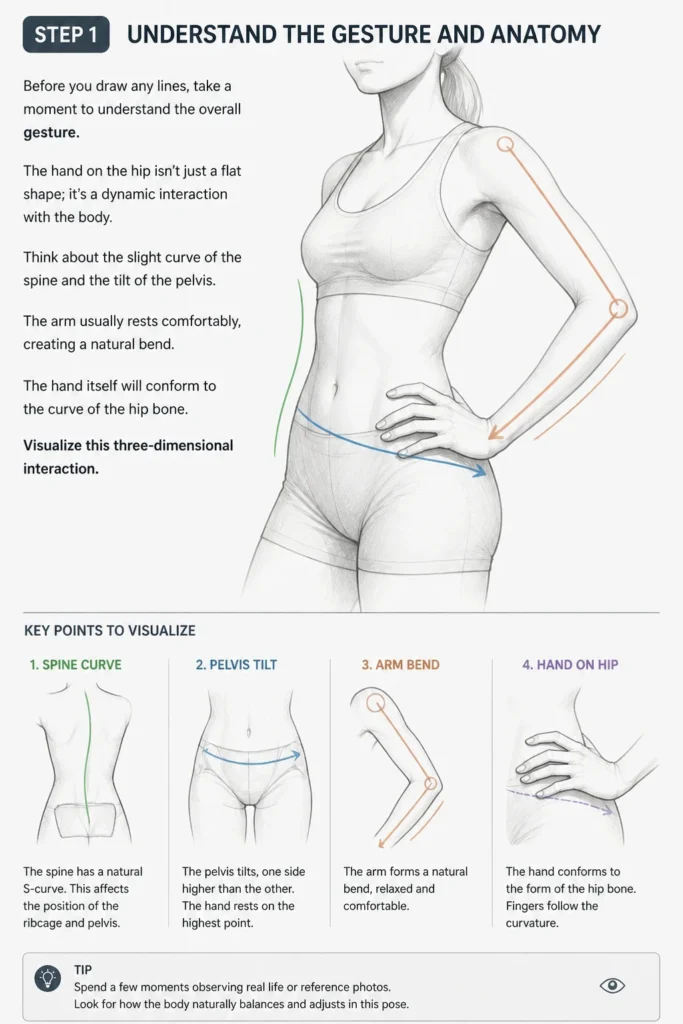
The arm usually rests comfortably, creating a natural bend. The hand itself will conform to the curve of the hip bone. Visualize this three-dimensional interaction.
Step 2: Sketch the Torso and Initial Arm Placement
Begin by lightly sketching the torso of your figure. Establish the waistline and the general curve of the hip where the hand will rest. This foundation is crucial for correct placement.
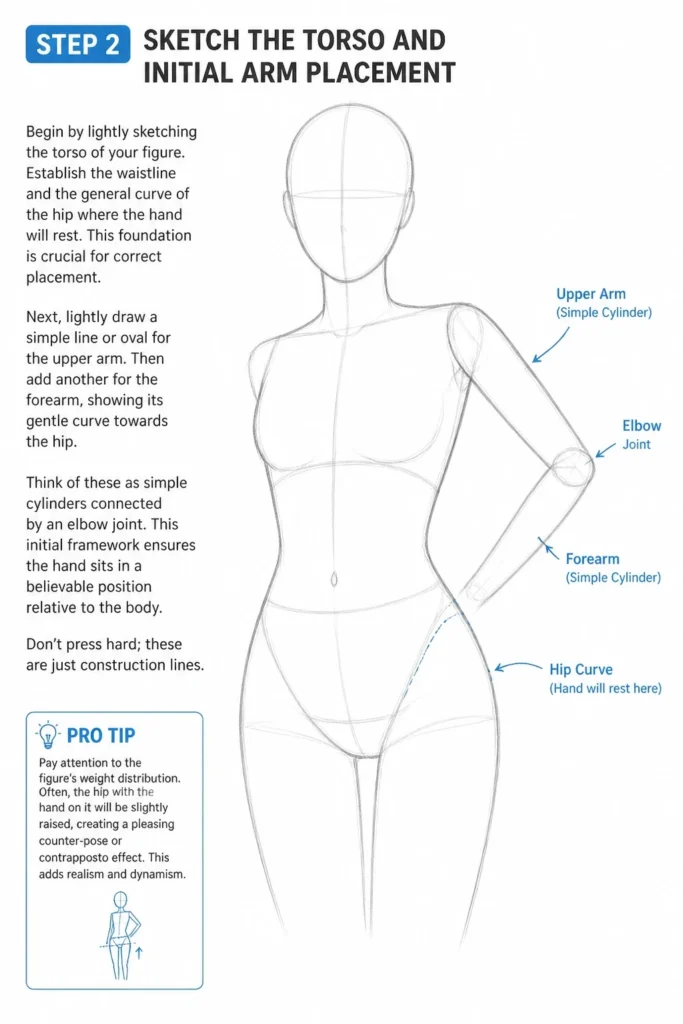
Next, lightly draw a simple line or oval for the upper arm. Then add another for the forearm, showing its gentle curve towards the hip. Think of these as simple cylinders connected by an elbow joint.
This initial framework ensures the hand sits in a believable position relative to the body. Don’t press hard; these are just construction lines.
Pro Tip: Pay attention to the figure’s weight distribution. Often, the hip with the hand on it will be slightly raised, creating a pleasing counter-pose or “contrapposto” effect. This adds realism and dynamism.
Step 3: Define the Arm and Forearm Forms
Flesh out the cylindrical shapes of the upper arm and forearm. Show the slight tapering towards the elbow and wrist. The forearm often has a subtle curve as it approaches the hand.
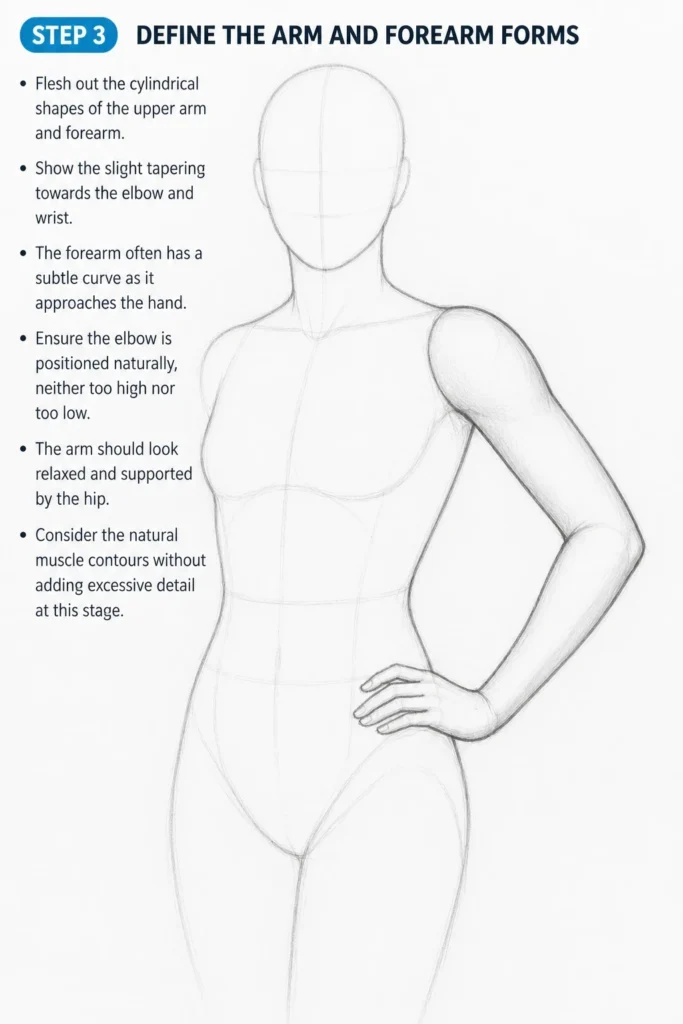
Ensure the elbow is positioned naturally, neither too high nor too low. The arm should look relaxed and supported by the hip. Consider the natural muscle contours without adding excessive detail at this stage.
Step 4: Block Out the Hand Shape
Now, focus on the hand itself. Start by drawing a simple, slightly angled box or mitten shape for the palm and base of the fingers. This block represents the main mass of the hand.
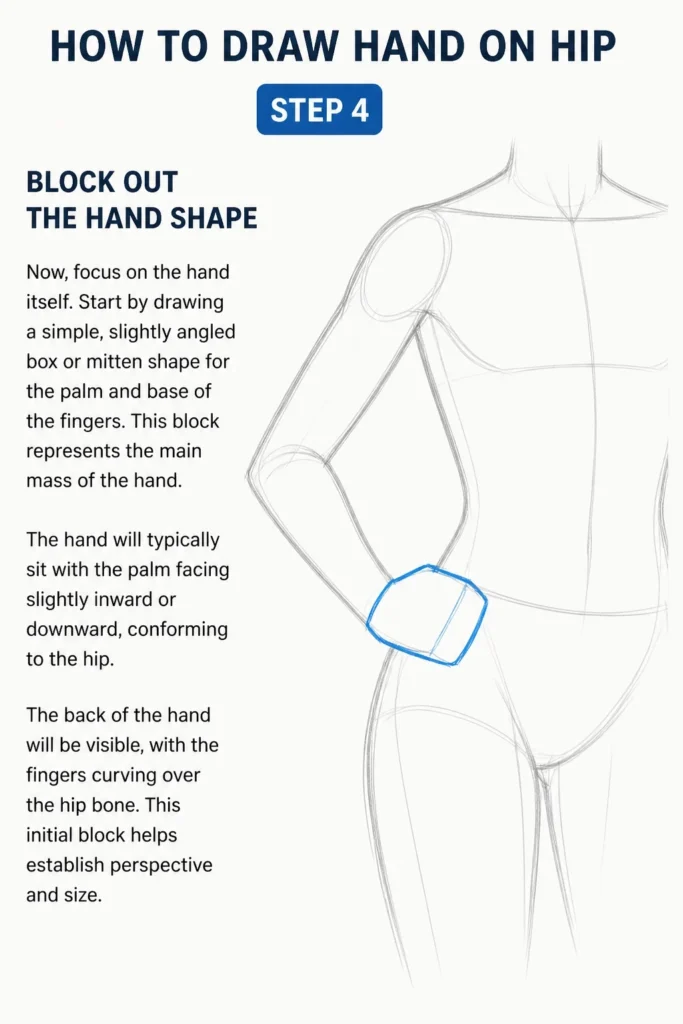
The hand will typically sit with the palm facing slightly inward or downward, conforming to the hip. The back of the hand will be visible, with the fingers curving over the hip bone. This initial block helps establish perspective and size.
Step 5: Position the Thumb
The thumb is critical for conveying the “hand on hip” pose. It typically wraps around the front of the hip bone or points downwards, separating from the other fingers. Sketch a simple oval or wedge for the thumb.
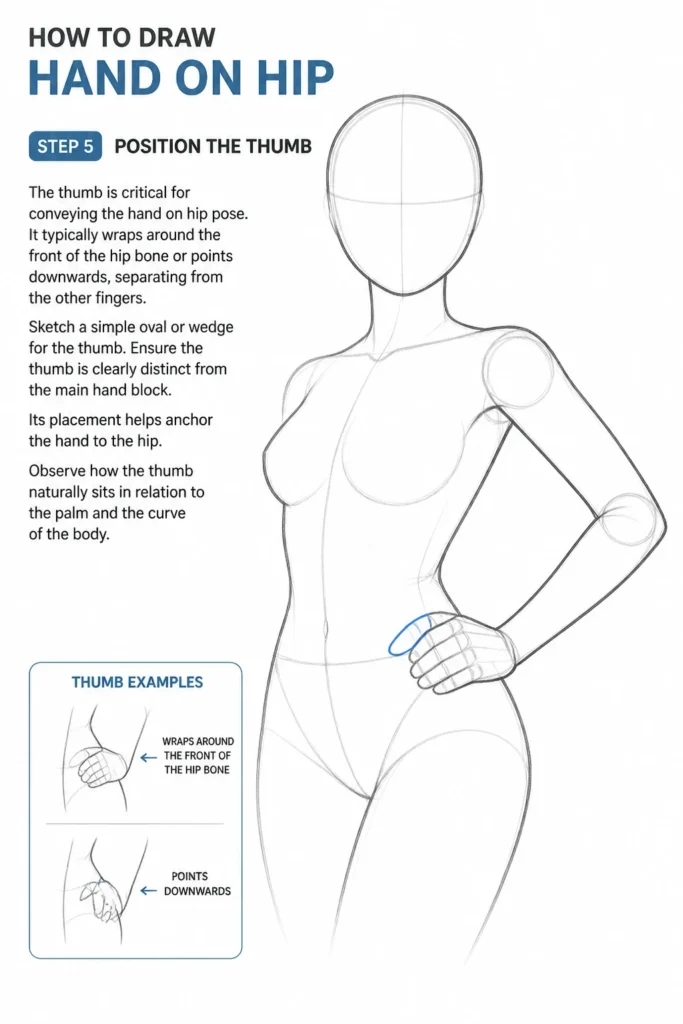
Ensure the thumb is clearly distinct from the main hand block. Its placement helps anchor the hand to the hip. Observe how the thumb naturally sits in relation to the palm and the curve of the body.
Step 6: Outline the Fingers
Once the main hand block and thumb are in place, start outlining the individual fingers. Think of them as a relaxed, slightly curved group. The fingers will likely overlap each other, especially the pinky and ring finger.
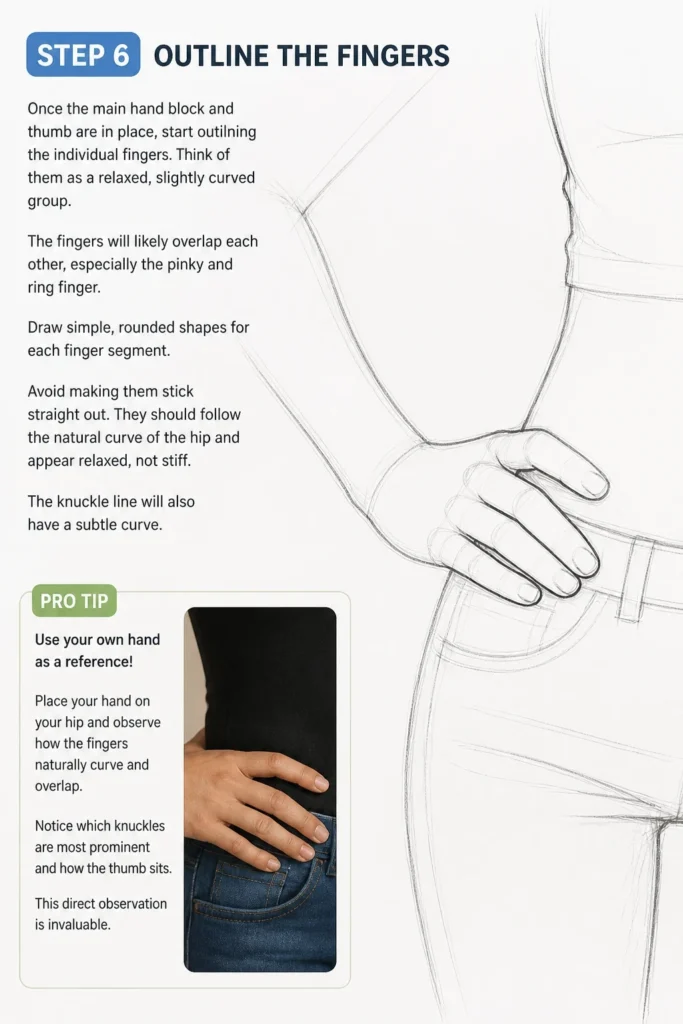
Draw simple, rounded shapes for each finger segment. Avoid making them stick straight out. They should follow the natural curve of the hip and appear relaxed, not stiff. The knuckle line will also have a subtle curve.
Pro Tip: Use your own hand as a reference! Place your hand on your hip and observe how the fingers naturally curve and overlap. Notice which knuckles are most prominent and how the thumb sits. This direct observation is invaluable.
Step 7: Refine the Knuckles and Palm Details
With the basic finger shapes down, refine the knuckles. The knuckles will be more prominent on the back of the hand. Add subtle bumps for the knuckles, ensuring they follow a gentle arc.
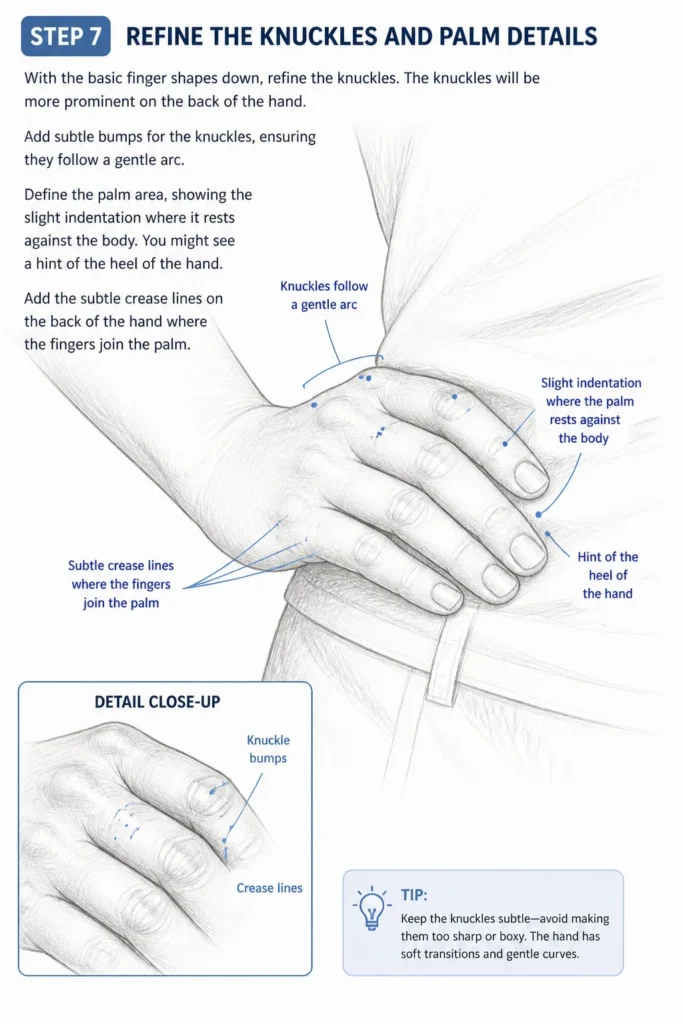
Define the palm area, showing the slight indentation where it rests against the body. You might see a hint of the heel of the hand. Add the subtle crease lines on the back of the hand where the fingers join the palm.
Step 8: Add Details and Form
Now you can start adding finer details. Sketch in the fingernails, paying attention to their curve and shape. Add the subtle lines and wrinkles on the knuckles and finger joints. These details bring the hand to life.
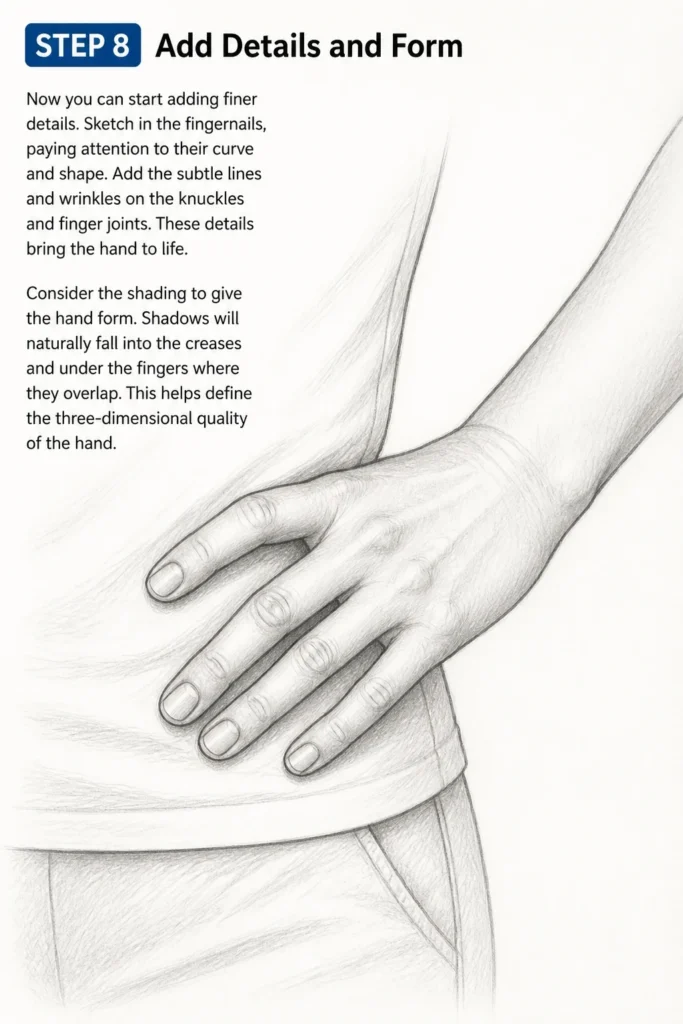
Consider the shading to give the hand form. Shadows will naturally fall into the creases and under the fingers where they overlap. This helps define the three-dimensional quality of the hand.
Step 9: Clean Up and Finalize
Gently erase all your initial construction lines. Use a kneaded eraser to lift away excess graphite without smudging. Then, strengthen your final outlines with a slightly darker pencil.
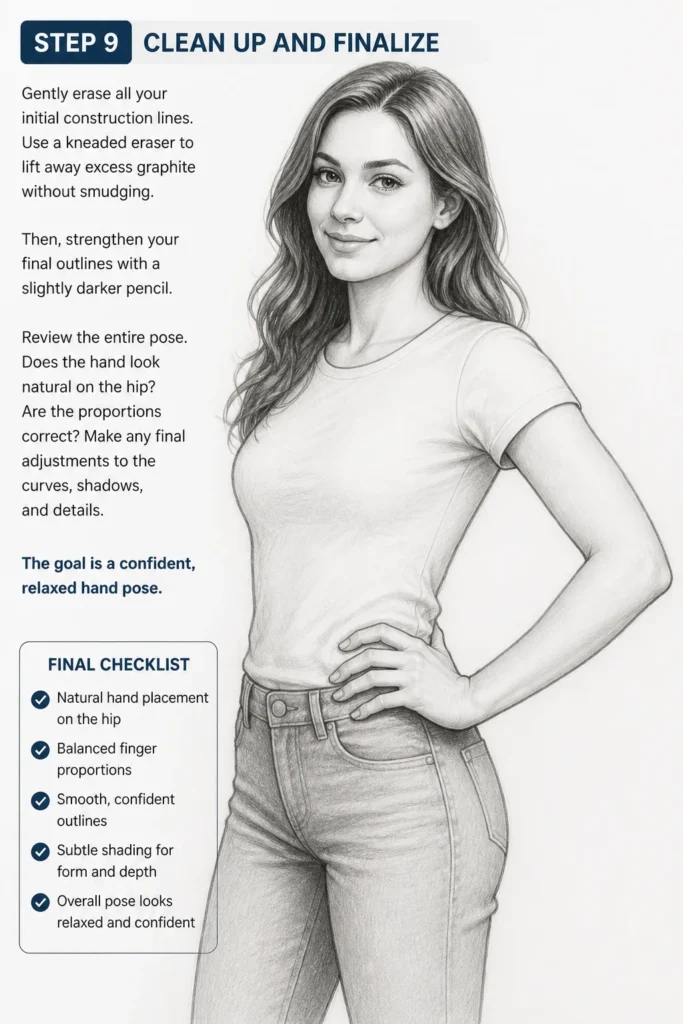
Review the entire pose. Does the hand look natural on the hip? Are the proportions correct? Make any final adjustments to the curves, shadows, and details. The goal is a confident, relaxed hand pose.
Common Mistakes to Avoid
Stiff, Posed Fingers
A common pitfall is drawing fingers that look rigid or like stiff sausages. This happens when you draw each finger as a separate, straight entity. Natural fingers are rarely perfectly straight. They have a subtle curve, even when relaxed.
Instead, think of the fingers as a unified, relaxed group. They should follow the natural curve of the hip, with slight overlaps. Practice drawing the gesture of the fingers first, then refine their individual shapes.
Incorrect Thumb Placement
The thumb is crucial for conveying that the hand is truly “on the hip.” If it’s drawn too far away, too close, or in an awkward angle, the entire pose can look unnatural. The thumb acts as an anchor.
Observe how the thumb naturally wraps around the hip bone or points downwards. It creates a subtle separation from the other fingers. Pay close attention to its angle and how it connects to the palm.
Disproportionate Hand Size
Hands are often drawn either too small or too large in relation to the rest of the body. A hand that is too small can make the figure look delicate or weak, while one too large can look cartoonish. The size of the hand should generally be comparable to the face.
Always compare the hand’s size to the head or other body parts to maintain consistent proportions. Sketching the overall form of the hand as a block first helps establish the correct scale early on.
Lack of Overlap
When drawing fingers, especially in a relaxed pose, they will naturally overlap each other. Ignoring this overlap makes the hand look flat and two-dimensional. Overlapping creates depth and realism.
Consciously draw the fingers so that some parts are hidden behind others. This creates a sense of three-dimensionality and makes the hand appear more natural and less like a collection of separate elements.
Troubleshooting
My Hand Looks Flat and Lifeless
If your hand drawing lacks depth, it might be due to neglecting perspective and overlapping forms. A flat hand often happens when you draw all contours on the same plane.
To fix this, go back to basic shapes. Think of the hand as a series of connected boxes and cylinders. Emphasize the curvature of the fingers and the palm. Add subtle shading to define planes and create the illusion of form and depth. Ensure fingers overlap realistically.
The Pose Doesn’t Look Natural or Relaxed
A stiff or unnatural pose usually stems from an incorrect initial gesture or arm placement. If the arm isn’t comfortably resting, the hand won’t look right.
Re-evaluate your initial arm and torso sketches. Check the angle of the elbow and wrist. Use reference photos of people with hands on hips to see the natural flow of the pose. Sometimes, a slight tilt of the head or shoulders can make the hand pose feel more integrated and relaxed.
My Fingers Still Look Like Sausages
This is a very common issue and means you might be drawing the fingers as single, unbroken units. Fingers have distinct segments and knuckles, and they taper.
Break down each finger into three simple segments (phalanges) connected by joints. Observe how each segment is slightly different in length and how the finger tapers towards the tip. Practice drawing these segmented forms, then add the subtle curves and details. Use a reference image to study the subtle variations in finger shapes.
Key Takeaways
- Always begin with the overall gesture and simple geometric shapes for the hand and arm.
- The thumb’s placement is essential for effectively conveying the “hand on hip” pose.
- Ensure fingers are drawn relaxed and curved, with natural overlaps, not stiff and straight.
- Regularly use reference photos to understand natural anatomy and pose dynamics.
- Practice is key; don’t be afraid to erase and refine your lines many times over.
- Focus on proportion and perspective early on to avoid common anatomical errors.
Frequently Asked Questions
How can I make the hand look more feminine or masculine?
To adjust the hand’s perceived gender, consider the overall proportions and details. Feminine hands often feature longer, more slender fingers and a slightly narrower palm, with softer knuckle details. Masculine hands tend to have broader palms, shorter or thicker fingers, and more pronounced knuckles and veins. Subtle differences in nail shape and overall robustness also play a role.
Should I always use reference photos when drawing hands?
While not strictly mandatory once you’ve internalized the anatomy, using reference photos is highly recommended, especially when learning. References help you observe real-world variations, lighting, and natural poses that are difficult to invent from memory. They are invaluable for understanding complex angles and foreshortening. Even experienced artists frequently use them.
What if my drawing still looks stiff after following these steps?
Stiffness often comes from drawing individual parts in isolation rather than as a connected whole. Try drawing the entire arm and hand as one flowing gesture first, focusing on the overall curve and energy. Loosen up your grip on the pencil and draw with lighter, more fluid strokes. Emphasize the natural curves and relaxed overlaps, and remember to check the connection to the torso.
How do I draw the other hand of the figure?
For the other hand, consider its role in the overall pose. Is it relaxed by the side, holding an object, or mirroring the hand on the hip? Apply the same principles: start with simple shapes and gesture, then refine. Ensure it complements the hand on the hip, contributing to the figure’s balance and expression. Always think about how the two hands interact within the full body pose.
Our Top Recommended Finds
- Quality Sketchbook: A good sketchbook with smooth, durable paper (like Strathmore or Canson) enhances your drawing experience and holds graphite well.
- Pencil Set (HB, 2B, 4B): Having a range of graphite pencils allows for varied line weights and shading, from light construction lines to dark, defining contours.
- Kneaded Eraser: Essential for gently lifting graphite without smudging and for creating highlights, offering more control than a standard plastic eraser.
Continue Your Artistic Exploration
Congratulations on taking the steps to master the hand-on-hip pose! This is a significant achievement in your drawing journey. The ability to render expressive hands truly brings characters to life.
Now, take what you’ve learned and apply it to your own characters. Experiment with different angles and slight variations of the pose. Consider how clothing might interact with the hand on the hip. Your artistic growth is an ongoing adventure. Keep practicing, keep observing, and most importantly, keep enjoying the process of creation.