👨 How To Draw A Guys Face Step By Step
Learning to draw a guy’s face might seem challenging at first, but it’s a skill anyone can develop with practice.
I remember struggling with proportions and symmetry, but breaking it down made all the difference.
This guide will walk you through each stage, building confidence as you go.
Quick Overview
You’re about to learn the fundamental techniques for sketching a convincing male face.
From basic shapes to detailed features, you’ll gain a solid foundation for your artistic journey.
- Time needed: 45-90 minutes (can be longer for detailed work)
- Difficulty: Beginner to Intermediate
- What you’ll need: Pencil (HB, 2B, 4B recommended), eraser, drawing paper, ruler (optional)
Step-by-Step Instructions
Step 1: Prepare Your Workspace and Mindset
Before you even touch your pencil, take a moment to set up your drawing area. Choose a well-lit space where you can sit comfortably without distractions.
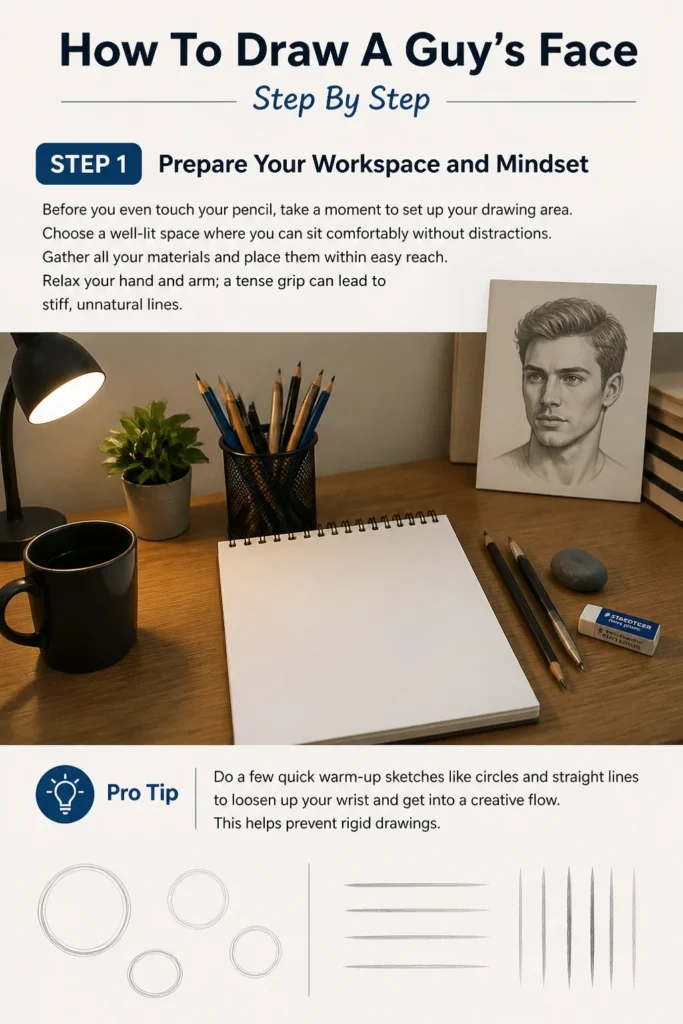
Gather all your materials and place them within easy reach. Relax your hand and arm; a tense grip can lead to stiff, unnatural lines.
Pro Tip: Do a few quick warm-up sketches like circles and straight lines to loosen up your wrist and get into a creative flow. This helps prevent rigid drawings.
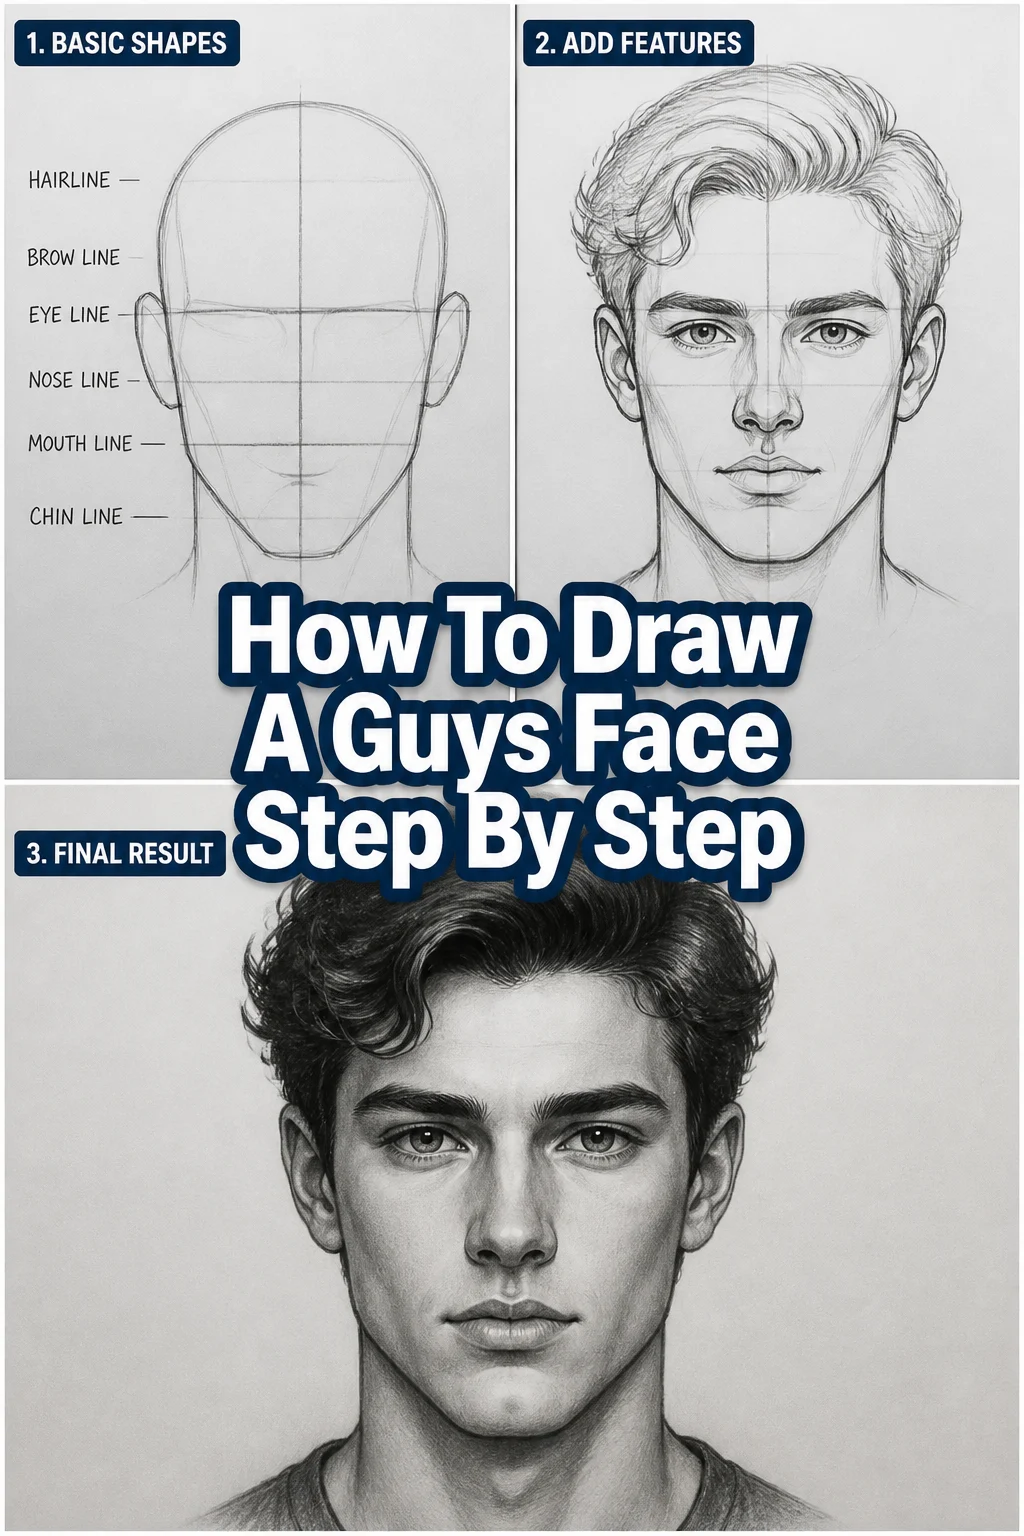
Step 2: Establish the Basic Head Shape
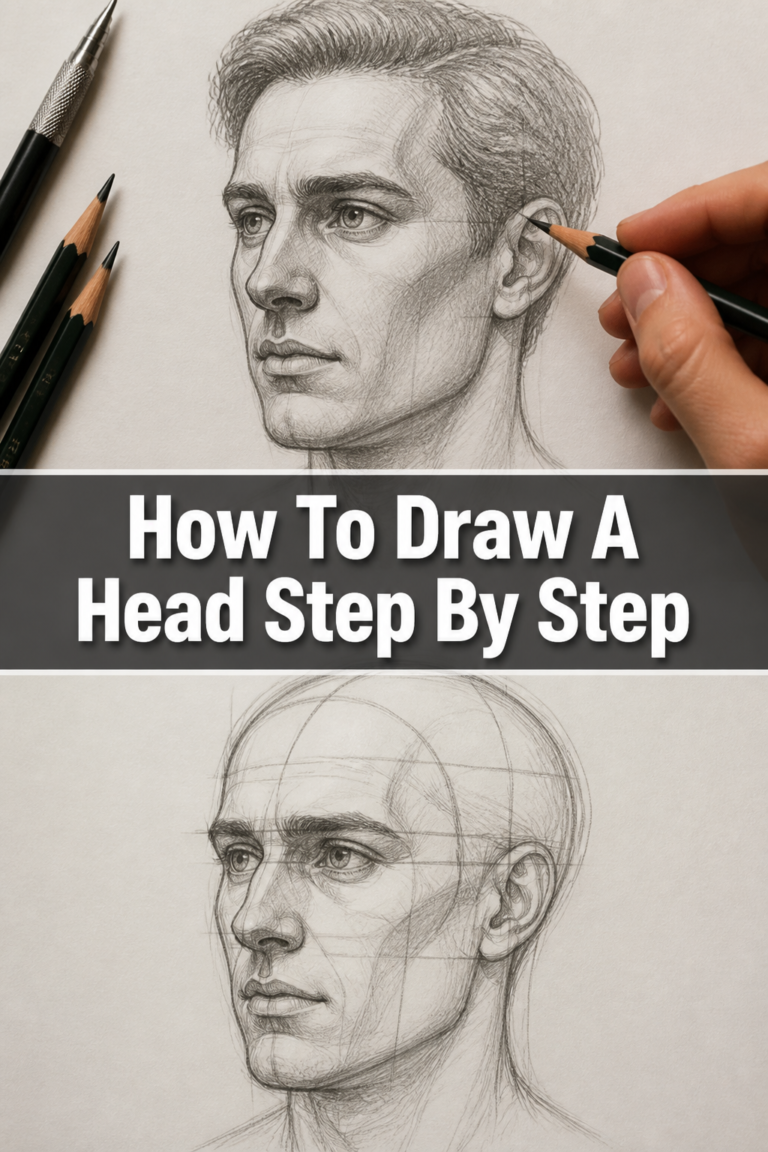
Begin by drawing a large, light circle on your paper. This circle will form the cranium, the top part of the head.
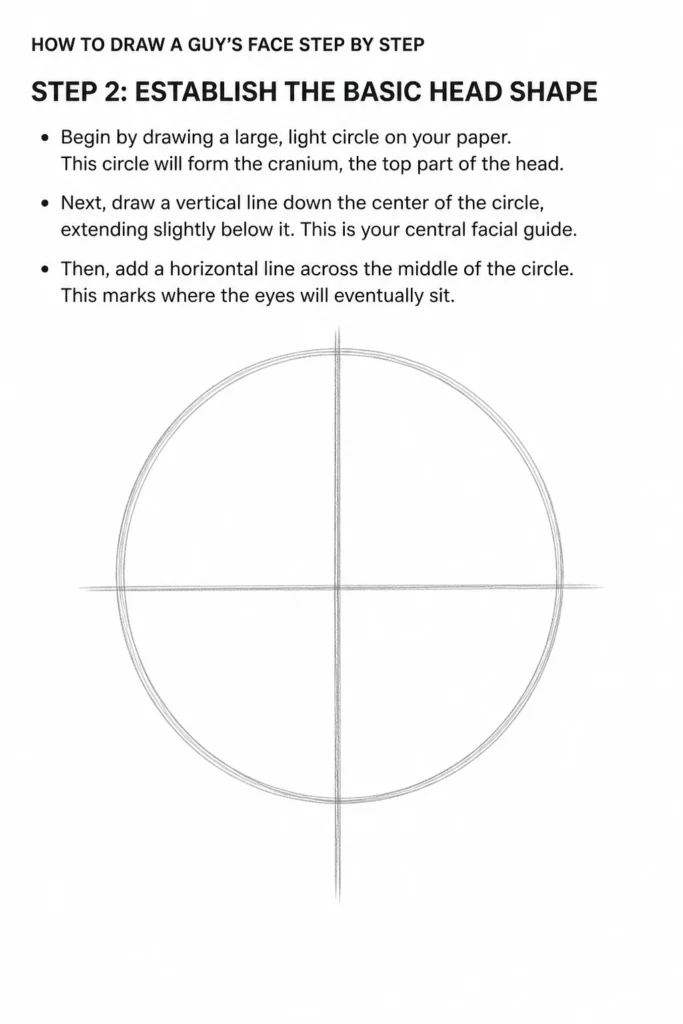
Next, draw a vertical line down the center of the circle, extending slightly below it. This is your central facial guide.
Then, add a horizontal line across the middle of the circle. This marks where the eyes will eventually sit.
Step 3: Map Out the Jawline and Chin
From the bottom of your initial circle, extend two diagonal lines downwards and inwards. These lines will form the sides of the jaw.
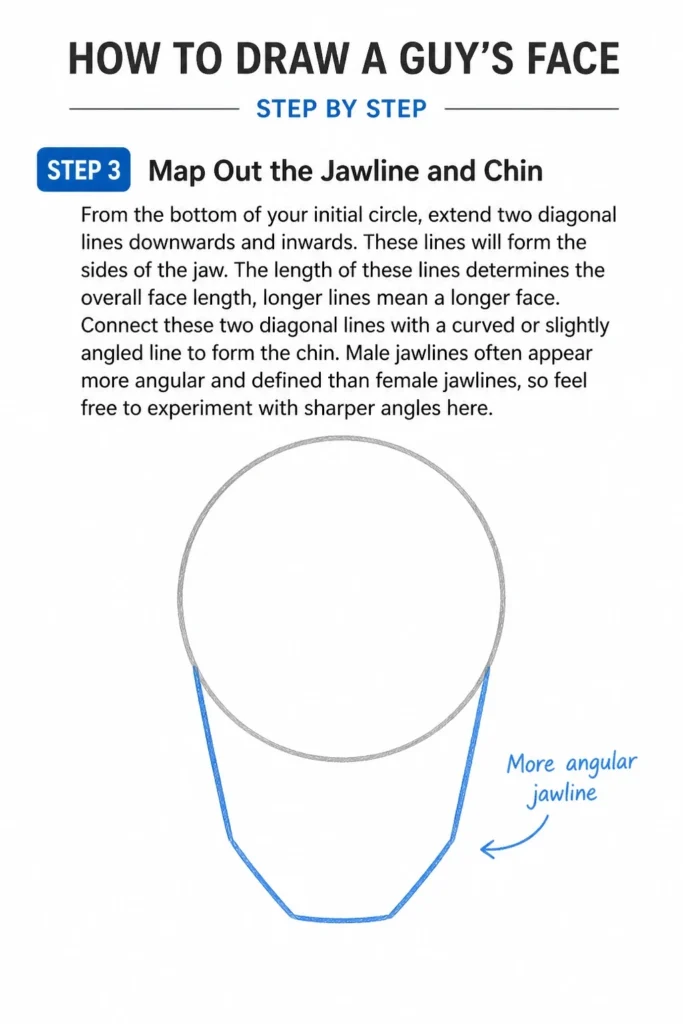
The length of these lines determines the overall face length; longer lines mean a longer face. Connect these two diagonal lines with a curved or slightly angled line to form the chin.
Male jawlines often appear more angular and defined than female jawlines, so feel free to experiment with sharper angles here.
Step 4: Place the Facial Guidelines
Now, let’s establish more precise guidelines. Draw a horizontal line halfway between the eye line and the chin line; this will be your nose line.
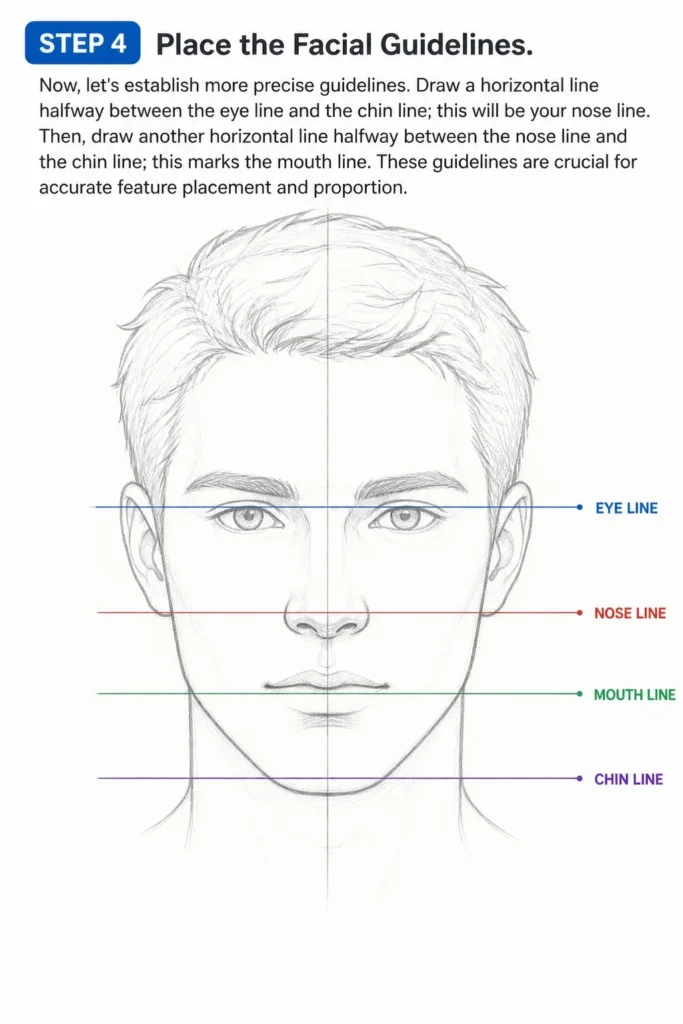
Then, draw another horizontal line halfway between the nose line and the chin line; this marks the mouth line.
These guidelines are crucial for accurate feature placement and proportion.
Step 5: Position the Eyes and Eyebrows
The eyes are typically positioned on the horizontal line you drew through the middle of the circle. Sketch two almond-shaped forms for the eyes, ensuring there’s roughly one eye-width space between them.
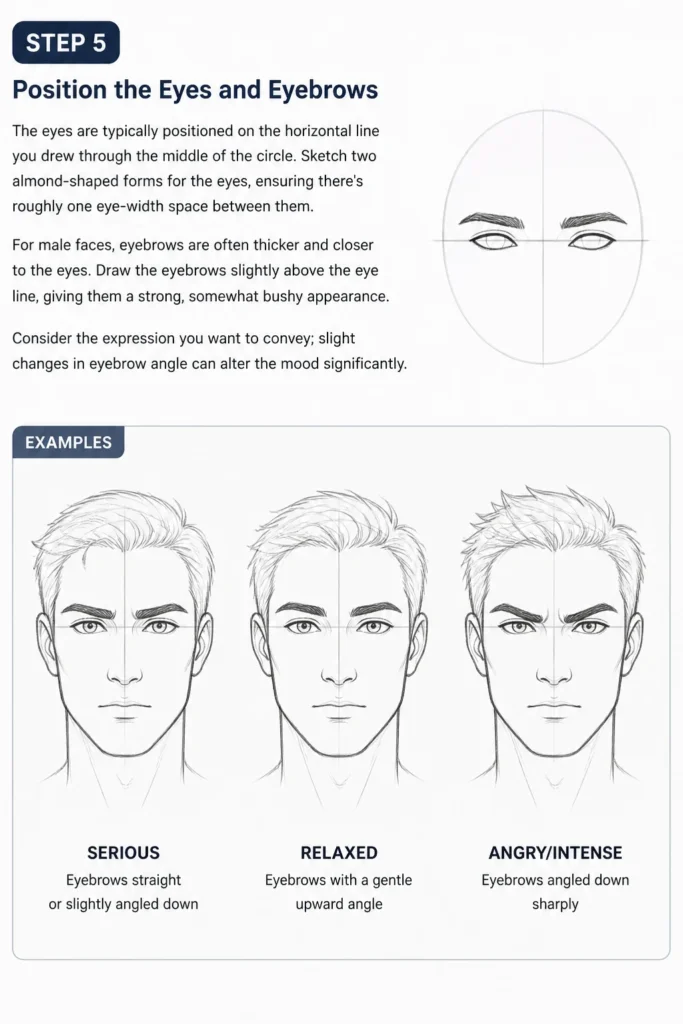
For male faces, eyebrows are often thicker and closer to the eyes. Draw the eyebrows slightly above the eye line, giving them a strong, somewhat bushy appearance.
Consider the expression you want to convey; slight changes in eyebrow angle can alter the mood significantly.
Step 6: Define the Nose Structure
The base of the nose sits on the nose line you established earlier. Start by drawing a small circle for the tip of the nose, centered on your vertical guideline.
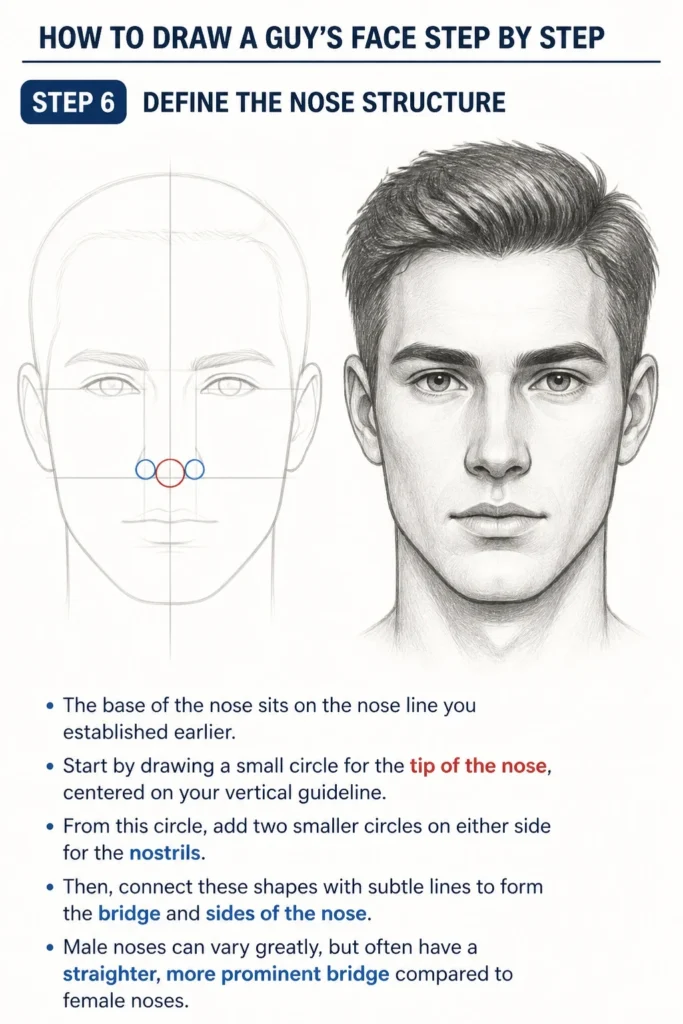
From this circle, add two smaller circles on either side for the nostrils. Then, connect these shapes with subtle lines to form the bridge and sides of the nose.
Male noses can vary greatly, but often have a straighter, more prominent bridge compared to female noses.
Step 7: Form the Mouth and Lips
The mouth is positioned on the mouth line. Draw a horizontal line for the mouth, ensuring its width aligns roughly with the inner corners of the eyes.
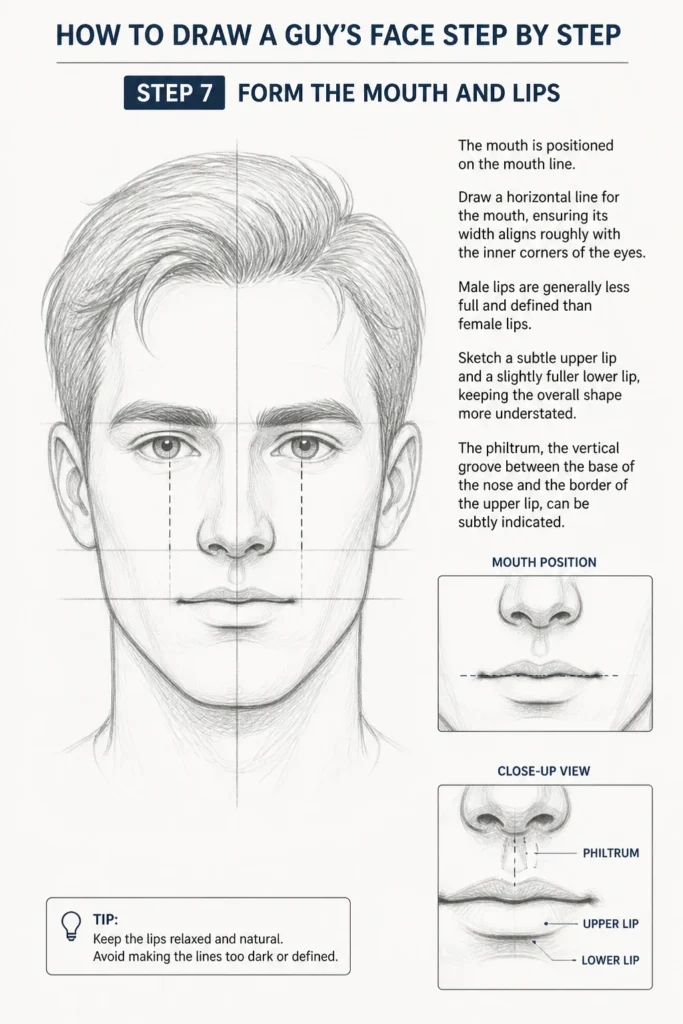
Male lips are generally less full and defined than female lips. Sketch a subtle upper lip and a slightly fuller lower lip, keeping the overall shape more understated.
The philtrum, the vertical groove between the base of the nose and the border of the upper lip, can be subtly indicated.
Step 8: Position the Ears
Ears typically align with the space between the eye line and the nose line. Draw the ears on either side of the head, ensuring their top aligns with the eye line and their bottom with the nose line.
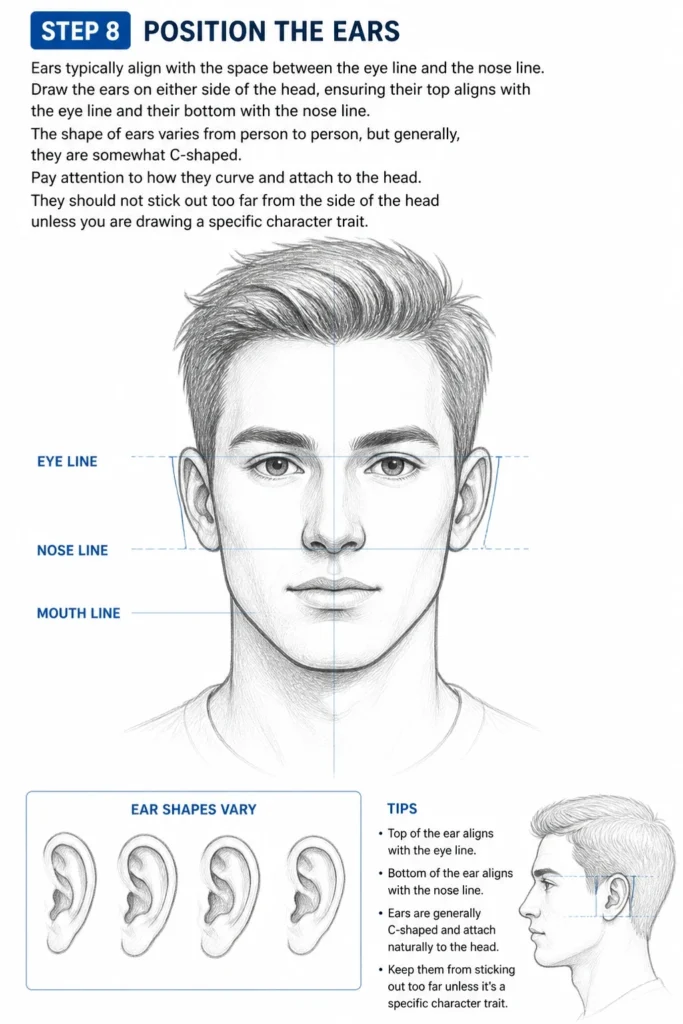
The shape of ears varies from person to person, but generally, they are somewhat C-shaped. Pay attention to how they curve and attach to the head.
They should not stick out too far from the side of the head unless you are drawing a specific character trait.
Step 9: Sketch the Hairline and Hairstyle
The hairline usually begins about one-third of the way down from the top of the head. Define the hairline first, considering whether it’s receding, straight, or has a widow’s peak.
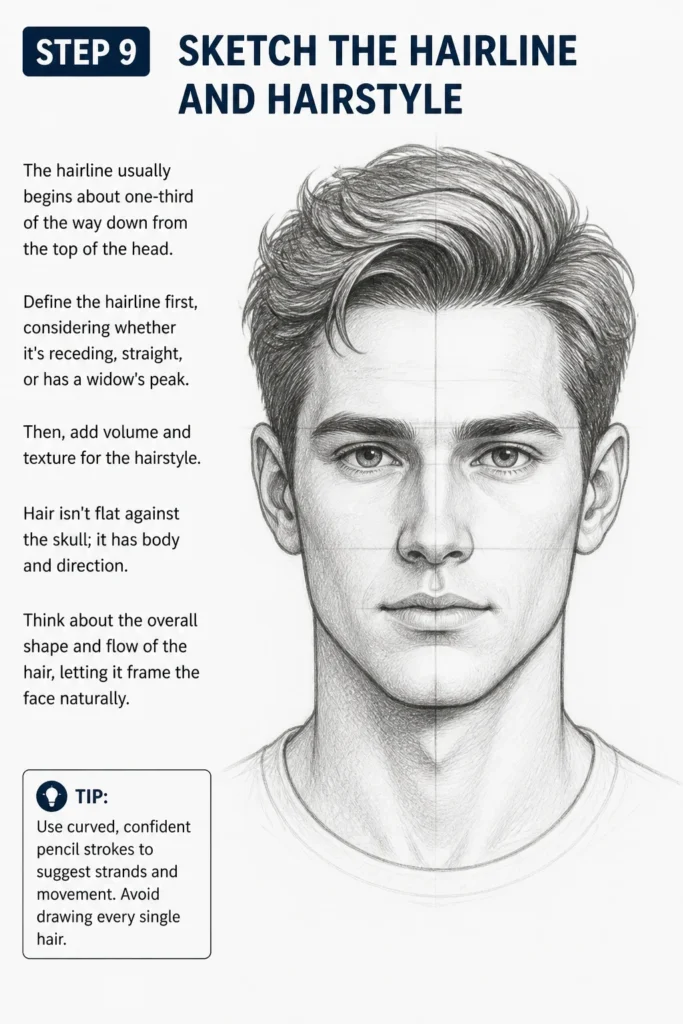
Then, add volume and texture for the hairstyle. Hair isn’t flat against the skull; it has body and direction.
Think about the overall shape and flow of the hair, letting it frame the face naturally.
Step 10: Refine Facial Features and Contours
Now, it’s time to refine your initial sketches. Go over your light lines, making them darker and more confident where needed.
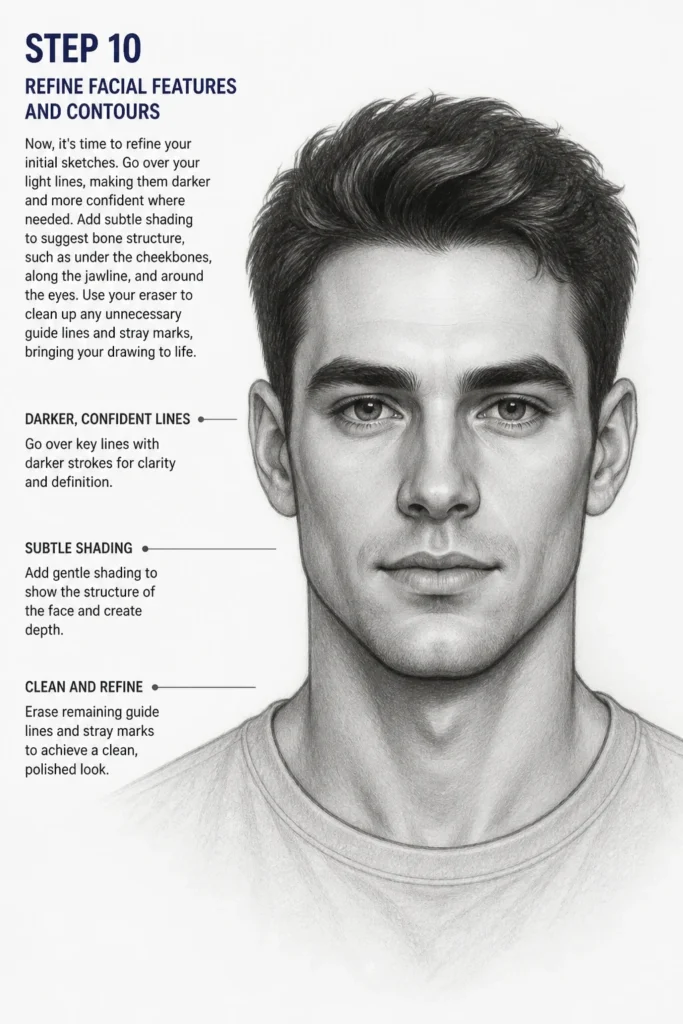
Add subtle shading to suggest bone structure, such as under the cheekbones, along the jawline, and around the eyes.
Use your eraser to clean up any unnecessary guide lines and stray marks, bringing your drawing to life.
Common Mistakes to Avoid
Incorrect Proportions
One of the most frequent errors is misjudging the size and placement of features. Eyes might be too big, or the nose too long.
Always use your initial guidelines as a reference. Constantly compare the distances between features and the overall head size. Stepping back from your drawing can help you spot these issues.
Symmetry Issues
Faces are rarely perfectly symmetrical, but significant imbalances can make a drawing look off. One eye might be higher than the other, or one side of the jaw might be wider.
Use your central vertical guideline to check alignment. Flipping your drawing upside down or viewing it in a mirror can reveal symmetry problems you wouldn’t notice otherwise.
Flat Features
Drawing features as flat shapes rather than three-dimensional forms is another common pitfall. The nose, for instance, isn’t just a line; it has depth and volume.
Think about the underlying bone structure and how light would fall on the face. Use subtle shading and varying line weight to give features a sense of depth and form.
Neglecting the Neck
Often, beginners focus solely on the face and forget about the neck. A well-drawn face can look odd if it’s placed on a disproportionate or non-existent neck.
The neck should be wide enough to support the head, originating from behind the jawline and extending downwards. Pay attention to the trapezius muscles that connect the neck to the shoulders.
Troubleshooting
My Face Looks Too Flat
If your drawing lacks depth, you might not be thinking in three dimensions. Consider the skull beneath the skin.
Try adding subtle shadows under the brow bone, along the sides of the nose, and beneath the lower lip. Use different pencil pressures to create a range of tones, suggesting contours and curves.
Features Aren’t Aligned
When eyes or ears appear at different levels, it’s usually a guideline issue. Go back to your basic head shape and re-establish your horizontal lines for eyes, nose, and mouth.
Ensure your central vertical line is straight and accurate. Sometimes a ruler can be helpful in the initial stages to ensure these foundational lines are correct.
The Jawline Seems Weak or Too Strong
The strength of the jawline greatly influences the perceived masculinity of the face. If it’s too weak, the face might look soft; too strong, and it could appear blocky.
Adjust the angle and length of the lines connecting the bottom of the circle to the chin. A more angular jaw often starts wider at the ears and tapers more sharply towards the chin.
Key Takeaways
- Always start with basic shapes and light guidelines to establish proportion.
- Use the eye line, nose line, and mouth line as crucial reference points for feature placement.
- Male faces often feature more angular jawlines and thicker eyebrows.
- Think about the three-dimensional form of the face, not just flat lines.
- Practice regularly and don’t be afraid to experiment with different styles.
- Step back and view your drawing from different angles to spot errors.
Frequently Asked Questions
How do I make the face look more masculine?
To enhance masculinity, focus on a more defined jawline, often with sharper angles, and a broader chin. Thicker, lower-set eyebrows also contribute, as do more prominent brow bones and a straighter nose bridge. Subtle shading can emphasize these features.
What’s the best way to practice proportions?
The best way to practice is by consistently using guidelines. Start every drawing with a circle and the central cross. Measure distances with your pencil against your drawing or use reference images with grids. Repetition helps build an intuitive understanding of proportions.
Should I use references when drawing?
Absolutely, using references is highly encouraged, especially when you’re learning. Look at photos of real people, anatomical drawings, or even other artists’ work. References help you understand how features look in different angles and lighting, improving accuracy and realism.
How do I add emotion to the face?
Emotion is primarily conveyed through the eyes, eyebrows, and mouth. Slight changes in the arch of the eyebrows, the size of the pupils, or the curve of the lips can drastically alter an expression. Practice drawing different expressions on a basic face outline to see the impact.
Our Top Recommended Finds
- Graphite Pencil Set: A range of hardness (HB, 2B, 4B, 6B) allows for versatile line work and shading.
- Kneaded Eraser: Excellent for lifting graphite without smudging and for creating highlights.
- Smooth Drawing Paper: Paper with a slight tooth holds graphite well and allows for clean lines.
Your Artistic Journey Continues
You’ve taken a fantastic first step in mastering the art of drawing a guy’s face.
Remember, drawing is a skill that improves with consistent practice and observation.
Don’t be afraid to experiment, make mistakes, and learn from every stroke. Now, grab your pencil and bring your next character to life!