🎨 How To Draw A Person Step By Step

& Painting
No rigid rules or pretension. Just practical guides, medium comparisons, and encouraging tips to help you enjoy the drawing & painting process.
Drawing people used to feel like trying to solve a complex puzzle without the box art.
I spent years sketching stick figures until I finally learned the secrets of body proportions.
This guide shares the exact method I use to create realistic human figures every single day.
Quick Overview
This tutorial focuses on the “mannequin” method, which breaks the complex human body into simple shapes.
You will learn how to build a figure from the inside out, starting with a basic skeleton and ending with a finished form.
- Time needed: 45 to 60 minutes
- Difficulty: Beginner
- What you’ll need: Drawing paper, a set of graphite pencils (HB and 2B), a kneaded eraser, and a ruler.
Step-by-Step Instructions
Step 1: Establish the Height and Proportions
Start by drawing a straight vertical line down the center of your paper to represent the height of your person.
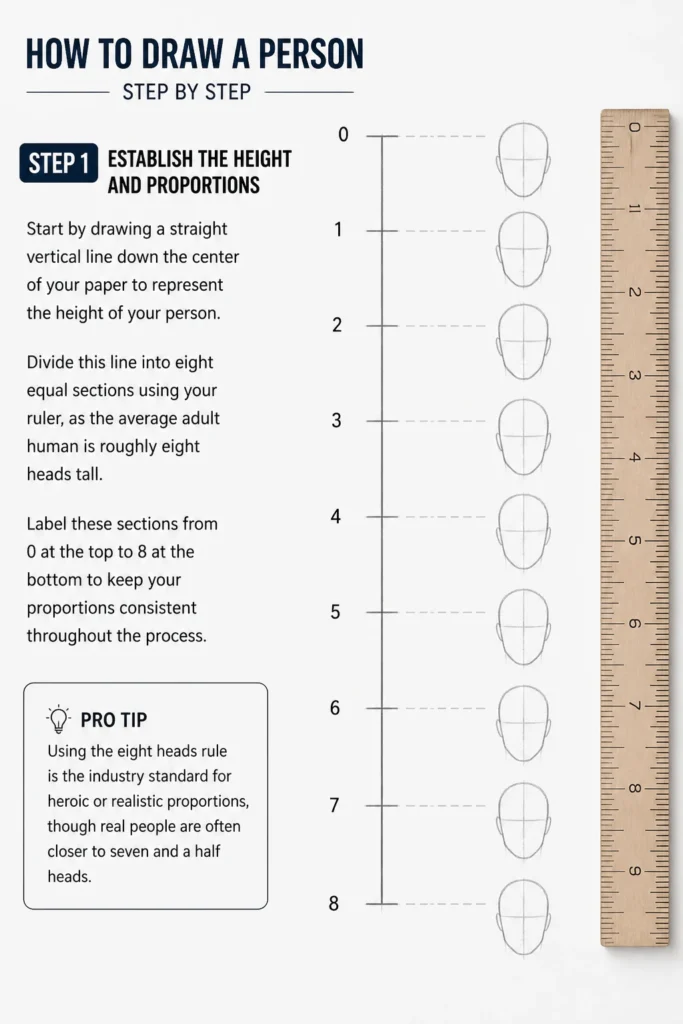
Divide this line into eight equal sections using your ruler, as the average adult human is roughly “eight heads” tall.
Label these sections from 0 at the top to 8 at the bottom to keep your proportions consistent throughout the process.
Pro Tip: Using the “eight heads” rule is the industry standard for heroic or realistic proportions, though real people are often closer to seven and a half heads.
Step 2: Sketch the Head and Neck
Draw an oval in the top section (between marks 0 and 1) to represent the skull and jaw.
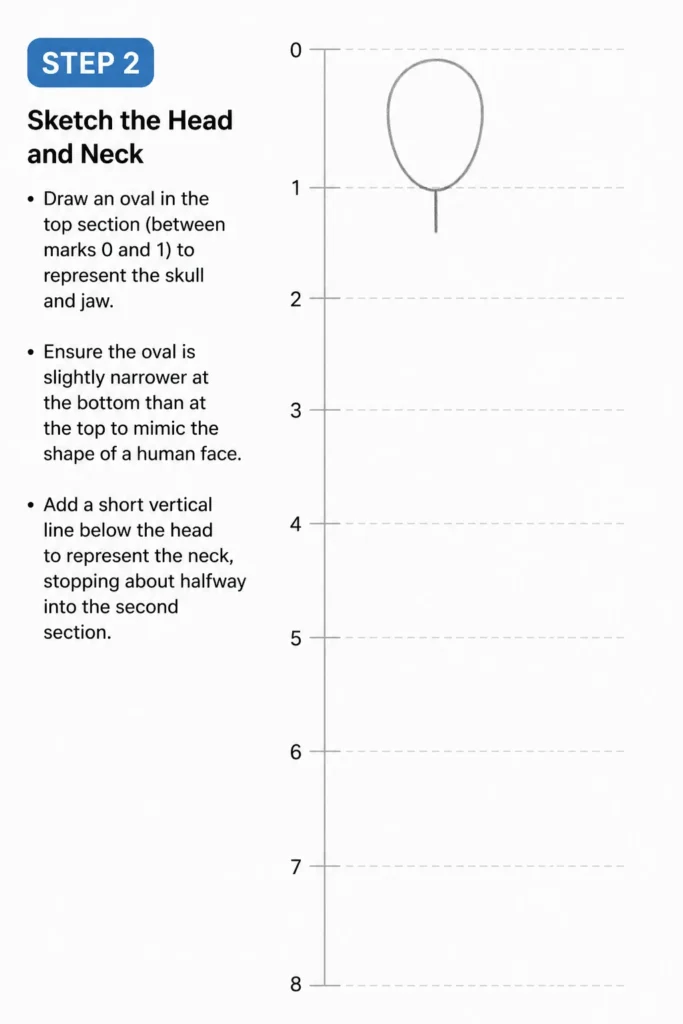
Ensure the oval is slightly narrower at the bottom than at the top to mimic the shape of a human face.
Add a short vertical line below the head to represent the neck, stopping about halfway into the second section.
Step 3: Create the Ribcage and Shoulders
Outline a large, slightly flattened oval or “egg” shape that occupies the rest of the second section and most of the third.
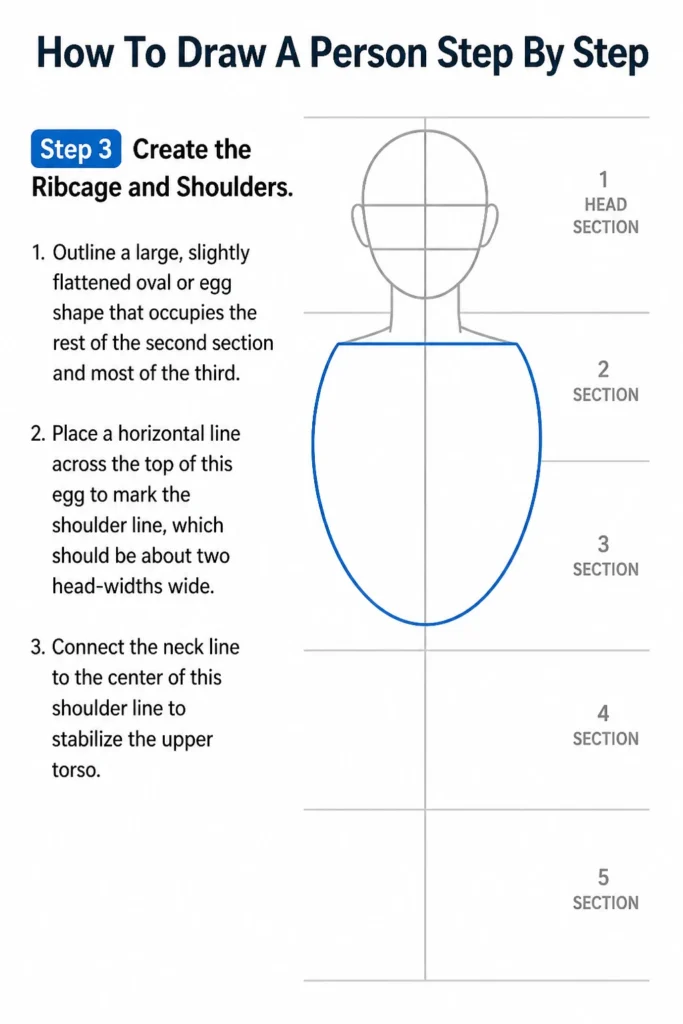
Place a horizontal line across the top of this egg to mark the shoulder line, which should be about two head-widths wide.
Connect the neck line to the center of this shoulder line to stabilize the upper torso.
Step 4: Map the Pelvis and Waist
Draw a smaller, bowl-like shape in the fourth section to represent the pelvis.
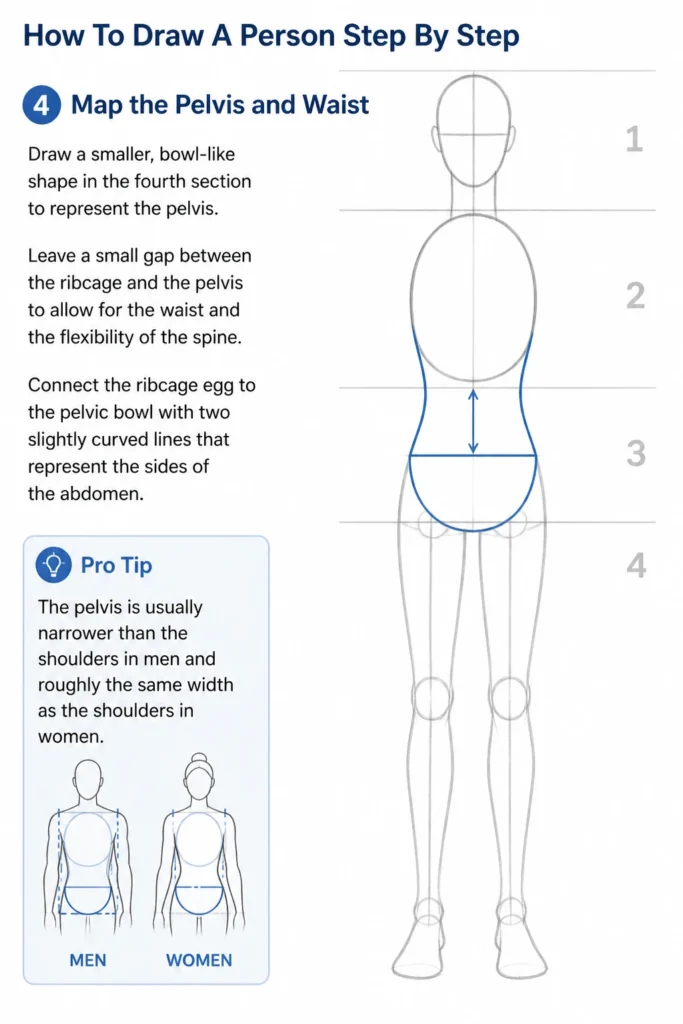
Leave a small gap between the ribcage and the pelvis to allow for the waist and the flexibility of the spine.
Connect the ribcage egg to the pelvic bowl with two slightly curved lines that represent the sides of the abdomen.
Pro Tip: The pelvis is usually narrower than the shoulders in men and roughly the same width as the shoulders in women.
Step 5: Position the Hips and Legs
Mark two circles at the outer corners of the pelvic bowl to serve as the hip joints.
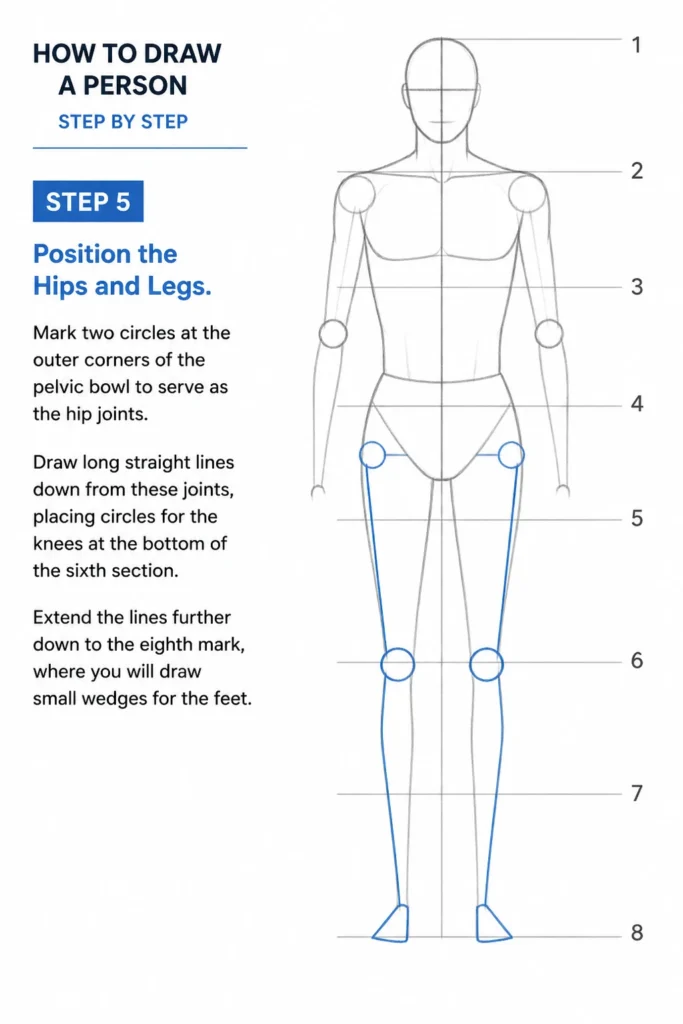
Draw long straight lines down from these joints, placing circles for the knees at the bottom of the sixth section.
Extend the lines further down to the eighth mark, where you will draw small wedges for the feet.
Step 6: Construct the Arms and Hands
Locate the shoulder joints at the ends of the shoulder line you drew in Step 3.
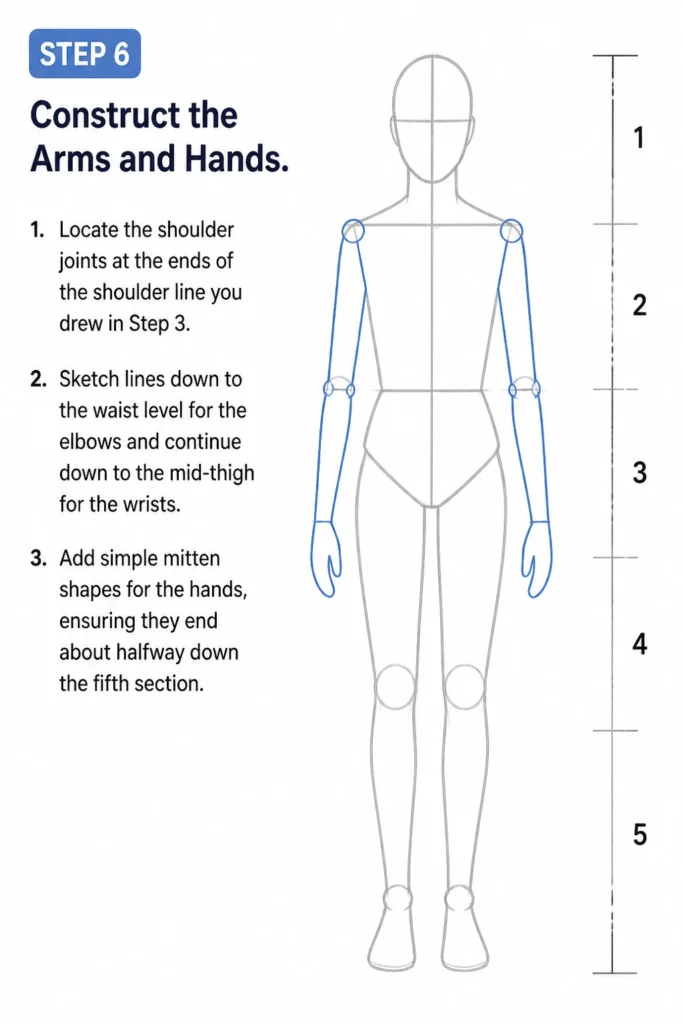
Sketch lines down to the waist level for the elbows and continue down to the mid-thigh for the wrists.
Add simple mitten shapes for the hands, ensuring they end about halfway down the fifth section.
Step 7: Add Mass and Muscle
Wrap cylinders around the stick-figure limbs you have created to give them volume and weight.
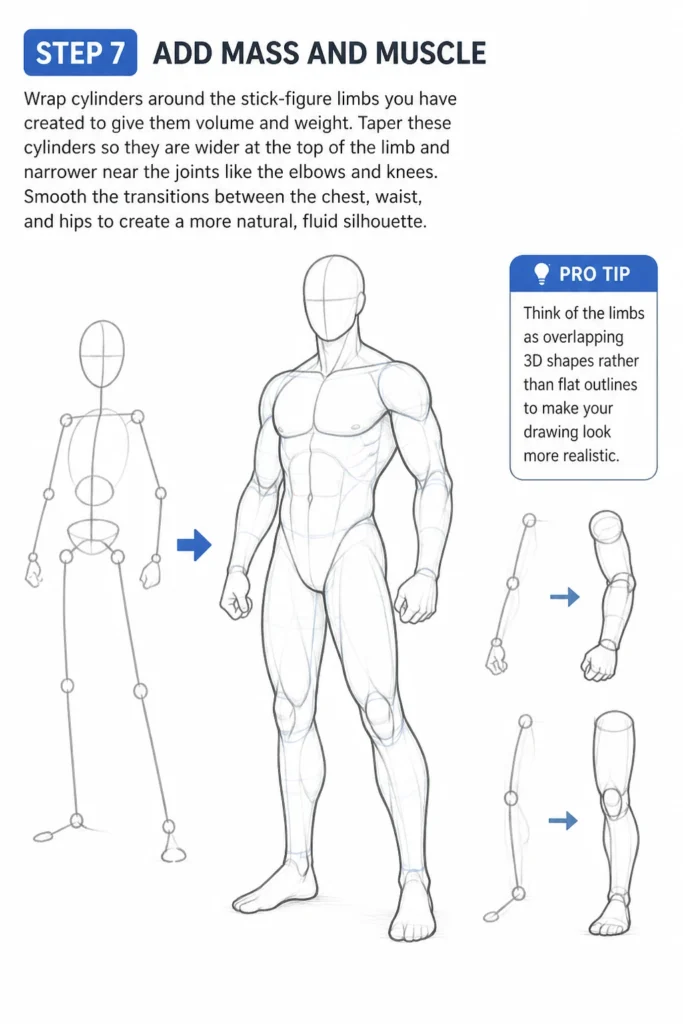
Taper these cylinders so they are wider at the top of the limb and narrower near the joints like the elbows and knees.
Smooth the transitions between the chest, waist, and hips to create a more natural, fluid silhouette.
Pro Tip: Think of the limbs as overlapping 3D shapes rather than flat outlines to make your drawing look more realistic.
Step 8: Refine the Features and Details
Add basic guidelines to the face for the eyes, nose, and mouth to give the person some character.
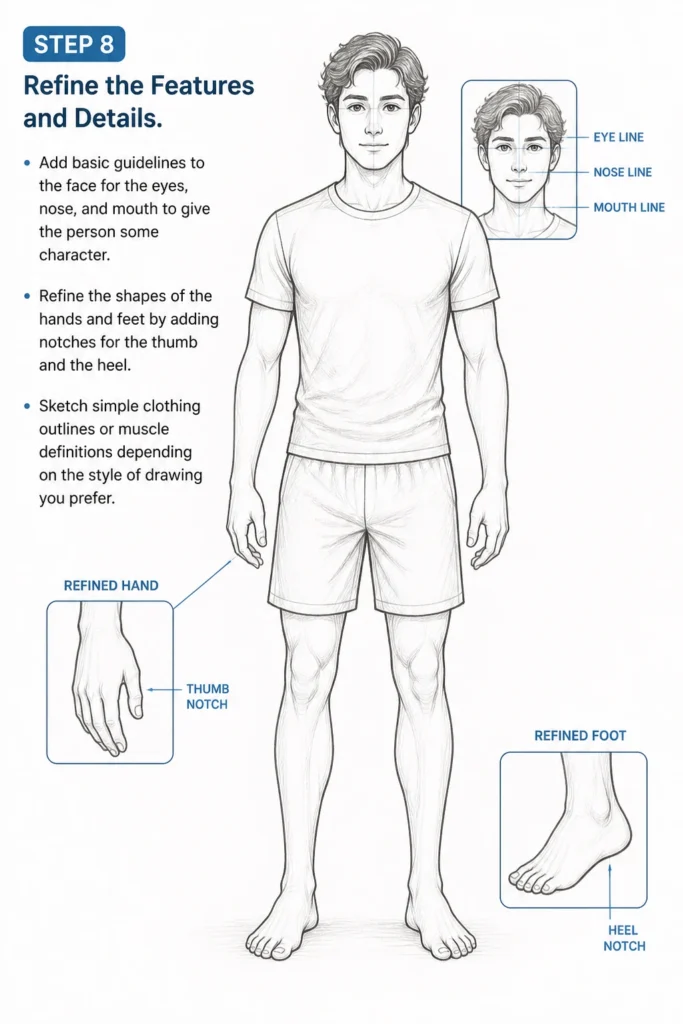
Refine the shapes of the hands and feet by adding notches for the thumb and the heel.
Sketch simple clothing outlines or muscle definitions depending on the style of drawing you prefer.
Step 9: Finalize the Line Work
Trace over your final outlines with a darker 2B pencil or a fine-liner pen to make them stand out.
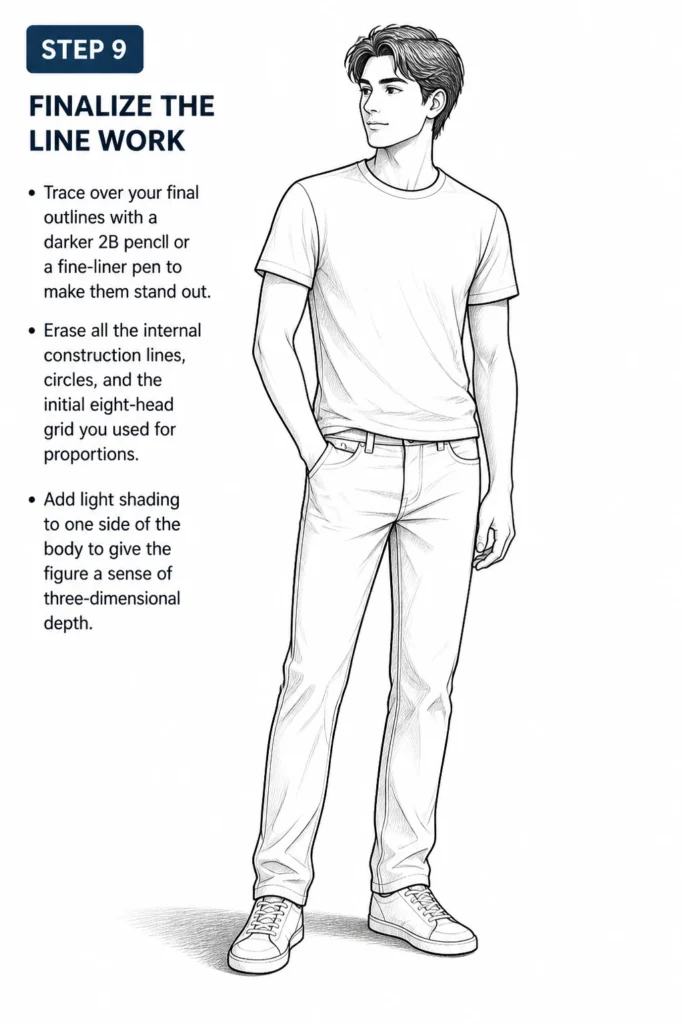
Erase all the internal construction lines, circles, and the initial eight-head grid you used for proportions.
Add light shading to one side of the body to give the figure a sense of three-dimensional depth.
Common Mistakes to Avoid
Making the Head Too Large
Beginners often draw the head much larger than it needs to be because they focus so much on facial details.
This makes the body look stunted or like a child rather than an adult.
Always check your head size against the rest of the body using the eight-head measurement rule.
Drawing Stiff “Soldier” Poses
If you draw the spine as a perfectly straight vertical line, the person will look like a statue.
Real people usually have a slight curve in their back or shift their weight to one leg.
Try tilting the shoulder line and the hip line in opposite directions to create a more natural “contrapposto” stance.
Ignoring the Center of Gravity
A common error is drawing a person so they look like they are about to fall over.
The “pit of the neck” should usually be directly above the foot that is supporting the most weight.
Draw a faint vertical line from the neck to the floor to ensure your character is balanced.
Troubleshooting
The Limbs Look Like Sausages
This happens when you draw the arms and legs with perfectly parallel lines.
Real muscles bulge and taper at specific points, like the calf muscle or the bicep.
Look at your own arm and notice how it is wider near the shoulder and narrower at the wrist.
The Torso Looks Too Long
If the waist area is too stretched out, the legs will appear too short and the figure will look distorted.
Check your fourth section mark; the crotch of the figure should generally sit right at that halfway point.
Shorten the space between the ribcage and the pelvis if the torso seems to drag on.
The Hands Look Like Claws
Drawing fingers can be frustrating, leading many to draw sharp, jagged lines.
Instead, simplify the hand into a “paddle” shape first and only add finger divisions at the very end.
Remember that the thumb usually points toward the body when the arms are relaxed at the sides.
Key Takeaways
- Use the “eight heads” rule to keep your proportions realistic and consistent.
- Break the body down into simple geometric shapes like ovals, bowls, and cylinders.
- Start with light, erasable lines before committing to dark, final outlines.
- Always establish a center of gravity to keep your figure from looking like it is falling.
- Practice gesture drawing to capture movement and avoid stiff, robotic poses.
- Observe real-life references or use a wooden mannequin to understand how joints move.
Frequently Asked Questions
How do I draw different body types?
The eight-head rule is a baseline, but you can adjust the width of the circles and cylinders to create different shapes.
For a more muscular character, broaden the shoulder line and thicken the arm cylinders.
For a shorter character, reduce the total number of “heads” in your height line to six or seven.
Why do my drawings always look flat?
Flatness usually comes from a lack of “wrapping lines” or shading.
When drawing the cylinders for the arms, draw curved lines around them to show they have volume.
Adding a simple shadow on one side of the figure instantly makes it pop off the page.
Is it better to draw from my head or use a photo?
Using a photo reference is the fastest way to improve your understanding of anatomy.
Drawing from your head often leads to repeating the same mistakes over and over.
Once you understand the basic proportions from this guide, use photos to see how muscles change when a person moves.
What is the hardest part of drawing a person?
Most artists find hands and feet to be the most challenging because of the many small joints.
Focus on the overall shape of the hand first rather than individual fingers.
With time and practice, these complex areas will become much easier to manage.
Our Top Recommended Finds
- Wooden Artist Mannequin: This tool helps you visualize how the body bends and rotates in 3D space.
- Kneaded Eraser: These are essential for lifting graphite without damaging the paper or leaving crumbs.
- Graphite Pencil Set: Having a range of leads from 4H (hard/light) to 6B (soft/dark) allows for better sketching and shading.
Mastering Your Next Masterpiece
Drawing a person is a journey that combines technical rules with creative expression.
Now that you have the basic mannequin structure down, try drawing your figure in different poses like sitting or running.
The more you practice these proportions, the more natural your sketches will become.
Grab your sketchbook and try drawing three different figures today to lock in what you have learned.
& Painting
No rigid rules or pretension. Just practical guides, medium comparisons, and encouraging tips to help you enjoy the drawing & painting process.