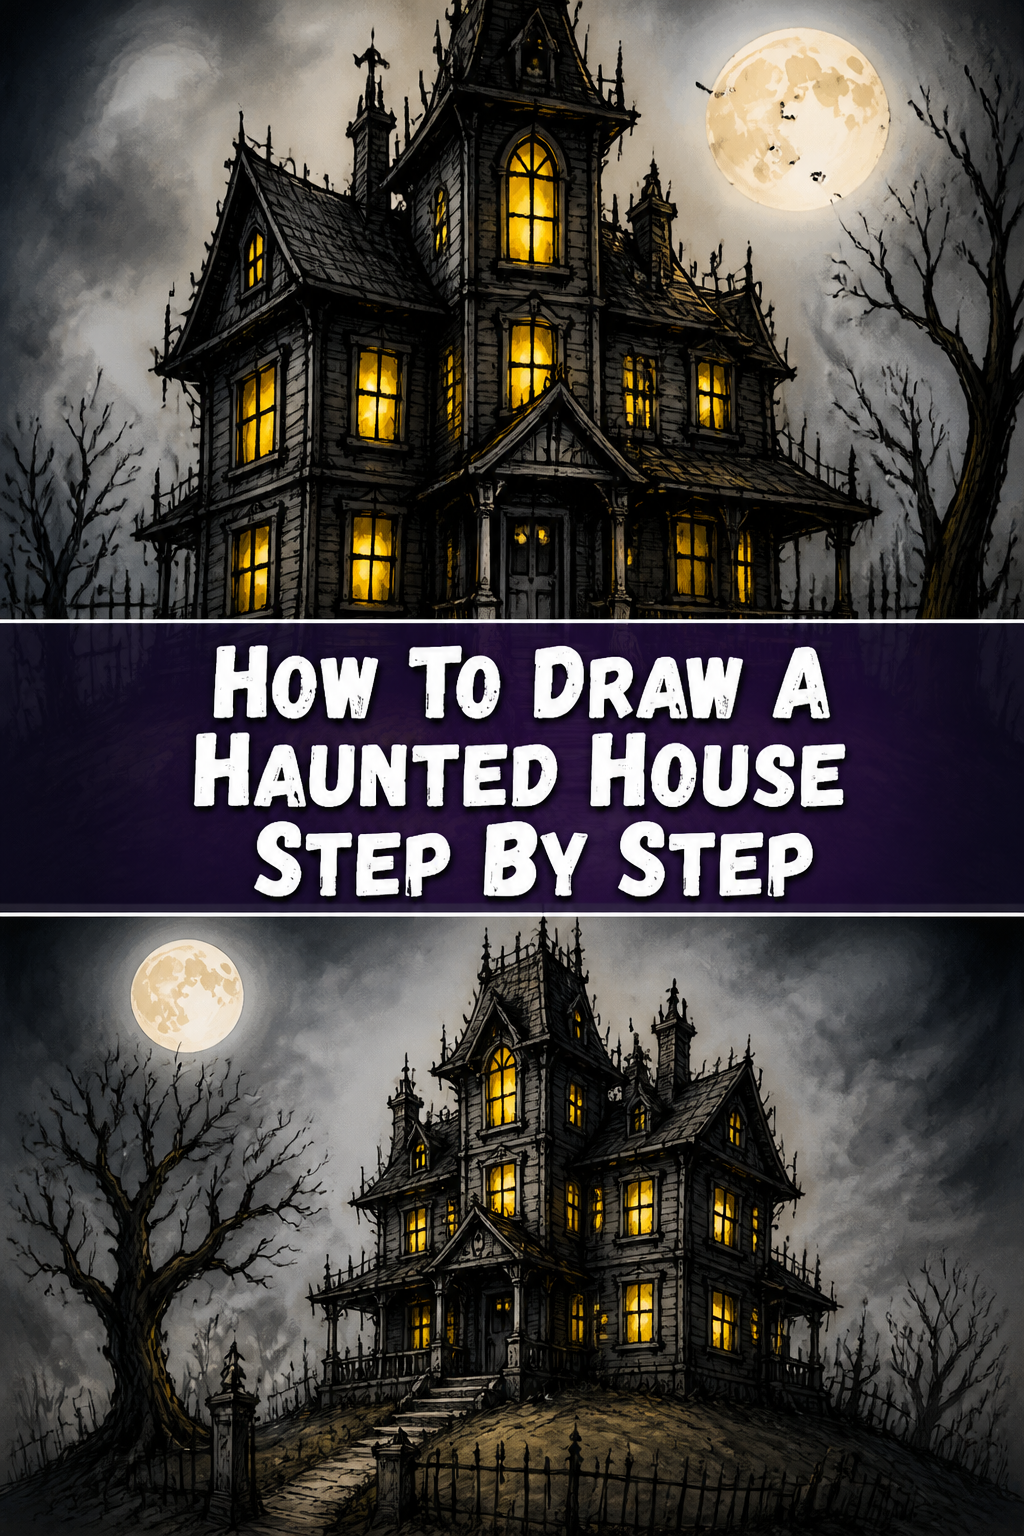
👻 How To Draw A Haunted House Step By Step

& Painting
No rigid rules or pretension. Just practical guides, medium comparisons, and encouraging tips to help you enjoy the drawing & painting process.
Have you ever wanted to sketch a creepy old mansion, full of mystery and shadows? It’s a classic subject that truly captures the imagination.
I’ve spent countless hours bringing spooky scenes to life on paper, and I’m excited to share my go-to methods with you. This guide will walk you through creating your very own haunted house, no prior art degree needed.
You’ll soon discover how simple it is to construct a chilling masterpiece, one line at a time. Let’s get started on this artistic adventure together.
Quick Overview
This guide will empower you to create a detailed and atmospheric haunted house drawing from scratch. You’ll learn foundational shapes, perspective tricks, and how to add those essential spooky details.
By the end, you’ll have a completed piece ready to show off, along with new skills for your artistic toolkit.
- Time needed: 45-75 minutes (depending on detail)
- Difficulty: Beginner
- What you’ll need: Pencil (HB or 2B), eraser, paper, optional: black fineliner pen, grey markers or colored pencils
Step-by-Step Instructions
Step 1: Sketch the Basic Foundation
The first step is to establish the main structure of your house. Think of it as building a house with simple geometric shapes.
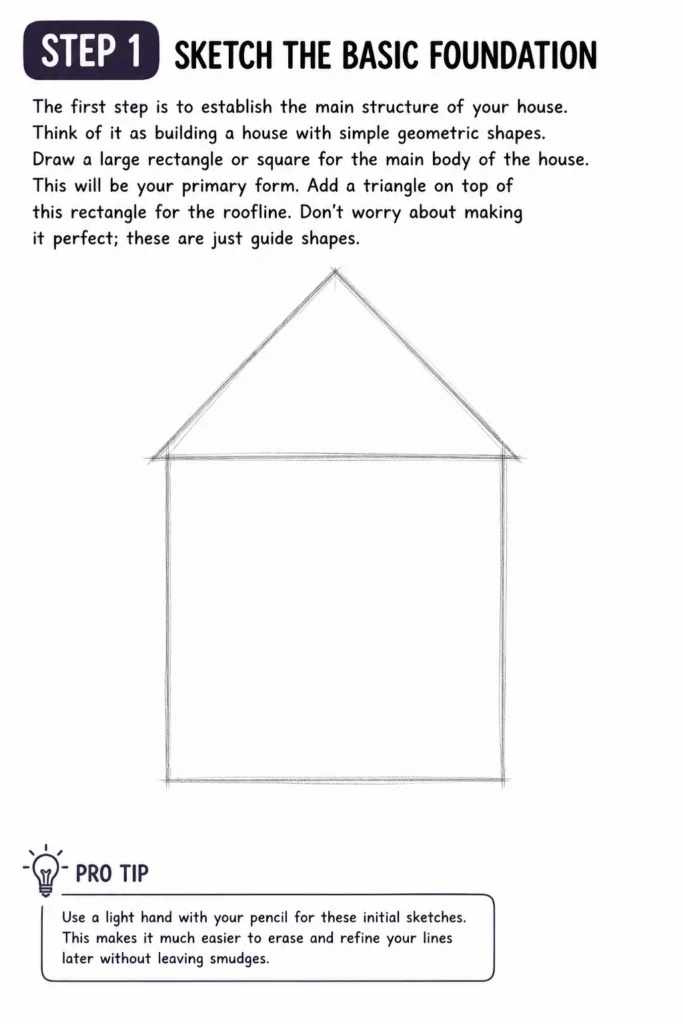
Draw a large rectangle or square for the main body of the house. This will be your primary form.
Add a triangle on top of this rectangle for the roofline. Don’t worry about making it perfect; these are just guide shapes.
Pro Tip: Use a light hand with your pencil for these initial sketches. This makes it much easier to erase and refine your lines later without leaving smudges.
Step 2: Define the Roof and Gables
Now, let’s give the roof some character. Instead of a single triangle, think about multiple roof sections.
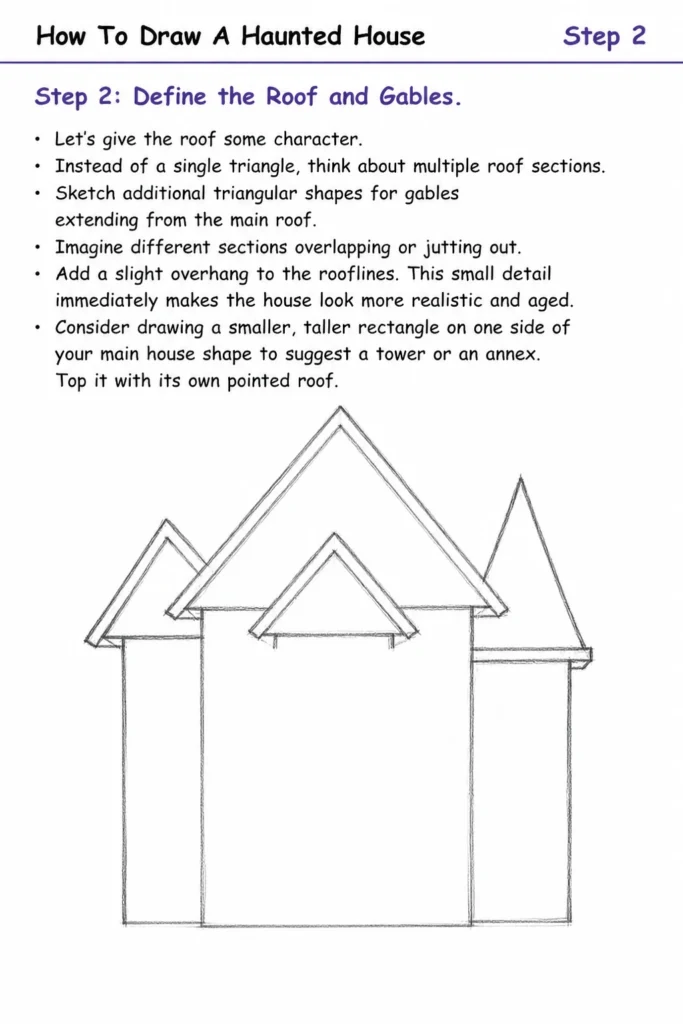
Sketch additional triangular shapes for gables extending from the main roof. Imagine different sections overlapping or jutting out.
Add a slight overhang to the rooflines. This small detail immediately makes the house look more realistic and aged.
Consider drawing a smaller, taller rectangle on one side of your main house shape to suggest a tower or an annex. Top it with its own pointed roof.
Step 3: Rough in Doors and Windows
A haunted house needs eyes and a mouth. Mark the general positions for doors and windows.
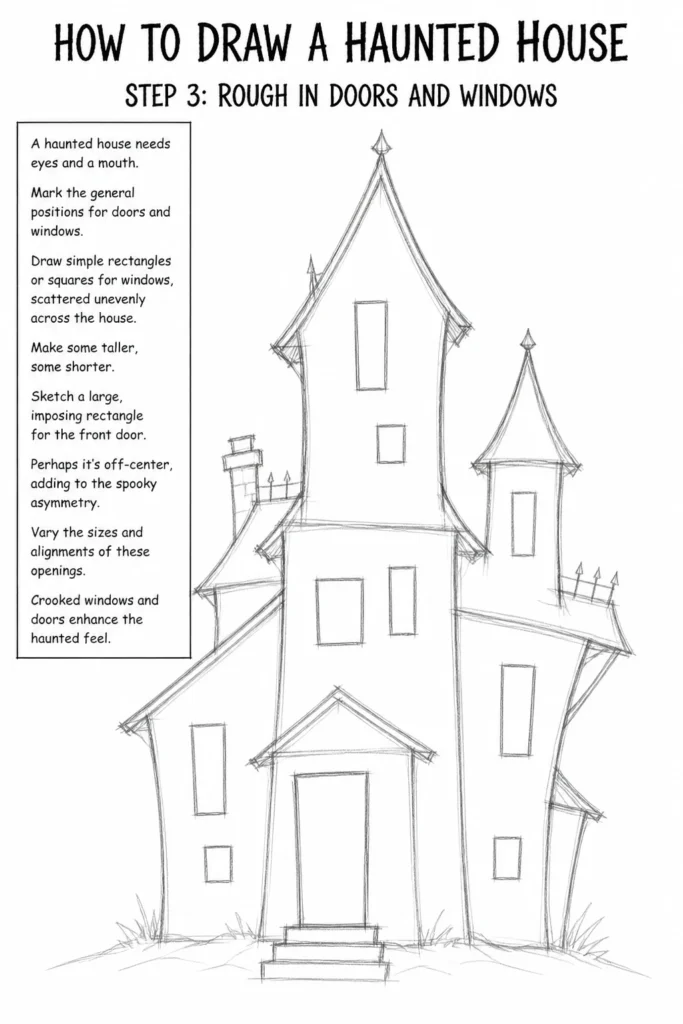
Draw simple rectangles or squares for windows, scattered unevenly across the house. Make some taller, some shorter.
Sketch a large, imposing rectangle for the front door. Perhaps it’s off-center, adding to the spooky asymmetry.
Vary the sizes and alignments of these openings. Crooked windows and doors enhance the haunted feel.
Step 4: Add Architectural Details and Texture
This is where your house truly starts to look dilapidated. Begin to refine the structural elements.
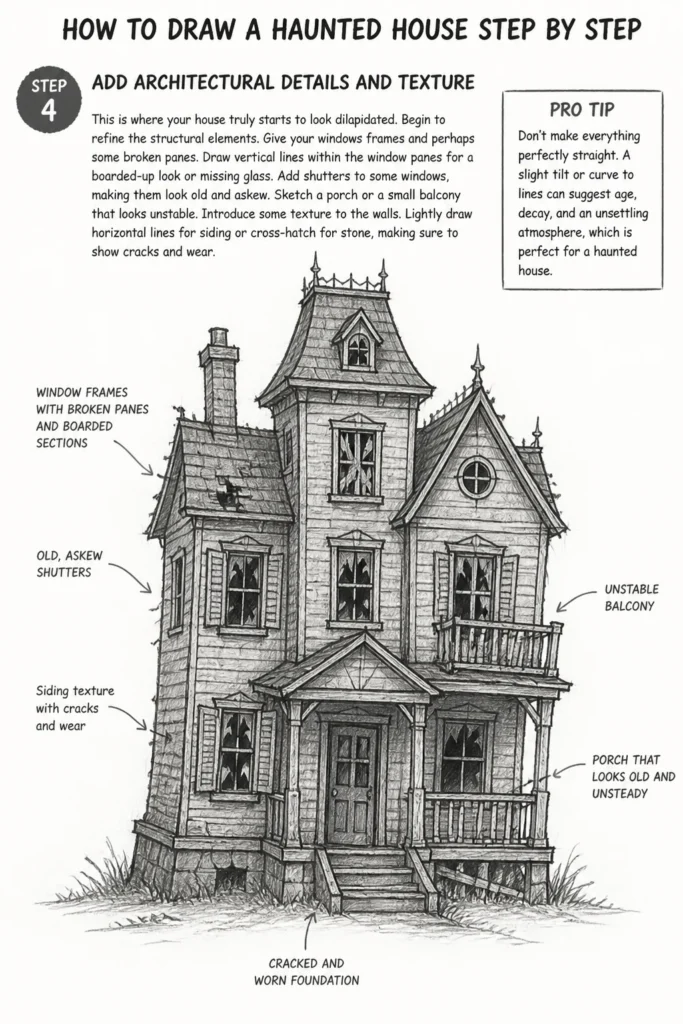
Give your windows frames and perhaps some broken panes. Draw vertical lines within the window panes for a boarded-up look or missing glass.
Add shutters to some windows, making them look old and askew. Sketch a porch or a small balcony that looks unstable.
Introduce some texture to the walls. Lightly draw horizontal lines for siding or cross-hatch for stone, making sure to show cracks and wear.
Pro Tip: Don’t make everything perfectly straight. A slight tilt or curve to lines can suggest age, decay, and an unsettling atmosphere, which is perfect for a haunted house.
Step 5: Incorporate Spooky Elements
Now, let’s dial up the spookiness. This is where the haunted house comes alive (or rather, undead).
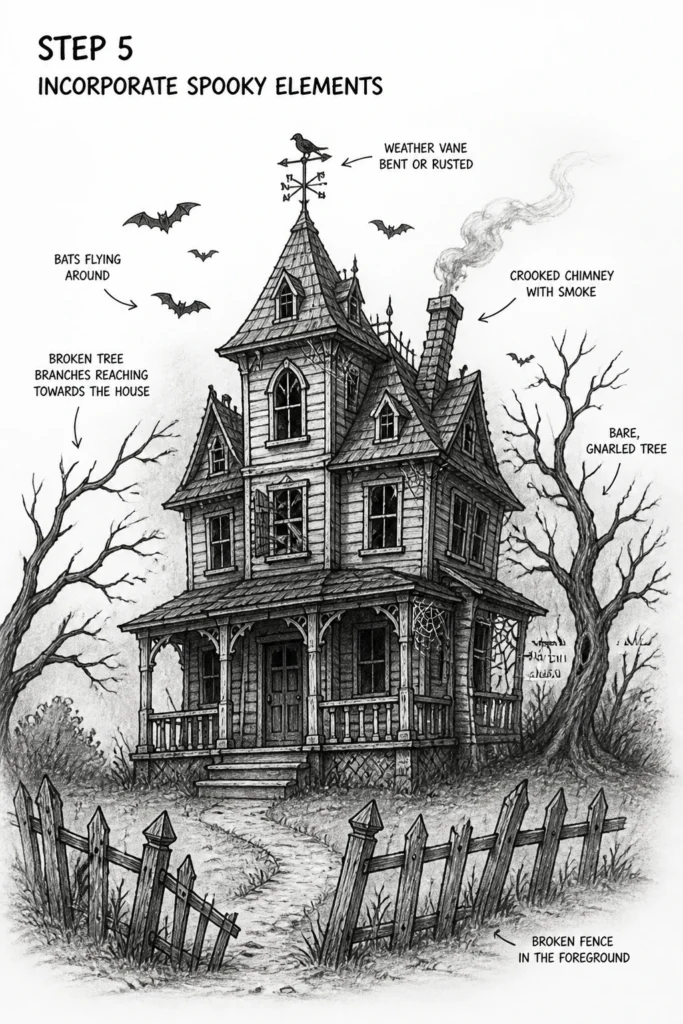
Draw some broken tree branches reaching towards the house, looking like skeletal fingers. Add a bare, gnarled tree nearby.
Sketch a weather vane on the highest point of the roof, perhaps bent or rusted. Consider a crooked chimney with smoke faintly curling out.
Introduce bats flying around or perched on the roof. Think about cobwebs in corners or a broken fence in the foreground.
Step 6: Refine Lines and Erase Guides
With all the details in place, it’s time to clean up your drawing. Go over your desired lines with a firmer hand.
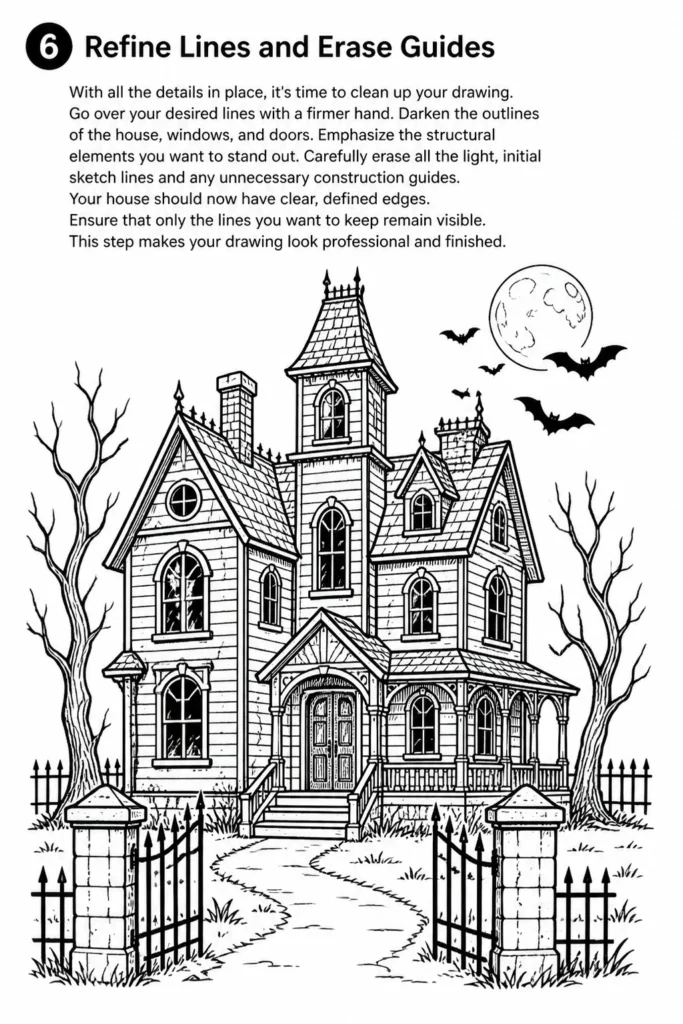
Darken the outlines of the house, windows, and doors. Emphasize the structural elements you want to stand out.
Carefully erase all the light, initial sketch lines and any unnecessary construction guides. Your house should now have clear, defined edges.
Ensure that only the lines you want to keep remain visible. This step makes your drawing look professional and finished.
Step 7: Add Shading and Depth
Shading brings your haunted house to three-dimensional life and enhances its ominous presence. Decide on a light source.
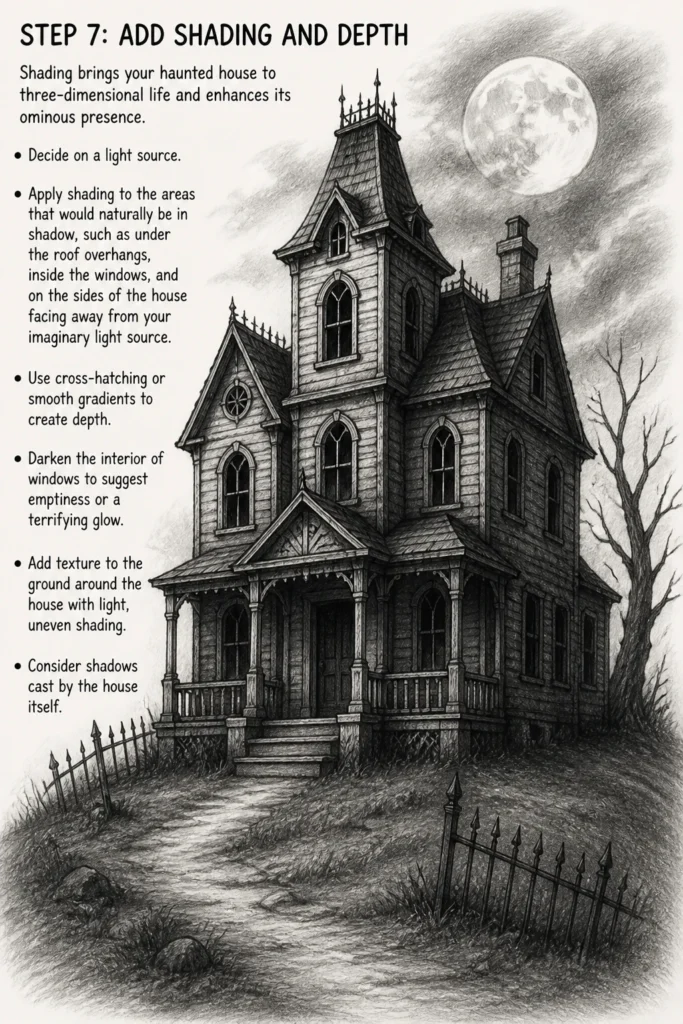
Apply shading to the areas that would naturally be in shadow, such as under the roof overhangs, inside the windows, and on the sides of the house facing away from your imaginary light source.
Use cross-hatching or smooth gradients to create depth. Darken the interior of windows to suggest emptiness or a terrifying glow.
Add texture to the ground around the house with light, uneven shading. Consider shadows cast by the house itself.
Common Mistakes to Avoid
Making It Too Symmetrical
A common pitfall is drawing a perfectly balanced haunted house. This often makes it look less spooky and more like a regular, albeit old, home. Haunted houses thrive on disarray and asymmetry. Always aim for crooked windows, uneven gables, and a general sense of imbalance to suggest decay and neglect.
Ignoring Perspective
Failing to consider basic perspective can make your house look flat and unrealistic. Even a simple two-point perspective can add immense depth. Remember that lines recede to vanishing points, making elements appear smaller the further away they are. A little understanding of perspective will make your house look anchored and imposing.
Adding Too Many Details Too Soon
Jumping straight into intricate details like broken glass or intricate railings before establishing the main structure can lead to a messy drawing. Start with the large shapes first, then gradually add smaller elements. This layered approach ensures your house has a solid foundation and prevents overwhelming yourself with tiny components prematurely.
Lack of Contrast
A drawing that lacks strong darks and lights can appear flat and uninteresting. Haunted houses rely heavily on atmosphere, and contrast is key to creating that sense of mystery and dread. Push your darks, especially in shadows and inside windows, to make your lights pop. This creates a dramatic and compelling image.
Troubleshooting
My Drawing Looks Flat
If your haunted house lacks depth, it’s likely due to insufficient shading or a lack of perspective. Revisit your light source and exaggerate the shadows. Darken the areas that would be furthest from the light, like the undersides of eaves or the interior of windows. Also, ensure that objects appear to recede into the distance by making distant elements slightly smaller and less detailed.
I Can’t Get the Perspective Right
Perspective can be tricky, but don’t give up! Try drawing very light guide lines from the corners of your main house shape to a single or two vanishing points on the horizon line. Use a ruler initially to help train your eye. Remember that vertical lines remain vertical, but horizontal lines converge towards these points. Practice drawing simple boxes in perspective before tackling the whole house.
My Details Look Messy
If your intricate details are making your drawing look cluttered, it’s often because you’re pressing too hard or adding too much too soon. Practice drawing details separately first. When adding them to the house, use a lighter touch and focus on clarity over quantity. Sometimes, less is more; a few well-placed broken windows are more effective than dozens of poorly drawn ones.
Key Takeaways
- Start with simple shapes: Always build your house from basic geometric forms before adding complexity.
- Embrace asymmetry: Crooked lines, uneven windows, and tilted roofs enhance the haunted aesthetic.
- Layer details gradually: Establish the main structure, then add architectural features, and finally the spooky elements.
- Utilize shading for depth: Strong contrast between light and shadow brings your drawing to life and creates atmosphere.
- Don’t be afraid to make mistakes: Each attempt is a learning opportunity; use your eraser freely and refine your lines.
- Practice regularly: The more you draw, the better your eye and hand coordination will become.
Frequently Asked Questions
How can I make my haunted house even spookier?
To amp up the spookiness, focus on atmosphere. Add elements like fog swirling around the base, ominous lightning in the sky, or ghostly figures in the windows. Exaggerate the decay: more broken windows, crumbling bricks, and twisted ironwork. Intensify your shadows to create deeper, more mysterious areas.
What if I’m not good at drawing straight lines?
That’s perfectly fine, especially for a haunted house! Imperfect, slightly wobbly lines can actually add to the character and aged look of the structure. If you prefer straighter lines, use a ruler for your initial construction lines, then freehand the details to maintain a natural feel. Remember, perfection isn’t the goal here; character is.
Can I use color for my haunted house?
Absolutely! Color can transform your drawing. Opt for muted, desaturated colors like dark greys, deep purples, sickly greens, and rusty browns to maintain a spooky vibe. Use bright, contrasting colors sparingly, perhaps for a glowing window or a flickering light, to draw attention and add a touch of eerie magic.
How do I make the house look old and decaying?
To make it look truly ancient and decaying, incorporate signs of wear and tear. Draw cracks in the walls, missing roof tiles, broken window panes, and leaning chimneys. Add overgrown vines creeping up the side, or patches of missing paint. Suggest sagging sections of the roof or porch to show structural weakness.
Our Top Recommended Finds
- Sketch Pencils Set (HB, 2B, 4B, 6B): A range of lead hardness allows for light sketching and dark shading, essential for depth.
- Quality Sketchbook (Acid-Free Paper): Provides a good surface for drawing and ensures your artwork lasts without yellowing.
- Fine-Tip Black Liner Pens (various sizes): Great for inking your final lines and adding crisp details once the pencil work is done.
Your Haunted Masterpiece Awaits!
You now have all the tools and knowledge to create your very own haunted house. Don’t be afraid to experiment with different styles and details.
Every artist starts somewhere, and the joy is in the process of creation. Grab your pencil and paper right now.
Let your imagination run wild and bring your spooky vision to life. What other chilling scenes will you draw next?
& Painting
No rigid rules or pretension. Just practical guides, medium comparisons, and encouraging tips to help you enjoy the drawing & painting process.